
Insert a Nonbreaking Space in Word to Keep Words or Characters Together
by Avantix Learning Team | Updated October 11, 2022
Applies to: Microsoft® Word® 2010, 2013, 2016, 2019, 2021 and 365 (Windows)
If you want to keep words or characters together on the same line in a Word document, you can insert nonbreaking spaces. Nonbreaking spaces can be inserted using the Insert Symbol dialog box or a keyboard shortcut.
Recommended article: 14 Timesaving Microsoft Word Selection Shortcuts to Quickly Select Text
Do you want to learn more about Microsoft Word? Check out our virtual classroom or in-person classroom Word courses >
Note: We are using a US keyboard layout but the strategies and shortcuts apply to English Canada keyboards. Keyboard shortcuts may work differently depending on your keyboard layout / language.
Inserting a nonbreaking space using a keyboard shortcut
To insert a nonbreaking space between two words or characters using a keyboard shortcut:
- Position the cursor between the two words or characters you want to keep together (there should be no space between these characters).
- Press Ctrl + Shift + Spacebar. Word inserts a nonbreaking space.
Inserting a nonbreaking space using Insert Symbol
To insert a nonbreaking space between two words or letters using Insert Symbol:
- Position the cursor between the two words or characters you want to keep together (there should be no space between these characters).
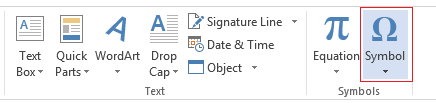
- Click the Insert tab in the Ribbon.
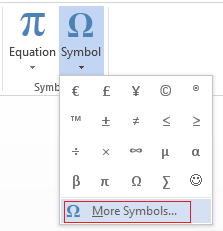
- In the Symbols group, click Insert Symbol and then More Symbols in the drop-down menu. A dialog box appears.
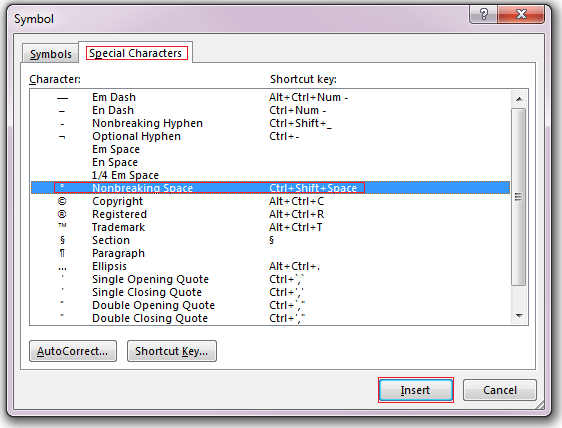
- Select the Special Characters tab.
- Select Nonbreaking space and click Insert.
- Click Close. Word inserts a nonbreaking space.
Below is the Insert Symbol dialog box with Nonbreaking Space selected:

You can also insert several other special characters using Insert Symbol.
Viewing nonbreaking spaces
To view nonbreaking spaces and other nonprinting characters:
- Click the Home tab in the Ribbon.
- Click Show/Hide ¶ on the Home tab in the Ribbon in the Paragraph group. Nonbreaking spaces display as circles but do not print.
- Click Show/Hide ¶ again to hide nonprinting characters.
Nonbreaking spaces can be extremely useful in Word to keep phone numbers together or specific characters that should be kept together on the same line.
Subscribe to get more articles like this one
Did you find this article helpful? If you would like to receive new articles, join our email list.
More resources
How to Quickly Remove Hard Returns in Word Documents
How to Insert, Format and Update Cross-References in Word
3 Ways to Insert the Copyright or Trademark Symbol in Word (with Shortcuts)
5 Ways to Insert the Approximately Equal To or Almost Equal To Symbol in Word
10+ Great Microsoft Word Navigation Shortcuts to Move Around Quickly in Your Documents
Related courses
Microsoft Word: Intermediate / Advanced
Microsoft Excel: Intermediate / Advanced
Microsoft PowerPoint: Intermediate / Advanced
Microsoft Word: Long Documents Master Class
Microsoft Word: Styles, Templates and Tables of Contents
Microsoft Word: Designing Dynamic Word Documents Using Fields
VIEW MORE COURSES >
Our instructor-led courses are delivered in virtual classroom format or at our downtown Toronto location at 18 King Street East, Suite 1400, Toronto, Ontario, Canada (some in-person classroom courses may also be delivered at an alternate downtown Toronto location). Contact us at info@avantixlearning.ca if you’d like to arrange custom instructor-led virtual classroom or onsite training on a date that’s convenient for you.
Copyright 2023 Avantix® Learning
Microsoft, the Microsoft logo, Microsoft Office and related Microsoft applications and logos are registered trademarks of Microsoft Corporation in Canada, US and other countries. All other trademarks are the property of the registered owners.
Avantix Learning |18 King Street East, Suite 1400, Toronto, Ontario, Canada M5C 1C4 | Contact us at info@avantixlearning.ca
Word for Microsoft 365 Word 2021 Word 2019 Word 2016 Word 2013 Word 2010 Word 2007 More…Less
You can often improve the look of your document by keeping certain words and paragraphs together on the page or across page breaks. Also, you can use hyphenation to improve overall readability.
Word automatically breaks the text at a space or a hyphen at the end of a line. To keep two words or a hyphenated word together on one line, you can use a nonbreaking space or nonbreaking hyphen instead of a regular space or hyphen.
-
Click where you want to insert the nonbreaking space.
-
On the Insert tab, in the Symbols group, click Symbol.

-
In the box that opens, click More Symbols.
-
In the Symbol dialog box, on the Special Characters tab, click the Nonbreaking Space row to highlight it, and then click Insert.
-
Click Close.
Tip: You can also use the keyboard shortcut. Click where you want to insert the nonbreaking space, and press Ctrl+Shift+Spacebar.
Sometimes you want a hyphenated word to stay together on one line, without it breaking across lines.
-
Click where you want to insert the nonbreaking hyphen.
-
On the Insert tab, in the Symbols group, click Symbol.
-
In the box that opens, click More Symbols.
-
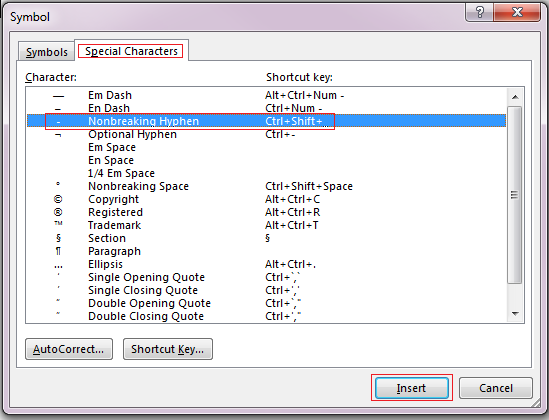
In the Symbol dialog box, on the Special Characters tab, click the Nonbreaking Hyphen row to highlight it, and then click Insert.
-
Click Close.
Tip: You can also use the keyboard shortcut. Click where you want to insert the nonbreaking hyphen, and press Ctrl+Shift+Minus Sign.
Word automatically breaks paragraphs at the end of a page, so a paragraph that started on one page continues on to the next page. To keep the whole paragraph on the same page, follow these steps.
-
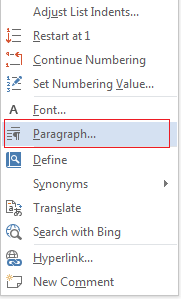
Right-click the paragraph that you want to keep together. In the box that opens, select Paragraph.
-
In the Paragraph dialog box, click the Line and Page Breaks tab.
-
In the Pagination section, select the Keep lines together check box, and click OK.
If two consecutive paragraphs or a subhead and a paragraph are closely related, you might want to keep them on the same page.
-
Right-click the paragraph or subhead that you want to keep with the content that follows it. In the box that opens, select Paragraph.
-
In the Paragraph dialog box, click the Line and Page Breaks tab.
-
In the Pagination section, select the Keep with next check box, and click OK.
Tip: It’s best not to add additional line breaks between your paragraphs because Word interprets each line break as a beginning of a new paragraph, and page breaks might not occur properly. If you want spaces between paragraphs, use the Paragraph Spacing controls. For more information, see Change spacing between paragraphs.
If a paragraph has a page break in the middle so that only the last line appears at the top of the following page, this lonely line is called a “widow.” If, on the other hand, a paragraph has a page break in the middle so that only the first line appears at the bottom of a page while the rest of the paragraph appears on the next page, this lonely line is called an “orphan.”
If you want to avoid widow and orphan lines in your document, follow these steps.
-
Right-click the paragraph in which you want to avoid widows and orphans. In the box that opens, select Paragraph.
-
Click the Line and page breaks tab.
-
In the Pagination section, select the Widow/Orphan control check box.
-
Click OK.
If a word is too long to fit at the end of a line, Microsoft Office Word 2007 moves the word to the beginning of the next line instead of hyphenating it. However, you can use the Hyphenation feature to automatically or manually hyphenate the text, insert optional or nonbreaking hyphens, and set the maximum amount of space allowed between a word and the right margin without hyphenating the word.
With automatic hyphenation, Office Word 2007 automatically inserts hyphens where they are needed. If you edit the document later and change line breaks, Office Word 2007 will re-hyphenate the document.
-
Make sure that no text is selected.
-
On the Page Layout tab, in the Page Setup group, click Hyphenation, and then click Automatic.
An optional hyphen is a hyphen that is used to control where a word or phrase breaks if it falls at the end of a line. For example, you can specify that the word «nonprinting» breaks as «non-printing» instead of «nonprint-ing.» When you insert an optional hyphen in a word that is not at the end of a line, the hyphen will be visible only if you turn on Show/Hide.
-
On the Home tab, in the Paragraph group, click Show/Hide.
-
Click in the word where you want to insert the optional hyphen.
-
Press CTRL+HYPHEN.

To automatically hyphenate part of a document, do the following:
-
Select the text that you want to hyphenate.
-
On the Page Layout tab, in the Page Setup group, click Hyphenation, and then click Automatic.
When you manually hyphenate text, Office Word 2007 searches for text to hyphenate. After you indicate where you want to hyphenate the text, Word inserts an optional hyphen. If you later edit the document and change line breaks, Office Word 2007 displays and prints only the optional hyphens that still fall at the end of lines. Word doesn’t re-hyphenate the document.
-
Select the text you want to hyphenate.
-
On the Page Layout tab, in the Page Setup group, click Hyphenation, and then click Manual.
-
If Office Word identifies a word or phrase to hyphenate, do one of the following:
-
To insert an optional hyphen in the location that Office Word proposes, click Yes.
-
To insert an optional hyphen in another part of the word, move the insertion point to that location, and then click Yes.
-
Nonbreaking hyphens prevent hyphenated words, numbers, or phrases from breaking if they fall at the end of a line of text. For example, you can prevent 555-0123 from breaking; instead, the entire item will move to the beginning of the next line.
-
Click where you want to insert a nonbreaking hyphen.
-
Press CTRL+SHIFT+HYPHEN.
The hyphenation zone is the maximum amount of space Office Word 2007 allows between a word and the right margin without hyphenating the word. You can change the hyphenation zone to make it wider or narrower. To reduce the number of hyphens, make the hyphenation zone wide. To reduce the raggedness of the right margin, make the hyphenation zone narrower.
-
On the Page Layout tab, in the Page Setup group, click Hyphenation, and then click Hyphenation Options.
-
In the Hyphenation zone, type the amount of space you want.
You can remove all automatic hyphenation and each instance of manual hyphenation, such as optional and nonbreaking hyphens.
-
To remove automatic hyphenation, on the Page Layout tab, in the Page Setup group, click Hyphenation, and then click None.

-
To remove manual hyphenation, on the Home tab, in the Editing group, click Replace.
-
If you don’t see the Special button, click More.
-
Click Special, and then click either Optional Hyphen to remove manual hyphens, or Nonbreaking Hyphen to remove nonbreaking hyphens.
-
Leave the Replace box empty.
-
Click Fix Next, Replace, or Replace All.
See Also
Line and page breaks
Insert a page break
Change spacing between paragraphs
Need more help?
Want more options?
Explore subscription benefits, browse training courses, learn how to secure your device, and more.
Communities help you ask and answer questions, give feedback, and hear from experts with rich knowledge.
Содержание
- 1 Неразрывный пробел: горячие клавиши и их назначение
- 2 Установка автозамены
- 3 Специальный пробел
- 4 Просмотр непечатаемых символов
- 5 Способы
- 6 Комбинация на клавиатуре
- 7 Пользуемся ASCII-кодами
- 8 Используем меню
- 9 Ситуация в пакете «Майкрософт Офис 2013»
- 10 Еще один универсальный способ
- 11 Рекомендации
Пользователи программы «Ворд» могут рано или поздно столкнуться с такой проблемой, как большой разрыв между словами. Эта проблема довольно хорошо изучена и есть множество путей для ее решения. Но в этой статье мы поговорим лишь об одном способе — как сделать неразрывный пробел в «Ворде» 2007. Данная функция очень полезна, особенно если проблема довольно часто вас тревожит.
Неразрывный пробел: горячие клавиши и их назначение
Как говорилось выше, чтобы избавить себя от проблемы, когда при печати текста в «Ворде» вводятся длинные пробелы, нужно пользоваться специальным пробелом. О том, как в «Ворде» сделать неразрывный пробел, мы сейчас и поговорим.

Чтобы не ходить вокруг да около, стоит сразу же сказать, что для ввода такого пробела существует специальная комбинация клавиш — CTRL+SHIFT+ПРОБЕЛ. Можете самостоятельно попробовать ее нажать. Конечно, если проблемы с длинными пробелами у вас не было, то разницу (между обычным и неразрывным пробелами) вы не заметите. Однако можете пользоваться таким способом повсеместно, чтобы уберечь себя от неправильного форматирования документа.
Теперь вы знаете, как сделать неразрывный пробел в «Ворде», однако такую комбинацию не каждый сможет запомнить или же просто ее будет неудобно каждый раз вводить. Для облегчения жизни можно воспользоваться переназначением этих горячих клавиш. Об этом сейчас и поговорим.
Вам нужно попасть в меню «Специальные знаки». Чтобы это сделать, перейдите во вкладку «Вставить», выберите «Символы» и нажмите «Другие». Теперь в окне перейдите в нужную нам вкладку — «Специальные знаки». Теперь в списке отыщите строку «Неразрывный пробел». Нажмите два раза на поле «Сочетание клавиш» и введите удобную вам комбинацию.

Вот теперь вы знаете не только, как в «Ворде» сделать неразрывный пробел, но и как самостоятельно назначить клавишу на него. Но это еще не все, о чем хотелось бы поговорить.
Установка автозамены
Если вы все равно испытываете дискомфорт при нажатии сочетания заданных клавиш, то есть еще один способ того, как в «Ворде» сделать неразрывный пробел. Он заключается в назначении автозамены. Это очень полезная опция не только для печати неразрывного пробела.
Для начала вам необходимо будет поместить в буфер обмена (простыми словами, скопировать) нужный элемент, в нашем случае — неразрывный пробел. После этого нужно перейти в уже знакомое меню «Специальные знаки». В этом окне нажмите на кнопку «Автозамена», которая располагается снизу.
Теперь перед вами окно автозамены. Вам нужно в поле «Заменить» вписать те символы, которые будут заменяться на неразрывный пробел, а в поле «На» вставить тот самый пробел. Обязательно не забудьте поставить отметку «Обычный текст». После этого нажмите кнопку «Добавить».
Вот вы и узнали, как сделать неразрывный пробел в «Ворде», каким способом пользоваться, решать только вам. Теперь поговорим о специальном пробеле.
Специальный пробел
Принцип того, как в «Ворде» сделать неразрывный пробел, очень похож на создание специального символа. По крайней мере суть практически одна и та же. Используйте специальный символ в том случае, если вы хотите задать определенное расстояние между буквами или словами. Этот символ, кстати, называется Narrow non-break space.

Итак, чтобы установить данный символ, вам нужно открыть таблицу всех символов. Теперь в выпадающем списке «Шрифт» выберите «Обычный текст», а в списке «Набор» — «Знаки пунктуации». Теперь среди всего множества различных символов найдите необходимый — Narrow non-break space. Если что, то его название отображается над кнопкой «Автозамена».
Отыскав символ, нажмите кнопку «Вставить», после этого символ вставится в указанное вами место. Если вы задаетесь вопросом о том, для чего эта функция может пригодиться, то она отлично подходит для вписывания дат. Таким образом, цифры «2017» будут написаны рядом со словом «Год», и отодвинуть их никак не получится.
Просмотр непечатаемых символов
Все, о чем мы говорили в этой статье, касалось непечатаемых знаков. Как можно понять из их названия, в тексте они невидимы. Но есть специальная опция в программе, которая позволяет их отобразить. Это соответствующая кнопка на верхней панели программы. На изображении вы можете увидеть ее расположение и сам значок.

После нажатия этой кнопки в тексте будут отображены все непечатаемые символы, и если вам необходимо с ними взаимодействовать, то только так вы сможете это сделать.
Кстати, в статье приводились примеры для версии «Ворда» 2007 года, однако если вы задаетесь вопросом о том, как сделать неразрывный пробел в «Ворде» 2010 года, то эта инструкция вам также должна подойти.
Проблема : в версии
Microsoft Word 2013 всем известный
неразрывный пробел (No-Break Space), вводимый по сочетанию
Ctrl + Shift + Пробел , перестал быть «привычно неразрывным». Он потерял одно из своих свойств —
фиксированную ширину , т.е. возможность оставаться неизменным при выравнивании по ширине, теперь он ведет себя в этом случае также, как и обыкновенный пробел, растягиваясь на варьируемую ширину при выравнивании строки. Функция же «неразрывности» теперь его единственное предназначение — т.е. не давать словам «разрываться» на разные строки при переносе.
Возможно это и правильно в некоторых случаях. Но многие привыкли использовать неразрывный пробел, например, при вводе номеров документов, единиц измерения и т.п.
Решение: использование пробела вида «Narrow No-Break Space», назначив его на привычные сочетания клавиш.
Итак, рассмотрим, как это сделать…
По умолчанию на сочетание клавиш Ctrl + Shift + Пробел назначен символ неразрывного пробела, о котором сказано выше. Хотелось бы, чтобы это сочетание выполняло ту же функцию в Word 2013, как и раньше.

Вот пример текста, набранного в
новосозданном документе Word 2013 с использованием старого и нового неразрывного пробела (см. на фрагменты «№ 1548» и «2001 г.»):

В предложении 1 использован обычный пробел, 2 — традиционный неразрывный пробел, а в 3 — пробел «Narrow No-Break Space».
Говорят, решение о переназначении функции неразрывного пробела в новой версии Word было принято ради совместимости с правилами пробелов в каскадных стилях CSS.
Если требуется именно фиксация ширины пробела, то, конечно, можно использовать «короткий пробел» (En Space, код символа 2002), но он не обладает свойством «неразрывности».
Если же необходима как фиксация ширины, так и неразрывность, то лучше всего использовать специальный пробел — «Narrow No-Break Space» (код символа 202F), который обладает этими свойствами.
Чтобы ввести такой пробел, делаем команду вставки символа и вводим код знака 202F:

Чтобы постоянно не искать его через вставку символов, можно назначить ввод на привычное сочетание клавиш. Для этого переходим по кнопке «Сочетание клавиш…» и в открывшемся окне «Настройка клавиатуры» сразу же нажимаем сочетание — Ctrl-Shift-Space. Сохраняем по кнопке «Назначить».

Теперь привычная функция будет на своем месте, однако проблема может «выползти» в документах предыдущих версий, где ранее использовался неразрывный пробел, при попытке преобразовать его в формат документа 2013 версии. Придется вручную сделать замену на новый символ, например, через форму поиска и замены:

При включении режима отображения скрытых символов новый неразрывный пробел (Narrow No-Break Space) визуально никак показываться не будет, в отличие от обычного пробела, который отображается в виде точки (.) или предыдущего неразрывного пробела (в виде º).
Кстати, в Word 2016 вернули всё обратно и пробел по ctrl+shift снова стал неразрывный и фиксированным. Однако теперь появилась обратная задача — как сделать такой пробел неразрывным, но при этом масштабируемым (растягиваемым по ширине при необходимости). Как это сделать смотрите в статье Word 2016 — неразрывный масштабируемый пробел
В этой статье будут описаны различные способы того, как вставить неразрывный пробел в Word или любое другое офисное приложение. Этот элемент хоть и не так часто, но все же используется в том же самом текстовом процессоре от «Майкрософт». Именно о нем и пойдет в дальнейшем речь.
Способы
Неразрывный пробел в Word и не только может быть установлен такими способами:
- С помощью специальной комбинации клавиш.
- С применением специального ASCII-кода.
- С использованием меню программы.
- С помощью буфера обмена.
Сам по себе этот символ в обычном режиме набора не виден. Его заметить можно лишь в режиме отображения непечатаемых символов, который активируется соответствующей кнопкой на панели инструментов.
Комбинация на клавиатуре
Это наиболее простой способ того, как набрать неразрывный пробел в Word. Сочетание клавиш позволяет в данном случае легко и быстро набрать данный символ. Порядок набора в данном случае такой:
- Устанавливаем курсор ввода в месте набора данного символа.
- Зажимаем одновременно функциональные клавиши Ctrl и Shift и, не отпуская их, нажимаем пробел.
- После этого отпускаем одновременно все клавиши и получаем в тексте неразрывный пробел.
Пользуемся ASCII-кодами
Любой символ можно ввести с помощью специального ASCII-кода в поле ввода текстового процессора от «Майкрософт». Неразрывный пробел в этом плане не исключение. Алгоритм ввода в этом случае такой:
- Устанавливаем указатель ввода в необходимом месте с помощью манипулятора или клавиш управления курсором.
- Переключаемся на английский язык ввода текста с помощью все того же манипулятора на языковой панели.
- Зажимаем функциональную клавишу Alt на левой части клавиатуры.
- Последовательно набираем комбинацию клавиш 2-4-8 (это и есть ASCII-код данного символа).
После проделанных манипуляций и должен появиться именно этот символ.
Используем меню
Неразрывный пробел в Word можно также поставить с помощью меню. Для этого устанавливаем курсор ввода в месте набора. В меню переходим на вкладку «Вставка» для «Офиса 2007» и более поздних версий этого программного продукта или выбираем пункт меню «Вставка» для «Офиса 2003» и более поздних версий этого софта. Затем находим пункт «Символ» и кликаем на нем левой кнопочкой мышки. В «Офисе 2007» и более поздних версиях этого программного обеспечения пункт «Символ», как правило, находится на правом краю дисплея. В открывшемся меню находим неразрывный пробел, выделяем его и нажимаем кнопку «Вставить». Все эти манипуляции выполняем с помощью мышки или клавиш навигации курсора и табуляции, которая позволяет переключаться между различными элементами пользовательского интерфейса.
Ситуация в пакете «Майкрософт Офис 2013»
Наиболее сложная ситуация с тем, как поставить неразрывный пробел в Word, в последних версиях данного программного обеспечения — «Офисе 2013». Привычная комбинация клавиш, указанная ранее, в нем по умолчанию не функционирует. Поэтому при первом запуске этого софта рекомендуется изменить его базовые настройки. Для этого заходим в меню или вкладку «Вставка» и находим на ней пункт «Символ». В поле «Код знака» вводим комбинацию 202F (это шестнадцатиричный код данного знака). После этого система автоматически найдет неразрывный пробел. Затем кликаем на кнопке «Сочетания клавиш» и после этого в открывшемся окне задаем привычную нам комбинацию клавиш для данного знака. Сохраняем внесенные изменения с помощью кнопки «Назначить». В дальнейшем в процессе ввода текста при необходимости набора этого знака необходимо лишь одновременно нажать привычную комбинацию из двух функциональных клавиш и пробела — и все.
Еще один универсальный способ
Еще один способ ввода неразрывного пробела основывается на использовании неразрывного пробела. В этом случае порядок действий такой:
- Находим в любом месте данный символ и выделяем его с использованием мышки. Например, в Интернете на любом сайте.
- Используем комбинацию клавиш Ctrl + С для внесения в буфер обмена символа неразрывного пробела.
- Далее переходим в то приложение, в котором необходимо вставить этот знак, и устанавливаем курсор в месте ввода.
- Затем нажимаем комбинацию Ctrl + V. После этого должен вставиться в наш документ скопированный символ.
Рекомендации
Как бы там ни было, а неразрывный пробел в Word наиболее просто вставить с помощью специальной комбинации клавиш. Именно ее и рекомендуется использовать на практике.
This tutorial shows how to insert nonbreaking spaces in Microsoft Word using the Symbol dialog box method and the keyboard shortcut method. Before we start the tutorial, we’ll briefly define nonbreaking spaces and see what they look like compared to regular spaces.
Watch all the steps shown here in real time!
Explore more than 200 writing-related software tutorials on my YouTube channel.
The images below are from Word for Office 365, which is currently the same as Word 2019. However, the steps are the same for Word 2016 and are similar for Word 2013 and Word 2010.
What Are Nonbreaking Spaces?
Nonbreaking spaces are special characters that keep words or individual characters from separating at line breaks. Nonbreaking spaces are particularly useful between ellipsis points. However, you can use them between any words or characters that you want to stay together.
In Microsoft Word, regular spaces are represented by a small, solid dot and nonbreaking spaces are represented by a slightly larger circle positioned higher than the regular-space dot.

To see these and other formatting symbols in your Word document, select the Show/Hide button in the Paragraph group of the Home tab. To hide the formatting symbols, reselect the Show/Hide button.

Insert Nonbreaking Spaces in Microsoft Word Using the Symbol Dialog Box
1. Place your cursor where the nonbreaking space should be inserted. Alternately, if a regular space already appears where the nonbreaking space should be inserted, select the regular space, as shown in the image below.

2. Select the Insert tab.

3. Select Symbols in the Symbols group.

4. Select More Symbols in the drop-down menu.

5. Select the Special Characters tab in the Symbol dialog box.

6. Select Nonbreaking Space from the Character menu.

7. Select the Insert button to insert the nonbreaking space.

Pro Tip: You can move your cursor around the document and insert additional nonbreaking spaces or other special characters while the Symbol dialog box is open.
8. Select the Close button to close the Symbol dialog box.

Insert Nonbreaking Spaces in Microsoft Word Using the Keyboard Shortcut
1. Place your cursor where the nonbreaking space should be inserted. Alternately, if a regular space already appears where the nonbreaking space should be inserted, select the regular space (see figure 1).
2. Select Ctrl + Shift + Space on your keyboard to insert the nonbreaking space.
Further Reading:
How to Insert Special Characters in Microsoft Word
How to Find and Replace Special Characters in Microsoft Word
How to Create a Nonbreaking Dash in Microsoft Word
Updated December 06, 2022
Occasionally text in paragraphs is not aligned correctly or cannot be positioned as you like. This problem could be a line break, also called soft return or text wrapping break.
A paragraph is created by entering text and pressing the Enter key. It can contain only one word or one sentence, or multiple sentences. Each paragraph ends with a paragraph mark that looks like a reverse P (¶).
The line break moves the next word to the beginning of a new line without starting a new paragraph. A line break character looks like a right-angle arrow pointing to the left ![]() .
.
For example:
- Text with two paragraphs where lines end with paragraph breaks:

- Text with two paragraphs where lines end with line breaks:

Note: You can also see a right-angle arrow between two vertical lines ![]() . This symbol shows the line break that separate text around an object, wrapping text such as a caption text or an image from the body text:
. This symbol shows the line break that separate text around an object, wrapping text such as a caption text or an image from the body text:
![]()
A line break character and other structural characters, such as spaces, paragraph marks, and tabs (also known as Whitespace characters in typography, nonprinting characters, or formatting marks) are usually hidden, but you can display them.
To insert a line break, do the following:
1. Position the cursor in front of the word you want to move to a new line.
2. Do one of the following:
- On the Layout tab, in the Page Setup group, click Breaks, and then click Text Wrapping:

- Press Shift+Enter.

Line breaks are used to delimit a specific text or break a line before a word that would otherwise be hyphenated (see more about automatic hyphenation and manual hyphenation).
To remove line breaks, follow the two-step procedure:
I. Replace two consecutive line breaks with one paragraph break:
1. Open the Find and Replace dialog box by doing one of the following:
- On the Home tab, in the Editing group, click the Find list and then choose Advanced Find…:

- Click Ctrl+H.
- On the Home tab, in the Editing group, click the Replace button:


2. In the Find and Replace dialog box, on the Replace tab:

- In the Find what field, type ^l^l (the caret symbol plus the lowercase Ls twice).
- In the Replace with field, type ^p (the code for a paragraph break).
3. Click the Replace All button.
II. Replace line breaks with spaces or remove them:
1. Open the Find and Replace dialog box.
2. In the Find and Replace dialog box, on the Replace tab:
- In the Find what field, type ^l (the caret symbol plus the lowercase Ls).
- In the Replace with field:
- Type a space if you need to place a space instead of each line break.
- Leave empty if you already have a space at the end of each line.
3. Click the Replace All button.
See more about replacing special characters.
Note: Word offers a helpful feature named AutoFormat that can format selected text with a paragraph break at the end of each full line to delete all the paragraph breaks but the last. In some cases, it can determine where the “real” paragraph breaks are and leave them intact. To run AutoFormat, click Alt+Ctrl+K.