
Excel for Microsoft 365 Excel 2021 Excel 2019 Excel 2016 Excel 2013 More…Less
Wherever you want to save your workbook (on your computer or the web, for example), you do all your saving on the File tab.
While you’ll use Save or press Ctrl+S to save an existing workbook in its current location, you need to use Save As to save your workbook for the first time, in a different location, or to create a copy of your workbook in the same or another location.
Note: If you are trying to save a macro-enabled workbook (.xlsm) as a regular workbook (.xlsx), be advised that macros will not be saved in the new file, which could result in loss of functionality, as VBA macros are a powerful way to automate significant amounts of work. Consider saving the macros or retaining the macro-enabled file until you are sure the new file has the functionality you expect.
-
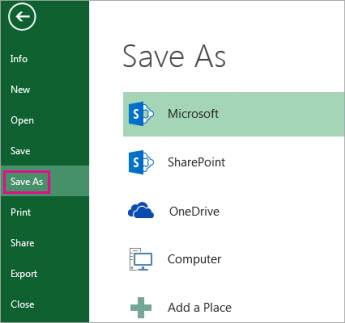
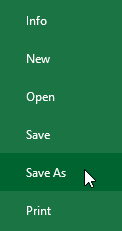
Click File > Save As.

-
Under Save As, pick the place where you want to save your workbook. For example, to save to your desktop or in a folder on your computer, click Computer.
Tip: To save to your OneDrive location, click OneDrive, and then sign up (or sign in). To add your own places in the cloud, like an Microsoft 365SharePoint or a OneDrive location, click Add a place.
-
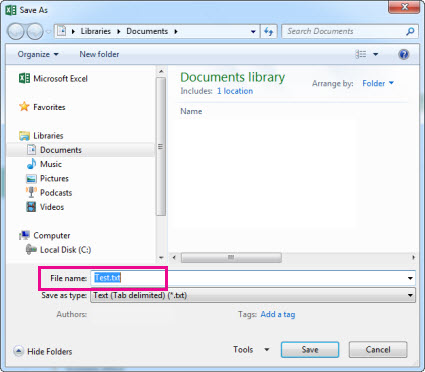
Click Browse to find the location you want in your Documents folder.
To pick another location on your computer, click Desktop, and then pick the exact place where you want to save your workbook.
-
In the File name box, enter a name for a new workbook. Enter a different name if you’re creating a copy of an existing workbook.
-
To save your workbook in a different file format (like .xls or .txt), in the Save as type list (under the File name box), pick the format you want.
-
Click Save.

Pin your favorite save location
When you’re done saving your workbook, you can “pin” the location you saved to. This keeps the location available so you can use it again to save another workbook. If you tend to save things to the same folder or location a lot, this can be a great time saver! You can pin as many locations as you want.
-
Click File > Save As.
-
Under Save As, pick the place where you last saved your workbook. For example, if you last saved your workbook to the Documents folder on your computer, and you want to pin that location, click Computer.
-
Under Recent folders on the right, point to the location you want to pin. A push pin image
appears to the right.
-
Click the image to pin that folder. The image now shows as pinned
. Every time you save a workbook, this location will appear at the top of the list under Recent folders.Tip: To unpin a location, just click the pinned push pin image
again.
 appears to the right.
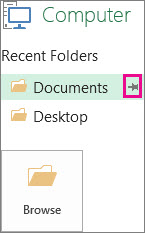
 . Every time you save a workbook, this location will appear at the top of the list under Recent folders.
Turn
on AutoRecovery
Excel automatically saves your workbook while you’re working on it, in case something happens, like the power going out. This is called AutoRecovery. This isn’t the same as you saving your workbook, so don’t be tempted to rely on AutoRecovery. Save your workbook, often. But Autorecovery is a good way to have a backup, just in case something happens.
Make sure AutoRecovery is turned on:
-
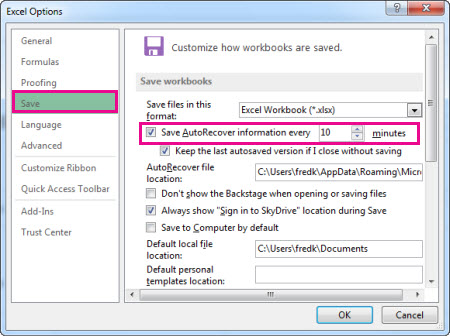
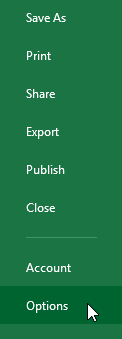
Click File > Options.
-
In the Excel Options dialog box, click Save.
-
Under Save workbooks, make sure
Save AutoRecover information every n minutes is checked. -
Set the minutes for how often you want Excel to back up your work, and then click OK.
Need more help?
“Save As” is located in the file tab of the worksheet in Excel. Still, there are also some keyboard shortcuts for using it. One is on the Quick Access Toolbar, or we can press F12 and display the save as option or press the keyboard shortcut CTRL+S, which opens the “Save As” dialog box to save the file in the desired format path.
For example, If you add the “Save As” option to your Quick Access Toolbar, you may move aimlessly over the icon to see its keyboard shortcut. e.g., Alt+H keyboard shortcut to open the Home tab.
Save and Save As: Both shortcuts belong to Excel’s “File” class functions. “Save” and “Save As” shortcut keys in Excel save the temporary data in Excel to an Excel file.
“Save” and “Save As” Shortcuts in ExcelAn Excel shortcut is a technique of performing a manual task in a quicker way.read more are the most important functions as they enable the user to save the data created in Excel. Without these functions, the user may lose the data that has been made in Excel once the file is closed. So, one must understand these functions clearly.
- The “Save As” shortcut key in Excel differs from the “Save” shortcut in Excel. The “Save As” function enables users to store the data in a separate file or even in an independent format from the original structure.
- It was introduced when it observed that the user loses the original file once the changes are saved in the file. The “Save As” shortcut function in Excel enables users to save the changes made in the primary file in a new file. Using the “Save As” function, the user can keep the file in the same format, with a different name, or even at a different location.
- So, Excel’s “Save As” shortcut function offers more functionality than Excel’s traditional “Save” function.
Table of contents
- Excel Shortcut: “Save As”
- Save As Shortcut in Excel Examples
- How to Use the “Save As” Shortcut in Excel?
- Method #1 – Using the Excel Keyboard Shortcut for “Save As”
- Method #2 – Add the “Save As” Function to the Quick Access Toolbar in Excel
- Method #3 – Adding “Save As” Option to the Ribbon in Excel
- Method #4 – Use VBA as a “Save As” Shortcut
- Explanation of “Save As” Function in Excel
- Things to Remember About “Save As” Shortcut in Excel
- Recommended Articles
Save As Shortcut in Excel Examples
Add the “Save As” function to the ribbon.
- Using the “Save As” shortcut key in Excel – F12

- Add the “Save As” function to the Quick Access Toolbar.

- Add the “Save As” function to the ribbon.

- Using VBA


How to Use the “Save As” Shortcut in Excel?
Below are the four methods of using Excel’s “Save As” shortcut.
Method #1 – Using the Excel Keyboard Shortcut for “Save As”
Step 1 – Make sure that no undoing of actions is required.
Before saving the file, one should ensure that no action performed needs an undo. If it requires undoing, one must first undo the action and then only can save the changes.
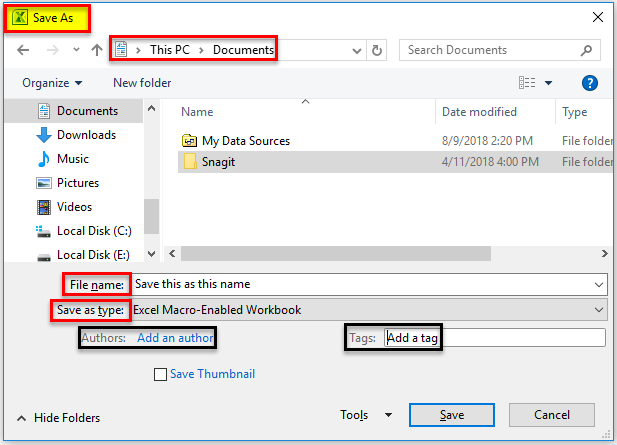
Step 2 – Use the keyboard Excel shortcut key “F12” to open the “Save As” dialog box.
Step 3 – Please choose a new file name, type, and location where you want to save the file.
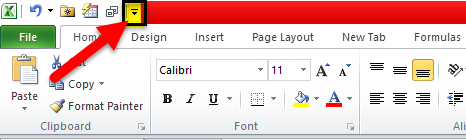
Method #2 – Add the “Save As” Function to the Quick Access Toolbar in Excel
Step 1 –
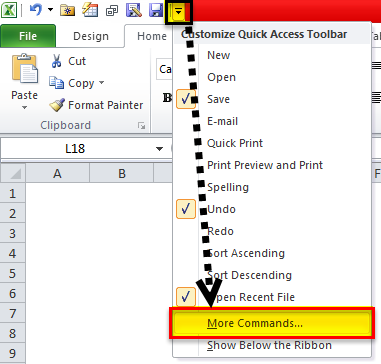
Go to the Quick Access ToolbarQuick Access Toolbar (QAT) is a toolbar in Excel that may be customized and is located on the upper left-hand side of the window. It enables users to save important shortcuts and easily access them when needed.read more and click on the little “dropdown” key.

Step 2 –
From the options, choose the option “More Commands.”
Step 3 –
Choose “All Commands” from the menu and add the “Save As” function to the Quick Access Toolbar.
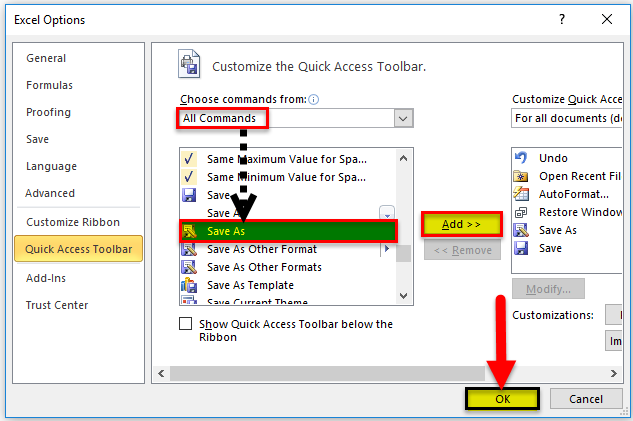
Step 4 –
After adding the “Save As” function, we can use it with a single click.

Method #3 – Adding “Save As” Option to the Ribbon in Excel
One can also add the “Save As” function to the ribbon.
Step 1 –
Click on “File” and choose “Options” from the menu.

Step 2 –
Choose all commands from the customize ribbon tab, search for the “Save As” function, and add that to the ribbon.
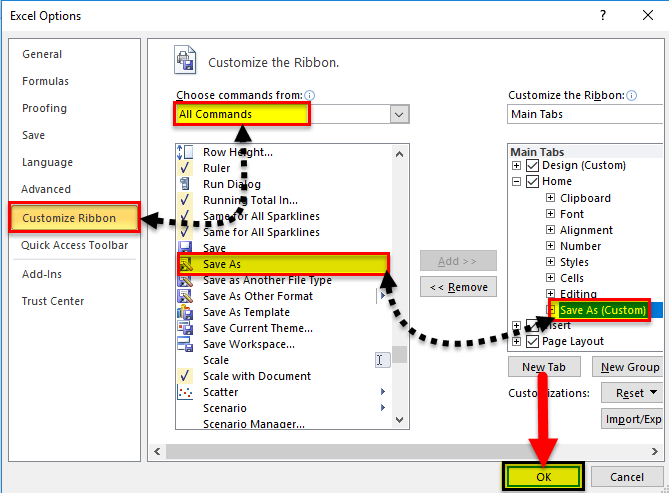
Step 3 –
After the “Save As” function is added to the ribbon, it will appear below.

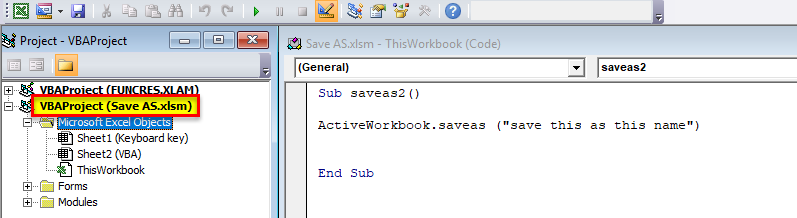
Method #4 – Use VBA as a “Save As” Shortcut
VBA can also be used as a shortcut for “Save As” by using the code.

Activeworkbook means active Excel.
Save As is the “Save As” function that must be executed.
“Save this as this name” and enter the name by which the file has to be saved.
Explanation of the “Save As” Function in Excel
Whenever we work on a spreadsheet shared between teammates, then it becomes essential that the other team members should not edit the primary file. For example, suppose there is a situation where the team manager has created a file and shared the file with the teammates. Some teammates have altered the formulas as per their needs and saved the changes in the file.
In such a situation, it will create a problem for the user who has made the primary file, as the teammate’s changes are already saved in the same file. Furthermore, restoring the changes and recovering the original file is impossible. So, to take care of both situations, we use Excel’s “Save As” function to save the changes and keep the primary file.
- Excel’s “Save As” function allows the user to save the changes by a new file name and enables the user to change the file type and location where the file has been saved.
- Using the “Save As” function, the user can create the file with a new location and a new file type. However, sometimes the user needs to save a file as a “PDF,” and sometimes they must change the file type to a macro-enabled worksheet. Therefore, it becomes essential that the user has some inbuilt option in such cases. Hence, we have the “Save As” function in Excel.
- So, whenever we want to save the changes and the primary file, use the “Save As” function. There are many ways to add shortcuts for the “Save As” function.
- We can use the keyboard shortcut key combinations and add these “Save As” functions in the ribbon or the quick access toolbar. Using the “Save As” shortcut key will enable a user to reduce the time saving the file with conventional methods. Moreover, we also have the VBA code that one can easily use to execute the “Save As” shortcut key in Excel.
Things to Remember About “Save As” Shortcut in Excel
- We must enter a unique name when using the “Save As” shortcut in Excel. Otherwise, we will get a warning message that “filename exists,” If we accidentally override the warning and hit the save button, the old file will get replaced. Hence, we will lose the primary file.
- If we used VBA code in ExcelVBA code refers to a set of instructions written by the user in the Visual Basic Applications programming language on a Visual Basic Editor (VBE) to perform a specific task.read more, we must use the Excel extensionExcel extensions represent the file format. It helps the user to save different types of excel files in various formats. For instance, .xlsx is used for simple data, and XLSM is used to store the VBA code.read more “.xlsm” while using the “Save As” shortcut in Excel.
- If we want to save the file with the same name as the primary file, we should change the file’s location while doing the “Save As” shortcut in Excel.
Recommended Articles
This article is a guide to Save As Shortcut in Excel. Here we discuss the keyboard shortcut of Save and Save As, including 4 different Excel methods (the F12 function, using the quick access toolbar, adding it in ribbon, and creating a shortcut in VBA). You may learn more about Excel from the following articles: –
- Age Calculation in Excel
- Using a Shortcut key to Merge Cells in Excel
- Compare Two Excel Columns
- Unmerge Cells in Excel
After you’ve created a workbook, you need to save it if you want to use it again. Also, if you make changes to a workbook you’ll want to save it. You can even save a copy of an existing workbook with a new name, to a different location, or using a different file type.
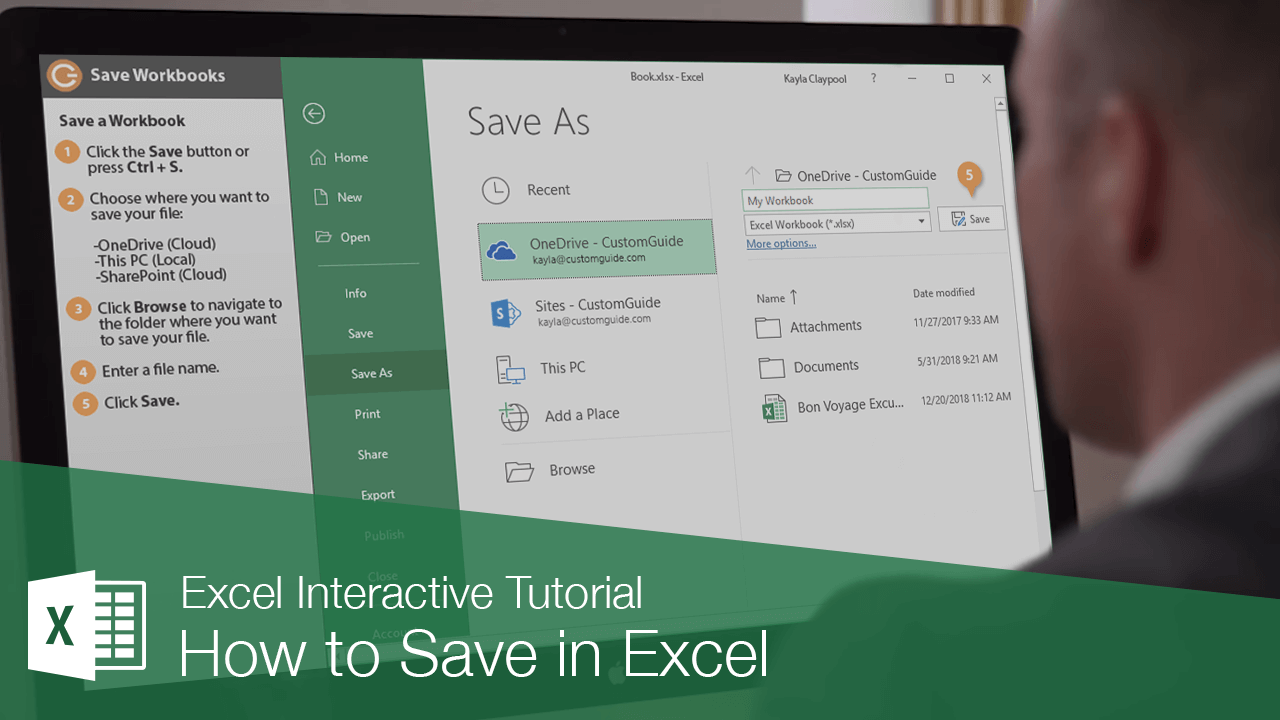
Save a Workbook
Once you’ve created a new workbook, you’ll need to save it if you want to use it again.
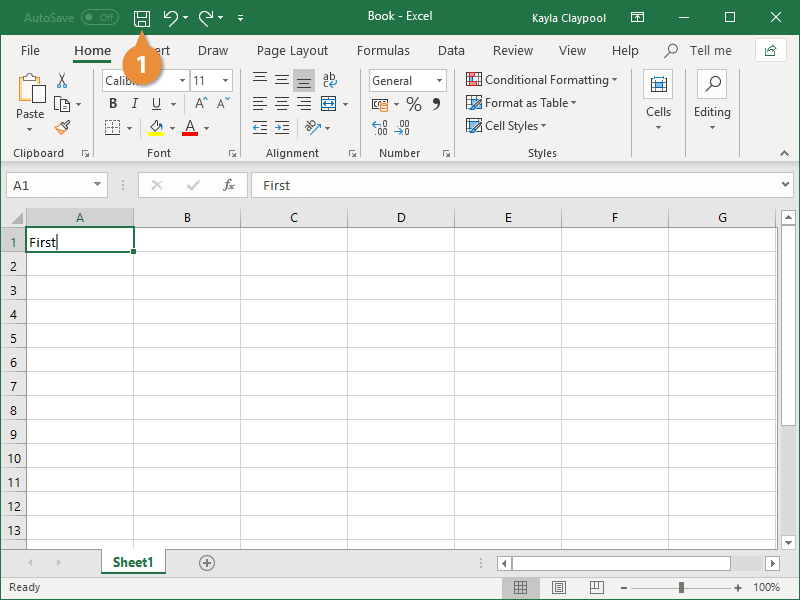
- Click the Save button.

Press Ctrl + S to quickly save a workbook.
If this is the first time you’ve saved the workbook, the Save As screen will appear.
- Choose where you want to save your file:
- OneDrive: Save to Microsoft’s cloud-based storage so you can open the worksheet on another computer.
- SharePoint: Save the workbook to a connected SharePoint server.
- This PC: Save to the local storage on your computer.
- Browse: Opens a dialog box, where you can browse through your computer’s folders, drives, and network shares.
- Enter a file name.
- Click Save.
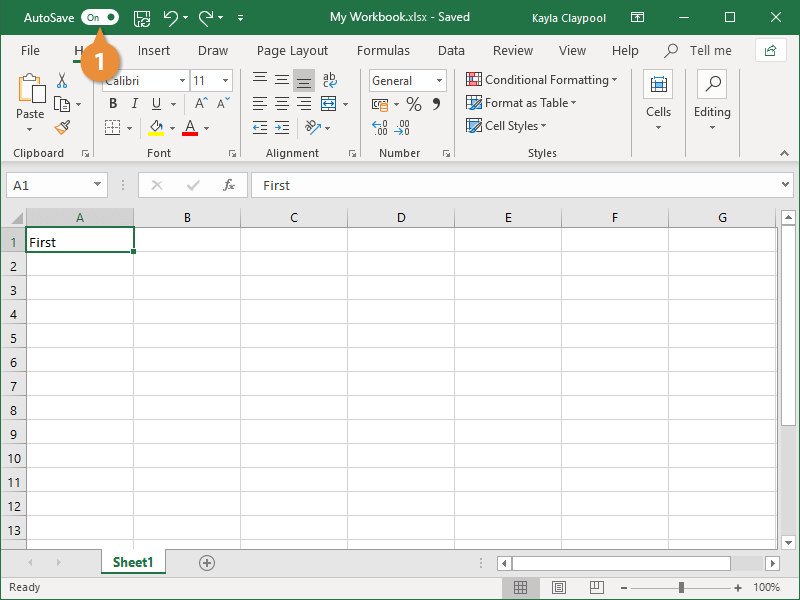
AutoSave Workbooks
If an Excel file is saved online, the AutoSave feature in the top-left is automatically turned on. However, this can be changed as needed.
- Click the AutoSave toggle button to turn the feature on or off.
Save Progress
As you continue to work in Excel, you’ll want to save any changes you make from time to time.
- Click the Save button.
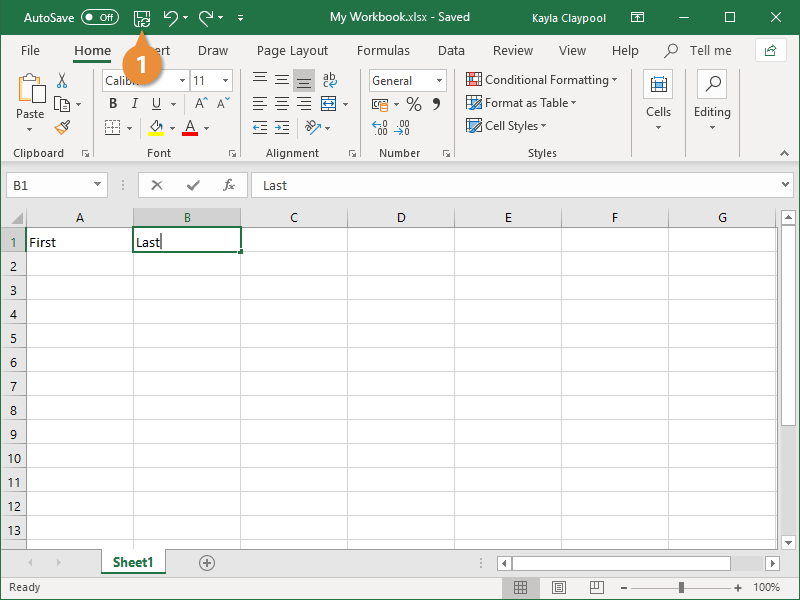
Press Ctrl + S to quickly save a workbook.
Try to save your progress every 10 minutes; that way you won’t lose any important changes if disaster strikes.
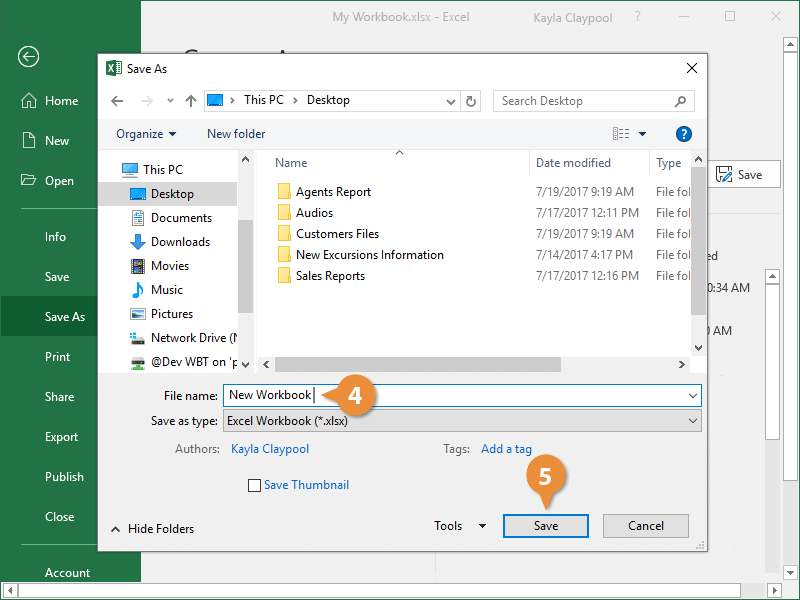
Save As a New File and/or Location
Sometimes you may want to make a copy of an existing workbook and save it with a new name. Using and modifying the content in an existing workbook can often save you a lot of time.
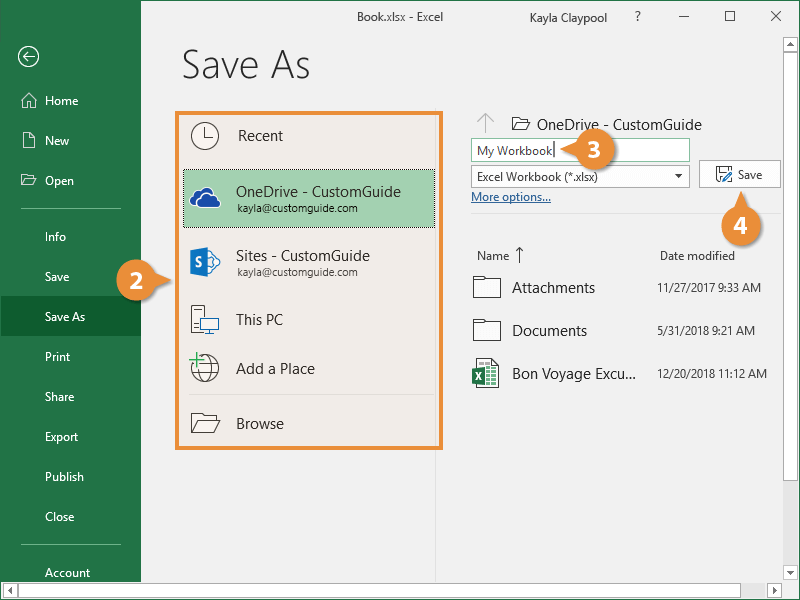
- Click the File tab.

- Click Save As.
- Click This PC to navigate to the folder you want to save your file.
- Enter a File name.
- Click Save.
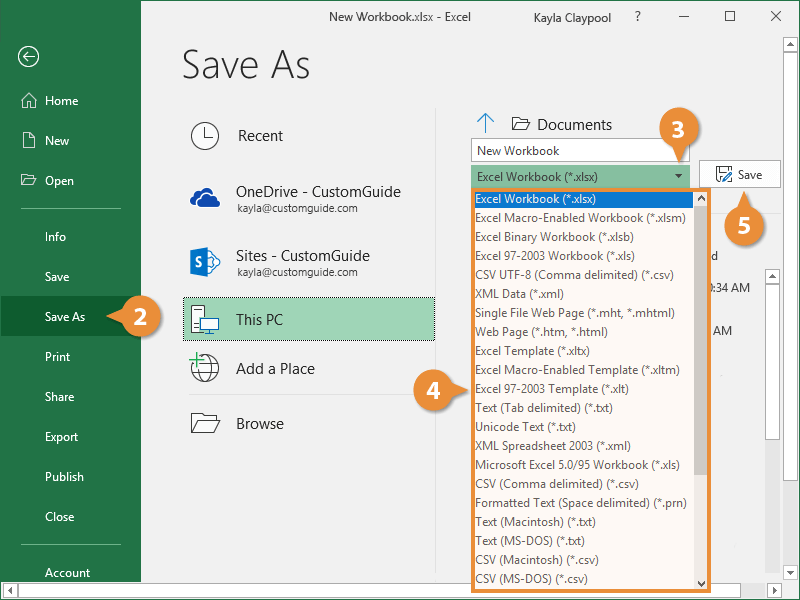
Save to Different File Formats
Excel normally saves its files as Excel workbooks, but you can save information to other file formats as well. For example, sometimes you may want to save your data as a Comma Separated Values or CSV file, so you can import it into another program.
- Click the File tab.
- Click Save As.
- Click the Save as type list arrow.
The default file type is an XLSX Excel file, but you can choose from plenty of other file formats in this menu.
- Select the desired format.
- Click Save.
File Types Commonly Saved to From Excel
| File Type | Extension | Description |
|---|---|---|
| CSV | .csv | Comma delimited text file, often used to import/export data. |
| Excel Workbook | .xlsx | The default XLM-based file format for Excel, in use since Excel 2007. |
| Excel 97-2003 Workbook | .xls | Excel files from Excel 2003 and older. |
| Excel Macro-Enabled Template | .xlsm | Excel template that contains macros. |
| Excel Template | .xltx | Excel template files. |
| Portable Document Format, a format that preserves document formatting and allows file sharing. | ||
| Web Page | .html | A web page that is saved as a folder and contains an .htm file and supporting files, such as images. |

FREE Quick Reference
Click to Download
Free to distribute with our compliments; we hope you will consider our paid training.
Lesson 4: Saving and Sharing Workbooks
/en/excel/creating-and-opening-workbooks/content/
Introduction
Whenever you create a new workbook in Excel, you’ll need to know how to save it in order to access and edit it later. As with previous versions of Excel, you can save files locally to your computer. You can also save a workbook to the cloud using OneDrive, as well as export and share workbooks with others directly from Excel.
Watch the video below to learn more about saving and sharing workbooks in Excel.
About OneDrive
Whenever you’re opening or saving a workbook, you’ll have the option of using your OneDrive, which is the online file storage service included with your Microsoft account. To enable this option, you’ll need to sign in to Office. To learn more, visit our lesson on Understanding OneDrive.
Save and Save As
Excel offers two ways to save a file: Save and Save As. These options work in similar ways, with a few important differences:
- Save: When you create or edit a workbook, you’ll use the Save command to save your changes. You’ll use this command most of the time. When you save a file, you’ll only need to choose a file name and location the first time. Then you can just click the Save command to save it with the same name and location.
- Save As: You’ll use this command to create a copy of a workbook while keeping the original. When you use Save As, you’ll need to choose a different name and/or location for the copied version.
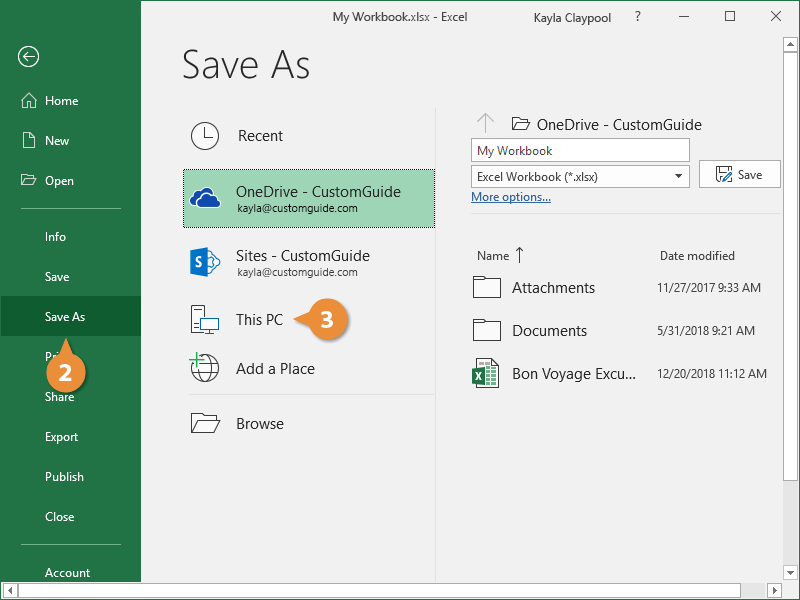
To save a workbook:
It’s important to save your workbook whenever you start a new project or make changes to an existing one. Saving early and often can prevent your work from being lost. You’ll also need to pay close attention to where you save the workbook so it will be easy to find later.
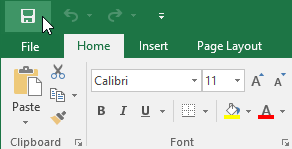
- Locate and select the Save command on the Quick Access Toolbar.
- If you’re saving the file for the first time, the Save As pane will appear in Backstage view.
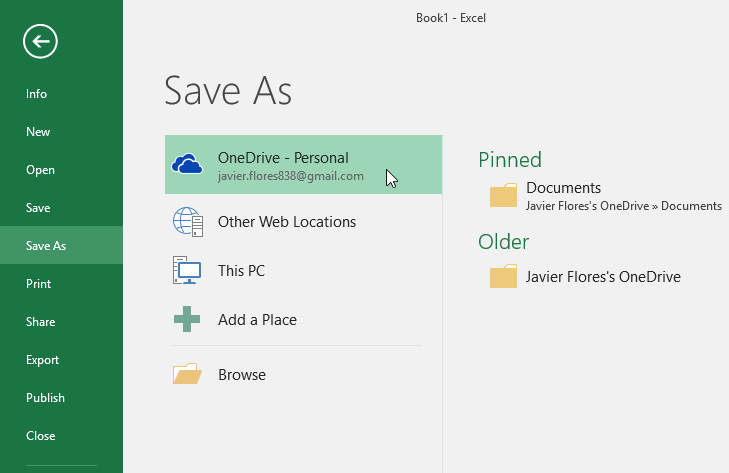
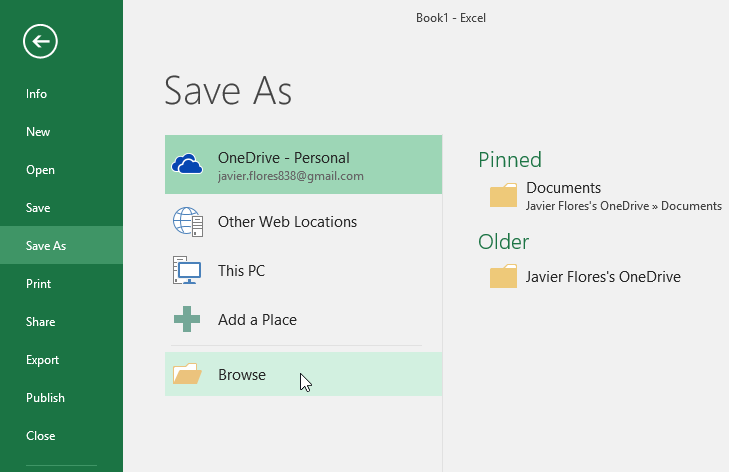
- You’ll then need to choose where to save the file and give it a file name. To save the workbook to your computer, select Computer, then click Browse. You can also click OneDrive to save the file to your OneDrive.
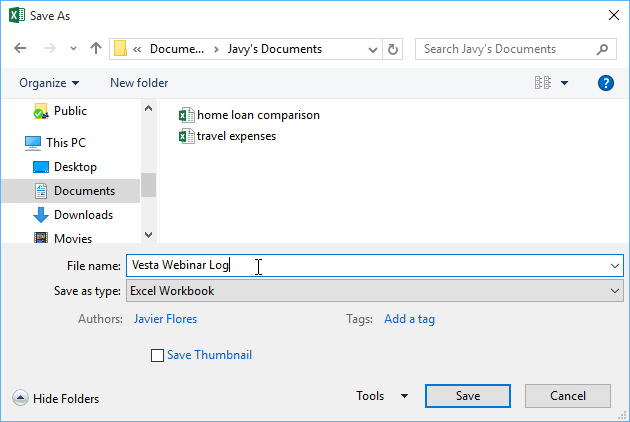
- The Save As dialog box will appear. Select the location where you want to save the workbook.
- Enter a file name for the workbook, then click Save.
- The workbook will be saved. You can click the Save command again to save your changes as you modify the workbook.
You can also access the Save command by pressing Ctrl+S on your keyboard.
Using Save As to make a copy
If you want to save a different version of a workbook while keeping the original, you can create a copy. For example, if you have a file named Sales Data, you could save it as Sales Data 2 so you’ll be able to edit the new file and still refer back to the original version.
To do this, click the Save As command in Backstage view. Just like when saving a file for the first time, you’ll need to choose where to save the file and give it a new file name.
To change the default save location:
If you don’t want to use OneDrive, you may be frustrated that OneDrive is selected as the default location when saving. If you find it inconvenient to select Computer each time, you can change the default save location so Computer is selected by default.
- Click the File tab to access Backstage view.
- Click Options.
- The Excel Options dialog box will appear. Select Save, check the box next to Save to Computer by default, then click OK. The default save location will be changed.

AutoRecover
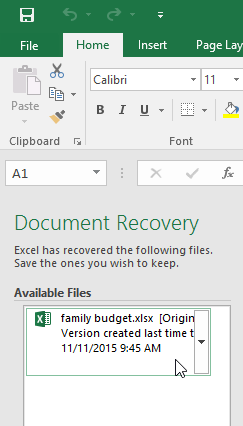
Excel automatically saves your workbooks to a temporary folder while you are working on them. If you forget to save your changes or if Excel crashes, you can restore the file using AutoRecover.
To use AutoRecover:
- Open Excel. If autosaved versions of a file are found, the Document Recovery pane will appear.
- Click to open an available file. The workbook will be recovered.
By default, Excel autosaves every 10 minutes. If you are editing a workbook for less than 10 minutes, Excel may not create an autosaved version.
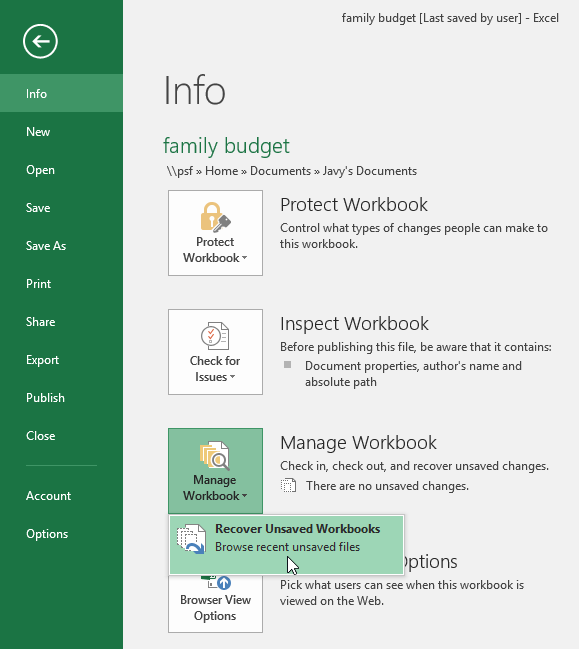
If you don’t see the file you need, you can browse all autosaved files from Backstage view. Just select the File tab, click Manage Workbook, then choose Recover Unsaved Workbooks.
Exporting workbooks
By default, Excel workbooks are saved in the .xlsx file type. However, there may be times when you need to use another file type, like a PDF or Excel 97-2003 workbook. It’s easy to export your workbook from Excel to a variety of file types.
To export a workbook as a PDF file:
Exporting your workbook as an Adobe Acrobat document, commonly known as a PDF file, can be especially useful if you’re sharing a workbook with someone who does not have Excel. A PDF will make it possible for recipients to view but not edit the content of your workbook.
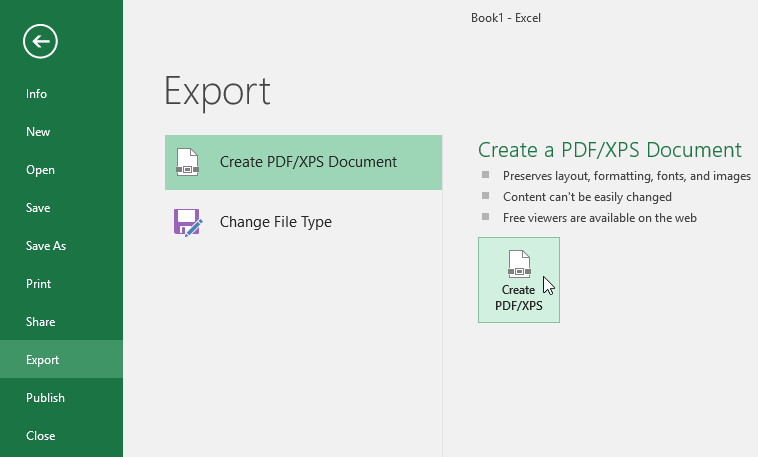
- Click the File tab to access Backstage view.
- Click Export, then select Create PDF/XPS.
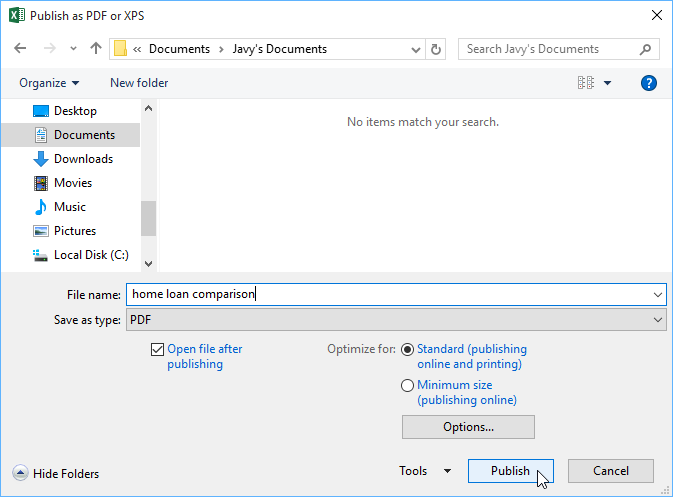
- The Save As dialog box will appear. Select the location where you want to export the workbook, enter a file name, then click Publish.
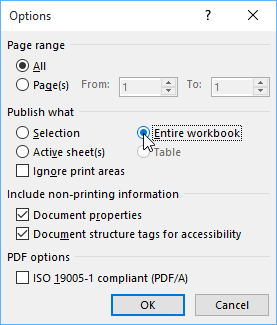
By default, Excel will only export the active worksheet. If you have multiple worksheets and want to save all of them in the same PDF file, click Options in the Save As dialog box. The Options dialog box will appear. Select Entire workbook, then click OK.
Whenever you export a workbook as a PDF, you’ll also need to consider how your workbook data will appear on each page of the PDF, just like printing a workbook. Visit our Page Layout and Printing lesson to learn more about what to consider before exporting a workbook as a PDF.
To export a workbook to other file types:
You may also find it helpful to export your workbook to other file types, like an Excel 97-2003 workbook if you need to share with people using an older version of Excel, or a .CSV file if you need a plain-text version of your workbook.
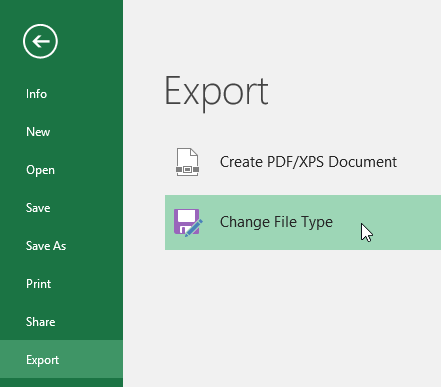
- Click the File tab to access Backstage view.
- Click Export, then select Change File Type.
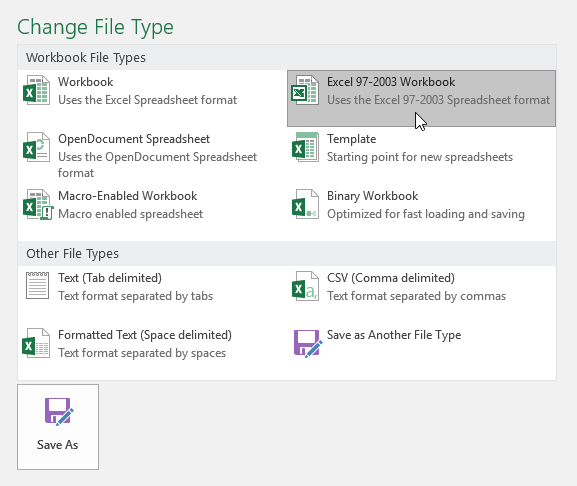
- Select a common file type, then click Save As.
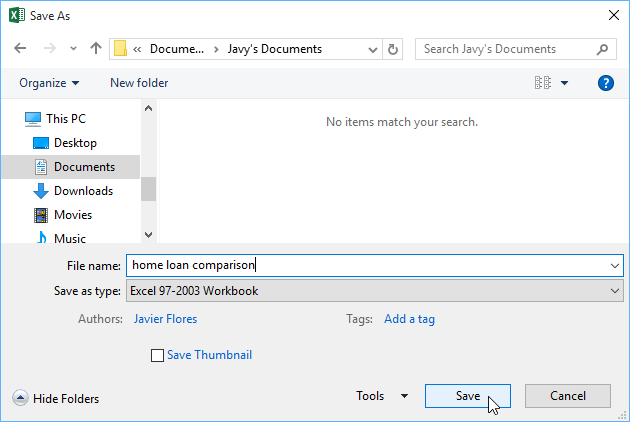
- The Save As dialog box will appear. Select the location where you want to export the workbook, enter a file name, then click Save.
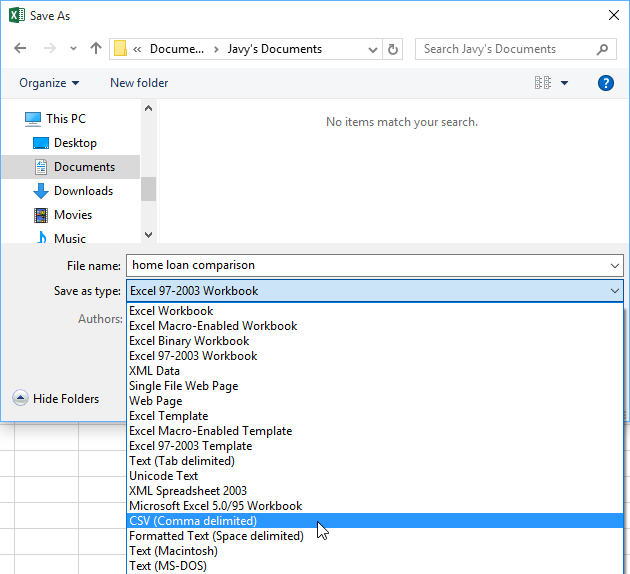
You can also use the Save as type: drop-down menu in the Save As dialog box to save workbooks in a variety of file types.
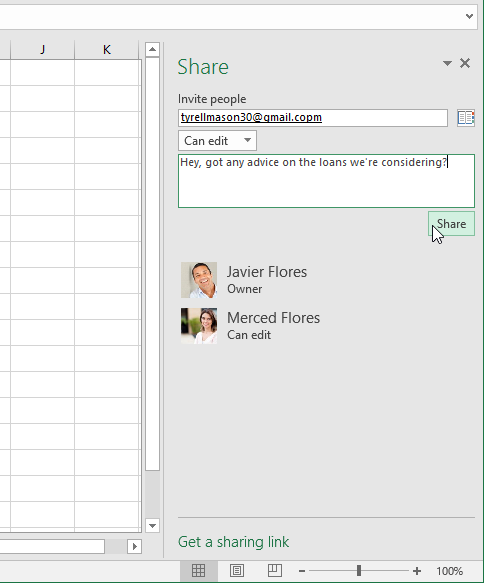
Sharing workbooks
Excel makes it easy to share and collaborate on workbooks using OneDrive. In the past, if you wanted to share a file with someone, you could send it as an email attachment. While convenient, this system also creates multiple versions of the same file, which can be difficult to organize.
When you share a workbook from Excel, you’re actually giving others access to the exact same file. This lets you and the people you share with edit the same workbook without having to keep track of multiple versions.
In order to share a workbook, it must first be saved to your OneDrive.
To share a workbook:
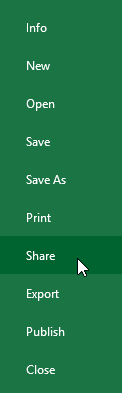
- Click the File tab to access Backstage view, then click Share.
- Excel will return to Normal view and open the Share panel on the right side of the window. From here, you can invite people to share your document, see a list of who has access to the document, and set whether they can edit or only view the document.
Challenge!
- Open our practice workbook.
- Using the Save As option, create a copy of the workbook and name it Saving Practice Challenge. You can save the copy to a folder on your computer or to your OneDrive.
- Export the workbook as a PDF file.
/en/excel/cell-basics/content/
Being confident in how to save an Excel workbook, including save a copy and save as PDF, is a fundamental skill in Excel.
Once you have created a workbook (file), you will need to save the file in order to store it for later use. Saving a file means that you are storing the file into a storage area.
Examples of file storage areas are the hard disk in your PC, the network server, OneDrive, SharePoint, or a flash drive.
If you do not save a file, you will not be able to use the file later but will have to re-create it. Therefore it is a good option to save a file.
Saving your workbook for the first time
Any time a new workbook (a.k.a. a file) is created; Excel automatically gives it a default name of Book# to temporarily identify the file until you save it with a more appropriate name.
In the examples below a new workbook has been created and Excel has automatically given it the name Book1. This indicates it is the first workbook created since starting Excel. Until Excel is closed down all new workbooks will be named sequentially, e.g. the next new workbook during this session would be named Book 2.
Unsaved workbook
Compatibility Mode
When you see the words “Compatibility Mode” in the Title bar this indicated Excel is working in a mode compatible with old file formats.
In the example below the file is a .xls file, meaning the file is probably an old file created in an older version of Excel, e.g. Excel 97 up to Excel 2003.
Files created in Excel 2007 through to 2016 have a .xlsx extension, as shown in the example above for the “Saved workbook”. Working in Compatibility Mode, Excel will offer only a limited number of the features. If you like you can do a Save As and save the file as an ‘Excel Workbook’ which will upgrade it to the latest version.
Saved workbook
Compatibility Mode
To save your workbook
Step 1. To save your file do one of the following:
- From the File tab select Save or Save As
- Press CTRL + S
- Click the Save button on the Quick Access Toolbar
Step 2. Navigate to the folder the file will be saved into.
Step 3. In the File name box type the name you wish to give your file and then click Save.
Excel now saves the file and displays the name of the file in the Title Bar at the top of the screen.
Now continue to click Save each time you want to update the saved copy of your file with what you currently can see on your screen.
It’s a good idea to get into the habit of saving regularly!
Warning: please note that clicking Save TOTALLY OVERWRITES the existing saved file with any updates you have made since the last save. This is excellent if it’s what you want to do, not so great if you don’t want to update the file. If you would like to make a copy of a workbook, leaving the original untouched, do a Save As.
Use Save As to make a copy of your workbook
Save As allows you to save a file with a different name, to a different location or as a different file type.
Save As saves a copy of the open file, leaving the original file intact.
This is a helpful option to use when needing to create similar files with different details. It can save you from having to totally recreate a file.
Step 1. From the File tab select Save As or Save a Copy. Navigate to the folder the file will be saved to.
Step 2. You will see the existing name of the file in the File name box. This can be replaced with the name of the new document.
Note: if you are saving the file into a new folder you can keep the same name. However, if there is an existing file in the folder with the same name this isn’t a good idea as it will replace the original file with your file so be careful.
Step 3. Click Save.
Save your worksheet as a PDF
Microsoft Excel offers you the ability to save your document as a PDF, even if you don’t have PDF creation software loaded on your computer.
To do this:
Step 1: Select the worksheet you want to PDF.
Step 2: From the File tab select Save As or Save as Copy.
Step 3: Select the location for the saved file. In the Save As dialog box click the drop-down arrow for the Save as type list. Select PDF.
Note: this doesn’t secure the PDF for password security. If this is a requirement within your organisation please contact your administrator to find out the software you should be using to do this.
Was this blog helpful? Let us know in the Comments below.
Instructions
To save your workbook
- Save by either going to the File tab and selecting Save or Save As, pressing CTRL + S or clicking the Save button on the Quick Access Toolbar.
- Navigate to the folder the file will be saved into.
- In the File name box type the name you wish to give your file and then click Save.
Use Save As to make a copy of your workbook
- From the File tab select Save As or Save a Copy. Navigate to the folder the file will be saved to.
- You will see the existing name of the file in the File name box. This can be replaced with the name of the new document.
- Click Save.
Save your worksheet as a PDF
- Select the worksheet you want to PDF.
- From the File tab select Save As or Save as Copy.
- Select the location for the saved file. In the Save As dialog box click the drop-down arrow for the Save as type list. Select PDF.
Notes
Saving your workbook for the first time
Any time a new workbook (a.k.a. a file) is created; Excel automatically gives it a default name of Book# to temporarily identify the file until you save it with a more appropriate name.
Warning: please note that clicking Save TOTALLY OVERWRITES the existing saved file with any updates you have made since the last save. This is excellent if it’s what you want to do, not so great if you don’t want to update the file. If you would like to make a copy of a workbook, leaving the original untouched, do a Save As.
Compatibility Mode
When you see the words “Compatibility Mode” in the Title bar this indicated Excel is working in a mode compatible with old file formats.
Use Save As to make a copy of your workbook
Save As allows you to save a file with a different name, to a different location or as a different file type. Save As saves a copy of the open file, leaving the original file intact.
Note: if you are saving the file into a new folder you can keep the same name. However, if there is an existing file in the folder with the same name this isn’t a good idea as it will replace the original file with your file so be careful.
Save your worksheet as a PDF
Note: this doesn’t secure the PDF for password security. If this is a requirement within your organisation please contact your administrator to find out the software you should be using to do this.
If you enjoyed this post check out the related posts below.
Elevate your Excel game and become a pro with our exclusive Insider Group.
Be the first to know about new tutorials, videos, and tips for Microsoft 365 products. Join us now and claim your exclusive bonus today!