Доброго времени суток друзья. Я уже рассказывал, как можно работать с Microsoft Excel средствами PowerShell. В данной статье мы рассмотрим работу
PowerShell
с
Microsoft Word
. Как и для Excel, чтобы получить доступ к MS Word нужно использовать COM объект. Для этого используем командлет
New-Object
с параметром
–ComObject
далее сам объект к которому хотим получить доступ, в нашем случае это
Word.Application
.
    #Создаем новый объект WORD
    $word = New-Object -ComObject Word.Application
После создания объекта обращаемся к свойству
Visible
и переключаем его в
TRUE
чтобы видеть работу скрипта непосредственно в самом
MS Word
а не в фоновом режиме.
    #Видимый режим вставки, по умолчанию FALSE
    $word.Visible = $True
Далее необходимо создать сам документ для этого обращаемся к свойству
Documents
и его методу
Add()
.
    #Создаем новый документ
    $doc = $word.Documents.Add()
Обратимся к свойству
Selection
для работы с текущим документом, далее мы будем использовать его для форматирования нашего документа.
    #Выбираем открывшийся документ для работы
    $Selection = $word.Selection
Задаем начальные настройки для документа допустим отступы со всех сторон.
    #Устанавливаем отступы для документа
    $Selection.Pagesetup.TopMargin = 50
    $Selection.Pagesetup.LeftMargin = 50
    $Selection.Pagesetup.RightMargin = 50
    $Selection.Pagesetup.BottomMargin = 50
Установим строчный интервал сверху и снизу.
    #Интервал отступов сверху и снизу
    $Selection.ParagraphFormat.SpaceBefore = 0
    $Selection.ParagraphFormat.SpaceAfter = 0
Подготовительные работы закончены, теперь можем заполнять наш документ. Укажем что наш первый абзац будет по центру для этого воспользуемся свойством ParagraphFormat и его свойством
Aligment
.
    #Выравнивание по центру
    $Selection.ParagraphFormat.Alignment = 1
Далее создаем таблицу с одной строкой и одной ячейкой которую зальем черным цветом и разместим пользовательскую картинку.
    #Добавляем таблицу
    $Table = $Word.ActiveDocument.Tables.Add($Word.Selection.Range, 1, 1)

    #Устанавливаем черный цвет заливки ячейки
    $Table.Cell(1,1).Shading.BackgroundPatternColor = 0

    #Вставляем картинку в ячейку таблицы
    $Table.Cell(1,1).Range.InlineShapes.AddPicture("D:Tempbezramok-tlt.png")

    #Конец таблицы, начать новую строку
    $Selection.EndKey(6, 0)
Далее переходим на новую строчку документа воспользовавшись методом
TypeParagraph()
.
    #Новый параграф
    $Selection.TypeParagraph()
Далее установим нужные настройки для нашего заголовка.
    #Шрифт написания
    $Selection.Font.Name = "Times New Roman"

    #Размер шрифта
    $Selection.Font.Size = 18
Как видно из примера мы установили шрифт
Time New Roman
и размер шрифта
18
, далее вставляем текст.
    #Текст заголовка
    $Selection.TypeText("Работаем с Microsoft Word при помощи PowerShell")
Для следующего текста поменяем настройки шрифта и размер и вид, а также выровняем текст по ширине документа.
    #Выравнивание по ширине листа
    $Selection.ParagraphFormat.Alignment = 3

    #Устанавливаем новые значения размера шрифта
    $Selection.Font.Name = "Arial"
    $Selection.Font.Size = 12

    #Пишем курсивом
    $Selection.Font.Italic = $true
Далее добавляем новый текст в наш документ.
    #Добавляем следующий текст
    $Selection.TypeText("Windows PowerShell — расширяемое средство автоматизации от Microsoft с открытым исходным кодом")
Так как для следующего текста нам не нужен курсив, то отключаем его.
    #отключаем курсив
    $Selection.Font.Italic = $false
Далее создаем настройки для следующего текста, выправным его по центру и изменим цвет на темно-зеленый, а также выделим жирным.
    #Вставляем заголовок по центру
    $Selection.ParagraphFormat.Alignment = 1

    #Устанавливаем новые значения размера шрифта
    $Selection.Font.Name = "Arial"
    $Selection.Font.Size = 18

    #Делаем цвет текста темно-зеленым
    $Selection.Font.Color = "wdColorDarkGreen"

    #Выделяем жирным
    $Selection.Font.Bold = $True

    #Следующий текст в нашем документе
    $Selection.TypeText("Добавляем картинку из файла ")
Далее вставляем картинку в документ по центру, для этого используем свойство
InlineShapes
и его метод
AddPicture()
передав путь до картинки.
    #Вставляем картинку из файла
    $Selection.InlineShapes.AddPicture("D:Tempword.jpg")
Далее отменяем центрирование и меняем цвет текста на черный.
    #Делаем цвет текста черным
    $Selection.Font.Color = 0

    #Отменяем жирный
    $Selection.Font.Bold = $False
Устанавливаем новые настройки для следующего текста.
    #Настройки размера шрифта для нового текста
    $Selection.Font.Name="Times New Roman"
    $Selection.Font.Size=12
Далее создадим таблицу с тремя столбцами в которую заполним с помощью
PowerShell
.
    #Добавляем таблицу
    $Table = $Word.ActiveDocument.Tables.Add($Word.Selection.Range, 1, 3)

    #Ручной вариант форматирования таблицы
    # $Table.Range.Style = "Table Grid"
    # $Table.Borders.InsideLineStyle = 1
    # $Table.Borders.OutsideLineStyle = 1

    #Заполняем шапку таблицы
    $Table.Cell(1,1).Range.Text = "№"
    $Table.Cell(1,2).Range.Text = "Name"
    $Table.Cell(1,3).Range.Text = "DysplayName"

    #Счетчики для генерации таблицы
    $i = 2
    $counter = 1

    #Получаем список всех процессов на компьютере
    $srv = Get-Service a*

    #Записываем полученые данные в ячейки таблицы
    foreach ($arr in $srv)
    {
    $Table.Rows.Add()
    $Table.Cell($i,1).Range.Text = $counter
    $Table.Cell($i,2).Range.Text = $arr.Name
    $Table.Cell($i,3).Range.Text = $arr.DisplayName


    #инкрементируем счетчики
    $i = $i + 1
    $counter = $counter + 1
    }

    #Автоформатирование таблицы
    $Table.AutoFormat(20)

    #Конец таблицы, начать новую строку
    $Selection.EndKey(6, 0)
Здесь нужно отметить, что ячейки таблицы начинаются с
1
. Для генерации новой строки нужно использовать свойство Rows и его метод
Add()
. Для удобства форматирования таблицы используем метод
AutoFormat()
передав число (это идентификатор шаблона форматирования таблицы). Для перехода от таблицы к обычному документу используем метод
EndKey(6, 0)
.
Далее создаем настройки для нового текста, выровняем все по левому краю и добавим гиперссылок в наш документ.
    #Вставляем заголовок по центру
    $Selection.paragraphFormat.Alignment = 0

    #Размер шрифта
    $Selection.Font.Size=14

    #Текст
    $Selection.TypeText("Урок создал")

    #Новый параграф
    $Selection.TypeParagraph()

    #Размер шрифта
    $Selection.Font.Size=12

    #Гиперссылка сайта
    $Selection.Hyperlinks.Add($Selection.Range,"http:#bezramok-tlt.ru")

    #Новый параграф
    $Selection.TypeParagraph()

    #Гиперссылка почты
    $Selection.Hyperlinks.Add($Selection.Range,"mailto:bezramok-tlt@mail.ru")

    #Новый параграф
    $Selection.TypeParagraph()

    #Текст
    $Selection.TypeText("Админ")

    #Новый параграф
    $Selection.TypeParagraph()

    #Размер шрифта
    $Selection.Font.Size=10

    #Текст
    $Selection.TypeText("Дата: " + $date)
Как вы заметили мы использовали свойство
Hyperlinks
и его метод
Add()
в который передали
URL
для гиперссылки.
Далее сохраняем документ (СохранитьКак) указываем путь куда будем сохранять наш файл, закрываем сам документ, закрываем само приложение MS Word.
    #СохранитьКак указываем путь куда и имя файла
    $doc.SaveAs([ref]"D:tempPsWord.docx")

    #Закрываем документ
    $doc.Close()

    #Закрываем приложение
    $word.Quit()
Я постарался собрать на мой взгляд основные действия для заполнения документа – это форматирование текста, изменение размера текста, шрифта, цвета. Создание таблиц, заполнение таблицы графически и текстовым материалом, а также заливка ячейки цветом.
Вот таким способом можно создавать документы
MS Word
с помощью
PowerShell
.
Скрипт PowerShell работа с MS Word целиком
    #Получаем текущую дату
    $date = Get-Date

    #Создаем новый объект WORD
    $word = New-Object -ComObject Word.Application

    #Видимый режим вставки, по умолчанию FALSE
    $word.Visible = $True

    #Создаем новый документ
    $doc = $word.Documents.Add()

    #Выбираем открывшийся документ для работы
    $Selection = $word.Selection

    #Устанавливаем отступы для документа
    $Selection.Pagesetup.TopMargin = 50
    $Selection.Pagesetup.LeftMargin = 50
    $Selection.Pagesetup.RightMargin = 50
    $Selection.Pagesetup.BottomMargin = 50


    #Интервал отступов сверху и снизу
    $Selection.ParagraphFormat.SpaceBefore = 0
    $Selection.ParagraphFormat.SpaceAfter = 0


    #Выравнивание по центру
    $Selection.ParagraphFormat.Alignment = 1

    #Добавляем таблицу
    $Table = $Word.ActiveDocument.Tables.Add($Word.Selection.Range, 1, 1)

    #Устанавливаем черный цвет заливки ячейки
    $Table.Cell(1,1).Shading.BackgroundPatternColor = 0

    #Вставляем картинку в ячейку таблицы
    $Table.Cell(1,1).Range.InlineShapes.AddPicture("D:Tempbezramok-tlt.png")


    #Конец таблицы, начать новую строку
    $Selection.EndKey(6, 0)

    #Новый параграф
    $Selection.TypeParagraph()

    #Шрифт написания
    $Selection.Font.Name = "Times New Roman"

    #Размер шрифта
    $Selection.Font.Size = 18

    #Текст заголовка
    $Selection.TypeText("Работаем с Microsoft Word при помощи PowerShell")

    #Переходим на новую строку
    $Selection.TypeParagraph()

    #Выравнивание по ширине листа
    $Selection.ParagraphFormat.Alignment = 3

    #Устанавливаем новые значения размера шрифта
    $Selection.Font.Name = "Arial"
    $Selection.Font.Size = 12

    #Пишем курсивом
    $Selection.Font.Italic = $true

    #Добавляем следующий текст
    $Selection.TypeText("Windows PowerShell — расширяемое средство автоматизации от Microsoft с открытым исходным кодом")

    #отключаем курсив
    $Selection.Font.Italic = $false

    #Новый параграф
    $Selection.TypeParagraph()

    #Новый параграф
    $Selection.TypeParagraph()

    #Вставляем заголовок по центру
    $Selection.ParagraphFormat.Alignment = 1

    #Устанавливаем новые значения размера шрифта
    $Selection.Font.Name = "Arial"
    $Selection.Font.Size = 18

    #Делаем цвет текста темно-зеленым
    $Selection.Font.Color = "wdColorDarkGreen"

    #Выделяем жирным
    $Selection.Font.Bold = $True

    #Следующий текст в нашем документе
    $Selection.TypeText("Добавляем картинку из файла ")

    #Вставляем картинку из файла
    $Selection.InlineShapes.AddPicture("D:Tempword.jpg")

    #Делаем цвет текста черным
    $Selection.Font.Color = 0

    #Отменяем жирный
    $Selection.Font.Bold = $False

    #Новый параграф двойной отступ
    $Selection.TypeParagraph()
    $Selection.TypeParagraph()

    #Настройки размера шрифта для нового текста
    $Selection.Font.Name = "Times New Roman"
    $Selection.Font.Size = 14

    $Selection.TypeText("Создание таблицы в Microsoft Word средствами PowerShell")

    #Новый параграф
    $Selection.TypeParagraph()

    #Новый параграф
    $Selection.TypeParagraph()

    #Настройки размера шрифта для нового текста
    $Selection.Font.Name="Times New Roman"
    $Selection.Font.Size=12

    #Добавляем таблицу
    $Table = $Word.ActiveDocument.Tables.Add($Word.Selection.Range, 1, 3)

    #Ручной вариант форматирования таблицы
    # $Table.Range.Style = "Table Grid"
    # $Table.Borders.InsideLineStyle = 1
    # $Table.Borders.OutsideLineStyle = 1

    #Заполняем шапку таблицы
    $Table.Cell(1,1).Range.Text = "№"
    $Table.Cell(1,2).Range.Text = "Name"
    $Table.Cell(1,3).Range.Text = "DysplayName"

    #Счетчики для генерации таблицы
    $i = 2
    $counter = 1

    #Получаем список всех процессов на компьютере
    $srv = Get-Service a*

    #Записываем полученые данные в ячейки таблицы
    foreach ($arr in $srv)
    {
    $Table.Rows.Add()
    $Table.Cell($i,1).Range.Text = $counter
    $Table.Cell($i,2).Range.Text = $arr.Name
    $Table.Cell($i,3).Range.Text = $arr.DisplayName


    #инкрементируем счетчики
    $i = $i + 1
    $counter = $counter + 1
    }

    #Автоформатирование таблицы
    $Table.AutoFormat(20)

    #Конец таблицы, начать новую строку
    $Selection.EndKey(6, 0)

    #Новый параграф
    $Selection.TypeParagraph()

    #Вставляем заголовок по центру
    $Selection.paragraphFormat.Alignment = 0

    #Размер шрифта
    $Selection.Font.Size=14

    #Текст
    $Selection.TypeText("Урок создал")

    #Новый параграф
    $Selection.TypeParagraph()

    #Размер шрифта
    $Selection.Font.Size=12

    #Гиперссылка сайта
    $Selection.Hyperlinks.Add($Selection.Range,"http:#bezramok-tlt.ru")

    #Новый параграф
    $Selection.TypeParagraph()

    #Гиперссылка почты
    $Selection.Hyperlinks.Add($Selection.Range,"mailto:bezramok-tlt@mail.ru")

    #Новый параграф
    $Selection.TypeParagraph()

    #Текст
    $Selection.TypeText("Админ")

    #Новый параграф
    $Selection.TypeParagraph()

    #Размер шрифта
    $Selection.Font.Size=10

    #Текст
    $Selection.TypeText("Дата: " + $date)

    #Новый параграф
    $Selection.TypeParagraph()

    #СохранитьКак указываем путь куда и имя файла
    $doc.SaveAs([ref]"D:tempPsWord.docx")

    #Закрываем документ
    $doc.Close()

    #Закрываем приложение
    $word.Quit()
This first article will dip our toes into creating the Word Com object, looking at sending text to Word and adjusting some of the various fonts and styles to give you a stepping stone on what you can do. I will be using Word 2013 in this article, so your mileage may vary if using older versions.
Creating the Word Object
Like any COM object, we must use New-Object with the –ComObject parameter to tell PowerShell that we are loading up a Com object.
$Word = New-Object -ComObject Word.Application
Now I have created my object as shown in the image below.
One thing that you might note is that we can’t see Word opened up, even though the process is actually active.
To make Word visible, we have to set the Visibility of the object to $True.
$Word.Visible = $True
Now you should see that Word is visible. But we don’t actually have a document loaded yet to start writing. We need to fix that first. We do this by calling the Documents.Add() method. I am keeping the output of this saved to another variable that will be used later on. I then want to select the current pane in Word so I can begin writing data to it.
$Document = $Word.Documents.Add()
$Selection = $Word.Selection
Writing to Word
Writing to word is as simple as calling TypeText() and supplying a parameter which is text.
$Selection.TypeText("Hello")
Ok, nothing really mind blowing here, but this is how we can write in word using PowerShell. If I attempt to do this again, it will not actually start on the next line but append to the existing line.
We work around this by calling TypeParagraph().
$Selection.TypeParagraph()
$Selection.TypeText("Hello1")
$Selection.TypeParagraph()
$Selection.TypeParagraph()
$Selection.TypeText("Hello2")
$Selection.TypeParagraph()
$Selection.TypeParagraph()
$Selection.TypeText("Hello3")
$Selection.TypeParagraph()
Working with Styles
So lets start with a fresh slate (actually I am just going to delete all of the words here instead of rebuilding the object) and look at some of the Styles that we can use.
First off, we should see what kind of styles are available to use.
[Enum]::GetNames([Microsoft.Office.Interop.Word.WdBuiltinStyle]) | ForEach {
    [pscustomobject]@{Style=$_}
} | Format-Wide -Property Style -Column 4
This is just one of the possible options to set a style that also includes using an integer or a string value that matches the names of what you would see in the toolbar for styles.
Whatever approach you are comfortable with will be just fine. Just make sure if it the setting isn’t that readable (such as using an integer) that you comment what the style is supposed to be for whoever might be looking at the code later on.
Moving on from that, we will set a couple of styles to show off what we can do. I think we at least need a Title and perhaps some sort of Header to show off what we are doing.
$Selection.Style = 'Title'
$Selection.TypeText("Hello")
$Selection.TypeParagraph()
$Selection.Style = 'Heading 1'
$Selection.TypeText("Report compiled at $(Get-Date).")
$Selection.TypeParagraph()
Feel free to explore and find some styles that will work with what you are trying to do!
Exploring Fonts
The last item that I will cover today is working with Fonts such as changing the color and going with Bold or Italics.
We can locate the fonts using $Selection.Font
$Selection.Font
Ok, there is obviously a lot of stuff available here that we can manipulate, but I just focus on the basics. Notice that the Bold and Italic are specified by an integer. Currently, a 0 means that this is turned off. If we want to turn it on, we specify something other than a 0, such as a 1.
$Selection.Font.Bold = 1
$Selection.TypeText('This is Bold')
$Selection.Font.Bold = 0
$Selection.TypeParagraph()
$Selection.Font.Italic = 1
$Selection.TypeText('This is Italic')
Lastly, we will check out adjusting the colors of the text in word and we can find out the available colors using the following code:
[Enum]::GetNames([Microsoft.Office.Interop.Word.WdColor]) | ForEach {
    [pscustomobject]@{Color=$_}
} | Format-Wide -Property Color -Column 4
Now we can write some code to take a look at some of these colors.
[Enum]::GetNames([Microsoft.Office.Interop.Word.WdColor]) | ForEach {
    $Selection.Font.Color = $_
    $Selection.TypeText("This is $($_)")
    $Selection.TypeParagraph()
}
$Selection.Font.Color = 'wdColorBlack'
$Selection.TypeText('This is back to normal')
Actually, I decided to just go through all of the colors so we can see each and every one!
One last thing! It may be a good idea to save our good work so we can view it later, right? So with that we can use the following code to save the document. We do this using the SaveAs method in the $Document object that we had created earlier. Aren’t you glad we saved that output earlier?
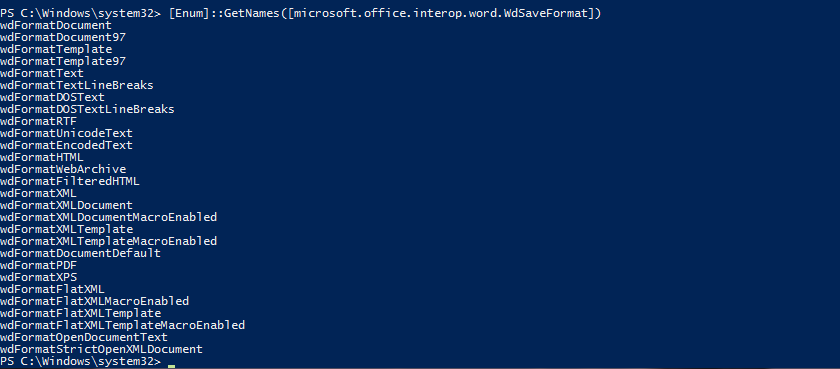
We do need to specify a reference variable which is the path and name of the file as well as a second parameter specifying the save format of the document. as…you guest it…another reference variable! We can find the possible format types using this code.
[Enum]::GetNames([microsoft.office.interop.word.WdSaveFormat])
And now I can save this document using the following code:
$Report = 'C:UsersproxbDesktopADocument.doc'
$Document.SaveAs([ref]$Report,[ref]$SaveFormat::wdFormatDocument)
$word.Quit()
I am calling the Quit() method to actually quit the application. Unfortunately, this doesn’t actually mean that the memory used to create this object has been freed up. Com objects play a little differently than .Net objects that we create. So with that in mind, I am going to do the following to free up that memory:
$null = [System.Runtime.InteropServices.Marshal]::ReleaseComObject([System.__ComObject]$word)
[gc]::Collect()
[gc]::WaitForPendingFinalizers()
Remove-Variable word
There you go! That was a little dip into the pool of PowerShell and Word to get you going on building out something cool!
Иногда приходится создавать с помощью PowerShell различные документы (отчеты по серверам, выборки из логов и пр. подобная информация). Обычно данные сохраняются в виде обычного текстового файла, либо конвертируются в HTML. Но если у вас на компьютере установлен MS Office, то данные можно сохранять в виде документа Word. Итак, предположим, что нам необходимо создать новый документ и добавить в него текст.
Первым делом запускаем Word:
$Word = New-Object -ComObject Word.Application
Приложение запущено, но оно работает в фоновом режиме и остается невидимым для пользователя. В принципе, для создания документа это не обязательно, но если вы хотите видеть результат, то надо сделать его видимым. Для этого необходимо изменить свойство Visible:
$Word.Visible = $true
Cоздаем новый документ:
$Document = $Word.Documents.Add()
Документ открыт, но перед тем, как приступить к его редактированию, необходимо выделить участок текста или весь документ:
$Selection = $Word.Selection
Теперь добавим в документ текст с помощью метода TypeText:
$Selection.TypeText(″PowerShell&Word″)
и сохраним документ в файл:
$File = C:Temppsword.doc
$Document.SaveAs([ref]$File)
Закрываем документ и выходим из Word:
$Document.Close()
$Word.Quit()
А теперь откроем созданный файл. Для этого опять запускаем Word и делаем его видимым:
$Word = New-Object -ComObject Word.Application
$Word.Visible = $true
Открываем документ:
$File = ″C:Temppsword.doc″
$Document = $Word.Document.Open($File)
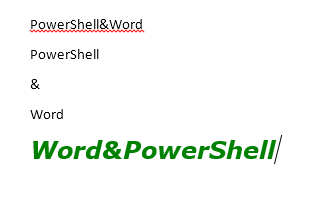
И смотрим, что получилось.
Теперь добавим еще пару строк текста. А для того, чтобы разбить текст на строки, используем метод TypeParagraph:
$Selection = $Word.Selection
$Selection.TypeParagraph()
$Selection.TypeText(″Power″)
$Selection.TypeText(″Shell″)
$Selection.TypeParagraph()
$Selection.TypeText(″&″)
$Selection.TypeParagraph()
$Selection.TypeText(″Word″)
Проверяем результат
Ну и в завершение немного украсим текст. Для этого выберем шрифт:
$Selection.Font.Name = ″Verdana″
Сделаем шрифт жирным (Bold) и наклонным (Italic):
$Selection.Font.Bold = $True
$Selection.Font.Italic = $True
Увеличим размер шрифта:
$Selection.Font.Size = 18
И изменим цвет на зеленый:
$Selection.Font.Color = ″wdColorGreen″
Добавляем текст:
$Selection.TypeText(″Word&PowerShell″)
В результате получим такую картину
Посмотреть доступные цвета можно командой:
[Enum]::GetNames([Microsoft.Office.Interop.Word.wdColor])
И еще, если необходимо сохранить документ в определенном формате (например для обеспечения совместимости) то формат можно указать явно. Вывести список доступных форматов можно командой:
[Enum]::GetNames([Microsoft.Office.Interop.Word.wdSaveFormat])
Для примера сохраним документ в формате OpenDocument:
$File = ″C:Temppsword.doc″
$Document.SaveAs([ref]$SaveFormat::wdFormatOpenDocumentText)
$Word.Quit()
На этом, пожалуй, все. Узнать больше о свойствах и методах объекта Word.Selection, использующегося для редактирования текста, можно на MSDN. Также здесь есть ряд подробных статей по данной теме.
Scripting COM Shell Objects – Launch Office Programs
I will show you how to use PowerShell’s New-Object to create Microsoft Office objects such as Word.Application or Outlook.Application. Incidentally, this PowerShell technique of replaces many of the tasks previously undertaken by VBScript’s CreateObject.
Topics for PowerShell’s New-Object -ComObject
- PowerShell’s New-Object -Com
- PowerShell Shell.Application Example
- Research Shell.Application Methods and Properties
- Summary of Com Shell Objects
♣
PowerShell’s New-Object -ComObject
All COM objects are created through the command: New-Object. There are dozens of applications that you can specify with the -ComObject parameter. For example, Excel.Application or Outlook.Application
1) Create the object (New-Object)
The first step is to create a new object and then assign it to a variable, for example:
# PowerShell Word.Application Create and Launch
Clear-host
$MsApp = New-Object -ComObject Word.Application
$MsApp.Visible = $true
Note 1: Observe how the parameter -ComObject handles the application. Incidentally, -ComObject is often abbreviated to -Com.
Note 2: You could substitute Excel for Word, however, Outlook would not work, but see example 2 for a successful technique.
1a) Closing Word
2) Starting Outlook
Using PowerShell to launch Outlook is a little more difficult than Word or Excel. Here is a method which gets the namespaces then displays the inbox.
# PowerShell Outlook.Application and GetNamespace
Clear-Host
$MsOutlook = New-Object -ComObject Outlook.Application
$Namespace = $MsOutlook.GetNamespace(«MAPI»)
$Folder = $Namespace.GetDefaultFolder(«olFolderInbox»)
$Explorer = $Folder.GetExplorer()
$Explorer.Display()
Note 3: For applications such as Outlook you could employ a completely different cmdlet and call for:
Start-Process Outlook.exe.
Guy Recommends: A Free Trial of the Network Performance Monitor (NPM) v11.5
v11.5
SolarWinds’ Network Performance Monitor will help you discover what’s happening on your network. This utility will also guide you through troubleshooting; the dashboard will indicate whether the root cause is a broken link, faulty equipment or resource overload.
What I like best is the way NPM suggests solutions to network problems. Its also has the ability to monitor the health of individual VMware virtual machines. If you are interested in troubleshooting, and creating network maps, then I recommend that you try NPM now.
Download a free trial of Solarwinds’ Network Performance Monitor
3) Working With Outlook in PowerShell
# PowerShell Retrieves Outlook Email Subject
Clear-Host
$MsOutlook = New-Object -ComObject Outlook.Application
$sentMail = $MsOutlook.Session.GetDefaultFolder(6)
$sentMail.Items | select -last 5 TaskSubject
Note 4: The script connects to Default Folder 6 which corresponds to the inbox, from there it retrieves the last 5 items which are the Subjects of the newest emails.
Other useful Outlook Const values
CONST olFolderDeletedItems = 3
CONST olFolderOutbox = 4
CONST olFolderSentMail = 5
CONST olFolderInbox = 6
CONST olFolderCalendar = 9
CONST olFolderContacts = 10
CONST olFolderJournal = 11
CONST olFolderNotes = 12
CONST olFolderTasks = 13
CONST olFolderDrafts = 16
PowerShell Script to Explore with the Windows Explorer
The idea behind a second version of opening the Windows Explorer is to give you perspective. By changing a few items, I hope that it gives you extra understanding, also more ideas for your own situation. In the example below I have introduced a variable $Drive to hold the value for the folder, which you want explorer to view. Note also how I have changed .open(«D:») to .explore(«C:windows»). For this script to work, you need to have a windows folder on your c: drive, fortunately, this is the default location for this system folder.
# ShellExplore.ps1
# Opening Explorer using PowerShell
# Author Guy Thomas https://computerperformance.co.uk/
# Version 2.5 – October 2010
# Sets the Drive
$Drive = «C:windows»
# Launches the Explorer
$ShellExp = New-Object -ComObject Shell.Application
$ShellExp.explore($Drive)
 Guy Recommends: SolarWinds Engineer’s Toolset v10
This Engineer’s Toolset v10 provides a comprehensive console of 50 utilities for troubleshooting computer problems. Guy says it helps me monitor what’s occurring on the network, and each tool teaches me more about how the underlying system operates.
There are so many good gadgets; it’s like having free rein of a sweetshop. Thankfully the utilities are displayed logically: monitoring, network discovery, diagnostic, and Cisco tools. Try the SolarWinds Engineer’s Toolset now!
Download your fully functional trial copy of the Engineer’s Toolset v10
Research Shell.Application Methods and Properties
Let us investigate the methods and properties available to our shell object with Get-Member
# PowerShell Shell.Application properties
$ShellExp = New-Object -ComObject Shell.Application
$ShellExp | Get-Member
In particular, lookout for the methods: ‘Open’ and ‘Explore’, because these are the methods that we are going to apply to our object.
®
| Name | MemberType |
| ——————- | ———- |
| AddToRecent | Method |
| BrowseForFolder | Method |
| CanStartStopService | Method |
| CascadeWindows | Method |
| ControlPanelItem | Method |
| EjectPC | Method |
| Explore | Method |
| ExplorerPolicy | Method |
| FileRun | Method |
| FindComputer | Method |
| FindFiles | Method |
| FindPrinter | Method |
| GetSetting | Method |
| GetSystemInformation | Method |
| Help | Method |
| IsRestricted | Method |
| IsServiceRunning | Method |
| MinimizeAll | Method |
| NameSpace | Method |
| Open | Method |
| RefreshMenu | Method |
| ServiceStart | Method |
| ServiceStop | Method |
| SetTime | Method |
| ShellExecute | Method |
| ShowBrowserBar | Method |
| ShutdownWindows | Method |
| Suspend | Method |
| TileHorizontally | Method |
| TileVertically | Method |
| ToggleDesktop | Method |
| TrayProperties | Method |
| UndoMinimizeALL | Method |
| Windows | Method |
| WindowsSecurity | Method |
| Application | Property |
| Parent | Property |
ComObject in PowerShell 3.0 Logon Script
The purpose of this script is to map a network drive in PowerShell. Observe how the ComObject can also act as a wrapper for the WScript.Network methods.
# PowerShell v 3 Logon Script Example
$Net = $(New-Object -ComObject WScript.Network)
$Net.MapNetworkDrive(«P:», «\YourMachineStuff»)
- See more on PowerShell 3.0 logon scripts.
- See more on New-PSDrive.
»
Summary of -ComObject and Office Applications
We have investigated how to use PowerShell’s New-Object to create Microsoft Office objects such as Excel.Application or Outlook.Application. Incidentally, this PowerShell technique of replaces many of the tasks previously undertaken by VBScript’s CreateObject.
If you like this page then please share it with your friends
See more Microsoft PowerShell tasks:
• PowerShell Home • Shell Application • New-Object • PowerShell Add Printer • PowerShell -com
• PowerShell Logon Script • Map Network Drive • PowerShell Create Shortcut • Free CSV Import Tool
• Invoke-Expression • Invoke-Command • Invoke-Item • PowerShell Expression v Command Mode
Please email me if you have a better example script. Also please report any factual mistakes, grammatical errors or broken links, I will be happy to correct the fault.
- Remove From My Forums
-
Вопрос
-
Добрый день!
Есть скрипт на powershell, который должен открыть документ Word и внести там кое-какие правки.
Система Windows 8.1, в системе установлен MS Office 2010.При выполнении строки $MSWord = New-Object -ComObject word.application
в переменной нет объекта — она пуста.Соответственно, в строчке $MSWord.documents.open($fullPath) происходит ошибка «Невозможно вызвать метод для выражения со значением NULL».
Подскажите, куда копать, что надо сделать, чтобы объект создавался?
-
Изменено
19 августа 2014 г. 8:58
-
Перемещено
Elina Lebedeva
19 августа 2014 г. 9:10
-
Изменено


 v11.5
v11.5 Guy Recommends: SolarWinds Engineer’s Toolset v10