
Excel для Microsoft 365 Word для Microsoft 365 Outlook для Microsoft 365 PowerPoint для Microsoft 365 Excel 2019 Word 2019 Outlook 2019 PowerPoint 2019 Excel 2016 Word 2016 Outlook 2016 PowerPoint 2016 Excel 2013 Word 2013 Outlook 2013 PowerPoint 2013 Excel 2010 Word 2010 Outlook 2010 PowerPoint 2010 Еще…Меньше
Если отключить функцию сжатия изображений, повысится их качество, но файлы несжатых изображений могут иметь очень большие размеры.
Примечание: Инструкции по отключению функции сжатия рисунков в Outlook различаются. Чтобы отключить сжатие для рисунков, которые вы добавили в сообщение, ознакомьтесь с приведенными ниже инструкциями по Outlook.
Отключение сжатия в Word, PowerPoint и Excel
-
Выберите пункты Файл > Параметры.
-
В диалоговом окне Параметры нажмите кнопку Дополнительно.
-
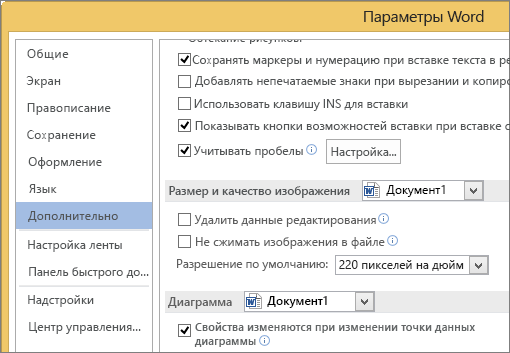
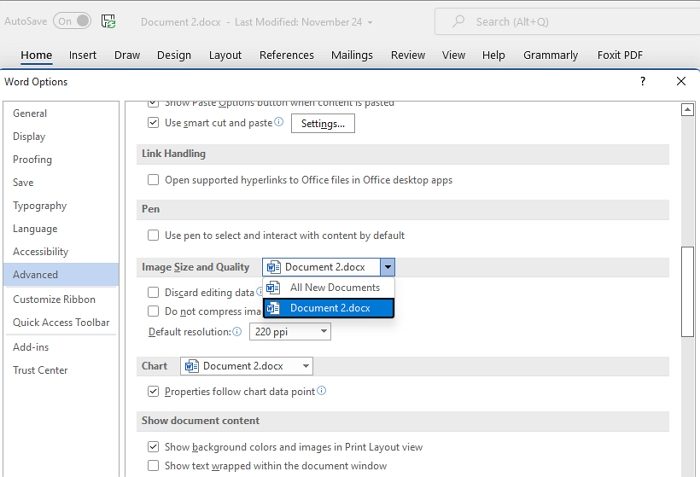
В списке в разделе Размер и качество изображения выполните одно из указанных ниже действий. (В этом примере показаны параметры в Word.)

-
Чтобы по умолчанию выбрать текущий документ, не выбирайте ничего в раскрывающемся списке.
-
Щелкните стрелку списка и выберите файл, для которого необходимо отключить сжатие рисунков.
-
Чтобы отключить функцию сжатия изображений во всех будущих документах, выберите вариант Все новые документы (этот параметр будет применен только к Word).
-
-
В разделе Размер и качество изображения установите флажок Не сжимать изображения в файле. Этот параметр применяется только к документу, который вы выбрали в списке Размер и качество изображения (если вы не выбрали вариант Все новые документы).
Сведения о том, как сжимать отдельные изображения или задавать другие варианты качества и разрешения изображения, см. в статье Уменьшение размера файла рисунка.
Отключение сжатия в Outlook
Параметр, позволяющий отключить сжатие рисунков в Outlook, доступен только после добавления рисунка в сообщение электронной почты в виде вложения.
-
В сообщении электронной почты, к которому вы присоединяете рисунок, щелкните файл > сведения.
-
В разделе вложенные рисунки в верхней части экрана выберите пункт не изменять размер изображений.
Нужна дополнительная помощь?
Many people do not want to compress the image while exporting a Word document, PowerPoint presentation or Excel spreadsheet because that might break the overall appearance of the file. If you are one of them, then you can disable image compression in Office 365 apps. No third-party app, add-on, or service is required for this job, as the feature is built-in.
What is image compression in Office 365 apps?
You can insert an image in Microsoft Word, Excel, etc. to make it a media-rich file. You cannot see the compression while adding as it happens in the background. However, if you save the file or export it in PDF or so, you can see a minor difference.
Image compression lets you decrease the image file size so that the file consumes minimal storage on your hard drive. This option is handy when you have a large document, and you do not want to create a 20 MB or 30 MB document file. However, if you want to save all the documents in original image quality, you need to turn off image compression in Word, Excel, etc.
What happens when you turn off image compression?
If you have a small document, you may not notice the difference. Nonetheless, if you have a large file with a lot of images, you can find the file size difference. In other words, Microsoft Word or other Office apps will save the data in a smaller size. For your information, this post includes Microsoft Excel (Office 365) screenshots. However, you can perform the same steps in other apps as well. Unfortunately, this functionality is not available in the web version of Word, Excel, etc.
How to Turn Off Picture Compression in Office 365 apps
To disable image compression in Office 365 apps, follow these steps-
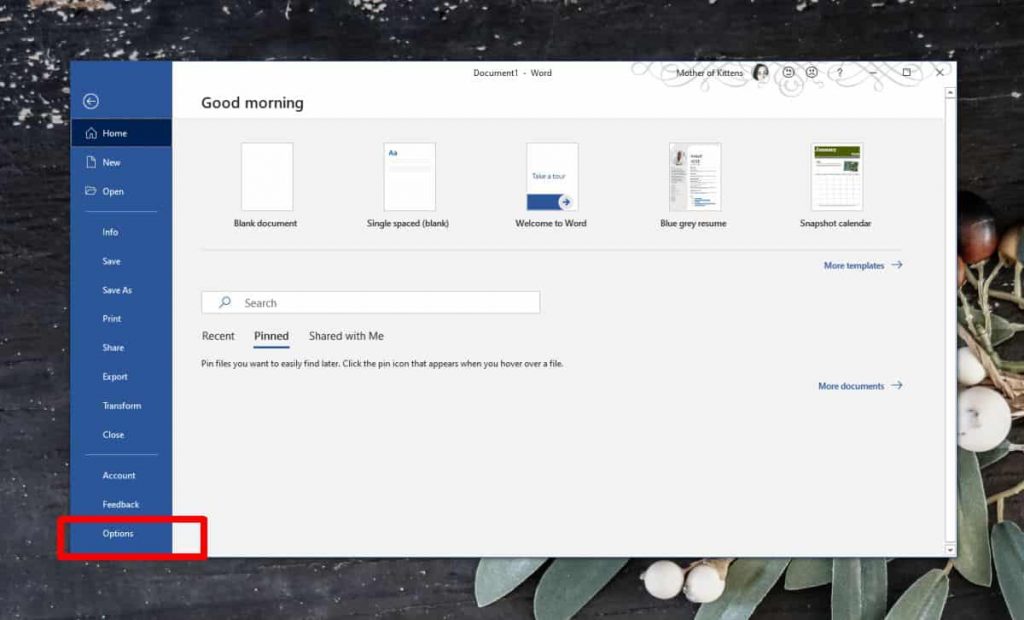
- Open an app and go to File > Options
- Go to Advanced tab
- Find Image Size and Quality label and make a tick in the Do not compress images in file checkbox
- Select High fidelity from Default resolution list
- Save your changes.
Let us see this in a bit more detail.
Open Microsoft Excel and click the File option. Here you can find a button called Options. After clicking on it, you need to switch to the Advanced section.
Now find out the Image Size and Quality label and choose the spreadsheet on which you want to apply the new settings. Following that, make a tick in the Do not compress images in file check box.

Now, you need to choose Hide fidelity from the Default resolution drop-down menu and click OK to save the changes.
Now, if you save the spreadsheet, images will not be compressed.
The same thing is possible for Word with the help of the Local Group Policy Editor and Registry Editor. However, you can enable or disable these settings in Word only when you insert inline images in Outlook. If you want to turn on or off those settings, follow the following guide.
How to disable Image Compression in Office 365 apps using Group Policy
To disable image compression in Office 365 apps using Group Policy, follow these steps:
- Press Win+R to open the Run prompt.
- Type gpedit.msc and hit the Enter button.
- Navigate to E-mail Options in User Configuration.
- Double-click on the Do not compress the inline images inserted in Outlook setting.
- Choose the Enable option.
- Click the OK button.
To learn more about these steps, continue reading.
First, you need to open the Local Group Policy Editor on your computer. For that, press Win+R to open the Run dialog, type gpedit.msc, and hit the Enter button.
Next, navigate to the following path:
User Configuration > Administrative Templates > Microsoft Word 2016 > Word Options > Advanced > E-mail Options
Here you can find a setting called Do not compress the inlined images inserted in Outlook. You need to double-click on it and select the Enabled option.

Click the OK button to save the change.
Note: It is also possible to set the quality of the compression. For that, you need to open the Specify default quality of compression done on inlined images inserted in Outlook setting, choose the Enabled option, and select the High Fidelity option.
How to disable Image Compression in Office 365 apps using Registry
To disable image compression in Office 365 apps using Registry Editor, follow these steps:
- Press Win+R > type regedit > press the Enter button.
- Click the Yes button.
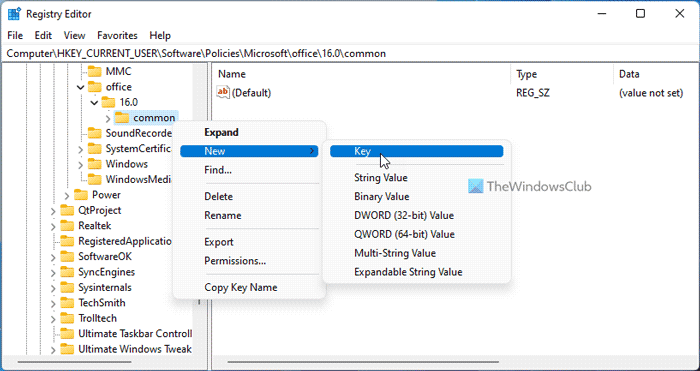
- Navigate to Microsoftoffice16.0 in HKCU.
- Right-click on 0 > New > Keyand name it as common.
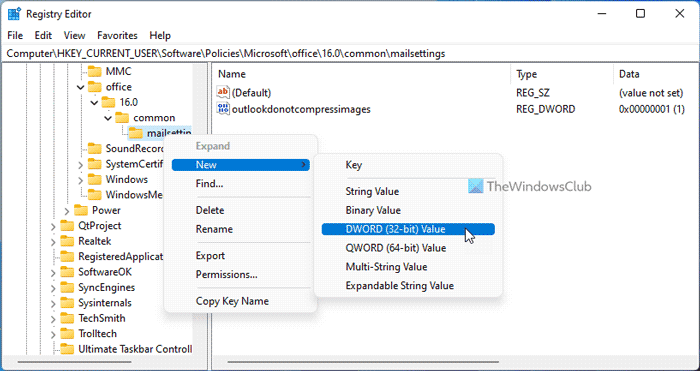
- Right-click on common > New > Keyand set the name as mailsettings.
- Right-click on mailsettings > New > DWORD (32-bit) Value.
- Name it as outlookdonotcompressimages.
- Double-click on it to set the Value data as 1.
- Click the OK button.
- Restart your computer.
Let’s check out these steps in detail to learn more.
To get started, press Win+R > type regedit > press the Enter button, and click on the Yes option to open the Registry Editor on your computer.
Then, you need to go to the following path:
HKEY_CURRENT_USERSoftwarePoliciesMicrosoftoffice16.0
Right-click on 16.0 > New > Key and name it as common. Then, right-click on common > New > Key and set the name as mailsettings.
Then, you need to create a REG_DWORD value. For that, right-click on mailsettings > New > DWORD (32-bit) Value and set the name as outlookdonotcompressimages.
By default, it comes with a value data of 0. However, you need to double-click on it and set the Value data as 1.

Finally, click the OK button and restart your computer.
Note: If you want to set the quality of the compression to the High Fidelity, you need to create another REG_DWORD value named oulookimagedpiindex and keep the Value data as 0. Again, you need to restart your computer to get the change.
Related: Preserve image quality when saving in Word, Excel, PowerPoint
Why does Outlook reduce image quality?
Outlook reduces the image quality to save the memory and bandwidth. If you insert high-resolution images, it will take more time to upload them to the server and send it to the recipient. However, if you use a low-resolution image or allow Outlook to compress the image, it won’t take much time to send an email with some images.
Download PC Repair Tool to quickly find & fix Windows errors automatically
When preparing a document, it is essential to have high-quality images. It not only makes sure that others can read it clearly, but also leaves an impression. However, if you notice, every time you add an image, the quality changes. It looks blurred, the text in the picture doesn’t look sharp, etc. This post will show how you can fix the loss of image quality after you save it in Word, Excel, and PowerPoint.

As more and more media is added to documents, the size increases. That’s why the Office applications compress the image to reduce the overall size. However, if you have enough bandwidth and are ok with the large-size document, disable the option.
- Open a Word or Excel, or PowerPoint document
- Click on File > Options
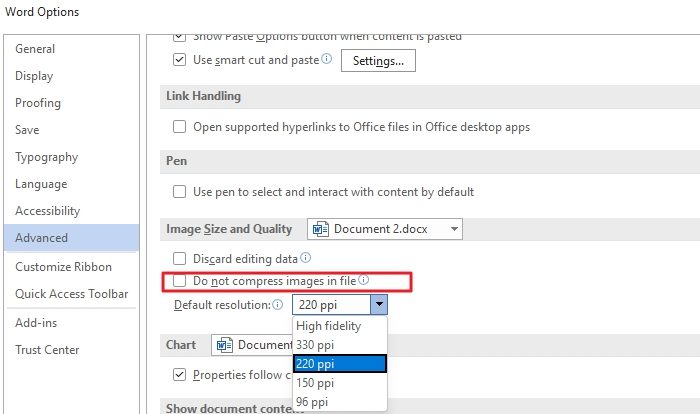
- Click on Advanced and then find the Image Size and Quality settings.
- Here you can configure the following
- Discard Editing Data
- Do not compress images in a file
- Default resolution
While you can check the second box, the office application will not compress any image. Here are more details on the rest:
- Discard Editing Data: Delete data used to restore edited pictures to their original state.
- Default Resolution: Using a resolution other than high fidelity will result in loss of quality. It reduces pixels which result in blurry images.
There is another option that you can select. You can apply for that particular document or apply it for all the documents for each of these options. Next to Image Size and Quality, the current document is listed. You can change it to All New Document if you click on it. Post this no document will compress the image.
You will have to configure this individually for all Office applications.
How do you save an image in a high-resolution Office document?
First, ensure the image you add to the document is of the best quality. Second Go to File > Options > Advanced Image Size and Quality settings. Uncheck the compression option, and then set the default resolution to high fidelity. This setting will ensure the best quality or the original image quality in the document.
Related: How to disable Image Compression in Office 365 apps
How do you fix a blurry picture in Microsoft Office?
You can achieve this using the Pictures tool. Select the Picture in the document and select Compress pictures under the Picture format. You can either choose to keep the original quality or select high fidelity.
How do you sharpen a picture in Microsoft Office?
You can achieve this using the Picture tool. Select the image, and then switch the picture format section. Then click on Correction, and then you can change Sharpen/Soften option. Preview the image, and save it. You can use the Reset Picture option to undo all the changes.

Ashish holds a Bachelor’s in Computer Engineering and is a veteran Windows and Xbox user. He has work experience as a Database and Microsoft.NET Developer. He has been a Microsoft MVP (2008-2010) and excels in writing tutorials to improve the day-to-day experience with your devices.
Office 365 имеет одно приложение для публикации. Другие приложения в пакете повышения производительности предназначены для создания документов, электронных таблиц, презентаций и т.д. Которые будут просматриваться на обычных экранах и распечатываться для обычного использования. Эти файлы, скорее всего, будут использоваться совместно, поэтому вполне естественно, что используемые в них изображения будут сжаты, чтобы размер файла не был слишком большим.
Конечный результат дает вам изображения, которые визуально прекрасны и не слишком велики. Чтобы делиться ими или отправлять по электронной почте. Тем не менее, вы можете отключить сжатие изображений в Office 365, если вам нужно использовать изображения высокого качества в файле.
Сжатие изображения можно отключить для каждого файла или для всех файлов. Если вы решите отключить его для всех файлов, вам все равно придется отключить его для каждого приложения. Например если вы отключите сжатие изображений для всех документов Word. Оно все равно будет включено для всех листов Excel. Вы должны отключить его отдельно в Excel.
Отключить сжатие изображений в Office 365
Гайд в разделе MS Офис Как отключить сжатие изображений в Office 365 содержит информацию, советы и подсказки, которые помогут изучить самые важные моменты и тонкости вопроса….
Поскольку сжатие изображений применяется отдельно для каждого файла, откройте файл, который вы хотите отключить. Перейдите в FileOptions.
Выберите вкладку «Дополнительно». Прокрутите вниз до раздела «Размер и качество изображения». Именно здесь вам нужно решить, хотите ли вы отключить сжатие изображений только для текущего файла или для всех файлов, которые вы создадите в будущем.
Если вы хотите отключить сжатие только для текущего файла, проверьте Параметр «Не сжимать изображения в файл». Вы также можете открыть раскрывающийся список под этой опцией и выбрать уровень сжатия. Это позволит вам иметь более качественные изображения в файле, но при этом по-прежнему будет контролировать размер документа.
|
Не сжимаются изображения в файле эксель |
||||||||
Ответить |
||||||||
Ответить |
||||||||
Ответить |
||||||||
Ответить |
||||||||
Ответить |
||||||||
Ответить |
||||||||
Ответить |
||||||||
Ответить |
||||||||
Ответить |


