
Форматирование текста в ячейке при помощи кода VBA Excel. Объект Font и его основные свойства. Примеры изменения начертания строк в заданном диапазоне.
В этой статье рассмотрены свойства шрифта (объекта Font), определяющие внешнее оформление (начертание) видимого значения ячейки. Это касается не только текста (строк), но и визуального начертания отображаемых дат и числовых значений.
Формат отображаемого значения
Когда мы из кода VBA Excel записываем в ячейку текстовое или другое значение, оно отображается в формате, присвоенном данной ячейке. Это может быть формат:
- рабочего листа по умолчанию;
- установленный для диапазона пользователем;
- примененный к диапазону из кода VBA Excel.
Если ячейка содержит текстовое значение, его начертание можно форматировать по отдельным частям (подстрокам). Такое форматирование доступно как в ручном режиме на рабочем листе, так и из кода VBA Excel.
У объекта Range есть свойство Font (шрифт), которое отвечает за форматирование (начертание) визуально отображаемого текста в ячейках рабочего листа. Его применение вызывает объект Font, который в свою очередь обладает собственным набором свойств, отвечающих за конкретный стиль начертания отображаемого значения.
| Свойство | Описание | Значения |
|---|---|---|
| Name | наименование шрифта | «Arial», «Calibri», «Courier New», «Times New Roman» и т.д. |
| Size | размер шрифта | от 1 до 409 пунктов |
| Bold | полужирное начертание | True, False |
| Italic | курсивное начертание | True, False |
| FontStyle | заменяет Bold и Italic | «обычный», «полужирный», «курсив», «полужирный курсив» |
| Superscript | надстрочный текст | True, False |
| Subscript | подстрочный текст | True, False |
| Underline | подчеркнутый текст | True, False |
| Color* | цвет текста | от 0 до 16777215 |
*Color — это не единственное свойство, отвечающее за цвет отображаемого текста в ячейке. Оно также может принимать и другие значения, кроме указанных в таблице. Смотрите подробности в статьях Цвет текста (шрифта) в ячейке и Цвет ячейки (заливка, фон).
Примеры форматирования текста
Пример 1
В этом примере ячейкам диапазона «A1:A3» присвоим шрифты разных наименований:
|
Sub Primer1() Range(«A1»).Font.Name = «Courier» Range(«A1») = «Шрифт «Courier»» Range(«A2»).Font.Name = «Verdana» Range(«A2») = «Шрифт «Verdana»» Range(«A3»).Font.Name = «Times New Roman» Range(«A3») = «Шрифт «Times New Roman»» End Sub |
Пример 2
В этом примере рассмотрим применение одного свойства объекта Font к одной ячейке:
|
Sub Primer2() Range(«A5»).Font.Bold = True Range(«A5») = «Полужирное начертание» Range(«A6»).Font.FontStyle = «полужирный курсив» Range(«A6») = «Полужирный курсив» Range(«A7»).Font.Superscript = True Range(«A7») = «Надстрочное начертание» End Sub |
Пример 3
Форматирование диапазона из нескольких ячеек:
|
Sub Primer3() With Range(«A9:C11») .Value = «Форматируем диапазон» .Font.Underline = True .Font.Color = 75962 End With End Sub |
Пример 4
Пример форматирования шрифта в разных ячейках по одному свойству:
|
1 2 3 4 5 6 7 8 9 10 11 12 13 14 15 16 17 18 19 20 21 22 |
Sub Primer4() Cells(1, 1) = «Свойство шрифта Bold = True» Cells(1, 1).Font.Bold = True Cells(2, 1) = «Свойство шрифта Color = xlGreen» Cells(2, 1).Font.Color = xlGreen Cells(3, 1) = «Свойство шрифта ColorIndex = 32» Cells(3, 1).Font.ColorIndex = 32 Cells(4, 1) = «Свойство шрифта FontStyle = ««Bold Italic»«» Cells(4, 1).Font.FontStyle = «Bold Italic» Cells(5, 1) = «Свойство шрифта Italic = True» Cells(5, 1).Font.Italic = True Cells(6, 1) = «Свойство шрифта Name = ««Courier New»«» Cells(6, 1).Font.Name = «Courier New» Cells(7, 1) = «Свойство шрифта Size = 14» Cells(7, 1).Font.Size = 14 Cells(8, 1) = «Свойство шрифта Subscript = True» Cells(8, 1).Font.Subscript = True Cells(9, 1) = «Свойство шрифта Superscript = True» Cells(9, 1).Font.Superscript = True Cells(10, 1) = «Свойство шрифта Underline = True» Cells(10, 1).Font.Underline = True End Sub |
Written by Puneet for Excel 2007, Excel 2010, Excel 2013, Excel 2016, Excel 2019, Excel for Mac
Key Notes
- To make changes in a font, you need to use the VBA Font object.
- There is a total of 18 properties with the font object that you can access and make changes.
VBA Font Object
In VBA, there is a font object which you can use to change properties of the font from a cell, like, font color, font size, font type, and you can also apply bold and italic to the font.
Syntax
expression.fontTo use it, first, you need to define the cell address, which you can specify in the following ways.
Selection.Font
Range("A1").Font
Cells(1, 1).Font
Range("A1:A5").Font
To change the color of the font, you have two different ways:
1. Using Color Constants
Excel has a few color constants that you can use to apply color to the font. For example, if you want to apply the red color to the font in cell A1, the code would be like the below:
Range("A1").Font.Color = vbRed
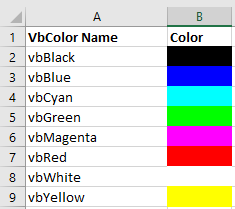
In the above code, after the font object, color is the property and you have used the vbRed constant that tells VBA to apply the red color to the cell A1. There is a total of eight constants that you can use:
- vbBlack: Black
- vbRed: Red
- vbGreen: Green
- vbYellow: Yellow
- vbBlue: Blue
- vbMagenta: Magenta
- vbCyan: Cyan
- vbWhite: White
2. Using RGB
You can also use the RGB color code to apply color to the font. RGB is the combination of red, green, and blue colors, where you can create a custom color using the code. Let’s say if you want to apply a combination of green and blue color to cell A1 the code would be:
Range("A1").Font.Color = RGB(0, 255, 255)
VBA Font Size
Font object also gives you access to the size property of the font. Let’s say you want to apply the font size of 16 to the font in the cell A1, the code would be:
Range("A1").Font.Size = 16
If you want to apply font size to all cells in a worksheet you can use the following code:
Cells.Font.Size = 16And if only want to apply font size to cells where you have data, the code would be:
ActiveSheet.UsedRange.Font.Size = 16Or to the selected cell.
Selection.Font.Size = 16VBA Font Name
In the same way, you can also change the font name using the name property of the font object. Let’s say you want to apply the “Consolas” font the cell A1. The code would be:
Range("A1").Font.Name = "Consolas"
While using this property, you need to type the correct name of the font that you want to apply, and if somehow the name is incorrect, it won’t show you an error.
VBA Font Bold, Italic, and Underline
There are also properties that you can use to make the font bold, italic, and underline. Below are the codes that you need to write for this.
Range("A1").Font.Bold = True
Range("A1").Font.Italic = True
Range("A1").Font.Underline = True
With these properties, you need to define TRUE or FALSE. So if the font is already bold or italic and you want to remove it, then you need to use FALSE to remove them.
Other Useful Font Properties
Here add a few more properties that can be useful for you (Strikethrough, Subscript, and Superscript).
Range("A1").Font.Strikethrough = True
Range("A1").Font.Subscript = True
Range("A1").Font.Superscript = True
More Tutorials
- Count Rows using VBA in Excel
- Excel VBA Hide and Unhide a Column or a Row
- Excel VBA Range – Working with Range and Cells in VBA
- Apply Borders on a Cell using VBA in Excel
- Find Last Row, Column, and Cell using VBA in Excel
- Insert a Row using VBA in Excel
- Merge Cells in Excel using a VBA Code
- Select a Range/Cell using VBA in Excel
- SELECT ALL the Cells in a Worksheet using a VBA Code
- ActiveCell in VBA in Excel
- Special Cells Method in VBA in Excel
- UsedRange Property in VBA in Excel
- VBA AutoFit (Rows, Column, or the Entire Worksheet)
- VBA ClearContents (from a Cell, Range, or Entire Worksheet)
- VBA Copy Range to Another Sheet + Workbook
- VBA Enter Value in a Cell (Set, Get and Change)
- VBA Insert Column (Single and Multiple)
- VBA Named Range | (Static + from Selection + Dynamic)
- VBA Range Offset
- VBA Sort Range | (Descending, Multiple Columns, Sort Orientation
- VBA Wrap Text (Cell, Range, and Entire Worksheet)
- VBA Check IF a Cell is Empty + Multiple Cells
⇠ Back to What is VBA in Excel
Helpful Links – Developer Tab – Visual Basic Editor – Run a Macro – Personal Macro Workbook – Excel Macro Recorder – VBA Interview Questions – VBA Codes
Return to VBA Code Examples
In this Article
- VBA Cell Font
- Change Font Color
- vbColor
- Color – RGB
- ColorIndex
- Font Size
- Bold Font
- Font Name
- Cell Style
VBA Cell Font
In VBA, you can change font properties using the VBA Font Property of the Range Object. Type the following code into the VBA Editor and you’ll see a list of all the options available:
Range("A1).Font.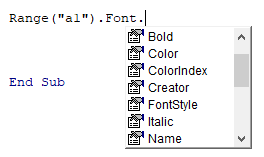
We will discuss a few of the most common properties below.
Change Font Color
There are a few ways to set font colors.
vbColor
The easiest way to set colors is with vbColors:
Range("a1").Font.Color = vbRedHowever, you’re very limited in terms of colors available. These are the only options available:
Color – RGB
You can also set colors based on RGB (Red Green Blue). Here you enter color values between 0-255 for Red, Green, and Blue. Using those three colors you can make any color:
Range("a1").Font.Color = RGB(255,255,0)ColorIndex
VBA / Excel also has a ColorIndex property. This makes pre-built colors available to you. However, they’re stored as Index numbers, which makes it hard to know what color is what:
Range("a1").Font.ColorIndex = …..We wrote an article about VBA Color codes, including a list of the VBA ColorIndex codes. There you can learn more about colors.
Font Size
This will set the font size to 12:
Range("a1").Font.Size = 12or to 16:
Range("a1").Font.Size = 16VBA Coding Made Easy
Stop searching for VBA code online. Learn more about AutoMacro — A VBA Code Builder that allows beginners to code procedures from scratch with minimal coding knowledge and with many time-saving features for all users!

Learn More
Bold Font
It is easy to set a cell font to Bold:
Range("A1").Font.Bold = Trueor to clear Bold formatting:
Range("A1").Font.Bold = FalseFont Name
To change a font name use the Name property:
Range("A1").Font.Name = "Calibri"Range("A1").Font.Name = "Arial"Range("A1").Font.Name = "Times New Roman"Cell Style
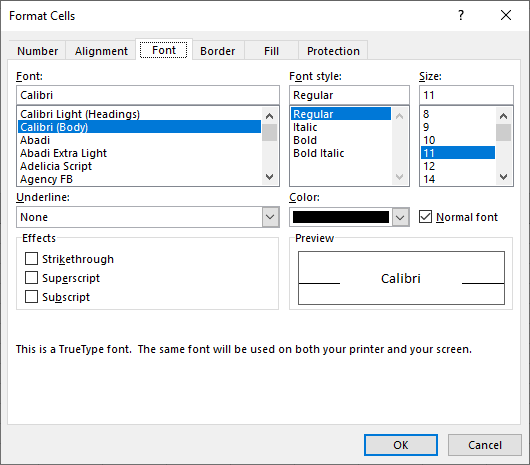
Excel offers the ability to create Cell “Styles”. Styles can be found in the Home Ribbon > Styles:

Styles allow you to save your desired Cell Formatting. Then assign that style to a new cell and all of the cell formatting is instantly applied. Including Font size, cell color, cell protections status, and anything else available from the Cell Formatting Menu:
Personally, for many of the models that I work on, I usually create an “Input” cell style:
Range("a1").Style = "Input"By using styles you can also easily identify cell types on your worksheet. The example below will loop through all the cells in the worksheet and change any cell with Style = “Input” to “InputLocked”:
Dim Cell as Range

For Each Cell in ActiveSheet.Cells
  If Cell.Style = "Input" then
    Cell.Style = "InputLocked"
  End If
Next Cell In this VBA Tutorial, you learn how to change or set the font characteristics of a cell range.
This VBA Font Tutorial is accompanied by Excel workbooks containing the data and macros I use in the examples below. You can get immediate free access to these example workbooks by subscribing to the Power Spreadsheets Newsletter.
Use the following Table of Contents to navigate to the section you’re interested in.
Related Excel VBA and Macro Tutorials
The following VBA and Macro Tutorials may help you better understand and implement the contents below:
- General VBA constructs and structures:
- Learn the basics of how to work with macros here.
- Learn about essential VBA terms here.
- Learn how to enable and disable macros here.
- Learn how to work with the Visual Basic Editor (VBE) here.
- Learn how to create object references here.
- Learn about the R1C1-style system here.
- Learn how to create Sub procedures here.
- Learn how to declare and work with variables here.
- Learn how to work with VBA data types here.
- Learn how to work with object properties here.
- Learn how to work with functions in VBA here.
- Learn how to work with loops here.
- Practical VBA applications and macro examples:
- Learn how to refer to worksheets here.
- Learn how to refer to cell ranges here.
- Learn how to find the last row in a worksheet here.
- Learn how to find the last column in a worksheet here.
- Learn how to specify a column’s width here.
- Learn how to identify empty cells here.
- Learn how to clear a cell here.
You can find additional VBA and Macro Tutorials in the Archives.
#1: Change or set font with theme fonts
VBA code to change or set font with theme fonts
To change or set the font by referring to the applicable theme fonts, use a statement with the following structure:
Range.Font.ThemeFont = xlThemeFontConstant
Process to change or set font with theme fonts
To change or set the font by referring to the applicable theme fonts, follow these steps:
- Identify the cell range whose font you modify (Range).
- Refer to the Font object representing Range’s font (Font).
- Set the Font.ThemeFont property to an xlThemeFont constant (Font.ThemeFont = xlThemeFontConstant), which specifies the theme font to be used.
VBA statement explanation
Item: Range
Range object representing the cell range whose font you modify.
You can usually work with, among others, the following properties to refer to this Range object:
- Worksheet.Range.
- Worksheet.Cells.
Item: Font
The Range.Font property returns a Font object representing Range’s font.
Item: ThemeFont
The Font.ThemeFont property sets the font by referring to the applicable theme fonts.
Item: =
The assignment operator assigns a new value (xlThemeFontConstant) to the Font.ThemeFont property.
Item: xlThemeFontConstant
The constants in the xlThemeFont enumeration specify the theme font. Therefore, set the Font.ThemeFont property to one of the following xlThemeFont constants:
| xlThemeFont constant | Value | Description |
| xlThemeFontMajor | 2 | Major theme font |
| xlThemeFontMinor | 1 | Minor theme font |
| xlThemeFontNone | 0 | Don’t use a theme font |
Macro example to change or set font with theme fonts
The following macro example sets the font in cell A5 (Range(“A5”)) of the “VBA Font” worksheet (Worksheets(“VBA Font”)) in the workbook where the macro is stored (ThisWorkbook) to the major theme font (font.ThemeFont = xlThemeFontMajor).
Sub fontThemeFont()
    'Source: https://powerspreadsheets.com/
    'sets the font by referring to applicable theme fonts
    'For further information: https://powerspreadsheets.com/excel-vba-font/

    'specify the theme font from the applied font scheme
    ThisWorkbook.Worksheets("VBA Font").Range("A5").font.ThemeFont = xlThemeFontMajor

End Sub
Effects of executing macro example to change or set font with theme fonts
The following GIF illustrates the results of executing the macro example. As expected, Excel sets the font of cell A5 to the major theme font.

#2: Change or set font name
VBA code to change or set font name
To change or set the font name, use a statement with the following structure:
Range.Font.Name = "FontName"
Process to change or set font name
To change or set the font name, follow these steps:
- Identify the cell range whose font you name you change (Range).
- Refer to the Font object representing Range’s font (Font).
- Set the Font.Name property to a string specifying the font you use (Font.Name = “FontName”).
VBA statement explanation
Item: Range
Range object representing the cell range whose font name you change.
You can usually work with, among others, the following properties to refer to this Range object:
- Worksheet.Range.
- Worksheet.Cells.
Item: Font
The Range.Font property returns a Font object representing Range’s font.
Item: Name
The Font.Name property sets the font’s name.
Item: =
The assignment operator assigns a new value (“FontName”) to the Font.Name property.
Item: “FontName”
Set the Font.Name property to a string specifying the font you use (FontName).
If you explicitly declare a variable to represent “FontName”, work with the String data type.
Macro example to change or set font name
The following macro example sets the font in cell A6 (Range(“A6”)) of the “VBA Font” worksheet (Worksheets(“VBA Font”)) in the workbook where the macro is stored (ThisWorkbook) to Verdana (font.Name = “Verdana”).
Sub fontName()
    'Source: https://powerspreadsheets.com/
    'sets the font
    'For further information: https://powerspreadsheets.com/excel-vba-font/

    'specify the font name
    ThisWorkbook.Worksheets("VBA Font").Range("A6").font.Name = "Calibri"

End Sub
Effects of executing macro example to change or set font name
The following GIF illustrates the results of executing the macro example. As expected, Excel sets the font of cell A6 to Verdana.

#3: Change or set font size
VBA code to change or set font size
To change or set the font size, use a statement with the following structure:
Range.Font.Size = FontSize#
Process to change or set font size
To change or set the font size, follow these steps:
- Identify the cell range whose font size you change (Range).
- Refer to the Font object representing Range’s font (Font).
- Set the Font.Size property to a number specifying the size (in points) of the font you use (Font.Size = FontSize#).
VBA statement explanation
Item: Range
Range object representing the cell range whose font size you change.
You can usually work with, among others, the following properties to refer to this Range object:
- Worksheet.Range.
- Worksheet.Cells.
Item: Font
The Range.Font property returns a Font object representing Range’s font.
Item: Size
The Font.Size property sets the font’s size.
Item: =
The assignment operator assigns a new value (FontSize#) to the Font.Size property.
Item: FontSize#
Set the Font.Size property to a number specifying the size (in points) of the font you use (FontSize#).
Macro example to change or set font size
The following macro example sets the font size of cell A7 (Range(“A7”)) of the “VBA Font” worksheet (Worksheets(“VBA Font”)) in the workbook where the macro is stored (ThisWorkbook) to 13 (font.Size = 13).
Sub fontSize()
    'Source: https://powerspreadsheets.com/
    'sets the font size
    'For further information: https://powerspreadsheets.com/excel-vba-font/

    'specify the font size
    ThisWorkbook.Worksheets("VBA Font").Range("A7").font.Size = 13

End Sub
Effects of executing macro example to change or set font size
The following GIF illustrates the results of executing the macro example. As expected, Excel sets the font size of cell A7 to 13.

#4: Change or set font style
VBA code to change or set font style
To change or set the font style, use a statement with the following structure:
Range.Font.FontStyle = "FontStyle"
Process to change or set font style
To change or set the font style, follow these steps:
- Identify the cell range whose font you style you change (Range).
- Refer to the Font object representing Range’s font (Font).
- Set the Font.Style property to a string specifying the font style you use (Font.FontStyle = “FontStyle”).
VBA statement explanation
Item: Range
Range object representing the cell range whose font style you change.
You can usually work with, among others, the following properties to refer to this Range object:
- Worksheet.Range.
- Worksheet.Cells.
Item: Font
The Range.Font property returns a Font object representing Range’s font.
Item: FontStyle
The Font.FontStyle property sets the font style.
Item: =
The assignment operator assigns a new value (“FontStyle”) to the Font.FontStyle property.
Item: “FontStyle”
Set the Font.FontStyle property to one of the following strings (FontStyle):
- Regular;
- Italic;
- Bold; or
- Bold Italic.
Macro example to change or set font style
The following macro example sets the font style of cell A8 (Range(“A8”)) of the “VBA Font” worksheet (Worksheets(“VBA Font”)) in the workbook where the macro is stored (ThisWorkbook) to bold and italic (font.fontStyle = “Bold Italic”).
Sub fontStyle()
    'Source: https://powerspreadsheets.com/
    'sets the font style
    'For further information: https://powerspreadsheets.com/excel-vba-font/

    'specify the font style
    ThisWorkbook.Worksheets("VBA Font").Range("A8").font.fontStyle = "Bold Italic"

End Sub
Effects of executing macro example to change or set font style
The following GIF illustrates the results of executing the macro example. As expected, Excel sets the font style of cell A8 to bold and italic.

#5: Set font bold
VBA code to set font bold
To set the font to bold, use a statement with the following structure:
Range.Font.Bold = True
Process to set font bold
To set the font to bold, follow these steps:
- Identify the cell range whose font you set to bold (Range).
- Refer to the Font object representing Range’s font (Font).
- Set the Font.Bold property to True (Font.Bold = True).
VBA statement explanation
Item: Range
Range object representing the cell range whose font you set to bold.
You can usually work with, among others, the following properties to refer to this Range object:
- Worksheet.Range.
- Worksheet.Cells.
Item: Font
The Range.Font property returns a Font object representing Range’s font.
Item: Bold
The Font.Bold property sets the font to bold (or not bold).
Item: =
The assignment operator assigns a new value (True) to the Font.Bold property.
Item: True
To make the font bold, set the Font.Bold property to True.
To remove the font’s bold formatting, set the Font.Bold property to False.
Macro example to set font bold
The following macro example makes the font of cell A9 (Range(“A9”)) of the “VBA Font” worksheet (Worksheets(“VBA Font”)) in the workbook where the macro is stored (ThisWorkbook) bold (font.Bold = True).
Sub fontBold()
    'Source: https://powerspreadsheets.com/
    'sets font to bold
    'For further information: https://powerspreadsheets.com/excel-vba-font/

    'make font bold
    ThisWorkbook.Worksheets("VBA Font").Range("A9").font.Bold = True

End Sub
Effects of executing macro example to set font bold
The following GIF illustrates the results of executing the macro example. As expected, Excel makes the font of cell A9 bold.

#6: Set font italic
VBA code to set font italic
To set the font to italic, use a statement with the following structure:
Range.Font.Italic = True
Process to set font italic
To set the font to italic, follow these steps:
- Identify the cell range whose font you set to italic (Range).
- Refer to the Font object representing Range’s font (Font).
- Set the Font.Italic property to True (Font.Italic = True).
VBA statement explanation
Item: Range
Range object representing the cell range whose font you set to italic.
You can usually work with, among others, the following properties to refer to this Range object:
- Worksheet.Range.
- Worksheet.Cells.
Item: Font
The Range.Font property returns a Font object representing Range’s font.
Item: Italic
The Font.Italic property sets the font to italic (or not italic).
Item: =
The assignment operator assigns a new value (True) to the Font.Italic property.
Item: True
To make the font italic, set the Font.Italic property to True.
To remove the font’s italic formatting, set the Font.Bold property to False.
Macro example to set font italic
The following macro example makes the font of cell A10 (Range(“A10”)) of the “VBA Font” worksheet (Worksheets(“VBA Font”)) in the workbook where the macro is stored (ThisWorkbook) italic (font.Italic = True).
Sub fontItalic()
    'Source: https://powerspreadsheets.com/
    'sets font style to italic
    'For further information: https://powerspreadsheets.com/excel-vba-font/

    'make font italic
    ThisWorkbook.Worksheets("VBA Font").Range("A10").font.Italic = True

End Sub
Effects of executing macro example to set font italic
The following GIF illustrates the results of executing the macro example. As expected, Excel makes the font of cell A10 italic.

#7: Set font underline
VBA code to set font underline
To underline the font, use a statement with the following structure:
Range.Font.Underline = xlUnderlineStyleConstant
Process to set font underline
To underline the font, follow these steps:
- Identify the cell range whose font you underline (Range).
- Refer to the Font object representing Range’s font (Font).
- Set the Font.Underline property to an xlUnderlineStyle constant (Font.Underline = xlUnderlineStyleConstant), which specifies the type of font underline.
VBA statement explanation
Item: Range
Range object representing the cell range whose font you underline.
You can usually work with, among others, the following properties to refer to this Range object:
- Worksheet.Range.
- Worksheet.Cells.
Item: Font
The Range.Font property returns a Font object representing Range’s font.
Item: Underline
The Font.Underline property sets the type of font underline.
Item: =
The assignment operator assigns a new value (xlUnderlineStyleConstant) to the Font.Underline property.
Item: xlUnderlineStyleConstant
The constants in the xlUnderlineStyle enumeration specify the type of font underline. Therefore, set the Font.Underline property to one of the following xlUnderlineStyle constants:
| xlUnderlineStyle constant | Value |
| xlUnderlineStyleDouble | -4119 |
| xlUnderlineStyleDoubleAccounting | 5 |
| xlUnderlineStyleNone | -4142 |
| xlUnderlineStyleSingle | 2 |
| xlUnderlineStyleSingleAccounting | 4 |
Macro example to set font underline
The following macro example underlines with a double line (font.Underline = xlUnderlineStyleDouble) the font of cell A11 (Range(“A11”)) of the “VBA Font” worksheet (Worksheets(“VBA Font”)) in the workbook where the macro is stored (ThisWorkbook).
Sub fontUnderline()
    'Source: https://powerspreadsheets.com/
    'underlines the font
    'For further information: https://powerspreadsheets.com/excel-vba-font/

    'underline the font
    ThisWorkbook.Worksheets("VBA Font").Range("A11").font.Underline = xlUnderlineStyleDouble

End Sub
Effects of executing macro example to set font underline
The following GIF illustrates the results of executing the macro example. As expected, Excel underlines the font of cell A11 with a double line.

#8: Set font strikethrough
VBA code to set font strikethrough
To strike the font through, use a statement with the following structure:
Range.Font.Strikethrough = True
Process to set font strikethrough
To strike the font through, follow these steps:
- Identify the cell range whose font you strike through (Range).
- Refer to the Font object representing Range’s font (Font).
- Set the Font.Strikethrough property to True (Font.Strikethrough = True).
VBA statement explanation
Item: Range
Range object representing the cell range whose font you strike through.
You can usually work with, among others, the following properties to refer to this Range object:
- Worksheet.Range.
- Worksheet.Cells.
Item: Font
The Range.Font property returns a Font object representing Range’s font.
Item: Strikethrough
The Font.Strikethrough property strikes through (or not) the font with a horizontal line.
Item: =
The assignment operator assigns a new value (True) to the Font.Strikethrough property.
Item: True
To strike through the font with a horizontal line, set the Font.Strikethrough property to True.
To remove a font’s strike through horizontal line, set the Font.Strikethrough property to False.
Macro example to set font strikethrough
The following macro example strikes through (font.Strikethrough = True) the font of cell A12 (Range(“A12”)) of the “VBA Font” worksheet (Worksheets(“VBA Font”)) in the workbook where the macro is stored (ThisWorkbook).
Sub fontStrikethrough()
    'Source: https://powerspreadsheets.com/
    'strikes font through
    'For further information: https://powerspreadsheets.com/excel-vba-font/

    'strike through font
    ThisWorkbook.Worksheets("VBA Font").Range("A12").font.Strikethrough = True

End Sub
Effects of executing macro example to set font strikethrough
The following GIF illustrates the results of executing the macro example. As expected, Excel strikes the font of cell A12 through.

#9: Change or set font color with RGB color model
VBA code to change or set font color with RGB color model
To change or set the font color with the RGB color model, use a statement with the following structure:
Range.Font.Color = RGB(Red, Green, Blue)
Process to change or set font color with RGB color model
To change or set the font color with the RGB color model, follow these steps:
- Identify the cell range whose font color you change with the RGB color model (Range).
- Refer to the Font object representing Range’s font (Font).
- Specify the red, green and blue components of the color with the RGB function (RGB(Red, Green, Blue)).
- Set the Font.Color property to the value returned by the RGB Function (Font.Color = RGB(Red, Green, Blue)).
VBA statement explanation
Item: Range
Range object representing the cell range whose font color you change with the RGB color model.
You can usually work with, among others, the following properties to refer to this Range object:
- Worksheet.Range.
- Worksheet.Cells.
Item: Font
The Range.Font property returns a Font object representing Range’s font.
Item: Color
The Font.Color property sets the font color using a numeric value.
Item: =
The assignment operator assigns a new value (returned by the RGB function) to the Font.Color property.
Item: RGB(Red, Green, Blue)
Theoretically, you can set the Font.Color property to a value specifying the font color you use.
In practice, you can use the RGB function to obtain the value specifying the font color. For these purposes, specify the Red, Green and Blue components of the color.
When working with the RGB function, consider the following:
- Specify each component (Red, Green and Blue) as numbers between 0 and 255 (inclusive).
- If you use a value exceeding 255, VBA assumes that the value is 255.
Macro example to change or set font color with RGB color model
The following macro example sets the font color of cell A13 (Range(“A13”)) of the “VBA Font” worksheet (Worksheets(“VBA Font”)) in the workbook where the macro is stored (ThisWorkbook) to red with the RGB color model (font.Color = RGB(255, 0, 0)).
Sub fontColorRgb()
'Source: https://powerspreadsheets.com/
'sets font color using RGB color model
'For further information: https://powerspreadsheets.com/excel-vba-font/

'specify font color with RGB function
ThisWorkbook.Worksheets("VBA Font").Range("A13").font.Color = RGB(255, 0, 0)

End Sub
Effects of executing macro example to change or set font color with RGB color model
The following GIF illustrates the results of executing the macro example. As expected, Excel sets the font color of cell A13 to red with the RGB color model.

#10: Change or set font color with color index (ColorIndex)
VBA code to change or set font color with color index (ColorIndex)
To change or set the font color with the ColorIndex property, use a statement with the following structure:
Range.Font.ColorIndex = ColorIndex#
Process to change or set font color with color index (ColorIndex)
To change or set the font color with the ColorIndex property, follow these steps:
- Identify the cell range whose font color you change with the ColorIndex property (Range).
- Refer to the Font object representing Range’s font (Font).
- Set the Font.ColorIndex property to a value between 0 and 56 or an xlColorIndex constant (Font.ColorIndex = ColorIndex#).
VBA statement explanation
Item: Range
Range object representing the cell range whose font color you change with the ColorIndex property.
You can usually work with, among others, the following properties to refer to this Range object:
- Worksheet.Range.
- Worksheet.Cells.
Item: Font
The Range.Font property returns a Font object representing Range’s font.
Item: ColorIndex
The Font.ColorIndex property sets the font color using the current color palette or a constant from the xlColorIndex enumeration.
Item: =
The assignment operator assigns a new value (ColorIndex#) to the Font.ColorIndex property.
Item: ColorIndex#
Set the Font.ColorIndex to one of the following:
- A value between 0 and 56, representing a color from the current color palette.
- One of the following xlColorIndex constants:
- xlColorIndexAutomatic (-4105), which represents automatic color.
- xlColorIndexNone (-4142), which represents no color.
Macro example to change or set font color with color index (ColorIndex)
The following macro example sets the font color of cell A14 (Range(“A14”)) of the “VBA Font” worksheet (Worksheets(“VBA Font”)) in the workbook where the macro is stored (ThisWorkbook) to blue with the ColorIndex property (font.ColorIndex = 5).
Sub fontColorIndex()
    'Source: https://powerspreadsheets.com/
    'sets the font color by referring to the current color palette or a constant
    'For further information: https://powerspreadsheets.com/excel-vba-font/

    'specify font color as index value of the current color palette or an XlColorIndex constant
    ThisWorkbook.Worksheets("VBA Font").Range("A14").font.ColorIndex = 5

End Sub
Effects of executing macro example to change or set font color with color index (ColorIndex)
The following GIF illustrates the results of executing the macro example. As expected, Excel sets the font color of cell A14 to blue with the ColorIndex property.

#11: Set font color to Automatic
VBA code to set font color to Automatic
To set the font color to Automatic (within the color palette), use a statement with the following structure:
Range.Font.ColorIndex = xlColorIndexAutomatic
Process to set font color to Automatic
To set the font color to Automatic (within the color palette), follow these steps:
- Identify the cell range whose font color you set to Automatic (Range).
- Refer to the Font object representing Range’s font (Font).
- Set the Font.ColorIndex property to xlColorIndexAutomatic (Font.ColorIndex = xlColorIndexAutomatic).
VBA statement explanation
Item: Range
Range object representing the cell range whose font color you set to Automatic (within the color palette).
You can usually work with, among others, the following properties to refer to this Range object:
- Worksheet.Range.
- Worksheet.Cells.
Item: Font
The Range.Font property returns a Font object representing Range’s font.
Item: ColorIndex
The Font.ColorIndex property sets the font color using the current color palette or a constant from the xlColorIndex enumeration.
Item: =
The assignment operator assigns a new value (xlColorIndexAutomatic) to the Font.ColorIndex property.
Item: xlColorIndexAutomatic
To set the font color to Automatic, set the Font.ColorIndex to:
- xlColorIndexAutomatic (-4105); or
- 0.
Macro example to set font color to Automatic
The following macro example sets the font color of cell A15 (Range(“A15”)) of the “VBA Font” worksheet (Worksheets(“VBA Font”)) in the workbook where the macro is stored (ThisWorkbook) to Automatic (font.ColorIndex = xlColorIndexAutomatic).
Sub fontColorAutomatic()
    'Source: https://powerspreadsheets.com/
    'sets the font color to automatic
    'For further information: https://powerspreadsheets.com/excel-vba-font/

    'specify the font color as Automatic
    ThisWorkbook.Worksheets("VBA Font").Range("A15").font.ColorIndex = xlColorIndexAutomatic

End Sub
Effects of executing macro example to set font color to Automatic
The following GIF illustrates the results of executing the macro example. As expected, Excel sets the font color of cell A15 to Automatic (from blue).

#12: Change or set font color with theme color scheme (ThemeColor, xlThemeColorAccent)
VBA code to change or set font color with theme color scheme (ThemeColor, xlThemeColorAccent)
To change or set the font color with the theme color scheme, use a statement with the following structure:
Range.Font.ThemeColor = xlThemeColorConstant
Process to change or set font color with theme color scheme (ThemeColor, xlThemeColorAccent)
To change or set the font color with the theme color scheme, follow these steps:
- Identify the cell range whose font color you change with the theme color scheme (Range).
- Refer to the Font object representing Range’s font (Font).
- Set the Font.ThemeColor property to an xlThemeColor constant (Font.ThemeColor = xlThemeColorConstant).
VBA statement explanation
Item: Range
Range object representing the cell range whose font color you change with the theme color scheme.
You can usually work with, among others, the following properties to refer to this Range object:
- Worksheet.Range.
- Worksheet.Cells.
Item: Font
The Range.Font property returns a Font object representing Range’s font.
Item: ThemeColor
The Font.ThemeColor property sets the font color using the theme color scheme.
Item: =
The assignment operator assigns a new value (xlThemeColorConstant) to the Font.ThemeColor property.
Item: xlThemeColorConstant
The constants in the xlThemeColor enumeration specify the theme color. Therefore, set the Font.ThemeColor property to one of the following xlThemeColor constants:
| xlThemeColor constant | Value | Description |
| xlThemeColorAccent1 | 5 | Accent 1. |
| xlThemeColorAccent2 | 6 | Accent 2. |
| xlThemeColorAccent3 | 7 | Accent 3. |
| xlThemeColorAccent4 | 8 | Accent 4. |
| xlThemeColorAccent5 | 9 | Accent 5. |
| xlThemeColorAccent6 | 10 | Accent 6. |
| xlThemeColorDark1 | 1 | Dark 1. |
| xlThemeColorDark2 | 3 | Dark 2. |
| xlThemeColorFollowedHyperlink | 12 | Followed hyperlink. |
| xlThemeColorHyperlink | 11 | Hyperlink. |
| xlThemeColorLight1 | 2 | Light 1. |
| xlThemeColorLight2 | 4 | Light 2. |
Macro example to change or set font color with theme color scheme (ThemeColor, xlThemeColorAccent)
The following macro example sets the font color of cell A16 (Range(“A16”)) of the “VBA Font” worksheet (Worksheets(“VBA Font”)) in the workbook where the macro is stored (ThisWorkbook) to the accent 1 of the theme color (font.ThemeColor = xlThemeColorAccent1).
Sub fontThemeColor()
    'Source: https://powerspreadsheets.com/
    'sets font color by referring to applicable theme colors
    'For further information: https://powerspreadsheets.com/excel-vba-font/

    'specify the font color from the theme color scheme
    ThisWorkbook.Worksheets("VBA Font").Range("A16").font.ThemeColor = xlThemeColorAccent1

End Sub
Effects of executing macro example to change or set font color with theme color scheme (ThemeColor, xlThemeColorAccent)
The following GIF illustrates the results of executing the macro example. As expected, Excel sets the font color of cell A16 to the accent 1 of the theme color.

#13: Change or set font tint and shade
VBA code to change or set font tint and shade
To change or set the font tint and shade, use a statement with the following structure:
Range.Font.TintAndShade = TintAndShade#
Process to change or set font tint and shade
To change or set the font tint and shade, follow these steps:
- Identify the cell range whose font tint and shade you change (Range).
- Refer to the Font object representing Range’s font (Font).
- Set the Font.TintAndShade property to a value (Font.TintAndShade = TintAndShade#) between -1 (darkest shade) and 1 (lightest shade).
VBA statement explanation
Item: Range
Range object representing the cell range whose font tint and shade you change.
You can usually work with, among others, the following properties to refer to this Range object:
- Worksheet.Range.
- Worksheet.Cells.
Item: Font
The Range.Font property returns a Font object representing Range’s font.
Item: TintAndShade
The Font.TintAndShade property lightens or darkens the font color.
Item: =
The assignment operator assigns a new value (TintAndShade#) to the Font.TintAndShade property.
Item: TintAndShade#
Set the Font.TintAndShade property to a value between -1 (darkest shade) and 1 (lightest shade). If you attempt to set the Font.TintAndShade property to a value outside this range, a run-time error (5: Invalid procedure call or argument) occurs.
Macro example to change or set font tint and shade
The following macro example lightens the font (font.TintAndShade = 0.5) of cell A17 (Range(“A17”)) of the “VBA Font” worksheet (Worksheets(“VBA Font”)) in the workbook where the macro is stored (ThisWorkbook).
Sub fontTintAndShade()
    'Source: https://powerspreadsheets.com/
    'lightens or darkens the font color
    'For further information: https://powerspreadsheets.com/excel-vba-font/

    'lighten or darken the font color
    ThisWorkbook.Worksheets("VBA Font").Range("A17").font.TintAndShade = 0.5

End Sub
Effects of executing macro example to change or set font tint and shade
The following GIF illustrates the results of executing the macro example. As expected, Excel lightens the font color of cell A17.

#14: Set font subscript
VBA code to set font subscript
To format the font as subscript, use a statement with the following structure:
Range.Font.Subscript = True
Process to set font subscript
To format the font as subscript, follow these steps:
- Identify the cell range whose font you format as subscript (Range).
- Refer to the Font object representing Range’s font (Font).
- Set the Font.Subscript property to True (Font.Subscript = True).
VBA statement explanation
Item: Range
Range object representing the cell range whose font you format as subscript.
You can usually work with, among others, the following properties to refer to this Range object:
- Worksheet.Range.
- Worksheet.Cells.
Item: Font
The Range.Font property returns a Font object representing Range’s font.
Item: Subscript
The Font.Subscript property formats the font as subscript (or not).
Item: =
The assignment operator assigns a new value (True) to the Font.Subscript property.
Item: True
To format the font as subscript, set the Font.Subscript property to True.
To remove the font’s subscript formatting, set the Font.Subscript property to False.
Macro example to set font subscript
The following macro example formats the font of cell A18 (Range(“A18”)) of the “VBA Font” worksheet (Worksheets(“VBA Font”)) in the workbook where the macro is stored (ThisWorkbook) as subscript (font.Subscript = True).
Sub fontSubscript()
    'Source: https://powerspreadsheets.com/
    'formats the font as a subscript
    'For further information: https://powerspreadsheets.com/excel-vba-font/

    'format the font as subscript
    ThisWorkbook.Worksheets("VBA Font").Range("A18").font.Subscript = True

End Sub
Effects of executing macro example to set font subscript
The following GIF illustrates the results of executing the macro example. As expected, Excel formats the font of cell A18 as subscript.

#15: Set font superscript
VBA code to set font superscript
To format the font as superscript, use a statement with the following structure:
Range.Font.Superscript = True
Process to set font superscript
To format the font as superscript, follow these steps:
- Identify the cell range whose font you format as superscript (Range).
- Refer to the Font object representing Range’s font (Font).
- Set the Font.Superscript property to True (Font.Superscript = True).
VBA statement explanation
Item: Range
Range object representing the cell range whose font you format as superscript.
You can usually work with, among others, the following properties to refer to this Range object:
- Worksheet.Range.
- Worksheet.Cells.
Item: Font
The Range.Font property returns a Font object representing Range’s font.
Item: Superscript
The Font.Superscript property formats the font as superscript (or not).
Item: =
The assignment operator assigns a new value (True) to the Font.SuperScript property.
Item: True
To format the font as superscript, set the Font.Superscript to True.
To remove the font’s superscript formatting, set the Font.Superscript to False.
Macro example to set font superscript
The following macro example formats the font of cell A19 (Range(“A19”)) of the “VBA Font” worksheet (Worksheets(“VBA Font”)) in the workbook where the macro is stored (ThisWorkbook) as superscript (font.Superscript = True).
Sub fontSuperscript()
    'Source: https://powerspreadsheets.com/
    'formats the font as a superscript
    'For further information: https://powerspreadsheets.com/excel-vba-font/

    'format the font as superscript
    ThisWorkbook.Worksheets("VBA Font").Range("A19").font.Superscript = True

End Sub
Effects of executing macro example to set font superscript
The following GIF illustrates the results of executing the macro example. As expected, Excel formats the font of cell A19 as superscript.

Learn more about specifying font characteristics with VBA
Workbook examples used in this VBA Font Tutorial
You can get immediate free access to the example workbooks that accompany this VBA Font Tutorial by subscribing to the Power Spreadsheets Newsletter.
References to constructs used in this VBA Font Tutorial
Use the following links to visit the appropriate webpage in the Microsoft Developer Network:
- Refer to the workbook containing the cell range you work with:
- Workbook object.
- Application.ThisWorkbook property.
- Refer to the worksheet containing the cell range you work with:
- Worksheet object.
- Workbook.Worksheets property.
- Refer to the cell range you work with:
- Range object.
- Worksheet.Range property.
- Refer to a cell range’s font:
- Font object.
- Range.Font property.
- Set or change a font’s properties:
- Font.Bold property.
- Font.Color property.
- Font.ColorIndex property and xlColorIndex enumeration.
- Font.FontStyle property.
- Font.Italic property.
- Font.Name property.
- Font.Size property.
- Font.Strikethrough property.
- Font.Subscript property.
- Font.Superscript property.
- Font.ThemeColor property and xlThemeColor enumeration.
- Font.ThemeFont property and xlThemeFont enumeration.
- Font.TintAndShade property.
- Font.Underline property and xlUnderlineStyle enumeration.
- Assign a new value to a property:
- = operator.
- Obtain a color with the RGB color model:
- RGB function.
- Work with variables and data types:
- Boolean data type.
- String data type.
В процессе программирования на VBA в Excel вы будете проводить много времени, работая в окнах VBE. Чтобы сделать редактор более удобным, вам понадобится настройка среды Visual Basic Editor под ваши предпочтения.[1] Находясь в Excel, перейдите в окно VBE, например, нажав Alt+F11. В строке меню окна VBE выберите команду Tools –> Options. Появится диалоговое окно Options (Параметры) с четырьмя вкладками: Editor (Редактор), Editor Format (Формат редактора), General (Общие) и Docking (Прикрепление). Кстати, не путайте это окно с диалоговым окном Параметры Excel программы Excel, которое можно открыть в Excel с помощью команды Файл –> Параметры Excel.

Рис. 1. Вкладка Editor диалогового окна VBE Options (Параметры)
Скачать заметку в формате Word или pdf
Вкладка Editor
На рис. 1 показаны параметры, доступ к которым можно получить, щелкнув на вкладке Editor (Редактор).
Настройка Auto Syntax Check (Автоматическая проверка синтаксиса) определяет, будет ли появляться диалоговое окно, когда VBE обнаружит синтаксическую ошибку в коде VBA. В этом диалоговом окне указывается тип допущенной ошибки. Если отменить установку этого флажка, то VBE выделит синтаксические ошибки, отобразив соответствующие фрагменты кода другим цветом, и вам не придется работать в диалоговых окнах, которые появляются на экране. Начинающим программистам рекомендуется установить эту опцию.
При установленном параметре Require Variable Declaration (Обязательное декларирование переменных) VBE вставляет в начале каждого нового модуля оператор Option Explicit. Если в модуле задан этот оператор, то вы должны явно определить каждую используемую в нем переменную. Таким образом, у вас вырабатывается хорошая привычка, которая, правда, требует дополнительных усилий. Если вы не объявляете переменные, все они имеют тип данных Variant; это достаточно гибко, но неэффективно с точки зрения использования аппаратных ресурсов и скорости выполнения кода. Имейте ввиду, что изменение параметра Require Variable Declaration влияет на новые модули, а не на существующие.
Если выбрана опция Auto List Members (Автоматическая вставка объектов), VBE предоставляет помощь при вводе кода VBA, отображая список элементов текущего объекта. К этим элементам относятся методы и свойства объекта, название которого вводится вручную. Данный параметр весьма полезен, поэтому его рекомендуется всегда активизировать. На рис. 2 показан пример использования этого параметра – VBE отображает список элементов объекта Application. Можете выбрать элемент из списка, чтобы не вводить его с помощью клавиатуры (в результате название элемента будет введено без ошибок).

Рис. 2. Автоматическая вставка объектов при ручном вводе кода
Если включен параметр Auto Quick Info (Отображать краткие сведения), VBE будет отображать информацию об аргументах функций, свойств и методов, названия которых вы вводите с клавиатуры. Рекомендуется всегда оставлять эту настройку включенной. На рис. 3 отображается синтаксис свойства Cells.

Рис. 3. Автоматическое отображение кратких сведений о синтаксисе
Если включен параметр Auto Data Tips, VBE отображает при отладке кода значение переменной, над которой находится указатель мыши. Рекомендуется всегда держать его включенным.
Настройка Auto Indent (Автоматический отступ) определяет, располагает ли автоматически VBE каждую новую строку программы с тем же отступом, который задан для предыдущей строки. Тем, кто использует отступы в программных кодах, советуем всегда обращаться к этому параметру. Вы можете также задать количество символов в отступе (по умолчанию указано значение 4). Используйте клавишу <Таb>, а не пробел, чтобы задать отступ в коде. При использовании клавиши <Таb> отступы получаются более «правильными». Кроме того, для отмены отступа в конкретной строке воспользуйтесь комбинацией клавиш <Shift+Tab>. Она может применяться при выделении нескольких строк.
При выборе параметра Drag-and-Drop Text Editing (Включить редактирование перетаскиванием) вы можете копировать и перемещать текст, перетаскивая его с помощью мыши. Если вы любите такой метод работы, оставьте этот параметр включенным. Я никогда не пользуюсь функцией перетаскивания, так как предпочитаю для копирования и вставки обращаться к комбинациям клавиш.
Параметр Default to Full Module View (По умолчанию использовать полный режим просмотра) определяет принцип просмотра процедуры. Если он включен, процедуры в окне кода помещаются в одно окно с полосой прокрутки. Если же он отключен, то вы можете просмотреть в определенный момент только одну процедуру. Рекомендуем активизировать этот параметр.
Когда параметр Procedure Separator (Разделение процедур) включен, в конце каждой процедуры в окне кода отображаются специальные разделители. Если вам нравятся эти визуальные подсказки окончания процедуры, выставляйте данный флажок.
Вкладка Editor Format
Параметры на этой вкладке определяют формат шрифта кода в VBE и некоторые иные свойства (рис. 4).

Рис. 4. Вкладка Editor Format в диалоговом окне Options
Параметр Code Colors (Цвета кода). Предоставляет возможность выбрать цвета кода (текста и фона) и индикатора, который используется для выделения разных элементов программы VBA. Цвета, конечно, выбираются в зависимости от личных предпочтений. Вы можете согласиться с цветами, принятыми по умолчанию. Для разнообразия можете изменить эти настройки.
Параметр Font (Шрифт). Предоставляет возможность указать шрифт, используемый в модулях VBA. Наибольшая эффективность достигается при работе с моноширинным шрифтом (например, Courier New). В таком шрифте все символы имеют одинаковую ширину, что делает программу более удобной для восприятия и анализа, так как все символы одинаково выровнены; кроме того, хорошо видны пробелы между словами.
Список Size (Размер). Определяет размер шрифта кода модулей VBA. Эта настройка зависит от личных предпочтений, которые, в свою очередь, определяются разрешением монитора и вашим зрением. По умолчанию размер задан равным 10.
Параметр Margin Indicator Ваг (Полоса индикатора границы). Отображает вертикальную полосу вдоль левой границы окна кода, на которой высвечиваются всевозможные индикаторы. Его необходимо выставить; в противном случае вы не увидите полезные графические извещения при отладке кода.
Вкладка General
На рис. 5 показаны параметры, доступные на вкладке General (Общие) диалогового окна Options.

Рис. 5. Вкладка General в диалоговом окне Options
Раздел Form Grid Settings (Параметры сетки формы). Находящиеся в этом разделе параметры предназначены для настройки пользовательских диалоговых окон; с их помощью определяются параметры сетки, которая облегчает позиционирование элементов управления в окне UserForm.
Флажок Show ToolTips (Показать подсказки). Определяет поведение кнопок панели инструментов. Рекомендуется всегда его устанавливать.
Флажок Collapse Proj. Hides Windows (Скрывать окна при сворачивании проектов). Установка этого флажка приведет к автоматическому закрытию окон в случае сворачивания проекта в окне Project. Рекомендуется установить этот флажок.
Раздел Edit and Continue (Редактировать и продолжать). Содержит единственный флажок, который может оказаться полезным в процессе отладки. В случае установки этого флажка VBA отображает сообщение, если переменные теряют присвоенные им значения в результате появления каких-либо проблем.
Раздел Error Trapping (Перехват ошибок). Находящиеся в этом разделе параметры определяют, что происходит при возникновении ошибки. Если вы создаете процедуры обработки ошибок, убедитесь в том, что установлен переключатель Break on Unhandled Errors (Остановка при возникновении неисправимой ошибки). При заданном параметре Break on All Errors (Остановка при возникновении любой ошибки) процедуры обработки ошибок игнорируются (вряд ли это нужно).
Раздел Compile (Компиляция). Находящиеся в этом разделе два параметра управляют процессом компиляции кода. Рекомендуется установить оба этих параметра. На современных компьютерах компиляция кода происходит практически мгновенно, если его размеры сравнительно невелики.
Вкладка Docking
На рис. 6 показана вкладка Docking (Прикрепление) диалогового окна Options. Ее параметры определяют поведение нескольких окон редактора VBE. На вкладке отображаются окна, которые могут быть прикреплены. Когда окно прикреплено, оно фиксируется по отношению к одной из границ окна VBE. В результате намного легче найти вспомогательное окно, так как оно отображается в строго определенной области. Если вы отключите все параметры прикрепления, то окна перемешаются между собой, а это усложнит работу. Как правило, идеальным выбором будут настройки по умолчанию.

Рис. 6. Вкладка Docking диалогового окна Options
Для прикрепления окна просто перетащите его в новое место. Например, вам может понадобиться присоединить окно Project Explorer к левой границе окна. Захватите его за заголовок и переместите влево. Отпустите кнопку мыши в момент, когда окно прилипнет к левому краю экрана. Прикрепление окна в VBE всегда было основной проблемой при настройке рабочей среды, однако после многочисленных попыток вам, будем надеяться, все же удастся решить эту задачу.
[1] По материалам книги Джон Уокенбах. Excel 2010. Профессиональное программирование на VBA. – М: Диалектика, 2013. – С. 177–183.