
Excel for Microsoft 365 Excel 2021 Excel 2019 Excel 2016 Excel 2013 Excel 2010 Excel 2007 More…Less
By default, Excel names worksheets Sheet1, Sheet2, Sheet3 and so on, but you can easily rename them.

3 ways to rename a worksheet
-
Double-click the sheet tab, and type the new name.
-
Right-click the sheet tab, click Rename, and type the new name.
-
Use the keyboard shortcut Alt+H > O > R, and type the new name.
Important:
Worksheet names cannot:
-
Be blank .
-
Contain more than 31 characters.
-
Contain any of the following characters: / ? * : [ ]
For example, 02/17/2016 would not be a valid worksheet name, but 02-17-2016 would work fine.
-
Begin or end with an apostrophe (‘), but they can be used in between text or numbers in a name.
-
Be named «History». This is a reserved word Excel uses internally.
Rename a workbook
If you want to rename a workbook, first locate it in Windows Explorer, then you can press F2, or right-click and select Rename, then type the new name.
If your workbook is already open, then you can go to File > Save As to save the workbook with a different name. This will create a copy of the existing workbook.
Need more help?
You can always ask an expert in the Excel Tech Community or get support in the Answers community.
See Also
Insert or delete a worksheet
Video: Move or copy worksheets
Quick start: Print a worksheet
Group worksheets
Protect a worksheet
Need more help?
Содержание
- Naming
- Using the (Format > Sheet) sub menu
- Using the Worksheet Shortcut menu
- Using the Mouse
- Naming Conventions
- Important
- VBA Name Worksheet
- Excel VBA Name WorkSheet
- Examples to Name Worksheet using VBA
- Example #1
- Example #2
- Things to Remember
- Recommended Articles
- How to Manage Multiple Worksheets in Excel?
- Working with Multiple Worksheets in Excel
- How to Manage Multiple Spreadsheets in Excel?
- 1. Coloring Worksheets in Excel
- 2. Hide and Unhide Sheets
- 3. Protect Worksheet with Password
- 4. Quick Reference from Another Sheet
- 5. Navigating Between Sheets
- 6. Limit Number of Sheets
- 7. Naming Worksheets Properly
- 8. Copy, Move and Delete Multiple Worksheets
- How to create and name a worksheet with VBA in Excel
- Syntax
- Adding a single sheet
- Adding multiple sheets
- Adding a sheet with a name
- Adding a sheet before or after a specific sheet
- Creating and naming multiple worksheets
Naming
Excel names your worksheets based on the number of worksheets that have been created in that workbook.
You can easily change the name of your worksheets and this can be done in three ways:
1) Using the (Format > Sheet) sub menu.
2) Using the Worksheet Shortcut menu .
3) Using the Mouse to double click the worksheet name.
You can also use the (Format > Sheet) sub menu and select Rename.
Alternatively you can use the shortcut menu by right mouse clicking on the worksheet tab and selecting «Rename».
Using the Mouse
You can double click the sheet tab with the left mouse button.
To confirm your entry click on any cell or select another sheet.
You can keep the previous sheet name by pressing ESC before confirming.
Naming Conventions
Your worksheet names cannot have more than 31 characters and using the space is not recommended.
Giving your worksheets descriptive names will help you to remember where the data is stored.
They must obviously be unique within the workbook and cannot contain any of the following characters , / , * , ? , : , [ , ].
Important
Try to avoid really long descriptive names as these will be displayed on the tab at the bottom of your workbook.
Sheet names cannot be longer than 31 characters.
The default naming convention for worksheets is Sheet1, Sheet2, etc.
The worksheet name » History » cannot be used, in either upper or lower case. A worksheet with this name is used with the Track Changes feature so this name cannot be used to avoid any confusion. If you try and rename a sheet with this name you will get the message «History is a reserved name».
Источник
VBA Name Worksheet


Excel VBA Name WorkSheet
In VBA, to name a worksheet does not need any special skills. However, we need to reference which sheet name we are changing by entering the current sheet name. For example, if we want to change the “Sales” sheet, we need to call the sheet by its name using the Worksheet object.
Table of contents
After mentioning the sheet name, we need to select the “Name” property to change the worksheet name.
Now, we need to set the name property to the name as per our wish. For example, assume you want to change the “Sales” to “Sales Sheet,” then put an equal sign after the “NAME” property and enter the new name in double quotes.
Like this, we can change the worksheet name using the Name property.
Examples to Name Worksheet using VBA
Example #1
Change or Rename Sheet using Variables.
Look at the below sample code.
Code:

First, we have declared the variable as “Worksheet.”
Next, we have set the reference to the variable as “Sales” using the worksheet object.
Now, the variable “Ws” holds the reference of the worksheet “Sales.”
Now, using the “Ws” variable, we have renamed the worksheet “Sales Sheet.”
This code will change the “Sales” name to “Sales Sheet.”

Important Note to Remember
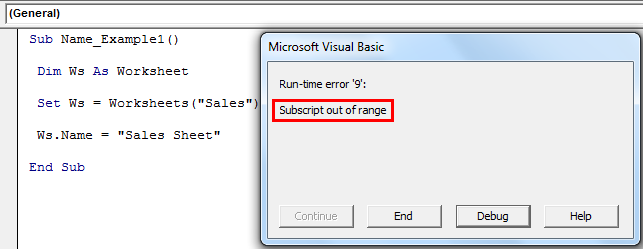
We get this error because, in the previous step itself, we have already changed the worksheet named “Sales” to “Sales Sheet.”
We do not have any ” Sales ” sheet; we will get this subscript out of range error.
Example #2
Get all the worksheet names in a single sheet.
For example, look at the below image.

We have so many sheets here.
Of all these sheets, we need the name of each sheet in the sheet called “Index Sheet.” Therefore, we have written the below code for you.
Code:
Now, copy this code to your module.

Now, run the code by naming any worksheets “Index Sheet.” This code will give all the worksheet names in the “Index Sheet.”

Like this, using the “NAME” property of the worksheet in VBA Worksheet In VBA Excel is a workbook, and worksheets or sheets are included within that workbook. Sheets are what we call them in a regular Excel file, but they’re called «Worksheets» in VBA. The term «Worksheets» refers to all of a worksheet’s collections. read more , we can play around with the name of the worksheets. For example, we can rename, extract, and choose the specific worksheet and do many other things that we can do by using the “Name” property.
Things to Remember
- The NAME in VBA is property.
- Using this name, we can rename the worksheet, and also we can extract sheet names.
- We can change any worksheet name in the specified workbook if you refer to other workbooks than the code-written workbook.
- If the worksheet name does not match, we will get “Subscript out of range.”
Recommended Articles
This article is a guide to the VBA Name Worksheet. Here, we discuss naming worksheets using VBA coding, practical examples, and a downloadable Excel template. Below you can find some useful Excel VBA articles: –
Источник
How to Manage Multiple Worksheets in Excel?
Microsoft Office applications are lifesaver for many of us in day-to-day life. Regardless of the education, professional and ethnic background, applications like Excel stand out for decades. Though it is simple to use Excel worksheets to create lists, charts and tables, learning few tips and tricks can save you considerable time. In our earlier article, we have explained about improving productivity in Excel and in this article let us explore tip to manage multiple spreadsheets in Excel workbook.
Working with Multiple Worksheets in Excel
Whenever you open an Excel application, it will open a new workbook with a name like “Book1”. Inside a single workbook, you can have multiple sheets for different purposes. You can refer sheets as spreadsheets or worksheets. People work with multiple sheets to prepare a larger output that has inputs spread across sheets. In this kind of scenario, it is essential to effectively manage multiple worksheets in Excel book to get things done quickly.
How to Manage Multiple Spreadsheets in Excel?
Here are few tips and tricks we think can help you in managing spreadsheets:
- Coloring sheets
- Hide and unhide sheets
- Protect worksheet with password
- Quick reference from another sheet
- Navigating between sheets
- Limit number of sheets
- Naming worksheets properly
- Copy and move worksheets
1. Coloring Worksheets in Excel
By default, all worksheets in a book have same white background color. When you have multiple worksheets, applying different background colors to sheets can help you to remember the type of content you have on each worksheet. You can also use the sheet colors for various other purposes like keeping all completed task in a green sheet while pending tasks under yellow or red sheet.
- When you are inside a workbook, right click on the sheet.
- Hover over “Tab Color” and choose the color from the visual color picker tool.
You will see a light background change on the sheet when you working on it. However, when you move to next sheet, you can see the full background color for other sheets. You can remove the applied color by again right clicking and going to “Tab Color > no Color” option.
2. Hide and Unhide Sheets
Probably you already know, you can hide or unhide workbooks from “View > Hide / Unhide” menu. Similar to workbooks, you can also hide or unhide the worksheets to increase the viewability of important sheets on your book.
- Right click on the sheet and select “Hide” option to hide a sheet.
- Use “Control” key to select multiple sheets one by one. Alternatively, use “Shift” key to select multiple sheets as a block and hide them at once.
- Similarly, right click and choose “Unhide” to select the sheet you want to unhide and show.
When you select multiple sheets, Excel will combine them in single group. You can ungroup from the right click menu or click on any sheet tab.
3. Protect Worksheet with Password
When you do not want anyone to change the content on your sheet, the good idea is to protect or lock the content with a password. The person viewing the sheet will not know the restriction unless he or she tries to edit the cell data. Go to “Review” tab and choose “Protect Sheet” option. Excel will show you a pop-up where you can type a password and select the actions user can do with that sheet.
After saving your workbook, if you or anyone try to modify the cell data in a protected cell will be prompted with the below message to enter the password.
Remember not to have sensitive data on your sheet though you protect, someone can simply delete the entire sheet.
4. Quick Reference from Another Sheet
When you lot of numbers, you may do mathematical calculations from cells referenced across sheets. Though you can go and select the cell for referring, the easy way is to use the text reference. Let us say, you have data in cells B2 and B3 of sheet 1. You can use the below formula, if you want to sum up these two cell data and show in a cell of sheet 2.
You can click on any cell an apply formula with Sheetx!Cellnumber format for cross reference.
5. Navigating Between Sheets
You can remove the pain of navigating across multiple worksheets by using keyboard shortcuts.
- Control + PageUp to move in left direction
- Control + PageDown move in right direction
6. Limit Number of Sheets
Excel does not restrict the number of sheets in a workbook. It depends on the available memory size on your computer at that point of time. We recommend, you to keep the number of sheets within a limit when working with multiple sheets. Otherwise, you may need to end up in using the small arrows located in lower left corner.
You can still use Control + Page Up/Down keys to navigate to next/previous sheet. Alternatively, you can use the following shortcuts.
- Right click on one of the small arrows to select all a sheet from the pop-up.
- Control + Click on left arrow to navigate to first sheet.
- Control + Click on right arrow to navigate to last sheet.
Note that Excel will remember where you are when closing a workbook. Next time when you open, it will go to the same sheet when you were at the time of closing.
7. Naming Worksheets Properly
Excel by default name the worksheets like Sheet1, Sheet 2, etc. This does not make sense when you have multiple sheets with content. You can double click on a sheet or select “Rename” from the right-click context menu to change the name. Having descriptive names will help you to easily navigate and remember the order.
8. Copy, Move and Delete Multiple Worksheets
You can manage moving, deleting and copying worksheets by right clicking and choosing the appropriate option. Use control or shift keys to select multiple sheets and delete, move or duplicate them at once.
Remember, in order to move you should drag and drop the selected sheet(s) in the required position. Excel will show you single or multiple document icon when you drag. The right click menu only allows you to move the selected sheet(s) to the end. When you want to copy or duplicate the entire worksheet, ensure to select “Create a copy” checkbox under “Move or Copy” pop-up.
Источник
How to create and name a worksheet with VBA in Excel

In this guide, we’re going to show you how to create and name a worksheet with VBA in Excel.
Syntax
You can create and name a worksheet using the Sheets.Add and Worksheets.Add methods. Both methods work similarly and have 4 optional arguments and return a sheet object which can take a Name property.
| Name | Description |
| Before | Optional. The sheet before which the new sheet is to be added. If omitted, Excel creates the new sheet(s) before the selected sheet(s). |
| After | Optional. The sheet after which the new sheet is added. If omitted, Excel creates the new sheet(s) before the selected sheet(s). |
| Count | The number of sheets to be added. The default is the number of selected sheets. |
| Type | Specifies the sheet type. The default is xlWorksheet which represents a standard worksheet. |
Adding a single sheet
All arguments are optional. The method without arguments creates worksheet(s) equal to the number of selected worksheets before the first selected worksheet.
For example, if two sheets are selected, the method will add two worksheets. To ignore the selected sheets and set the sheet number to one (1), use 1 for the Count argument.
Adding multiple sheets
You can set the Count argument to an integer greater than 1 to add multiple sheets at once. For example, the following code adds three (3) worksheets.
Adding a sheet with a name
Sheets.Add method returns a sheet object and sets its name by updating the Name property. A property is an attribute of object that determines one of the object’s characteristics. The property of an object is addressed by entering the property name after the corresponding object and a dot(.). Just like calling the Add method for the Sheets object.
If all you need is to create worksheets and name them regardless of their position, use one of the following code lines.
Adding a sheet before or after a specific sheet
If the new sheet’s position is important, use either the Before or After argument. Each argument accepts a sheet object. The new sheet will be created before or after the sheet you supplied based on the argument you are using.
You can call a sheet object by giving the sheet’s name or index to Sheets or Worksheets objects. It can be a variable which you have defined. Here are some examples:
Creating and naming multiple worksheets
To name multiple worksheets, you have to use an array of names and a loop. Let’s say you have names in a range like A1:A5 in the worksheet named “Sheet1”. A loop should check each cell inside the range and create a worksheet from the corresponding name. Check out the following code:
This is our last tip for how to create and name a worksheet with VBA in Excel article. If you are new to loops in VBA, check out All You Need to Know on How to Create a VBA loop in Excel to understand and find more ways of looping.
Источник
20
20 people found this article helpful
How to Rename a Worksheet in Excel
Make your worksheets names more descriptive
Updated on December 12, 2021
What to Know
- Press and release Alt+H+O+R, type a new name, and press Enter to rename the active worksheet.
- Double-click the current worksheet’s name, type a new name, and press the Enter key.
- Right-click the current worksheet’s name, select Rename, type a new name, and press the Enter key.
Two changes that make it easier to organize and identify worksheets and the data they contain are to rename the worksheet and to change the color of the worksheet tab at the bottom of the work area. These instructions apply to Excel 2019, Excel 2016, Excel 2013, Excel 2010, Excel 2019 for Mac, Excel 2016 for Mac, Excel for Mac 2011, Excel for Microsoft 365, and Excel Online.
Using Keyboard Hotkeys
In Excel 2019, Excel 2016, Excel 2013, or Excel 2010, you can use a keyboard shortcut to rename a worksheet tab.
This set of keystrokes activates the ribbon commands. Once the last key in the sequence, the R, is pressed and released, the current name on the sheet tab of the current or active sheet is highlighted.
- Press and release in sequence the following key combination to highlight the name of the active sheet: Alt + H + O + R.
- Type the new name for the worksheet.
- Press the Enter key on the keyboard to complete renaming the worksheet.
As with renaming a worksheet using hotkeys, you don’t have to hold down the Alt key while you press the other keys, as with some keyboard shortcuts. Each key is pressed and released in succession.
Double-Click the Sheet Tab
This method works in all versions of Excel for Windows, Mac, Microsoft 365, and Online.
- Double-click on the current name in the worksheet tab to highlight the current name in the tab.
- Type the new name for the worksheet.
- Press the Enter key on the keyboard to complete renaming the worksheet.
- The new name should be visible on the worksheet tab.
Right-Click the Sheet Tab
This method works in all versions of Excel for Windows, Mac, Microsoft 365, and Online.
- Right-click on the tab of the worksheet you want to rename to open the context menu.
- Click on Rename in the menu list to highlight the current worksheet name.
- Type the new name for the worksheet.
- Press the Enter key on the keyboard to complete renaming the worksheet.
- The new name should be visible on the worksheet tab.
Access the Ribbon Option With the Mouse
This method works in all versions of Excel for Windows, Mac, Microsoft 365, and Online.
- Click on the tab of the worksheet to be renamed to make it the active sheet.
- Click on the Home tab of the ribbon.
- Click Format in the Cells group to open the drop-down menu.
- Click on Rename Sheet to highlight the sheet tab at the bottom of the screen.
- Type the new name for the worksheet.
- Press the Enter key on the keyboard to complete renaming the worksheet.
View All Sheet Tabs in a Workbook
If a workbook has a lot of worksheets or the horizontal scroll bar is extended, not all the sheet tabs will necessarily be visible at once. The longer the sheet names, the longer the tabs.
To correct this situation:
- Place the mouse pointer over the vertical ellipsis (three vertical dots) next to the horizontal scrollbar.
- The mouse pointer will change to a double-headed arrow, as shown in the image above.
- Press and hold down the left mouse button and drag the pointer to the right to enlarge the area for sheet tabs to be displayed, or to the left to widen the scrollbar.
Excel Worksheet Name Restrictions
There are a few restrictions when it comes to renaming an Excel worksheet:
- A name cannot exceed 31 characters in length
- A worksheet name cannot be left blank
- The following characters cannot be in a name: / ? : * [ ]
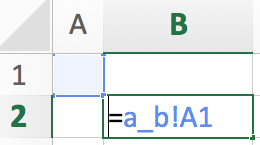
Using Worksheet Names in Excel Formulas
Renaming a worksheet not only makes it easier to keep track of individual sheets in a large workbook, but it has the added benefit of making it easier to understand formulas that span multiple worksheets.
When a formula includes a cell reference from a different worksheet, the worksheet name must be in the formula.
If the default worksheet names are used — such as Sheet2, Sheet3 — the formula will look something like this:
=Sheet3!C7+Sheet4!C10
Giving the worksheets a descriptive name — such as May Expenses and June Expenses — can make the formula easier to decipher. For example:
='May Expenses'!C7+'June Expenses'!C10
Thanks for letting us know!
Get the Latest Tech News Delivered Every Day
Subscribe
A basic task in Excel: Renaming worksheets. Just changing the name is quite simple. But what if you have to do it for dozens of sheets? And what rules are there for worksheet names? What character can you use? In this article we’ll have a close look at how to rename Excel worksheets.
How to rename worksheets?
Rename worksheets with your mouse
Changing a worksheet name in Excel is quite straight forward. There are actually three ways:
- Double click on the sheet name and type a new name.
- Right click and the sheet name and click on ‘Rename’.
- For Mac users: Click on ‘Format’ in the Mac menu bar. Next click on Sheet and then on ‘Rename’.
Rename worksheets with keyboard shortcuts
But what do you do, if you have to rename several worksheets in Excel? Renaming a worksheet can be troublesome, especially when you have to double-click on each sheet name separately. There is a keyboard shortcut (on Windows):
Press these keys on your keyboard one after another:
–>
With a little bit of practice, you can save some time. Especially as you don’t have to grab the mouse.
There is another related keyboard which might help you in this context. Insert new worksheets:
+
Requirements for worksheet names
General requirements
There are some general requirements for worksheet names:
- The sheet names can not have more than 31 characters.
- A worksheet name must be unique, there can’t be two sheets with the same name.
Just a small piece of advice here: Also hidden worksheets count. Learn more about hidden (and very hidden) worksheets here. - You can’t leave the name blank. There must at least be one character. But you can use just a space character.
- You can’t use the name ‘History’ as Excel needs this for the Track Changes function.
- There are certain characters you are not allowed to use (see next chapter).
Characters you can’t use in worksheet names
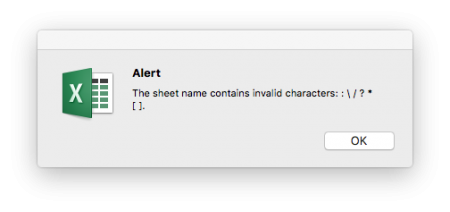
You can’t use any of the following character. In newer versions of Excel you can’t even type these character. In older version, you’ll get an error message similar to the one on the right hand side.
- :
- /
- ?
- *
- [
- ]
That’s it for the strict conditions of worksheet names in Excel. However, there are some more recommendations for worksheet names.
Recommendations and best practice when you rename sheets
General recommendations
Let’s start with some obvious recommendations:
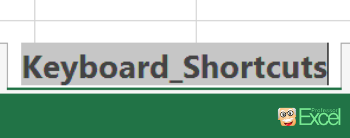
- Use consistent naming. E.g. let all input data sheet names begin with “Input_” (“Input_ERP_2016”).
- Make sheet names self-explanatory. E.g. don’t just call it “Sheet1” but better “Calculation_of_szenarios”.
- Therefore we recommend using complete words and prepositions (“of”) if it makes it easier to understand the file.
- Admittedly, a little bit contradicting: Keep worksheet names short wherever possible. Especially for large Excel files it’s nice to see as many sheet tabs as possible at the same time.
Characters you should not use in worksheet names

We usually advise not to use character as spaces or special characters as ‘!’, ‘%’ or ‘-‘. The reason is, that if you link to a sheet with such name, Excel will insert single quotation marks. Formulas like INDIRECT will be more difficult to create. So why not omit such character from the beginning?
- – (minus)
- ,
- !
- “
- $
- %
- &
- (
- )
- =
- `
- +
- #
- @
- {
- }
- (space)
- ~
- |
- <
- ¢
- ^
Do you want to boost your productivity in Excel?
Get the Professor Excel ribbon!

Add more than 120 great features to Excel!
Special characters that don’t generate single quotation marks
You really want to use special characters for worksheet names in Excel? What about the following one? Any of them suitable for you? The advantage of these characters: They don’t require or add the single quotation mark.
- _
- .
- §
- ¡
- ¶
- ≠
- ¿
- ±
- ‘
- – (en dash)
- ∞
- ≤
- °
- …
Summary of renaming worksheets
Renaming Excel worksheets is simple. Every Excel user has to deal with it. But there are some strict rules and requirements. Furthermore there are recommendations which should simplify your work in Excel.

Henrik Schiffner is a freelance business consultant and software developer. He lives and works in Hamburg, Germany. Besides being an Excel enthusiast he loves photography and sports.
Select a Worksheet | Insert a Worksheet | Rename a Worksheet | Move a Worksheet | Delete a Worksheet | Copy a Worksheet | SHEETS function
A worksheet is a collection of cells where you keep and manipulate the data. Each Excel workbook can contain multiple worksheets.
Select a Worksheet
When you open an Excel workbook, Excel automatically selects Sheet1 for you. The name of the worksheet appears on its sheet tab at the bottom of the document window.

Insert a Worksheet
You can insert as many worksheets as you want. To quickly insert a new sheet, click the plus sign at the bottom of the document window.

Result:

Rename a Worksheet
To give a worksheet a more specific name, execute the following steps.
1. Right click on the sheet tab of Sheet1.
2. Choose Rename.

3. For example, type Sales 2016.

Move a Worksheet
To move a worksheet, click on the sheet tab of the worksheet you want to move and drag it into the new position.
1. For example, click on the sheet tab of Sheet2 and drag it before Sales 2016.

Result:

Delete a Worksheet
To delete a worksheet, right click on a sheet tab and choose Delete.
1. For example, delete Sheet2.

Result:

Copy a Worksheet
Imagine, you have got the sales for 2016 ready and want to create the exact same sheet for 2017, but with different data. You can recreate the worksheet, but this is time-consuming. It’s a lot easier to copy the entire worksheet and only change the numbers.
1. Right click on the sheet tab of Sales 2016.
2. Choose Move or Copy.

The ‘Move or Copy’ dialog box appears.
3. Select (move to end) and check Create a copy.

4. Click OK.
Result:

Note: you can even copy a worksheet to another Excel workbook by selecting the specific workbook from the drop-down list (see the dialog box shown earlier).
SHEETS function
To count the total number of worksheets in a workbook, use the SHEETS function in Excel (without any argument).
1. For example, select cell A1.
2. Type =SHEETS() and press Enter.
