
Apply styles

Try it!
Styles give your document a consistent, professional look.
-
Select the text you want to format.
Tip: If you place your cursor in a paragraph, the style is applied to the whole paragraph. If you select specific text, only the selected text is formatted.
-
On the Home tab, point to a style to preview it.

If you don’t see a style you want, click the More button
to expand the gallery. -
Select a style.
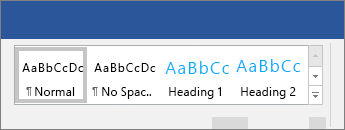
 to expand the gallery.
Using Headings allows you to move parts of the document around by using View > Navigation Pane and then moving the listed headings up or down in the doc. Headings also can be used in creation of a table of contents.
Note: If you need a different look, go to Design > Themes and select a new one. Each Theme has its own set of Styles.
Want more?
Use the Navigation pane in Word
Apply themes
Customize or create new styles in Word
Insert a table of contents
Need more help?
Apply and Customize Headings in Word Documents
by Avantix Learning Team | Updated April 19, 2022
Applies to: Microsoft® Word® 2010, 2013, 2016, 2019, 2021 or 365 (Windows)
You can create headings in Microsoft Word documents by applying Word’s built-in heading styles (such as Heading 1 or Heading 2). After you have applied styles, you can modify them and change the font, size, color, and other formatting attributes so the entire document will update. Once you have applied heading styles, you’ll be able to navigate to the headings using the Navigation Pane and create a table of contents.
Recommended article: How to Hide Comments in Word (or Display Them)
Do you want to learn more about Microsoft Word? Check out our virtual classroom or in-person classroom Word courses >
Heading styles are very important because they create structure in your documents and are readable by screen readers or assistive technology programs used by people with vision impairments. They can also save you a lot of time formatting and reformatting documents.
In addition to creating structure, heading styles are also used to:
- Generate a table of contents
- Reformat a document using Style Sets
- Navigate using the Navigation Pane (select Navigation Pane on the View tab in the Ribbon)
- Rearrange a document using the Outline View
- Create a structured PDF (portable document format) file with heading tags
Note: Screenshots in this article are from Word 365 but are very similar in previous versions of Word.
Creating headings by applying Word heading styles
To create or designate headings, you will need to apply the built-in heading styles in order (Heading 1, Heading 2, Heading 3, and so) to paragraphs. There are 9 levels of headings available in Word.
Heading styles are technically available as paragraph and character styles, but it’s important to apply them as paragraph styles to entire paragraphs. A paragraph in Word is anything with a hard return after it (you have pressed Return or Enter).
Heading styles are affected by your theme choices (overall theme, color theme, and font theme). You can change theme options using the Design tab in the Ribbon.
To create headings by applying heading styles:
- Click in the paragraph (title or subheading) you want to designate or format as a heading.
- Click the Home tab in the Ribbon.
- Click the heading style you want in the Styles Gallery (such as Heading 1) in the Style group. You may need to click the More arrow on the bottom right of the Styles Gallery to view more styles and then click the style you want to use.
All available heading styles do not appear initially in the Styles Gallery. When you apply a heading level (such as Heading 3), an additional heading level should appear in the Gallery (such as Heading 4).
The Styles Gallery appears on the Home tab in the Ribbon and typically displays top level headings:

If you click the More arrow on the bottom right of the Styles Gallery, an expanded gallery appears:

Modifying or customizing heading styles using the Styles task pane
If you modify heading styles, every instance of the modified style will change in your document. Not only will this save time, but it will also ensure consistency. There are many ways to customize heading styles in Word. In this article, we will modify heading styles using the Styles task pane.
The Styles task pane appears with styles in the document (you can change this display by clicking Options at the bottom of the task pane):

To modify or customize a heading style:
- Click the Home tab in the Ribbon.
- Click the dialog box launcher (diagonal arrow) on the bottom right in the Styles group. You can also press Ctrl + Alt + Shift + S. The Styles task pane will appear. If the task pane is floating, double-click the title bar.
- Click in a paragraph using the style you want to modify.
- Click the arrow to the right of the heading you want to modify in the Styles task pane and then select Modify from the drop-down menu. You can also right-click the heading style in the task pane and select Modify. A dialog box appears.
- In the Modify Style dialog box, select the desired options such as font, font size, font color, alignment, and line spacing. Buttons in this dialog box are comparable to those in the Ribbon.
- If you want to change some other formatting options (such as paragraph formats), select Format at the bottom of the dialog box and select other options from the drop-down menu.
- Select Only in this document so that the style is modified in the current document only.
- Do not select Automatically Update unless you want the document styles to update when a user changes heading formatting in the document. It’s typically best to leave this option unchecked.
- Click OK or press Enter. The entire document will change unless a heading has been manually formatted (which overrides the style). You can simply reapply the style if this occurs.
The Modify Styles dialog box displays the style name, the type of style and options for modifying the style:

When you save the document, the modified styles are also saved.
Styles are the most important formatting feature in Word to automate formatting in longer documents. Heading styles also have the added benefit of creating structured documents and are integrated with several other Word features such as generated tables of contents.
This article was first published on May 15, 2021 and has been updated for clarity and content.
Subscribe to get more articles like this one
Did you find this article helpful? If you would like to receive new articles, join our email list.
More resources
How to Create a Table of Contents in Word
14+ Word Selection Shortcuts to Quickly Select Text
How to Copy Styles Between Microsoft Word Documents Using the Organizer
How to Insert Reusable Text Snippets in Word with Quick Parts (Great Timesaver)
How to Convert a PDF to Word in Microsoft Word (for Free – No Third Party Programs Needed)
Related courses
Microsoft Word: Intermediate / Advanced
Microsoft Excel: Intermediate / Advanced
Microsoft PowerPoint: Intermediate / Advanced
Microsoft Word: Long Documents Master Class
Microsoft Word: Styles, Templates and Tables of Contents
Microsoft Word: Designing Dynamic Word Documents Using Fields
VIEW MORE COURSES >
To request this page in an alternate format, contact us.
Our instructor-led courses are delivered in virtual classroom format or at our downtown Toronto location at 18 King Street East, Suite 1400, Toronto, Ontario, Canada (some in-person classroom courses may also be delivered at an alternate downtown Toronto location). Contact us at info@avantixlearning.ca if you’d like to arrange custom instructor-led virtual classroom or onsite training on a date that’s convenient for you.
Copyright 2023 Avantix® Learning
Microsoft, the Microsoft logo, Microsoft Office and related Microsoft applications and logos are registered trademarks of Microsoft Corporation in Canada, US and other countries. All other trademarks are the property of the registered owners.
Avantix Learning |18 King Street East, Suite 1400, Toronto, Ontario, Canada M5C 1C4 | Contact us at info@avantixlearning.ca
 Please Note:
This article is written for users of the following Microsoft Word versions: 2007, 2010, 2013, 2016, 2019, Word in Microsoft 365, and 2021. If you are using an earlier version (Word 2003 or earlier), this tip may not work for you. For a version of this tip written specifically for earlier versions of Word, click here: Understanding Styles.
![]()
Written by Allen Wyatt (last updated April 16, 2022)
This tip applies to Word 2007, 2010, 2013, 2016, 2019, Word in Microsoft 365, and 2021
Unlike most other word processing programs, Word does an excellent job of separating content from appearance. This may sound strange, but the words you type are your content and the way they look on screen or on paper is the appearance. Styles are nothing more than a named definition of how text should appear. You can best understand this by comparing your text to water (this is your content). The appearance of the water depends on the attributes of the container in which it is placed. If you place it in a glass it will look one way; if you place it in a pitcher, it looks a different way. The relationship between text and styles is no different; if you change the style that has been applied to text, then the appearance of the text automatically changes.
While Word allows you to explicitly format your text by selecting it and then picking the attributes you want applied, styles give you much more power. This is because you only need to define the style once and then you can apply it to text as you see fit. Plus, if you later change the style, all text formatted with that style is automatically updated to reflect the change. (You have changed the container, so the water changes appearance.)
The two most prevalent style types in Word are Character styles and Paragraph styles. Character styles are used to define how individual characters appear, including attributes such as font, font size, and bold, italics, superscript, etc. Paragraph styles are much more comprehensive and define not only how the characters in the paragraph appear, but how the paragraph should appear in relation to the margins of your document, whether it should include bullets or numbering, how it should be treated by the spelling and grammar checkers, and how it should appear in relation to other paragraphs in the document.
In addition to character and paragraph styles, you can also define table and list styles. Table styles are used to specify how a particular table appears, including borders, spacing, and other table-specific formatting attributes. List styles are used to define how bulleted lists and numbered lists should appear.
Styles are saved with a document, or they can be stored in a document template. Word allows you to add, change, rename, and delete styles. Follow these steps to define a style:
- Press Alt+Ctrl+Shift+S. Word displays the Styles task pane. (If your fingers get twisted when you try this shortcut, you can display the Home tab of the ribbon and click the small icon at the bottom-right of the Styles group.)
- At the bottom of the task pane there are 3 buttons. Click the left one, New Style. Word displays the Create New Style from Formatting dialog box. (See Figure 1.)
- The initial settings in the dialog box are based on the style of the paragraph in which the insertion point is located. In the middle of the dialog box there is a block of text that approximates what the new style will look like. Immediately below is a list of the formatting attributes assigned to the style.
- Make sure you specify the name and type of style you are creating. You can also indicate if this new style is based on (derived from) an existing style.
- You can make changes to common attributes right in the dialog box. If you need to make more detailed attribute changes, click on the Format button (bottom left corner of the dialog box). The types of formatting available through the Format button depend on the type of style you are defining.
- Selecting the Add to the Styles Gallery check box will add the style to the gallery in the Home tab of the ribbon.
- When you are done setting the formatting attributes, click on OK to close the dialog box.
- Close the Styles task pane.
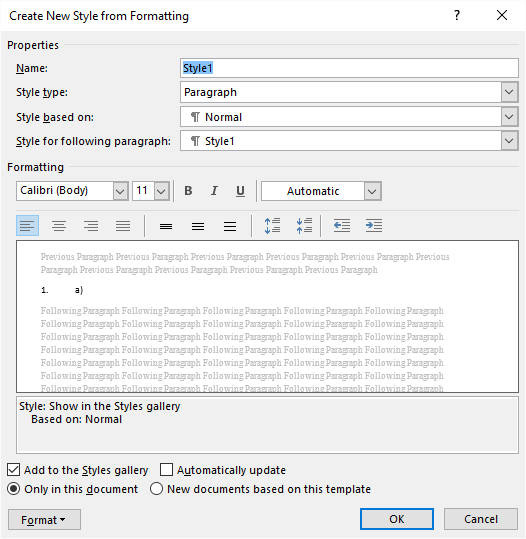
Figure 1. The Create New Style from Formatting dialog box.
At this point you can use your style anywhere you like within your document.
WordTips is your source for cost-effective Microsoft Word training.
(Microsoft Word is the most popular word processing software in the world.)
This tip (9627) applies to Microsoft Word 2007, 2010, 2013, 2016, 2019, Word in Microsoft 365, and 2021. You can find a version of this tip for the older menu interface of Word here: Understanding Styles.
Author Bio
With more than 50 non-fiction books and numerous magazine articles to his credit, Allen Wyatt is an internationally recognized author. He is president of Sharon Parq Associates, a computer and publishing services company. Learn more about Allen…
MORE FROM ALLEN
Sharing AutoText Entries
AutoText entries can make your writing more productive, if used effectively. Because of this, it can be advantageous for …
Discover More
Self-Adjusting Column Widths
It is important to understand how column widths relate to the margins you may have set in your document. The reason is …
Discover More
Viewing Multiple Pages
If you have a large monitor, you can view more than one page at a time in Word. This is very handy when you want to …
Discover More
Welcome to Part 3 of the Harnessing the Power of Microsoft Word series. In the last post, I covered how to create and access templates. Today’s post will walk you through paragraph and character styles. Although you can use these concepts at the document level, defining styles in your templates will make them available to anyone creating a document based on your templates.
Before explaining what paragraph and character styles are and how they can help you, take a few minutes to ask yourself the following questions:
Have you ever found yourself scrolling through a document and applying the same formatting over and over again?
Have you ever had a page break roll onto a new page creating a largely blank page in the middle of your document? Then had to go through the document deleting and re-inserting page breaks?
Have you ever tried to indent a single list item and had the entire list move? Then found yourself fighting with Word to get your indentation just the way you want it?
Have you ever noticed extra space at the top of a page and weren’t really sure why it was there?
Have you ever received a document from another writer and found formatting that wasn’t consistent with your house styles? Or worse, formatting that was inconsistent within the document?
If you answered yes to any of these questions, you’ll be happy to hear that there is a way to eliminate these issues and the frustration that goes along with them. The solution, paragraph and character styles. They can be a huge time saver, reduce your frustration, and ensure consistent formatting throughout your documents.
Paragraph and character styles are pre-configured formatting rules that you can apply to paragraphs or selected text. These styles provide several benefits including:
- Much faster formatting—simply select the items to be formatted and click the applicable style;
- Ability to mass update—change all paragraphs of a specific style at once by modifying the style attributes;
- Numbering control—numbering controlled by styles will not misbehave;
- Indentation control—indentation controlled by styles will not misbehave either;
- Pagination control—avoid orphaned bullets or text by using the keep-with-next paragraph attributes;
- Paragraph spacing control; and
- Consistency in the look of all content throughout the document.
The rest of this post will show you how to:
- Plan for style creation based on your formatting needs
- Create paragraph and character styles
- Modify paragraph and character styles
- Display, configure, and use the Styles pane
- Apply the styles to your content
Consider Your Style Needs
Before I get into the mechanics of creating and using styles, I’d like to suggest taking a little time to think about the formatting elements and the content types you need in your documents so that you can figure out what styles you will need to create. Here are some questions to consider and the implications of various choices:
Do you want your headings to appear at the left edge of your documents to maximize page real estate or do you want each heading to be indented to show hierarchy?
Indenting headings will require more styles because you will need content styles that align with the indentation of each heading level. For example, if all headings are left-justified with no indentation, you need only one or two styles for body text; if your headings are indented, then you will need a body text style that aligns with each level of indentation that your headings use. You will also need multiple levels of styles for bullets, numbered items, etc. As you can see, this approach can lead to a very long list of styles, making it a little harder to work with your styles list.
Also, indentation can eat up a lot of page real estate. If you have an 8.5” page with 1” margins, your usable real estate is 6.5”. If you indent each heading .5”, content under a Heading 5 will have only 4.5” of real estate. This may not be an issue if your documents are mostly text, but if they contain illustrations, you may want access to as much real estate as possible.
Do you want numbered or unnumbered headings?
Numbered headings will help to communicate hierarchy so you don’t need to indent subheadings.
Do you want captions on your figures and tables? And do you want them before or after the figure or table?
Captions allow you to cross-reference a figure or table from elsewhere in the document and they can be used to generate a list of figures or a list of tables.
If you want captions, you’ll need a style to hold an inline figure or table and a style for the caption. These styles will automatically set the position of the figure or table and its caption. For example, if you want your figures left justified but indented a .5” you can create a style called Figure with these properties. When you insert a figure into a paragraph that uses the Figure style, it will automatically appear left-justified with the appropriate indentation.
In a style, you can tell Word what style to apply to the next paragraph, which comes into play in this example. Say you want your captions to appear above your figures or tables. You would create a style for the caption, something like “Figure_Caption,” and set it to return the Figure style as the next paragraph. When you’re working, you will insert your dynamically-numbered caption (discussed in a later post), apply the Figure_Caption style and then press Enter. The new paragraph will automatically be set to Figure so you can quickly insert your graphic with no additional style-application steps or positioning required.
Finally, notice the example naming convention Figure and Figure_Caption. These styles denote their purpose making them intuitive to other authors in your organization and they will appear right next to each other in your styles list so you don’t have to scroll around the styles list when you applying these styles to existing graphics and captions.
What elements do you want to keep together on a page?
Word offers a keep-with-next property that you can use to control pagination so you don’t have to insert page breaks and deal with the issues that can arise from using page breaks, such as, half-empty pages in the middle of your document and time spent on removing and reapplying page breaks.
Likely you will want to keep a figure and its caption together on a page. Continuing the figure example, if you set the Figure_Caption style to keep-with-next, the caption and figure will always remain together.
You may also want bulleted lists to stay together on a page. You can achieve this by creating two styles, such as Bullet1_KWN (KWN denotes keep-with next) and Bullet1_Last ( _Last denotes that it should be applied to the last bullet in the list).
If you also want to keep the sentence that introduces the list with the list, you could create a Body_KWN style.
How many levels of bullets do you want? And do you need different spacing options?
If you need three levels of nesting with your bullets, you’ll need at least three styles—one for each level of nesting. For example:
- Bullet1
- Bullet2
- Bullet3
- Bullet2
If you want the option of controlling whether the list can break across pages, you’ll need two styles per list level—one KWN style and one _Last style for each level of bullets.
If you want various spacing options, you’ll need additional styles. For instance, you may want one style for short-item lists that has no space between the list items and another style for long-item lists (i.e., items that span lines) with space between for easier readability.
I like to keep list items together on a page so readers do not have to flip back and forth or scroll up and down to see the entire list. I use three styles for each level of nesting:
- Bullet1_KWN (for long-item lists, produces 8 points of white space after each item)
- Bullet1_Comp_KWN (for short-item lists, produces no space between items—Comp is short for compressed)
- Bullet1_Last (for the last item in any Bullet1 list, does not keep-with-next, and produces 8 points of white space after to return to the standard paragraph spacing after the list)
I replicate this pattern for each level of nesting required.
Do you need any auto-labelled styles?
You can use auto-numbering to create automatic labels. For example, you may want a style for notes that automatically produces the word “Note:” in bold text, while the text you type into the note is not bold and has a hanging indent that aligns the text next to the label, as shown below:
You can use this approach for all sorts of things, such as question and answer pairs, where the auto-number produces the appropriate “Question:” or “Answer:” label. I’ll get into the specifics of how to accomplish this in a later post. For now, it’s important for you to know the option exists and to identify whether you need this type of element in your styles list.
What are your formatting conventions for selected text?
You may want to consider some standard formatting conventions for selected text to ensure consistency. For example, you may want authors to italicize or bold a term that is being defined in a given sentence or, if you are writing a user’s guide, you may want screen names, menu items, and buttons to appear with specific formatting. These conventions take the guesswork out of formatting for you and your authors and they help your readers consume content more quickly.
Think through the situations in which you use the controls in the Font group of the Home ribbon and then try to establish rules for when you would apply a given type of formatting.
Once you have the rules figured out, then you can create a character style for each rule. Continuing with the user’s guide example, you might create a character style for screen names, buttons, menu items, definitions, emphasis, etc.
When you name your character styles, select names that are indicative of the style’s purpose, rather than its attributes. This will help your authors know what each style is used for and it will allow you to change attributes without affecting the meaning of the style’s name. I also recommend applying a prefix to your character style names so that they will be grouped in the styles list and easily differentiated from the paragraph styles. For example, I prefix my character styles with c-.
In addition to quick formatting, character styles provide mass update capability, just like paragraph styles. That is, changing the attributes of a character style will update all instances bearing that style. So, if you wanted to convert screen names from bold text to underlined text, you could do so in just a couple of clicks.
Do you want to minimize the learning curve for your template users?
Your organization may use a variety of document types and the formatting of each document may vary; however, the style names can be the same across all templates to minimize the learning curve for your authors. This also supports content reuse.
For example, say you have a product description that is used in a marketing document and in a user’s guide, but the fonts and colors are completely different for these two documents. If your templates use the same style names, you can apply the applicable template to the document containing the content and voila! Or you can copy the content into the applicable document using the Merge Formatting paste option and it will automatically reformat the content to match the style definitions in the destination document.
Now that you’ve given some thought to the formatting and layout elements in your document, you can begin creating styles.
Create Styles
To create a new paragraph or character style:
1. Open the Styles pane by clicking the launcher in the Styles area of the Home ribbon.
2. At the bottom of the Styles pane, click the New Style button.
3. On the Create New Style from Formatting dialog:
a. Complete the fields on this screen. See the field definitions following the screenshot.
b. Use the Format drop-down to access additional attributes, such as font, paragraph, tabs, borders, numbering, and more.
c. When you are done formatting, click OK.
There are a lot of options on this screen, some of which may be intuitive and others not so much. The following expandable table defines each field or control on this screen and provides some useful tips that can help you avoid some of the pitfalls that I’ve encountered when building styles.