
I have been learning VBA for a while but there is one issue that I have been facing that I was not able to figure it out until know.
I want to be able to name a column using VBA, so I can use it later it as a reference column (using INDEX function) in other cells/columns.
I know to how to name a column that is fixed. But that is not what I am looking for.
Example of my issue:
This month I am naming column D as TotalAmount.
The VBA code can be:
ActiveWorkbook.Names.Add Name:="TotalAmount", RefersToR1C1:="=Sheet1!C4"
I will be referring to that column in other cells using the INDEX function.
However, next month I will be adding a new column (let’s say previous month sales) just before Column D. So the new column that I want to name as TotalAmount the next month will be column E as opposed to D.
I know that the Column naming should not change when adding a new column and Column E will automatically become the TotalAmount column. However, I cannot rely on it because the excel sheet is accessed by different people and everyone is doing his own calculations.
So I tried this as well (I am sure it is stupid but hey I am still a noob) but it did not work 
Sub Macro4()
    Range("D1").Select
    '(I can select the desired cell each month using the search function)
    Dim i As Integer
    i = ActiveCell.Column
    ActiveWorkbook.Names.Add Name:="TotalAmount", RefersToR1C1:="=Sheet1!Ci"
End sub
So I will be very grateful if anyone could help me or guide me on this subject.
Содержание
- Свойство Range.Columns (Excel)
- Синтаксис
- Замечания
- Пример
- Поддержка и обратная связь
- VBA Columns
- Excel VBA Columns Property
- Examples
- Example #1
- Example #2 – Select Column Based on Variable Value
- Example #3 – Select Column Based on Cell Value
- Example #4 – Combination of Range & Column Property
- Example #5 – Select Multiple Columns with Range Object
- Recommended Articles
- VBA Columns
- Excel VBA Columns Property
- How to Use Columns Property in Excel VBA?
- Example #1 – Select Column using VBA Columns Property
- Example #2 – VBA Columns as a Worksheet Function
- Example #3 – VBA Columns Property to Select Range of Cells
- Things to Remember
- Recommended Articles
Свойство Range.Columns (Excel)
Возвращает объект Range , представляющий столбцы в указанном диапазоне.
Синтаксис
expression. Столбцы
выражение: переменная, представляющая объект Range.
Замечания
Чтобы вернуть один столбец, используйте свойство Item или аналогично включите индекс в круглые скобки. Например, и Selection.Columns(1) возвращают Selection.Columns.Item(1) первый столбец выделенного фрагмента.
При применении к объекту Range , который является выделенным с несколькими областями, это свойство возвращает столбцы только из первой области диапазона. Например, если объект Range имеет две области — A1:B2 и C3:D4, возвращает Selection.Columns.Count значение 2, а не 4. Чтобы использовать это свойство в диапазоне, который может содержать выбор из нескольких областей, проверьте Areas.Count , содержит ли диапазон несколько областей. Если это так, выполните цикл по каждой области в диапазоне.
Возвращаемый диапазон может находиться за пределами указанного диапазона. Например, Range(«A1:B2»).Columns(5).Select возвращает ячейки E1:E2.
Если буква используется в качестве индекса, она эквивалентна числу. Например, Range(«B1:C10»).Columns(«B»).Select возвращает ячейки C1:C10, а не ячейки B1:B10. В примере «B» эквивалентно 2.
Использование свойства Columns без квалификатора объекта эквивалентно использованию ActiveSheet.Columns . Дополнительные сведения см. в свойстве Worksheet.Columns .
Пример
В этом примере для каждой ячейки в столбце один в диапазоне с именем myRange задается значение 0 (ноль).
В этом примере отображается количество столбцов в выделенном фрагменте на листе Sheet1. Если выбрано несколько областей, в примере выполняется цикл по каждой области.
Поддержка и обратная связь
Есть вопросы или отзывы, касающиеся Office VBA или этой статьи? Руководство по другим способам получения поддержки и отправки отзывов см. в статье Поддержка Office VBA и обратная связь.
Источник
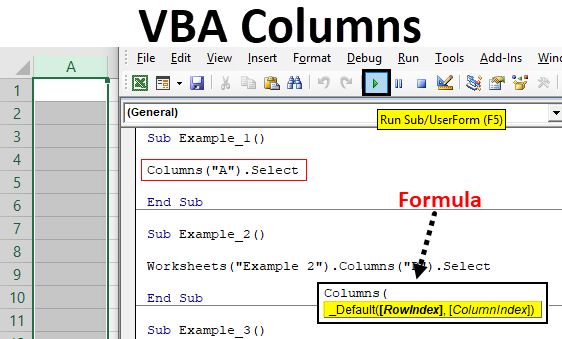
VBA Columns


Excel VBA Columns Property
VBA Columns property is used to refer to columns in the worksheet. Using this property we can use any column in the specified worksheet and work with it.
When we want to refer to the cell, we use either the Range object or Cells property. Similarly, how do you refer to columns in VBA? We can refer to columns by using the “Columns” property. Look at the syntax of COLUMNS property.
Table of contents

We need to mention the column number or header alphabet to reference the column.
For example, if we want to refer to the second column, we can write the code in three ways.
Examples
Example #1
If you want to select the second column in the worksheet, then first, we need to mention the column number we need to select.
Code:
Now, put a dot (.) to choose the “Select” method.
One of the problems with this property is we do not get to see the IntelliSense list of VBA.
Code:
Instead of mentioning the column number, we can use the column header alphabet “B” to select the second column.
Code:
The above codes will select column B, i.e., the second column.
Example #2 – Select Column Based on Variable Value
We can also use the variable to select the column number. For example, look at the below code now.
Code:
In the above, we have declared the variable as “Integer” and assigned the value of 4 to this variable.
We have supplied this variable instead of the column number for the Column’s property. Since the variable holds the value of 4, it will select the 4th column.
Example #3 – Select Column Based on Cell Value
We have seen how to select the column based on variable value now. Next, we will see how we can select the column based on the cell value number. For example, in cell A1 we have entered the number 3.

The code below will select the column based on the number in cell A1.
Code:
The above code is the same as the previous one. Still, the only thing we have changed here is instead of assigning the direct number to the variable. Instead, we gave a variable value as “whatever the number is in cell A1.”
Since we have a value of 3 in cell A1, it will select the third column.
Example #4 – Combination of Range & Column Property
We can also use the Columns property with the Range object. Using the Range object, we can specify the specific range. For example, look at the below code.
Code:
In the above example, we have specified the range of cells as C1 to D5. Then, using the columns property, we have specified the column number as 2 to select.
Now, in general, our second column is B. So the code has to select the “B” column but see what happens when we run the code.

It has selected the cells from D1 to D5.
In our perception, it should have selected the second column, i.e., column B. But now, it has selected the cells from D1 to D5.
It has selected these cells because before using the COLUMNS property, we have specified the range using the RANGE object as C1 to D5. Now, the property thinks within this range as the columns and selects the second column in the range C1 to D5. Therefore, D is the second column, and specified cells are D1 to D5.
Example #5 – Select Multiple Columns with Range Object
Using the Range object and Columns property, we can select multiple columns. For example, look at the below code.
Code:
The code will select the column from the second column to the fifth column, i.e., from column B to E.

We can also write the code in this way.
Code:
The above is the same as the previous one and selects the columns from B to E.
Like this, we can use the COLUMNS property to work with the worksheet.
Recommended Articles
This article has been a guide to VBA Columns. Here, we discuss examples of the column property in Excel VBA and select multiple columns with the range object and downloadable Excel templates. Below are some useful articles related to VBA: –
Источник
VBA Columns
Excel VBA Columns Property
We all are well aware of the fact that an Excel Worksheet is arranged in columns and rows and each intersection of rows and columns is considered as a cell. Whenever we want to refer a cell in Excel through VBA, we can use the Range or Cells properties. What if we want to refer the columns from Excel worksheet? Is there any function which we can use to refer the same? The answer is a big YES!
Yes, there is a property in VBA called “Columns” which helps you in referring as well as returning the column from given Excel Worksheet. We can refer any column from the worksheet using this property and can manipulate the same.
Valuation, Hadoop, Excel, Mobile Apps, Web Development & many more.
Syntax of VBA Columns:
The syntax for VBA Columns property is as shown below:

- RowIndex – Represents the row number from which the cells have to be retrieved.
- ColumnIndex – Represents the column number which is in an intersection with the respective rows and cells.
Obviously, which column needs to be included/used for further proceedings is being used by these two arguments. Both are optional and if not provided by default would be considered as the first row and first column.
How to Use Columns Property in Excel VBA?
Below are the different examples to use columns property in excel using VBA code.
Example #1 – Select Column using VBA Columns Property
We will see how a column can be selected from a worksheet using VBA Columns property. For this, follow the below steps:
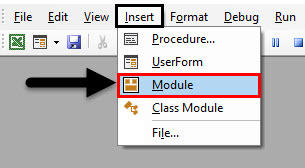
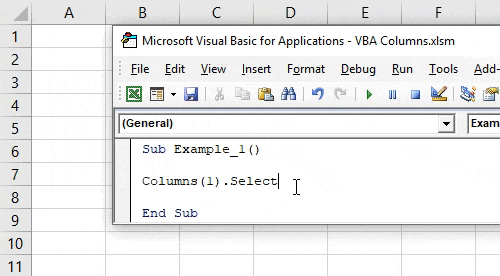
Step 1: Insert a new module under Visual Basic Editor (VBE) where you can write the block of codes. Click on Insert tab and select Module in VBA pane.
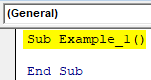
Step 2: Define a new sub-procedure which can hold the macro you are about to write.
Code:
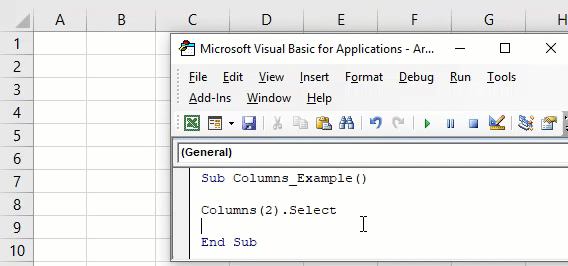
Step 3: Use Columns.Select property from VBA to select the first column from your worksheet. This actually has different ways, you can use Columns(1).Select initially. See the screenshot below:
Code:
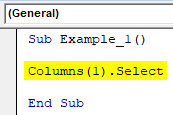
The Columns property in this small piece of code specifies the column number and Select property allows the VBA to select the column. Therefore in this code, Column 1 is selected based on the given inputs.
Step 4: Hit F5 or click on the Run button to run this code and see the output. You can see that column 1 will be selected in your excel sheet.
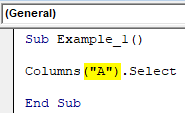
This is one way to use columns property to select a column from a worksheet. We can also use the column names instead of column numbers in the code. Below code also gives the same result.
Code:
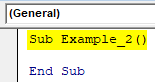
Example #2 – VBA Columns as a Worksheet Function
If we are using the Columns property without any qualifier, then it will only work on all the Active worksheets present in a workbook. However, in order to make the code more secure, we can use the worksheet qualifier with columns and make our code more secure. Follow the steps below:
Step 1: Define a new sub-procedure which can hold the macro under the module.
Code:
Now we are going to use Worksheets.Columns property to select a column from a specified worksheet.
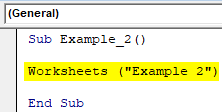
Step 2: Start typing the Worksheets qualifier under given macro. This qualifier needs the name of the worksheet, specify the sheet name as “Example 2” (Don’t forget to add the parentheses). This will allow the system to access the worksheet named Example 2 from the current workbook.
Code:
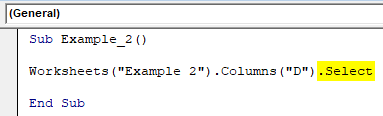
Step 3: Now use Columns property which will allow you to perform different column operations on a selected worksheet. I will choose the 4 th column. I either can choose it by writing the index as 4 or specifying the column alphabet which is “D”.
Code:

As of here, we have selected a worksheet named Example 2 and accessed the column D from it. Now, we need to perform some operations on the column accessed.
Step 4: Use Select property after Columns to select the column specified in the current worksheet.
Code:
Step 5: Run the code by pressing the F5 key or by clicking on Play Button.

Example #3 – VBA Columns Property to Select Range of Cells
Suppose we want to select the range of cells across different columns. We can combine the Range as well as Columns property to do so. Follow the steps below:
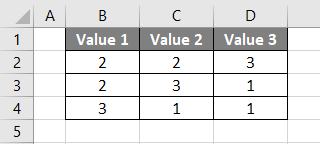
Suppose we have our data spread across B1 to D4 in the worksheet as shown below:
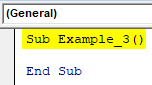
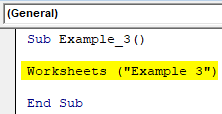
Step 1: Define a new sub-procedure to hold a macro.
Code:
Step 2: Use the Worksheets qualifier to be able to access the worksheet named “Example 3” where we have the data shown in the above screenshot.
Code:
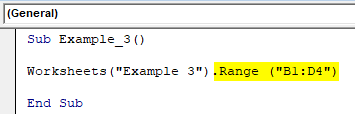
Step 3: Use Range property to set the range for this code from B1 to D4. Use the following code Range(“B1:D4”) for the same.
Code:
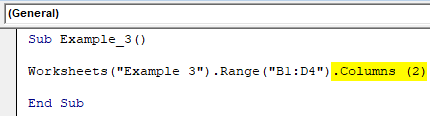
Step 4: Use Columns property to access the second column from the selection. Use code as Columns(2) in order to access the second column from the accessed range.
Code:
Step 5: Now, the most important part. We have accessed the worksheet, range, and column. However, in order to select the accessed content, we need to use Select property in VBA. See the screenshot below for the code layout.
Code:
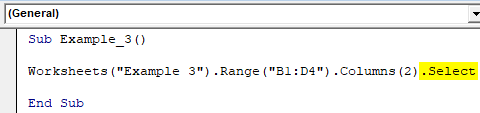
Step 6: Run this code by hitting F5 or Run button and see the output.
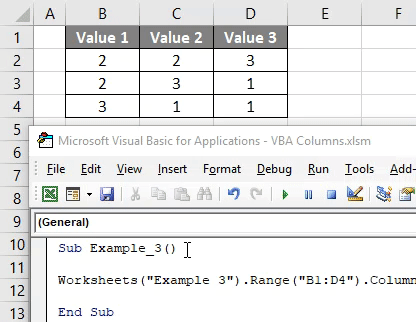
You can see the code has selected Column C from the excel worksheet though you have put the column value as 2 (which means the second column). The reason for this is, we have chosen the range as B1:D4 in this code. Which consists of three columns B, C, D. At the time of execution column B is considered as first column, C as second and D as the third column instead of their actual positionings. The range function has reduced the scope for this function for B1:D4 only.
Things to Remember
- We can’t see the IntelliSense list of properties when we are working on VBA Columns.
- This property is categorized under Worksheet property in VBA.
Recommended Articles
This is a guide to VBA Columns. Here we discuss how to use columns property in Excel by using VBA code along with practical examples and downloadable excel template. You can also go through our other suggested articles –
Источник
November 15, 2015/
Chris Newman
What Is A Named Range?
Creating a named range allows you to refer to a cell or group of cells with a custom name instead of the usual column/row reference. The HUGE benefit to using Named Ranges is it adds the ability to describe the data inside your cells. Let’s look at a quick example:
Can you tell if shipping costs are charged with the product price?
-
= (B7 + B5 * C4) * (1 + A3)
-
=(ShippingCharge + ProductPrice * Quantity) * (1 + TaxRate)
Hopefully, you can clearly see option number TWO gives you immediate insight to whether the cost of the products includes shipping costs. This allows the user to easily understand how the formula is calculating without having to waste time searching through cells to figure out what is what.
How Do I Use Named Ranges?
As a financial analyst, I play around with a bunch of rates. Examples could be anything from a tax rate to an estimated inflation rate. I use named ranges to organize my variables that either are changed infrequently (ie Month or Year) or something that will be static for a good amount of time (ie inflation rate). Here are a list of common names I use on a regular basis:
-
ReportDate
-
Year
-
Month
-
FcstID
-
TaxRate
-
RawData
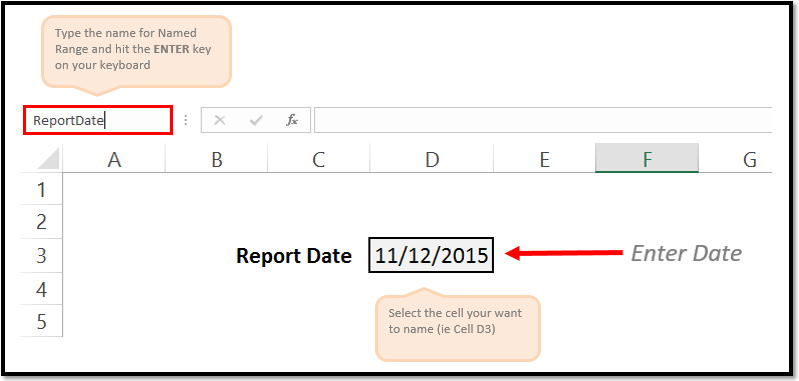
Creating Unique Names On The Fly
It is super easy to create a Named Range. All you have to do is highlight the cell(s) you want to reference and give it a name in the Name Box. You name cannot have any spaces in it, so if you need to separate words you can either capitalize the beginning of each new word or use an underscore (_). Make sure you hit the ENTER key after you have finished typing the name to confirm the creation of the Named Range.
As a side note, any Named Range created with the Name Box has a Workbook scope. This means the named range can be accessed by any worksheet in your Excel file.
Creating Names With The «Name Manager»
If you want to customize your named ranges even more, you can open up the Name Manager (Formulas tab > Defined Names group > Name Manager button) to edit and create new named ranges.
I won’t go into great detail in this article, but know that with the Name Manager you can
-
Change the name of an existing Named Range
-
Change the reference formula
-
Specify the scope (what worksheets the name can be accessed from)

On To The VBA
Now that you have had a brief overview on Named Ranges, lets dig into some VBA macros you can use to help automate the use of Named Ranges.
Add A Named Range
The below VBA code shows ways you can create various types of named ranges.
Sub NameRange_Add()
‘PURPOSE: Various ways to create a Named Range
‘SOURCE: www.TheSpreadsheetGuru.com
Dim cell As Range
Dim rng As Range
Dim RangeName As String
Dim CellName As String
‘Single Cell Reference (Workbook Scope)
RangeName = «Price»
CellName = «D7»
Set cell = Worksheets(«Sheet1»).Range(CellName)
ThisWorkbook.Names.Add Name:=RangeName, RefersTo:=cell
‘Single Cell Reference (Worksheet Scope)
RangeName = «Year»
CellName = «A2»
Set cell = Worksheets(«Sheet1»).Range(CellName)
Worksheets(«Sheet1»).Names.Add Name:=RangeName, RefersTo:=cell
‘Range of Cells Reference (Workbook Scope)
RangeName = «myData»
CellName = «F9:J18»
Set cell = Worksheets(«Sheet1»).Range(CellName)
ThisWorkbook.Names.Add Name:=RangeName, RefersTo:=cell
‘Secret Named Range (doesn’t show up in Name Manager)
RangeName = «Username»
CellName = «L45»
Set cell = Worksheets(«Sheet1»).Range(CellName)
ThisWorkbook.Names.Add Name:=RangeName, RefersTo:=cell, Visible:=False
End Sub
Loop Through Named Ranges
This VBA macro code shows how you can cycle through the named ranges within your spreadsheet.
Sub NamedRange_Loop()
‘PURPOSE: Delete all Named Ranges in the Active Workbook
‘SOURCE: www.TheSpreadsheetGuru.com
Dim nm As Name
‘Loop through each named range in workbook
For Each nm In ActiveWorkbook.Names
Debug.Print nm.Name, nm.RefersTo
Next nm
‘Loop through each named range scoped to a specific worksheet
For Each nm In Worksheets(«Sheet1»).Names
Debug.Print nm.Name, nm.RefersTo
Next nm
End Sub
Delete All Named Ranges
If you need to clean up a bunch of junk named ranges, this VBA code will let you do it.
Sub NamedRange_DeleteAll()
‘PURPOSE: Delete all Named Ranges in the ActiveWorkbook (Print Areas optional)
‘SOURCE: www.TheSpreadsheetGuru.com
Dim nm As Name
Dim DeleteCount As Long
‘Delete PrintAreas as well?
UserAnswer = MsgBox(«Do you want to skip over Print Areas?», vbYesNoCancel)
If UserAnswer = vbYes Then SkipPrintAreas = True
If UserAnswer = vbCancel Then Exit Sub
‘Error Handler in case Delete Function Errors out
On Error GoTo Skip
‘Loop through each name and delete
For Each nm In ActiveWorkbook.Names
If SkipPrintAreas = True And Right(nm.Name, 10) = «Print_Area» Then GoTo Skip
‘Error Handler in case Delete Function Errors out
On Error GoTo Skip
‘Delete Named Range
nm.Delete
DeleteCount = DeleteCount + 1
Skip:
‘Reset Error Handler
On Error GoTo 0
Next
‘Report Result
If DeleteCount = 1 Then
MsgBox «[1] name was removed from this workbook.»
Else
MsgBox «[» & DeleteCount & «] names were removed from this workbook.»
End If
End Sub
Delete Named Ranges with Error References
This VBA code will delete only Named Ranges with errors in them. These errors can be caused by worksheets being deleted or rows/columns being deleted.
Sub NamedRange_DeleteErrors()
‘PURPOSE: Delete all Named Ranges with #REF error in the ActiveWorkbook
‘SOURCE: www.TheSpreadsheetGuru.com
Dim nm As Name
Dim DeleteCount As Long
‘Loop through each name and delete
For Each nm In ActiveWorkbook.Names
If InStr(1, nm.RefersTo, «#REF!») > 0 Then
‘Error Handler in case Delete Function Errors out
On Error GoTo Skip
‘Delete Named Range
nm.Delete
DeleteCount = DeleteCount + 1
End If
Skip:
‘Reset Error Handler
On Error GoTo 0
Next
‘Report Result
If DeleteCount = 1 Then
MsgBox «[1] errorant name was removed from this workbook.»
Else
MsgBox «[» & DeleteCount & «] errorant names were removed from this workbook.»
End If
End Sub
Anything Missing From This Guide?
Let me know if you have any ideas for other useful VBA macros concerning Named Ranges. Or better yet, share with me your own macros and I can add them to the article for everyone else to see! I look forward to reading your comments below.
About The Author
Hey there! I’m Chris and I run TheSpreadsheetGuru website in my spare time. By day, I’m actually a finance professional who relies on Microsoft Excel quite heavily in the corporate world. I love taking the things I learn in the “real world” and sharing them with everyone here on this site so that you too can become a spreadsheet guru at your company.
Through my years in the corporate world, I’ve been able to pick up on opportunities to make working with Excel better and have built a variety of Excel add-ins, from inserting tickmark symbols to automating copy/pasting from Excel to PowerPoint. If you’d like to keep up to date with the latest Excel news and directly get emailed the most meaningful Excel tips I’ve learned over the years, you can sign up for my free newsletters. I hope I was able to provide you with some value today and I hope to see you back here soon!
— Chris
Founder, TheSpreadsheetGuru.com