
Предназначение программы: вставка изображений в таблицу Excel, поиск картинок в папке или в Google, экспорт картинок из таблицы в папку.
Основные функции программы:
- вставка фото из папки (поиск по имени файла)
- вставка картинок по ссылкам из таблицы
- поиск изображений в гугл по данным с листа Excel
- экспорт изображений с листа в файлы
- сжатие изображений перед вставкой (получается файл минимального размера)
- поиск картинок в подпапках (глубина поиска по подпапкам не ограничена)
- добавление гиперссылок к вставляемым изображениям
- 3 варианта поиска файлов в папке (по точному совпадению имени файла и значения ячейки, или по частичному вхожению)
- 2 режима вставки картинок — подгонка размеров под ячейку, или соблюдение пропорций исходного изображения
- возможность вставки изображений в примечания к ячейкам
- поиск недостающих фотографий товара в Google (в т.ч. поиск по заданным сайтам)
- режим вставки изображений сразу в несколько столбцов
- экспорт полноразмерных изображений (в каком виде они хранятся внутри файла Excel)
Подробнее — в разделе Справка по программе
Подробные инструкции и описание функционала также можно найти в разделе Справка по программе
Подробные инструкции и описание функционала также можно найти в разделе Справка по программе
Надстройка позволяет искать в выбранной папке изображения, основываясь на содержимом ячеек таблицы Excel, и производить вставку найденных изображений в соседние ячейки (или в примечания к этим ячейкам).
Кроме того, надстройка умеет скачивать изображения по ссылкам, сохраняя загруженные изображения в заданной папке, и вставлять картинки в примечания к ячейкам.
Принцип работы с программой:
- Скачиваем файл программы (по ссылке выше), и сохраняем его куда-нибудь себе на диск. (например, на Рабочий Стол)
- Запускаем файл надстройки PastePictures.xla(как любой другой файл Excel — двойным щелчком)
- Открываем файл с названиями картинок (пример файла вы увидите при тестировании программы)
- На панели инструментов программы нажимаем кнопку «Настройки», выставляем нужные параметры
- На форме настроек выбираем путь к папке, содержащей картинки (изображения)
- Выставляем необходимые размеры для ячеек с картинками, выбираем первую ячейку на листе с именем файла
- Указываем номер столбца, в который будут помещены изображения
- и т.д. и т.п. — настроек там много разных, но разобраться в них совсем не сложно
- Нажимаем в меню «Изображения» — «Вставить картинки из папки», и через несколько секунд получаем результат.
- Если в исходной таблице — не имена файлов, а ссылки (URL) на картинки в интернете, то используем для запуска пункт меню «Изображения» — «Вставить картинки по ссылкам».
-

-
September 17 2013, 09:25
Надстройка PastePictures позволяет искать в выбранной папке изображения, основываясь на содержимом ячеек таблицы Excel, и производить вставку найденных изображений в соседние ячейки (или в примечания к этим ячейкам).
Кроме того, надстройка умеет скачивать изображения по ссылкам, сохраняя загруженные изображения в заданной папке, и вставлять картинки в примечания к ячейкам.
- поиск картинок в подпапках (глубина поиска по подпапкам не ограничена)
- установка выбранного пользователем размера для вставляемых изображений
- отображение состояния поиска и вставки изображений (прогресс-бар)
- вывод результатов обработки таблицы (сколько изображений вставлено, сколько не найдено)
- добавление гиперссылок к вставляемым изображениям (по щелчку на картинке открывается исходный файл)
- 2 режима поиска файлов — по точному совпадению имени файла, и по началу имени файла-изображения
- 2 режима вставки картинок — подгонка размеров под ячейку, или соблюдение пропорций исходного изображения
- вывод количества файлов в выбранной папке
- возможность выбора столбца с названиями файлов, и указания номера столбца для вставляемых изображений
- возможность вставки изображений в комментарии к ячейкам
- поиск недостающих фотографий товара в Google (в т.ч. поиск по заданным сайтам)
- режим вставки изображений сразу в несколько столбцов
Надстройка позволяет искать в выбранной папке изображения, основываясь на содержимом ячеек таблицы Excel, и производить вставку найденных изображений в соседние ячейки (или в примечания к этим ячейкам).
Кроме того, надстройка умеет скачивать изображения по ссылкам, сохраняя загруженные изображения в заданной папке, и вставлять картинки в примечания к ячейкам.

- Особенности
Особенности надстройки:
поиск картинок в подпапках (глубина поиска по подпапкам не ограничена)
установка выбранного пользователем размера для вставляемых изображений
отображение состояния поиска и вставки изображений (прогресс-бар)
вывод результатов обработки таблицы (сколько изображений вставлено, сколько не найдено)
добавление гиперссылок к вставляемым изображениям (по щелчку на картинке открывается исходный файл)
2 режима поиска файлов — по точному совпадению имени файла, и по началу имени файла-изображения
2 режима вставки картинок — подгонка размеров под ячейку, или соблюдение пропорций исходного изображения
вывод количества файлов в выбранной папке
возможность выбора столбца с названиями файлов, и указания номера столбца для вставляемых изображений
возможность вставки изображений в комментарии к ячейкам
поиск недостающих фотографий товара в Google (в т.ч. поиск по заданным сайтам)
режим вставки изображений сразу в несколько столбцов

ExcelVBA — полезные надстройки для Excel, предназначенные для широкого круга задач. Тратите много времени на работу с программой Microsoft Excel? Ускорьте и упростите свою работу при помощи макросов: — всего лишь одно нажатие кнопки, и Excel сам выполнит за вас всю работу! Макросы могут делать почти всё то же самое, что делаете вы вручную, — собирать информацию из файлов, заполнять документы Word данными из Excel, рассылать почту, загружать данные из интернета, формировать отчёты любой сложности, анализировать данные при помощи формул, объединять информацию из прайс-листов, и многое-многое другое.
Системные требования:
Windows XP | Vista | 7 | 8 | 8.1 | 10
Excel 2007 | 2010 | 2013 | 2016
Торрент ExcelVBA — Универсальные надстройки для Excel 08.2017 RePack подробно:
·Lookup 1.1.6 — Программа подстановки данных из одного файла в другой (замена функции ВПР)
Если вам надо сравнить 2 таблицы (по одному столбцу, или по нескольким), и для совпадающих строк скопировать значения выбранных столбцов из одной таблицы в другую, надстройка «Lookup» поможет сделать это нажатием одной кнопки.
·FillDocuments 3.1.3 — Программа заполнения документов данными из Excel (из Excel в Word) + рассылка почты
Надстройка FillDocuments предназначена для формирования (подготовки) документов по шаблонам, с заполнением созданных файлов данными из текущей книги Excel, с возможностью отправки писем.
В качестве шаблонов могут выступать следующие типы файлов:
— шаблоны и документы Word (расширения DOC, DOCX, DOCM, DOT, DOTX, DOTM)
— шаблоны и книги Excel (расширения XLS, XLSX, XLSM, XLSB, XLT, XLTX, XLTM)
— текстовые документы (расширения TXT, DAT, XML и т.д.)
В качестве исходных данных для заполнения, используется открытый в Excel файл (с таблицей, содержащей строку заголовка)
Количество шаблонов документов неограничено (хотя в программе предусмотрен вывод предупреждения, если количество используемых шаблонов превышает 50 — поскольку время формирования документов напрямую зависит от количества файлов)
Рассылка писем выполняется средствами почтовых программ TheBAT! или Outlook (на ваш выбор)
·Unification 2.1.0 — «Прайс лист» — программа объединения и обработки прайс листов
Программа «Прайс лист», выполненная в виде надстройки для Excel, позволяет вам нажатием одной кнопки преобразовать множество прайс-листов различных форматов к единому виду.
Представьте себе ситуацию, когда вам в очередной раз прислали несколько файлов Excel (прайс-листов, отчётов, таблиц, и т.д.), и вам надо объединить данные из всех этих файлов в одну таблицу.
И всё бы ничего, но таблицы в этих файлах очень уж разнотипные (хотя, по сути, содержат похожую информацию — например, коды товаров, наименования, цены и количество).
Кроме того, составители этих «таблиц», будто специально, постарались усложнить вам жизнь, — в каждой таблице что-нибудь, да сделано через ж..у, — например, один отправитель разбил ФИО на 3 разных столбца (отдельно фамилия, имя и отчество), другой — цены указал в монгольских тургиках (вместо рублей), третий — объединил в одном столбце наименование товара с его кодом, четвертый — сделал группировку в прайс-листе, вынеся названия категорий товара в отдельные строки…
И вот смотрите вы на все эти файлы, и понимаете, что, кроме как вручную, эти таблицы не привести к единому виду. А без этого никак — иначе не получится ни проанализировать данные, ни свой прайс-лист составить…
Подсчитав суммарное количество строк в файлах, вы понимаете, что работы тут на пару недель. А новые прайсы поставщики присылают ежедневно.
Какой же выход есть из этой ситуации?
Очень просто — надо доверить обработку всех этих файлов специализированной программе.
Программа «Прайс-лист» как раз предназначена для таких случаев — потратив полчаса на настройку программы, вы сможете обрабатывать все эти разнотипные файлы нажатием одной кнопки!
Вам потребуется один раз задать настройки для каждого типа обрабатываемого файла (из какого столбца что брать, в какой столбец итоговой таблицы вставлять) — и потом программа сама будет делать за вас всю работу.
·Parser 2.9.20 — Парсер сайтов и файлов (сбор данных с сайта в Excel)
Программа предназначена для загрузки (парсинга) в Excel данных со страниц произвольного сайта.
Надстройка может работать и как парсер файлов, — собирать данные из файлов Word, xml, txt и т.п.
Исходными данными является список ссылок или артикулов товара на листе Excel, или же программа работает без исходных данных, загружая все данные с сайта, и формируя таблицу Excel «с нуля»
Программа может обрабатывать как исходный текст (HTML-код) веб-страниц, так и текст страницы или её части (полученный из HTML-кода)
Реализована загрузка файлов по ссылкам (ссылка для загрузки файла может браться из HTML-кода веб-страницы).
Скачанные файлы сохраняются в заданную папку под именем из выбранного столбца Excel (можно задать маску имени файла)
·BarcodeScanner 1.2.2 — Сканер штрих-кодов: ввод данных в таблицу Excel
Программа предназначена для облегчения ввода данных со сканера штрих-кодов в таблицу Excel.
Вы нажимаете кнопку на сканере, — в таблице Excel автоматически находится считанный штрих-код, и в этой строке количество товара увеличивается на единицу.
Особенности программы:
2 режима фиксации ввода штрих-кода: по фиксированной длине, и по завершающему символу
возможность удаления части символов из считанного штрихкода
добавление новых (отсутствующих в таблице) штрих-кодов в конец таблицы
поддержка ячеек с несколькими штрихкодами одновременно
ввод количества товара с клавиатуры (если количество товара больше 1)
цветовая индикация результатов поиска (зеленый — штрихкод найден в таблице, красный — не найден, желтый — добавлена новая строка с этим штрихкодом)
В настройках программы можно задать:
номера столбцов со штрихкодами и количеством товара
включить режим добавления новых штрихкодов в таблицу Excel
задать столбец с ограничением количества товара для данной записи (строки)
настроить «горячую клавишу» для ввода количества с клавиатуры
·PastePictures 3.4.2 — Надстройка для вставки картинок (изображений) в Excel
Надстройка позволяет искать в выбранной папке изображения, основываясь на содержимом ячеек таблицы Excel, и производить вставку найденных изображений в соседние ячейки (или в примечания к этим ячейкам).
Кроме того, надстройка умеет скачивать изображения по ссылкам, сохраняя загруженные изображения в заданной папке, и вставлять картинки в примечания к ячейкам.
·Особенности надстройки:
поиск картинок в подпапках (глубина поиска по подпапкам не ограничена)
установка выбранного пользователем размера для вставляемых изображений
отображение состояния поиска и вставки изображений (прогресс-бар)
вывод результатов обработки таблицы (сколько изображений вставлено, сколько не найдено)
добавление гиперссылок к вставляемым изображениям (по щелчку на картинке открывается исходный файл)
2 режима поиска файлов — по точному совпадению имени файла, и по началу имени файла-изображения
2 режима вставки картинок — подгонка размеров под ячейку, или соблюдение пропорций исходного изображения
вывод количества файлов в выбранной папке
возможность выбора столбца с названиями файлов, и указания номера столбца для вставляемых изображений
возможность вставки изображений в комментарии к ячейкам
поиск недостающих фотографий товара в Google (в т.ч. поиск по заданным сайтам)
режим вставки изображений сразу в несколько столбцов
Дополнительная информация:
RePack: forum.ru-board.com
Установка:
·Выберите для папки с надстройками удобное местоположение на жестком (не сетевом!) диске и не меняйте его, т.к. Excel будет в дальнейшем загружать надстройки из этой папки при каждом запуске.
·Запустите Excel, перейдите в настройки безопасности, в параметрах макросов установите галочки: «Включить макросы» и «Доверять доступ к объектной модели проектов VBA»
В настройках Excel, на вкладке «Надстройки» нажмите «Перейти», укажите папку с надстройками и подключите требуемые надстройки.
Скачать ExcelVBA — Универсальные надстройки для Excel 08.2017 RePack через торрент:

Содержание
- Insert a picture in Excel for the web
- Insert Picture from your computer
- Insert Picture from Stock Images
- Insert Picture from Bing Pictures
- Надстройка для вставки картинок (изображений) в Excel
- Как скачать и протестировать программу
- How to Insert Picture Into a Cell in Excel (a Step-by-Step Tutorial)
- Insert Picture into a Cell in Excel
- Lock the Picture with the Cell in Excel
- How to insert picture in Excel cell, comment, header or footer
- How to insert picture in Excel
- Insert an image from a computer
- Add picture from the web, OneDrive or Facebook
- Paste picture in Excel from another program
- How to insert picture in Excel cell
- How to insert multiple pictures into cells in Excel
- How to insert picture in a comment
- A quick way to insert a picture in a comment
- How to embed image into Excel header or footer
- Insert a picture in Excel cell with formula
- Insert data from another sheet as picture
- How to copy/paste as picture in Excel
- Make a dynamic picture with Camera tool
- How to modify picture in Excel
- How to copy or move picture in Excel
- How to resize picture in Excel
- How to change picture’s colors and styles
- How to replace picture in Excel
- How to delete picture in Excel
Insert a picture in Excel for the web
Inserting a picture in your worksheet is an easy way to show information or add visual interest. There are three ways to add a picture in Excel for the web.
Tip: To add pictures in Excel for the web, you may need to first switch to Editing View by clicking Edit Workbook > Edit in Browser.
Insert Picture from your computer
To insert a picture that is saved in a location you can access, follow these steps:
Click the location in your worksheet where you want to insert a picture.
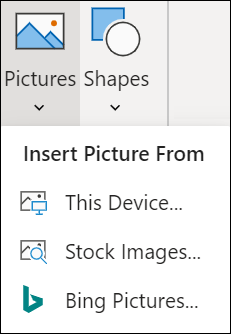
On the Insert ribbon, click Pictures.
Select This Device…
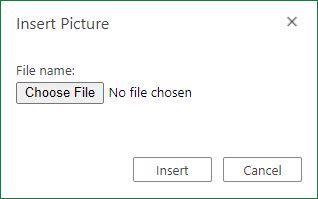
Browse to the picture you want to insert, select it, and then click Open.
The picture will be inserted in your worksheet.
Insert Picture from Stock Images
To insert a picture from a collection of stock images, follow these steps:
Click the location in your worksheet where you want to insert a picture.
On the Insert ribbon, click Pictures.
Select Stock Images…
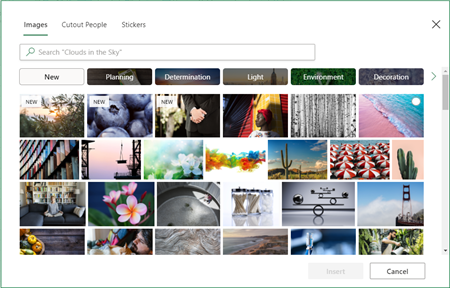
Browse to the picture you want to insert, select it, and then click Open.
The picture will be inserted in your worksheet.
Insert Picture from Bing Pictures
To insert a picture from a Bing Pictures search, follow these steps:
Click the location in your worksheet where you want to insert a picture.
On the Insert ribbon, click Pictures.
Select Bing Pictures…
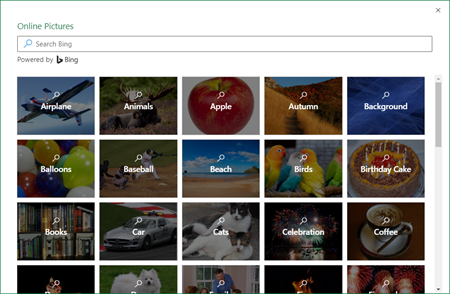
Search for the picture you want to insert, select it, and click Open.
The picture will be inserted in your worksheet.
Inserting an insecure image using Bing search is not supported on Excel for the web. Images can be considered insecure for one of the following reasons:
The website hosting the image is not using HTTPS. This can be considered a potential security vulnerability.
The website URL of the image is not a valid address.
If you would like to use an image found through Bing Pictures search on Excel for the web which is not supported, we suggest using these steps:
Click the location in your worksheet where you want to insert a picture.
On the Insert ribbon, click Pictures.
Select Bing Pictures…
Search for the picture you want to insert.
On the specific image you would like to insert, click on ellipses (. ) and then on the image link. This will open the image in a new browser tab.
Save the image to your computer.
Follow the steps above to Insert Picture from your computer using the image you just saved.
Tip: You can also copy and paste an image from the web or an app into Excel for the web, without saving it first and without using the Insert menu.
After the picture is in your worksheet, you can resize it, move it wherever you want, and even add alternate text for improved accessibility.
Источник
Надстройка для вставки картинок (изображений) в Excel
Надстройка PastePictures для MS Excel: общие сведения
Предназначение программы: вставка изображений в таблицу Excel, поиск картинок в папке или в Google, экспорт картинок из таблицы в папку.
Основные функции программы:
- вставка фото из папки (поиск по имени файла)
- вставка картинок по ссылкам из таблицы
- поиск изображений в гугл по данным с листа Excel
- экспорт изображений с листа в файлы
- сжатие изображений перед вставкой (получается файл минимального размера)
- поиск картинок в подпапках (глубина поиска по подпапкам не ограничена)
- добавление гиперссылок к вставляемым изображениям
- 3 варианта поиска файлов в папке (по точному совпадению имени файла и значения ячейки, или по частичному вхожению)
- 2 режима вставки картинок — подгонка размеров под ячейку, или соблюдение пропорций исходного изображения
- возможность вставки изображений в примечания к ячейкам
- поиск недостающих фотографий товара в Google (в т.ч. поиск по заданным сайтам)
- режим вставки изображений сразу в несколько столбцов
- экспорт полноразмерных изображений (в каком виде они хранятся внутри файла Excel)
Подробнее — в разделе Справка по программе
На видео рассказывается о работе с программой, и показан процесс её настройки:
Подробные инструкции и описание функционала также можно найти в разделе Справка по программе
Видеоинструкция по дополнительным возможностям
На видео рассказывается о возможностях поиска изображений в Google:
Подробные инструкции и описание функционала также можно найти в разделе Справка по программе
Надстройка позволяет искать в выбранной папке изображения, основываясь на содержимом ячеек таблицы Excel, и производить вставку найденных изображений в соседние ячейки (или в примечания к этим ячейкам).
Кроме того, надстройка умеет скачивать изображения по ссылкам, сохраняя загруженные изображения в заданной папке, и вставлять картинки в примечания к ячейкам.
Принцип работы с программой:
- Скачиваем файл программы (по ссылке выше), и сохраняем его куда-нибудь себе на диск. (например, на Рабочий Стол)
- Запускаем файл надстройки PastePictures.xla(как любой другой файл Excel — двойным щелчком)
- Открываем файл с названиями картинок (пример файла вы увидите при тестировании программы)
- На панели инструментов программы нажимаем кнопку «Настройки», выставляем нужные параметры
- На форме настроек выбираем путь к папке, содержащей картинки (изображения)
- Выставляем необходимые размеры для ячеек с картинками, выбираем первую ячейку на листе с именем файла
- Указываем номер столбца, в который будут помещены изображения
- и т.д. и т.п. — настроек там много разных, но разобраться в них совсем не сложно
- Нажимаем в меню «Изображения» — «Вставить картинки из папки», и через несколько секунд получаем результат.
- Если в исходной таблице — не имена файлов, а ссылки (URL) на картинки в интернете, то используем для запуска пункт меню «Изображения» — «Вставить картинки по ссылкам».
Как скачать и протестировать программу
Для загрузки надстройки PastePictures воспользуйтесь кнопкой Скачать программу
Если не удаётся скачать надстройку, читайте инструкцию про антивирус
Если скачали файл, но он не запускается, читайте почему не появляется панель инструментов
Это полнофункциональная пробная (TRIAL) версия, у вас есть 15 дней бесплатного использования ,
в течение которых вы можете протестировать работу программы.
Этого вполне достаточно, чтобы всё настроить и проверить, используя раздел Справка по программе
Если вам понравится, как работает программа, вы можете Купить лицензию
Лицензия (для постоянного использования) стоит 2000 рублей .
В эту стоимость входит активация на 2 компьютера (вы сможете пользоваться программой и на работе, и дома).
Если нужны будут дополнительные активации, их можно будет в любой момент приобрести по 600 рублей за каждый дополнительный компьютер.
Источник
How to Insert Picture Into a Cell in Excel (a Step-by-Step Tutorial)
Watch Video – How to Insert Picture into a Cell in Excel
A few days ago, I was working with a data set that included a list of companies in Excel along with their logos.
I wanted to place the logo of each company in the cell adjacent to its name and lock it in such a way that when I resize the cell, the logo should resize as well.
I also wanted the logos to get filtered when I filter the name of the companies.
Wishful Thinking? Not Really.
You can easily insert a picture into a cell in Excel in a way that when you move, resize, and/or filter the cell, the picture also moves/resizes/filters.
Below is an example where the logos of some popular companies are inserted in the adjacent column, and when the cells are filtered, the logos also get filtered with the cells.
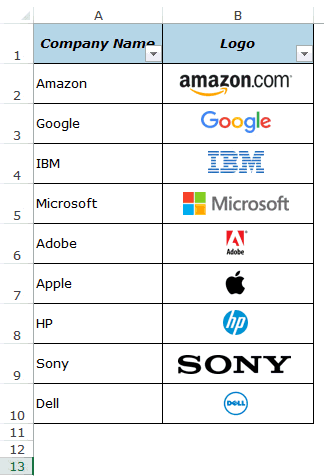
This could also be useful if you’re working with products/SKUs and their images.
When you insert an image in Excel, it not linked to the cells and would not move, filter, hide, and resize with cells.
In this tutorial, I will show you how to:
- Insert a Picture Into a Cell in Excel.
- Lock the Picture in the cell so that it moves, resizes, and filters with the cells.
Insert Picture into a Cell in Excel
Here are the steps to insert a picture into a cell in Excel:
- Go to the Insert tab.
- Click on the Pictures option (it’s in the illustrations group).

- In the ‘Insert Picture’ dialog box, locate the pictures that you want to insert into a cell in Excel.
- Click on the Insert button.
- Re-size the picture/image so that it can fit perfectly within the cell.
- Place the picture in the cell.
- A cool way to do this is to first press the ALT key and then move the picture with the mouse. It will snap and arrange itself with the border of the cell as soon it comes close to it.
- A cool way to do this is to first press the ALT key and then move the picture with the mouse. It will snap and arrange itself with the border of the cell as soon it comes close to it.
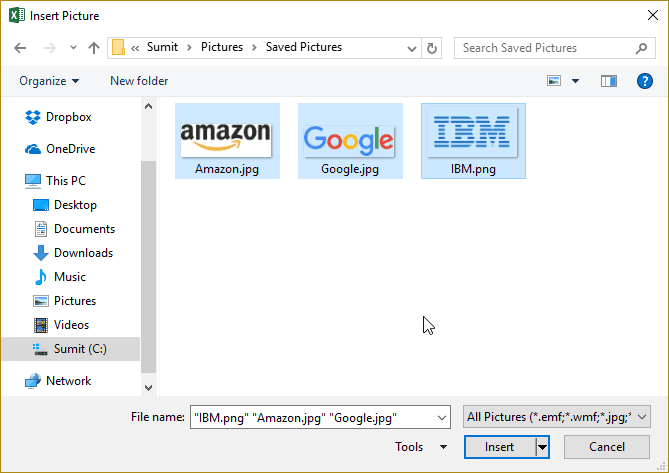


If you have multiple images, you can select and insert all the images at once (as shown in step 4).
You can also resize images by selecting it and dragging the edges. In the case of logos or product images, you may want to keep the aspect ratio of the image intact. To keep the aspect ratio intact, use the corners of an image to resize it.
When you place an image within a cell using the steps above, it will not stick with the cell in case you resize, filter, or hide the cells. If you want the image to stick to the cell, you need to lock the image to the cell it’s placed n.
To do this, you need to follow the additional steps as shown in the section below.
Lock the Picture with the Cell in Excel
Once you have inserted the image into the workbook, resized it ti fit within a cell, and placed it in the cell, you need to lock it to make sure it moves, filters, and hides with the cell.
Here are the steps to lock a picture in a cell:
- Right-click on the picture and select Format Picture.
- In the Format Picture pane, select Size & Properties and with the options in Properties, select ‘Move and size with cells’.


Now you can move cells, filter it, or hide it, and the picture will also move/filter/hide.
Try it yourself.. Download the Example File 
This could be a useful trick when you have a list of products with their images, and you want to filter certain categories of products along with their images.
You can also use this trick while creating Excel Dashboards.
You May Also Like the Following Excel Tutorials:
Источник
 by Svetlana Cheusheva, updated on March 20, 2023
The tutorial shows different ways to insert an image in Excel worksheet, fit a picture in a cell, add it to a comment, header or footer. It also explains how to copy, move, resize or replace an image in Excel.
While Microsoft Excel is primarily used as a calculation program, in some situations you may want to store pictures along with data and associate an image with a particular piece of information. For example, a sales manager setting up a spreadsheet of products may want to include an extra column with product images, a real estate professional may wish to add pictures of different buildings, and a florist would definitely want to have photos of flowers in their Excel database.
In this tutorial, we will look at how to insert image in Excel from your computer, OneDrive or from the web, and how to embed a picture into a cell so that it adjusts and moves with the cell when the cell is resized, copied or moved. The below techniques work in all versions of Excel 2010 — Excel 365.
How to insert picture in Excel
All versions of Microsoft Excel allow you to insert pictures stored anywhere on your computer or another computer you are connected to. In Excel 2013 and higher, you can also add an image from web pages and online storages such as OneDrive, Facebook and Flickr.
Insert an image from a computer
Inserting a picture stored on your computer into your Excel worksheet is easy. All you have to do is these 3 quick steps:
- In your Excel spreadsheet, click where you want to put a picture.
- Switch to the Insert tab >Illustrations group, and click Pictures.
- In the Insert Picture dialog that opens, browse to the picture of interest, select it, and click Insert. This will place the picture near the selected cell, more precisely, the top left corner of the picture will align with the top left corner of the cell.

To insert several images at a time, press and hold the Ctrl key while selecting pictures, and then click Insert, like shown in the screenshot below: 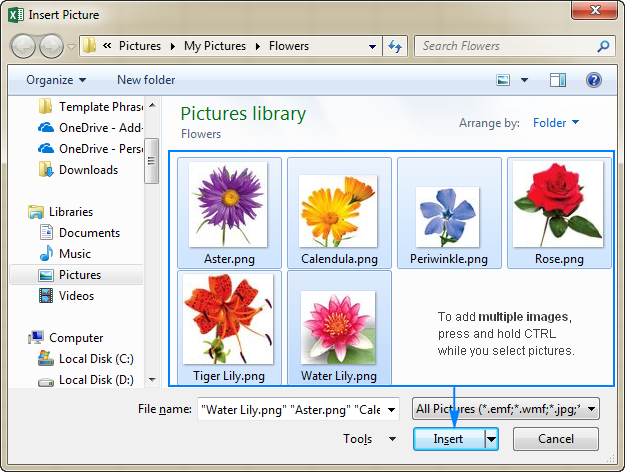
Done! Now, you can re-position or resize your image, or you can lock the picture to a certain cell in a way that it resizes, moves, hides and filters together with the associated cell.
Add picture from the web, OneDrive or Facebook
In the recent versions of Excel 2016 or Excel 2013, you can also add images from web-pages by using Bing Image Search. To have it done, perform these steps:
- On the Insert tab, click the Online Pictures button:
- The following window will appear, you type what you’re looking for into the search box, and hit Enter:
- In search results, click on the picture you like best to select it, and then click Insert. You can also select a few images and have them inserted in your Excel sheet in one go:


If you are looking for something specific, you can filter the found images by size, type, color or license — just use one or more filters at the top of the search results.
Note. If you plan to distribute your Excel file to someone else, check the picture’s copyright to make sure you can legally use it.
Besides adding images from Bing search, you can insert a picture stored on your OneDrive, Facebook or Flickr. For this, click the Online Pictures button on the Insert tab, and then do one of the following:
- Click Browse next to OneDrive, or
- Click the Facebook or Flickr icon at the bottom of the window.

Note. If your OneDrive account does not appear in the Insert Pictures window, most likely you are not signed in with your Microsoft account. To fix this, click the Sign in link at the upper right corner of the Excel window.
Paste picture in Excel from another program
The easiest way to insert a picture in Excel from another application is this:
- Select an image in another application, for example in Microsoft Paint, Word or PowerPoint, and click Ctrl + C to copy it.
- Switch back to Excel, select a cell where you want to put the image and press Ctrl + V to paste it. Yep, it’s that easy!

How to insert picture in Excel cell
Normally, an image inserted in Excel lies on a separate layer and «floats» on the sheet independently from the cells. If you want to embed an image into a cell, change the picture’s properties as shown below:
- Resize the inserted picture so that it fits properly within a cell, make the cell bigger if needed, or merge a few cells.
- Right-click the picture and select Format Picture…
- On the Format Picture pane, switch to the Size & Properties tab, and select the Move and size with cells option.


That’s it! To lock more images, repeat the above steps for each image individually. You can even put two or more images into one cell if needed. As a result, you will have a beautifully organized Excel sheet where each image is linked to a particular data item, like this: 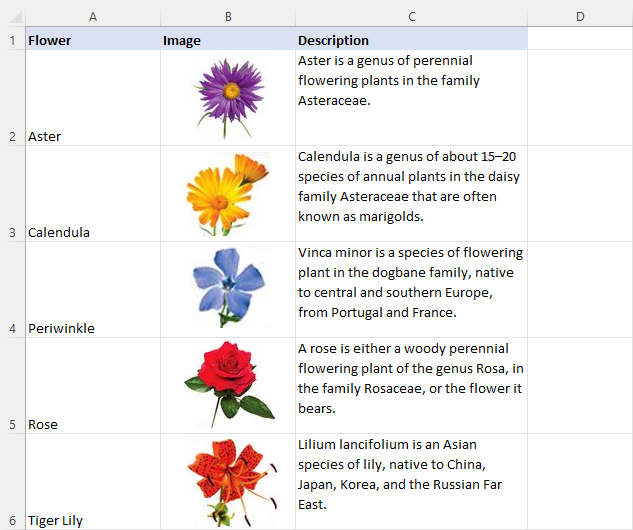
Now, when you move, copy, filter or hide the cells, the pictures will also be moved, copied, filtered or hidden. The image in the copied/moved cell will be positioned the same way as the original.
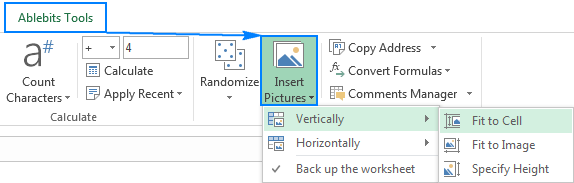
How to insert multiple pictures into cells in Excel
As you have just seen, it’s quite easy to add a picture in an Excel cell. But what if you have a dozen different images to insert? Changing the properties of each picture individually would be a waste of time. With our Ultimate Suite for Excel, you can have the job done in seconds.
- Select the left top cell of the range where you want to insert pictures.
- On the Excel ribbon, go to the Ablebits Tools tab >Utilities group, and click the Insert Picture button.
- Choose whether you want to arrange pictures vertically in a column or horizontally in a row, and then specify how you want to fit images:
- Fit to Cell — resize each picture to fit the size of a cell.
- Fit to Image — adjust each cell to the size of a picture.
- Specify Height — resize the picture to a specific height.
- Select the pictures you want to insert and click the Open button.
Note. For pictures inserted in this way, the Move but don’t size with cells option is selected, meaning the pictures will keep their size when you move or copy cells.
Inserting an image into an Excel comment may often convey your point better. To have it done, please follow these steps:
- Create a new comment in the usual way: by clicking New Comment on the Review tab, or selecting Insert Comment from the right-click menu, or pressing Shift + F2 .
- Right click the border of the comment, and choose Format Comment… from the context menu.
If you are inserting a picture into an existing comment, click Show All Comments on the Review tab, and then right-click the border of the comment of interest. 

If you want to Lock picture aspect ratio, select the corresponding checkbox like shown in the screenshot below: 
The picture has been embedded into the comment and will show up when you hover over the cell: 
If you’d rather not waste your time on routine tasks like this, Ultimate Suite for Excel can save a few more minutes for you. Here’s how:
- Select a cell where you want to add a comment.
- On the Ablebits Tools tab, in the Utilities group, click Comments Manager >Insert Picture.
- Select the image you want to insert and click Open. Done!

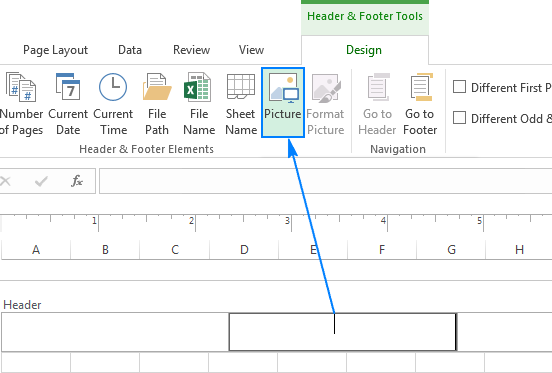
In situations when you want to add a picture into the header or footer of your Excel worksheet, proceed with the following steps:
- On the Insert tab, in the Text group, click Header & Footer. This should take you to the Header & Footer tab.
- To insert a picture in the header, click a left, right or center header box. To insert a picture in the footer, first click the text «Add footer», and then click within one of the three boxes that will appear.
- On the Header & Footer tab, in the Header & Footer Elements group, click Picture.
- The Insert Pictures dialog window will pop up. You browse to the picture you want to add and click Insert. The &[Picture] placeholder will appear in the header box. As soon as you click anywhere outside of the header box, the inserted picture will appear:

Insert a picture in Excel cell with formula
Microsoft 365 subscribers have one more exceptionally easy way to insert a picture in cells — the IMAGE function. All you need to do is:
- Upload your image to any website with the «https» protocol in any of these formats: BMP, JPG/JPEG, GIF, TIFF, PNG, ICO, or WEBP.
- Insert an IMAGE formula into a cell.
- Press the Enter key. Done!
The image immediately appears in a cell. The size is adjusted automatically to fit into the cell maintaining the aspect ratio. It’s also possible to fill the entire cell with the image or set given width and height. When you hover over the cell, a bigger tooltip will pop up. 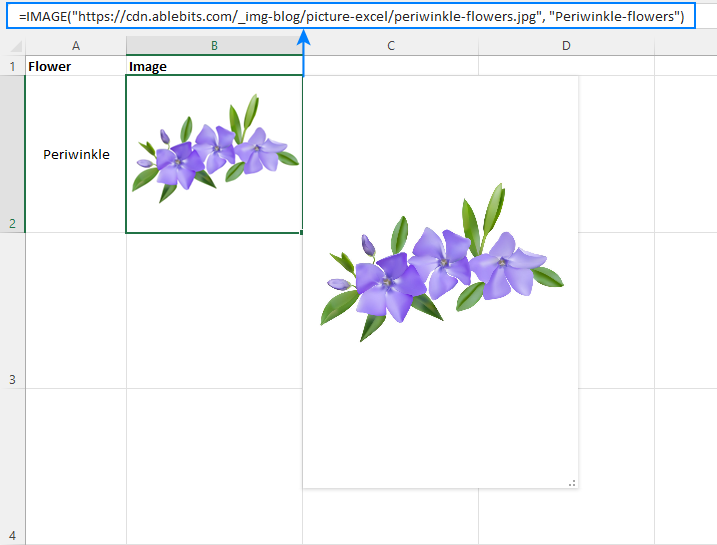
Insert data from another sheet as picture
As you have just seen, Microsoft Excel provides a numbers of different ways to insert an image into a cell or in a specific area of a worksheet. But did you know you can also copy information from one Excel sheet and insert it in another sheet as an image? This technique comes in handy when you are working on a summary report or assembling data from several worksheets for printing.
Overall, there are two methods to insert Excel data as picture:
Copy as Picture option — allows copy/pasting information from another sheet as a static image.
Camera tool — inserts data from another sheet as a dynamic picture that updates automatically when the original data changes.
How to copy/paste as picture in Excel
To copy Excel data as an image, select the cells, chart(s) or object(s) of interest and do the following.
- On the Home tab, in the Clipboard group, click the little arrow next to Copy, and then click Copy as Picture…
- Choose whether you want to save the copied contents As shown on screen or As shown when printed, and click OK:
- On another sheet or in a different Excel document, click where you want to put the picture and press Ctrl + V .


That’s it! The data from one Excel worksheet is pasted into another sheet as a static picture.
Make a dynamic picture with Camera tool
To begin with, add the Camera tool to your Excel ribbon or Quick Access Toolbar as explained here. 
With the Camera button in place, perform the following steps to take a photo of any Excel data including cells, tables, charts, shapes, and the like:
- Select a range of cells to be included in the picture. To capture a chart, select the cells surrounding it.
- Click on the Camera icon.
- In another worksheet, click where you want to add a picture. That’s all there is to it!
Unlike the Copy as Picture option, Excel Camera creates a «live» image that synchronizes with the original data automatically.
How to modify picture in Excel
After inserting a picture in Excel what is the first thing you’d usually want to do with it? Position properly on the sheet, resize to fit into a cell, or maybe try some new designs and styles? The following sections demonstrate some of the most frequent manipulations with images in Excel.
How to copy or move picture in Excel
To move an image in Excel, select it and hover the mouse over the picture until the pointer changes into the four-headed arrow, then you can click the image and drag it anywhere you want: 
To adjust the position of a picture in a cell, press and hold the Ctrl key while using the arrows keys to reposition the picture. This will move the image in small increments equal to the size of 1 screen pixel.
To move an image to a new sheet or workbook, select the image and press Ctrl + X to cut it, then open another sheet or a different Excel document and press Ctrl + V to paste the image. Depending on how far you’d like to move an image in the current sheet, it may also be easier to use this cut/paste technique.
To copy a picture to clipboard, click on it and press Ctrl + C (or right-click the picture, and then click Copy). After that, navigate to where you wish to place a copy (in the same or in a different worksheet), and press Ctrl + V to paste the picture.
How to resize picture in Excel
The easiest way to resize an image in Excel is to select it, and then drag in or out by using the sizing handles. To keep the aspect ratio intact, drag one of the corners of the image. 
Another way to resize a picture in Excel is to type the desired height and width in inches in the corresponding boxes on the Picture Tools Format tab, in the Size group. This tab appears on the ribbon as soon as you select the picture. To preserve the aspect ratio, type just one measurement and let Excel change the other automatically. 
How to change picture’s colors and styles
Of course, Microsoft Excel does not have all the capabilities of photo editing software programs, but you may be surprised to know how many different effects you can apply to images directly in your worksheets. For this, select the picture, and navigate to the Format tab under Picture Tools: 
Here is a short overview of the most useful format options:
- Remove the image background (Remove Background button in the Adjust group).
- Improve the brightness, sharpness or contrast of the picture (Corrections button in the Adjust group).
- Adjust the image colors by changing saturation, tone or do complete recoloring (Color button in the Adjust group).
- Add some artistic effects so that your image looks more like a painting or sketch (Artistic Effects button in the Adjust group).
- Apply special picture styles such as 3-D effect, shadows, and reflections (Picture Styles group).
- Add or remove the picture borders (Picture Border button in the Picture Styles group).
- Reduce the image file size (Compress Pictures button in the Adjust group).
- Crop the picture to remove unwanted areas (Crop button in the Size group)
- Rotate the picture at any angle and flip it vertically or horizontally (Rotate button in the Arrange group).
- And more!
To restore the original size and format of the image, click the Reset Picture button in the Adjust group.
How to replace picture in Excel
To replace an existing picture with a new one, right-click it, and then click Change Picture. Choose whether you want to insert a new picture from a file or online sources,
locate it, and click Insert: 
The new picture will be placed exactly in the same position as the old one and will have the same formatting options. For example, if the previous picture was inserted into a cell, the new one will also be.
How to delete picture in Excel
To delete a single picture, simply select it and press the Delete button on your keyboard.
To delete several pictures, press and hold Ctrl while you select images, and then press Delete.
To delete all pictures on the current sheet, use the Go To Special feature in this way:
- Press F5 key to open the Go To dialog box.
- Click the Special… button at the bottom.
- In the Go To Special dialog, check the Object option, and click OK. This will select all pictures on the active worksheet, and you press the Delete key to delete them all.

Note. Please be very careful when using this method because it selects all objects including pictures, shapes, WordArt, etc. So, before pressing Delete, make sure the selection does not contain some objects that you’d like to keep.
This is how you insert and work with pictures in Excel. I hope you will find the information helpful. Anyway, I thank you for reading and hope to see you on our blog next week!
Источник