
The typical way to achieve this is to export to CSV and then load the CSV into Excel.
TL;DR:
-
For a server-side Excel-friendly CSV file from a
SELECTquery, run this:SELECT ... FROM someTable WHERE etc INTO OUTFILE 'someTableExport.csv' CHARACTER SET utf8mb4 FIELDS TERMINATED BY ',' OPTIONALLY ENCLOSED BY '"' ESCAPED BY '' LINES TERMINATED BY 'rn'; -
For a server-side Excel-friendly CSV file use
mysqldumplike so:mysqldump -h serverHostName -u mysqlUserName -p --tab="someTableExport.csv" --fields-optionally-enclosed-by=0x22 --fields-escaped-by='' --fields-terminated-by=0x2C --lines-terminated-by=0x0D0A --databases databaseName --tables table1 table2 table3 -
For a client-side Excel-friendly CSV file using
mysqlsh(MySQL Shell) like so:mysqlsh --user="mysqlUserName" --host="serverHostName" --port=3306 --schema="databaseName" # Once connected, run this: util.exportTable("tableName", "file:///C:/Users/You/Desktop/test.csv", { dialect: "csv", fieldsEscapedBy: ""})
First, a caution about Excel:
Excel’s vs. MySQL’s default CSV formats:
Remember that Excel has its own underdocumented ideas about how CSV files should be formatted and these stand in-contrast to MySQL’s own ideas about CSV files; though Excel is largely compliant with RFC 4180 you still need to prod and poke MySQL and its associated tooling to generate CSV files that Excel won’t misinterpret:
| Excel | MySQL (default) | MySQL (when configured) | |
|---|---|---|---|
SQL NULL |
Zero-length value | Literal N |
Literal NULL |
| Text values that don’t contain commas, quotes, or line-breaks | Not enclosed | Not enclosed | Enclosed in " |
| Text values that contain commas, quotes, or line-breaks | Enclosed in " |
Not enclosed | Enclosed in " |
| Non-text values | Not enclosed | Not enclosed | Not enclosed |
| Line-breaks and tabs in text values | Literal | Escaped as [r]n |
Literal |
| Double-quotes in text values | Doubled-up "" |
Escaped as " |
Doubled-up "" |
| Field separator | , |
t (Tab) |
, |
| Record separator | rn |
n |
rn |
| Commas inside non-quoted text values | (Results in broken table data) | Not escaped | Will always be quoted if the value contains a comma |
| UTF-8 support |
|
Use utf8mb4.Do not specify the older broken utf8 or utf8mb3 encodings. |
Use utf8mb4 |
As per the table above, MySQL can generate Excel-friendly CSV files, excepting that SQL NULLs will always be interpreted by Excel as literal text, though it’s trivial to use PowerQuery or even just Find-and-Replace in Excel to replace them with empty cells.
Excel and special CSV text markers
- If any of your text values start with
=then you’ll need to manually fudge those as even when quoted Excel will interpret the text following=as a formula instead of literal text. - Also watch out for leading text like
sep=too.
Excel and UTF-8 encoding:
Surprisingly, it wasn’t until Excel was 31 years old (Excel 2016) when Excel added built-in support for UTF-8 encoding in files without needing a BOM, but it still defaults to importing and exporting CSV files using your system-default non-Unicode encoding (e.g. Windows-1252).
- When importing CSV into Excel, be sure to select Codepage
65001for correct UTF-8 handling as Excel still defaults to non-Unicode-based codepages for some reason.-
Note that opening a CSV file in Excel won’t display the Text Import Wizard. (As of Excel 2021) you need to copy-and-paste CSV text into Excel and use the popup menu to use the legacy (frozen-in-1994) wizard, or use Data > From Text/CSV on the ribbon to use the newer (but less flexible, imo) PowerQuery-based CSV import wizard:
-
Your options:
| Option | SELECT INTO OUTFILE |
mysqldump --tab |
mysqldump > file.csv |
mysqlsh |
MySQL Workbench |
|---|---|---|---|---|---|
| Server-side CSV | True | True | True | True | Broken |
| Remote (client-side) CSV | False | False | False | True | Broken |
| MySQL Server version support | All versions | All versions | All versions | Only 5.7 and later | All versions |
Option 1: Exporting an Excel-friendly CSV using INTO OUTFILE:
- You can do a server-side CSV export by using the
INTO OUTFILEclause of aSELECTquery.- Because this is «normal» SQL that’s executed by the MySQL server this works regardless of whatever MySQL client tool you’re using, so you don’t need to install MySQL Workbench.
- …but because this is a server-side export you need to have permission to write to the server’s filesystem which you might not have, in which case consider using specialty export tools like
mysqldump(see below).
- MySQL’s
OUTFILEclause has a number of optional subclauses that must be specified for some-level of compatibility with Excel’s own CSV reader:FIELDS...TERMINATED BY(default:'t', for Excel use',')[OPTIONALLY] ENCLOSED BY(default:'', should be'"'with theOPTIONALLYkeyword)ESCAPED BY(default:'\', for Excel use'')
LINES...TERMINATED BY(default:'n', for Excel use'rn')STARTING BY(default:'', for Excel you can omit this or use the MySQL default).
- Do not use
ENCLOSED BY(without the precedingOPTIONALLYkeyword) as that will enquote all values, regardless of type (i.e. it will enquoteintvalues which will cause Excel (by default) to interpret them as text (strings) instead of numbers).
- Note that there is no option to instruct MySQL to output SQL
NULLs as empty-fields, and so Excel will interpet them as unquoted strings of text (i.e. as"NULL"), so you’ll want to do a Find-and-Replace in Excel after importing the file. - If your
INTO OUTFILE <fileName>filename (e.g.'someTableExport.csv'above) is not an absolute path then it will be saved into your database’sdatadirdirectory. RunSHOW VARIABLES LIKE 'datadir';to get the path. Note that you might not necessarily have read/write permission for new files under that directory.
So your query (SELECT * FROM document WHERE documentid...) would look something like this:
SELECT
    *
FROM
    document
WHERE
    documentid IN ( SELECT documentid FROM TaskResult WHERE taskResult = 2429 )
INTO
    OUTFILE 'someTableExport.csv'
    FIELDS TERMINATED BY ',' OPTIONALLY ENCLOSED BY '"', ESCAPED BY ''
    LINES TERMINATED BY 'rn';
Option 2: Exporting an Excel-friendly CSV using mysqldump:
- To store dump into CSV file using the
--tabcommand-line option, as permysqldump‘s documentation. - Unfortunately
mysqldump‘s--tab=option won’t work for remote MySQL servers: this is because--tab="fileName.csv"can only represent a path on the server.- While you can use
stdoutredirection to generate a local file (i.e.mysqldump --etc > output.csv) you cannot use the--fields-terminated-byand other format options withstdout, making it useless for Excel-compatible output. So if you’re remote and cannotssh-in then you will need to use MySQL Shell (mysqlsh) instead (see below).
- While you can use
- Note that
mysqldumpdoes not supportSELECTqueries for dumping data: it does support simpleWHERE-style filters with the--where=<expr>option but this doesn’t support things like filtering using anINNER JOIN(though as a workaround you couldSELECTinto a new table, then runmysqldumpon that new table. Note that you cannot useTEMPORARY TABLEwithmysqldumpas Temporary Tables are connection-scoped).
In the OP’s case, due to limitations inherent in how the --where= command-line option works, they’ll want to export both tables (document and TaskResult) and apply their filter logic in Excel PowerQuery or similar. Perform the export like so:
mysqldump -h serverHostName -u mysqlUserName -p --tab="someTableExport.csv" --fields-optionally-enclosed-by=0x22 --fields-escaped-by='' --fields-terminated-by=0x2C --lines-terminated-by=0x0D0A --databases databaseName --tables document TaskResult
-
The above command-line should work without modification in Windows’
cmd.exe, macOS’szsh, andbashon Linux — providedmysqldumpis in yourPATH. -
The use of hex-encoded chars means sidestepping the hassle of figurig out how to pass double-quotes and line-breaks as literals in your shell and terminal (
0x22is",0x2Cis,, and0x0D0Aisrn). -
Avoid using the
--password=<value>(aka-p<value>) option on
themysqldumpcommand-line, as it will mean your password will be saved in plaintext to your terminal or console history file, which is an obvious massive security risk.- So if you’re in an interactive command-line session need to specify a password then
mysqldumpwill prompt you for the password immediately when the program runs so it won’t be saved to your history file. - If you want to run
mysqldumpin a non-interactive context (e.g. from within a web-application, daemon, or other process) then there’s (normally) no history file to worry about, but you should still consider alternative approaches before resorting to handling passwords in an insecure way.
- So if you’re in an interactive command-line session need to specify a password then
-
If you don’t specify an absolute path but use a short (unqualified) filename like
INTO OUTFILE 'output.csv'orINTO OUTFILE './output.csv'theb it will store the output file to the directory specified bySHOW VARIABLES LIKE 'datadir';.
Option 3: Exporting an Excel-friendly CSV using MySQL Workbench:
Unfortunately, you can’t (unless you don’t have any double-quotes anywhere in your data): As of late 2022 MySQL Workbench has an open bug regarding its own CSV export feature: output files never escape double-quote characters in text, so pretty much all CSV-handling software out there will report a malformed CSV file or import data to the wrong columns — so this makes it completely unsuitable for use with Excel.
Option 4: Exporting an Excel-friendly CSV using MySQL Shell (aka mysqlsh):
- This is probably the simplest option, but you might need to install the MySQL Shell as it doesn’t come in-box in most MySQL installations.
- MySQL Shell supports connecting to MySQL Server 5.7 and later (but not older versions). If you’re still using MySQL Server 5.6 or earlier (then you really should update to 5.7 or later anyway) you’ll have to stick with
mysqldumprun locally on the MySQL Server itself (but you can use ansshsession, of course).- The new «MySQL X» protocol (
mysqlx://user@host/schema) is not supported by MySQL 5.7, butmysqlshsupports non-X connections with old-style command-line parameters.
- The new «MySQL X» protocol (
- Install MySQL Shell if it isn’t already installed.
- If you start MySQL Shell without any command-line arguments (e.g. because you use the Start Menu shortcut on Windows)) then use the
connectcommand to connect.-
For MySQL 5.7 use
connect mysql://username@hostname -
For MySQL 8.0+ there are a variety of ways to connect, including the «MySQL X» protocol as well as «Classic» connections. Consult the docs for more info.
-
If your username contains literal
@characters then you need to percent-encode them (e.g. if you’re using Azure MySQL then your full username will be likeusername%40servername@servername.mysql.database.azure.com). -
Immediately after you submit the
connectcommand you will be prompted for your password interactively.
-
- If you can start
mysqlshwith arguments, then you can runmysqlsh --user="userName" --host="hostName" --port=3306 --schema="dbName"directly without using theconnectcommand. - Once connected, run the
util.exportTable(tableName, outputUri, options)command with the following arguments:tableName: your table name.- Unfortunately there doesn’t seem to be a way to apply a
WHEREfilter or export the results of aSELECTquery, (though as withmysqldumpyou could always save your query results to a newTABLE, then export that table, thenDROP TABLEwhen you’re done with it. Remember thatTEMPORARY TABLEwon’t work here as tables created in one session aren’t visible from any other session — andmysqlshwill have its own session.
- Unfortunately there doesn’t seem to be a way to apply a
outputUri: To save the file locally use afile:///URI.- On Windows you can use a forward-slash as a directory-name separator instead of a backslash. e.g.
file:///C:/Users/Me/Desktop/export.csv.
- On Windows you can use a forward-slash as a directory-name separator instead of a backslash. e.g.
options: To ensure compatibility with Excel specify{ dialect: "csv", fieldsEscapedBy: ""}.- The
dialect: "csv"option sets Excel-compatible defaults for all-but-one of theOUTFILEparameters, so you must also specifyfieldsEscapedBy: "", otherwise SQLNULLwill be be rendered asN(literally) while double-quotes and line-breaks inside text values will be backslash-escaped, which Excel doesn’t support.
- The
 Последнее обновление 04 апреля 2019 06:16:12 (UTC / GMT +8 часов)
script1adsense2code
script1adsense3code
Установка и настройка
Импорт и экспорт данных между MySQL и Excel стал намного проще в Excel 2007, чем в предыдущих версиях. Чтобы изучить эту функцию, вам нужно установить MySQL для Excel.
Вы можете установить компонент MySQL для Excel при установке MySQL Community Server 6. Или вы можете установить его как дополнение к существующей установке MySQL Server. Однако для установки этого компонента есть некоторые предпосылки.
MySQL для Excel Требования
Для установки MySQL для Excel Installer на вашем компьютере должно быть установлено следующее:
-
.NET Framework 4.0 (клиент или полный профиль).
-
Microsoft Office Excel 2007 или выше, для Microsoft Windows.
-
Visual Studio Tools для Office 4.0 и MySQL Installer могут установить это для вас.
-
Доступное соединение с MySQL Server.
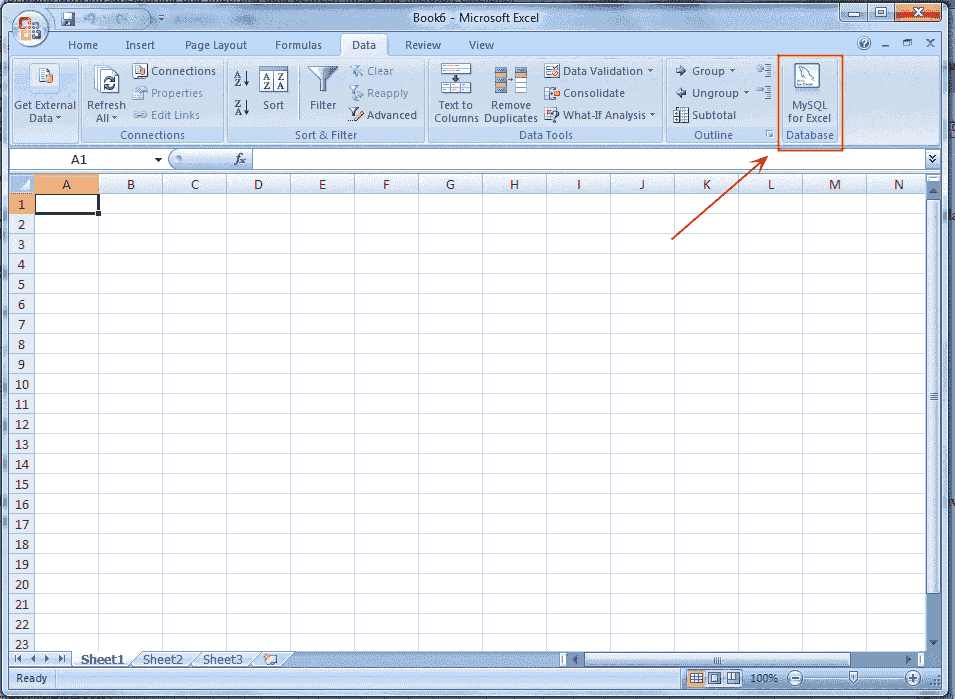
MySQL для Excel загружается и выполняется путем выбора вкладки меню «Данные» в Excel, а затем выбора значка «База данных MySQL для Excel». Это открывает новую боковую панель Excel с доступными опциями MySQL для Excel. Панель навигации со значком MySQL для Excel показана на следующем снимке экрана:

Редактировать данные MySQL в Excel
MySQL для Excel позволяет загружать и редактировать данные MySQL непосредственно из Microsoft Excel, или же вы можете сделать это вручную, нажав «Принять изменения».
В приведенном ниже примере используется таблица расположения примера базы данных сотрудников, но экран будет выглядеть одинаково для любой таблицы. В MySQL для Excel откройте соединение MySQL, щелкните схему сотрудника, затем выберите таблицу местоположений, нажмите «Изменить данные MySQL», затем выберите «Импорт», чтобы импортировать данные в новый лист Microsoft Excel для редактирования.
Вот пошаговое руководство по редактированию и фиксации данных:
Шаг 1:
Загрузить Microsoft Office Excel 7

Шаг 2:
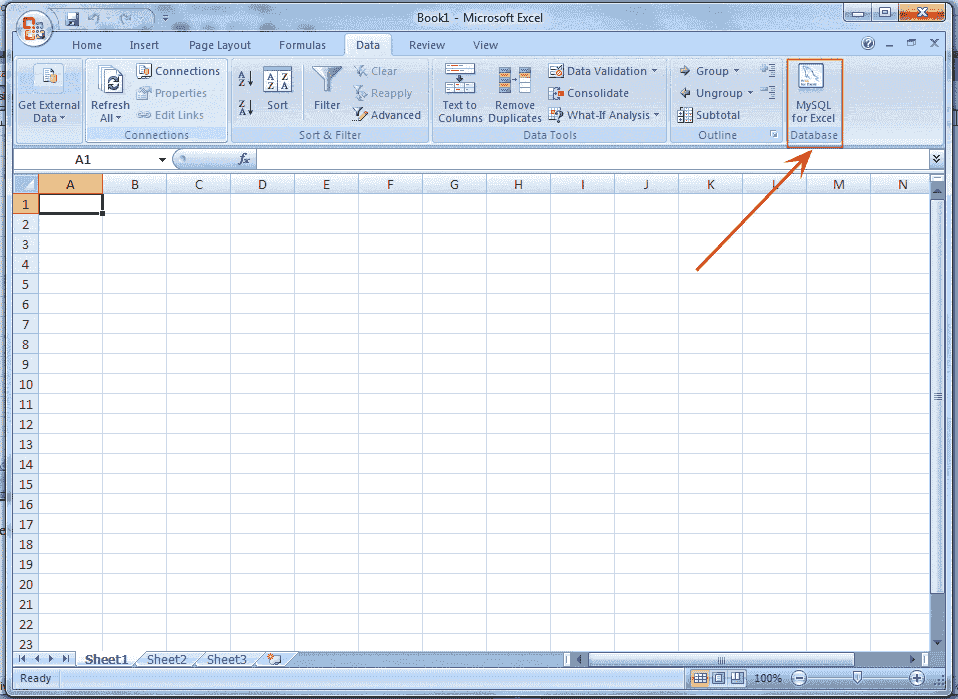
Нажмите на вкладку данных , см. Рисунок выше, значок базы данных «MySQL для Excel» появится ниже.

Шаг 3:
Нажмите на значок базы данных «MySQL для Excel». Он открывает новую боковую панель Excel с доступными параметрами MySQL для Excel. Панель навигации со значком MySQL для Excel показана на следующем рисунке.

Здесь наша База данных является сотрудником, и мы работаем с таблицей местоположений , но экран будет выглядеть одинаково для любой таблицы.
Шаг 4:
В боковой панели MySQL для Excel откройте соединение MySQL двойным щелчком мыши. Здесь наше соединение — Локальный экземпляр MySQL5.6, и для принятия пароля появится следующий экран.

Шаг 5:
Введите пароль для соединения с сервером MySQL. Базы данных будут отображаться в боковой панели MySQL для Excel. Наша База данных является сотрудником. Смотрите следующую картинку.

Шаг 6:
Дважды щелкните по нужной базе данных, и отобразятся таблицы в базе данных. Наш стол — это местоположение. Смотрите следующую картинку.

Шаг 7:
Выберите таблицу, которую вы хотите редактировать, нажмите «Редактировать данные MySQL» на панели навигации, как показано выше, и посмотрите следующий снимок экрана.

Шаг 8:
Нажмите кнопку «Импорт», как указано на картинке выше, и посмотрите следующий снимок экрана. Появятся данные выбранной таблицы, и если вы наведете курсор на диапазон данных, в противном случае появится кнопка «Восстановить данные и зафиксировать изменения» (указанная красным прямоугольником).

Шаг 9:
Здесь, в нашей таблице, идентификатор первого столбца является первичным ключом. Если мы изменим значение ID в ячейке A19 вместо 17 и нажмем клавишу ввода, цвет этой ячейки будет зеленым. Теперь мы изменили значение ячейки F16 Лондона и нажмите клавишу ввода, цвет ячейки изменится на зеленый, а желтый цвет в последнюю очередь означает, что ячейки принимают новые данные. Введенные здесь данные вставляются в таблицу MySQL.

Шаг 10:
Теперь, если мы нажмем кнопку «Восстановить данные», посмотрите следующий снимок экрана.

Здесь на картинке выше, если вы нажмете кнопку «Обновить данные из БД», данные будут обновлены и отобразятся исходные данные из БД, а если вы нажмете «Восстановить измененные данные», вы потеряете только что сделанные изменения. На этом этапе, если вы нажмете кнопку «Применить изменения», посмотрите следующий снимок экрана.

Здесь на рисунке выше вы видите сообщение об ошибке, и цвет ячейки A19 изменился с зеленого на красный, потому что столбец идентификатора является первичным ключом, а уникальность здесь нарушена. Теперь мы вернули значение ячейки A19 в исходное значение, то есть 18, и нажмите кнопку Commit Changes, и теперь посмотрим на снимок экрана ниже.

На изображении выше показано, как цвета ячейки F16 преобразованы из зеленого в синий, что означает успешное выполнение изменений. Теперь вы можете закрыть сохранение окна Excel или нет, но таблица базы данных была обновлена. Вы можете видеть это, чтобы сделать шаг снова. Если вы установили флажок «Автоматическая фиксация», эффект сразу же отобразится на вашем листе, и данные будут обновлены в базе данных MySQL.
Импорт данных MySQL в Excel
Данные можно импортировать из MySQL в электронную таблицу Microsoft Excel с помощью параметра «Импорт данных MySQL» после выбора таблицы, представления или процедуры для импорта.
Прежде всего, вы делаете первые 6 шагов, описанных выше в «Редактировании данных MySQL в Excel», затем выбираете таблицу, которую хотите импортировать. Здесь наш стол — местоположение. Поэтому выберите таблицу местоположений, а затем нажмите «Импорт данных MySQL» и посмотрите на скриншот, показанный ниже.

Выбор столбцов для импорта
По умолчанию все столбцы выбраны и будут импортированы. Определенные столбцы могут быть выделены (или не выбраны) с использованием стандартного метода Microsoft Windows: либо Control + щелчок мышью для выбора отдельных столбцов, либо Shift + щелчок мышью для выбора диапазона столбцов.
Белый цвет фона указывает, что столбец или столбцы были выбраны, и они готовы к импорту, с другой стороны, серый цвет указывает, что столбцы не выбраны и столбец не будет импортирован.
Если щелкнуть правой кнопкой мыши в любом месте сетки предварительного просмотра, откроется контекстное меню с параметром «Нет» или «Выбрать все» в зависимости от текущего состояния.
Таблица импорта
Включить имена столбцов в качестве заголовков: по умолчанию этот параметр включен, и он обрабатывает имена столбцов в верхней части электронной таблицы Microsoft Excel как строку «заголовков» и будет вставлен в качестве заголовка.
Ограничить и строки и начать с строки : по умолчанию этот параметр отключен, если включен, это ограничивает диапазон импортируемых данных. Параметр Limit to по умолчанию равен 1, и этот предел может быть изменен путем определения количества строк для импорта. Параметр «Начать со строки» по умолчанию равен 1, т. Е. Начинается с первой строки, и его можно изменить, определяя номер, с которого начинается импорт. Каждый параметр имеет максимальное значение COUNT (строки) в таблице.
Теперь предполагается, что мы хотим импортировать столбцы LOATION_ID и CITY. Щелкните мышью по столбцу LOCATION_ID, затем нажмите и удерживайте клавишу CTRL, щелкните столбец CITY и посмотрите следующий снимок экрана.

Теперь, если мы нажмем кнопку «Импорт», все строки для этих двух столбцов будут импортированы в Microsoft Excel Worksheet.
Предполагается, что мы хотим импортировать только 6 строк, начиная с 3-го ряда. Теперь посмотрите следующий снимок экрана.

Здесь на рисунке выше показано, что все столбцы выбраны, и значение Limit to равно 6, что означает, что будет импортировано 6 строк, и начало импорта начнется с 3-й строки, потому что мы установили значение Start with Строка 3. Теперь нажмите кнопку «Импорт» и посмотрите следующий снимок экрана.

Добавить данные Excel в MySQL
Данные электронной таблицы Microsoft Excel можно добавлять в таблицу базы данных MySQL с помощью параметра «Добавить данные Excel в таблицу».
Отображения столбцов
Сопоставление столбцов Excel со столбцами MySQL можно выполнить автоматически (по умолчанию), вручную или с помощью хранимой процедуры сопоставления. Чтобы добавить данные из Excel в MySQL, необходимо выполнить следующий шаг:
Сначала выполните 6 шагов «Редактирования данных MySQL в Excel», затем введите записи в таблицу Excel, совместимую со структурой таблицы MySQL, в которую вы хотите добавить записи. Вот пример, в котором мы взяли только одну строку, вы можете взять более одной строки и затем выбрать записи. Смотрите следующий снимок экрана.

Теперь нажмите «Добавить данные Excel в таблицу», как упомянуто выше, и посмотрите на экран как.

Здесь на картинке выше, вы ищете два цвета для легенды. Один красный, а другой зеленый.
Зеленый цвет указывает, что исходный столбец сопоставлен (сопоставленный означает, что исходные столбцы в приведенной выше сетке, созданной в электронной таблице, были сопоставлены со структурой таблицы MySQL в качестве целевых столбцов, показанных в нижней сетке) с целевым столбцом и здесь на рисунке выше. показывает, что все исходные столбцы были сопоставлены с целевыми столбцами.
Если вы перетащите заголовок любого целевого столбца на зеленый цвет и оставите его вне сетки, цвет целевого столбца будет красным, а цвет исходного столбца — серым. Смотрите на картинке ниже.

Здесь на рисунке выше целевой столбец 4 стал красным, а исходный столбец 4 — серым.
Красный цвет означает, что целевой столбец не сопоставлен, а серый цвет означает, что исходный столбец не сопоставлен.
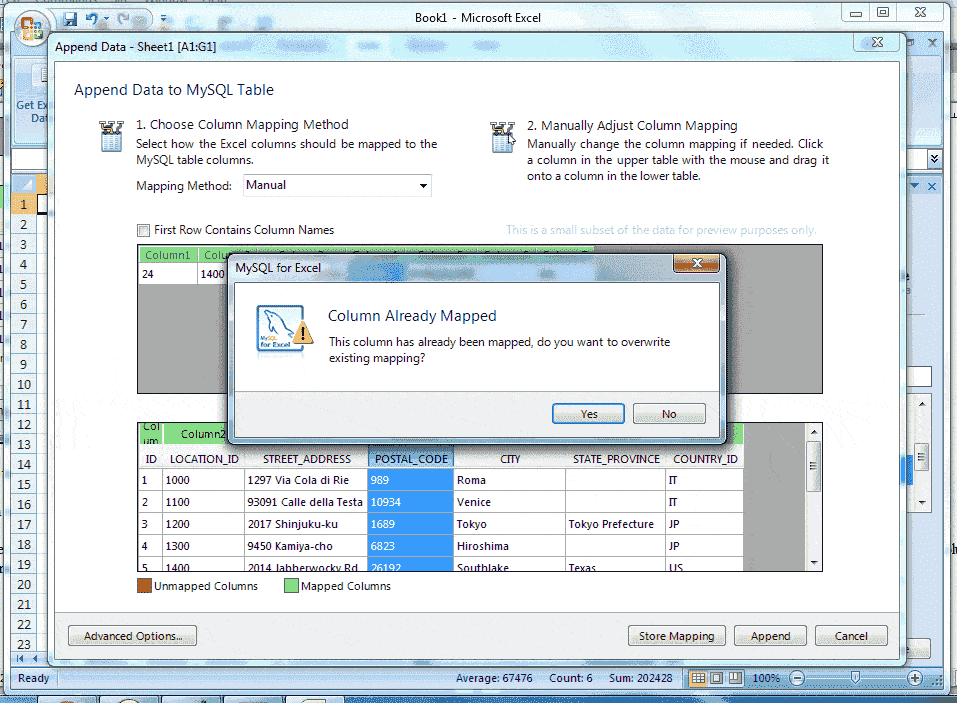
Следует отметить, что исходный столбец может быть сопоставлен с несколькими целевыми столбцами, хотя это действие генерирует диалоговое окно с предупреждением, и при щелчке правой кнопкой мыши по целевому столбцу отображается меню с параметрами либо «Удалить сопоставление столбцов» для одного столбца, либо «Очистить». Все сопоставления для всех столбцов.
Предположим, мы отображаем вручную путем перетаскивания исходного столбца 4 с целевыми столбцами 4 и столбцами 5 Целевой столбец 4 будет отображаться просто, но при выполнении процесса для целевого столбца 5 появится диалоговое окно с предупреждением, показанное ниже.

Методы картирования
Вот посмотрите три метода отображения:
Метод автоматического сопоставления пытается сопоставить имена исходных столбцов Excel с именами столбцов целевой таблицы MySQL.
В методе сопоставления вручную имена столбцов источника перетаскиваются вручную с именами столбцов назначения. После выбора Автоматического метода также можно выполнить метод ручного перетаскивания.
Вы можете сохранить свои собственные стили сопоставления с помощью кнопки « Сохранить сопоставление» и сохранить имя, например «name (dbname.tablename)», и оно будет доступно в поле со списком «Метод сопоставления».
Сохраненные сопоставления могут быть удалены или переименованы в диалоговом окне « Дополнительные параметры ».
Расширенные настройки
Если мы нажмем кнопку «Дополнительные параметры», диалоговое окно будет выглядеть примерно так:

Выполните автоматическое сопоставление при открытии диалогового окна : с помощью этих параметров автоматически сопоставляется цель и источник при открытии диалогового окна «Добавить данные».
Автоматически сохранять сопоставление столбцов для данной таблицы . Чтобы проверить этот параметр, сохраняется каждая подпрограмма сопоставления после выполнения операции добавления. Процедура отображения сохраняется в формате «tablenameMapping (dbname.tablename)». Это может быть выполнено вручную с помощью кнопки Store Mapping.
Перезагрузите сохраненное сопоставление столбцов для выбранной таблицы автоматически : если существует сохраненная подпрограмма сопоставления, которая сопоставляет все имена столбцов в исходной сетке с целевой сеткой, то она автоматически загружается.
Расширенные параметры поля данных:
Используйте первые 100 (по умолчанию) строк данных Excel для предварительного просмотра и расчета типов данных. Это определяет количество строк, которые отображает предварительный просмотр, и значения, которые влияют на функцию автоматического сопоставления.
При проверке Использовать отформатированные значения данные из Excel обрабатываются как Текст, Двойной или Дата. Это включено по умолчанию. Если мы отключим его, существующие данные никогда не будут обрабатываться как тип даты, поэтому, например, это означает, что дата может быть представлена в виде числа.
Сохраненные сопоставления столбцов — это список сохраненных сопоставлений столбцов, которые были сохранены с помощью функции «Автоматически сохранять сопоставление столбцов для данной таблицы» или вручную с параметром «Сопоставление хранилищ».
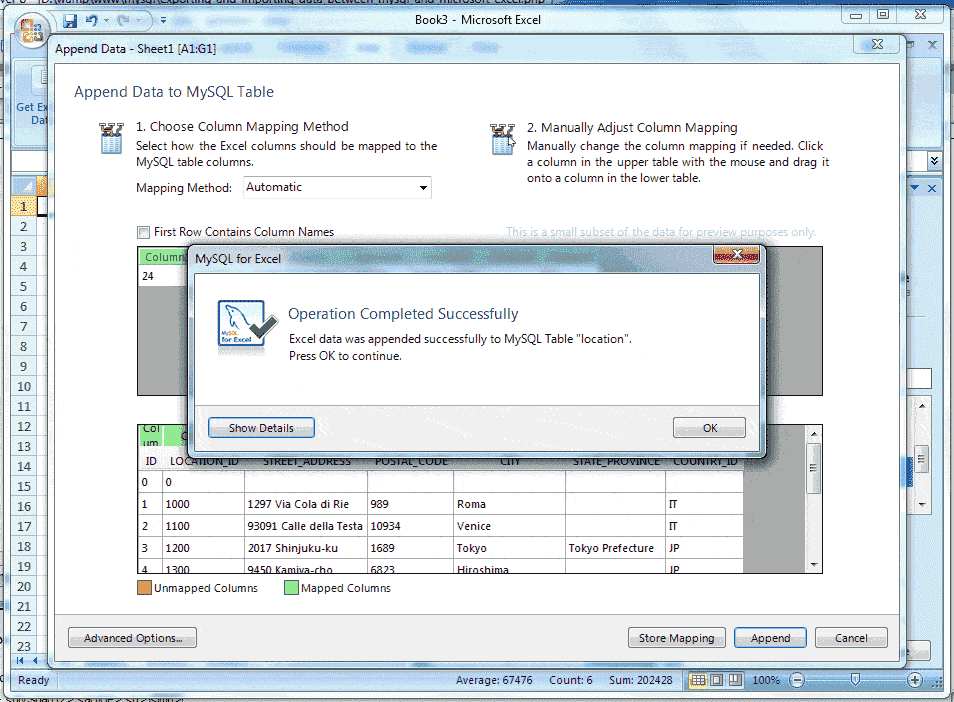
После завершения всех шагов, если мы нажмем кнопку «Добавить», появится следующий экран.

Экспорт данных Excel в MySQL
Данные электронной таблицы Microsoft Excel можно экспортировать в новую таблицу базы данных MySQL с помощью параметра « Экспорт данных Excel в новую таблицу» . Сначала вы делаете первые 6 шагов, описанных выше, в разделе « Редактирование данных MySQL в Excel» . Затем введите несколько записей с нужным заголовком в электронную таблицу Excel и выберите записи. Теперь посмотрите пример записи на следующем рисунке —

Теперь нажмите «Экспорт данных Excel в новую таблицу» с помощью стрелки на изображении выше и посмотрите на следующий экран.

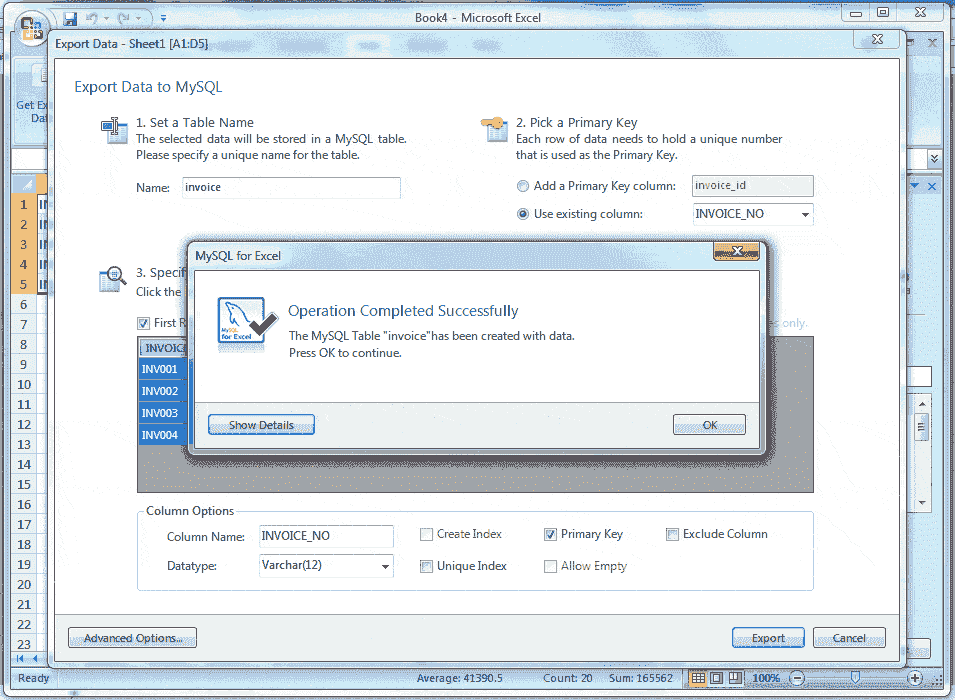
1 — Укажите уникальное имя для таблицы MySQL. Предположим, что имя таблицы MySQL «счет-фактура»
2 — Если установлен переключатель радиокнопки Добавить первичный ключ, будет добавлен дополнительный столбец первичного ключа, вы можете изменить имя столбца, и по умолчанию тип данных будет целым числом, которое отображается в 7.
3 — Когда вы установите переключатель «Использовать существующие столбцы», имена столбцов будут доступны в поле со списком, и вы сможете выбрать столбец первичного ключа из списка, и столбец будет выбран. Предположим, вы выбрали столбец INVOICE_NO, посмотрите следующую картинку.

Здесь на рисунке выше был выбран столбец INVOICE_NO, и теперь вы можете изменить имя столбца (точка 6), тип данных (точка 7) и ограничение (точка 9), которые активны.
4 — Если вы установите флажок Первая строка содержит имена столбцов (пункт 4), первый столбец в ваших данных Excel будет заголовком, в противном случае это будет столбец1, столбец2 и т. Д.
5 — Предположим, вы изменили тип данных и имя столбца для других столбцов, которые вы можете нажать на заголовок столбца. Предполагая, что мы хотим изменить тип данных INVOICE_DT, нажмите на INVOICE_DT, и этот столбец будет выбран, а затем вы можете использовать пункты 6,7 и 9.
6 — Вы можете изменить имя столбца.
7 — Вы можете изменить тип данных
8 — Расширенный параметр показывает следующее диалоговое окно.

Расширенные настройки
Используйте первые 100 (по умолчанию) строк данных Excel для предварительного просмотра и вычисления типов данных : этот параметр определяет количество строк, отображаемых при предварительном просмотре, и указанные значения влияют на функцию автоматического сопоставления.
Анализировать и пытаться определить правильный тип данных на основе содержимого поля столбца. Этот параметр пытается анализировать данные и определять тип данных для столбца. Когда столбец содержит несколько типов данных, он определяется как VARCHAR.
Добавить дополнительный буфер к длине VARCHAR (округлить до 12, 25, 45, 125, 255) : если он включен, он автоматически определяет тип данных и устанавливает значение VARCHAR, а затем находит максимальную длину для всех строк в столбце, и округляет максимальную длину до одной из указанных выше длин и, если она отключена, то длина VARCHAR устанавливается равной длине самой длинной записи в электронной таблице Excel.
Автоматически установите флажок «Индекс» для столбцов с целочисленными значениями : по умолчанию этот параметр включен, и тогда для столбцов с целочисленным типом данных будет включен параметр «Создать индекс» по умолчанию.
Автоматически установите флажок «Разрешить пустой» для столбцов без индекса: по умолчанию этот параметр включен, а при включении для столбцов без флажка «Создать индекс» автоматически включается параметр конфигурации «Разрешить пустой».
Использовать отформатированные значения: по умолчанию этот параметр включен, и данные из Excel обрабатываются как текстовые, двойные или даты, но если они отключены, они независимы, то есть не имеют определенного типа данных.
Удалить столбцы, которые не содержат данных, в противном случае пометьте их как «Исключенные»: если этот параметр включен, столбцы без данных в Excel удаляются и не отображаются на панели предварительного просмотра. По умолчанию этот параметр отключен, и тогда эти столбцы будут существовать, но с включенным параметром «Исключить столбец».
После завершения всех настроек нажмите кнопку «Экспортировать» и увидите следующий снимок экрана:

Предыдущий: MySQL DROP
Далее: Резервное копирование и восстановление MySQL
Если нужно быстро и единоразово выгрузить данные из таблицы MySQL в Exel файл, то помогут следующие способы:
1
Экспорт через PHPMyAdmin
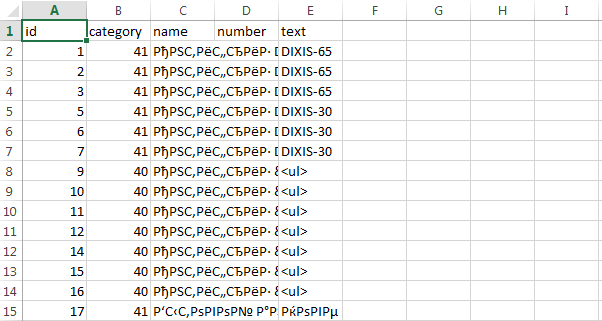
В PHPMyAdmin при экспорте можно выбрать формат «CSV for MS Excel»:

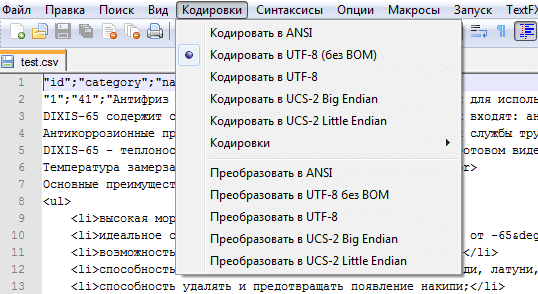
При открытии полученного файла в Excel будет сбита кодировка:
Чтобы это исправить, нужно открыть csv файл в редакторе типа Notepad++ и изменить кодировку на ANSI:
Результат:

2
Экспорт через HTML таблицу
Смысл метода состоит в том чтобы PHP-скриптом сформировать HTML таблицу:
<?php
$dbh = new PDO('mysql:dbname=db_name;host=localhost', 'логин', 'пароль');
$sth = $dbh->prepare("SELECT * FROM `test`");
$sth->execute();
$items = $sth->fetchAll(PDO::FETCH_ASSOC);
?>

<table>
	<tr>
		<td>ID</td>
		<td>Категория</td>
		<td>Название</td>
		<td>Описание</td>
	</tr>
	<?php foreach($items as $row): ?>
	<tr>
		<td><?php echo $row['id']; ?></td>
		<td><?php echo $row['category']; ?></td>
		<td><?php echo $row['name']; ?></td>
		<td><?php echo $row['text']; ?></td>
	</tr>
	<?php endforeach; ?>
</table>
PHP
Результат работы скрипта:
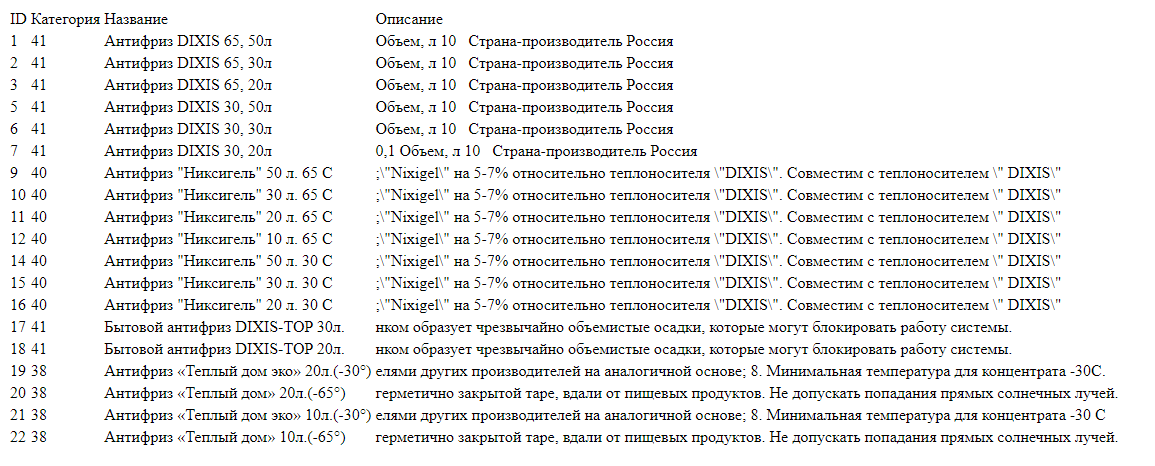
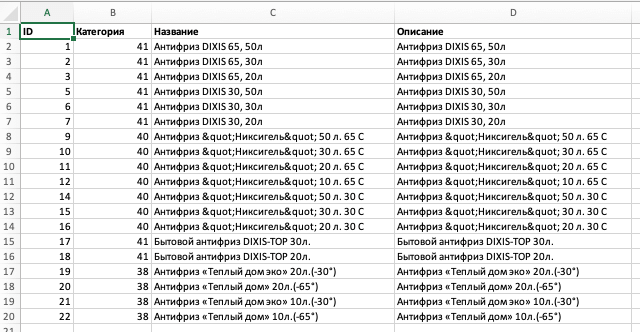
Полученную таблицу копируем и вставляем в чистый лист Microsoft Exel:

3
Экспорт через PHPExcel
Третий метод – сформировать xls-файл в библиотеке PHPExcel (PHPExcel.zip).
//spl_autoload_unregister('autoload');
require_once __DIR__ . '/PHPExcel/Classes/PHPExcel.php';
require_once __DIR__ . '/PHPExcel/Classes/PHPExcel/Writer/Excel2007.php';

$xls = new PHPExcel();
$xls->setActiveSheetIndex(0);
$sheet = $xls->getActiveSheet();

// Шапка
$sheet->getStyle("A1:D1")->getFont()->setBold(true);
$sheet->setCellValue("A1", 'ID');
$sheet->setCellValue("B1", 'Категория');
$sheet->setCellValue("C1", 'Название');
$sheet->setCellValue("D1", 'Описание');

// Выборка из БД
$dbh = new PDO('mysql:dbname=db_name;host=localhost', 'логин', 'пароль');
$sth = $dbh->prepare("SELECT * FROM `test`");
$items = $sth->fetch(PDO::FETCH_ASSOC);

$index = 2;
foreach ($items as $row) {
	$sheet->setCellValue("A" . $index, $row['id']);
	$sheet->setCellValue("B" . $index, $row['category']);
	$sheet->setCellValue("C" . $index, $row['name']);
	$sheet->setCellValue("D" . $index, $row['name']);
	$index++;
}

// Отдача файла в браузер
header("Expires: Mon, 1 Apr 1974 05:00:00 GMT");
header("Last-Modified: " . gmdate("D,d M YH:i:s") . " GMT");
header("Cache-Control: no-cache, must-revalidate");
header("Pragma: no-cache");
header("Content-type: application/vnd.ms-excel" );
header("Content-Disposition: attachment; filename=prods.xlsx");

$objWriter = new PHPExcel_Writer_Excel2007($xls);
$objWriter->save('php://output');

exit();
PHP
Результат:
Last update on August 19 2022 21:51:24 (UTC/GMT +8 hours)
Installing and Configuring
Import and export data between MySQL and Excel has become much easier in Excel 2007 than it’s previous versions. To explore the feature, you need to install MySQL For Excel.
You can install the MySQL For Excel component while installing MySQL Community Server 6. Or you may install it as an add-on upon your existing MySQL Server installation. Installation of this component has some prerequisites, though.
MySQL for Excel Requirements
You must have following installed on your machine for installing MySQL For Excel Installer :
-
.NET Framework 4.0 (Client or Full Profile).
-
Microsoft Office Excel 2007 or greater, for Microsoft Windows.
-
Visual Studio Tools for Office 4.0 and MySQL Installer may install this for you.
-
An available MySQL Server connection.
MySQL for Excel is loaded and executed by selecting the Data menu tab in Excel, and then choosing the «MySQL for Excel» Database icon. This opens a new Excel sidebar with the available MySQL for Excel options. The navigation bar with the MySQL for Excel icon is shown in the following screen shot:
Edit MySQL Data in Excel
MySQL for Excel enables you to load and edit MySQL data directly from Microsoft Excel, or yon can do it manually by pressing Commit Changes.
The example below uses the location table of the example employee database, but the screen will look the same for any table. Within MySQL for Excel, Open a MySQL Connection, click the employee schema, Next, select the location table, click Edit MySQL Data, then choose Import to import the data into a new Microsoft Excel worksheet for editing.
Here is the step by step guide to editing and commit the data:
Step 1:
Load Microsoft Office Excel 7

Step 2:
Click on Data Tab, see the above picture, the» MySQL for Excel» Database icon will appear shown below.
Step 3:
Click on «MySQL for Excel» Database icon. It opens a new Excel sidebar with the available MySQL for Excel options. The navigation bar with the MySQL for Excel icon is shown in the following picture.:
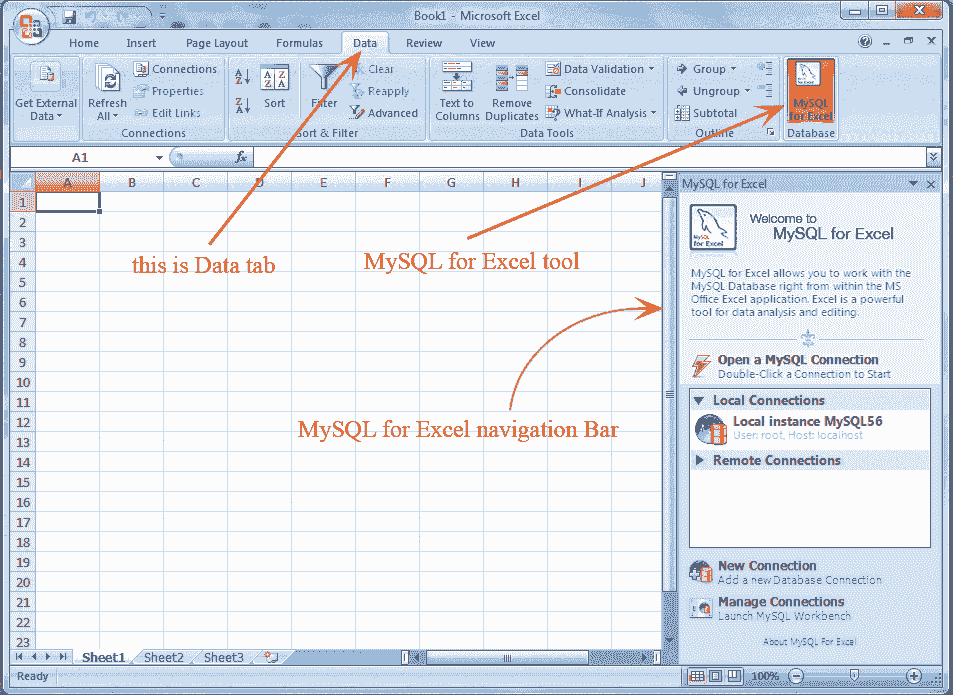
Here our Database is employee and we are working with location table, but the screen will look the same for any table.
Step 4:
Within MySQL for Excel sidebar open a MySQL connection by double clicking. Here our connection is Local instance MySQL5.6 and with the following screen will appear for accepting the password.
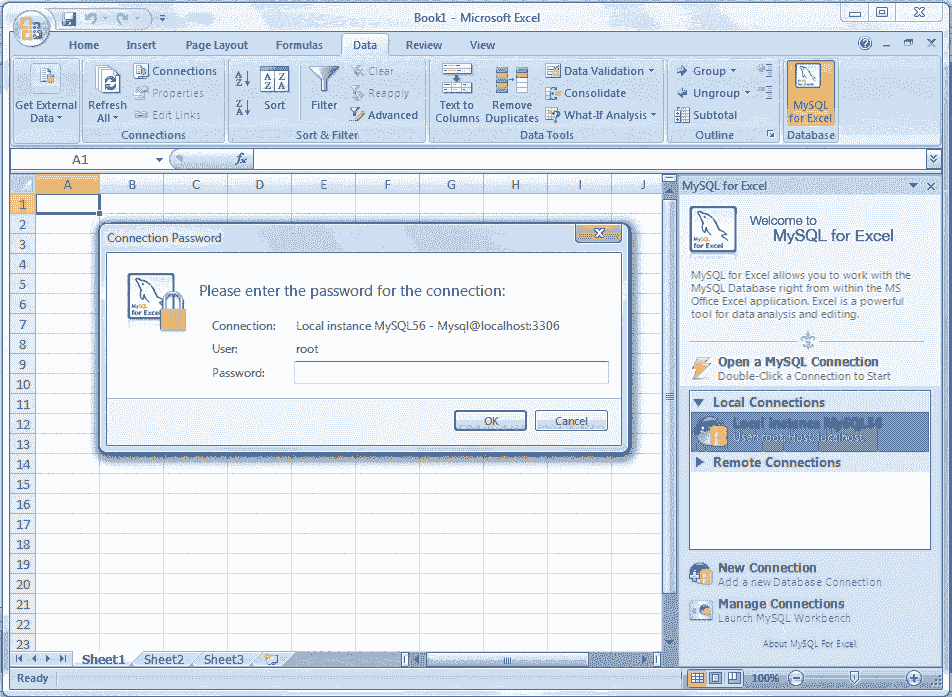
Step 5:
Enter password for connection with MySQL server. The databases will show in MySQL for Excel sidebar. Our Database is employee. See the following picture.
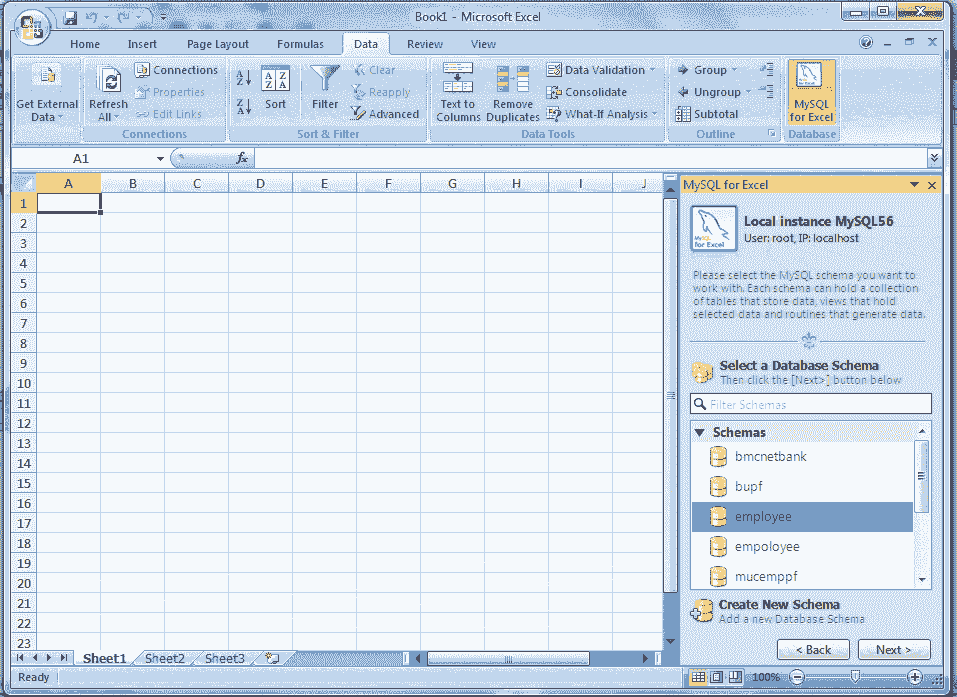
Step 6:
Double click on your desire database, and the tables within the database will display. Our table is location. See the following picture.
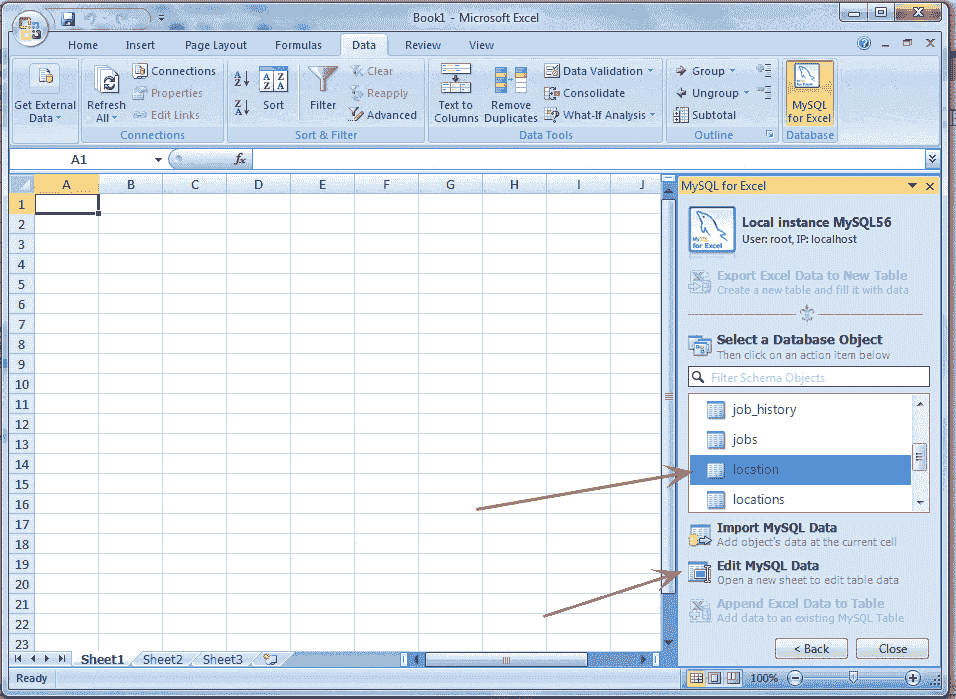
Step 7:
Select the table which you want to edit, click «Edit MySQL Data» inside the navigation bar as shown above, and see the following screen shot.
Step 8:
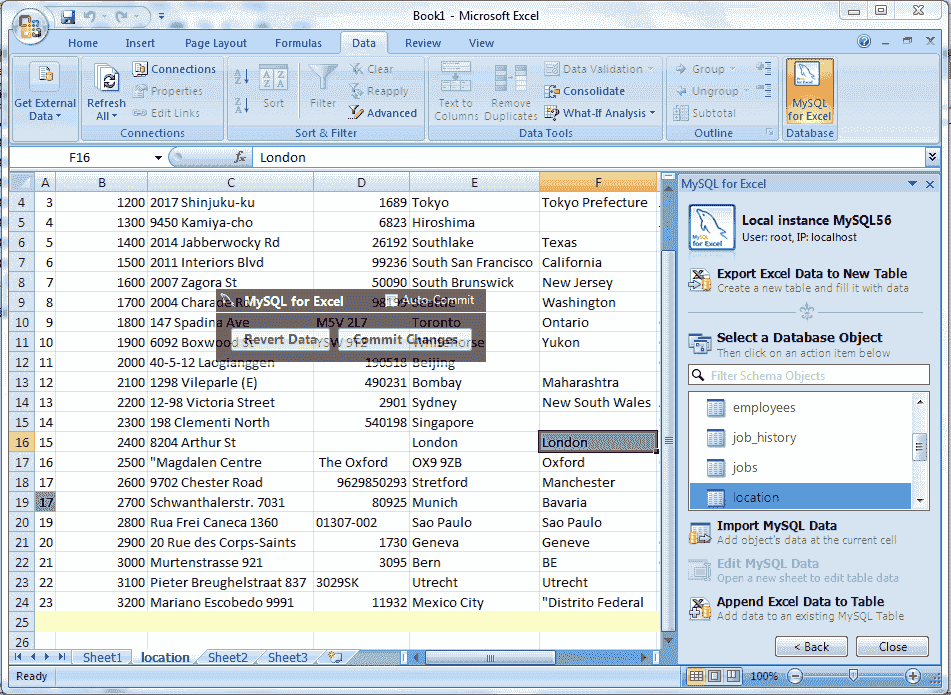
Click on Import button as mention in the above picture, and watch the following screen shot. The data of the selected table will appear and if you place the cursor on the data range the Revert Data and Commit Changes button ( specified by a red color rectangle ) will appear otherwise not.

Step 9:
Here at our table, the first column ID is a primary key. If we change the value of ID in A19 cell 17 instead of 18 and press enter key the color of this cell will be green. Now we have changed the value of F16 cell is London and press enter key the cell color will change into green, and the color yellow at the last, indicate that the cells that accept new data. Data entered here is inserted into the MySQL table.
Step 10:
Now if we click the Revert Data button, watch the following screen shot.
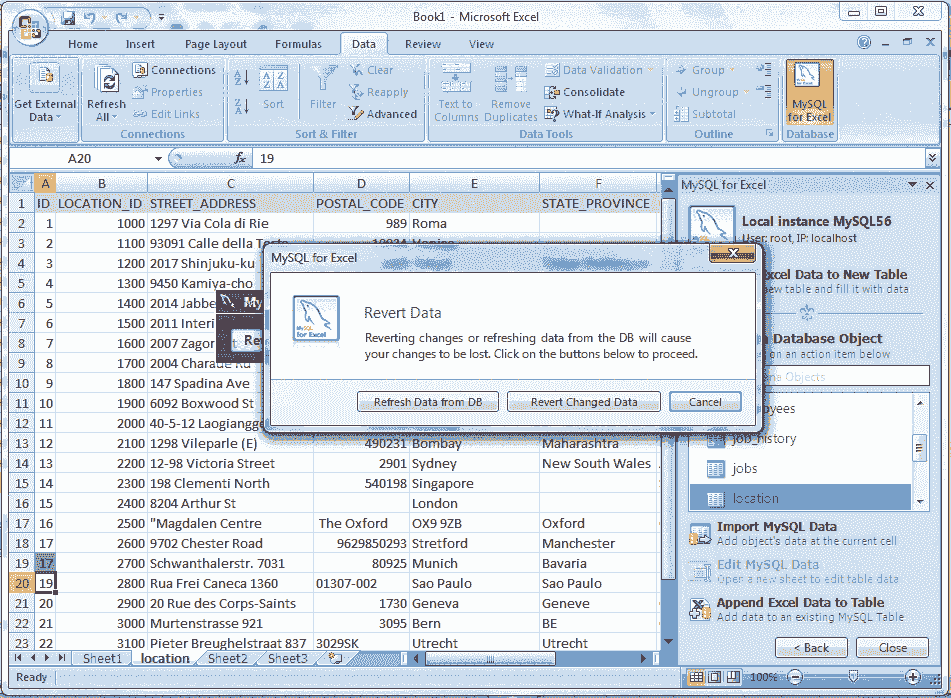
Here in above picture if you click the Refresh Data from DB the data will be refresh and display the original data from DB, and if you click on Revert Changed Data, you will loose your changes just made. In this stage, if you click on Commit Changes button look the following screen shot.
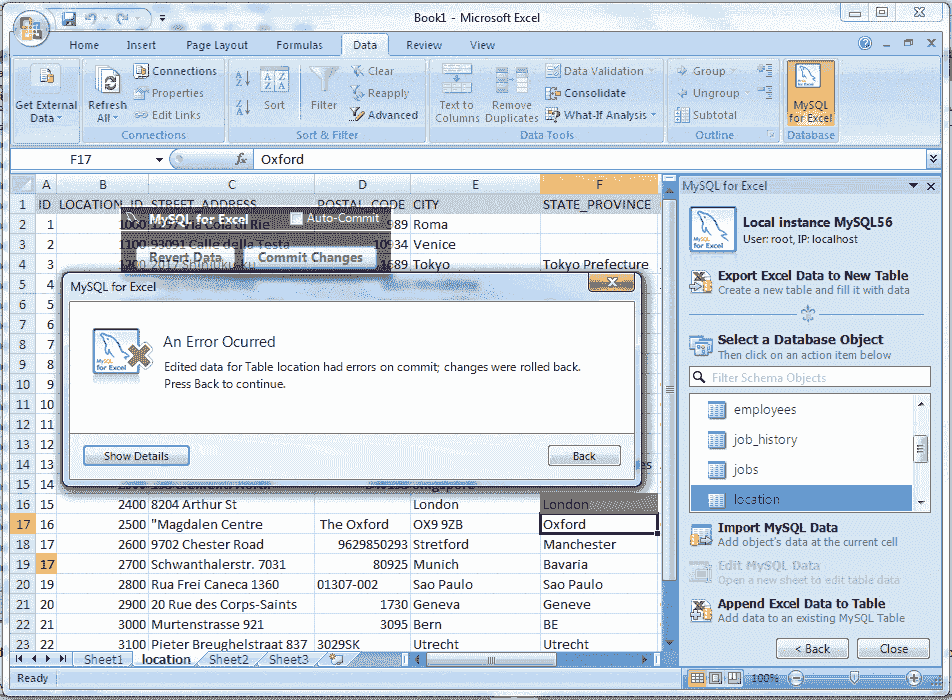
Here in the above picture, you are looking an error message, and the color of A19 cell changed from green to red, that is because the ID column is the primary key and the uniqueness have been violated here. Now we returned the value of A19 cell in its original value, i.e. 18, and click on Commit Changes button, and now look the below screen shot.
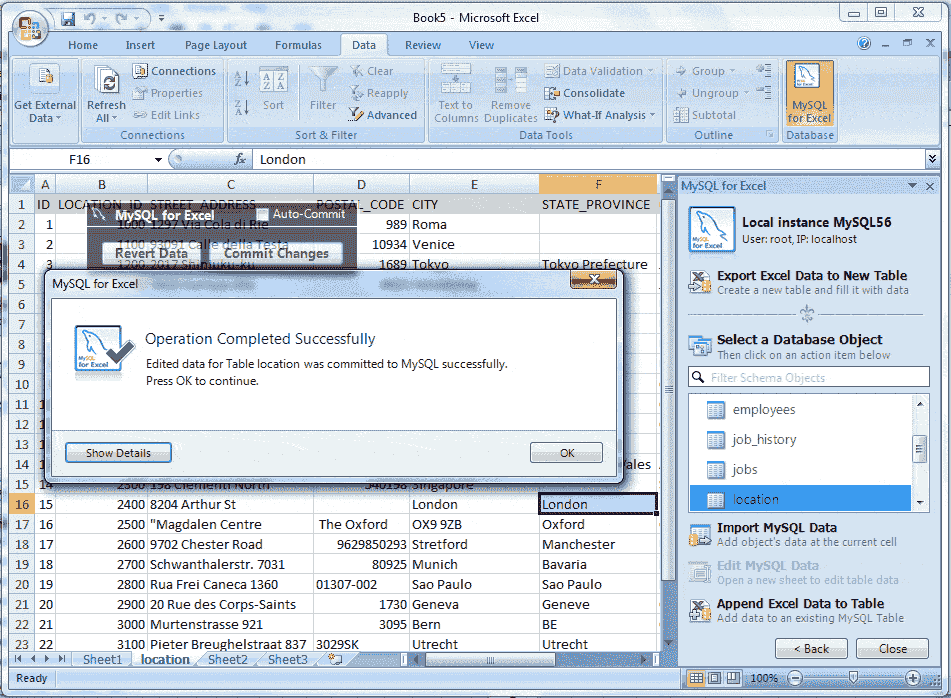
In the above picture shows the color of cell F16 have converted from green to blue, that means Commit Changes done successfully. Now you can close the Excel window saving or not but the database table has been updated. You can see it to do the step again. If you checked the Auto Commit check box, the effect immediately is seen in your sheet and data will be updated in MySQL database.
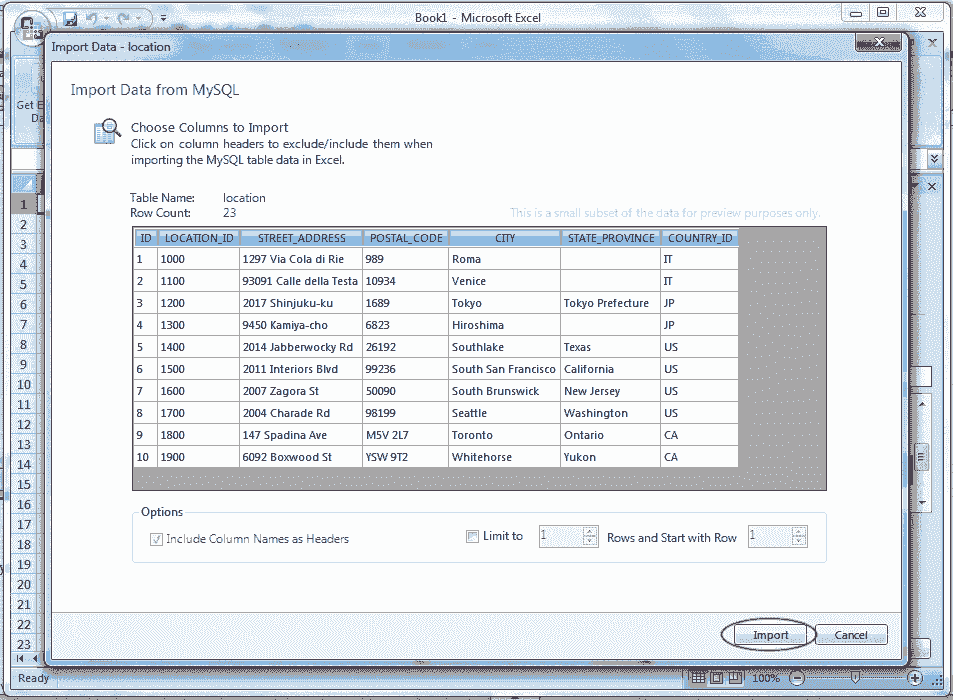
Import MySQL Data into Excel
Data can be imported from MySQL into a Microsoft Excel spreadsheet by using the Import MySQL Data option after selecting either a table, view, or procedure to import.
First of all, you do the first 6 steps describe above in «Edit MySQL Data in Excel» then select your table which you want to import. Here our table is location. So select the location table and then click «Import MySQL Data» and look the appeared screen shot here in the below.
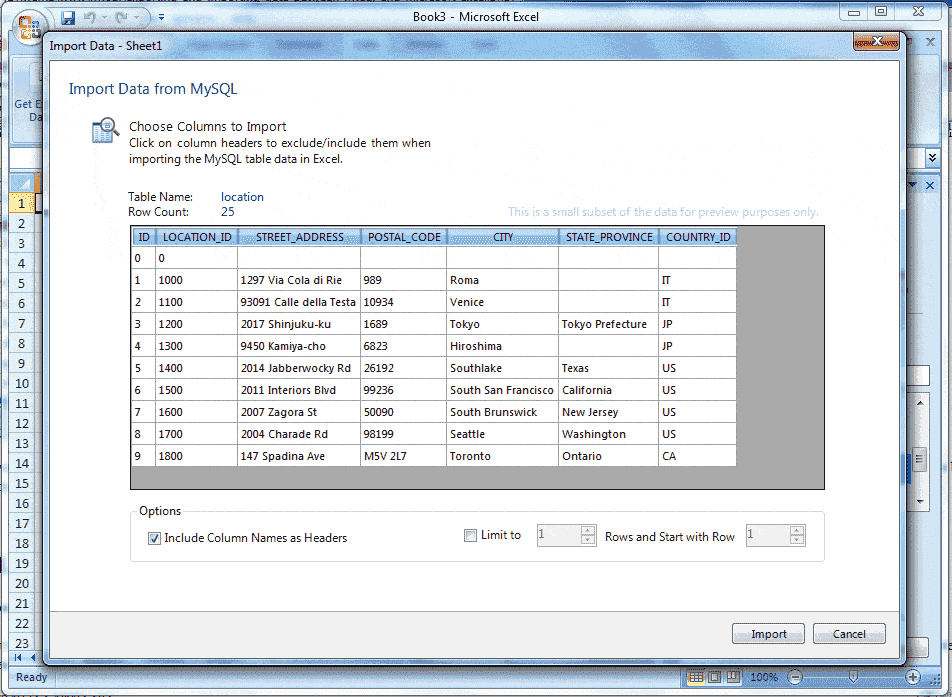
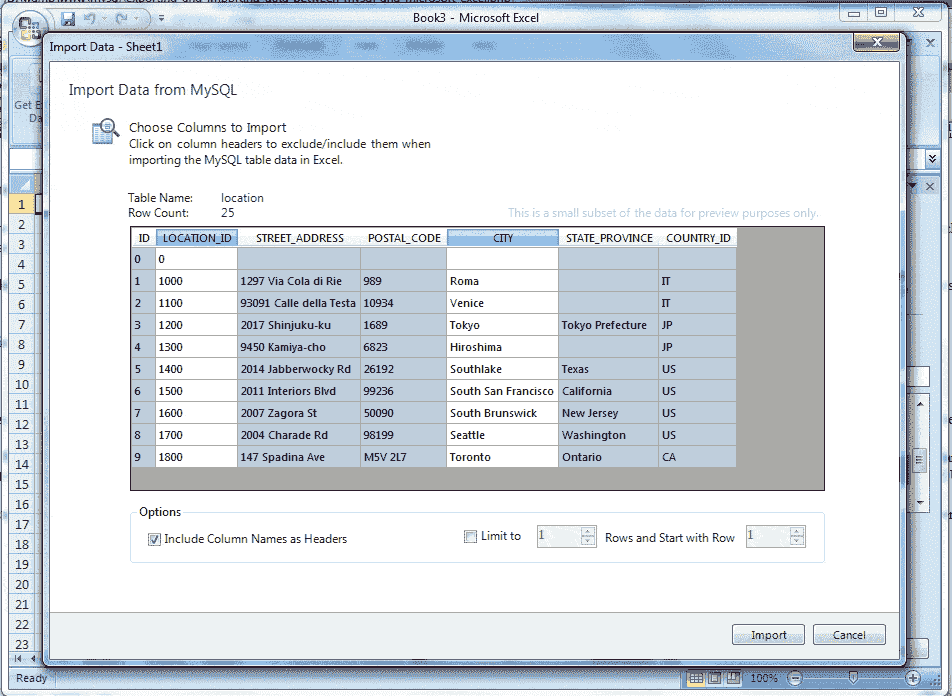
Choosing columns to import
By default, all columns are selected and will be imported. Specific columns may be selected (or unselected) using the standard Microsoft Windows method of either Control + Mouse click to select the individual columns, or Shift + Mouse click to select a range of columns.
The background color white indicates, the column or columns have been selected and they are ready to be imported, on the other hand, the gray color indicates that the columns are not selected and the column will not be imported.
Right-clicking anywhere in the preview grid opens a context-menu with either a Select None or Select All option, depending on the current status.
Importing Table
Include Column Names as Headers: By default, this option is enabled, and this treats the column names at the top of the Microsoft Excel spreadsheet as a «headers» row and will be inserted as a header.
Limit to and Rows and Start with Row : By default, this option is disabled if enabled, this limits the range of imported data. The Limit to option defaults to 1 and this limit can be changed by defines the number of rows to import. The Start with Row option defaults to 1, i.e. starting from the first row, and it can be changed by defines the number from where the import begins. Each option has a maximum value of COUNT(rows) in the table.
Now assumed that we want to import the columns LOATION_ID and CITY. Click the mouse on LOCATION_ID column and then press and hold CTRL key and click on CITY column, and look the following screen shot.
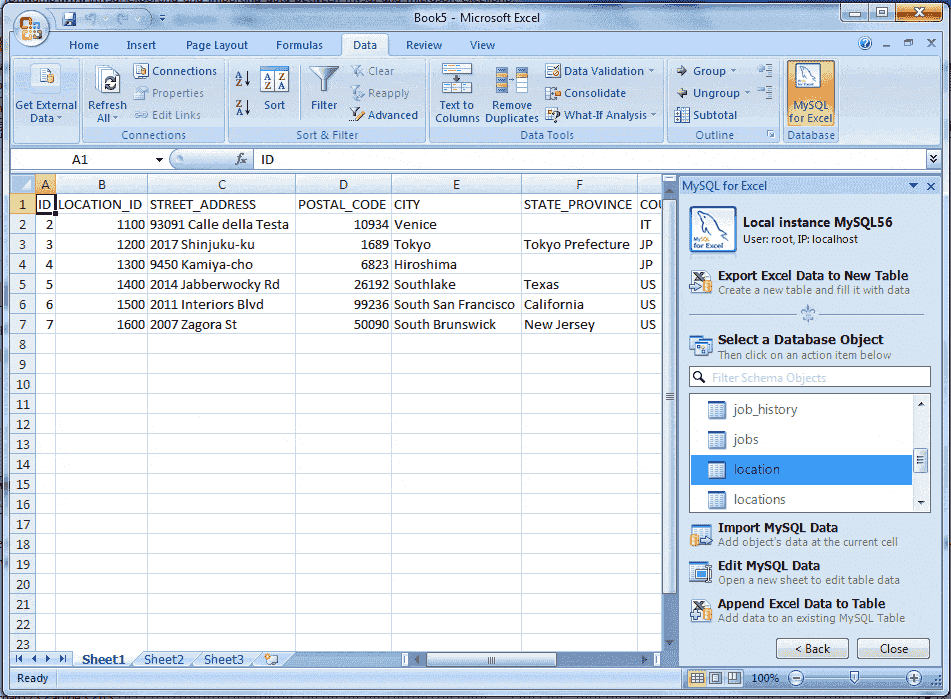
Now if we click the Import button all the rows for this two columns will be imported in Microsoft Excel Worksheet.
Assumes that, we want to import only 6 rows beginning from the 3rd row. Now look the following screen shot.
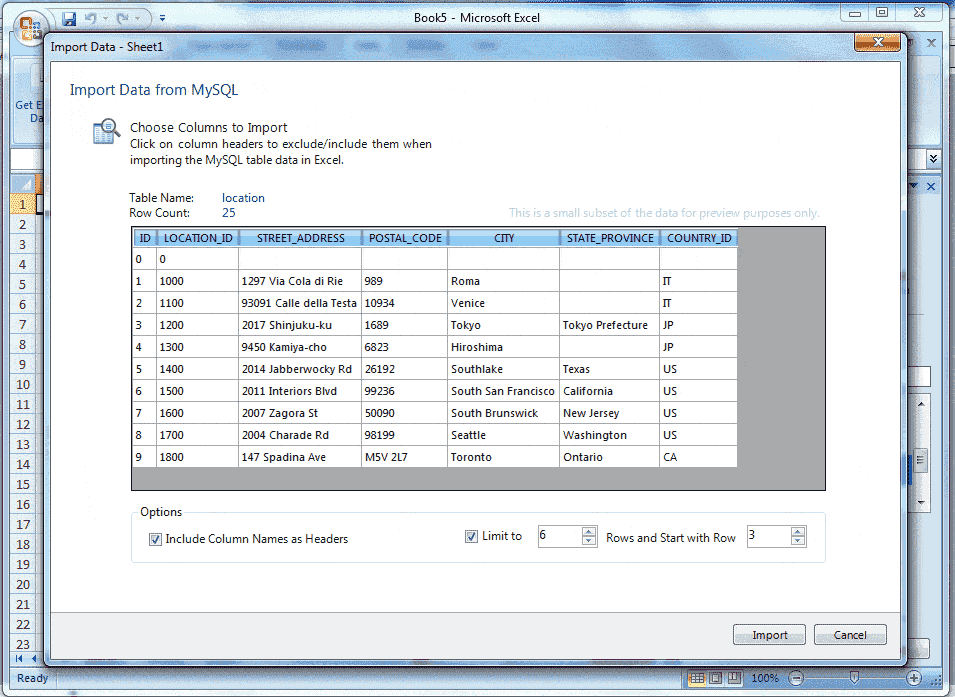
Here in the above picture shows all the columns have selected and the value of Limit to is 6, that means a number of 6 rows will be imported and the beginning of importing will start from the 3rd row because we have set the value of Start with Row is 3. Now click the Import button and look the following screen shot.
Append Excel Data into MySQL
The Microsoft Excel spreadsheet data can be appended to a MySQL database table by using the Append Excel Data to Table option.
Column mappings
Mapping the Excel columns to the MySQL columns can be executed automatically (default), manually, or by using a stored mapping routine. To append the data from Excel toMySQL the following step to be followed:
At first do th e above 6 steps of «Edit MySQL Data in Excel» then input records in excel spreadsheet compatible to the structure of MySQL table in which you want to append the records. Here is the example in which we have taken only one row, you may take more than one rows and then select the records. See the following screen shot.
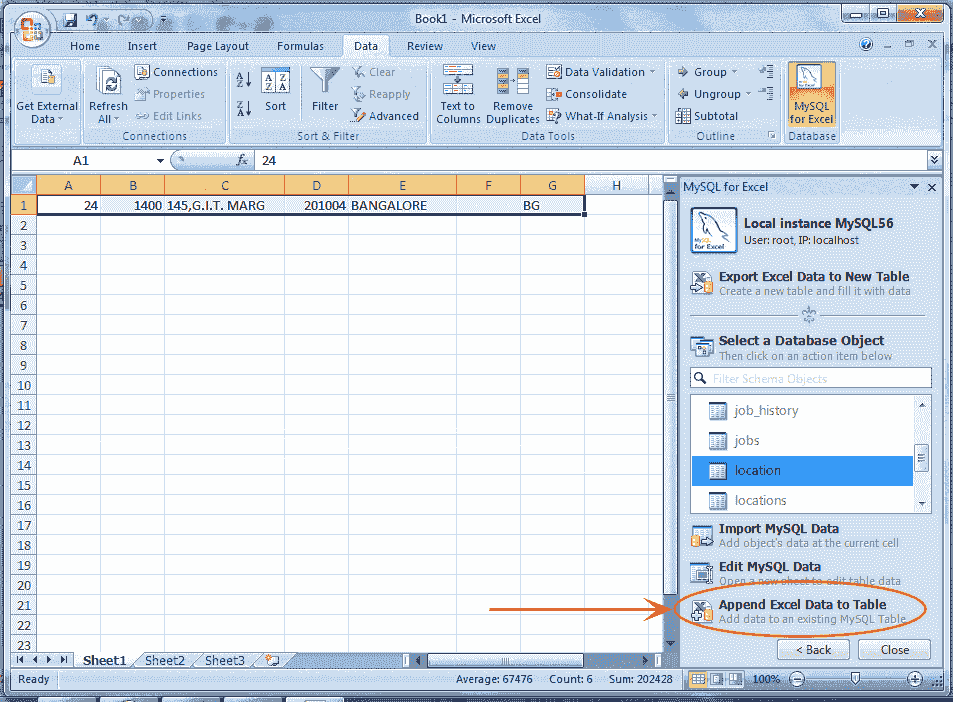
Now click on the Append Excel Data to Table as mention above, and look the screen like.
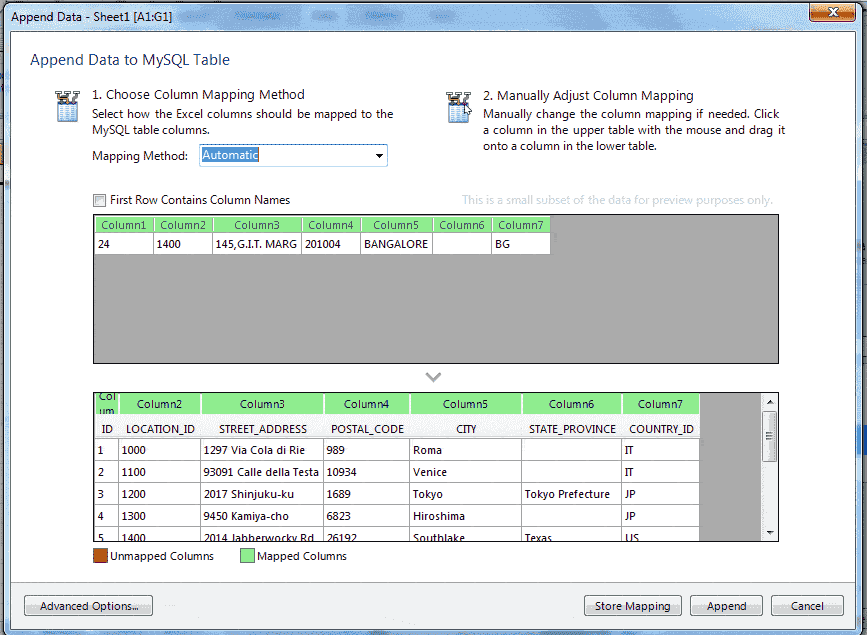
Here in the above picture, you are looking two colors for the legend. One is Red and another is Green.
The Green color indicate that a source column is mapped ( mapped means the source columns in above grid created in the spreadsheet have been matched with structure of the MySQL table as target columns shown in below grid ) to a target column and here in the above picture shows all the source columns have been mapped with target columns.
If you drag any target column heading backed by green color and leave it in outside the grid, the color of the target column will be Red and the color of the source column will be Gray. See in below picture.
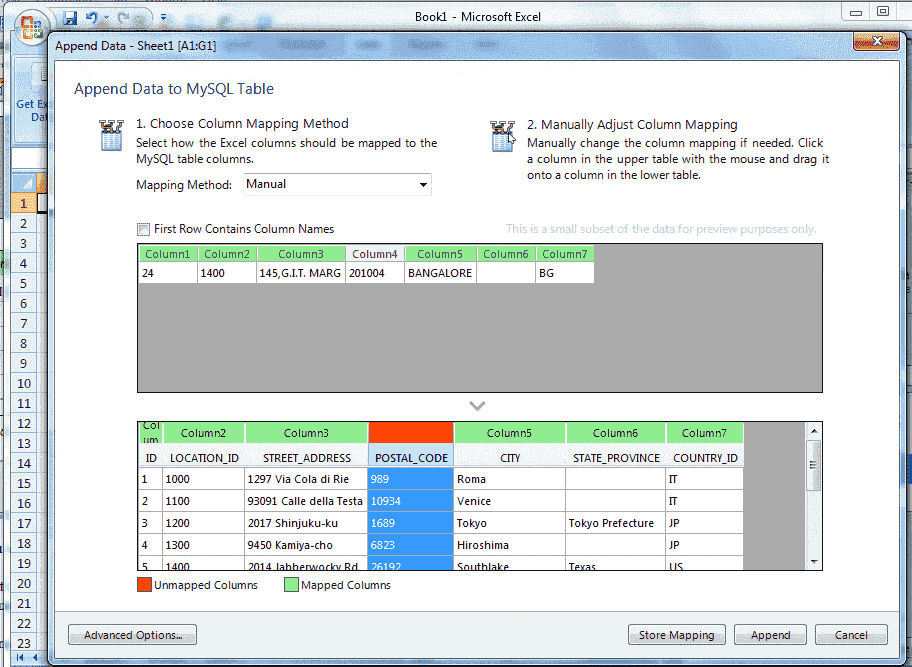
Here in the above picture, the target column4 became Red and source column4 became Gray.
The Red color indicates that a target column is not mapped and the Gray color indicate that, a source column is not mapped.
It is to be noted that, a source column may be mapped to multiple target columns, although this action generates a warning dialog and right-clicking on a target column shows a menu with options to either Remove Column Mapping for a single column or to Clear All Mappings for all columns.
Suppose, we are mapping manually by dragging source column4 with target column4 and column5. The target column4 will be mapping simply but when doing the process for target column5 the warning dialog will appear, show below.
Mapping methods
Here look the three mapping methods:
The automatic mapping method attempts to match the Excel source column names with the MySQL target table column names.
In the manual mapping method, source column names are manually dragged with the target column names. After the Automatic method is selected the Manual dragging method can also be performed.
You may store your own mapping styles using the Store Mapping button and saved a name like «name (dbname.tablename)» and it will be available in the Mapping Method combo box.
Stored mappings may be deleted or renamed within the Advanced Options dialog.
Advanced Options
If we click the Advanced Options button the dialog looks similar to:
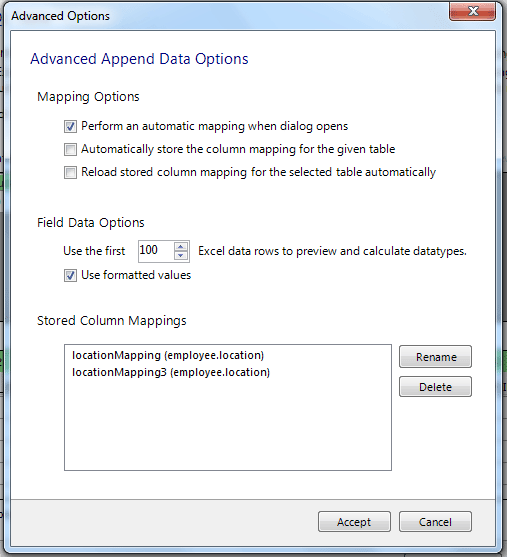
Perform an automatic mapping when the dialog opens: By this options, it happens automatically to map the target and source when the Append Data dialog is opened.
Automatically store the column mapping for the given table:To check this option, stores each mapping routine after executing the Append operation. The mapping routine is saved using the «tablenameMapping (dbname.tablename)» format. It can be performed manually by using the Store Mapping button.
Reload stored column mapping for the selected table automatically: If a stored mapping routine exists which matches all column names in the source grid with the target grid, then it is automatically be loaded.
The advanced Field Data Options:
Use the first 100 (default) Excel data rows to preview and calculate data types. This determines the number of rows that the preview displays, and the values that affect the automatic mapping feature.
When you check the Use formatted values, the data from Excel is treated as Text, Double, or Date. This is enabled by default. If we make it disabled, the existing data is never treated as a Date type, so for example, this means that a date may be represented as a number.
The Stored Column Mappings is a list of saved column mappings that were saved with the «Automatically store the column mapping for the given table» feature, or manually with the Store Mapping option.
After completion all the steps if we click Append button the following screen will appear.
Export Excel Data into MySQL
Microsoft Excel spreadsheet’s data can be exported to a new MySQL database table by using the Export Excel Data to New Table option. At first, you do the first 6 steps above describe in Edit MySQL Data in Excel . Then enter some records with heading as you wish, into your Excel spreadsheet and select the records. Now look the sample records in the following picture —
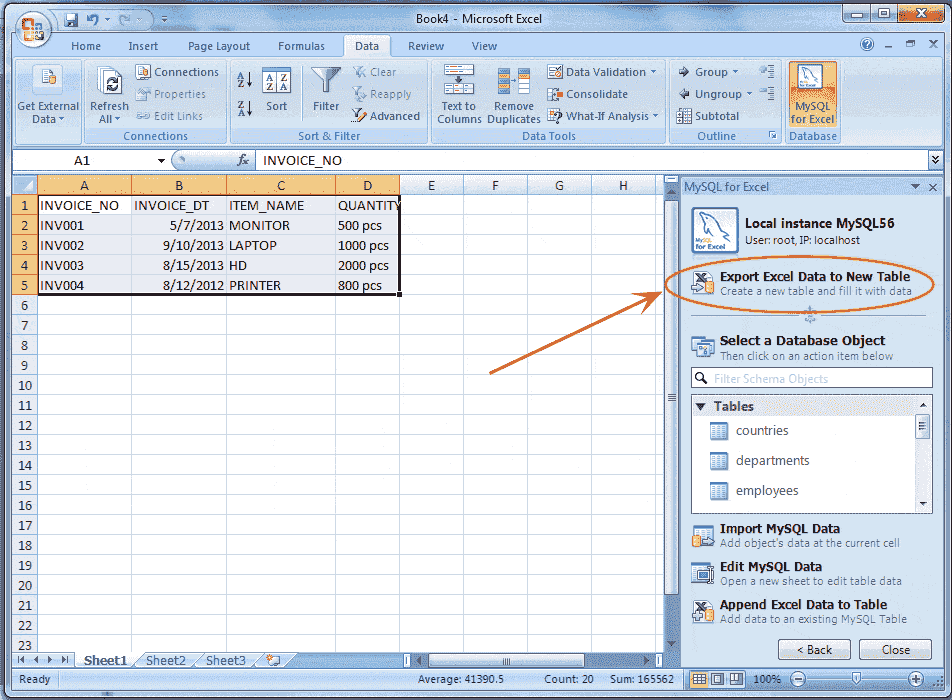
Now click on Export Excel Data to New Table mention by the arrow in the above picture and look the following screen.
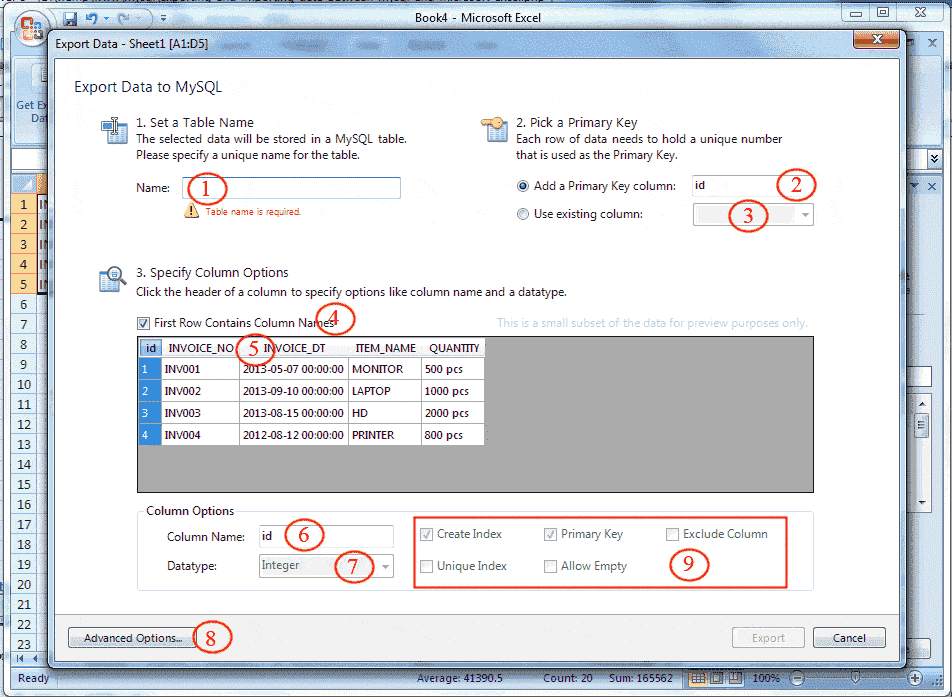
1 — Specify a unique name for the MySQL table. Suppose the name of the MySQL table is «invoice»
2 — If Add a Primary Key column radio button is checked an additional primary key column will be add, you can change the name of the column and by default, the data type will be an integer which is displaying in 7.
3 — When you check the Use Existing Columns radio button the column names will the available in the combo box and you can choose the primary key column from the list, and the column will be selected. Suppose you selected INVOICE_NO column, look the following picture.
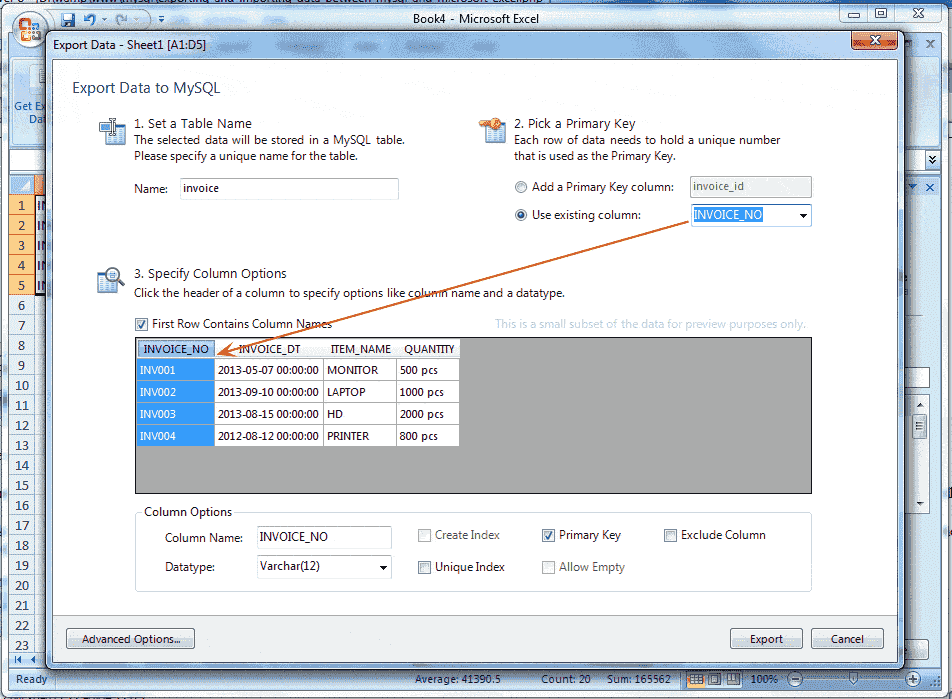
Here in the above picture, the INVOICE_NO column has been selected and now you can change the Column Name (point 6), Data type (point 7) and the constraint (point 9) which are active.
4 — If you check the check box First Row Contains Column Names (point 4) the first column in your excel data will be heading otherwise it will be column1,column2,… etc
5 — Suppose you change the Data type and column name for other columns you can click on the column heading. Assumed that we want to change the Data type of INVOICE_DT, click on INVOICE_DT, and this column will be selected and then you can use point 6,7 and 9.
6 — You can change the Column Name.
7 — You can change the Data type
8 — Advance Option shows the following dialog.
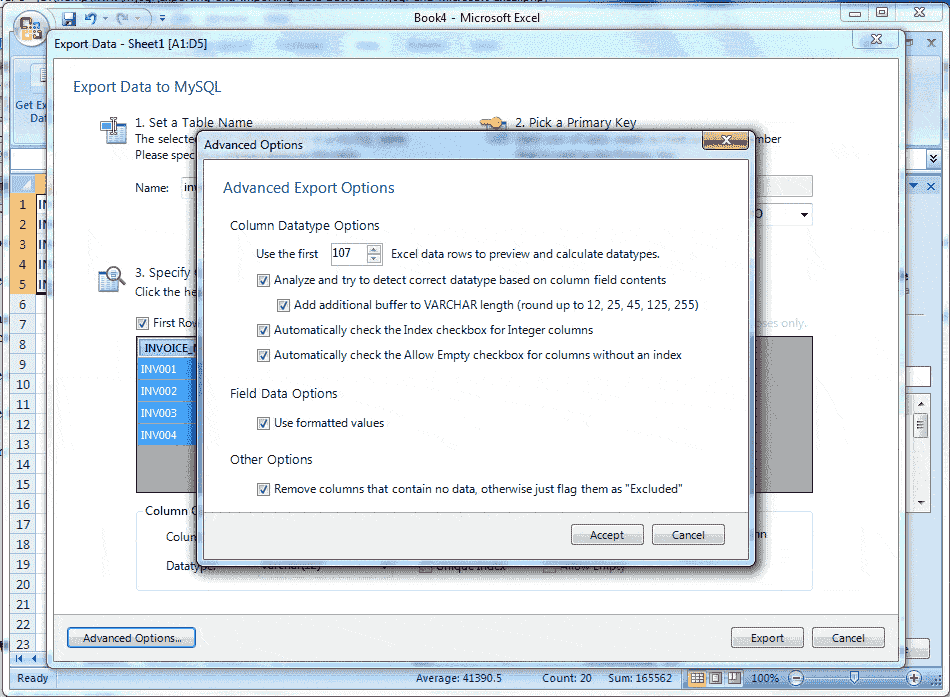
Advanced Options
Use the first 100 (default) Excel data rows to preview and calculate data types: This option determines the number of rows that the preview displays and the specified values affect the feature of automatic mapping.
Analyze and try to detect correct data type based on column field contents: This option try to analyze the data and determine the data type for the column. When the column contains multiple types of data then it defined as VARCHAR.
Add additional buffer to VARCHAR length (round up to 12, 25, 45, 125, 255): When it is enabled, it detects the data type automatically and set to VARCHAR, then it find the maximum length for all rows within the column, and rounds it up the maximum length to one of the defined lengths above and when disabled, then the VARCHAR length is set to the length of the longest entry in the Excel spreadsheet.
Automatically check the Index checkbox for Integer columns: By default, this option is enabled , and then columns with an Integer data type will have the Create Index option enabled by default.
Automatically check the Allow Empty checkbox for columns without an index: By default, this option is enabled, and when enabled the columns without the Create Index checkbox checked will automatically enable the Allow Empty configuration option.
Use formatted values: By default, this option is enabled, and the data from Excel is treated as Text, Double, or Date but when disabled the data’s are independent, that is they have no specific data type.
Remove columns that contain no data, otherwise flag them as «Excluded»: When this option is enabled, columns without data in Excel are removed and not shown in the preview panel. By default, this option is disabled and then these columns will exist but have the Exclude Column option checked.
After completion, all setting click Export button the and see the following screen shot —
Previous:
MySQL DROP
Next:
MySQL backup and restore
Содержание
- How to export/import MySQL data to Excel
- Export/Import MySQL data to Excel using the SELECT INTO … OUTFILE statement
- Export/Import MySQL data to Excel using the From Database feature
- Use MySQL for Excel add-in
- Installation
- Connect to MySQL database
- Export to Excel using a third-party software
- 3 Steps To Export Data From MYSQL To Excel In PHP
- TLDR – QUICK SLIDES
- TABLE OF CONTENTS
- DOWNLOAD & NOTES
- QUICK NOTES
- EXAMPLE CODE DOWNLOAD
- DATABASE TO EXCEL SPREADSHEET
- STEP 1) DOWNLOAD PHPSPREADSHEET
- STEP 2) CREATE A DUMMY DATABASE
- STEP 3) EXPORT FROM DATABASE TO SPREADSHEET
- ALTERNATIVE) EXPORT MYSQL TO CSV FILE
- EXTRA BITS & LINKS
- LINKS & REFERENCES
- TUTORIAL VIDEO
- INFOGRAPHIC CHEAT SHEET
- THE END
How to export/import MySQL data to Excel
One of the main aspects of modern business is gathering and sharing information with others.
In this article, several ways to export/import MySQL data to an Excel file will be explained. The first method will show the exporting process when the SELECT INTO … OUTFILE statement is used. After that, the Excel features for export/import MySQL data, as well as MySQL add-in for Excel, will be explained, and in the end, the Export to Excel option from the ApexSQL Database Power Tools for VS Code extension will be shown.
The following methods will be used:
- The SELECT INTO … OUTFILE statement
- The From Database feature in Excel
- The MySQL for Excel add-in
- Export to Excel using a third-party software
Export/Import MySQL data to Excel using the SELECT INTO … OUTFILE statement
One of the commonly used MySQL statement which can be included in the SELECT statements for exporting data to specific (e.g., .txt, .CSV) file format is SELECT INTO … OUTFILE statement. This statement writes a selected row to a file. Columns and line terminators can be specified to produce a specific output format.
In a query editor, execute a SELECT statement which results want to be exported, add the location where data should be exported, and specify the file format. In the example below, the .txt file format is used:
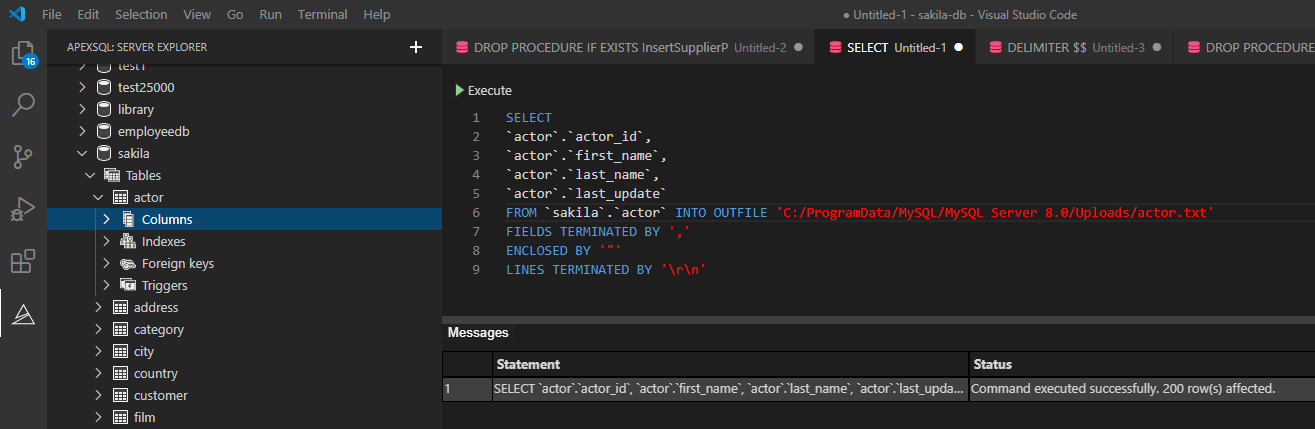
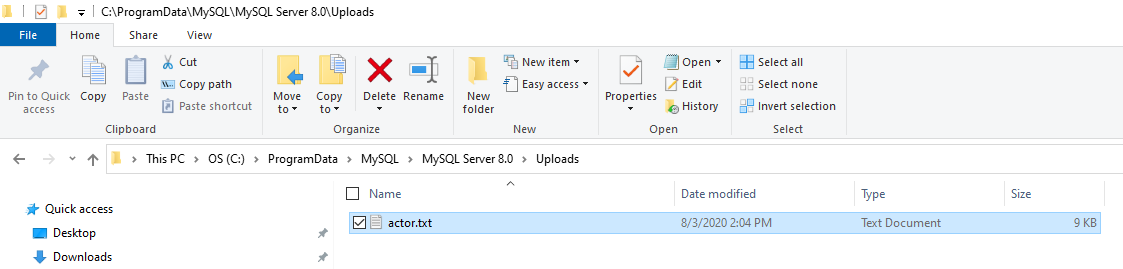
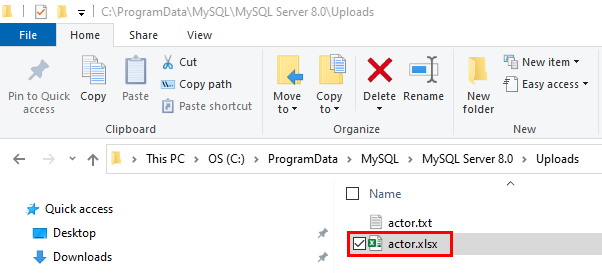
When the above statement is executed, all exported data will be in the actor.txt file:
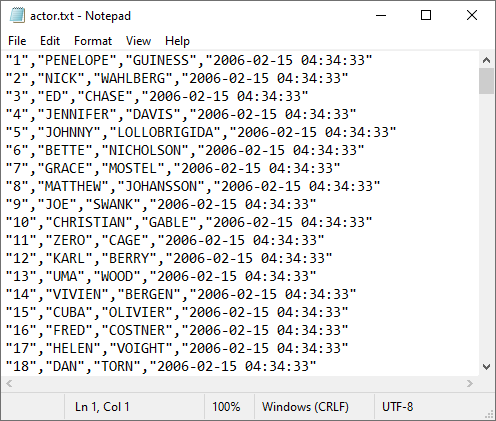
Under the specified location:
For more details about SELECT INTO … OUTFILE statement, see How to export MySQL data to CSV article.
When the data is exported, let’s open it in Excel and save it in .xlsx file format.
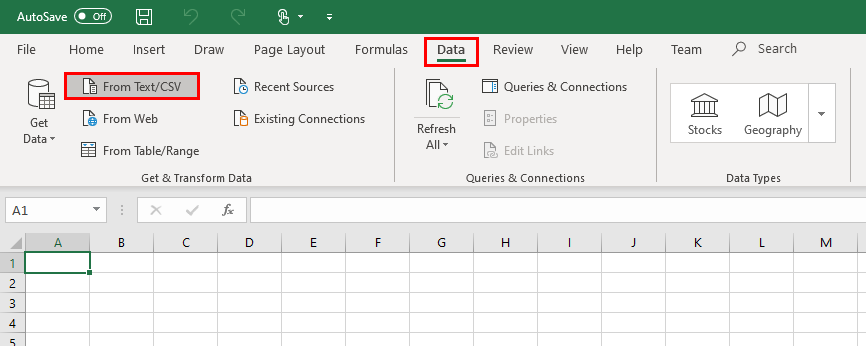
Open Excel and under the Data tab, click the From Text/CSV button:
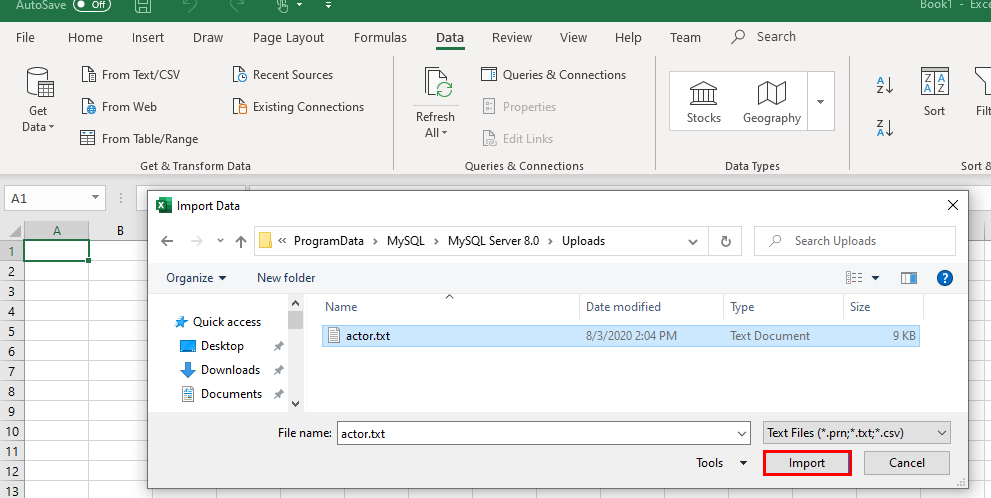
Navigate to the location of the exported .txt file and click Import:
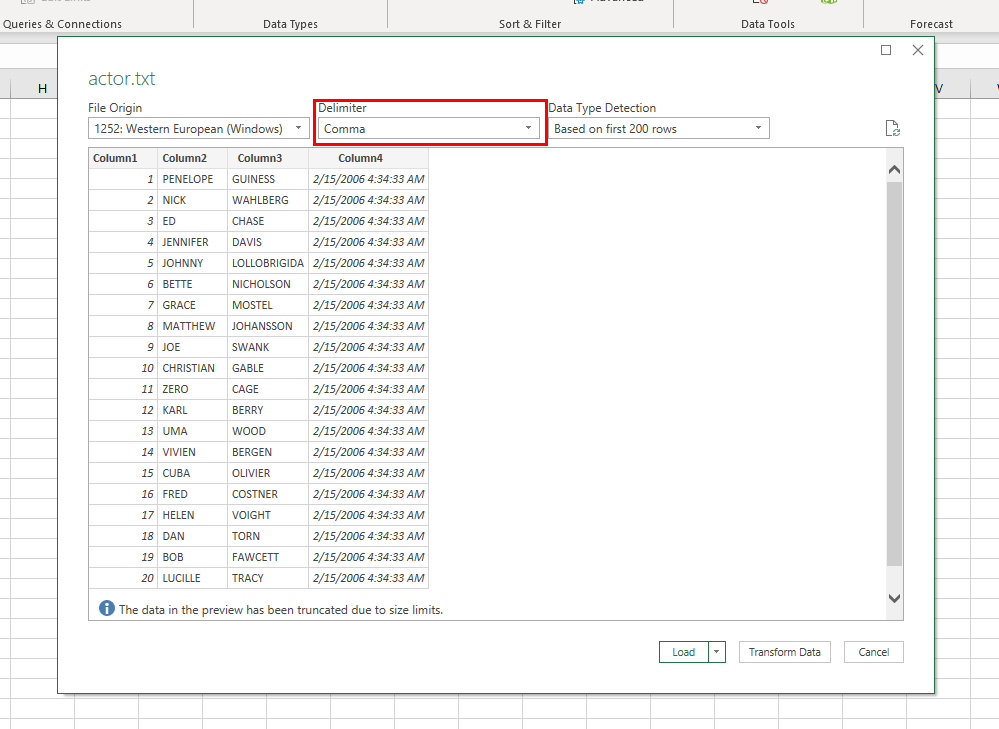
In the newly opened dialog, choose appropriate delimiter and click Transform Data:
In the Power Query Editor window, it is necessary to set some additional settings (e.g., add the name of the columns):
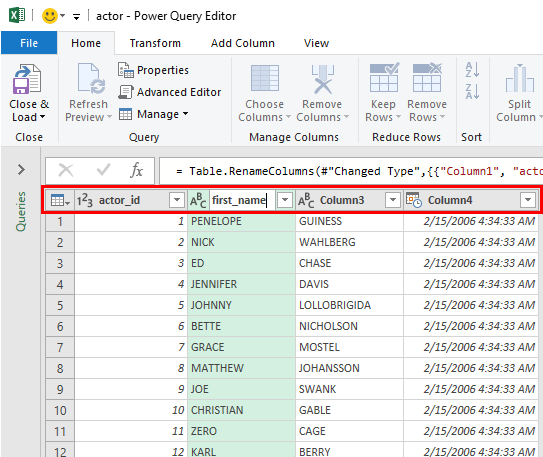
When all is set, click the Close & Load command:
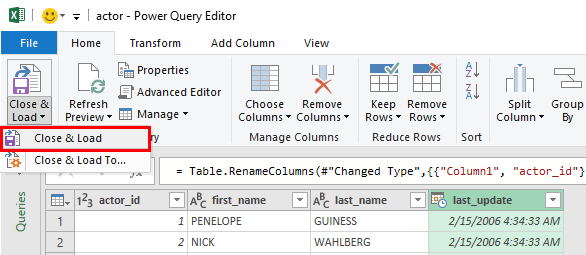
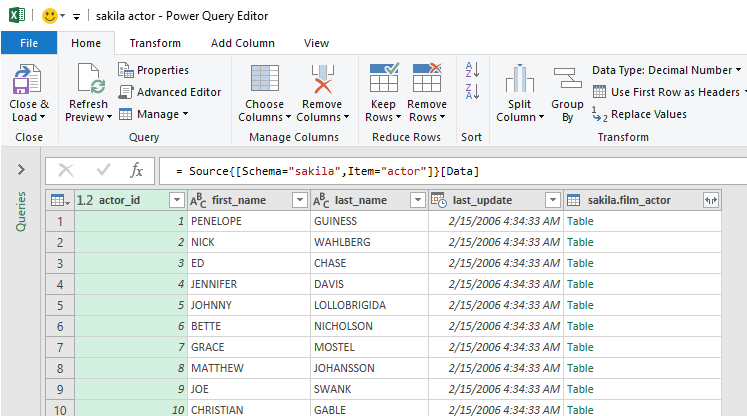
The data will be loaded in a separate sheet:
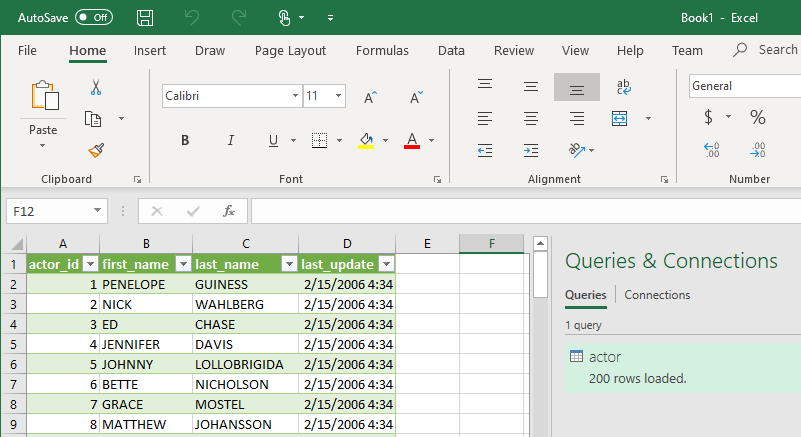
Save newly imported data in .xlsx file format:
Export/Import MySQL data to Excel using the From Database feature
Similar to the method in the section above, Excel provides one more option to load data from the MySQL database to Excel.
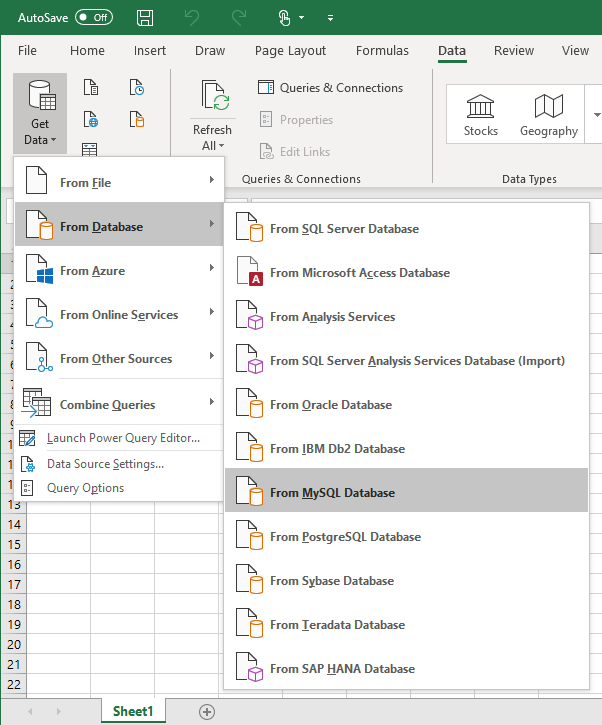
In the Data tab, under the Get Data list, choose the From MySQL Database command:
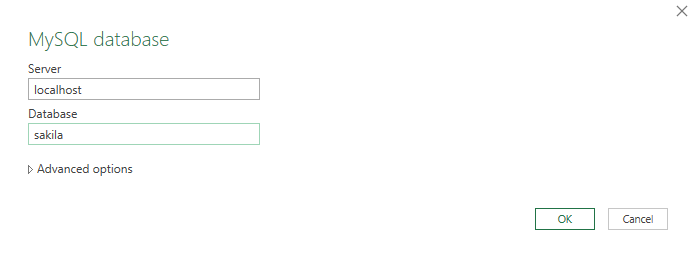
In the MySQL database dialog, enter server and database name from which you want to load data and click the OK button:
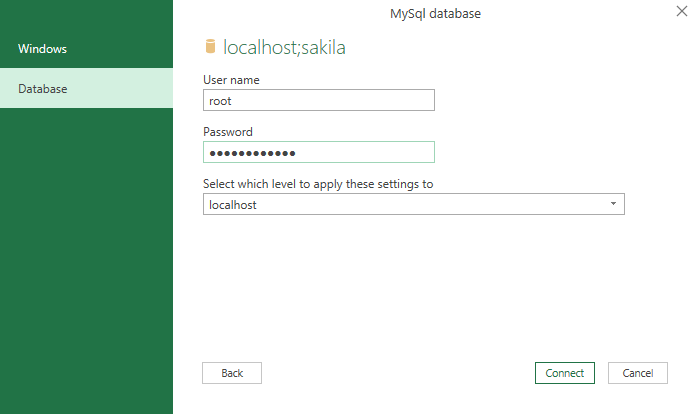
On the next window, under the Database tab, enter credentials for the user that have permission to access the targeted database and click the Connect button:
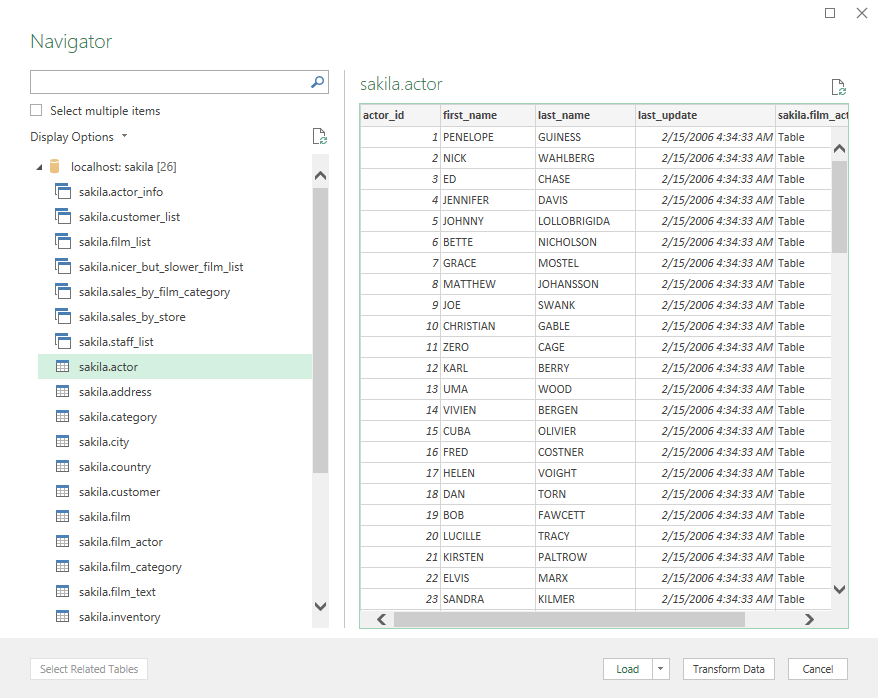
From the Navigator window, choose the tables, views, etc. from which to load data:
Click the Transform Data button. The Power Query Editor window will appear with desired data in it. Now, the steps for loading data are the same as we explained in the previous section:
Use MySQL for Excel add-in
MySQL for Excel is the Windows-based add-in that integrates into Excel under the Data tab that provides export/import MySQL data capabilities.
To install MySQL for Excel add-in first download the MySQL for Excel MSI file. Before starting with installation, please check that the following requirements are fulfilled:
- .NET Framework 4.5.2 (Client or Full Profile)
- Microsoft Office Excel 2007 or later (for Microsoft Windows)
- Visual Studio 2010 Tools for Office Runtime. MySQL Installer may install this for you. This requirement is different than Office Developer Tools for Visual Studio, which is not a substitute
- An available MySQL server connection
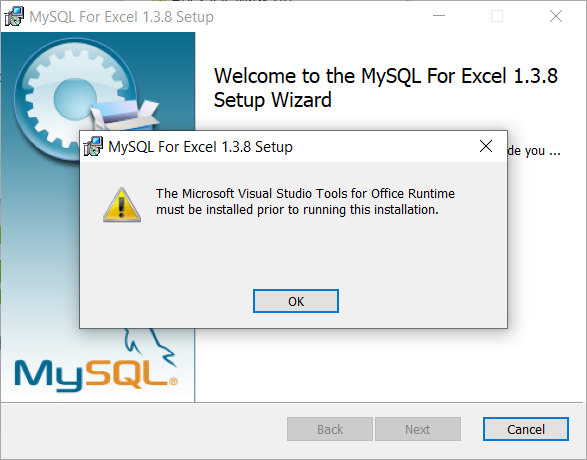
Otherwise, some errors may occur during the installation process, like that one from the image below, when the Visual Studio 2010 Tools for Office Runtime is not installed:
Note: The Microsoft Visual Studio Tools for Office Runtime must be installed prior to running this installation.
Installation
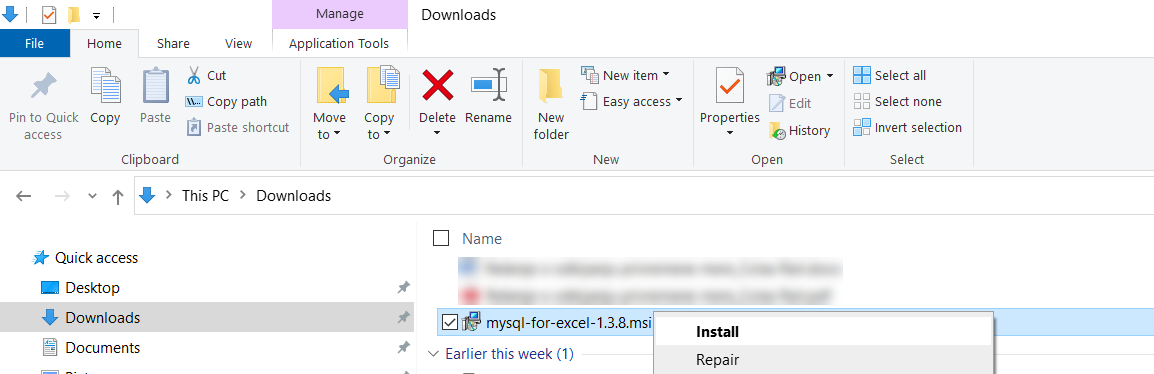
The installation process is straightforward. Go to the location where the installer (mysql-for-excel-1.3.8.msi) is downloaded, right-click on it, and from the context menu, choose the Install command:
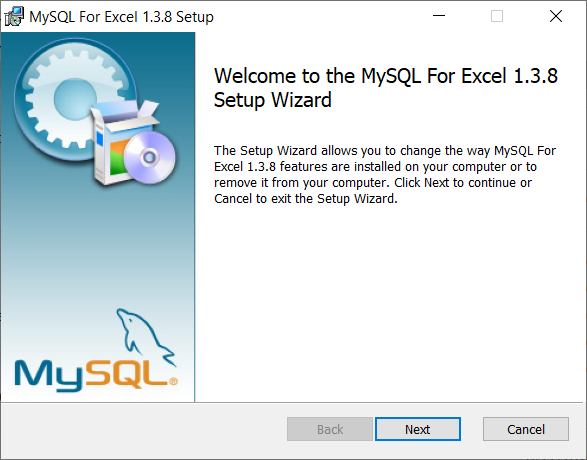
When the installation wizard is launched, click Next:
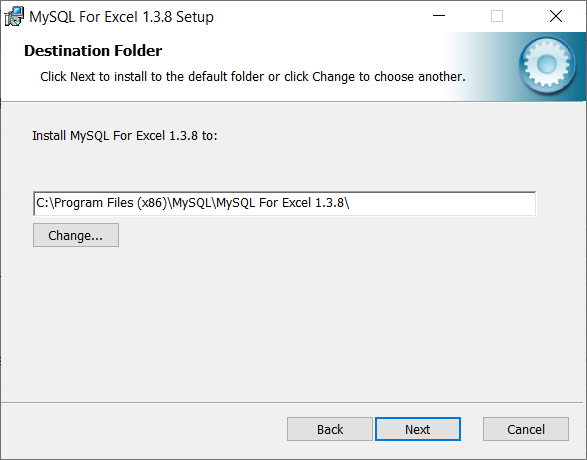
On the Destination Folder step, choose a location where the MySQL For Excel 1.3.8 will be installed and click Next:
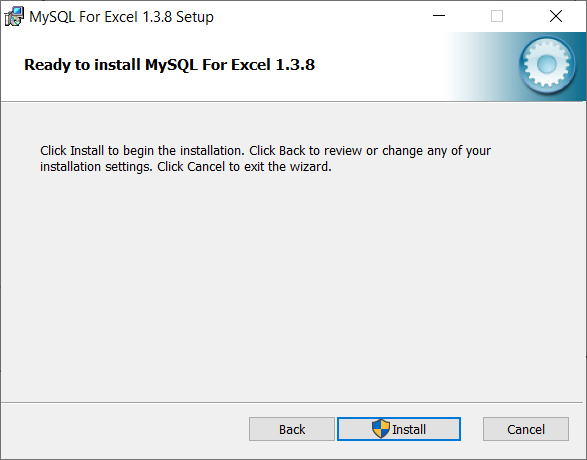
On the next step, click the Install button to start the installation of MySQL For Excel 1.3.8:
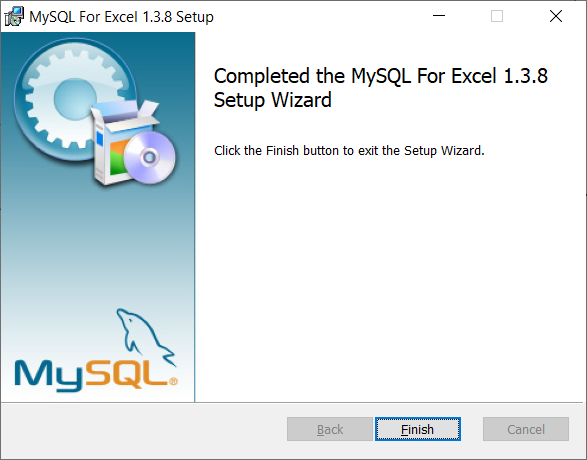
On the last step, click the Finish button to close the setup wizard:
Now when Excel is launched, the MySQL for Excel add-in will appear in the top-right corner of the Data tab:

Connect to MySQL database
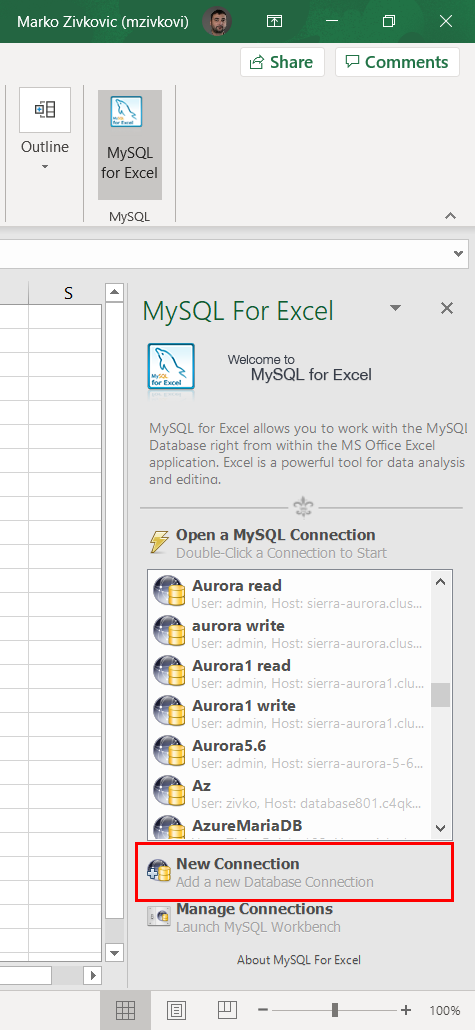
To start MySQL for Excel, click on the MySQL for Excel icon under the Data tab. In the panel that shows find and click the New Connection button:
In the MySQL Server Connection window, enter the name for the connection in the Connection Name box (e.g., Sakila_database).
From the Connection Method drop-down list, chose the method to connect to RDBMS (e.g., Standard (TCP/IP)).
In the Hostname box, enter a name or IP address of the server host (e.g., localhost). Under the Port box, enter the TCP/IP port number (e.g., 3306). For the Username and Password fields, enter the credentials for the user that have access to the specified server in the Hostname field:

Optional, from the Default Schema drop-down list, the default schema can be selected.
To confirm that connection to the MySQL Server works properly, click the Test Connection button:
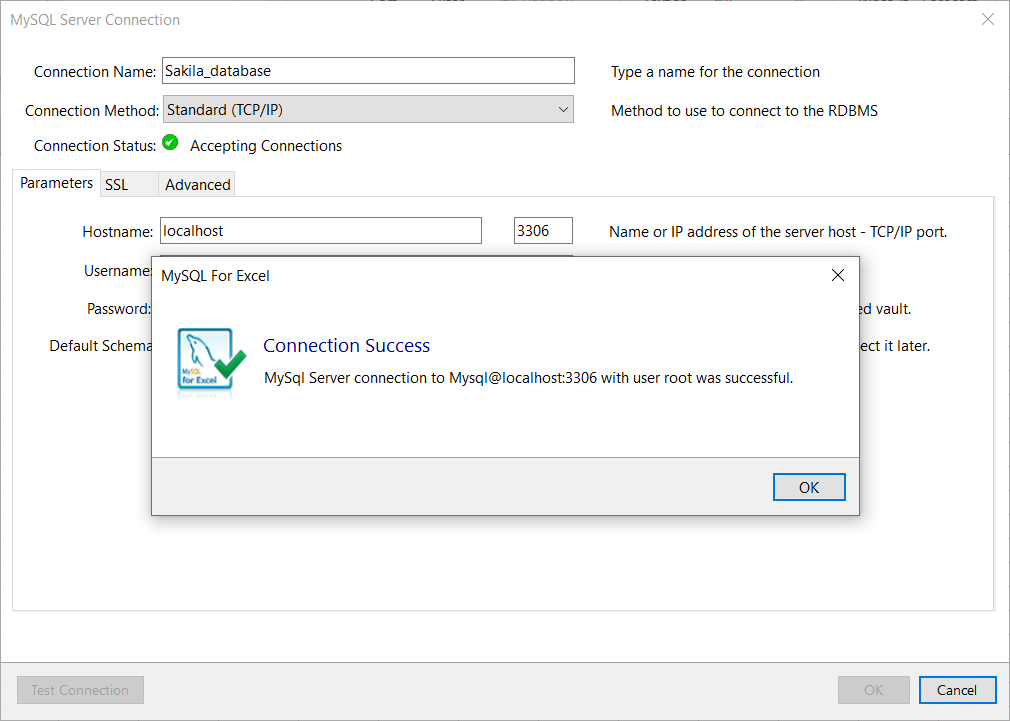
Click the OK button on the MySQL Server Connection window for MySQL for Excel to create a connection in MySQL for Excel panel:
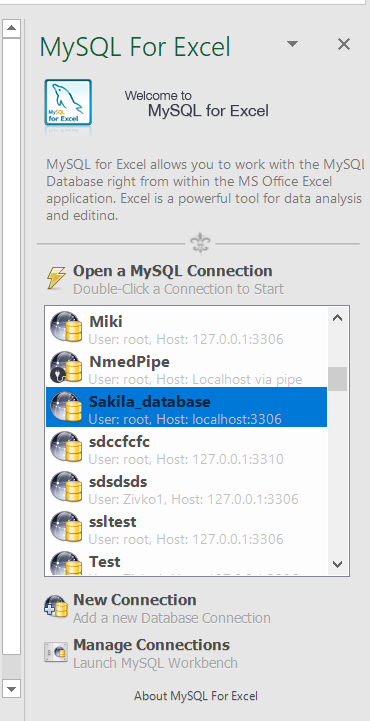
Double-click on the newly created connection will list all available databases from that MySQL server:
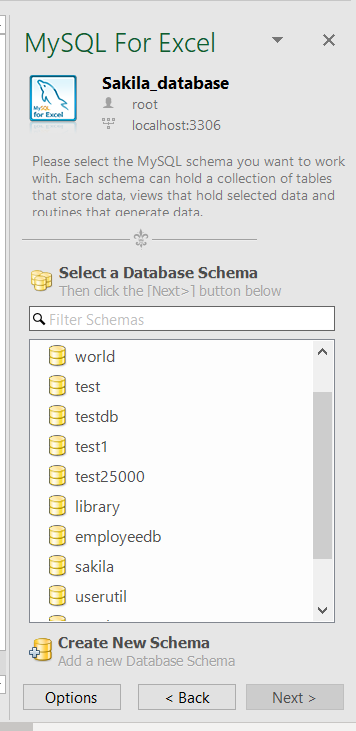
Double-click on a database, in the MySQL for Excel panel, will list all tables, views, and procedures from that database:
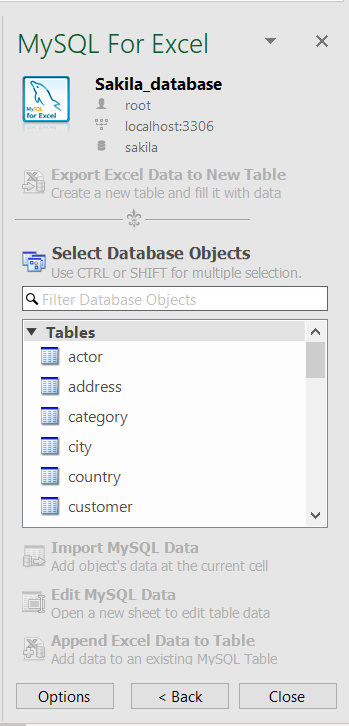
To import data, on the MySQL for Excel panel, select the desired table, and click the Import MySQL Data button. The Import Data window will appear:
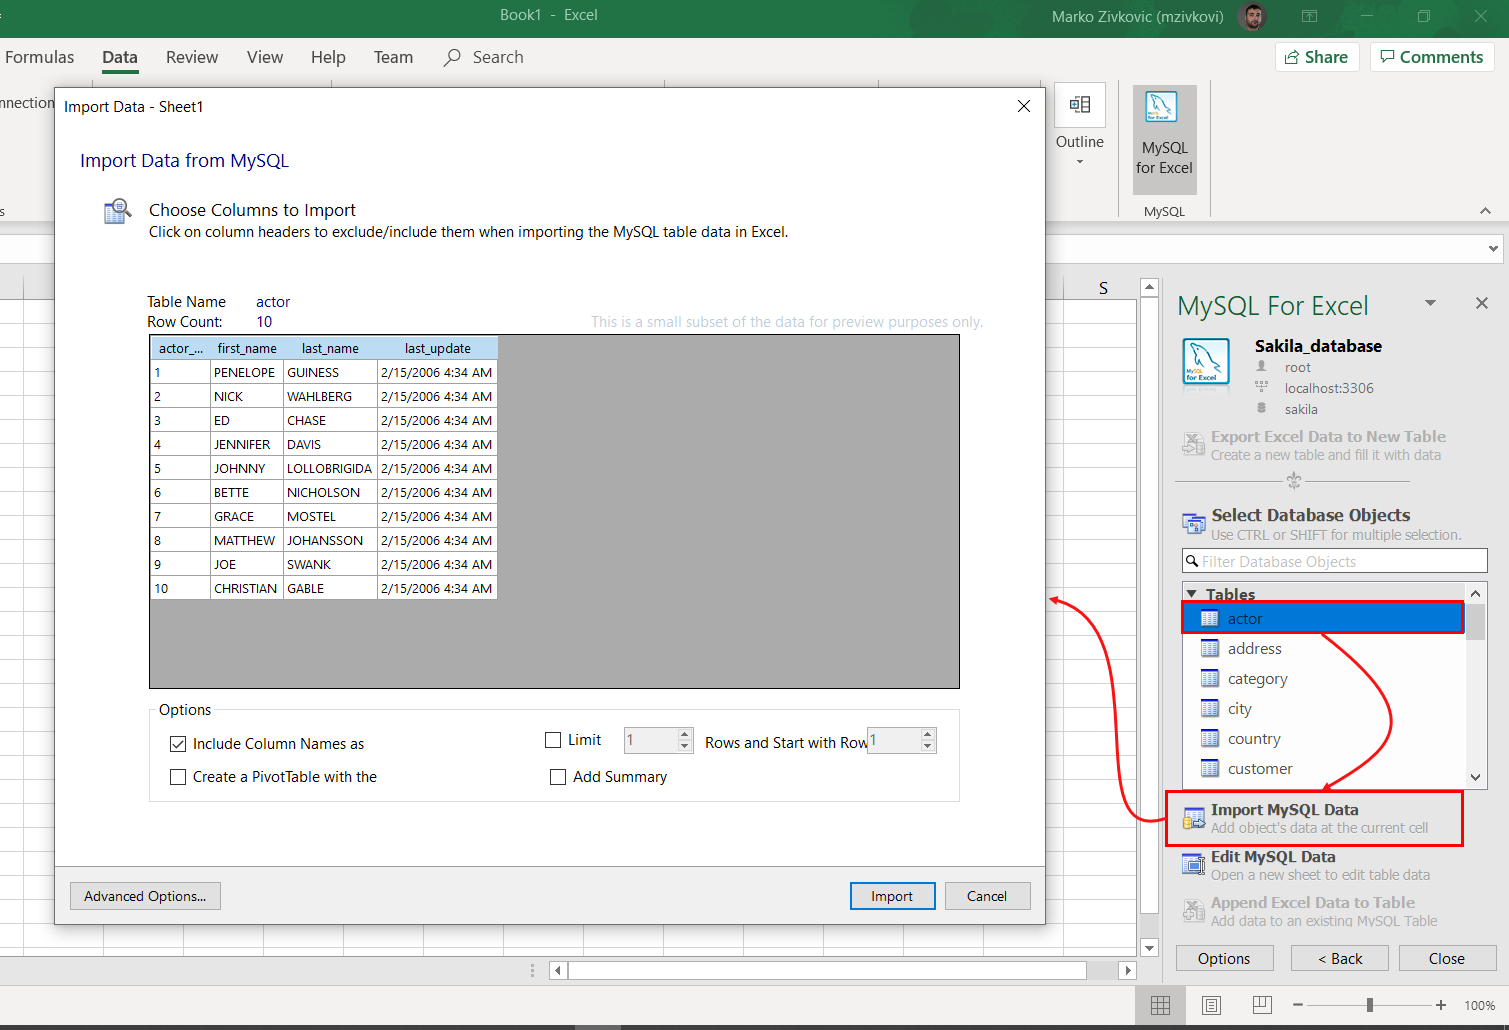
When all settings are set, click the Import button. The imported data will look something like this:
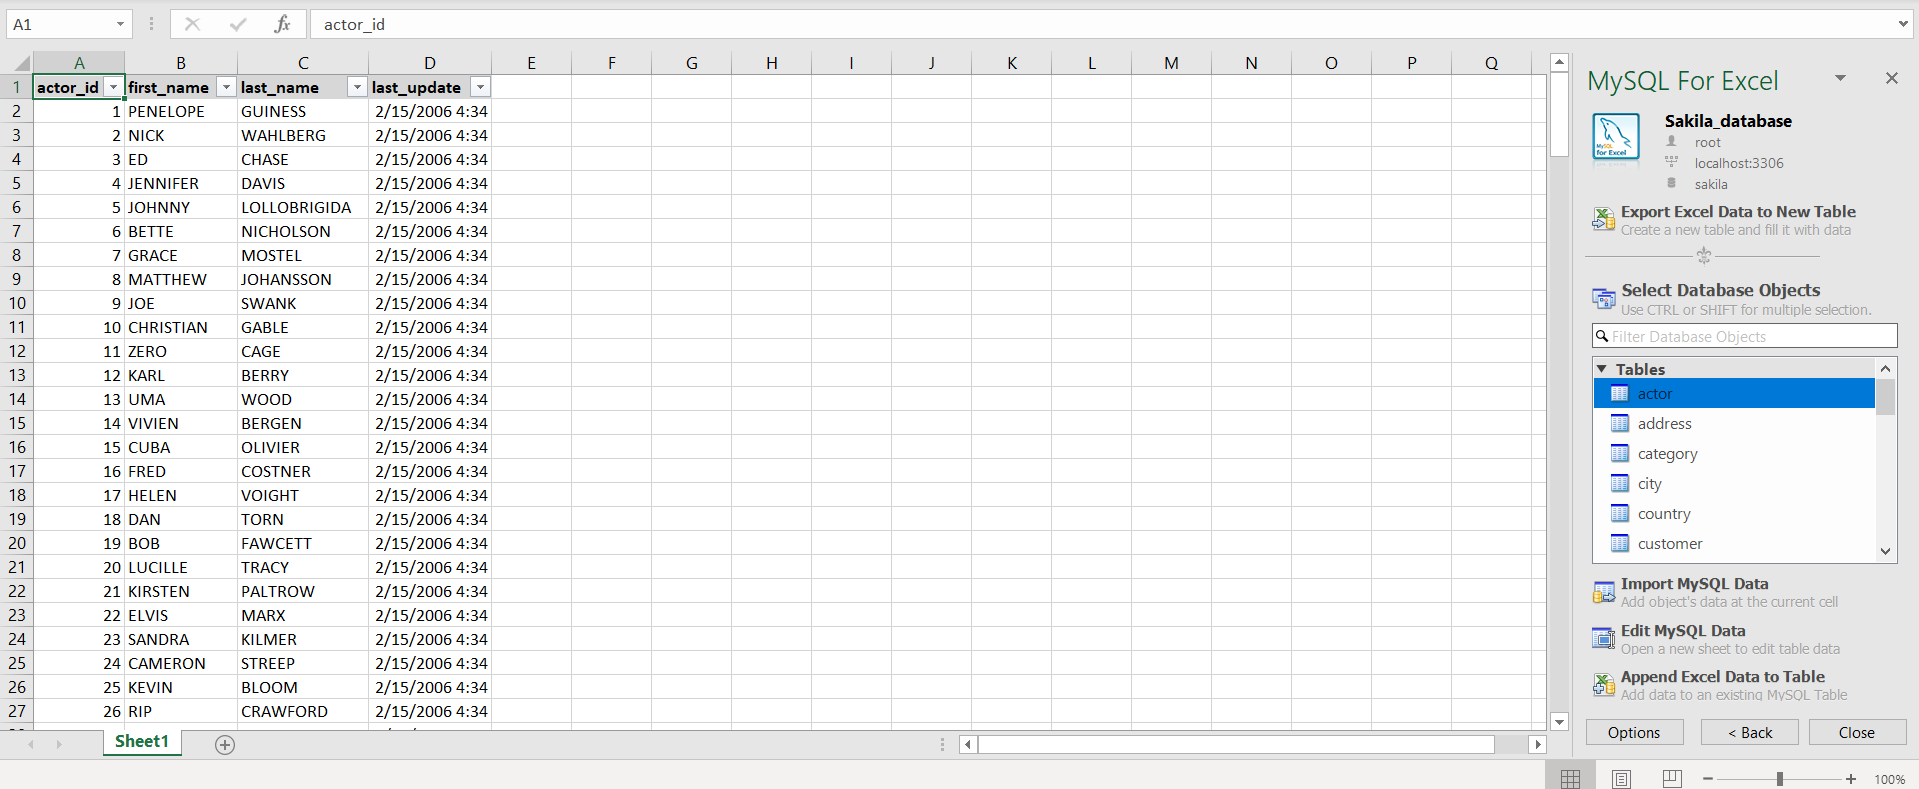
This add-in can return all rows, or a specified range of rows, from a specified table. It cannot import data stored in two different tables, perform table joins, or filter data.
More details about MySQL for Excel tool can be found on the MySQL for Excel page.
Export to Excel using a third-party software
Using the Export to Excel feature from ApexSQL Database Power Tools for VS Code, query results can be exported to MySQL data from the results grid in just a few steps. Besides exporting data to Excel, this VS Code extension provides a couple of more exporting options, such as export data to JSON, CSV, and HTML file format.
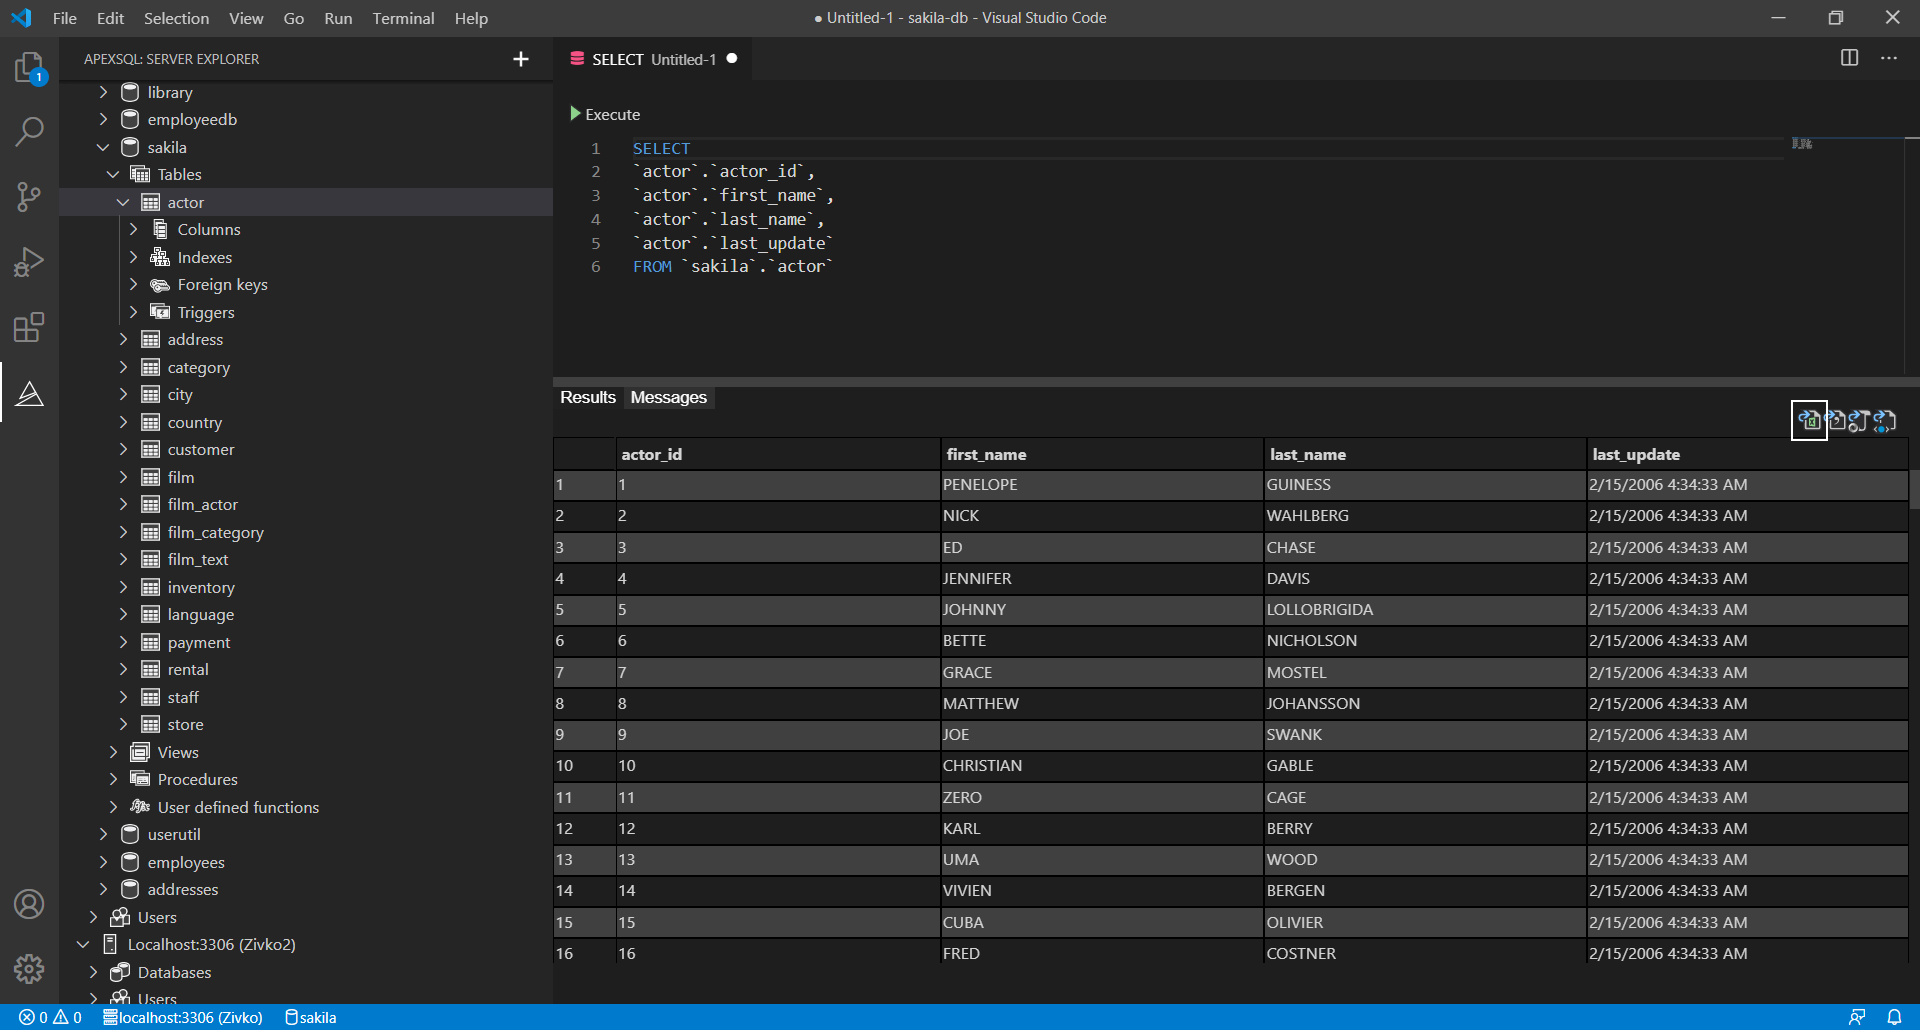
In a query editor of the VS Code extension, execute a query from which you want to be data exported. In the top right corner of the Results grid, click the Export to Excel button:
In the Save as window, enter a name and location for a new Excel file and click the Save button:
Источник
3 Steps To Export Data From MYSQL To Excel In PHP
Welcome to a quick tutorial on how to export data from MYSQL to an Excel Spreadsheet. Need to export some data from the database into Excel spreadsheets? Sadly, PHP is unable to generate Excel files natively.
To export data from MySQL to an Excel Spreadsheet:
- We need to use a third-party library to generate Excel files in PHP, a good recommendation is PHPSpreadsheet.
- Fetch entries from the database table.
- Write them to a Spreadsheet using PHPSpreadsheet.
But just how is this done exactly? Let us walk through a simple example in this guide – Read on!
ⓘ I have included a zip file with the example code at the start of this tutorial, so you don’t have to copy-paste everything… Or if you just want to dive straight in.
TLDR – QUICK SLIDES
TABLE OF CONTENTS
DOWNLOAD & NOTES

First, here is the download link to the example source code as promised.
QUICK NOTES
- A copy of PHPSpreadsheet is not included in the zip file. Download the latest version with Composer by yourself – composer require phpoffice/phpspreadsheet
- Create a dummy database and import 2-database.sql .
- Change the database settings in 3-db-spreadsheet.php to your own, and launch in the browser (or command line).
If you spot a bug, feel free to comment below. I try to answer short questions too, but it is one person versus the entire world… If you need answers urgently, please check out my list of websites to get help with programming.
EXAMPLE CODE DOWNLOAD
Click here to download the source code, I have released it under the MIT license, so feel free to build on top of it or use it in your own project.
DATABASE TO EXCEL SPREADSHEET

All right, let us now get into the example of how to export MYSQL data to an Excel spreadsheet.
STEP 1) DOWNLOAD PHPSPREADSHEET
Yep, PHP does not have native functions and extensions to generate Excel files, we will use a library called PHPSpreadsheet.
- One of the lazy ways to get PHPSpreadsheet is to use a package manager called Composer. Just download and install that, quite a hassle, but a one-time effort nonetheless.
- After installing Composer – Open the command line, navigate to your project folder, and run “ composer require phpoffice/phpspreadsheet “.
- That’s all, Composer will automatically fetch the latest version into the vendor/ project.
If you need more, the official manual for PhpSpreadsheet is available online here, and also check out their GitHub page.
STEP 2) CREATE A DUMMY DATABASE
For this example, we will be using this dummy user table. Very simple, and just has 3 fields – ID, name, and email.
STEP 3) EXPORT FROM DATABASE TO SPREADSHEET
This should be pretty straightforward and easy to understand:
- Connect to the database, and remember to change the database settings to your own.
- Captain Obvious. Include and use the PHPSpreadsheet library.
- Create a new spreadsheet, and get the current worksheet.
- Fetch entries from the database and populate the cells.
- Save the spreadsheet onto the server (or force download if you want).
One small thing to take note though – Avoid exporting an entire database and not generate massive spreadsheets… That will probably crash the server.
ALTERNATIVE) EXPORT MYSQL TO CSV FILE
If you do not want to use any extra libraries, we can always export them in CSV format instead. Just like the above, except that we are reading entries from the database and directly echoing them out.

Finally, here are some small extras and links that may be useful to you.
LINKS & REFERENCES
- A massive list of commonly used Excel formula that you might find useful.
- Need to do the opposite of importing data from a spreadsheet instead? Here’s how – Import Excel into MySQL
- Create Excel File In Javascript – Code Boxx
TUTORIAL VIDEO
INFOGRAPHIC CHEAT SHEET
THE END

Thank you for reading, and we have come to the end of this short tutorial. I hope this has helped you to create Excel files in PHP for your project, and if you have anything to share with this guide, please feel free to comment below. Good luck and happy coding!
Источник