
A. Match the pictures with the words in the box.
equipment • experiment • gadgets • hardware • laboratory • laptop • screen • software

Answers
1 laboratory 2 screen 3 experiment 4 equipment
5 laptop 6 gadgets 7 software 8 hardware
B. Complete using the words in the box.
artificial • automatic • complicated • digital • exact • maximum
minimum • plastic • sudden • unique
1 It’s not a/an ………………… watch. It’s got hands.
2 If you play this stereo on ………………… volume, you’ll go deaf!
3 It’s not a/an ………………… experiment. In fact, it’s really simple.
4 Are leather chairs more comfortable than ………………… ones?
5 There aren’t any windows in the lab, so all the light is ………………… .
6 Was it a/an ………………… decision, or had you thought about it for a long time?
7 The lights are ………………… – they come on when you enter the room, and go off when you leave.
8 Each person’s fingerprints are ………………… No two people have the same fingerprints.
9 The ………………… number of patients necessary to test the new drug is 50. Any less than that and the scientists won’t know if it works properly or not.
10 I can’t remember the ………………… year it was discovered, but it was around 1976.
Answers
1 digital 2 maximum 3 complicated 4 plastic 5 artificial
6 sudden 7 automatic 8 unique 9 minimum 10 exact
C. Circle the correct word.
1 Do you know who invented / discovered the planet Mars?
2 The number of people dying of malaria has run / decreased enormously over the last 100 years.
3 You need at least three people to operate / estimate this machine safely.
4 Modern technology / equipment makes all our lives easier.
5 We’ve done a lot of research / experiment into why people are scared of spiders.
6 I’m using a computer research / program that translates from English into Greek.
7 This drug seems to have no effect / lack on humans at all.
8 The experiment just involves / operates answering a few questions.
9 Could you program / estimate how many times a week you eat cheese?
10 Do you think anyone will ever invent / discover a time machine?
11 Professor Reinhart decreases / runs the computer lab with her three assistants.
12 There’s a lack / an effect of phones in this office. We need some more!
Answers
1 discovered 2 decreased 3 operate 4 technology 5 research
6 program 7 effect 8 involves 9 estimate 10 invent
11 runs 12 a lack
D. Choose the correct answer.
1 I ……………… across this book about the moon in the library. It’s really interesting!
A went B found
C came D looked
2 Jenny pulled ……………… the handle so we can’t open the cupboard now.
A off B away
C in D over
3 I’d like to find ……………… more about being a computer programmer.
A across B up
C off D out
4 Our car has broken ……………… again.
A off B down
C out D in
5 Dean was late for physics so he ……………… up a story about being attacked by a cat!
A took B wrote
C created D made
6 ……………… the TV off. This show is boring.
A Put B Set
C Turn D Make
7 I’m going to throw these old shoes ……………… I never wear them anymore.
A off B away
C down D back
8 I turned ……………… the tap but no water came out.
A over B up
C round D on
Answers
1 C 2 A 3 D 4 B 5 D 6 C 7 B 8 D
E. Complete using the words in the box.
chance • end • future • last • opinion • order
1 These toilets have been out of ………………….. for a week now. When are they going
to fix them?
2 In my ………………….., humans will never live on other planets.
3 Alexander Fleming discovered penicillin by ………………….. . He didn’t expect to find it at all.
4 I wonder what new technology will be invented in the ………………….. .
5 Helen couldn’t get the experiment to work for ages, but in the ………………….. it was fine.
6 It’s so nice to have my own computer at ………………….. .
Answers
1 order 2 opinion 3 chance 4 future 5 end 6 last
F. Use the word given in capitals at the end of each line to form a word that fits in the gap in the same line.
Mr Thomas
Mr Thomas was a teacher at our school. He’d trained as a (1) ………………….. (HISTORY) and usually taught history. He definitely wasn’t a (2) ………………….. (SCIENCE), but for some strange reason he taught us (3) ………………….. (CHEMIST) for a term. His lessons were always (4) ………………….. (FASCINATE), but that was mainly because his experiments always went wrong! If he was supposed to use (5) ………………….. (BOIL) water for an experiment, Mr Thomas would use cold water by mistake. Once, he was measuring the (6) ………………….. (LONG) of some pieces of sodium. I can’t remember exactly why he needed this (7) ………………….. (MEASURE), but I think he wanted all the pieces to react (8) ………………….. (IDENTICAL). As he picked up the ruler, his arm knocked over a jug of water and the sodium caught fire. He almost burnt the lab down and they had to call the fire brigade. I think after that Mr Thomas came to the (9) ………………….. (CONCLUDE) that he should stick to history! I learnt a lot from him, though. Whenever there was a question in a science (10) ………………….. (EXAMINE) about what happens when sodium reacts with water, I always got the answer right!
Answers
1 historian 2 scientist 3 chemistry 4 fascinating 5 boiling
6 length 7 measurement 8 identically 9 conclusion
10 exam(ination)
G. Match to make sentences.
1 What’s the difference
2 This box is full
3 This resulted
4 Connect this cable
5 I’ve had an idea
6 Could you fill this bottle
A in us having to call the fire brigade.
B to that piece of equipment over there.
C about how to do this experiment.
D between H2O and H2SO4?
E with water?
F of old camping equipment.
Answers
1 D 2 F 3 A 4 B 5 C 6 E
H. Write one word in each gap.
1 This program is very different ………………… the one you’re using at the moment.
2 Let’s begin the lesson ………………… a short test on the names of the different parts of an insect.
3 Disconnect your PC ………………… the power supply before you take the case off.
4 There are a number ………………… different ways of doing this experiment.
5 How many types ………………… building can you think of?
6 What were your reasons ………………… choosing to do biology at university?
Answers
1 from 2 with 3 from 4 of 5 of 6 for
Related Posts
- Practice English Vocabulary B1 Exercises – Vocabulary Test 1
- Practice English Vocabulary B1 Exercises – Vocabulary Review 14
- Practice English Vocabulary B1 Exercises – Vocabulary Review 13
- Practice English Vocabulary B1 Exercises – Vocabulary Review 12
- Practice English Vocabulary B1 Exercises – Vocabulary Review 11
- Practice English Vocabulary B1 Exercises – Vocabulary Review 10
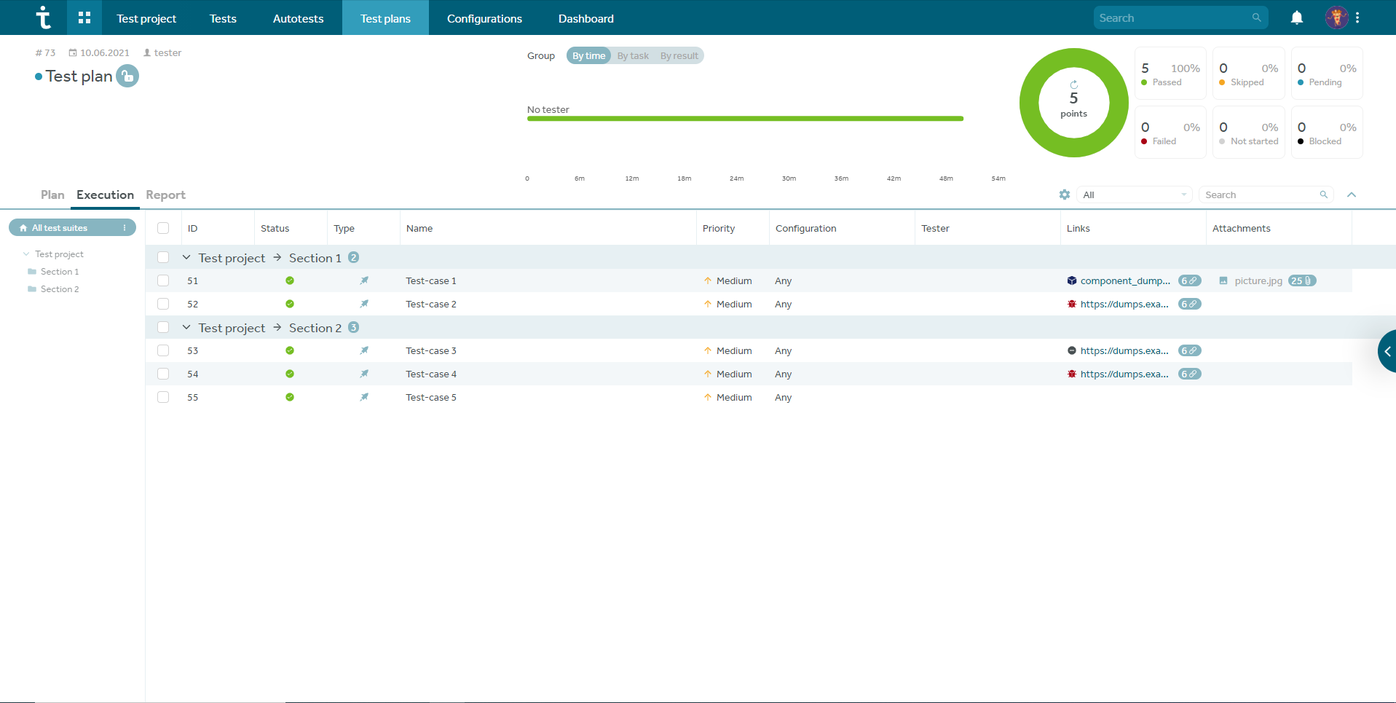
Система управления тестированием Test IT позволяет работать в одном интерфейсе с ручными и автоматизированными тестами. Можно связывать автотесты с тест-кейсами и хранить информацию в системе, запускать наравне с ручными и анализировать результаты запусков. Результаты автоматически проставляются в TMS-системе с треком ошибок и скриншотами, что удобно при анализе тест-планов.
Неважно, на каком языке написаны ваши автотесты, а также какую CI-систему вы используете. Test IT может интегрироваться практически с любыми фреймворками и инструментами. В этой статье-инструкции подробно объясним, как связать автотесты на Pytest с Gitlab CI и Test IT и потом с этим работать.
Алгоритм работы выглядит следующим образом:
-
Подготовка к интеграции
-
Настройка GitLab
-
Создание gitlab-ci.yml
-
Получения токена
-
Настройка рабочего проекта Test IT
-
Настройка webhook в Test IT
-
Запуск тест-рана из Test IT
-
Проверка журнала логов webhook
-
Пайплайн с GitLab
-
Выполнение пайплайна
-
Завершение пайплайна
-
Проставление результатов в Test IT
Запись вебинара об интеграции автотестов на Python в Test IT^
Ниже распишем каждый шаг подробнее.
Подготовка
Для начала интеграции требуется:
-
Рабочий проект в системе Test IT со слинкованными между собой тест-кейсами и автотестами
-
GitLab репозиторий со следующим наполнением:
-
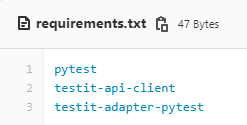
файл requirements.txt с указанием пакетов для установки (pytest, testit-adapter-pytest, testit-api-client)
- актуальные автотесты (код автотестов должен отражать ситуацию в рабочем проекте Test IT)
Пример requirements.txt:
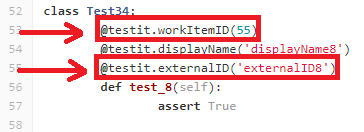
Пример актуального автотеста:
-
в системе Test IT тест-кейс с глобальным идентификатором “55” связан с автотестом с идентификаором автотеста “externalID8”
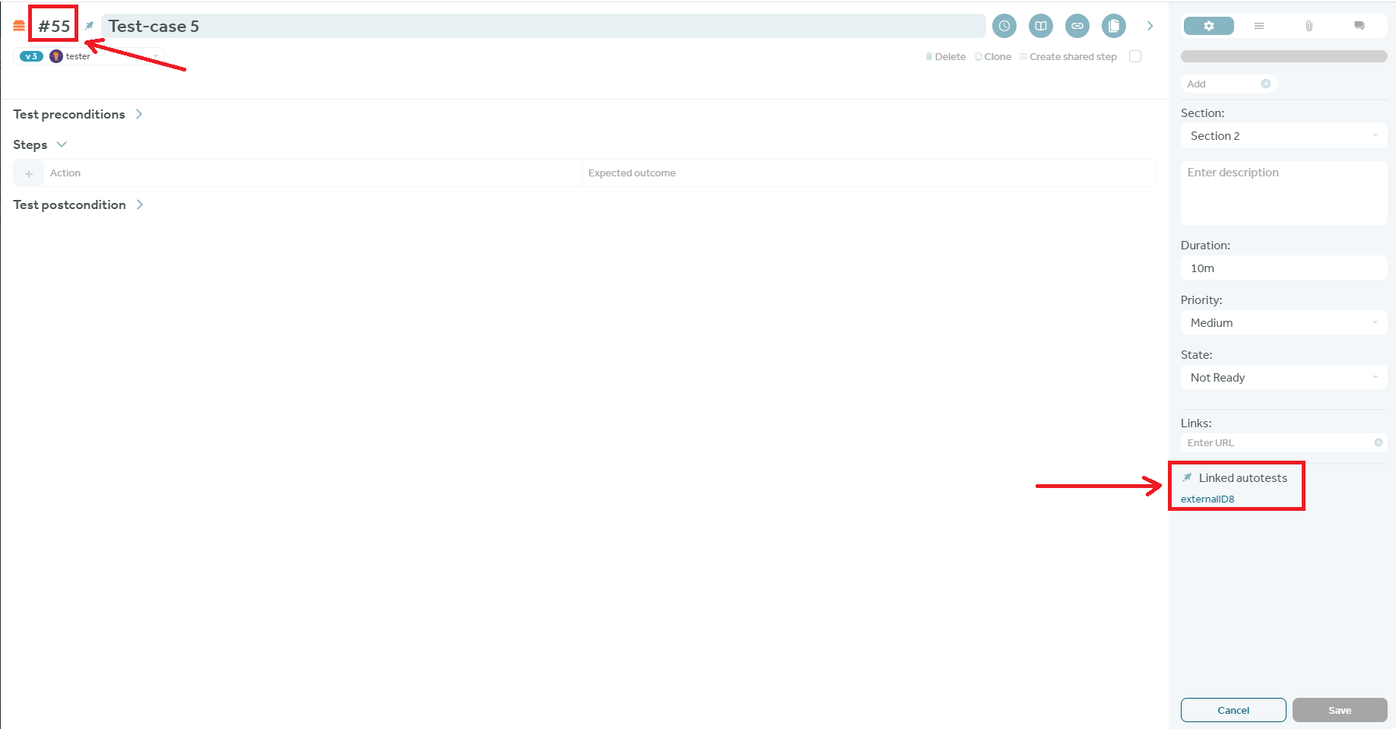
- GitLab имеет автотест с декораторами externalID “externalID8“ и workItemID “55“, что отражает ситуацию в рабочем проекте Test IT
Настройка GitLab репозитория
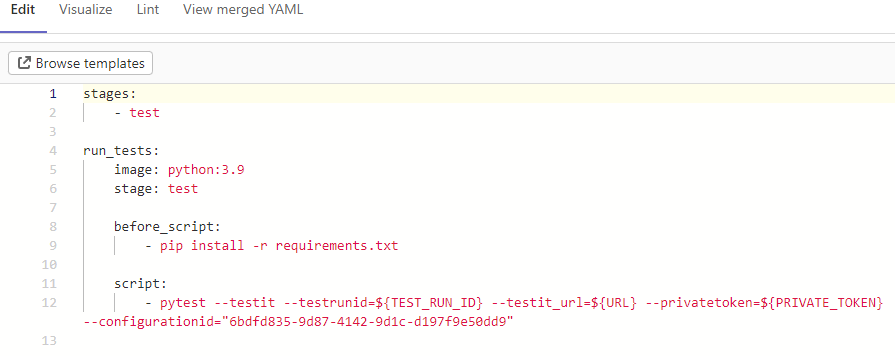
Создание .gitlab-ci.yml:
Необходимо перейти во вкладку CI/CD > Editor и настроить .gitlab-ci.yml файл для установки необходимых пакетов из файла requirements.txt и запуска автотестов с необходимыми переменными окружения.
Пример .gitlab-ci.yml файла (нужно прописать через параметры командной строки использование переменных окружения):
Получения токена:
Перейдите во вкладку Settings > CI/CD > Pipeline triggers и добавьте trigger (Description можно указать любым).

Настройка рабочего проекта Test IT
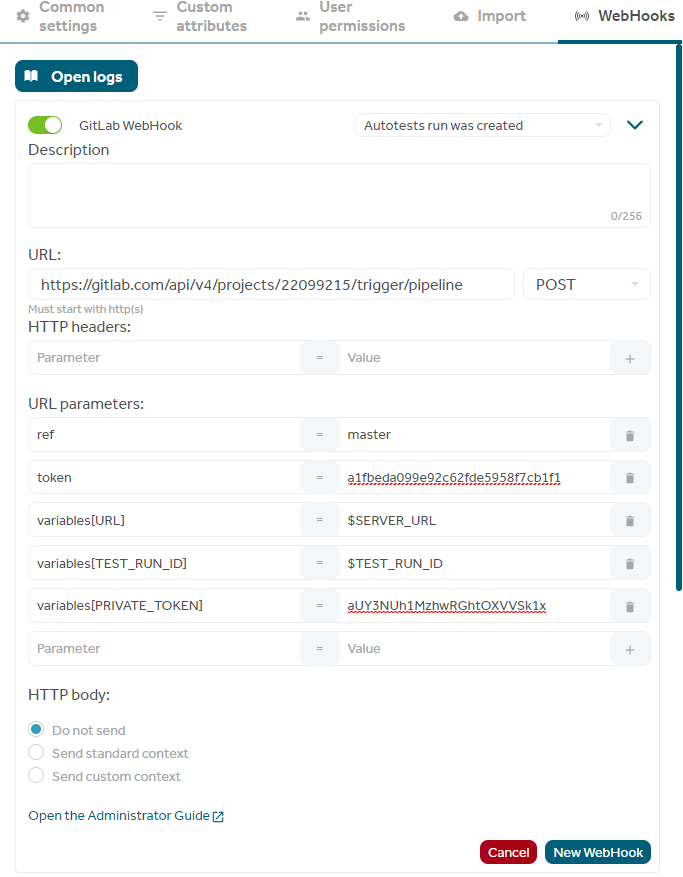
Настройка webhook в Test IT:
Перейдите во вкладку во вкладку Project Settings > WebHooks и добавьте новый WebHook.
Настройки WebHook:
-
установите активацию вебхука при запуске автотестов
-
установите POST-запрос следующим образом:
https://{DOMAIN}/api/v4/projects/{PROJECT_ID}/trigger/pipeline,
где DOMAIN — инстанс, где располагается репозиторий GitLab;
PROJECT_ID — глобальный идентификатор репозитория GitLab

-
в URL parameters установите следующие передаваемые параметры:
-
ref = название ветки GitLab репозитория с автотестами
-
token = token триггера, который был создан в шаге 2 при настройке GitLab репозитория
-
variables[URL] = $SERVER_URL
-
variables[TEST_RUN_ID] = $TEST_RUN_ID
-
variables[PRIVATE_TOKEN] = API secret key из профиля Test IT
Пример рабочего WebHook:
Готово!
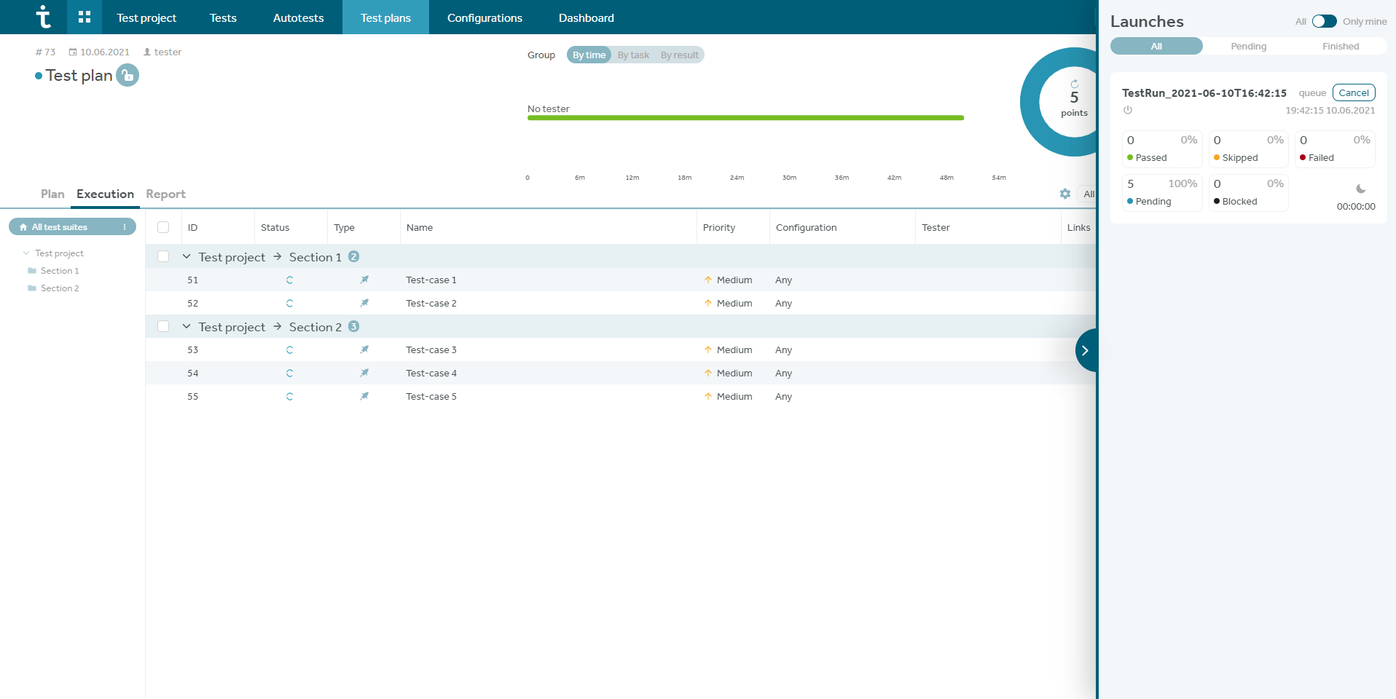
Запуск тест-рана из Test IT
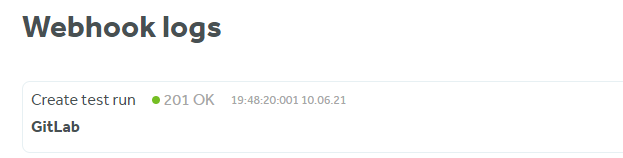
Проверка журнала логов вебхуков
Пайплайн с гитлаба

Выполнение пайплайна
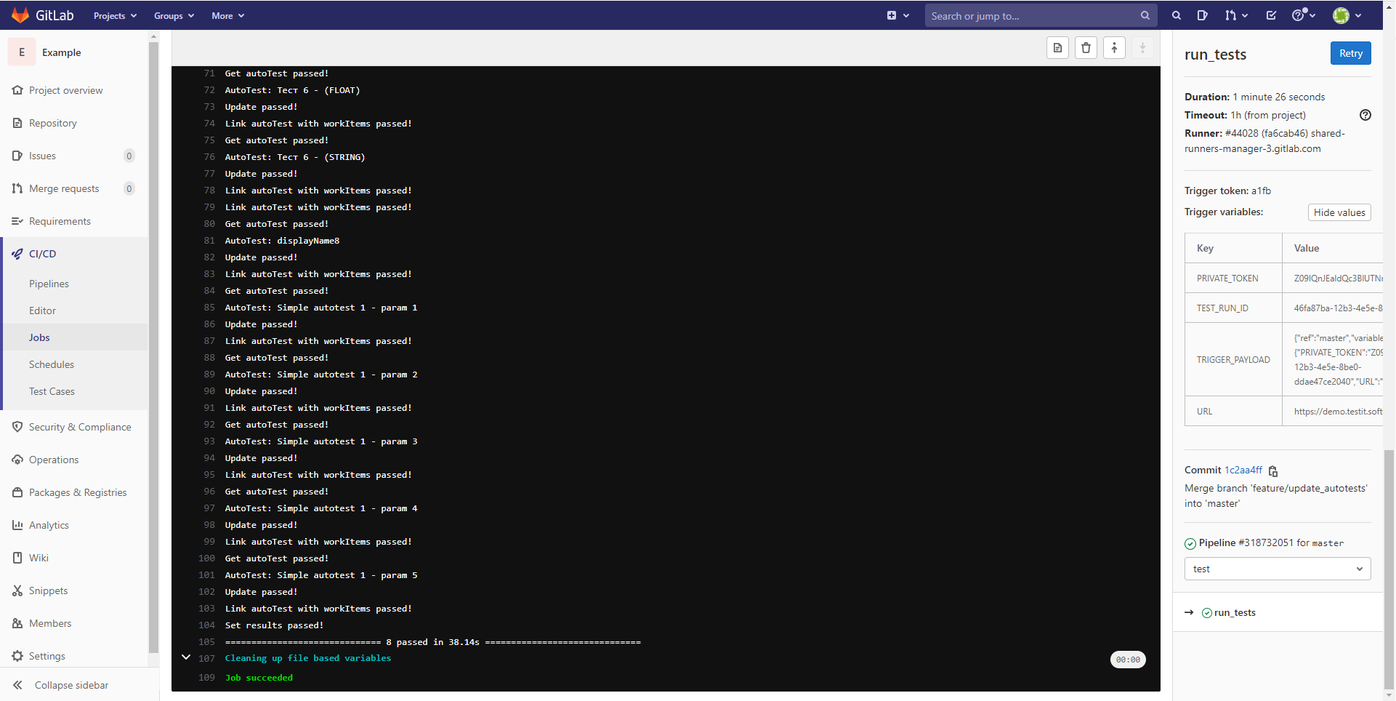
Завершение пайплайна

Проставление результатов в Test IT

14
moDuLe
217
Go online for a full diagnostic test
Relative, participle
and other clauses
Before you start
1 Read about Ian Fleming. Look at the highlighted grammar examples.
2 now read the sentences and choose the correct words in italics. The highlighted grammar
examples will help you.
1 Marie Curie was the scientist which / who discovered X-rays. ➤ unit 72
2 That’s the London house in which / which in Ian Fleming was born. ➤ unit 72
3 We got the fl ights, that / which were very cheap, on the Internet. ➤ unit 73
4 My best friend didn’t come to the party, who / which was very annoying! ➤ unit 73
5
‘Goldfi nger’, made / which made in 1964, was the third
James Bond
fi lm
with Sean Connery. ➤ unit 74
6 Most of the James Bond fi lms featuring / featured Sean Connery are now
available on DVD. ➤ unit 74
7 To arrive / Arriving at the railway station late at night, Clara couldn’t fi nd
a taxi to take her home. ➤ unit 75
8 The last James Bond novel to be written / writing by Ian Fleming was
‘The Man With The Golden Gun’. ➤ unit 76
9 My brother’s main aim in life is for to be / to be rich. ➤ unit 76
10 I don’t understand what / that our teacher is saying. ➤ unit 77
3 Check your answers below. Then go to the unit for more information and practice.
1 who 2 in which 3 which 4 which 5 made 6 featuring
7 Arriving 8 to be written 9 to be 10 what
IAN FLEMING
Ian Fleming was the writer who invented James Bond. Casino Royale, published
in 1953, was the fi rst novel in which this character appeared. Fleming went on to
write eleven more James Bond novels before his death in 1964.
As a young man, Fleming’s ambition was to join the British Foreign Offi ce. But he
failed to get a job there, which was a great disappointment for him. Although he
had never intended to be a writer, he got a job as a journalist for Reuters News
Agency. Then, at the start of World War Two, Fleming became a secret information
offi cer in the Royal Navy.
Leaving the navy in 1945, Fleming took the decision to write. But it was his work
for the navy, which included several secret expeditions, that had given him the
ideas for his James Bond novels.
The fi rst James Bond novel to be made into a fi lm was Dr No, in 1962. The fi lm,
starring Sean Connery, was a huge success.
Nobody really knows what makes the James Bond stories so successful. But now,
half a century after Fleming’s death, they are as popular as ever.
M14_MGL_GBWK_INTGLB_4574_CH14.indd 217 11/11/2011 15:46
-
Home
- /
- MyStatLab Answers

MyStatLab Answers: Affordable, Accurate & Dependable!
Do you need Pearson MyStatLab answers? Want to know how to complete your Statistics Homework faster? MyStatLab is a popular statistics course that many students take every year.
Unfortunately, it can be difficult to complete MyStatLab homework and tests on time. This is where Takeonlineclasshelp comes in!
Our online class helpers have helped thousands of students over the years with MyStatLab assignments, projects, tests, and more. We offer affordable prices and accurate work that will always satisfy your academic needs!
Looking for Accurate MyStatLab Answers? Get Help From Us!
Pearson MyStatLab platform is one of the popular Statistics Courseware students undertake every year.
The stat lab system helps teachers see if students have learned the skills taught so far in class.
However, some people think that Pearson MyStatLab Answers, much like MathXL Answers, are too hard for them to understand. They need help from professional statistics experts like Takeonlineclasshelp, who can assist with these difficult questions.

One of the main reasons they have trouble getting answers to MyStatLab questions is they are inexperienced and lack the practice.
Moreover, the absence of time for solving the task is why we are available to help you with correct MyStatLab answers. Our statistics experts support all those students who do not have time to solve the statistics problems.
Additionally, the statistics coursework has many quiz sessions. The students who attempt such statistics questions are often puzzled to get Stats lab answers and cannot score the points they should because they are lagging.
It seems like it doesn’t matter how hard you try or what your level of understanding is; these statistical tests can be rather challenging.
Fortunately, our online academic experts have reliable solutions for their online classes that come promptly when provided with information about the course material.
Even when students are working quickly, they often make mistakes in calculations. So it can be an advantage to have help from our reliable academic online assistants. They can provide the correct answers and all types of assistance including Mcgraw Hill Connect Answers Statistics Homework Answers, MyStatLab homework answer key, MyStatLab Applied Statistics Answers, MyStatLab Answers Quizlet etc.
What Is MyStatLab?
Pearson MyStatLab is an online course management system that was first introduced in 2000. MyStatLab provides a way for students to interact with the material and work on various assignments remotely without attending any lectures or taking exams at their university’s physical campus.
The MyStatLab system is an upgraded version of Statistics. All tests, homework, exams are done using its statistical software for completion.
That’s why so many students are confused with MyStatLab assignments and quiz answers. Many of these students also need the WebAssign Answers homework help we offer, which is just one more reason to use our service!
The automated systems on most of the websites are not authentic and often produce incorrect calculations.
However, it is safe to take guidance from Takeonlineclasshelp as the team boasts of efficient statisticians who will provide you with assistance for all your StatLab homework.
We Provide Online Class Help For These Portals
What Pearson MyStatLab Offers?
Some of the components of MyStatLab include,
Pearson MyStatLab Quiz –
MyStatLab Quizzes are designed to help students learn MyStatLab concepts, and they can take the quizzes as many times as they want.
MyStatLab Test –
MyStatLab Tests are designed to help MyStatLab students practice MyStatLab concepts and MyStatLab skills. MyStatLab Tests are graded automatically, so you don’t have to worry about grading them yourself.
If you are a statistics student, also check out the next blog on MyStatlab cheat.
MyStatLab Discussion Forum –
A MyStatLab discussion forum is a place where students can discuss My stats topics and concepts with other Mystatlab users. Students are encouraged to post their MyStats questions on the forums for others to answer.
MyStatLab Assignments –
Students are responsible for MyStatLab assignments, which they can do at any time and from anywhere. Mystatlab Assignments have three parts: MyStatLab Homework Questions (unsolved), My Stat Lab Quiz, and My Stats Tests. These assignments also assess whether your grasp of statistics is strong enough for college-level study.
MyStatLab Homework –
Mystatlab homework is designed to be a companion for Mystatlab quizzes, tests, or discussion forum topics. Mystatlab homework helps students master the Mystatlab skill and provides an opportunity for any missed questions in Mystatlab Quizzes or MyStatistics Test.
MyStatLab Exam –
MyStatLab Exams are Mystatlab’s way of assessing student knowledge and skills. Mystatlab exams should have a score of at least 90% on all Mystatlab Quizzes and Tests to take the MystatLab exam. In this way, students will not waste time doing useless work!
Get MyStatLab Questions and Answers
Q1. Twelve different video games showing violence were observed. The duration times of violence were recorded, with the times (seconds) listed below. What requirements must be satisfied to test the claim that the sample is from a population with a mean greater than 85 sec? Are the requirements allsatisfied?
| 80 | 14 | 593 | 54 | 0 | 61 | 203 | 46 | 172 | 0 | 2 | 54 |
What requirements must be satisfied? Select all that apply.
A. The sample observations must be a simple random sample.
B. Either the population is normally distributed, or n>30, or both.
C. At least one observation must be above or below 85 sec.
D. The conditions for a binomial distribution must be satisfied.
Ans: A. he sample observations must be a simple random sample.
B. Either the population is normally distributed, or n>30, or both.
Are the requirements all satisfied?
A. No. The conditions for a binomial distribution are not satisfied, and there is not enough information given to determine whether the sample is a simple random sample.
B. No. The sample size is not greater than 30, the sample does not appear to be from a normally distributed population, and there is not enough information given to determine whether the sample is a simple random sample.
C. No. The sample size is not greater than 30, the sample does not appear to be form a normally distributed population, and there are no observations above 85 sec.
D. Yes. A normal quantile plot suggests that the sample is from a normally distributed population, and there are observations above and below 85 sec.
E. Yes. A normal quantile plot suggests that the sample is from a normally distributed population, and there is enough information to determine that the sample is a simple random sample.
F. Yes. The conditions for a binomial distribution are satisfied, and there is enough information to determine that the sample is a simple random sample.
Ans:
B. No. The sample size is not greater than 30, the sample does not appear to be from a normally distributed population, and there is not enough information given to determine whether the sample is a simple random sample.
Q2. The display provided from technology available below results from using data for a smartphonecarrier’s data speeds at airports to test the claim that they are from a population having a mean less than 6.00 Mbps. Conduct the hypothesis test using these results. Use a 0.05 significance level. Identify the null and alternativehypotheses, teststatistic, P-value, and state the final conclusion that addresses the original claim.
Technology output:

Identify the test statistic.
Ans: -0.36 (Round to two decimal places as needed.)Identify the P-value.
Ans: 0.359 (Round to three decimal places as needed.)
State the final conclusion that addresses the original claim.
Ans:
Failed to reject H0.There is not sufficient evidence to support the claim that the sample is from a population with a mean less than 6.00 Mbps.
Q3. A data set includes data from 500 random tornadoes. The display from technology available below results from using the tornado lengths (miles) to test the claim that the mean tornado length is greater than 2.8 miles. Use a 0.05 significance level. Identify the null and alternative hypotheses, test statistic, P-value, and state the final conclusion that addresses the original claim.
Technology output:

What are the null and alternative hypotheses?
H0:µ=2.8 miles
H1:µ>2.8 miles
Identify the test statistic.
Ans: 2.12 (Round to two decimal places as needed.)
Identify the P-value.
Ans: 0.017 (Round to three decimal places as needed.)
State the final conclusion that addresses the original claim.
Ans: Reject H0.There is sufficient evidence to support the claim that the mean tornado length is greater than 2.8 miles.
Q4. For a hypothesis test of the claim that the mean amount of sleep for adults is less than 8 hours. technology output shows that the hypothesis test has power of 0.4516 f supporting the claim that µ<8 hours of sleep when the actual population mean is 6.5 hours of sleep. Interpret this value of the power, then identify the value of β and interpret that value.
Interpret this value of the power.
Ans: The chance of recognizing that µ<8 hours is not very high when in reality µ=6.5 hours.
Identify the value of β and interpret that value. Select the correct choice below and fill in the answer box to complete your choice.
Ans: The value β =1-0.4516=0.5484 indicates that there is a greater than 50% chance of failing to recognize that µ<8 hours when in reality µ=6.5 hours.
Q5. Determine whether the results appear to have statistical significance, and also determine whether the results appear to have practical significance.
In a study of a birth sex selection method used to increase the likelihood of a baby being born female, 1928 users of the method gave birth to 944 males and 984 females. There is about 19% chance of getting that many babies born female if the method had no effect.
Answer: Because there is a 19% chance of getting that many babies born female if the method had no effect, the method does not have statistical significance not many couples would likely use a procedure that raises the likelihood of a baby born female from the approximately 50% rate expected by chance to the 51% produced by this method.
So this method does not have practical significance
Why Is It Difficult to Get MyStatLab Statistics Homework Answers?
Many Students often ask themselves “ Can I Pay Someone to Take My Online class?” or “Can Someone Take My Online MyStatLab Class?”, – as getting accurate MyStatLab Answers key statistics can be quite difficult.
The Reasons can be categorized as follows:
Solutions Are Difficult to Come by –
MyStatLab users often find it difficult to get reliable Mystatlab Statistics homework answers because they’re hard to come by. The explanations given for the Mystatlab assignments and quiz questions from different websites may be confusing or irrelevant!
Not Enough Time –
Some students require MystatLab Answer keys because they don’t have enough time to complete their MyStatLab homework. Additionally, Mystatlab assignments and MyStatLab quiz questions are given in a short period, so students often find themselves struggling to complete the tasks.
Lack Of Knowledge –
Some students cannot get answers because they don’t have the knowledge required for MystatLab homework. Some students face difficulty with the questions, while others find themselves unable to understand MyStatLab homework.
Concepts Are Difficul –
Some students find Mystatlab homework is difficult because they have difficulty grasping the concepts. Understanding an idea and applying it correctly is an integral part of MyStatLab homework, so if you can’t get this right, you won’t be able to complete your tasks!
Technical Difficulty –
Students face issues with MyStatLab because they have technical difficulties. Many students find themselves unable to solve MyStatLab tasks due to Mystatlab software not working correctly or accessing the Mystatlab website!
Help In Unavailable –
Some students need the MyStatlab answer key because they can’t get help from others. Whether it’s a lack of time, knowledge, or other reasons, students often have to do MyStatLab homework by their lonesome!
Inadequate Teaching –
Most students fail in their online class as they find MyStatLab assignments difficult because they received terrible MystatLab teaching. It becomes hard to understand the concepts and answer MyStatLab questions if you’re not taught properly!
At Takeonlineclasshelp, we offer online class helpers who can provide Statistics homework help, along with all the answers to quizzes, tests, exams, and more.
Various MyStatLab Answers That We Provide.
MyStatLab Statistics Homework Answers
Pearson MyStatLab Answers
MyStatLab Homework Answers
MyStatLab Statistics Answers
MyStatLab Answers Key Statistics
How Can Our Pearson MyStatLab Answer Key 2022 Help Students?
MyStatLab provides a set deadline for each assignment. Students enrolled in the course need to spend at least some time every day, or else they may lose their attention and need to start again from scratch.
The idea of statistics is that it builds on previous topics, and if you’re starting somewhere in the middle, you need to make sure you’re not going too far ahead without answering what came before.
The stat lab answer key can help point out where your thinking may be getting fuzzy – as long as you don’t neglect the past material.
Now one question that arises is where you can find the MyStatLab answer keys?
There are multiple sources and pages which offer Mystatlab statistics answer key for solving statistics problems at Mystatlab. However, not all of these sites are trustworthy or will provide what you need.
Takeonlineclasshelp in this regard can be helpful if you want to get correct solutions to any statistics question, including MyOpenMath Answers, and get your problem solved for a reasonable price.
While there are other sources you can find for getting statistics answers, they may also be expensive.
However, some web pages provide the answers key to MyStatLab Answer, but prices vary based on page reliability.
Therefore, If you want to learn difficult concepts or solve hard problems, choose a reliable source, such as us, and get MyStatLab Answers.
If you want to look at our previous My Lab Statistics Answers, such as MyStatlab Answers 2016, MyStatLab Answers 2017, etc- just contact our service team to avail them!


Get Reliable MyStatLab Answers From Our Experts.
With a wide range of career opportunities possible, it becomes important that you have the best education at an affordable cost without compromising quality and ease.
At Takeonlineclasshelp, you will find the best MyStatLab online class helpers who can help you in the following areas,
My Stat Lab Course –
If you are struggling to complete your Stat lab course, we can help with correct answers to your questions. Takeonlineclasshelp offers the smartest and most comprehensive MyStatLab Answer Key for any course, including Aleks Topics answers. This service gives you the chance to get in touch with professional experts who will assist you in completing your online classes and at a reasonable price.
MyStatLab Test Answers –
Our team is always ready to assist when it comes to MyStatLab Test Answers. We have MyStatLab specialists who can help you with any MyStatLab test that comes your way. If it is a My Stat Lab quiz, My Stat Lab midterm, or final exam, we are the experts for providing MyStatLab answers.
My Stat Lab Quiz Answers –
If you are looking for Pearson MyStatLab Quiz Answers, then Takeonlineclasshelp is the right place for you. Our MyStatLab specialists can help with any MyStatLab quiz and provide answers to your MyStatLab questions on time that will get you excellent grades every time! We also provide services for WileyPlus Answers as well!
My Stat Lab Exam Answers –
If MyStatLab Exam Answers are what you need, then Takeonlineclasshelp is the best place for your My Stat Lab exam needs. My Stat Lab exam can be nerve-wracking, and our MyStatLab experts will always help you get through it.
My Stat Lab Homework Answers –
MyStatLab homework answers are something that My Stat Lab experts at Takeonlineclasshelp know a lot about. We have MyStatLab specialists who can provide you with any MyStatLab homework help and provide answers to MyStatLab problems in no time! Such as MyStatLab homework answers 2015, MyStatLab Homework Answers 2017, etc. Additionally, along with Pearson statistics homework answers if you are searching for MyItLab Answers, we provide services for that too!
How To Find Answers On MyStatLab?
Accurate MyStatlab Answers are easy to find if you follow these simple steps.
Step 1: Fill The Form.
Please fill out this form on our website, mentioning your login details and what task you need help with. The information is an important part of the process, as it tells our experts what work needs to be done when it needs to be completed, and how much time is allowed for completion.
Step 2: Receive A Free Quote.
Once you fill out the form on our website, we’ll send you a free quote. You can be certain that our prices are pretty reasonable.

Step 3: Make The Payment.
If you like the quote sent to you, please click on the link, and it will redirect you to our payment portal to finalize your order. Payments are accepted using debit cards, credit cards, or PayPal.
Step 4: Get MyStatLab Answers.
After paying, our team will work on getting you impeccable MyStatLab answers. Our process starts with assigning the ideal expert, solving all the questions in time, and ends with getting you top grades for your assignment.
The best part of our service is how transparent it is. You can log in to your student portal at any time to check the progress or give one of our friendly customer support team a call, and they will happily update you on the work being done.
Why Should You Choose Us for MyStatLab Answers?


N
Affordable.
Although we do not offer free MyStatLab Answers, we offer the best prices on our services. What’s more, you can take advantage of discounts and special offers when purchasing courses from us.
N
Accurate & Dependable.
At Takeonlineclasshelp, our team works hard to provide top-notch service with accurate answers for any task, whether it be a test or homework question. We are devoted to delivering customer satisfaction every single time!
N
A+ Grades.
We offer MyStatLab answers for any My Stat Lab test, quiz, or exam. Our team of experts has completed over 100+ MyStatLab assignments with 98% and above grades!
N
Transparent.
We offer an easy way of tracking progress on your order – log in to your student portal at any time or contact our friendly customer support representatives to know what’s been done!
N
Professionalism.
Our team works hard every day so that students can have to access My Stat Lab Answer key anytime they need it. We strive for excellence by providing professional services, affordable prices without compromising quality. It is why we have a 100% satisfaction guarantee!
N
Always On-time.
We offer MyStatLab Answers on time so that students can get the grades they deserve. Our My Stat Lab experts will consistently deliver MyStatLab Homework answers to your inbox in time, minus any delays or issues!
N
High-Quality Answers.
We provide High quality Answers that are rich in accuracy & quality! We offer the most accurate solutions for all types of tasks, including tests and assignments! If you want exceptional service, affordable prices without compromising quality, then look no further than Takeonlineclasshelp.
N
Expert Writers.
We assign the right expert to your task depending on their experience & specialization so you can be ensured of getting top grades for any MyStatLab assignment!
N
Privacy And Confidentiality.
We never share your MyStatLab data with any third party. We make certain that the privacy and confidentiality of all My Stat Lab work and our clients remain entrusted to us!
N
24/7 Student Support.
We have MyStatLab Answers at your fingertips 24/7! Our My Stat Lab experts are always available for students and offer quick replies to all My Stat Lab orders.
How To Cheat MyStatLab?
Unfortunately, you cannot “cheat” your way through MyStatLab statistics answers. Numbers are generated in random order, and you need to rely on your skills and knowledge to ace those tests, quizzes, or assignments.
However, if the material is too difficult for you to study independently or if you don’t have enough time in your schedule to take the test online, there is a better alternative.
Given the need for tests to be taken in real-time, Takeonlineclasshelp has a pool of experts from Ivy League Universities who can assist students in getting Statlab Answer keys. They have been doing this work for years.
They are so in-tune with the dynamics of the course; they can look at just about any question and provide accurate StatLab answers. There is nothing that could surprise them.
Hence, If you are looking to ace MyStatLab courses and exams effortlessly, look no further than Takeonlineclasshelp!
Frequently Asked Questions
1. What is MyStatLab / Pearson MyStatLab?
MyStatLab is a part of the Pearson MyLab suite that provides a broad range of interactive content, including video tutorials and practice questions. MyStatLab includes sample course materials in many different formats:
- Videos with accompanying textbook problems to make the concepts easier to understand.
- Calculators for performing simple calculations like finding averages or maximums on data sets.
- Quizzes where a student can practice problem-solving skills.
- Interactive multi-step problems.
2. How to find homework answers MyStatLab?
The first step is finding where MyStatLab has posted its answers. Since they don’t provide them directly on the site, we have to figure it out. The easiest way to do this is looking through the “Answers” link at the top of each assignment, where you’ll find a list of links with different names – one will be labeled “MyStatLab.” Click on this and then scroll down until you see your homework question!
The second step is making sure you’re on the right page. If you see a table of contents, that’s great! It means MyStatLab has posted their answers there instead, and we can look through them for our homework answers without going to the “MyStatLab” link – this is much faster than finding it in each assignment individually.
However, If your problem isn’t in the table of contents, you’ll need to click on “My StatLab” and search through their site for your answer.
Once you’ve found your homework question (or answers!), it’s time to go back to MyStatLab and complete the assignment!
You can either copy-and-paste from a new window into our old window or click on “Show Answer” to copy-and-paste it into our old window.
3. How to get all the answers to MyStatLab?
– Download the workbook from your course site.
– Use a password-protected PDF viewer and scan each page individually on the computer screen or mobile device such as an iPad.
The workbook provides a list of all the questions and answers and instructions for getting access on your computer or mobile device.
You must have a compatible reader installed on your machine though not necessarily Adobe version 11, because other versions may be compatible with MyStatLab.
4. How MyStatlab answer key 2022 will be helpful for you?
MyStatlab answer key 2021 will be useful as it is a free online homework help service for students enrolled in statistics courses at colleges and universities. The Mystatlab answer key provides the correct answers to your problem sets, quizzes, exams, and other assignments.
Here are some features of using the answer key:
– It’s fast and easy to use.
– It offers more than 100,000 probability and statistical problems with detailed solutions.
– You can also download quizzes for offline purposes.
5. How to get the answers to MyStatLab elementary statistics?
The answer to MyStatLab elementary statistics is in the online textbook and solutions manual. The answers are not randomized, so you can find them using CTRL+F (find) on your keyboard. It will also be marked as a hint if it has been answered correctly or with an error message such as “ERROR: Chapter 14 – Section A” for that particular problem set from section A of chapter 14.
6. How to hack Pearson to Mystatlab to get all answers right?
Pearson’s MyStatLab is an excellent option for those who are not academically inclined. This program will provide all of the answers to your questions and even show you how to solve them! All one has to do is login with their Pearson account information and then follow the steps mentioned below.
Steps:
Log into the Pearson account by using “login” as both the username and password.
Click on MyStatLab from your dashboard and wait for it to load. It may take some moments to log in at an off-peak time of day, so be patient!
Select one of their practice Quizzes or Exercises:
- Quiz = example questions with answers provided;
- Exercise = step-by-step instructions for solving problems with correct solutions available right away. (If they’re not listed under Courses, then select Other Resources > Practice Questions).
It will provide you with all the hints you need to do well on exams without having to crack open any books.
Avail Take my Online Class Service Easily
Take my Online Class has come up with the opportunity of working with the Great Tutors
I need to write code that counts the number of occurrences of each word in a string. If the string has multiple rows, I treat each row as a separate string. Here is what I have so far. I know that after I find 2 words that match, I update the number of occurrences and change the second word to the empty string, so it doesn’t get matched again. My code does’t do each word, it does the whole string. Can anyone assist me? I also know I need to utilize regexp(), but I’m not sure how.
[row col] = size(str);
if(row > 1)
    fprintf('You inputted %.0f stringsn',row);
    cArr = cellstr(str);
    for index=1:row-1
        for index2=2:row-1
            numOcc = 1;
            x = cArr(index);
            y = cArr(index2);
            isSame = strcmp(x,y);
            if isSame == 1
                numOcc = numOcc + 1;
                y = '';
            end;
        end;
    end;
    z = char(x);
    fprintf('%s: %.0fn',x,numOcc);
end;

Example output:
str =
This string should be the first row.
This string should be the second row, or should it?
>> wordhist(str)
You inputted 2 strings.
String 1
This: 1
string: 1
should: 1
be: 1
the: 1
first: 1
row: 1
String 2
This: 1
string: 1
should: 2
be: 1
the: 1
second: 1
row: 1
or: 1
it: 1
asked Dec 2, 2015 at 4:19
![]()
2
Here’s an example that just deals with one string at a time, and doesn’t worry about punctuation (it just splits on spaces). You’ll have to work on those two things to get them to your liking. This example is largely taken from a Matlab Central question.
% an example string
str = 'This string is an example string to test if there is a working string counter.'
% the words in the string (use regexp for more advanced e.g., punctuation)
words = strsplit(str, ' ');
% unique words in the cell array
[uwords, idw, idu] = unique(words);
% counts for each word corresponding to idw
n = accumarray(idu,1);
% display the counts
for i = 1:numel(n)
  fprintf('%s: %in', words{idw(i)}, n(i));
end
The output is:
str =
  This string is an example string to test if there is a working string counter.

This: 1
a: 1
an: 1
counter.: 1
example: 1
if: 1
is: 2
string: 3
test: 1
there: 1
to: 1
working: 1
answered Dec 2, 2015 at 6:08
![]()
kmackmac
6884 silver badges15 bronze badges
Download Free PDF
![]()
Download Free PDF

Foley mark hall diane mygrammarlab b1 b2 answer key
Foley mark hall diane mygrammarlab b1 b2 answer key
Foley mark hall diane mygrammarlab b1 b2 answer key
Foley mark hall diane mygrammarlab b1 b2 answer key
 Hạ Phạm Thị
My Grammarlab B1 B2
![]()
Лабораторная работа 5 ТЕКСТОВОЙ ПРОЦЕССОР
Цель работы – освоение функциональных возможностей инструментов текстового процессора Microsoft Word, входящего в состав пакета Microsoft Office для Windows.
Работа включает пять упражнений и контрольное задание. Установки в текстовом процессоре.
Создание нового стиля.
Форматирование текста.
Форматирование таблицы. Обработка примечаний.
5.1. Общие сведения
Работа с Текстовым процессором при вводе текста во многом напоминает работу с пишущей машинкой. Принципиальным отличием Текстового процессора является возможность отображения на экране дисплея результатов работы, контроля их правильности и редактирования текста до его печати. Сохранение на магнитных или оптических носителях текущих результатов позволяет вернуться к ним при необходимости.
Текстовой процессор – эффективный помощник при подготовке разнообразных документов: писем, служебных записок, отчетов, рефератов и пояснительных записок. Текстовой процессор позволяет легко перемещать слова, предложения или абзацы, удалять фрагменты текста и заменять их на другие, располагать заголовки по центру страницы, выделять в тексте определенные слова, вставлять в документ диаграммы, рисунки и колонтитулы, устанавливать автоматическую нумерацию страниц и многое другое.
5.1.1. Создание нового документа
Для создания нового документа во время работы в Текстовом про-
цессоре Microsoft Word нажмите кнопку Microsoft Office и выберите меню
Создать (CTRL + N). В результате выполнения команды Создать в оперативную память компьютера загружается новый файл ДОКУМЕНТ1.DOCX.
5.1.2. Открытие существующего документа
Для открытия существующего документа, хранящегося на диске, нажмите кнопку Microsoft Office и затем выберите меню Открыть (CTRL + O). Выберите нужный Вам файл из списка файлов в диалоговом окне Открыть.
68
Нажмите кнопку ОК или клавишу ENTER. На экране появится окно Текстового процессора с заголовком окна в виде имени открытого файла.
5.1.3. Набор текста в документе
При создании нового документа место ввода текста обозначается маркером «|» и находится в верхнем левом углу окна документа. При включенной кнопке Непечатаемые символы (CTRL + SHIFT + *) сразу за маркером размещается метка конца абзаца «¶». По мере набора новых строк текста эта метка перемещается вниз на новые строки до тех пор, пока не нажата клавиша ENTER. Далее начинается ввод текста нового абзаца.
Для размещения текста на экране MS Word использует перенос по словам. Это означает, что, если Вы набираете слово, выходящее за маркер правого поля, MS Word автоматически переносит все слово на следующую строку.
Если окно документа шире, чем экран, и маркер правого поля в нем не виден, документ при вводе текста автоматически прокручивается до правого поля документа и затем переходит на левое поле.
5.1.4. Присваивание имени и сохранение документа
Текущий документ хранится только в памяти компьютера. Это ненадежно, поскольку прекращение подачи электроэнергии или выключение компьютера очистит его память и приведет к потере текущей информации.
Во избежание такой проблемы необходимо производить запись документа на жесткий диск. Нажмите кнопку Microsoft Office и выберите команду Сохранить (CTRL + S / SHIFT + F12). В окне Имя файла введите имя файла, состоящее не более чем из 256 символов. Расширение имени файла (.DOCX) набирать не нужно: MS Word автоматически добавит расширение к введенному имени файла. Нажмите кнопку ОК.
Присваивать имя документу следует только при первой записи на диск. Когда Вы создаете новый документ, MS Word присваивает ему имя, например ДОКУМЕНТ1.DOCX (DOCUMENT1.DOCX). Вы можете изменить это имя на другое, которое больше соответствует содержанию документа, например
E_REPORT.DOCX.
Для сохранения документа в процессе работы нажмите кнопку Сохра-
нить на Панели быстрого доступа.
5.1.5. Выделение для внесения изменений
Существует множество способов изменить документ: задать выполнение текста полужирным шрифтом или курсивом, подчеркнуть, удалить или
69
скопировать текст и т. д. Прежде чем вносить изменения, Вам нужно выделить ту информацию, которую Вы хотите изменить.
Из приведенного ниже ряда (табл. 5.1) выберите метод, которым Вы
|
Таблица 5.1 |
|||||||||
|
Чтобы |
С помощью мыши |
С помощью клавиатуры |
|||||||
|
выделить |
|||||||||
|
Любое |
количе- |
Нажмите |
левую |
кнопку |
При нажатой клавише SHIFT |
||||
|
ство текста, диа- |
мыши и протащите указа- |
нажмите |
клавишу |
СТРЕЛКА |
|||||
|
грамм |
или объ- |
тель по тексту |
ВЛЕВО или СТРЕЛКА ВПРАВО |
||||||
|
ектов |
|||||||||
|
Слово |
Дважды щелкните по сло- |
Передвиньте место |
ввода |
к |
|||||
|
ву |
слову и дважды нажмите кла- |
||||||||
|
вишу F8 |
|||||||||
|
Строку |
Щелкните |
в левом |
поле |
Передвиньте место ввода |
к |
||||
|
окна документа на уровне |
началу строки и нажмите кла- |
||||||||
|
этой строки |
виши SHIFT + END |
||||||||
|
Предложение |
Нажмите |
левую |
кнопку |
В месте ввода, расположен- |
|||||
|
мыши и протащите указа- |
ном в этом предложении, |
||||||||
|
тель по предложению |
трижды нажмите клавишу F8 |
||||||||
|
Несколько строк |
В левом поле окна доку- |
При нажатой клавише F8 на- |
|||||||
|
мента |
протащите |
указа- |
жмите |
клавишу |
СТРЕЛКА |
||||
|
тель вверх или вниз |
ВЛЕВО или СТРЕЛКА ВПРАВО |
||||||||
|
Абзац |
Дважды щелкните в ле- |
Передвиньте место |
ввода |
к |
|||||
|
вом поле окна документа |
абзацу и четыре раза нажмите |
||||||||
|
на уровне этого абзаца |
F8 |
||||||||
|
Весь документ |
При |
нажатой клавише |
Пять раз нажмите клавишу F8 |
||||||
|
СТRL щелкните мышью в |
|||||||||
|
левом поле окна доку- |
|||||||||
|
мента |
|||||||||
хотите изменить текст, интервал или объект.
5.1.6. Одновременный просмотр двух частей документа
При работе с документом большого размера часто возникает необходимость одновременно видеть его различные части, например: первую и последнюю страницы. Окно документа можно разделить по вертикали на два так называемых окна-фрагмента с помощью горизонтальной линии разделения. Ее фрагмент расположен в правом конце линейки разметки до-
70
кумента. При совмещении маркера мыши с этим фрагментом маркер трансформируется из стрелки в двойную линию с двумя стрелками, направленными в разные стороны. Перетаскивание вниз этого фрагмента активирует на экране горизонтальную линию разделения и дополнительную линейку разметки документа. Нужное Вам положение разделения устанавливается перетаскиванием линии вверх или вниз.
Быстрое введение или смещение разделения производится с помощью мыши: линия разделения перетаскивается к нужному месту. Быстрая отмена разделения также производится с помощью мыши: двойной щелчок мышью по линии разделения возвращает ее в исходное положение. Для перехода от одного фрагмента документа к другому щелкните по тому окнуфрагменту, в который Вы хотите передвинуться, или нажмите клавишу F6.
5.1.7. Введение, смещение и отмена разделения
На вкладке Вид в группе Окно выберите команду Разделить. Если в настоящий момент у Вас нет отдельных окон-фрагментов, MS Word выводит на экран в окне документа линию разделения. Если у Вас уже есть отдельные окна-фрагменты, MS Word предложит снять уже существующее разделение. Чтобы передвинуть линию разделения, нажмите клавишу СТРЕЛКА ВВЕРХ или СТРЕЛКА ВНИЗ. Если Вы хотите отменить разделения, передвиньте линию разделения в самый верх или в самый низ окна документа. Нажмите клавишу ENTER.
5.1.8. Панель инструментов и Линейка
Панель инструментов (или Лента) и Линейка предоставляют Вам быстрые кнопки многих наиболее употребительных команд текстового процессора. Исходно MS Word выводит на экран Панель инструментов и Линейку, когда Вы создаете новый документ, но Вы можете отключить это изображение, если хотите иметь большее рабочее пространство.
На Панели инструментов одним щелчком можно изменить вид выделенных символов, выровнять абзацы или выполнить такие операции, как проверка орфографии или печать документа.
Каждый раз, когда Вы выделяете отформатированный текст, соответствующие кнопки на Панели инструментов вкладки Главная изменяют свой вид и показывает вид шрифта или формат выделенного объекта.
Для быстрого изменения шрифта, вида или выравнивания абзаца: а) выделите символ или абзац, который Вы хотите изменить;
71
б) на вкладке Главная в группе Шрифт (CTRL + SHIFT + F) щелкните по кнопке той команды, которую Вы хотите выбрать, или, если Вы изменяете шрифт или размер шрифта (CTRL + SHIFT + P), щелкните по стрелке раскрывающегося списка Шрифт или по стрелке раскрывающегося списка Размер, а затем выберите нужную гарнитуру шрифта или его размер из списка, который MS Word выведет на экран.
Как использовать Линейку По Линейке Вы можете двигать маркеры отступа, чтобы устанавливать
или изменять размер отступов, а также вводить остановы табуляции щелчком кнопки мыши. По желанию можно использовать линейку со шкалой в дюймах, сантиметрах, пайках или пунктах.
На Линейке положение абзацев и остановов табуляции может определяться в дюймах, сантиметрах, пайках или пунктах. Пользуйтесь той шкалой Линейки, которая Вам более привычна, или той, которая обеспечивает нужную Вам точность.
Когда Линейка показана на экране, Вы можете изменять размер отступа абзацев, передвигая маркеры абзацных отступов на Линейке. Вы можете также вводить табуляцию по левому краю, по правому краю, по центру или с десятичным выравниванием.
Как вывести на экран или убрать Линейку На вкладке Вид в группе Показать или скрыть выберите команду Ли-
нейка. При этом рядом с ее именем появляется знак «√». Чтобы отменить показ линейки, отметьте эту команду повторно.
Для быстрого изменения абзацных отступов:
а) выделите абзац, который Вы хотите отформатировать; б) на линейке установите положение маркеров отступа: верхний левый мар-
кер задает отступ первой строки от левого поля документа, нижний левый маркер – положение остальных строк абзаца относительно левого поля документа, правый маркер – положение правой границы всего абзаца относительно правого поля документа.
5.1.9. Отмена изменений
Команда Отменить в панели быстрого доступа (CTRL + Z) может аннулировать изменения параметров печати, редактирования или форматирования в любой момент работы над текстом документа, поскольку MS Word сохраняет перечень (историю) всех использованных команд. Доступ к ранее использованным командам обеспечивается с помощью правой части двой-
72
ной кнопки Отменить на Панели быстрого доступа. Например, если Вы случайно стерли какой-то текст, для его восстановления следует использовать кнопку Отменить.
Команда Отменить может восстановить следующие изменения (табл.
5.2):
|
Таблица 5.2 |
|||
|
Используйте |
Чтобы |
||
|
команду Отменить |
|||
|
При вводе |
Удалить набранные символы, вернуться в то поло- |
||
|
жение, из которого Вы в последний раз передвинули |
|||
|
место ввода |
|||
|
При |
редактирова- |
Аннулировать действие команд меню Правка: Вы- |
|
|
нии |
резать, Копировать, Вставить и Удалить |
||
|
При |
форматирова- |
Аннулировать действие любых команд, задающих |
|
|
нии |
вид шрифта, команд выравнивания абзацев, а также |
||
|
задание рамок абзацев и расстояния между абзацами |
|||
|
При |
проверке ор- |
Аннулировать все изменения, сделанные в ходе |
|
|
фографии |
проверки орфографии |
||
Для отмены последнего изменения в Панели быстрого доступа выберите команду Отменить или нажмите клавиши CTRL + Z.
Для быстрой установки отступа:
а) установите маркер на абзаце, для которого надо задать отступ; б) на Линейке передвиньте маркер отступа в новое положение.
Чтобы точно задать один отступ или все отступы одновременно, а) выделите все абзацы, для которых надо задать одинаковый отступ;
б) нажмите правую кнопку мыши, выберите команду Абзац, раздел Отсту-
пы и Интервалы; в) в полях Отступ: Слева, Справа и Первая строка наберите нужные зна-
чения.
Как задать выравнивание для визуальной организации абзацев Способ, которым абзацы выровнены на странице, может оказывать
влияние как на внешний вид документа, так и на то, насколько легко его можно будет читать. Если Вами не оговорен другой вариант, MS Word выравнивает набираемые Вами абзацы по левому краю. Однако, используя соответствующие команды и кнопки на вкладке Главная в группе Абзац, можно обеспечить выравнивание По правому краю (CTRL + R), По центру (CTRL + E) или По ширине (CTRL + J). MS Word выравнивает абзац по полям страницы или, если абзац имеет отступы, между этими отступами.
Как измененить внешний вид текста и размер шрифтов
73
Варьируя способ представления текста в документе, можно привлечь внимание к ключевым словам и фразам, сделать более понятным смысл слов и абзацев, а также зрительно выделить внесенные Вами изменения.
Как быстро сделать текст полужирным, курсивным или подчеркнутым а) выделите текст, который Вы хотите форматировать, или передвиньте место ввода туда, где Вы хотите набирать отформатированный текст; б) на вкладке Главная в группе Шрифт щелкните мышью по кнопке вы-
бранного вида: Полужирный, Курсив или Подчеркнутый, – или нажмите соответствующую комбинацию клавиш выбранного Вами вида шрифта:
CTRL + B, CTRL + I, CTRL + U.
|
Для выделения текста |
Щелкните по кнопке |
Нажмите клавиши |
|
Полужирным |
B |
CTRL + B |
|
Курсивом |
I |
CTRL + I |
|
Подчеркиванием |
U |
CTRL + U |
Для быстрой смены шрифта:
а) выделите текст, который надо изменить, или передвиньте место ввода туда, где надо начать набор текста с использованием другого шрифта; б) на вкладке Главная в группе Шрифт щелкните сперва по стрелке списка
Шрифт (CTRL + SHIFT + F), а затем по названию выбранного Вами шрифта. Для быстрой смены размера шрифта:
а) выделите текст, который надо изменить, или передвиньте место ввода туда, где надо начать набор текста с использованием нового размера шрифта; б) на вкладке Главная в группе Шрифт щелкните сперва по стрелке списка
Размер шрифта (CTRL + SHIFT + P), а затем по выбранному Вами размеру шрифта.
Для одновременной замены шрифта и размера шрифта:
а) выделите текст, который надо изменить, или передвиньте место ввода туда, где надо начать набор нового текста с использованием другого шрифта или размера шрифта;
б) нажмите правую кнопку мыши, выберите команду Шрифт (CTRL + D).
в) на закладке Шрифт в диалоговых строках Шрифт и Размер выберите желаемые шрифт и размер; г) выберите кнопку ОК.
Как использовать табуляцию для формирования таблиц и списков Остановы табуляции выравнивают столбцы в таблице или списке. При
нажатии клавиши TAB MS Word вставляет в документ метку табуляции «→» и
74
передвигает место ввода к следующему останову табуляции в текущей строке.
MS Word показывает на линейке остановы табуляции для текущего абзаца или абзацев. Остановы могут быть выровнены по правому или левому краю, по центру или по десятичной запятой при использовании команды
Табуляция в меню Шрифт (CTRL + D).
Перед остановами табуляции может также стоять несколько типов символов. Такие символы (Заполнитель) связывают содержимое табулированного столбца с содержимым предыдущего столбца. Это могут быть точки (…..), тире ( – – -), двойные тире (====) или символы подчеркивания (_). Если Вы не задали символы для постановки перед остановом табуляции, то MS Word оставляет пространство между столбцами пустым.
MS Word помещает предварительно установленные остановы табуляции через каждые 1,3 см. Вы можете изменить интервал между предварительно установленными остановами табуляции, а также ввести собственные. При вставке пользовательского останова табуляции MS Word удаляет все предварительно установленные остановы слева от пользовательского.
Как заключить абзац в рамку Рамки представляют собой простые, двойные или полужирные линии
вокруг одного или нескольких абзацев. Они помогают выделить эти абзацы из остального текста. Рамки простираются от левого поля или левого отступа до правого поля или правого отступа. Рамки используются для того, чтобы привлечь внимание к определенным пунктам или отдельным разделам документа, чтобы выделить заголовки и т. д.
Чтобы заключить абзац в рамку, а) поместите маркер на абзац, который надо заключить в рамку;
б) на вкладке Главная в группе Абзац нажмите на стрелку вниз у кнопки
Границы и заливка и выберите пункт меню Внешние границы.
Как удалить рамку а) поместите маркер на абзац, для которого Вы хотите удалить рамку;
б) отожмите кнопку Внешние границы на вкладке Главная в группе Абзац. Как задать конец страницы
MS Word автоматически расставляет в документе метки конца страницы, которые при выводе на печать определяют начало каждой страницы. Вы можете также вставлять собственные метки конца страницы, если хотите, чтобы страницы начинались с разных мест. Когда Вы задаете конец страниц вручную, MS Word удаляет или корректирует все автоматически
75
расставляемые метки конца страницы. Метки, установленные автоматически, и метки, установленные вручную, MS Word обозначает по-разному.
Вы можете отформатировать абзацы таким образом, чтобы метки конца страницы не разбивали их или не отделяли от следующих абзацев. При таком форматировании таблица не окажется размещенной на разных страницах, а заголовок – отделенным от дальнейшего текста.
Чтобы вставить метку конца страницы, а) передвиньте место ввода к началу строки, с которой надо начать новую страницу;
б) нажмите клавиши CTRL + ENTER или на вкладке Вставка в группе Страницы выберите команду Разрыв страницы. В конце страницы появится метка (непечатаемый символ) – Разрыв страницы.
Для удаления метки конца страницы:
а) передвиньте место ввода в начало страницы, следующей непосредственно за меткой конца страницы;
б) удалите метку конца страницы нажатием клавиши BACKSPACE «←«. Как пронумеровать страницы документа
На вкладке Вставка в группе Колонтитулы выберите команду Номер страницы. Выберите требуемое положение номера страницы. Строка состояния текстового процессора в нижней левой части экрана отобразит абсолютный и относительный номера текущей страницы и общее количество страниц в документе. При переходе на новую страницу указанная информация будет обновляться.
Как создать верхний или нижний колонтитул и нумерацию страниц Верхний колонтитул – текст, который печатается вверху каждой рас-
печатанной страницы документа.
Нижний колонтитул – текст, который печатается внизу каждой распечатанной страницы документа. Вы можете использовать верхние и нижние колонтитулы для нумерации страниц и их сопровождения названиями глав, датами или другой информацией.
Абзацы-колонтитулы могут состоять из одной или нескольких строк и включать в себя рисунок или другой объект. Этот текст и его объекты можно копировать, перемещать или форматировать так же, как любой другой.
В колонтитулы можно включать заданного размера табуляцию (клавиша TAB), которая обеспечит их взаимное положение на странице, и способ выравнивания колонтитула: по левому, по правому краю или по центру.
Для создания колонтитула:
76
а) на вкладке Вставка в группе Колонтитулы выберите команду Верхний
(Нижний) Колонтитулы;
б) в диалоговом окне выберите нужный тип колонтитула; в) при необходимости переход от верхнего к нижнему колонтитулу и обрат-
но можно произвести кнопкой Перейти к нижнему (верхнему) колонтитулу.
Чтобы вставить номера страниц в нижний колонтитул, а) на вкладке Вставка в группе Колонтитулы выберите команду Нижний
Колонтитулы и внизу выберите Изменить нижний колонтитул;
б) нажмите кнопку Номер страницы или используйте комбинации клави-
шей ALT + SHIFT + C;
в) обеспечьте необходимое положение номера страницы относительно ее полей, используя выравнивание абзаца.
Для изменения номера начальной страницы:
а) на вкладке Вставка в группе Колонтитулы выберите команду Номер страницы и выберите пункт Формат номера страницы;
б) в соответствующем диалоговом окне для параметра Нумерация страниц установите нужное значение, например: активируйте режим начать с: и наберите номер начальной страницы.
Для изменения положения границ верхнего и нижнего колонтитулов:
а) на вкладке Разметка страницы в группе Параметры страницы выбери-
те команду Поля; б) выберите необходимый тип поля из предложенных, либо выберите раз-
меры полей вручную, выбрав меню настраиваемые поля.
Как печатать первую страницу без верхнего или нижнего колонтитула а) на вкладке Вставка в группе Колонтитулы выберите команду Верхний
(нижний) колонтитул, выберите Изменить верхний (нижний) колонти-
тул, на вкладке Конструктор в группе Параметры выберите команду Раз-
личать колонтитулы и активируйте режим Особый колонтитул для первой страницы;
б) чтобы MS Word отображал колонтитулы четных и нечетных страниц по-
разному, активируйте параметр Различать колонтитулы для четных и нечетных страниц.
Предварительный просмотр документа перед выводом на печать Имеющаяся в MS Word команда Предварительный просмотр доступна
при выборе меню Печать при нажатии кнопки Microsoft Office. Команда позволяет увидеть, как будут выглядеть страницы документа при печати. За-
77