
Создание коллекции страниц с наборами элементов управления на пользовательской форме VBA Excel с помощью элемента управления MultiPage. Примеры кода.
UserForm.MultiPage – это элемент управления пользовательской формы, представляющий коллекцию страниц (Pages) как единый набор, позволяющий визуально разделить на отдельные страницы (Page) большой объем взаимосвязанной информации.

Элемент управления MultiPage очень удобен, когда большой объем информации может быть разделен на несколько категорий, каждая из которых размещается на отдельной странице.
Основное свойство коллекции страниц – Value, которое возвращает индекс текущей (активной) страницы (индексация начинается с нуля).
Основное событие (метод) коллекции страниц – Change, которое происходит в момент перехода между страницами.
На каждой странице элемента управления MultiPage размещается свой набор элементов управления. Этим коллекция страниц отличается от элемента TabStrip, у которого на каждой вкладке отображается один и тот же набор элементов управления.
По умолчанию в редакторе VBA Excel на элементе управления MultiPage отображены 2 вкладки. Добавить, удалить, переименовать или переместить вкладку можно через контекстное меню, кликнув по ярлыку страницы правой кнопкой мыши.

- New Page – добавление новой страницы;
- Delete Page – удаление страницы;
- Rename… – переименование страницы;
- Move… – перемещение страницы.
Примеры кода VBA Excel с MultiPage
Пример 1
Добавление и удаление страниц элемента управления MultiPage с помощью кода VBA Excel.
Добавление 3-й, 4-й, 5-й и 6-й страниц к двум, которые уже есть по умолчанию:
|
Dim i As Byte For i = 3 To 6 MultiPage1.Pages.Add («Page» & i) Next |
Удаление второй страницы:
|
MultiPage1.Pages.Remove («Page2») MultiPage1.Pages.Remove (1) |
Удаление всех страниц:
Подгон размеров элемента управления MultiPage полностью под размеры пользовательской формы:
|
With MultiPage1 .Left = Me.Left .Top = Me.Top .Width = Me.Width .Height = Me.Height End With |
Пример 2
Добавление информации о новом сотруднике с помощью элемента управления MultiPage и запись в таблицу на рабочем листе Excel.
Для реализации примера понадобится следующая таблица:

и проект пользовательской формы в редакторе VBA Excel:


Наименования страниц элемента управления MultiPage и текст надписей (Label) заданы непосредственно на проекте пользовательской формы. Кнопку будем переименовывать в коде, так как она используется на 1-й и 2-й страницах для перехода на следующую страницу, а на 3-й странице – для записи данных в таблицу.
Загрузка пользовательской формы с необходимыми параметрами:
|
Private Sub UserForm_Initialize() With MultiPage1 ‘Подгоняем MultiPage1 под размеры ‘формы, оставив место под кнопку .Left = Me.Left .Top = Me.Top .Width = Me.Width .Height = Me.Height * 0.7 ‘переходим на первую страницу .Value = 0 End With CommandButton1.Caption = «Далее >>» End Sub |
Смена надписи на кнопке в зависимости от индекса текущей страницы элемента управления MultiPage1:
|
Private Sub MultiPage1_Change() If MultiPage1.Value = 2 Then CommandButton1.Caption = «Сохранить» Else CommandButton1.Caption = «Далее >>» End If End Sub |
Обработка клика по кнопке CommandButton1:
|
1 2 3 4 5 6 7 8 9 10 11 12 13 14 15 16 17 18 |
Private Sub CommandButton1_Click() If MultiPage1.Value < 2 Then ‘Переход на следующую страницу MultiPage1.Value = MultiPage1.Value + 1 Else ‘Запись данных в таблицу на листе Excel Dim n As Byte n = Range(«A1»).CurrentRegion.Rows.Count + 1 Cells(n, 1) = TextBox1 & » « & TextBox2 _ & » « & TextBox3 Cells(n, 2) = TextBox4 Cells(n, 3) = TextBox5 & » « & TextBox6 Cells(n, 4) = TextBox7 Cells(n, 5) = TextBox8 Cells(n, 6) = TextBox9 Cells(n, 7) = TextBox10 End If End Sub |
Заполнение данными страниц элемента управления MultiPage1:


Записанная строка в таблице Excel после нажатия кнопки «Сохранить»:

Элемент управления Multipage
 августа 28, 2015
  admin
admin
Компонент Multipage это набор страниц, предоставляет возможность добавлять на поверхность формы несколько страниц, это эффективно в том случае, если элементов управления слишком много, и все они не умещаются на поверхности.
Multigape предоставляет набор из нескольких страниц, каждая из которых содержит собственный заголовок и собственный набор элементов управления. Для перехода между страницами достаточно кликнуть по заданному корешку.
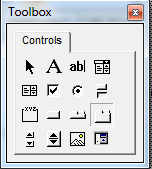
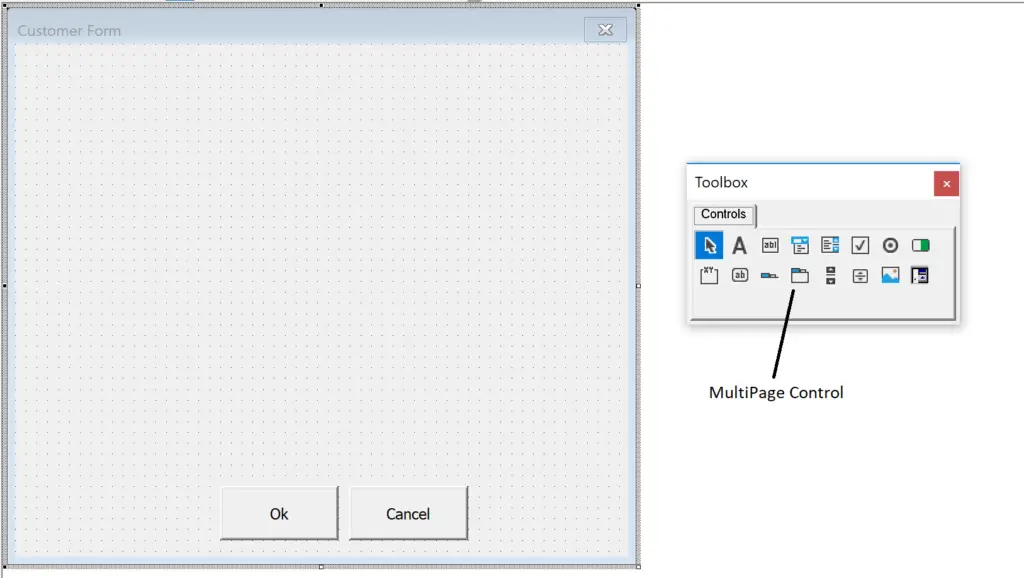
рис . 1.1 Элемент управления MultiPage на панели ToolBox
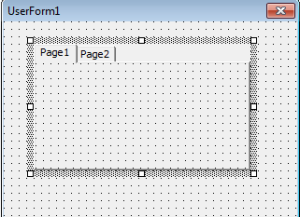
рис. 1.2 Элемент управления MultiPage на форме
После того, как вы выбрали компонент MultiPage в окне ToolBox и перетащили его на поверхность формы (UserForm), у вас будет только две вкладки для Набора страниц. Если вы кликните правой кнопкой мыши по корешку MultiPage vba, то вам откроется контекстное меню, со следующими пунктами:
- NewPage – позволяет добавить новую страницу к уже имеющимся. Обратите внимание, имена корешков страниц назначаются автоматически (Page1, Page2, …. , PageN).
- DeletePage – удаляет ту страницу, по корешку которой вы кликнули.
- Rename – позволяет переименовать выбранную страницу, аналогично, вы можете сделать тоже самое в окне свойств (свойство Caption).
- Move – переместить выбранную страницу. После клика вам откроется небольшое диалоговое окно, где вы сможете переместить выбранную вкладку в заданном направлении.
Основные свойства для класса Multipage vba языка следующие:
MultiRow – свойство языка vba может принимать логическое True или False. Само свойство актуально в том случае, если вкладок страниц слишком много и они не помещаются в на поверхности формы. Если будет установлено значение False, то все корешки будут находиться на одной линии, для перехода к тем вкладкам, которые не видно, будут добавлены дополнительные кнопки. Если значение установлено в True – то при большом количестве вкладок, они будут располагаться в несколько строк.
TabOrientation – позволяет задать, где будут расположены корешки страниц, свойство предоставляет четыре значения: fmTabOrientationTop – расположении вверху, fmTabOrientationBottom – внизу, fmTabOrientationLeft – слева и fmTabOrientationRight – справа.
SelectedItem – содержит ссылку на объект выбранной страницы
Value – свойство позволяет получить номер той вкладки страницы, которая выбрана в данный момент, нумерация начинается с нуля.
Style – определяет стиль вкладок: fmTabStyleTabs – в виде закладок, fmTabStyleButton – в виде кнопок и fmTabStyleNone – вкладки отсутствуют
Основным событием для класса MultiPage является событие Change, оно возникает при переходе между вкладками.
Хорошо, теперь давайте напишем простой пример с компонентом VBA MultiPage.
Добавьте в окно Проектов новый модуль и форму (меню Insert, пункты UserForm и Module). Я всегда даю соответствующие имена для формы и модуля (свойство Name), в данном случае MPModule и MPForm. Теперь надо настроить внешний вид формы. Нм понадобятся только три элемента управления из окна ToolBox (меню View, пункт Toolbox):
MultiPage – добавляем а форму данный элемент управления, у вас автоматически появятся два флажка, кликаем по одному из флажков и жмем New Page, это добавить третью вкладку. В свойстве Caption пропишите для каждой вкладки: Флажок 1, Флажок 2 и Флажок 3.
ListBox – добавьте на поверхность объекта MultiPage список (ListBox), точнее, три списка, по одному на каждую вкладку.
Label – в самый низ формы добавьте компонент Надпись, он должен находится на поверхности формы UserForm. Свойство Caption оставьте пустым.
Теперь нам нужно прописать код для формы, жмем в окне проектов на наш объект UserForm (MPForm) и нажимаем кнопку View Code. В окне редактора кода прописываем следующие процедуры:
Private Sub MultiPage1_Change()
Label1.Caption = MultiPage1.SelectedItem.Caption
End Sub
Private Sub UserForm_Initialize()
For i = 0 To 50
ListBox1.AddItem “число_” & i
Next
For i = 50 To 100
ListBox2.AddItem “число_” & i
Next
For i = 100 To 150
ListBox3.AddItem “число_” & i
Next Label1.FontSize = 16
Label1.ForeColor = &H1055F2
Label1.TextAlign = fmTextAlignCenter
Label1.Caption = MultiPage1.SelectedItem.Caption
End Sub
Давайте разберем код:
MultiPage1_Change – тут происходит обработка события Change, которое возникает при клике по флажкам. Каждый раз, когда мы будем переходить на ту или иную вкладку, в свойство Caption объекта Label будет записываться название выбранного флажка.
UserForm_Initialize – данная процедура будет выполняться при инициализации формы. Тут есть три цикла for, по одному на каждый объект ListBox, по сути, в цикле происходит простое заполнение списков. Далее идут настройки свойств:
- Label1.FontSize – задаем размер шрифта для объекта Надпись
- Label1.ForeColor – задаем цвет текста, которые отображается в поле Надпись
- Label1.TextAlign – выравниваем шрифт по центру
- Label1.Caption – тут мы прописываем начальное значение для свойства Caption.
В принципе все, не забывайте, что в редакторе кода для модуля (макроса), нужно прописать процедуру, которая будет выводить форму:
Sub MPModule()
MPForm.Show
End Sub
Ну, вот и все, в статье мы кратко рассмотрели класс MultiPage VBA и написал небольшой пример.
UserForm Controls — Frame, MultiPage and TabStrip
UserForm acts as a container in which you add multiple ActiveX controls, each of which has a specific use and associated properties. By itself, a UserForm will not be of much use unless ActiveX controls are added to it which are the actual user-interactive objects. Using ActiveX Controls on a Worksheet have been illustrated in detail, in the separate section of «Excel VBA: ActiveX Controls, Form Controls & AutoShapes on a Worksheet».
Also refer «2. UserForm and Controls — Properties» for properties common to the UserForm and most Controls
Note: In below given examples, vba codes are required to be entered in the Code Module of the UserForm, unless specified otherwise.
—————————————-
Contents:
Frame Control
MultiPage Control
TabStrip Control
—————————————-
Frame Control
Frames are used to group controls that work together, are related to each other or have some commonality, in a UserForm. They also enhance the UserForm’s layout by bunching and organizing a related set of items. For example, in a BioData Form, the physical attributes like height, complexion, weight and hair color can be grouped in a particular Frame. Frames are particularly useful to group two or more OptionButtons. Primarily, Frames are used for 2 purposes: (i) to group related Controls in a UserForm to visually enhance and organize the Form’s layout; and (ii) to group OptionButtons to set their behaviour — they become mutually exclusive within a Frame and selecting one OptionButton will de-select all other OptionButtons within that Frame only. Using a Frame: First add the Frame in a UserForm and then add Controls to the Frame.
Example 1: Determine name and caption of all enabled OptionButtons in a Frame
Private Sub CommandButton1_Click()
‘determine name and caption of all enabled OptionButtons in a Frame
Dim ctrl As Control
For Each ctrl In Frame1.Controls
If TypeOf ctrl Is MSForms.OptionButton Then
If ctrl.Enabled = True Then
MsgBox ctrl.Name & » is an enabled OptionButton with caption » & ctrl.Caption
End If
End If
Next
End Sub
Example 2: Using Controls in a Frame with vba code (refer Image 25):

Private Sub UserForm_Initialize()
‘Set properties of Controls on initialization of UserForm.
Dim i As Integer
Dim myArray As Variant
‘enter value in «Name» TextBox of UserForm:
Me.txtName.Value = «Enter Your Name»
‘set Caption for the 2 Frames:
Me.fraPhyAttr.Caption = «Physical Attributes»
Me.fraEduExp.Caption = «Education & Experience»
‘populate ListBox of «Age» in the UserForm:
With Me.lstAge
For i = 1 To 100
.AddItem i & » yrs»
Next i
End With
‘populate ListBox of «Height» in the Frame «Physical Attributes»:
With Me.fraPhyAttr.ListBox1
For i = 140 To 200
.AddItem i & » cms»
Next i
End With
‘populate ListBox of «Weight» in the Frame «Physical Attributes»:
With Me.fraPhyAttr.ListBox2
For i = 80 To 250
.AddItem i & » lbs»
Next i
End With
‘populate ListBox «Field of Work» in the frame «Education & Experience»:
myArray = Array(«Finance», «Banking», «Medical», «Engineering», «Marketing», «Management», «Airlines», «Others»)
Me.fraEduExp.lstWorkField.List = myArray
‘populate ListBox of «Exp in Years» in the Frame «Education & Experience»:
With Me.fraEduExp.lstExpYrs
For i = 1 To 50
.AddItem i & » yrs»
Next i
End With
‘Group OptionButtons:
With Me.fraPhyAttr
optDark.GroupName = «Complexion»
optWheatish.GroupName = «Complexion»
optFair.GroupName = «Complexion»
optBlack.GroupName = «Hair»
optBlonde.GroupName = «Hair»
optBrunette.GroupName = «Hair»
optOther.GroupName = «Hair»
End With
Me.fraEduExp.optGraduate.GroupName = «EduLevel»
Me.fraEduExp.optPostGrad.GroupName = «EduLevel»
Me.fraEduExp.optProfessional.GroupName = «EduLevel»
‘enter value in «University/Institution» TextBox of the Frame «Education & Experience»:
Me.fraEduExp.txtUniversityInstitution.Value = «Enter Name»
End Sub
Private Sub txtName_Enter()
‘on selection, clears «Name» TextBox of UserForm
Me.txtName.Value = «»
End Sub
Private Sub txtUniversityInstitution_Enter()
‘on selection, clears «University/Institution» TextBox of the Frame «Education & Experience»
Me.fraEduExp.txtUniversityInstitution.Value = «»
End Sub
—————————————————————————————————————
MultiPage Control
A MultiPage control comprises of one or more Page objects, each containing its own set of controls. MultiPage is best used when you wish to handle a large amount of data that can be classified into multiple categories, wherein a separate Page can be created for each category. All controls that are added to a Page in a MultiPage control, are contained in and become a part of that Page which distinguishes the controls from those which are otherwise a part of the UserForm. A MultiPage control has several Pages, wherein selecting a Page makes it the current one (making it visible) while hiding the others. Each Page of a MultiPage control has its own tab order. The Pages are numbered from 0, and to select the first Page in a MultiPage control, use the code: MultiPage1.Value = 0. By default, a MultiPage control has 2 Pages. To Add Pages, right-click on the tab and select New Page ((select Delete Page to delete a Page). Note: Each Page of a MultiPage control will separately group two or more OptionButtons, irrespective of whether all OptionButtons (across all pages) have the same GroupName.
Dynamically Add/Remove a Page:
Using the Add Method: Syntax: Set m = MultiPage1.Pages.Add(pageName, pageCaption, pageIndex). pageIndex (optional) is an integer which specifies the position for the Page to be inserted, starting from 0 for the first position/Page. pageName sets the Name for the Page, pageCaption sets the Caption. Both are optional to specify.
Set m = MultiPage1.Pages.Add(«Page5», «NewPage», 1) — this code adds a new Page with name Page5 and Caption NewPage, as the second Page (viz. second position in the page order).
MultiPage1.Pages.Add «Page3»; MultiPage1.Pages(2).Caption = «NewPage» — these 2 codes add a new (third) Page with name Page3 and set its Caption to NewPage.
MultiPage1.Pages.Add — this code simply adds a new Page.
To Remove a Page — Syntax: MultiPage1.Pages.Remove (pageIndex). Example: MultiPage1.Pages.Remove (1) — this code removes the second Page.
Dynamically Access an individual Page:
To change or set the properties of a Page at Run-time, we need to identify that Page in the MultiPage control, which can be done in different ways. To access an individual Page in a MultiPage control, the following methods can be used (refer Images 26a & 26b and below Example of vba codes):
1. Numeric Index (using the Pages collection): Index 0 refers to the first page, Index 1 to the second page, and so on. Code to set Caption — MultiPage1.Pages(Index).Caption
2. Item Method (using the Pages collection): Item Index 0 refers to the first page, Item Index 1 to the second page , and so on. Code to set Caption — MultiPage1.Pages.Item(ItemIndex).Caption
3. Page Name: Code to set Caption — MultiPage1.Pages(«PageName»).Caption or MultiPage1.Pages.Item(«PageName»).Caption
4. Page Object: Code to set Caption — MultiPage1.PageName.Caption
5. SelectedItem Property: Code to set Caption — MultiPage1.SelectedItem.Caption
Example 3: Change properties of each Page of a MultiPage control, by using different methods of Page Selection. Refer Image 26a before the code is run (ie. MultiPage is per Design-time) and refer Image 26b which shows the changed Captions (Run-time) after running the below vba code.


Private Sub UserForm_Activate()
‘change/set properties of each Page of a MultiPage control, by using different methods of Page Selection.
‘using Numeric Index: sets Caption for the first Page:
MultiPage1.Pages(0).Caption = «Australia»
‘using Item Method: sets Caption for the second Page:
MultiPage1.Pages.Item(1).Caption = «Canada»
‘using Page Name: sets Caption for the third Page, whose name is Page3:
MultiPage1.Pages(«Page3»).Caption = «France»
‘alternate code: MultiPage1.Pages.Item(«Page3»).Caption = «France»
‘using Page Object: sets Caption for the fourth Page, whose name is Page4:
MultiPage1.Page4.Caption = «Germany»
‘using SelectedItem Property: sets Caption for the fifth Page, which is the selected/active page:
‘selects the fifth Page
MultiPage1.Value = 4
‘sets Caption for the selected page
MultiPage1.SelectedItem.Caption = «USA»
End Sub
Create a wizard using a Single UserForm and MultiPage control
In case you wish to accept data sequentially (ie. one step after another), then instead of using multiple UserForms it is better to use a MultiPage control to create multiple Pages in a Single UserForm. The next Page can be made accessible only after the previous Page has been filled and entered. We show how to create a wizard interface comprising of 4 Pages, as below.


Example 4: Refer Images 27a to 27d which show the 4 Pages in the MultiPage wizard. Below is the set of vba codes for these (to be entered in the Code Module of the UserForm):
Private Sub UserForm_Initialize()
‘set properties of each Page of the MultiPage control
Dim i As Integer
‘set Caption for each Page:
MultiPage1.Pages(0).Caption = «Name»
MultiPage1.Pages(1).Caption = «Gender & Age»
MultiPage1.Pages(2).Caption = «Personal»
MultiPage1.Pages(3).Caption = «Professional»
‘set Caption for Frames in fourth Page:
MultiPage1.Pages(3).Frame1.Caption = «Field of Work»
MultiPage1.Pages(3).Frame2.Caption = «Education Level»
‘populate ListBox «Age» in second Page:
With MultiPage1.Pages(1).lstAge
For i = 1 To 100
.AddItem i & » yrs»
Next i
End With
‘populate ComboBox «Residing Country» in third Page:
myArray = Array(«Argentina», «Australia», «Brazil», «China», «France», «Germany», «Greece», «HongKong», «India», «Italy», «Japan», «Russia», «Singapore», «Spain», «Switzerland», «UK», «USA»)
MultiPage1.Pages(2).cmbCountry.List = myArray
MultiPage1.Pages(0).Enabled = True
MultiPage1.Pages(1).Enabled = False
MultiPage1.Pages(2).Enabled = False
MultiPage1.Pages(3).Enabled = False
‘select first page:
MultiPage1.Value = 0
End Sub
Private Sub MultiPage1_Change()
‘set properties of Previous, Next, Cancel & Save Buttons. Note: these buttons are created outside the MultiPage control.
Select Case MultiPage1.Value
‘First Page:
Case 0
cmdPrevious.Enabled = False
cmdNext.Enabled = True
cmdSave.Enabled = False
‘Last Page:
Case MultiPage1.Pages.Count — 1
cmdPrevious.Enabled = True
cmdNext.Enabled = False
cmdSave.Enabled = True
‘Other Pages:
Case Else
cmdPrevious.Enabled = True
cmdNext.Enabled = True
cmdSave.Enabled = False
End Select
End Sub
Private Sub cmdSave_Click()
‘set properties for CommandButton Save. Note: this code does not provide how/where MultiPage data will be saved, but only the conditions under which data will get stored.
‘Last Page — atleast one OptionButton should be selected in each Frame:
With MultiPage1.Pages(MultiPage1.Pages.Count — 1)
If optAdmin.Value = False And optMktg.Value = False And optOps.Value = False And optOther1.Value = False Then
MsgBox «Please select Field of Work»
Exit Sub
ElseIf optGrad.Value = False And optPostGrad.Value = False And optProff.Value = False And optOther2.Value = False Then
MsgBox «Please select Education Level»
Exit Sub
End If
End With
End Sub
Private Sub cmdPrevious_Click()
‘set properties for CommandButton Previous
Select Case MultiPage1.Value
Case 1
MultiPage1.Pages(1).Enabled = False
MultiPage1.Pages(0).Enabled = True
MultiPage1.Value = 0
Case 2
MultiPage1.Pages(2).Enabled = False
MultiPage1.Pages(1).Enabled = True
MultiPage1.Value = 1
Case 3
MultiPage1.Pages(3).Enabled = False
MultiPage1.Pages(2).Enabled = True
MultiPage1.Value = 2
End Select
End Sub
Private Sub cmdNext_Click()
‘set properties for CommandButton Next
Select Case MultiPage1.Value
‘Name is required to be entered to proceed to next Page:
Case 0
If txtName.Value = «» Then
MsgBox «Please Enter Name»
Exit Sub
Else
MultiPage1.Pages(0).Enabled = False
MultiPage1.Pages(1).Enabled = True
MultiPage1.Value = 1
End If
‘Gender & Age are required to be selected to proceed to next Page:
Case 1
If optMale.Value = False And optFemale.Value = False Then
MsgBox «Please Select Gender»
Exit Sub
ElseIf lstAge.ListIndex = -1 Then
MsgBox «Please Select Age»
Else
MultiPage1.Pages(1).Enabled = False
MultiPage1.Pages(2).Enabled = True
MultiPage1.Value = 2
End If
‘Marital Status & Residing Country are required to be selected to proceed to next Page:
Case 2
If optMarried.Value = False And optSingle.Value = False Then
MsgBox «Please Select Marital Status»
Exit Sub
ElseIf cmbCountry.Value = «» Then
MsgBox «Please Select or Enter Country»
Else
MultiPage1.Pages(2).Enabled = False
MultiPage1.Pages(3).Enabled = True
MultiPage1.Value = 3
End If
End Select
End Sub
Private Sub cmdClose_Click()
‘set properties for CommandButton Close
Unload Me
End Sub
—————————————————————————————————————
TabStrip Control
A TabStrip control is used to view different contents in each Tab, for the same set of controls. A TabStrip is a collection of Tabs wherein each Tab contains a set of controls. By default, a TabStrip control has 2 Tabs. To Add Tabs, right-click on the Tab and select New Page (select Delete Page to delete a Tab).
Dynamically Add/Remove a Tab:
Using the Add Method: Syntax: Set t = TabStrip1.Tabs.Add(tabName, tabCaption, tabIndex). tabIndex (optional) is an integer which specifies the position for the Tab to be inserted, starting from 0 for the first position/Tab. tabName sets the Name for the Tab, tabCaption sets the Caption. Both are optional to specify.
Set t = TabStrip1.Tabs.Add(«Tab4», «NewTab», 1) — this code adds a new Tab with name Tab4 and Caption NewTab, as the second Tab (viz. second position in the tab order).
TabStrip1.Tabs.Add «Tab3»; TabStrip1.Tabs(2).Caption = «Div 3» — the 2 codes add a new (third) Tab named Tab3 and set its Caption to Div 3.
To Remove a Tab — Syntax: TabStrip1.Tabs.Remove (tabCaption). Example: TabStrip1.Tabs.Remove («Div 3») — this code removes Tab with Caption Div 3.
Difference between a MultiPage control and TabStrip control:
A MultiPage control is a container for controls, similar to a Frame. Each Page has a separate set of controls and selecting a Page (ie. making it visible) hides the other Pages of the MultiPage.
A TabStrip contains a consistent set of controls across all Tabs (within the TabStrip). The content of the controls changes when a different Tab is selected but the visibility or layout of the controls remain same.
Selecting a Tab:
To change or set the properties of a Tab at Run-time, we need to identify that Tab in the TabStrip control, which can be done in different ways. SelectedItem property of the TabStrip control indicates which Tab is selected. To select a Tab, set the Value property of the TabStrip control. Tab values start from 0, and the value of first Tab in a TabStrip control will be 0, value of second Tab will be 1, and so on. To access an individual Tab in a TabStrip control, the following methods can be used (refer below Example of vba codes):
1. Numeric Index (using the Tabs collection): Index 0 refers to the first page, Index 1 to the second page , and so on. Code to set Caption — TabStrip1.Tabs(Index).Caption
2. Item Method (using the Tabs collection): Item Index 0 refers to the first page, Item Index 1 to the second page , and so on. Code to set Caption — TabStrip1.Tabs.Item(ItemIndex).Caption
3. Tab Name: Code to set Caption — TabStrip1.Tabs(«TabName»).Caption or TabStrip1.Tabs.Item(«TabName»).Caption
4. Tab Object: Code to set Caption — TabStrip1.TabName.Caption
5. SelectedItem Property: Code to set Caption — TabStrip1.SelectedItem.Caption
Example 5: Change/set properties of each Tab of a TabStrip control, by using different methods of Tab Selection.
Private Sub UserForm_Initialize()
‘change/set properties of each Tab of a TabStrip control, by using different methods of Tab Selection.
‘using Numeric Index: sets Caption for the first Tab:
TabStrip1.Tabs(0).Caption = «Australia»
‘using Item Method: sets Caption for the second Tab:
TabStrip1.Tabs.Item(1).Caption = «Canada»
‘using Tab Name: sets Caption for the third Tab, whose name is Tab3:
TabStrip1.Tabs(«Tab3»).Caption = «France»
‘alternate code: TabStrip1.Tabs.Item(«Tab3»).Caption = «France»
‘using Tab Object: sets Caption for the fourth Tab, whose name is Tab4:
TabStrip1.Tab4.Caption = «Germany»
‘using SelectedItem Property: sets Caption for the fifth Tab, which is the selected/active Tab:
‘selects the fifth Tab
TabStrip1.Value = 4
‘sets Caption for the selected Tab
TabStrip1.SelectedItem.Caption = «USA»
End Sub
Private Sub CommandButton1_Click()
‘check Name and Caption of all Tabs in a TabStrip control.
Dim i As Integer
For i = 0 To TabStrip1.Tabs.Count — 1
MsgBox TabStrip1.Tabs(i).Name & » has a caption of » & TabStrip1.Tabs(i).Caption
Next i
End Sub
Example 6: How to work with a TabStrip control and Tabs — using a TabStrip and its Tabs to Load data from worksheet and to update worksheet range from Tab data. Refer Images 28a to 28c, and below vba codes:


Private Sub UserForm_Initialize()
‘Set properties of Controls on initialization of UserForm.
‘set Captions for each Tab:
With TabStrip1
.Tabs(0).Caption = «Div 1»
.Tabs(1).Caption = «Div 2»
‘add new Tab named «Tab3» and set its Caption:
.Tabs.Add «Tab3»
.Tabs(2).Caption = «Div 3»
End With
‘populate TextBoxes «Sales Target», «Actual Sales» & «Achieved (%)» for Division 1 from worksheet:
txtSalesTarget.Value = Sheet5.Range(«B2»).Value
txtActualSales.Value = Sheet5.Range(«B3»).Value
txtAchieved.Value = Round(Sheet5.Range(«B4″).Value * 100, 2) & » %»
‘set first Tab as the selected Tab:
TabStrip1.Value = 0
‘set properties of Label (viz. Caption, BackColor, Font & TextAlign) which appears on selection of the first Tab:
lblDivision.Caption = «Div 1: Sales Performance»
Me.lblDivision.BackColor = RGB(255, 0, 0)
Me.lblDivision.Font.Bold = True
Me.lblDivision.TextAlign = fmTextAlignCenter
‘user not allowed to enter in TextBox of «Acheived (%)»
txtAchieved.Enabled = False
End Sub
Private Sub TabStrip1_Change()
‘when a new Tab is selected, Label properties are set and TextBoxes are populated from worksheet:
Dim n As Integer
n = TabStrip1.SelectedItem.Index
Select Case n
Case 0
‘on selection of first Tab, Caption of Label is set and its BackColor changes to Red:
lblDivision.Caption = «Div 1: Sales Performance»
Me.lblDivision.BackColor = RGB(255, 0, 0)
‘TextBoxes «Sales Target» & «Actual Sales» for Division 1 get populated from worksheet:
txtSalesTarget = Sheet5.Range(«B2»).Value
txtActualSales = Sheet5.Range(«B3»).Value
txtAchieved = Round(Sheet5.Range(«B4″).Value * 100, 2) & » %»
Case 1
‘on selection of second Tab, Caption of Label is set and its BackColor changes to Green:
lblDivision.Caption = «Div 2: Sales Performance»
Me.lblDivision.BackColor = RGB(0, 255, 0)
‘TextBoxes «Sales Target» & «Actual Sales» for Division 2 get populated from worksheet:
txtSalesTarget = Sheet5.Range(«C2»).Value
txtActualSales = Sheet5.Range(«C3»).Value
txtAchieved = Round(Sheet5.Range(«C4″).Value * 100, 2) & » %»
Case 2
‘on selection of third Tab, Caption of Label is set and its BackColor changes to Yellow:
lblDivision.Caption = «Div 3: Sales Performance»
Me.lblDivision.BackColor = RGB(255, 255, 0)
‘TextBoxes «Sales Target» & «Actual Sales» for Division 3 get populated from worksheet:
txtSalesTarget = Sheet5.Range(«D2»).Value
txtActualSales = Sheet5.Range(«D3»).Value
txtAchieved = Round(Sheet5.Range(«D4″).Value * 100, 2) & » %»
End Select
End Sub
Private Sub cmdClose_Click()
‘clicking on «Close» button, unloads the UserForm
Unload Me
End Sub
Private Sub cmdClick_Click()
‘Clicking the «Save» button will update worksheet with the values of each Tab.
‘Note that worksheet Range(«B4:D4») has a Percentage format of 2 decimals. Range(«B4») has formula: =B3/B2; Range(«C4») has formula: =C3/C2; and Range(«D4») has formula: =D3/D2.
Dim n As Integer
n = TabStrip1.SelectedItem.Index
Select Case n
‘update worksheet range per updated values in Text Boxes, for Division 1:
Case 0
If IsNumeric(txtSalesTarget.Value) And txtSalesTarget.Value > 0 And IsNumeric(txtActualSales.Value) Then
Sheet5.Range(«B2»).Value = txtSalesTarget.Value
Sheet5.Range(«B3»).Value = txtActualSales.Value
txtAchieved.Value = Round((txtActualSales.Value / txtSalesTarget.Value) * 100, 2) & » %»
Else
txtAchieved.Value = «»
End If
‘update worksheet range per updated values in Text Boxes, for Division 2:
Case 1
If IsNumeric(txtSalesTarget.Value) And txtSalesTarget.Value > 0 And IsNumeric(txtActualSales.Value) Then
Sheet5.Range(«C2»).Value = txtSalesTarget.Value
Sheet5.Range(«C3»).Value = txtActualSales.Value
txtAchieved.Value = Round((txtActualSales.Value / txtSalesTarget.Value) * 100, 2) & » %»
Else
txtAchieved.Value = «»
End If
‘update worksheet range per updated values in Text Boxes, for Division 3:
Case 2
If IsNumeric(txtSalesTarget.Value) And txtSalesTarget.Value > 0 And IsNumeric(txtActualSales.Value) Then
Sheet5.Range(«D2»).Value = txtSalesTarget.Value
Sheet5.Range(«D3»).Value = txtActualSales.Value
txtAchieved.Value = Round((txtActualSales.Value / txtSalesTarget.Value) * 100, 2) & » %»
Else
txtAchieved.Value = «»
End If
End Select
End Sub
Компонент Multipage vba языка — набор страниц, предоставляет возможность добавлять на поверхность формы несколько страниц, это эффективно в том случае, если элементов управления слишком много, и все они не умещаются на поверхности.
Multigape предоставляет набор из нескольких страниц, каждая из которых содержит собственный заголовок и собственный набор элементов управления. Для перехода между страницами достаточно кликнуть по заданному корешку.
После того, как вы выбрали компонент MultiPage в окне ToolBox и перетащили его на поверхность формы (UserForm), у вас будет только две вкладки для Набора страниц. Если вы кликните правой кнопкой мыши по корешку MultiPage vba, то вам откроется контекстное меню, со следующими пунктами:
- NewPage – позволяет добавить новую страницу к уже имеющимся. Обратите внимание, имена корешков страниц назначаются автоматически (Page1, Page2, …. , PageN).
- DeletePage – удаляет ту страницу, по корешку которой вы кликнули.
- Rename – позволяет переименовать выбранную страницу, аналогично, вы можете сделать тоже самое в окне свойств (свойство Caption).
- Move – переместить выбранную страницу. После клика вам откроется небольшое диалоговое окно, где вы сможете переместить выбранную вкладку в заданном направлении.
Основные свойства для класса Multipage vba языка следующие:
MultiRow – свойство языка vba может принимать логическое True или False. Само свойство актуально в том случае, если вкладок страниц слишком много и они не помещаются в на поверхности формы. Если будет установлено значение False, то все корешки будут находиться на одной линии, для перехода к тем вкладкам, которые не видно, будут добавлены дополнительные кнопки. Если значение установлено в True – то при большом количестве вкладок, они будут располагаться в несколько строк.
TabOrientation – позволяет задать, где будут расположены корешки страниц, свойство предоставляет четыре значения: fmTabOrientationTop – расположении вверху, fmTabOrientationBottom – внизу, fmTabOrientationLeft – слева и fmTabOrientationRight – справа.
SelectedItem – содержит ссылку на объект выбранной страницы
Value – свойство позволяет получить номер той вкладки страницы, которая выбрана в данный момент, нумерация начинается с нуля.
Style – определяет стиль вкладок: fmTabStyleTabs – в виде закладок, fmTabStyleButton – в виде кнопок и fmTabStyleNone – вкладки отсутствуют
Основным событием для класса MultiPage является событие Change, оно возникает при переходе между вкладками.
Хорошо, теперь давайте напишем простой пример с компонентом VBA MultiPage.
Добавьте в окно Проектов новый модуль и форму (меню Insert, пункты UserForm и Module). Я всегда даю соответствующие имена для формы и модуля (свойство Name), в данном случае MPModule и MPForm. Теперь надо настроить внешний вид формы. Нм понадобятся только три элемента управления из окна ToolBox (меню View, пункт Toolbox):
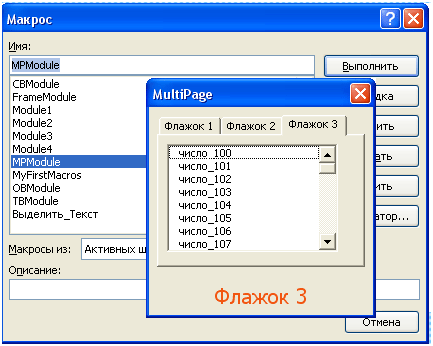
MultiPage – добавляем а форму данный элемент управления, у вас автоматически появятся два флажка, кликаем по одному из флажков и жмем New Page, это добавить третью вкладку. В свойстве Caption пропишите для каждой вкладки: Флажок 1, Флажок 2 и Флажок 3.
ListBox – добавьте на поверхность объекта MultiPage список (ListBox), точнее, три списка, по одному на каждую вкладку.
Label – в самый низ формы добавьте компонент Надпись, он должен находится на поверхности формы UserForm. Свойство Caption оставьте пустым.

Теперь нам нужно прописать код для формы, жмем в окне проектов на наш объект UserForm (MPForm) и нажимаем кнопку View Code. В окне редактора кода прописываем следующие процедуры:
Private Sub MultiPage1_Change()
    Label1.Caption = MultiPage1.SelectedItem.Caption
End Sub

Private Sub UserForm_Initialize()
    For i = 0 To 50
        ListBox1.AddItem "число_" & i
    Next
    For i = 50 To 100
        ListBox2.AddItem "число_" & i
    Next
    For i = 100 To 150
        ListBox3.AddItem "число_" & i
    Next

    Label1.FontSize = 16
    Label1.ForeColor = &H1055F2
    Label1.TextAlign = fmTextAlignCenter
    Label1.Caption = MultiPage1.SelectedItem.Caption
End Sub
Давайте разберем код:
MultiPage1_Change – тут происходит обработка события Change, которое возникает при клике по флажкам. Каждый раз, когда мы будем переходить на ту или иную вкладку, в свойство Caption объекта Label будет записываться название выбранного флажка.
UserForm_Initialize – данная процедура будет выполняться при инициализации формы. Тут есть три цикла for, по одному на каждый объект ListBox, по сути, в цикле происходит простое заполнение списков. Далее идут настройки свойств:
- Label1.FontSize – задаем размер шрифта для объекта Надпись
- Label1.ForeColor – задаем цвет текста, которые отображается в поле Надпись
- Label1.TextAlign – выравниваем шрифт по центру
- Label1.Caption – тут мы прописываем начальное значение для свойства Caption.
В принципе все, не забывайте, что в редакторе кода для модуля (макроса), нужно прописать процедуру, которая будет выводить форму:
Sub MPModule()
    MPForm.Show
End Sub
Ну, вот и все, в статье мы кратко рассмотрели класс MultiPage VBA и написал небольшой пример.
The Excel VBA MultiPage control is a useful way of logically grouping the controls of your userform. Especially if you have many (just think of the Format Cells window).
In this blog post, we will look at how to create and use the MultiPage Control on your Excel VBA userforms, and also how to modify its properties and refer to it during runtime.
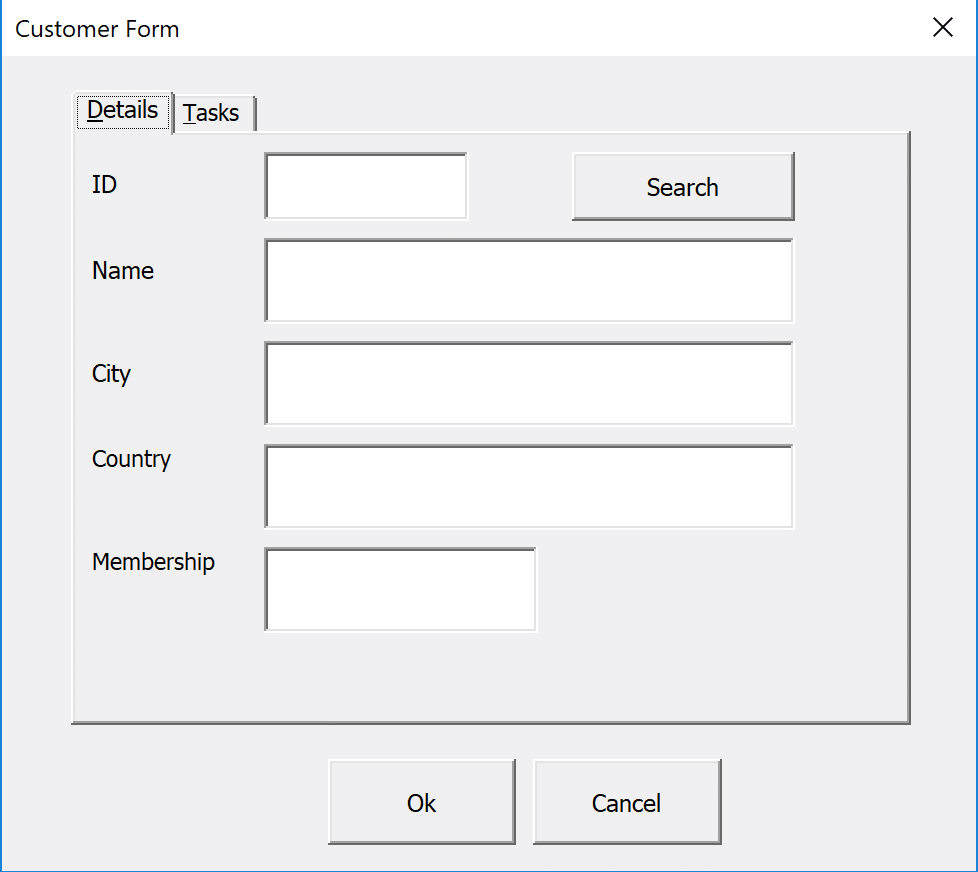
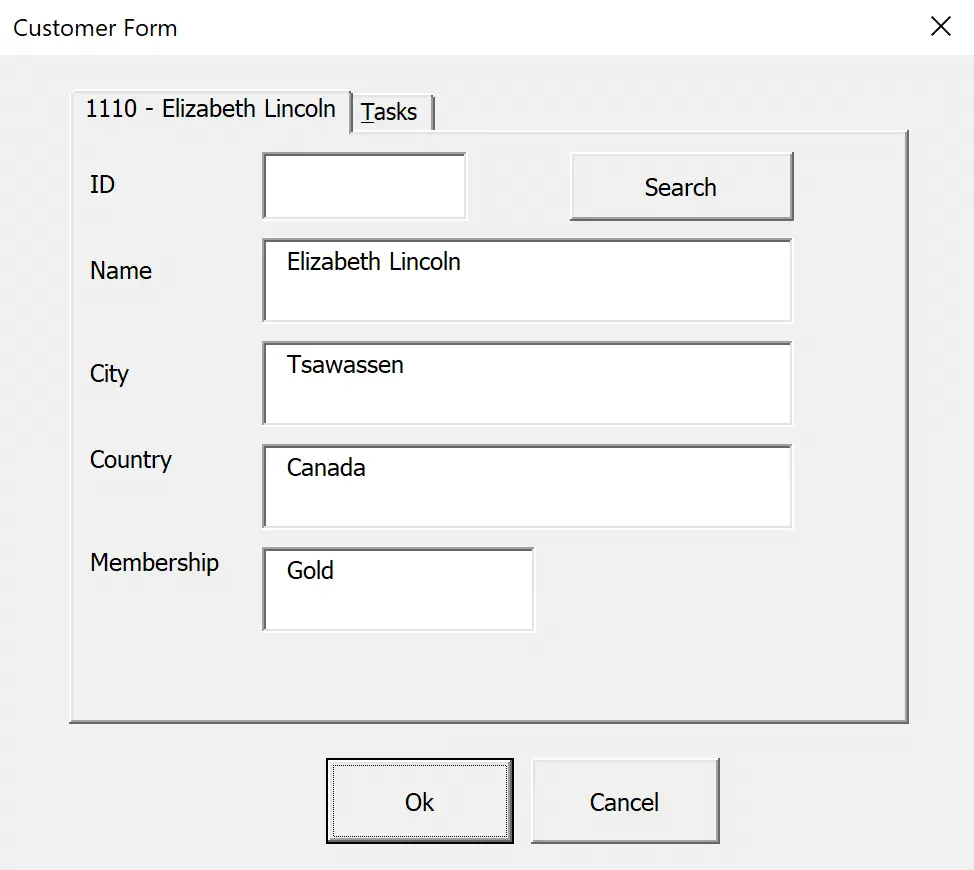
For this example, we have a list of customers. And we want to use a userform when editing the details about these customers. This will provide greater validation and more reliable data entry than editing the details directly on the sheet.
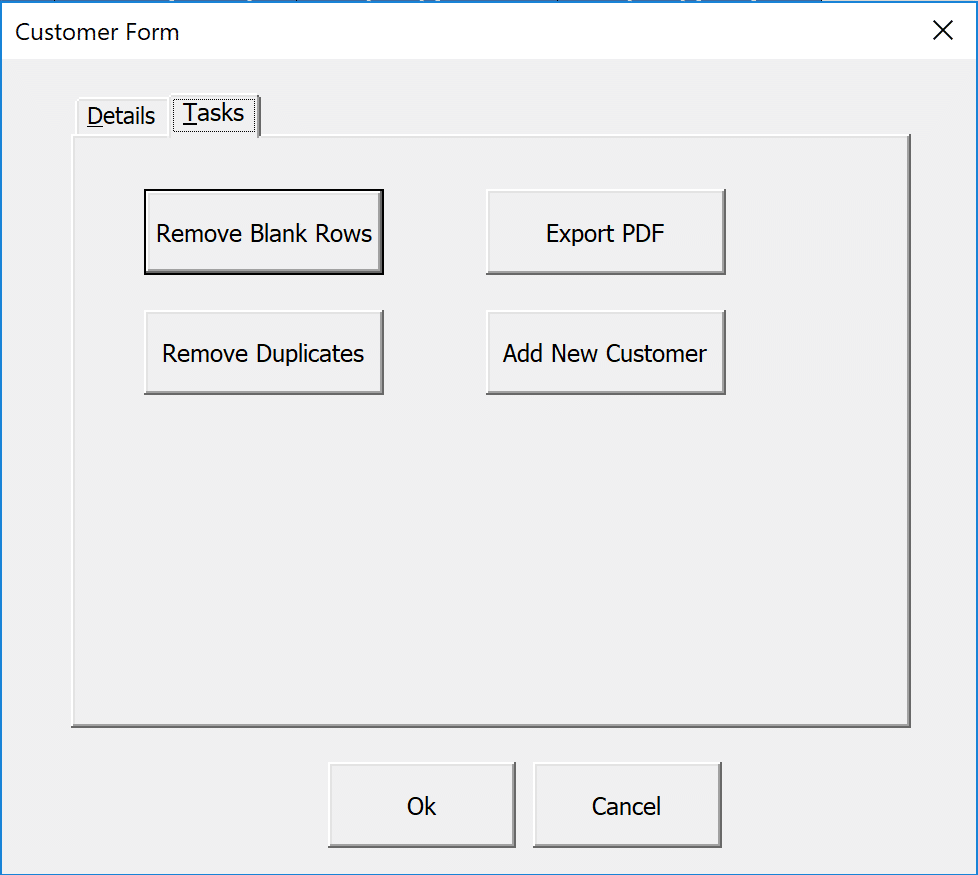
We would also like to run common tasks from this userform. So the Excel VBA MultiPage control has been used to group the customer details, and common tasks onto separate tabs, or pages.
This image shows the customer details tab.
And this shows the Tasks tab.
So let’s have a look at how to use the Excel VBA MultiPage Control.
Watch the Video – Excel VBA MultiPage Control
Inserting the Excel VBA Multipage Control
We have the beginnings of a userform below. And firstly we need to insert the MultiPage control.
Click the MultiPage Control button in the Toolbox, and click and drag to draw it onto the userform (do not confuse it with the TabStrip Control next to it).
Editing the Properties of Each Page
Once the control is inserted, we need to edit some key properties about each page of the control.
You can also edit properties of the MultiPage control, such as its name. As it is the only one on the form, this is left as MultiPage1.
You can edit these properties in two main ways. Firstly you could right mouse click on the page you want to edit.
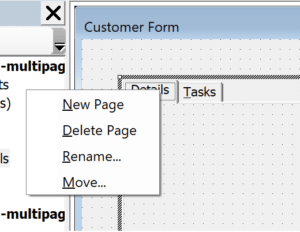
From the menu that appears, you can insert additional pages (you get 2 with the control to start with). This is useful.
If you click the Rename option, you get the window below.
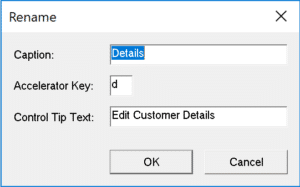
From here, you can change the Caption of the page. This is what the user will see in the page tab.
You can also set the Accelerator Key. This is a shortcut for the page.
In the image above, the letter d is used. This means the user can press Alt + d to access the page, instead of clicking the tab. The letter d of the caption Details will be underlined to show the user this (you can see this in the image at the beginning of the blog post).
Finally, you can set the Control Tip Text in this window. This is the text that the user sees when they position the cursor over the page.
Another way of setting the page properties is by using the Properties window.
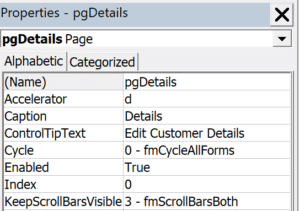
Here you have more options including naming the page. This is important as we can refer to the page in VBA code by using this name. Name it something meaningful like pgDetails for easy reference.
You can also see the Index property for the page here. The first page has an Index of 0. This will be useful shortly when referring to the page.
Selecting a Page Tab of the Multipage Control
You will need to know some VBA to work with the MultiPage control, and something you will probably need is to be able to select a page tab during runtime.
In the video of this blog post, we have a scenario where if the user has a cell selected in the customer list, we want the userform to go to the Details page tab, whilst if the cell is blank go to the Tasks page tab.
Now here is something unexpected.
To select a page tab, you use its Value property.
So to select the first page tab of the control you would write.
MultiPage1.Value = 0
Remember that MultiPage1 is the name of our MultiPage control, and you can change this property.
And to select the second page tab of the control you would write.
MultiPage1.Value = 1
It is an unusual use of the Value property, but it is what you do with the Excel VBA MultiPage control.
This can be added to the Initialize event of the form so that the page is selected as the form opens.
Changing MultiPage Control Properties in VBA
We have looked at changing the properties of the page tabs and MultiPage control itself manually. But how can this be done using VBA.
For example, maybe I want the Caption of a page to change depending on the details of the currently selected customer.
We can modify the Caption property of a Page with this code.
MultiPage1.Pages(0).Caption = Cells(i, 1).Value & " - " & Cells(i, 2).Value
This example uses the Pages collection in the same way that you might be used to using the Worksheets, or Workbooks collections.
0 is the Index value of the first page tab.
You can also bypass the Pages collection and refer to the Page using its name. This is shown below (remember the first page was named pgDetails).
MultiPage1.pgDetails.Caption = Cells(i, 1).Value & " - " & Cells(i, 2).Value
The rest of this code is pulling data from the worksheets and assigning it to a Caption.
You can see in the image below the caption Details is replaced with 1110 – Elizabeth Lincoln (the currently selected customer).
The Excel VBA MultiPage Control can be very useful when designing a userform with many controls. You can group them meaningfully so user find your forms easy to use.