
You can customize the appearance of a list by defining your own numbered, bulleted, and multilevel lists. Once you customize them, you can save those settings as a style and use it again and again.
What would you like to do?
-
Define a new bullet format
-
Define a new number format
-
Define a new multilevel list
-
Define a new list style
-
Turn off automatic numbering for lists
-
Related information
Define a new bullet
Do any of the following:
Change the bullet to a symbol
-
Select the text or bulleted list you want to change.
-
On the Home tab, in the Paragraph group, click the arrow next to Bulleted List
 , and then click Define New Bullet.
 -
Click Symbol and then click the symbol you want to use.
-
Click OK.
 , and then click Define New Bullet.
Change a bullet to a picture
-
Select the text or bulleted list you want to change.
-
On the Home tab, in the Paragraph group, click the arrow next to Bulleted List
, and then click Define New Bullet. -
Click Picture and then browse for your picture from a file or Bing Image Search.
-
Click Insert.
-
Review what the picture bullets will look like and click OK to add it or change the picture by repeating steps 3-5.
Change the bullet font
-
Select the text or bulleted list you want to change.
-
On the Home tab, in the Paragraph group, click the arrow next to Bulleted List
, and then click Define New Bullet. -
Click Font and then change the font properties to be used for the bullet. You can choose settings on the Font tab or Advanced tab:
|
Tab |
Description |
|---|---|
|
Font tab |
Change the bullet font, style, size, color, underline style, underline color, and effects. |
|
Advanced tab |
Change the bullet font character spacing and OpenType features. |
Change the bullet alignment
-
Select the text or bulleted list you want to change.
-
On the Home tab, in the Paragraph group, click the arrow next to Bulleted List
, and then click Define New Bullet. -
Under alignment, choose Left, Centered, or Right.
-
Click OK.
Define a new number format
-
Select the text or numbered list you want to change.
-
On the Home tab, in the Paragraph group, click the arrow next to Numbered List
, and then click Define New Number Format. -
To change the style, click the down arrow next to Number style and choose numbers, letters, or another chronological format.
-
To change the font size, style, and color, click Font and choose a setting on the Font tab or Advanced tab:.
Tab
Description
Font tab
Change the bullet font, style, size, color, underline style, underline color, and effects.
Advanced tab
Change the bullet font character spacing and OpenType features.
-
To append the numbering with a dash, parentheses, or another value, enter it in the Number format field.
-
To change the number alignment, choose Left, Centered, or Right under Alignment.
-
Click OK.
 , and then click Define New Number Format.
Define a new multilevel list
-
Select the text or numbered list you want to change.
-
On the Home tab, in the Paragraph group, click the arrow next to Multilevel List
, and then click Define New Multilevel List. -
Expand the Multilevel list dialog box by clicking More in the lower left corner.
-
Choose the list level to modify by selecting it in the list. 1 is selected by default.
-
Choose where you would like to apply your changes by clicking Whole list, This point forward, or Current paragraph.
-
To use an existing style in Word for each level in the list, choose a style under Link level to style.
-
Choose the number to show in the gallery. Level 1 is shown by default.
-
Give the multilevel list a name in the ListNum field list name. This name will appear wherever you see the Listnum field.
-
To append the numbered list with a dash, parentheses, or another value, enter it in the Number format field.
-
To change the font size, style, and color, click Font and choose a setting on the Font tab or Advanced tab:.
Tab
Description
Font tab
Change the bullet font, style, size, color, underline style, underline color, and effects.
Advanced tab
Change the bullet font character spacing and OpenType features.
-
To change the style, click the down arrow next to Number style and choose numbers, letters, or another chronological format. Specify a level number to include this from.
-
Choose the number to start the list at. The default value is 1. To restart numbering after a specific level, select the Restart List After check box and choose a level in the list.
-
Select Legal Style Numbering to enforce a legal style on the multilevel list.
-
To change the number alignment, choose Left, Centered, or Right under Alignment
-
Specify a value for where to start the alignment and a value for the text indent.
-
To apply these values to the entire list, choose Set for All Levels.
-
Enter a value for what should follow each number, Tab character, Space, or Nothing. Check Add tab stop at and enter a value.
-
Click OK.
 , and then click Define New Multilevel List.
Define a new list style
-
Select the text or numbered list you want to change.
-
On the Home tab, in the Paragraph group, click the arrow next to Multilevel List
, and then click Define New List Style. -
Specify a name for your new list style.
-
Choose the number to start the list at. The default value is 1.
-
Choose a level in the list to apply your formatting.
-
Specify the font face, size, and color for the list style.
-
Change the down arrow to change the style of the numbered list or bulleted list.
-
Choose a symbol for the list.
-
Choose an image for the list.
-
Choose to move the indent to the left or the right.
-
Choose to apply these changes to Only in this document or New documents based on this template.
-
To change more formatting settings, click Format and choose Font, Numbering, Text effects, and so forth.
-
Click OK.
Turn off automatic numbering for lists
-
Use one of the following methods, as appropriate for the version of Word you’re using:
Word 2016, Word 2013, or Word 2010
-
Select File, and then from the left pane, select Options.
Word 2007
-
Click the Microsoft Office button, and then select Word Options.
-
-
In the Word Options dialog, in the left pane, select Proofing.
-
In the right pane, under AutoCorrect options, select AutoCorrect Options.
-
Select the AutoFormat As You Type tab.
-
Under Apply as you type, clear the Automatic numbered lists check box, and then select OK.

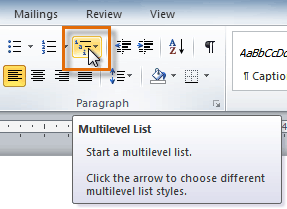
Microsoft Word lets you easily create and format multilevel lists in your documents. You can choose from a variety of formatting options, including bulleted, numbered, or alphabetized lists. Let’s take a look.
Creating a multilevel list in Word is dead simple. Start by typing out one or more lines of your list, with each item of your list on a different line. Then, select those lines.

On the “Home” tab of the Ribbon, click the “Multilevel Lists” button, and then click one of the built-in lists types shown on the dropdown menu.
Your list will now be formatted in the style you chose.
And yes, right now, it’s a single-level list. The truth is that technically, single- and multi-level lists are not much different in Word. It’s not until you start promoting and demoting list items that it turns into a multilevel list.
Demoting and Promoting Lines On Your Multilevel List
Demoting a line in your list indents the line and bumps it to a lower list level. Promoting a line does just the opposite.
Demote or Promote a List Item By Pressing Tab or Shift-Tab
Start by placing your cursor at the beginning of the line you want to demote or promote.
To demote that line to a lower list level, just hit your Tab key.
You can also demote a line more than once by just pressing Tab however many times you need. Here, we’ve demoted the third line in our list twice.
Repeat these steps if you would like to add four, five, or even more levels to your multilevel list.
You can also promote a line (move it back a level) by placing your cursor at the beginning of the line…
And then hitting Shift+Tab.
You can also demote or promote multiple lines at a time by selecting them…
and then hitting the Tab or Shift+Tab keys.
Pick a Specific List Level for a Line
While just using the Tab and Shift+Tab key combos is probably the easiest way to promote or demote lines on your list, Word does have a menu option for choosing a specific level.
Place your cursor anywhere in the line you want to change (or select multiple lines if you want to change more than one).
Click the “Multilevel List” button on the Home tab of the Ribbon, point to the “Change List Level” option on the dropdown, and then select the level you want.
And the line (or lines) you selected get changed to that level.
How to Quickly Change the Type of Your Multilevel List
Sometimes, you may decide that you want to change the basic type of multilevel list you’re using. Perhaps you originally went with numbers, but now want to use bullet points. Or maybe you just want a different numbering scheme. Whatever the case, you can easily make that change.
Place your cursor anywhere on any line of your list. It really doesn’t matter where, because this is going to change the whole list.
Open that “Multilevel Lists” dropdown menu again, and this time, just click any of the other default list types on the menu.
Your whole list changes to that new type.
How to Customize Your Multilevel List
So, what if you want to change something about your list like the way just one line level is numbered or how the levels are aligned. Well, you can do that, too. Multilevel lists in Word are pretty customizable, letting you make changes to just about every aspect.
Start by placing your cursor anywhere on any line of your list. Open the “Multilevel List” dropdown, and then choose the “Define New Multilevel List” command.
The Define New Multilevel List window pops up, showing you a number of basic options for customizing how the lines in your list appear. However, there’s more here than meets the eye, so go ahead and click that “More” button down in the bottom left corner.
Now, your window should look like this, with a bunch of extra options off to the right.
So, here’s the rundown. First, select the level of the list that you want to modify. You can click either in the simple numbered list to the left, or on a line in the center window that shows how the list actually looks.
Below that, you’ll find a bunch of options for changing the number format and positioning for the selected level appears.
Here’s what you can do there (and note that this list includes the extra stuff revealed by that “More” button):
- Enter formatting for number: You can type the text for the line number as you want it to appear in this box. Click the “Font” button to its right to change the font used for the level.
- Number style for this level: Use this dropdown to change the style of the selected number level. You can change it to pretty much any number or bullet style you want. You can even mix bullet points into a numbered list this way (or vice versa).
- Include level number from: Use this dropdown to include the number from a previous level. This lets you create line numbers like 1.1; 1.1.1; and so on.
- Start at: Choose the number or letter where you want to start the numbering.
- Restart list after: Have the list restart after it reaches a certain number or letter.
- Position: Use the controls in the “Position” section to change how the selected number level is aligned and indented. You can also click the “Set For All Levels” button to control alignment and indents for your whole list. You can also choose whether the line number is followed by a tab character (the default), a space, or no character at all.
And at the top right of the window, you’ll find a few extra options, including:
- Apply changes to: Choose whether you want to apply changes to the whole list, from the point where your cursor is placed in the list, or only levels you’ve selected.
- Link level to style: You can use this dropdown to link your selected level to a style, whether a built-in Word style or one you’ve created. This can be particularly handy for linking levels to heading styles.
- Level to show in gallery: This dropdown lets you choose the level of the list that’s shown in the gallery on Word’s Home tab. Honestly, its not a very useful option, and it’s usually best to leave it set to its default—Level 1.
- ListNum field list name: Use this field to associate the level with a name that you can then use along with Word’s LISTNUM function. This is useful if you’re creating functions to generate lists.
After making changes to a particular level, you’ll need to repeat the process for each additional level of the list you want to modify. So, select a level, make your changes, select the next level, make those changes, and so on.
When you have finished changing all the levels you want, click the “OK” button, and your multilevel list will now show your changes.
How to Turn Your Multilevel List into a New Style
After customizing you multilevel list just the way you want it, you may find yourself wanting to use that same formatting for other lists—even lists in other documents. You can do this by turning the list into a style.
Place your cursor anywhere on any line of your list, open the “Multilevel List” dropdown menu again, and this time, choose the “Define New List Style” option.
In the Define New List Style window, start by giving your new style a name.
Now, there are a number of formatting options available in this window. You can change the font, character formatting, type (number or bullet), and several other things that you were also able to change when customizing your list.
While these options can be useful if you want to create a quick new multilist style from scratch (i.e., when you have not already created and customized a list you want to turn into a style), we highly recommend that you don’t bother with them. Instead, it’s much more effective to create your list, customize using the more powerful tools we talked about in the previous section, and then creating your style. The new style will include all those customizations you’ve already made to the list.
One option you will want to pay attention to is whether you want the style to be available only in the current document, or in new documents based on the template attached to the document. You’ll want to choose the latter if you need to access the style when you create other documents.
Choose what you want, and then click “OK” to save your new style.
Now, you’ll be able to choose that style (or any other list styles you’ve created) from the “Multilevel List” dropdown menu any time you want to create another multilevel list.
And now you know more than you ever wanted to know about creating multilevel lists in Word.
READ NEXT
- › How to Edit, Restart, or Continue a Numbered List in Google Docs
- › How to Alphabetize Lists and Tables in Microsoft Word
- › How to Make a PowerPoint Presentation From an Outline
- › BLUETTI Slashed Hundreds off Its Best Power Stations for Easter Sale
- › This New Google TV Streaming Device Costs Just $20
- › The New NVIDIA GeForce RTX 4070 Is Like an RTX 3080 for $599
- › HoloLens Now Has Windows 11 and Incredible 3D Ink Features
- › How to Adjust and Change Discord Fonts
To create a multilevel list:
- Select the text you want to format as a multilevel list.
- Click the Multilevel List command on the Home tab. The Multilevel List command.
- Click the bullet or numbering style you want to use.
- Position your cursor at the end of a list item, then press the Enter key to add an item to the list.
Contents
- 1 How do I get 1.1 Numbering in Word?
- 2 How do I use a multilevel list in Word table?
- 3 How do I number 2.1 2.2 in Word?
- 4 How do I fix multi level numbering in Word?
- 5 How do I create a multilevel list in Word 2016?
- 6 How do I create a multilevel list in Word 2010?
- 7 What is a multi level list?
- 8 How do I add chapters in Word?
- 9 What is multilevel numbering?
- 10 Why is my multilevel list in Word Not working?
- 11 How do you fix numbered lists in Word?
- 12 What is the shortcut key for multilevel list in Word?
- 13 How many levels can you specify for a multilevel list?
- 14 How do you use multilevel list in Word for Mac?
- 15 How do I split text into two columns in Word?
- 16 Can multilevel list be created in HTML5?
- 17 How do you split a Word document into sections?
- 18 How do I add chapter numbers to a table of contents in Word?
- 19 How do I link a list of numbers in Word?
- 20 How do you change the number level in Word?
How do I get 1.1 Numbering in Word?
Practice: Customize Outline Numbering
- Create a new document.
- From the Format menu, choose Bullets and Numbering.
- Select the Outline Numbered tab.
- Select the second option on the top row. The default is 1, 1.1, 1.1.
- Click Customize.
- In the Number format field, type Article before the number that appears in the box.
How do I use a multilevel list in Word table?
Place your cursor anywhere in the line you want to change (or select multiple lines if you want to change more than one). Click the “Multilevel List” button on the Home tab of the Ribbon, point to the “Change List Level” option on the dropdown, and then select the level you want.
How do I number 2.1 2.2 in Word?
If you just need the chapter number included in captions, on the On the Home Ribbon, in the Paragraph Group, click the Multilevel List icon and select the one with the words Chapter 1 in it from the List Library section. If you need subsections numbered (for example, 2.1, 2.2, 2.12, etc.)
How do I fix multi level numbering in Word?
How to fix Multilevel list in Word
- Select the first heading level and then from the Word Main menu, under the tab Home, within the group Paragraph, click the Multilevel List icon.
- From the drop-down list, click option Define New Multilevel List.
How do I create a multilevel list in Word 2016?
On the Home tab, click the Multilevel List button and choose what kind of list you want. If none of the lists suit you, you can choose Define New Multilevel List and create a new kind of list in the Define New Multilevel List dialog box. Enter the items for the list, pressing Enter as you complete each one.
How do I create a multilevel list in Word 2010?
To create a multilevel list:
- Select the text you want to format as a multilevel list.
- Click the Multilevel List command on the Home tab. The Multilevel List command.
- Click the bullet or numbering style you want to use.
- Position your cursor at the end of a list item, then press the Enter key to add an item to the list.
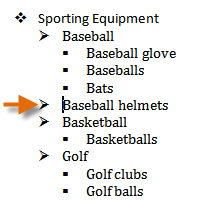
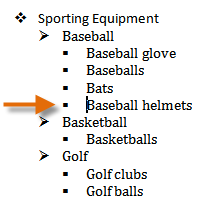
What is a multi level list?
Word’s multilevel list feature takes bullets and numbering to the next step. It makes creating sublists or subpoints in a list easy. An example of a multilevel list is an outline where the first level uses a Roman numeral and the next level uses a capital letter.
How do I add chapters in Word?
New chapter
- Click where you want to insert the new chapter heading and insert a page break (see Section and Page Breaks).
- In the Styles Pane, click Heading 1 style. The word “Chapter” and the chapter number will appear.
- Click after the chapter number and enter the text for the chapter heading.
What is multilevel numbering?
A multilevel list is a list with more than one level. For example, the picture is an example of a multilevel bullet list and a multilevel numbered list.In Microsoft Word, while creating a bullet or number list, you can create a new level by pressing the Tab .
Why is my multilevel list in Word Not working?
Click on the office button->word options->proofing->auto correct options->auto format as you type and select the check box “set left and first indents with tabs and back spaces” under automatically as you type section at the bottom.
How do you fix numbered lists in Word?
Change the numbering in a numbered list
- Double-click the numbers in the list. The text won’t appear selected.
- Right-click the number you want to change.
- Click Set Numbering Value.
- In the Set value to: box, use the arrows to change the value to the number you want.
What is the shortcut key for multilevel list in Word?
When you say that you want a multilevel list, what exactly are you looking for? For me, I start a list as you mentioned, with ctrl + shift + l . I then begin to type, and what is typed becomes the top-level bullet point. I can then hit return , and I am then typing on another top-level bullet point.
How many levels can you specify for a multilevel list?
Multilevel lists allow you to define up to nine numbering levels. You can mix numerals and letters, uppercase and lowercase letters, and a variety of styles to create the type of list that best fits the needs of your document.
How do you use multilevel list in Word for Mac?
Create a multilevel list
- On the Home tab, under Paragraph, click Multilevel List .
- Type the list, pressing RETURN after each item.
- To move an outline numbered item to the appropriate numbering level, do one of the following: To. Click anywhere in the item, and then do this. Demote the item to a lower numbering level.
How do I split text into two columns in Word?
How to Split Text to Columns
- Open the document.
- Select the Page Layout tab.
- In Page Setup group click the Columns command.
- It displays a list of options to split text into columns.
- Select the desired option.
Can multilevel list be created in HTML5?
A multilevel list can be created in HTML5.
How do you split a Word document into sections?
Divide a Document into Sections
- Place the insertion point where you want the section break.
- Choose the Page Layout tab.
- Click the down-arrow next to the Breaks button. A menu appears.
- Click the type of section break you want. Word inserts the section break.
How do I add chapter numbers to a table of contents in Word?
Add chapter numbers to captions in Word
- Select the first chapter heading in your document.
- On the Home tab, in the Paragraph group, click the arrow next to Multilevel List.
- Click a chapter-numbering list definition (one that includes the text Heading 1 or Chapter 1).
How do I link a list of numbers in Word?
In Microsoft Word, you can connect a subsequent numbered list to a previous numbered list by selecting and right-clicking the second list and, from the resulting pop-up menu, selecting the Continue Numbering option, as suggested in the image below.
How do you change the number level in Word?
Here is the correct process:
- Select the text that you want to number (this can be a section of text or the whole document).
- Select the Home tab. Click the multilevel numbering icon in the Paragraph group.
- Choose Define New Multilevel List to display the control dialog.
- In the top left is a list of levels.
Lesson 10: Working with Lists
/en/word2010/line-and-paragraph-spacing/content/
Introduction
Bulleted and numbered lists can be used in your documents to format, arrange, and emphasize text. In this lesson, you will learn how to modify existing bullets, insert new bulleted and numbered lists, select symbols as bullets, and format multilevel lists.
Using bulleted and numbered lists
When you want to organize lists in Word, you can format them as either bulleted or numbered lists. Word offers a variety of bullet options that allow you to customize your lists to suit your needs.
Optional: You can download this example for extra practice.
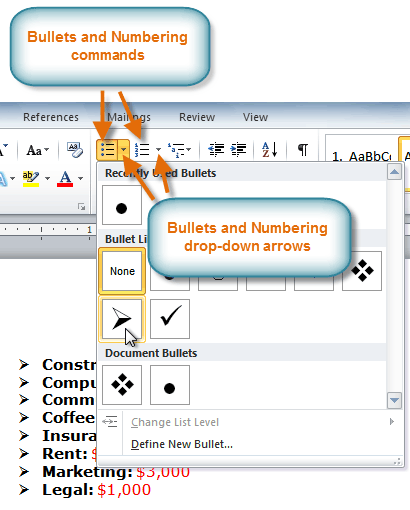
To create a list:
- Select the text you want to format as a list.
- Click the Bullets or Numbering drop-down arrow on the Home tab.
The Bullets and Numbering commands and drop-down arrows
- Select the bullet or numbering style you want to use, and it will appear in the document.
- To remove numbers or bullets from a list, select the list, then click the Bullets or Numbering commands.
When you’re editing a list, you can press Enter to start a new line, and the new line will automatically have a bullet or number. When you’ve reached the end of your list, press Enter twice to return to normal formatting.
Bullet options
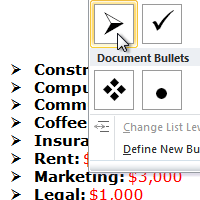
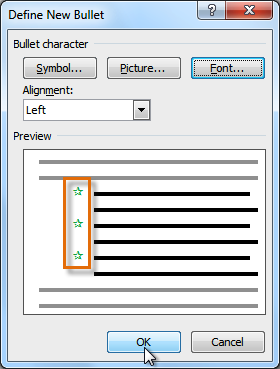
To use a symbol as a bullet:
- Select an existing list.
- Click the Bullets drop-down arrow.
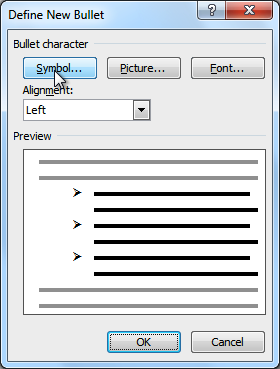
- Select Define New Bullet from the drop-down menu. The Define New Bullet dialog box appears.
The Define New Bullet dialog box
- Click the Symbol button. The Symbol dialog box appears.
- Click the Font drop-down box, and select a font. The Wingdings and Symbol fonts are good choices because they have a large number of useful symbols.
Choosing a symbol
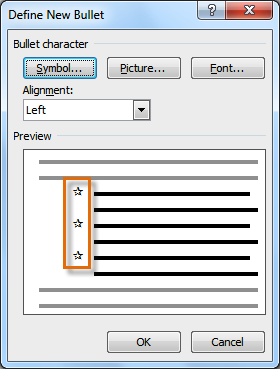
- Select the desired symbol.
- Click OK. The symbol will now appear in the Preview section of the Define New Bullet dialog box.
Preview of the new bullets
- Click OK to apply the symbol to the list in the document.

You can use a picture as a bullet. Click the Picture button in the Define New Bullet dialog box, then locate the image file on your computer.
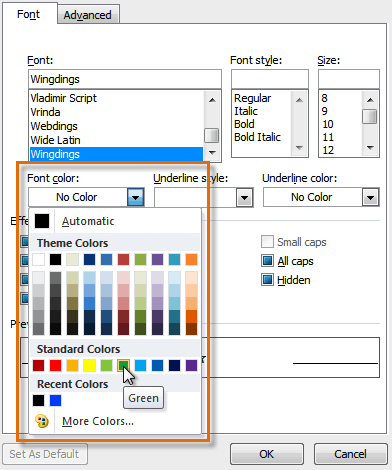
To change the bullet color:
- Select an existing list.
- Click the Bullets drop-down arrow.
- Select Define New Bullet from the list. The Define New Bullet dialog box appears.
- Click the Font button. The Font dialog box appears.
- Click the Font Color drop-down box.
Choosing a bullet color
- Click the desired color to select it.
- Click OK. The bullet color will now appear in the Preview section of the Define New Bullet dialog box.
Preview of the new bullet color
- Click OK to apply the bullet color to the list in the document.
The finished bullets
Multilevel lists
Multilevel lists allow you to create an outline with multiple levels. In fact, you can turn any bulleted or numbered list into a multilevel list by placing the insertion point at the beginning of a line and pressing the Tab key to change the level for that line. You can then use the Multilevel List command to choose the types of bullets or numbering that are used.
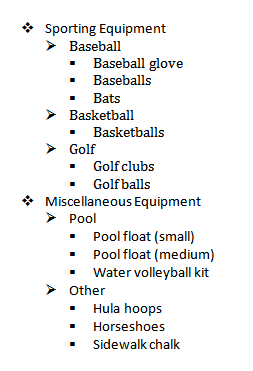 A multilevel list
To create a multilevel list:
- Select the text you want to format as a multilevel list.
- Click the Multilevel List command on the Home tab.
The Multilevel List command
- Click the bullet or numbering style you want to use. It will appear in the document.
- Position your cursor at the end of a list item, then press the Enter key to add an item to the list.
To remove numbers or bullets from a list, select the list, then click the Bullets or Numbering commands.
To change the level of a line:
- Place the insertion point at the beginning of the line.
Placing the insertion point at the beginning of a line
- Press the Tab key to increase the level.
Pressing the Tab key to increase the level of a line
- Hold Shift and press Tab to decrease the level.
Challenge!
- Open an existing Word document. If you want, you can use this example.
- Format some text as a bulleted or numbered list. If you’re using the example, use the list of New Clients on page 2.
- Insert a new numbered list into the document.
- Modify the color of a bullet.
- Use the Tab key to change the levels of some of the lines.
/en/word2010/adding-breaks/content/
Multilevel numbering in Word is the #1 headache for many people working with large documents.
Believe it or not, it’s not complicated. It just takes somebody to lead the way and point out the pitfalls you need to avoid.
Today that pleasure falls to me!
Before I start, grab your free multilevel numbering troubleshooting guide that shows you the steps to get multilevel numbering working properly first time, every time, together with answers to over 20 FAQs and plenty of real client examples constructed step by step to help you fix what isn’t working with your numbering.

1. What Multi-level Numbering Looks Like
Often used in the legal profession or in large corporate documents, multilevel numbering creates a logical hierarchy and easy navigation within the document. The headings can also be summarised later on in a table of contents. Here is a simple example:

2. How to Set Up Multilevel Numbering
Here is the correct process:
1. Select the text that you want to number (this can be a section of text or the whole document).

2. Select the Home tab.
3. Click the multilevel numbering icon in the Paragraph group.
![]()
4. You can either select an existing layout from the list to use as a starting point, or you can create a new numbering system from scratch. As you hover over each thumbnail image, Word provides a larger image of the numbering system.
5. Choose Define New Multilevel List to display the control dialog.

The dialog box can be broken down as follows:
Step #1 Click level to modify
In the top left is a list of levels. As you select each level, the settings in the rest of the dialog box changes.
Level 1 is the highest level, i.e. the main headings such as chapter or section titles.
Level 2 is subordinate to level 1.
Level 3 is subordinate to level 2.

Step #2 Enter formatting for number
This is where the level number is constructed. If you include a previous level number, it will be displayed with a grey background, as will the number for the current level.
Type anything you wish to put in between the numbers such as dots, dashes, brackets etc.
Clear any text in the ‘Enter formatting for this number’ box.
Step #3 Include level number from
When creating a subordinate level (or child level), you can first specify the level number of the parent.
For example, for section 3.2
- ‘3’ is the parent level (level 1) and
- ‘2’ is the child level (level 2)

Step #4 Number style for this level
Each level can have its own number style. It may be a standalone style, e.g. 1, 2, 3 or a, b, c or continue on from a higher level, e.g. 1.1.1 or 1.a.i.
- When creating 1.1 numbering, this option is 1, 2, 3.
- When creating 1.a numbering, this option is a, b, c

Step #5 Font
Set the font formatting for the selected level, if you want.

Step #6 Position
What position from the left margin do you want items for each level of numbering. For example, level 1 items may be 0cm from the left margin, level 2, 1cm from the left margin and level 3, 2cm from the left margin.
Here’s what they mean:
- The Aligned At determines how far from the left margin the number appears.
- The Text indent at figure determines how far from the left margin the text following the number is.

6. Click OK to save all the settings and close the dialog box.
The text you selected in step 1 now looks like this.

The next part is where the magic happens …
3. How to Apply Multilevel Numbering
Once you have created your numbering system:
1. Position the cursor at the beginning of a line.

2. Press the TAB key to move the text down a level (demote).

3. Press the SHIFT and TAB keys together to move the text up a level (promote).

If you prefer, you can also click the indent icon to demote and the outdent icon to promote between levels.
![]()
4. How to Change Multilevel Settings
Once you have created your numbering system:
1. Reselect all text that is using the multilevel numbering.
2. Click the multilevel numbering icon and select Define New Multilevel List (yes, you choose this option even if you are modifying an existing multilevel list).

The original settings that you defined are redisplayed.
3. In the top-left box select the level that you wish to change, then change your settings.
4. Repeat for the other settings.
5. Click OK to save the settings. Your numbered list should now reflect your new settings.
5. Linking Multilevel Numbering to Styles
Each level of a multilevel numbering system can be linked to a style. This means that as you apply styles throughout the document, the numbering is applied appropriately and automatically. You can either use the built-in Heading 1, Heading 2, Heading 3 styles or use your own custom styles.
1. In the Numbering dialog box, click the MORE button in the bottom-left corner to expand the dialog box.
2. Select level to modify in the top-left box.
3. Open the Link level to style drop-down list and choose the style you wish to connect to the numbering level.

4. Click OK.
5. In the document, apply the Heading 1, Heading 2, Heading 3 styles where needed.
It’s a good idea to create a body text style and apply that where appropriate, so that the body text does not inadvertently get caught up in the multi-level numbering.
6. Select the whole document (or the portion of the document where you want to apply your numbered sections).
7. Click the icon in the Paragraph group (Home tab).
8. Select your custom numbering style from the gallery. The thumbnail image should show the linked styles.

6. How to Use Styles to Set Number Levels
1. Select all the text that you wish to apply the same number level to. Alternatively, if you wish to go line by line, you can place the cursor anywhere in a line of text.
2. In the Styles gallery, click the style that corresponds to the number level you wish to apply. For example, to apply the top level numbering click Heading 1 and for the third level numbering click Heading 3 (assuming those are the styles you assigned).
The numbering and all the numbering settings will be applied to the selected text or the paragraph in which the cursor was positioned.

And that, my friend, is how you do multilevel numbering in Word with no loose ends.
How to set up a dual-multilevel numbering system in Word
7. Two resources to help you
1. Grab your free multilevel numbering troubleshooting guide.

2. Watch over my shoulder as I set up multilevel numbering from scratch.

8. What next?
I hope you found plenty of value in this post. I’d love to hear your biggest takeaway in the comments below together with any questions you may have.
Have a fantastic day.


About the author
Jason Morrell
Jason loves to simplify the hard stuff, cut the fluff and share what actually works. Things that make a difference. Things that slash hours from your daily work tasks. He runs a software training business in Queensland, Australia, lives on the Gold Coast with his wife and 4 kids and often talks about himself in the third person!
SHARE