- Start
- Newsblog
- Android / iOS / Microsoft Windows
- Data Protection / ecommerce / finance
- Microsoft Excel – Office 365
- Microsoft Office / Office 365
- Microsoft Outlook – Office 365
- Microsoft Word – Office 365
- WordPress, Google, SEO & Affiliate
- Downloads
- Word & Excel Templates
- CV-Templates
- Contact
- Imprint
- Donate
How to create serial letter in Microsoft Word
The function to create form letters Word actually has from the beginning, and of course always offers when the content of a message is always the same, and only the recipient changes.
But as long as there is this function, as long as there are always uncertainties about how fields must be inserted, and how the data source for the e-mail addresses and the salutation because now works exactly.

Topic Overview
Topic Overview
In our article we describe step by step how to create form letters with Microsoft Word – Office 365 and what to look for.
Content:
- Prepare/Choose the address list
- Insert the merge fields in the recipient field
- Set rules for salutation
- Print a form letter for the mailing
- Send a form letter by e-mail
How to create serial letter in Microsoft Word
The function to create form letters Word actually has from the beginning, and of course always offers when the content of a message is always the same, and only the recipient changes.
But as long as there is this function, as long as there are always uncertainties about how fields must be inserted, and how the data source for the e-mail addresses and the salutation because now works exactly.

Topic Overview
Topic Overview
In our article we describe step by step how to create form letters with Microsoft Word – Office 365 and what to look for.
Content:
- Prepare/Choose the address list
- Insert the merge fields in the recipient field
- Set rules for salutation
- Print a form letter for the mailing
- Send a form letter by e-mail
1. Prepare/Choose the address list
1. Prepare/Choose the address list
In order for Word to be able to create form letters, it needs a data source / address list that can be accessed.
In this all necessary information like:
- salutation
- Name first Name
- House no.
- Postcode / town
be saved.
Basically, you can use almost any database where the contacts are reasonably organized. This can be an Excel list, or an Access database, or even your Outlook contact list. If you have not prepared yet, you can set it up under Word, and then save it later as an Access file.
See picture: (click to enlarge)

Important:
The main thing about the database is that it has a clean structure. What does that mean in columns and lines already mentioned above? Information is organized.
For our example, we just take an Excel list with fictitious names and addresses to illustrate. Here you can see how the whole thing should be organized.
Of course, they are not just set to the columns shown here, but you can add as many others as you like. These will be available later in the selection of merge fields.
See picture: (click to enlarge)

If you also want to work with such an Excel list later, it is best to save it under a correspondingly clear name on your computer if you later need it again.
It certainly can not hurt to keep your contacts in a well-organized location.
In order for Word to be able to create form letters, it needs a data source / address list that can be accessed.
In this all necessary information like:
- salutation
- Name first Name
- House no.
- Postcode / town
be saved.
Basically, you can use almost any database where the contacts are reasonably organized. This can be an Excel list, or an Access database, or even your Outlook contact list. If you have not prepared yet, you can set it up under Word, and then save it later as an Access file.
See picture:

Important:
The main thing about the database is that it has a clean structure. What does that mean in columns and lines already mentioned above? Information is organized.
For our example, we just take an Excel list with fictitious names and addresses to illustrate. Here you can see how the whole thing should be organized.
Of course, they are not just set to the columns shown here, but you can add as many others as you like. These will be available later in the selection of merge fields.
See picture:

If you also want to work with such an Excel list later, it is best to save it under a correspondingly clear name on your computer if you later need it again.
It certainly can not hurt to keep your contacts in a well-organized location.
2. Insert the merge fields in the recipient field
2. Insert the merge fields in the recipient field
Now that we have completed a data source, we can already start creating our form letter.
So that the address field sits where it is supposed to sit, and later (for the mailing) fits into an envelope with a viewing window, we set the margins in the layout as follows:
- Above: 4.5 cm
- Left: 2.5 cm
- Right: 2.5 cm
- Below: 2.0 cm
- Gutter: 0.0 cm
- Gutter position: left
- Orientation: Portrait
Note:
On the topic “Letter templates” we also have a separate article that you can view here >>>
First, we’ll set the previously created data source.
To do this we go to the “Shipments” tab and select “Recipient” and then “Use Existing List” again. In the following dialog window, simply select your created list, and then confirm in the second window that our columns have headers.
See picture: (click to enlarge)

As a next step, we will insert our merge fields, starting with the field “Salutation”, and then below accordingly:
- first name
- Surname
- Street, house number
- Postcode / town
For this we go again in the tab “shipments” on “merge field insert” and select there “salutation” from.
Here you can also immediately see which merge fields are available. Namely exactly which of the column headings of our data source are the same.
See picture: (click to enlarge)

When the recipient field is finished, the placeholders of our column headers will be everywhere, and Word will automatically fill them with the corresponding entries.
See picture: (click to enlarge)

Now that we have completed a data source, we can already start creating our form letter.
So that the address field sits where it is supposed to sit, and later (for the mailing) fits into an envelope with a viewing window, we set the margins in the layout as follows:
- Above: 4.5 cm
- Left: 2.5 cm
- Right: 2.5 cm
- Below: 2.0 cm
- Gutter: 0.0 cm
- Gutter position: left
- Orientation: Portrait
Note:
On the topic “Letter templates” we also have a separate article that you can view here >>>
First, we’ll set the previously created data source.
To do this we go to the “Shipments” tab and select “Recipient” and then “Use Existing List” again. In the following dialog window, simply select your created list, and then confirm in the second window that our columns have headers.
See picture:

As a next step, we will insert our merge fields, starting with the field “Salutation”, and then below accordingly:
- first name
- Surname
- Street, house number
- Postcode / town
For this we go again in the tab “shipments” on “merge field insert” and select there “salutation” from.
Here you can also immediately see which merge fields are available. Namely exactly which of the column headings of our data source are the same.
See picture:

When the recipient field is finished, the placeholders of our column headers will be everywhere, and Word will automatically fill them with the corresponding entries.
See picture:


3. Set rules for salutation
3. Set rules for salutation
After we have inserted our letterhead with the appropriate merge fields and the subject, now comes the point where the salutation is concerned.
Now you could just type in “Dear Sir / Madam”, but that looks rather unprofessional and is also impersonal. The problem now emerging is “How should Word know who man and who is a woman” and then adjust the salutation accordingly?
The solution is that we set rules for it. We do this (similar to Excel) with a “if – then – else” rule.
To do this, we go back to the “Shipments” tab and click on “Rules” and select “If … Then … Otherwise …”.
Here we can say: IF ANREDE = Mr. / THEN = Dear Mr. / OTHERS = Dear Mrs.
Of course, you can also extend this, which is especially useful if there is no specific contact person and, for example, you address an organization or a company.
Then you could set an additional rule that says: IF ANREDE = empty / THEN = Dear Sir or Madam, or IF ANREDE = Company / THEN = Ladies and Gentlemen. And the ELSE rule just leave blank.
So here you do not just have to rely on one single rule, you can set several.
See picture: (click to enlarge)
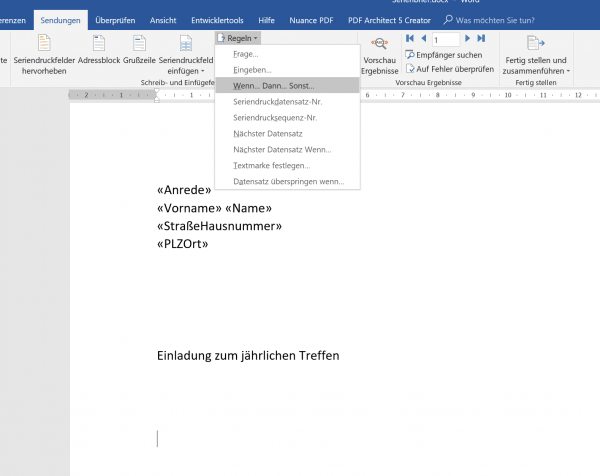

Now that the rule is set, we can position our cursor in the line where the salutation should be, and insert a greeting line.
Again, go back to the tab “Shipments” then “Greeting Line” and confirm with “OK”. You also have the possibility to check a preview of the respective salutation to see if the rule has been set correctly.
Of course, you can also use the merge fields everywhere in the flowing text to give the whole an even more personal touch. So is also gladly worked in advertising letters, which the reader is repeatedly addressed by his name.
See picture: (click to enlarge)


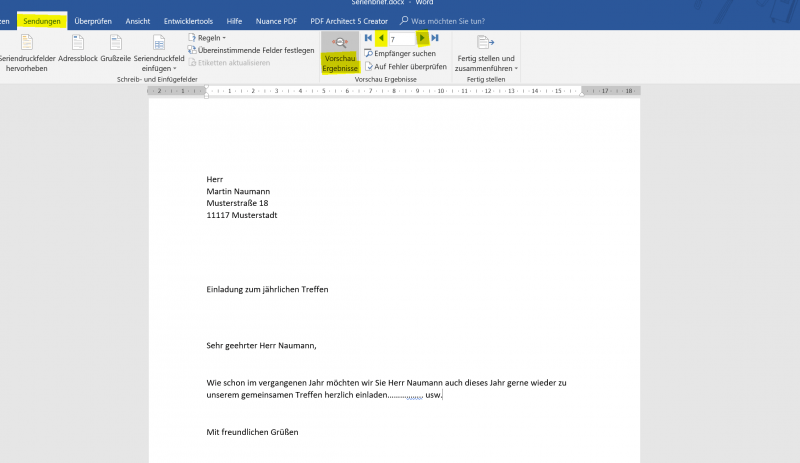
When you have finished your text, you can now get a preview before printing / shipping, to see if everything was done properly.
Of course, mistakes can have fatal consequences, especially with serial letters, and the iron can not be taken out of the fire as easily as if one made a mistake only with one recipient.
To see the preview go back to the tab “Shipments” and then to “Preview Results”.
Here you can comfortably switch through the receivers with the arrow keys.
See picture: (click to enlarge)
After we have inserted our letterhead with the appropriate merge fields and the subject, now comes the point where the salutation is concerned.
Now you could just type in “Dear Sir / Madam”, but that looks rather unprofessional and is also impersonal. The problem now emerging is “How should Word know who man and who is a woman” and then adjust the salutation accordingly?
The solution is that we set rules for it. We do this (similar to Excel) with a “if – then – else” rule.
To do this, we go back to the “Shipments” tab and click on “Rules” and select “If … Then … Otherwise …”.
Here we can say: IF ANREDE = Mr. / THEN = Dear Mr. / OTHERS = Dear Mrs.
Of course, you can also extend this, which is especially useful if there is no specific contact person and, for example, you address an organization or a company.
Then you could set an additional rule that says: IF ANREDE = empty / THEN = Dear Sir or Madam, or IF ANREDE = Company / THEN = Ladies and Gentlemen. And the ELSE rule just leave blank.
So here you do not just have to rely on one single rule, you can set several.
See picture:


Now that the rule is set, we can position our cursor in the line where the salutation should be, and insert a greeting line.
Again, go back to the tab “Shipments” then “Greeting Line” and confirm with “OK”. You also have the possibility to check a preview of the respective salutation to see if the rule has been set correctly.
Of course, you can also use the merge fields everywhere in the flowing text to give the whole an even more personal touch. So is also gladly worked in advertising letters, which the reader is repeatedly addressed by his name.
See picture:


When you have finished your text, you can now get a preview before printing / shipping, to see if everything was done properly.
Of course, mistakes can have fatal consequences, especially with serial letters, and the iron can not be taken out of the fire as easily as if one made a mistake only with one recipient.
To see the preview go back to the tab “Shipments” and then to “Preview Results”.
Here you can comfortably switch through the receivers with the arrow keys.
See picture:

4. Print a form letter for the mailing
4. Print a form letter for the mailing
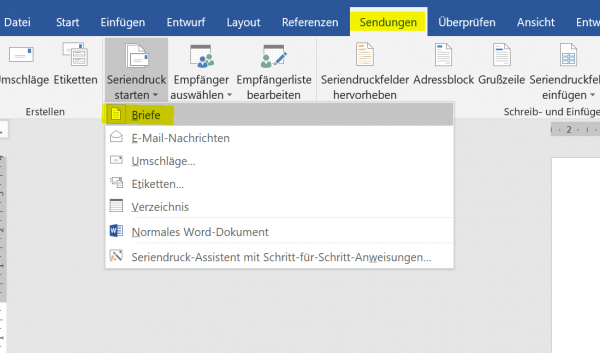
If you want to print out your form letter and send it by mail, go back to the tab “Shipments” – “Start Mail Merge” and select “Letters”.
Then continue in the column “Finish and merge” – “Print documents”
See picture: (click to enlarge)

If you want to print out your form letter and send it by mail, go back to the tab “Shipments” – “Start Mail Merge” and select “Letters”.
Then continue in the column “Finish and merge” – “Print documents”
See picture: (click to enlarge)


5. Send a form letter by e-mail
5. Send a form letter by e-mail
Of course it is most economical to send the form letter by e-mail.
However, here it is helpful to have an additional merge field inserted in our data source, in which the e-mail addresses are assigned to the respective recipients.
If you have not done this in advance, you can easily add a column to your e-mail address table later on. To have Word take over this field then do the following:
- Save serial letter
- Open data source
- Add a column with e-mail addresses
- Save and close the data source
When you reopen your form letter afterwards, the new mail merge field will be available with the email addresses.
Note:
You can not make any changes to the data source while the form letter is open. This can only be opened during read-only.
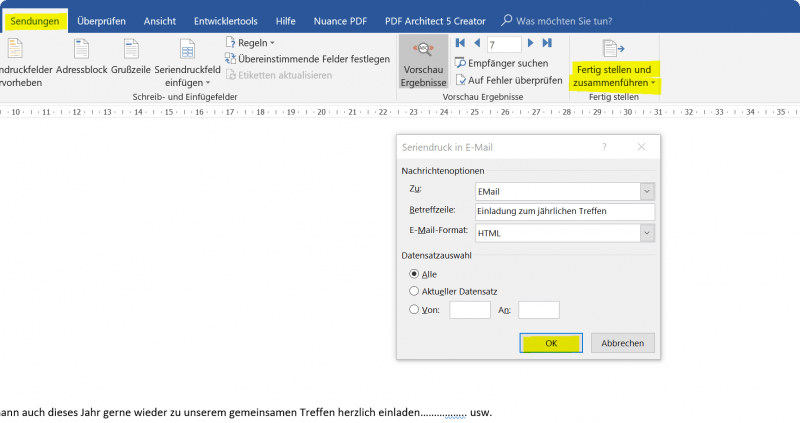
In order to start sending by e-mail, go back to “Shipments” – “E-mail messages” and then again “Finish and merge” – “Send e-mail messages”
In the next dialog box, select the mail merge field “E-Mail”, add the subject line and then have the option to send all or only select specific recipients.
See picture: (click to enlarge)
And that’s it.
As you have seen, you can use the mail merge feature to do a whole lot, not just reach multiple recipients quickly, but also give each letter a personal touch.
Of course it is most economical to send the form letter by e-mail.
However, here it is helpful to have an additional merge field inserted in our data source, in which the e-mail addresses are assigned to the respective recipients.
If you have not done this in advance, you can easily add a column to your e-mail address table later on. To have Word take over this field then do the following:
- Save serial letter
- Open data source
- Add a column with e-mail addresses
- Save and close the data source
When you reopen your form letter afterwards, the new mail merge field will be available with the email addresses.
Note:
You can not make any changes to the data source while the form letter is open. This can only be opened during read-only.
In order to start sending by e-mail, go back to “Shipments” – “E-mail messages” and then again “Finish and merge” – “Send e-mail messages”
In the next dialog box, select the mail merge field “E-Mail”, add the subject line and then have the option to send all or only select specific recipients.
See picture:

And that’s it.
As you have seen, you can use the mail merge feature to do a whole lot, not just reach multiple recipients quickly, but also give each letter a personal touch.
Popular Posts:
Enable developer tools in Office 365
Michael2023-04-12T09:11:59+02:00April 12th, 2023|Categories: Microsoft Excel, Microsoft Office, Microsoft Outlook, Microsoft PowerPoint, Microsoft Teams, Microsoft Word, Office 365, Short News, Uncategorized|Tags: form fields, MS-Office, Office 365, Short News|
Schalten Sie die Entwicklertools in Excel, Word und Outlook frei. Erweitern Sie die Möglichkeiten mit zusätzlichen Funktionen in Office 365.
Hide folders in Windows – Protect folders with password
Michael2023-04-04T07:05:14+02:00April 4th, 2023|Categories: Data Protection, Homeoffice, Microsoft Office, Microsoft Windows, Office 365, Short News, Uncategorized|Tags: Data Protection, Datenschutz, MS-Windows, password, Passwort, Short News|
Cyber security is also becoming increasingly important in the home. Encrypt files | Hiding folders | Password protection of folders in Windows.
Special Offers: Word & Excel Templates
Special Offers: Design CV Templates
Monatliche Technik Bestseller:
Related Posts
Title
Page load link
Go to Top
Notes Downloading link
Download Notes
Envelopes = Create and print envelopes.

Labels = Create and print Labels.

Start Mail Merge = Start a mail merge to create a form letter
which you intend to print ore-mail multiple times, sending each copy to a
different recipient. You can insert fields, such as Name or Address, which
Word will replace automatically with information from a database or
contact list for each copy of the form letter.
How to Use Start Mail Merge

1) Write down your letter. Leave the “NAME” , “ADDRESS” and “MOBILE NO.” in the
letter blank.
2) Click on Start Mail Merge and select Step by Step mail merge wizard

3) Click on Starting Document.

4) Click on Select Recipients

5) Click on Type a new list

6) Click on Write your letter

7) Then New address list dialog box appear on your screen. Click on Customize
columns.

8) Delete all field names & click on Add button to add some columns. Like:- name ,
address , phone no. then click ok

9) Fill all the details in New address list & click ok.

10) Save your New address list.

11) Check your Address list And Click on Ok .

12) Place the cursor in the name space & click on Insert Merge Field and insert
name , address , phone no. field.

13) Then Click on Auto Check for errors. Your all letters is created with different
names and address.
Sometimes people would like to print the same letters on multiple peoples. For example, the if factory manager would like to print the appraisal letter to all their 100 employees. Letter content is the same for the 100 employees, but each letter needs to change the Name, Address, and Greeting line. In this situation how they can print the letter with an automated system. Microsoft Mail Merge is helping to make this process easier.
Before using this feature, you have to prepare the address list in excel by the following format.
- Open the Word document enter the letter content
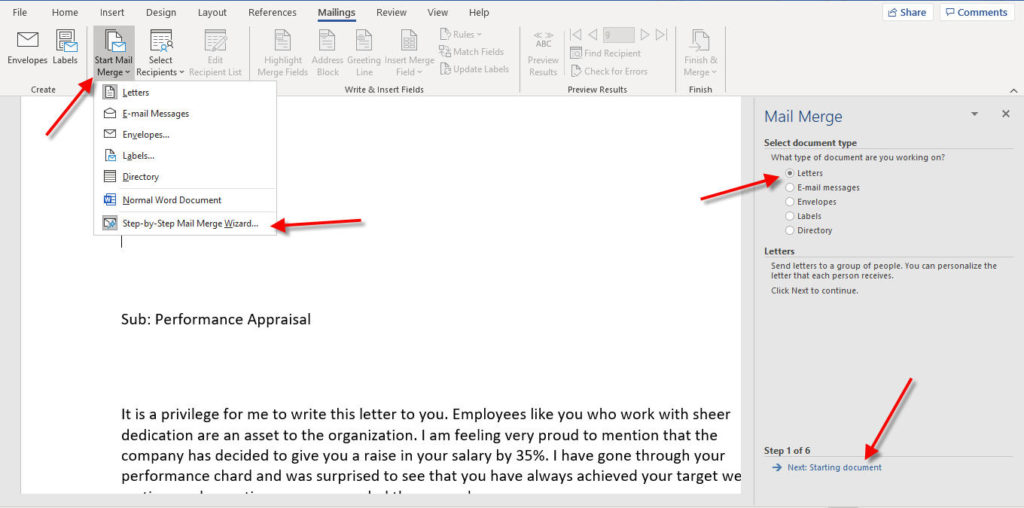
- Then Go to Mailings Tab and choose the Start Mail Merge
- After that, you need to click on the Step-by-Step Mail Merge Wizard link
- Mail Merge Section will be open on the Right Side with Step 1 of 6
- In the first step, you can choose the Letters and click on the “Next: Starting document” link
- The second step you can leave the default option as Use the current document, then go to Next step by click on the bottom link
- In the third step, you have chosen the Address Excel list that you prepared already by click on the Browse link.
- After opening the address list it will preview all Mailing recipients. You can also remove the particular person from here.
- If you not prepared have to choose the option “Type a new list”. This will be open the list window here you have to enter all of your Mailing address list
- In the Fourth step, place the cursor top of the content where you would like to place the Address
- Click on the Address block link, it will open the Insert Address block link and choose the format.
- You can also add the letter greeting line by click on the Greeting Line link and go to Next step
- In the Fifth step, Mail Merge will be showing the Preview of the letter. If you feel everything is correct then go to the next step
- In the Sixth step will show the Print option, click on the Print link
- This will be open the print window and choose your printer and make the print.
Now all the letters will be printed based on your address list. Mail Merge is really making print multiple letters at once.
Mail Merge is most often used to print or email form letters to multiple recipients. Using Mail Merge, you can easily customize form letters for individual recipients. Mail merge is also used to create envelopes or labels in bulk.
This feature works the same in all modern versions of Microsoft Word: 2010, 2013, and 2016.
- In a blank Microsoft Word document, click on the Mailings tab, and in the Start Mail Merge group, click Start Mail Merge.
- Click Step-by-Step Mail Merge Wizard.
- Select your document type. In this demo we will select Letters. Click Next: Starting document.
- Select the starting document. In this demo we will use the current (blank) document. Select Use the current document and then click Next: Select recipients.
- Note that selecting Start from existing document (which we are not doing in this demo) changes the view and gives you the option to choose your document. After you choose it, the Mail Merge Wizard reverts to Use the current document.
- Select recipients. In this demo we will create a new list, so select Type a new list and then click Create.
- Write the letter and add custom fields.
- Press Enter on your keyboard and click Greeting line… to enter a greeting.
- In the Insert Greeting Line dialog box, choose the greeting line format by clicking the drop-down arrows and selecting the options of your choice, and then click OK.
- Note that the address block and greeting line are surrounded by chevrons (« »). Write a short letter and click Next: Preview your letters.
Perform a Mail Merge in Microsoft Word to Generate Form Letters for Bulk Mailings
by Avantix Learning Team | Updated January 10, 2021
Applies to: Microsoft® Word® 2013, 2016, 2019 and 365 (Windows)
You can use mail merge in Microsoft Word to create form letters, labels, envelopes and even a catalog or directory. In this article, we’ll review the process for creating form letters for multiple contacts or clients. You’ll need to create a main document or letter in Microsoft Word and then connect to a data set of names and addresses in a Word document, Excel worksheet, delimited file or database like Microsoft Access. When you run the mail merge, you have the option of creating a new merged file (which would include a letter for each contact) or merge directly to a printer.
Recommended article: How to Create Labels in Word Using Mail Merge and Excel Source Data
Do you want to learn more about Word? Check out our virtual classroom or live classroom Word courses >
Understanding the mail merge process for form letters
There are 7 steps in the mail merge process to create form letters in Word:
- Start the merge and specify the main document for the letter.
- Select the source file containing the data set with names and addresses. Microsoft refers to a data set or database as a list. It’s best to create this file before you begin the mail merge process.
- Insert fields into the letter and any other required content (such as the body of the letter and signature).
- Format the letter.
- Select specific recipients or filter the recipient list (optional).
- Preview the merged letter (optional).
- Run the mail merge.
During the mail merge process, fields are inserted into the main document and appear in carets (such as <<FirstName>>). By default, when you click in a field, it is displayed with grey shading. When you run the merge, the fields are replaced by data from the source file.
In this article, we’ll be using the Mailings tab in the Ribbon to set up and run a mail merge (not the Mail Merge Wizard):
Step 1: Start the merge and specify the main document
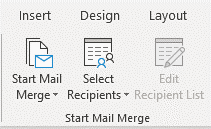
The first step in the mail merge process is to start the merge using Start Mail Merge on the Mailings tab in the Word Ribbon:
To start the merge and specify the main document as a form letter:
- Create a new blank document or open a Word document containing a sample letter.
- Click the Mailings tab in the Ribbon and then click Start Mail Merge in the Start Mail Merge group.
- From the drop-down menu, select the type of document you want to create. In this case, select Letters. By default, Word uses the current document. At this point, you may want to insert other components such as a date, the body of the letter and a signature.
Step 2: Select the source file containing the data set
The next step is to connect to a source file containing a list of names and addresses using Select Recipients. The source file can be a Microsoft Word document containing a table or delimited data, Excel worksheet or even a table or query in a database such as Microsoft Access. For Word tables and Excel spreadsheets, the first row in the table or worksheet must contain field names such as FirstName, LastName, Company, Address and so on. In a Word source file, there cannot be any paragraphs above the table or data. You can also use a comma or tab delimited file as long as the first line in the document contains field names. In delimited files, the field names and data are separated by a delimiter such as a comma or tab.
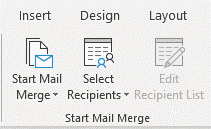
Select Recipients appears on the Mailings tab in the Ribbon:
In the following example, note that the field names are in the first row of a Word table which will be used as a source:
In the following Excel example, note that the field names are in the first row of the worksheet which will be used as a source:
To select a Microsoft Word source file containing a table with names and addresses:
- In the main Word document, click the Mailings tab in the Ribbon and then click Select Recipients in the Start Mail Merge group. A dialog box appears.
- Click Use an Existing List from the drop-down menu. A dialog box appears.
- Navigate to the Word file containing the names and addresses you want to use.
- Double-click the file.
To select a Microsoft Excel source file containing a worksheet with names and addresses:
- In the main Word document, click the Mailings tab in the Ribbon and then click Select Recipients in the Start Mail Merge group. A dialog box appears.
- Click Use an Existing List from the drop-down menu. A dialog box appears.
- Navigate to the Excel file containing the names and addresses you want to use.
- Double-click the file. A dialog box appears.
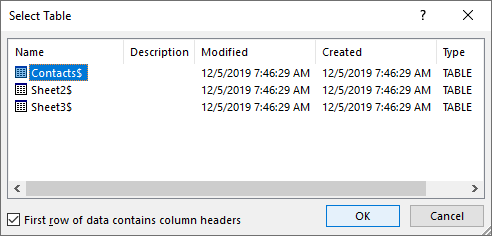
- Ensure First row of data contains column headers is checked.
- Click the Excel worksheet containing the data you wish to use.
- Click OK.
The following dialog box appears when you select an Excel file as the source for a merge:
Step 3: Insert fields from the source file
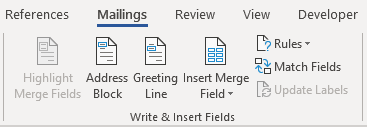
Once you have connected to a source file, you can insert fields into the main document or letter. You have the option of using special Word fields such as Address Block and Greeting Line (for example, to insert Dear John) or inserting individual fields.
Address Block and Greeting Line appear as follows in the Ribbon:
To insert the Address Block field:
- Click in the main document where you want to insert an address block.
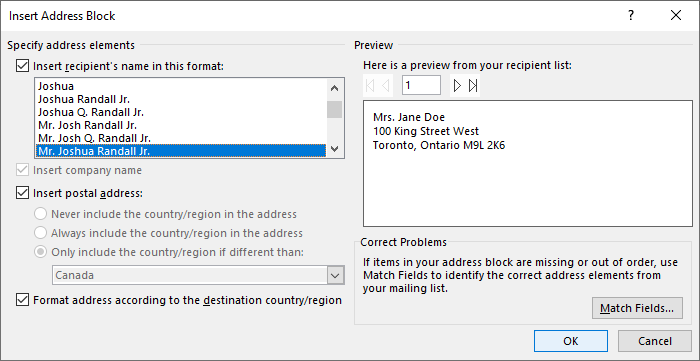
- Click the Mailings tab in the Ribbon and then click Address Block in the Write & Insert Fields group. A dialog box appears. Word will display an address based on the source data.
- In the samples on the left, select the address sample you prefer.
- Check or uncheck other options if necessary.
- Click OK. Word inserts an Address Block field into the main document.
For Address Block, select a sample address in the area on the left in the Insert Address Block dialog box:
To insert a Greeting Line field:
- Click in the main document where you want to insert a greeting.
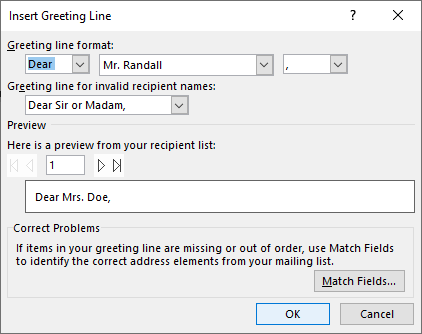
- Click the Mailings tab in the Ribbon and then click Greeting Line in the Write & Fields group. A dialog box appears. Word will display a greeting based on the source data.
- Select greeting line options for the Greeting line format.
- Select an option for invalid recipient names.
- Click OK. Word inserts a Greeting Line field into the main document.
For Greeting Line, select greeting line options in the Insert Greeting Line dialog box:
To insert fields individually:
- Click in the main document where you want to insert a field (such as FirstName).
- Click the Mailings tab in the Ribbon and then select Insert Merge Field in the Write & Insert Fields group.
- From the drop-down menu, select the field you want to insert.
- Press the spacebar, type text or press Enter if necessary.
- Repeat for other fields you want to insert.
Step 4: Format the letter
You may need to apply formatting to the letter such as changing the font and size and adjusting paragraph spacing.
It’s common for an Address Block field or address lines to have extra paragraph spacing above and / or below lines in the address when the results are previewed or printed. This is caused by default settings for space above and below paragraphs.
To remove the paragraph spacing:
- Select the Address Block field or other lines (often in the address if you have inserted individual fields).
- Click the Home tab in the Ribbon and select the dialog box launcher on the bottom right of the Paragraph group.
- Select Don’t add space between paragraphs of the same style. Alternatively, change the space above and below the paragraph(s).
- Click OK.
Step 5: Select specific recipients or filter the recipient list (optional)
You have the option of specifying specific recipients or filtering the recipient list if you don’t want to create form letters for all contacts in the data source.
To choose specific contacts:
- Click the Mailings tab in the Ribbon and then click Edit Recipient List in the Start Mail Merge group. A dialog box appears.
- Uncheck the check boxes beside the recipients you do not want to include in the mail merge.
- Click OK.
To filter the source list:
- Click the Mailings tab in the Ribbon and then click Edit Recipient List in the Start Mail Merge group. A dialog box appears.
- Click Filter. A dialog box appears.
- Select / enter the desired filtering options.
- Click OK.
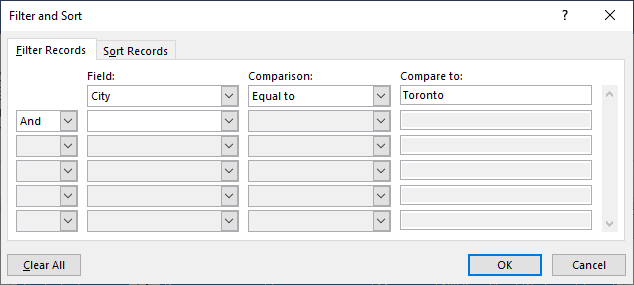
For example, below is a filter to display records from Toronto:
To remove the filter, repeat the process, but click Clear All in the Filter and Sort dialog box.
Step 6: Preview the results (optional)
Before you run the mail merge, you can preview the results:
- In the main document, click the Mailings tab in the Ribbon and then click Preview Results in the Preview Results group.
- Click the arrows in the Preview Results group to go to the next or previous letter.
- Click Preview Results to view the fields again.
Step 7: Run the mail merge for letters
The final step is to run the merge. You can either create a new merged document or merge directly to a printer.
To run the letter mail merge in the main document and create a new merged document:
- Click the Mailings tab in the Ribbon and then click Finish & Merge in the Finish group. A drop-down menu appears.
- Click Edit Individual Documents. A dialog box appears.
- Click Current Record or enter a selected range if necessary.
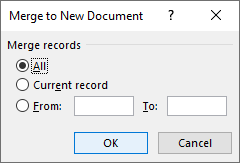
- Click OK. Word creates a new merged document that you can edit, print and save. Each letter will appear on a new page in a new section.
The following dialog box appears when you select Edit individual documents.
To run the letter mail merge in the main document and print the merged documents:
- Click the Mailings tab in the Ribbon and click Finish & Merge in the Finish group. A drop-down menu appears.
- Select Print Documents. A dialog box appears.
- Click Current Record or enter a selected range if necessary.
- Click OK. A dialog box appears.
- Select the desired printer and other printer options.
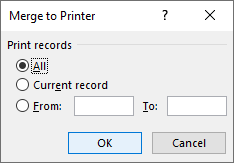
- Click OK.
The following dialog box appears when you select Print Documents:
You will typically want to save the main document and the source file. If you save the merged file, you will have a record of the letters that were created.
The process is similar for labels. The main document would be labels (usually a label type with a product code) and would connect to the source document in the same way.
This article was first published on December 9, 2019 and has been updated for clarity and content.
Subscribe to get more articles like this one
Did you find this article helpful? If you would like to receive new articles, join our email list.
More resources
How to Insert a DRAFT Watermark in Word and Remove It (Add Text or Picture Watermarks)
How to Remove Hard Returns in Word Documents
How to Superscipt or Subscript in Word (with Shortcuts)
Related courses
Microsoft Word: Intermediate / Advanced
Microsoft Word: Designing Dynamic Word Documents Using Fields
Microsoft Word: Long Documents Master Class
Microsoft Word: Accessible Word Documents
Microsoft PowerPoint: Intermediate / Advanced
VIEW MORE COURSES >
Our instructor-led courses are delivered in virtual classroom format or at our downtown Toronto location at 18 King Street East, Suite 1400, Toronto, Ontario, Canada (some in-person classroom courses may also be delivered at an alternate downtown Toronto location). Contact us at info@avantixlearning.ca if you’d like to arrange custom instructor-led virtual classroom or onsite training on a date that’s convenient for you.
Copyright 2023 Avantix® Learning
Microsoft, the Microsoft logo, Microsoft Office and related Microsoft applications and logos are registered trademarks of Microsoft Corporation in Canada, US and other countries. All other trademarks are the property of the registered owners.
Avantix Learning |18 King Street East, Suite 1400, Toronto, Ontario, Canada M5C 1C4 | Contact us at info@avantixlearning.ca


