
Скачай Ответы икт, рубежный контроль и еще Рефераты в формате PDF Информатика только на Docsity! 1) Which number system is used in PC to create coding of data *+binary 2*!The idea of program control on computing processes for the first time has been stated by *+Ch. Babbage 3*!Byte is * +the sequence from eight bits 4*!In computer are stored *+data 5*!According to this characteristics, information as a message should include all the relevant information *+completeness 6) According to this characteristics, message must be verifiable so that its validity, accuracy, appropriateness can be assessed *+verifiability 7) According to this characteristics, information as a message should be reasonably or legally satisfy a requirement *+adequacy  According to this characteristics, the information should be timely available and it should not be obsolete as well *+currency 9) Characteristics of information which striving to reduce or eliminate biases, subjective evaluations by relying on verifiable data *+objectivity 10) Data processing which is used for ordering data *+sorting of data 11) Data processing which is used to compressing data *+archiving of data 12) The maximum number in which no more than 8 bits of information are included *+256 13) Binary equivalent of decimal number 42 *+101010 14) Types of magnetic storage *+floppy and hard 15) For acceleration of access to random access memory it is used *+cash memory 16) Constant memory of BIOS is used for *+checking of the computer equipment 17*!He has offered computer organization *+John von Neumann 18*!The modem and the fax-modem are used for *+exchanging information with other computers 19*!Core speed *+microprocessor speed 20*!Random Аccess Мemory is *+operative memory 21*!Hardware is *+computer configuration 22*!The streamer is intended for *+fast saving of information in the hard drive 23*!The central processor serves for *+calculations and information processing 24*!Hard drive is *+high capacity integral disk 25*!Operative memory is *+device which addresses regularly to machine during performance of operations 26*!Video memory is used for *+storage of images which are displayed on the screen 27*!Plotter is used for *+printing graphs and pictures 28*!In word «INFORMATICS» there are *+88 bits 29*! In word «COMPUTER» there are *+8 bytes 30 *!In 32 Gbytes there are *+235 bytes 31*!Convert binary number 1001 into decimal system *+9 32*!Multiplication of binary numbers 1011 and 110 *+1000010 33*!Convert hexadecimal number 255 into decimal system *+597 34*!Decimal number 2 in binary system is written as *+10 35*!The sum of binary numbers 111011101010 is equal to *+1100101 36*!The multiplication of binary numbers 110 and 111 *+101010 37*!Why is mathematical coprocessor necessary *+to help to basic processor in performance of mathematical operations 38*!The modem and the fax-modem are used for *+connections to satellite communication 39*!Second generation computers used value technology as *+transistors 40*!Order of switching off of the computer *+system unit, printer, monitor 41*!Logical elements of a computer *+adder, trigger, counter, coder, decoder 42The node intended for conversion of a n-bit code to one of 2n outputs *+adder 43*!The key parameters of processors determining its productivity: *+digit capacity, clock rate, cache memory size 44*!The lowest level software is *+BIOS 45*!Data are *+the registered signals 46*!First computer *+ENIAC 47*!The binary number system concerns to *+positional systems 48*!The greatest volume of the information can be received via *+sight 49*!The first computer was invented in *+USA 50*!The first computer was invented in *+1946 *+functions 101*!MS Excel. The document created in Excel, is called *+workbook 102) MS Excel. Each worksheet has a sheet name that appears on a(n) ____ at the bottom of thе workbook *+sheet tab #103*!MS Excel. Each worksheet in a workbook has ____ rows *+1048576 #104*!MS Excel. The ____, located near the top of the excel window, is the control center in excel *+ribbon #105*!MS Excel. The number of worksheets that you can add to a workbook is *+Limited by the amount of memory on the computer #106*!MS Excel. The ____ on a worksheet is one in which you can enter data *+activecell #107*!MS Excel. By default, Excel positions text in a cell: *+left-aligned #108*!MS Excel. Use the ____ function to determine the lowest number in a range *+min #109*!MS Excel. Which of the following comparison operator means greater than or equal to *+>= 110)MS Excel. A cell reference with only one dollar sign before either the column or the row is called a(n) *+mixed cell reference #111*!MS Excel. Automatic creation of the chart according to the selected data *+F11 112)MS Excel. To add borders to a range of cells, right-click the selected range, select ____ on the shortcut menu, then click the border tab *+format #113*!MS Excel. When the background formula checker finds a rule that might be in violation, it places a ____ triangle in the cell *+green #114*!MS Excel. Shortkeys for saving workbook *+SHIFT+F12 #115*!MS Excel. The file extension for a Microsoft Excel 2007 workbook is *+.xlsx #116*!MS Excel. *!The absolute link is *+$ #117*!MS Excel. The relative link is *+А1 #118*!The mixed link is *+$A1 #119*!The size of a worksheet in Excel 2007/2010 *+1 048 576 rows and 16 384 columns #120*!MS Excel. For an illustration of continuous data use the following type of charts *+hystograms #121*!Excel. Binary file format (BIFF12) in Excel *+.xlsb #122*!MS Excel. What kind of data found in a spreadsheet *+Numbers, formulas, labels #123*!MS Excel. To merge the cells which tab do you use from the format, cells menu *+Alignment tab #124*!MS Excel. Where a row and a column meet, what do you call that *+A cell #125*!MS Excel. In an excel sheet the active cell is indicated by *+A dark wide border #126*!MS Access. How do you rearrange the date in ascending or descending order *+Data, sort #127*!MS Access. Connected fields can have *+different names, but identical type of data #128*!MS Access. «Create» tab allows to *+create new table, form, report, query, macro and module #129*!MS Access. Changing the structure of a table *+design mode #130*!MS Access. Special objects for input and viewing of data in the table *+forms #131*!MS Access. For copying the records it’s necessary to select and execute comand *+home — clipboard — copy #132*!MS Access. The type of a field is set in *+design View #133*!MS Access. This object represents formatted printouts of data in a database *+report #134*!Which of the following is not a valid data type in MS Access *+picture #135*!MS Access. Records are sorted by increase *+$10, $25, $35, $50 #136*!MS Access. Logical operator «not»is used to select *+in coincident values #137*!MS Access. Logical operator «not Т» is used for select *+words which do not begin from letter «Т» #138*!MS Access. Logical operator «С asterics» is used for select *+words which begin from letter «С» #139*!MS Access. Logical operator «[B-C]» is used for select *+words which begin from letters «В», «С», «D» #140*!The appropriate data type to store time in MS Access *+date/time #141*!MS Access. Database properties are also known as *+Metadata #142*!MS Access. A table is represented as a collection of rows and columns called a *+Datasheet #143*!MS Access. If your criterion for filtering is that the value in a particular field matches or does not match a certain value, use *+Filter by Selection #144*!MS Access. A form typically has ____ sections *+3 #145*!MS Access. View which allows you to make changes to the form, but does not show the actual form *+Design view #146*!MS Access. The arrange tab button called ____ opens the object’s property sheet to set its properties *+Property Sheet #147*!MS Access. ____ are the details about a file *+Database properties #148*!MS Access. Database design refers to the arrangement of data into: *+Tables and fields #149*!MS Power Point. The ____ slide transition gently uncovers one slide to reveal the next *+Wipes #150*!MS Power Point. ____ Are defined combinations of formatting options *+Quick Styles #151*!MS PowerPoint assumes you want your bulleted list to appear ____ of your slide *+On the left side #152*!MS PowerPoint. The entrance, exit, and emphasis animations are grouped into categories that do not include *+Colorful #153*!PowerPoint’s ____ allows you to advance through the slides with your timing recorded *+Rehearsal feature #154*!MS PowerPoint. To select sequential slides, click the first slide, press and hold down the ____ key, and then click the last slide *+SHIFT #155*!MS Power Point. The ____ slide transition uses blinds and checkerboard patterns *+Stripes and Bars #156*!MS Power Point. Clips that reside on a shared network file server are part of ____ *+Shared Collections #157*!MS Power Point. Video, music and sound files are examples of ____ *+Multimedia #158*!MS Power Point. The ____, on the scroll bar, indicates the location of the slide in the document window *+Scroll box #159-!MS Power Point. ____ defines the appearance and shape of the letters, numbers, punctuation marks, and symbols *+Style #160*!MS Power Point. The ____ shows the number and title of the slide you are about to display *+Slide indicator #161*!MS Power Point. ____ allows you to point to a gallery choice and see its effect in the document *+Live preview #162*!MS Power Рoint. A presentation is also called a ____ *+Slide show #163*!MS Power Рoint. *!Power Point files formats are *+.ppt and .pptx #164*!MS Power Рoint. Elements of slides design *+color scheme, background, colors of objects #165*!Statistical set *+group of the fixed casual events #166*!Statistical observation *+scientific organization of information registration #167*!Statistical indicator *+ result of properties’ measurement of the studied object #168*!The values of a sign repeating with the largest frequency *+mode #169*!Indicator of a variance *+square of an average deviation #170*!The meaning of correlation in statistics *+relation #171*!What is the fundamental issue of the person – computer interaction? *+increase in reliability of the computer #172*!Person – computer interaction. Ergonomic design of systems is: *+Design of systems on the basis of the COMPUTER with the accounting of a human #173*!Person – computer interaction. Between what tags is placed an office information? *+<head>and</head> #174*!Person – computer interaction. What tags are used for allocation of new paragraphs in the document? *+<р> and </р > #175*!Person – computer interaction. The color image with a palette from 8 flowers has the size of 100х200 points. What information volume does have the image? #245*!Infection with loading viruses occurs at: *+Turning on the computer with busy floppy #246*!Loading viruses can infect: *+Boot-Strap program #247*!Replicators: *+Transfer a virus #248*!Auditor programs: *+Remember data on a condition of programs #249*!Macro viruses are: *+Macros #250*!The important future of multimedia technology is: *+Interactivity #251*!The computer presentation is… *+the sequence of the slides containing multimedia objects #252*!The hyperlink is: *+a reference to data that the reader can directly follow either by clicking, tapping, or hovering #253*!The database which can be used in several spheres of human activities *+Universal #254*!How in a query it will be correct to specify the following criterion:: «Patient’s weight is between 50 and 80» *+<80 or >50 #255*!If criteria are connected with AND, then in query design they register as: *+on the same row #256*!To change the size of text field from 255 into 50 characters in MS Access it is necessary: *+ in a design view to change field size #257*!For query design with parameter, displaying a surname of the doctor, it is necessary to type on criteria row: *+[Enter surname of the doctor] #258*!Windows XP. The ____ allows you to perform often-used tasks quickly *+standard buttons toolbar #259*!Windows XP. A ____ is a pointing device *+mouse #260*!WindowsXP. Using the mouse to move or copy cells is called *+drag and drop #261*!MSWindows. How to invent start menu *+Ctrl +Esc #262*!MS Windows.Auxillary level program *+windows antivirus #263*!Which of the following operating system can work only with one program at current time *+MS DOS #264*!MSWindows. Which of the following file name extension suggests that the file is backup copy of another file *+bak #265*!MSWindows.Which of the following type of objects can you search on your computer and on the network, using Windows XP search companion *+all of these #266*!MSWindows.Which of the following is an operating system you would be using on the computer *+Microsoft Windows #267*!AVP is: *+anti-virus program #268*!Virus is: *+the special program which interferes with a programs runtime #269*!How to load anti-virus AVP program: *+Start — Programs — Antiviral Toolkit Pro #270*!The computer virus is: *+the program damaging computer programs and data #271*!Distinctive features of a computer virus are: *+small volume. ability to independent start and repeated copying of a code, to creation of noise to correct operation of the computer #272*!How the computer can be infected a virus: *+in case of execution of the infected program #273*!The computer virus is: *+the program which breeds itself and does harm to the computer of the user and other objects located in network #274*!What general property do the interactive presentations have? *+are operated by the speaker #275*!Expert systems are: *+the systems of an artificial intelligence based on knowledge #276*!Medical expert systems: *+diagnostic systems of second generation #277*!Main objective of an artificial intelligence: *+simulation of intellectual activities of the person for transmission of a computer of routine processes #278*!Systems of an artificial intelligence are: *+the machine programs created in the direction of artificial intellectual systems #279*!Are engaged in expert systems: *+experts and specialists in the field of an artificial intelligence #280*!Constructing process of expert systems consists of stages: *+5 #281*!MS Word 2007. The group symbols is on tab *+insert #282*!MS Word 2007. The group table is on tab *+insert #283*!MS Word 2007. The clipboard is on tab *+home #284*!MS Word 2007. The group font is on tab *+home #285*!MS Word 2007. The group styles is on tab *+home #286*!MS Word 2007. The group page setup is on tab *+page layout #287*!MS Word 2007. The group spelling is on tab *+review #288*!MS Word 2007. The group zoom is on tab *+view #289*!MS Word 2007. The ruler pictogram is located on tab *+view #290*!Excel displays the error message ____ in cells to indicate a cell reference error *+#REF! #291*!Excel. The Excel program file has an extension *+.Xlsx #292!MS Excel.Which keyboard shortcut should be used to display the format of cells dialog box *+CTRL+1 #293*!MS Excel.Which keyboard shortcut should be used to apply or remove an italic tracing *+CTRL+3 #294*!MS Excel. Which keyboard shortcut should be used to cross out the text or to remove deletion *+CTRL+5 #295*!MS Excel. Which keyboard shortcut should be used to fill a range of cells with the same data *+<Ctrl>+<Shift>+<Enter> #296*!MS Excel. To add two cells (A1 and A2) together you use the following formula *+=sum(A1;A2) #297*!Excel displays the error message ____ in cells to indicate a divide by zero error *+#DIV/ ! #298*!The cell A3 contains next formula: =В1+$С1; A3 is copied in A4. The formula in A4 will become *+=В2+$С2 #299*!The cell A3 contains next formula: =$В$1+$С1; A3 is copied in A4.The formula in A4 will become *+=$В$1+$С2 #300*!The cell A3 contains next formula: =В1+С$1; A3 is moved in A4. The formula in A4 will become *+=В2+С$1 #301*!MSExcel. It is specified in a formula row *+cell contents #302*!MS Excel. For creation of diagrams and drawing up formulas is used *+function wizard #303*!The document created in Excel is called *+workbook #304*!MS Excel. Function of the Office button *+opens the only menu of the program #305*!MS Excel. Selecting of cells range on the work sheet *+drag the mouse pointer from one corner of range to another #306*!МS Аccess.Which data type can store more than 255 characters *+memo #307*!MS Access. There are 3 type of relationship that valid in MS Access 2007, except *+intermediate #308*!MS Аccess. Format of database *+.mdb, .ассdb #309*!MS Access. What queries are used to summarize data in tables *+CrossTab #310*!MSАccess.What type of queries is a queries that select records from tables based on criteria *+Select Queries #311*!MSАccess.Table in Microsoft Access can be create by using all below except *+Input Mask #312*!MSАccess. Maximum number of symbols in text field of the table *+255 #313*!MSАccess. Rename the table *+F2 #314*!MSAccess. You can __________ macros setting so that the macros run automatically for any database you open *+Enable #315*!MSАccess. Before printing a datasheet, you can use______ to determine whether to change the page orientation from portrait to vertical orientation *+Print Preview #316*!MSАccess. Maximum numbers of symbols in «Mемо» field *+65 536 #317*!MS Access. A _____ is a major database object used to display information in an attractive, easy-to- read screen format *+form #318*!MS Access. What happens when a user selects a record in a form and presses [Delete] *+The record is deleted in the form and from its source table #319*!MS Access. Which of the following cannot be done to data using a form *+Store #320*!MS Access. What is one of the advantages for using a form over other Access objects *+Utilizes field placement to improve the efficiency of data entry #321*!MS Access. The undo command is found where in Access *+Quick Access toolbar #322*!Comand to break slideshow of Power Point *+ESC #323*!The format of presentation created in MS Power Point 2003 *+.рpt #324*!Possibilities of the Power Point program *+creation of the presentation with multimedia animation #325*!Stop or renewal of automatic display *+S or «+» symbol #326*!The presentation component containing various objects *+slide #327*!Set of the slides collected in one file *+presentation #328*!Transition to the slide under «X» number *+number+ENTER #329*!Transition to the first or following hyperlink on a slide *+SHIFT+TAB #330*!The statistics studies *+mass phenomena #331 *!Origin of the term «statistics» +status #332 *!Term «Statistic» was introduced by +G.Akhenval #333 *!Specify two main groups of viruses: +Resident, non-resident #334 *!Computer viruses are divided by extent of influence on: +resident, non-resident #335 *!The viruses using mistakes and inaccuracies in a complex software: +Virusesinterceptors #336 *!On features of an algorithm computer viruses divide on: +parasitic, replicators, invisible beings, mutants, trojan #337 *!Types of antivirus programs: +detectors, doctors, auditors, filters, vaccines #338 *!Antivirus programs can be divided into following main groups: +detectors, doctors, auditors #339 *!Antivirus programs: +antivirus #340 *!Antivirus program: +Doctor Web #341 *!Program for search and treatment of computer viruses: +Dr Web #403 *!Internet. Правила обмена информации между компьютерами посредством сети +protocol #404 *!Formats of Html document +.htm и html #405 *!Html. Heading tags +<head>_</head> #406 *!The address of Web-site on world wide web, for instance, http://www.microsoft.com +uniform resource locator #407 *!Html. The tag defining the color of the row +color #408 *!Html. Command for refresh the Web-site +F5 #409 *!Html. The tag which is used to create of horizontal row +<hr> #410 *!It is possible to change a profile photo, entering in service: +google + #411 *!To work with the documents of GOOGLE you need to enter in service: +disk #412 *!To create questionnaires are used Google documents: +forms #413 *!To work with one Google document in online mode group of users has to: +open shared access #414 *!Mobile application is: +software #415 *!Portable multi-function device of mobile communication: +smartphone #416 *!The international organization defining recommendations in the field of telecommunications and radio: +ITU #417 *!The largest software developer, the creator a web — service ElasticComputerCloud (EC2): +Amazon #418 *!How many levels of cloud technologies are exist: +3 #419 *!Levelofcloud technologies.PlatformasaService — PaaS): +intermediate level of a platform #420 *!Html. Which filter converts the text horizontally +FlipH #421 *!Html. Filter which creates the negative image +Xray #422 *!Html. Tag which opens hyperlink in a new window of the browser +target=blank #423 *!Html. Which input type would allow a reader to select several options from a list of possibilities +type=checkbox #424 *!Html. What is the HTML feature that divides a web page into two or more scrollable parts +<frame>and<frameset> #425 *!Html. The <I> tag makes text +Italic #426 *!Html. TAG<select…>contains attributes +option, multiple #427 *!Html. Tag defining the column of a table +<td> #428 *!Html. Besides <B>, another way to make text bold is what +<strong> #429 *!Html. Attributes of<a ….>tag +href, target, title #430 *!Html. Attributes of<marquee…..>tag +scroll, slide, alternate #431 *!Html. The tag setting distance between frames of cells of the table in pixels +cellspacing #432 *!Html. The tag defining «Range» of cell across +colspan #433 *!Html. The tag defining the place of the form processor +action #434 *!Html. The tag defining a radiobutton +type=radio #435 *!Html. Attributes of < target …..>tag +top, blank, self, parent #436 *!Html. Attributes of < form…..>tag +acton, method, enctype #437 *!Html. Insertion of the upper and lower index of the text +sub, sup #438 *!Main stages of e-government in the Republic of Kazakhstan +Information, interactive, transactional #439 *!Program of forming «E-government» in Republic of Kazakhstan on 2005-2007 +10.11.2004, №1471 #440 *!The number of information services on web-portal of «E-government» +933 #441 *!Citizens, government agencies, organizations and other economic entities utilizing the services of e-government +Consumers of e-services #442 *!State bodies, organizations and other economic entities providing services ict tools +E-service providers #443 *!The law «About the Electronic Document and the Digital Signature» was adopted +7th January 2003, № 370-2 #444 *!The abbreviation designating interaction of government with citizens +government-to-consumer #445 *!The abbreviation designating interaction of the state with government +government-to- government #446 *!The abbreviation designating interaction of the state with private sectors +government -to-business #447 *!The abbreviation designating interaction of business with the state +business-to-government #448 *!The abbreviation designating interaction of citizens with the state +consumer-to- government #449 *!Method how to obtain digital signature: +it is necessary to submit the application for obtaining the electronic digital signature (EDS) on www.egov.kz #450 *!For authorization on the Web portal of «Electronic government» the following data are necessary: +personal identification number and password of the user #451 *!Phone number of Call-center of «E-government» +1414 #452 *!The medical ethics studies +principles of morals and professional ethics #453 *!The doctor has the right to +refuse to treat the patient #454 *!A doctor should possess and show this status to his patient +empathy #455 *!Ethics is +the discipline studying bases of morals and morality #456 *!Medical ethics are the discipline studying +moral responsibility of the doctor #457 *!The main category of medical ethics is +doctoring debt #458 *!To express an opinion on competence of the colleague before patients +tactlessness manifestation #459 *!Implementation by the doctor in his activities of specific moral requirements and standards of behavior +professional ethics #460 *!Patronizing model of the relations between the doctor and patient +paternalism #461 *!Principle of medical ethics +humanity #462 *!Case of violation of the patient’s rights by the doctor +to tell about the diagnosis the patient’s relatives #463 *!In what case the right of the patient is violated +if operation is performed without the patient’s consent #464 *!To keep ethical principle which requires in secret everything that occurs during medical interaction of the doctor and the patient +confidentiality #465 *!Clueful consent of the patient +the patient’s consent to a medical interference after obtaining the complete information #466 *!Reduces communicative competence of the doctor +panic #467 *!Basis of an information system +environment of storage and data access #468 *!Reason of creation of medical information systems +need of use of large volumes of information for the decision of medical tasks #469*!Subdividings on scope of information systems +decision making support systems #470 *!The medical information system realizing the Salamatty Kazakhstan program *+medical information system Paragraph «Medicine» #471 *!The main objective of medical information systems of basic level is +computer support of doctors’ activity of different specialties #472 *!The main objective of information systems of treatment and prevention facilities +information support of administrative processes of MPI #473 *!Information security from illegal access +each user of system shall have the personal password #474 *!Signs of the clinical information description +qualitative #475 *!Diagnostic medical information systems are based on +receiving, transmission and data analysis #476 *!Expert systems * systems of artificial intelligence #477 *!Automated management systems is +the complex of tools providing management of an object in various spheres of human life #478 *!Work of neural networks is based on +mathematical model #479 *!Medical information systems specialize +on integration of administrative, medical and financial information #480 *!Multimedia product is: +interactive computer development #481 *!The main characteristics of the virtual world: +immersion, presence, interactivity #482 *!Standard of wireless high-speed data transmission for mobile phones: +LTE #483 *!Global system of coordinatesdetermination: +GPS #570 *!Information unit of measure +gbyte, tbyte #571 *!Information processe +information processing #572 *!Property of information +relevance #573 *!The last 2 stage of development of the electronic computer +big integrated circuits #574 *!Elementary logic functions +conjunction #575 *!Element performing operation of a disjunction and conjunction +or #576 *!What is the octal and binary equivalent of a decimal number +11100 #577 *!Element of a technological chain of information input +measuring modules #578 *!MSWindows. Way of object deleting: +Delete #579 *!MS Windows. The main desktop object +My computer #580 *!MS Windows. Accessory +Рaint #581 *!MS Word. Initially available «useful» command of the shortcut bar *+save #582 *!The main type of data model in MS Access +relational #583 *!MS Аccess. Object of database: +tables, forms #584 *!MSWindows. The main operation with windows +open #585 *!MSWindows.Command «OPEN» and «SAVE» +Ctrl+S #586 *!В MS Method «Triad» include use of: +menu bar #587 *!MSWord.Ways of selecting the text: +double click with the left button of the mouse on the fragment of the text #588 *!MS Word. Group «FONT» of «HOME» tab is intended for +creating the uppercase and low case text #589 *!MS Excel. The way of cutting content of the selected cell +select the cell and press CTRL+X key #590 *!MS Access. Type of data +date/time #591 *!MS Access. Define type of queiry +parameter #592 *!MS Access. Method of creating table +table #593 *!MS Access.Type of creating query +query design #594 *!MS Access. Possible sizes of numeric table field +integer #595 *!MS Power Рoint. Way of creating presentation +new presentation #596 *!MS Power Рoint. Type of slide show of presentation +from current slide #597 *!MS Power Рoint. Transition method from one slide to another +rotation #598 *!MS Excel. It is possible to make change into the created chart +in the added legend and data sheets #599 *!MS Windows.Computer virus are divided by feature of algorithms on: +trojan #600 *!Relation address and its example in Excel +second line of column F #601 *!The absolute address and its example in Excel +before the second line of a column F and a column F the dollar sign is written #602 *!MS Excel. Copying of the selected cell +press CTRL+C #603 *!MS Excel. Possible variant of the date format +05.12.1996 #604 *!MS Access. To load the application +Double click on MS Office Access shortcut on desktop #605 *!MS РowerРoint. Name tab: +home #606 *!MS Access. In the database operation which are executed with the record +sortings #607 *!MS РowerРoint.Group of command of the animation tab +viewing #608 *!MS Power Point. Break presentation: +CTRL+BREAK #609 *!MS РowerРoint. List of tabs: +home #610 *!The computer presentation is +the sequence of the slides containing multimedia objects #611 *!MS Excel. The main element of spreadsheet and the indication of activity of this element +the content is displayed on the formula row #612 *!MS Word. Way of cutting the selected text into the clipboard +Shift+Del #613 *!MS Word. Shortkey of applying bold and italic fonts to the selected text +Сtrl+B #614 *!MS Word. Hotkeys of «Find» and «Replace» the text fragment +Ctrl+F #615 *!MS Word. Way of copying the selected text into the clipboard +Ctrl+C #616 *!MS Excel. Type of the following diagram +«histogram» #617 *!MS Excel. In spreadsheet when writing the formula are used *+names of cells #618 *!MS Excel. Short key which are used to save of workbook +CTRL+S #619 *!MS Power Point. Action of the esc key during demonstration of the presentation +demonstration completion #620 *!Type of antivirus security: +Organizational #621 *!What program are used for work with a sound +sound editor #622 +context menu — copy #623 *!MS Word. Method of the insertion of the cutted document fragment +context menu-insert #624 *!MS Access. Method of creating queries +query wizard #625 *!MS Access. Method of creation form +form design #626 *!MS Power Point. Comand of the animation tab +animation #627 *!MS Excel. The error in the following formula record: SUM$ (C7:C10) +absence of a sign «=» at the beginning of a formula #628 *!MS Excel. Value of characters » » in the cell +the number can’t be completely displayed #629 *!Computer virus are divided by a method of infection and an influence level +resident #630 *!MS Excel 2007. Command of «FORMULA» tab sorting and filtering #631 *!MS Excel. In spreadsheet when writing the formula are used +names of cells #632 *!MS Power Point application format: +.рptx #633 *!INTERNET. Component of search engine +program indexing #634 *!INTERNET. The main types of search engine +the universal search engine #635 *!Internet. Type of network +peer-to-peer network #636 *!HTML. Web-browser +Mozilla Firefox #637 *!HTML. The filter used to the text +glow #638 *!HTML. The filter used to the image +invert #639 *!Internet. Element of Internet Explorer window:
This article is a consolidation of the following previously available article: 211272
For a Microsoft Word 97 version of this article, see
184143.
For a Microsoft Word 7.0 for Windows 95 version of this article, see
184142.
When you view your document in Microsoft Word, some characters may be missing, or the top (or bottom) of some characters may be cut off.
This problem may affect the following types of characters:
-
Underscore
-
Character with an ascender
-
Character with a descender
-
International character that contains an umlaut, acute accent, grave accent, circumflex, or tilde
-
Object that is inline with the text of your document—for example, a picture that is not inserted in a frame or text box
NOTE: This problem does not affect printing; that is, underscores, characters with ascenders or descenders, and international characters are printed correctly although they may not be displayed correctly.
Symptoms
This problem may be caused by one of the following.
Case 1
The line spacing of your text may be set to an exact height. When you set the line spacing to Exactly and select a measurement that is equal to or less than the height of the font, underscore characters may not be displayed and characters that have an ascender, descender, or an umlaut may be cut off. For example, if you set line spacing to Exactly 9-point for a 10-point font, underscore characters may be cut off.
NOTE: This problem may occur differently with different fonts.
Case 2
The printer driver may incorrectly substitute screen fonts at certain view percentages. If you change the printer driver, you may notice an immediate difference, depending on the view you are using.
Case 3
The zoom percentage that the document is set to may cause characters to have the top or bottom portion of the screen font cut off. You can adjust the zoom percentage from 75 percent to 100 percent in most cases to correct this visually.
Cause
This problem is a display-only problem. Use one or more of the following methods appropriate for your situation.
Method 1: Change the Document Zoom Setting
When you change the zoom percentage, Word may allow you to view the full height of your text. To do this, use one of the following methods depending on the version of Word you are using:
Microsoft Office Word 2003, Microsoft Word 2002, or Microsoft Word 2000
-
On the View menu, click Zoom.
-
Do one of the following:
-
Under Zoom to, change to a larger setting. For example, change to 200% and then click OK.
-
Under Percent, change the percentage to a larger setting. For example, change it to 120%.
-
Microsoft Office Word 2007
-
On the View tab, click
Zoom in the Zoom group. -
Do one of the following:
-
Under Zoom to, change the value to a larger setting. For example, change the value to 200%.
-
Under Percent, change the percentage value to a larger setting. For example, change the value to 120%.
-
-
Click OK.
Method 2: Change the Document View
When you change the view of your document to outline view, Word shows the full height of your text.
To change the view of your document in Word 2003, in Word 2002, or in Word 2000, click Outline on the View menu.
To change the view of your document in Word 2007, click Outline in the
Document Views group on the
View tab.
NOTE: This problem may occur in normal, print layout, and Web layout views. When you view your document in outline view, paragraph formatting is ignored.
Method 3: Change the Line Spacing
Word 2003, Word 2002, or Word 2000
-
Select the text and then click Paragraph on the Format menu.
-
Do one or both of the following:
-
On the Indents and Spacing tab, change the Line spacing box to something other than Exactly. For example, change the Line spacing setting to Single.
-
Change the At setting to a setting slightly larger than the font point size you are using in your document. For example, if your font point size is 10 point, then change the At setting to 11 point.
-
Word 2007
-
Select the text.
-
On the Hometab, click the
Paragraph dialog box launcher in the Paragraph group. -
Do one or both of the following:
-
On the Indents and Spacing tab, change the setting in the Line spacing box to a setting other than
Exactly. For example, change the setting in the Line spacing box to Single. -
Change the At setting to a setting slightly larger than the font point size that you are using in your document. For example, if your font point size is 10 point, then change the
At setting to 11.
-
Method 4: Change the Font or Point Size
Word 2003, Word 2002, or Word 2000
-
Select your text and then click Font on the Format menu.
-
On the Font tab, do one or both of the following:
-
Change the Font setting to a different font.
-
Change the Size setting to a smaller size than what you have your line spacing set to. For example, if you have your line spacing set to Exactly 12 point, change the font size to 11 point.
-
Word 2007
-
Select the text.
-
On click the Hometab, click the
Font dialog box launcher in the Font group. -
On the Font tab, do one or both of the following:
-
Change the Font setting to a different font.
-
Change the Size setting to a smaller size than what you have your line spacing set to. For example, if you have your line spacing set to Exactly 12 point, change the font size to 11 point.
-
Resolution
Line spacing determines the amount of vertical space between lines of text. Word uses single line spacing by default. The line spacing that you select affects all lines of text in the selected paragraph or the paragraph that contains the insertion point. The following table describes the line spacing options:
This option Results in
————————————————————————
Single Line spacing for each line that accommodates the largest
font in that line, plus a small amount of extra space.
The amount of extra space varies depending on the font
used.
1.5 Lines Line spacing for each line that is one-and-one-half
times that of single line spacing. For example, if
10-point text is spaced at 1.5 lines, the line spacing
is approximately 15 points.
Double Line spacing for each line that is twice that of single
line spacing. For example, in double-spaced lines of
10-point text, the line spacing is approximately 20
points.
At Least Minimum line spacing that Word can adjust to accommodate
larger font sizes or graphics that otherwise do not
fit within the specified spacing.
Exactly Fixed line spacing that Word does not adjust. This
option makes all lines evenly spaced.
Multiple Line spacing that is increased or decreased by a
percentage that you specify. For example, setting line
spacing to a multiple of 1.2 increases the space by
20 percent, and setting line spacing to a multiple of
0.8 decreases the space by 20 percent. Setting the
line spacing at a multiple of 2 is equivalent to setting
the line spacing at Double. In the At box, type or
select the line spacing you want. The default is three
lines.
At The amount of line spacing you select. This option is
available only if you select At Least, Exactly, or
Multiple in the Line Spacing box.
NOTE: If a line contains a large text character, graphic, or formula, Word increases the spacing for that line. To space all lines evenly, click Exactly in the Line spacing box, and then select the line spacing in the At box that is large enough to fit the largest character or graphic in the line. If characters or graphics still appear cut off, select a larger number in the At box.
For more information, click the following article number to view the article in the Microsoft Knowledge Base:
192973 Definitions of typography terms in Word 2000
More Information
Microsoft Word 2007 – Home Tab
| New Look | Home Tab | Insert Tab | Page Layout Tab | References Tab |
| Mailings Tab | Review Tab | View Tab | Acrobat Tab | Misc. Items |
The Home Tab in MS word – Tutorial
The Home Tab is by far the most important Tab in Microsoft Word 2007. The Home Tab contains all the commands that are used most often. These include formatting commands like changing text size, font style, font color, list types, and clipboard functionality like Cut, Copy and Paste. Furthermore, the home tab in Word 2007 includes features like text alignment, line spacing, gallery styles and theme settings. Finally, the Home Tab includes the asrcility to find and replace text.
For this lesson I will be using my resume for practice. Here is a print screen of the Home Tab in Microsoft Word 2007.

The groups on the Home Tab are as follows:
- Clipboard
- Font
- Paragraph
- Styles
- Editing
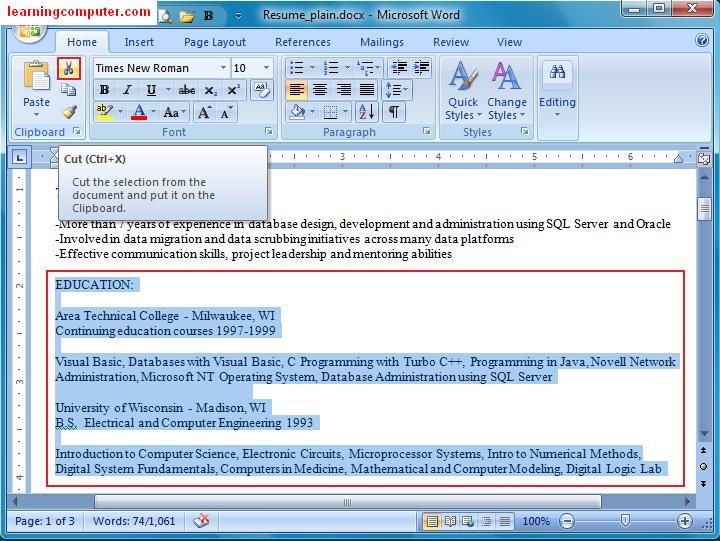
Let us take a look at these groups one at a time. The first one is the Clipboard. This group includes popular commands like Cut, Copy and Paste. Using the Cut command, you can remove a piece of text from one location and insert it into a new location within the same document. You can also use the Copy command instead of the Cut command, however this will leave the original text in place. Next you can browse to the new location where you would like to insert the cut text. Using the Paste command you can then insert the text at this new spot.
For our example, I am going to move the section on Education all the way down in my resume. You can first select the text using the keyboard or mouse. Next you can click on Cut button to add this to the clipboard.
Here is a screen shot of what I am talking about.
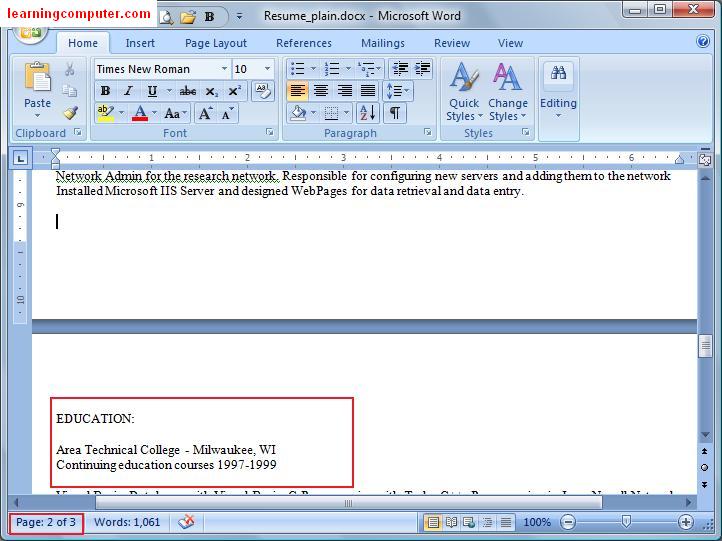
Next I scroll all the way down in my resume. I find a new line and click on the mouse to enable the insertion point. Then, I click on the Paste command under the Clipboard group to insert the section on my Education.
Here is a screen capture of this action:

You will notice that the Education text block has now been inserted into the new area which happens to be on a new page. You can see that we are currently on the second page whereas we were on page one before we did the Cut and Paste operation.
When you need to modify a part of the text in your Microsoft Word document, you can use the Font group under Home Tab. You can choose from options like font size, font type, bold, italicize, underline etc. In addition you can highlight a portion of your document and experiment with different font colors under the Font group in Microsoft Word 2007. Here is a display of the formatting options relating to Font.
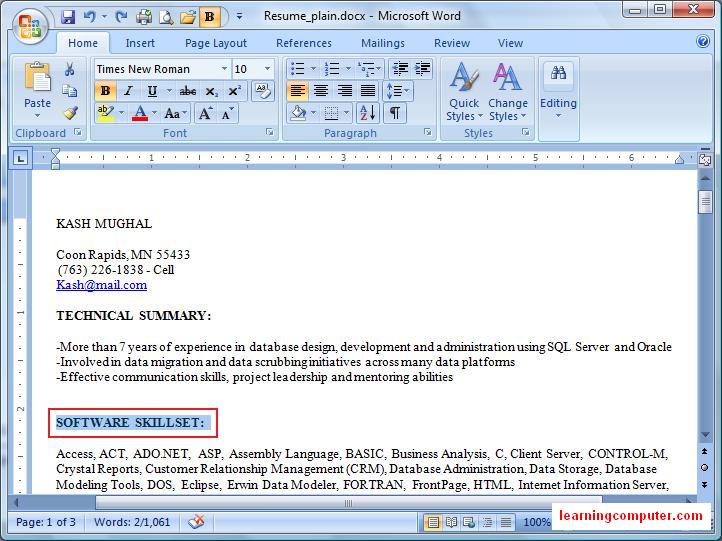
Let’s say we would like to change TECHNICAL SUMMARY heading in my resume to bold. You can highlight the specific text and then click on the Bold command as shown in the red square below.

Here is the end result in Bold instead of Normal font setting shown previously.

Notice that the font group also has a dialog box launcher on the bottom-right corner in the Ribbon screen shot below. This gives you even more options related to font and character spacing. These may look familiar to you as they were available in Microsoft Word 2003 and earlier versions.
The next few figures display these options.


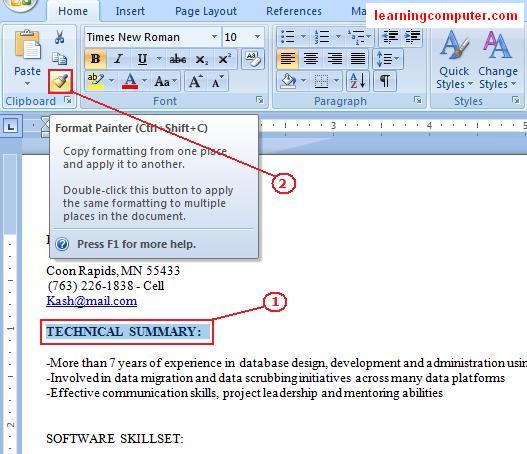
I’m going to switch back to the Format Painter option that I skipped over from the clipboard group. This is a handy little feature that will let you copy formatting from one place to another using the mouse. This is what you need to do. First you need to select your text, apply the necessary formatting and then double click on the format painter command. Now you can highlight any text in your document that needs to have the same formatting. Sweet! In the case of my resume, I want to copy formatting from Technical Summary to all the Headings like Software Skillset, Professional Experience, etc.
Here is a screen shot of the needed steps in order.
As long as the Format Painter option is enabled, you can simply copy that formatting anywhere in the document. I just applied the formatting from Technical Summary to Software Skillset as shown below.
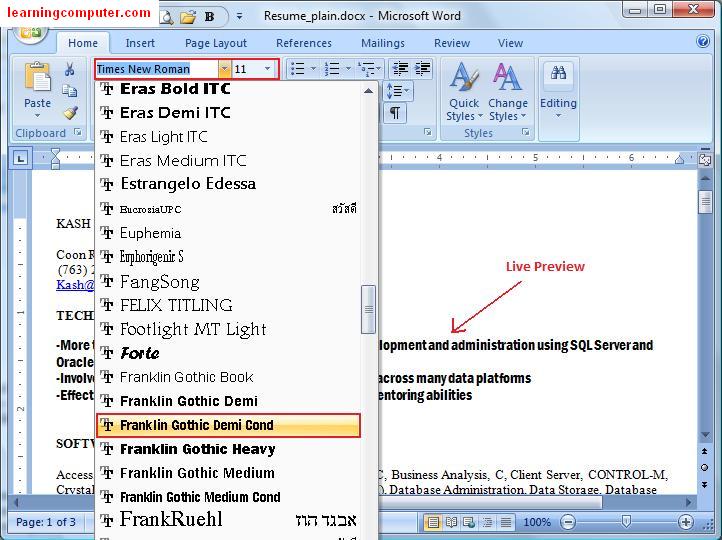
I also feel that I need to emphasize the Technical Summary portion of my document. I’m going to highlight the specific area and then change the font style to something more eye catching. After I select my text, I can click on font style drop down, and try one of the many available fonts from the list. You will notice as you hover over these font styles, Microsoft word 2007 will give you a live preview of what the text will look like after the selection has been made. I really like the Live Preview feature in Microsoft word 2007, very cool. I think I like the Franklin Gothic Demit font style, so I will choose that one.
This is shown as follows.
The Headings look good in my resume, however my actual software skills look rather blah. How about a little font color change to spice things up? I can do just that by using the color palette options under the font group. Purple looks good so I will select this choice for my skills section. My resume looks acceptable now so I will go ahead and save this document.

Sometimes you may have made a lot of changes, maybe more than you wanted to, I do that sometimes. At that juncture you may wish to clear all the formatting from your document. You are in luck as Microsoft Word 2007 has just this option for you. It is the Clear Formatting command under the Font group. The keyboard shortcut for this is Ctrl + Spacebar.
Here is what it looks like and the screen capture below.
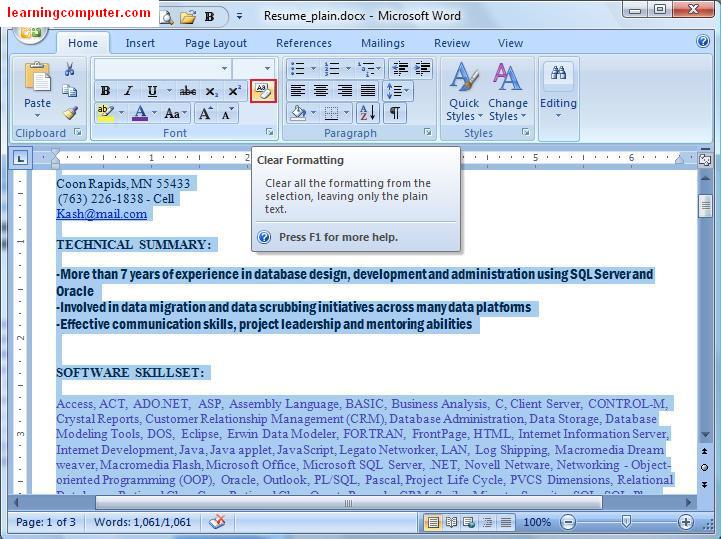
After I used this option, I was able to get back to my original plain resume. It’s good to remember the Clear Formatting option when you need to get back to the way things were originally.

Moving on to the Paragraph Group, here you are able to start a bulleted list, numbered list, multilevel list, increase or decrease indentation, change the text alignment, increase or decrease line spacing… Furthermore you can add features like borders and shading.
Here is a screen shot of this listed below.
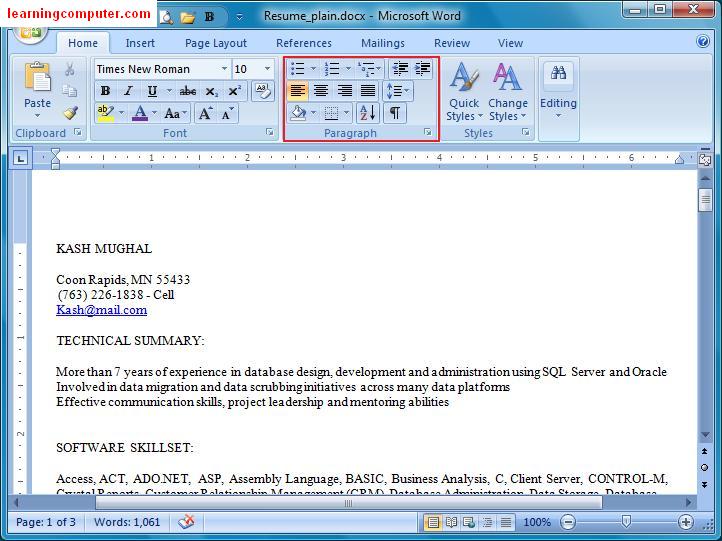
The Paragraph Group in Microsoft Word 2007 has a lot of different options just like the font group. Let us jump right into it and start looking at these features one at a time. After I switched my resume to the old boring format, I am ready to redesign it again. I will be using bullets to highlight the Technical Summary section. In order to do this, I will select the section and then click on Bullets command on the paragraph group.
Here is an example using this feature.

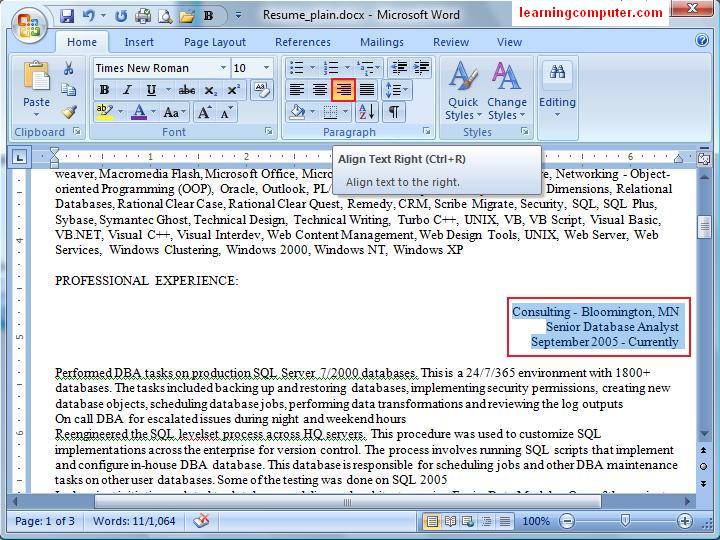
As I scroll down my resume, I would like to align all the employers along the right margin. You can do this by selecting the appropriate text and choosing the align text right command.
I have a screen capture of this right below in red rectangle. Notice that now the employer info. has shifted to the right margin, perfect!
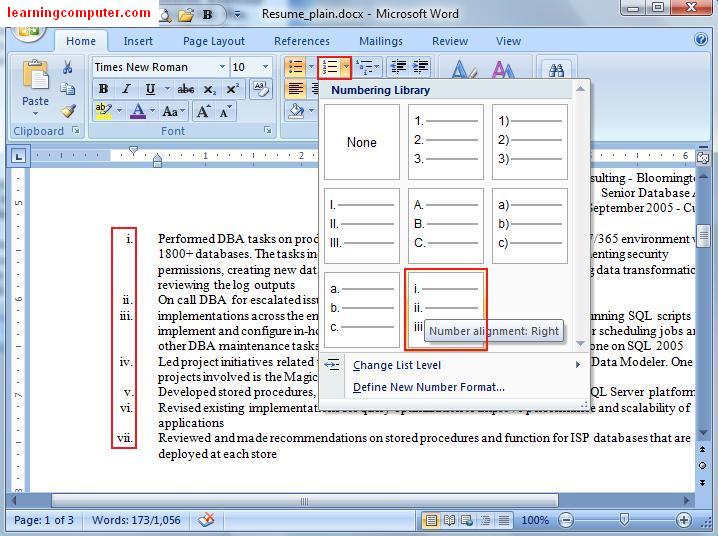
Within my job highlights, all the items are jumbled up, that is definitely not good. I would like to possibly use a numbered list to organize the highlights of my prior job positions. Let’s try this in our next practice area. You can highlight the necessary part in your document, click on the numbered drop down menu of commands as shown below.
In my case I used the one in the red square. After I selected this option, it applied the formatting rather nicely to my resume, shown in the long red rectangle.
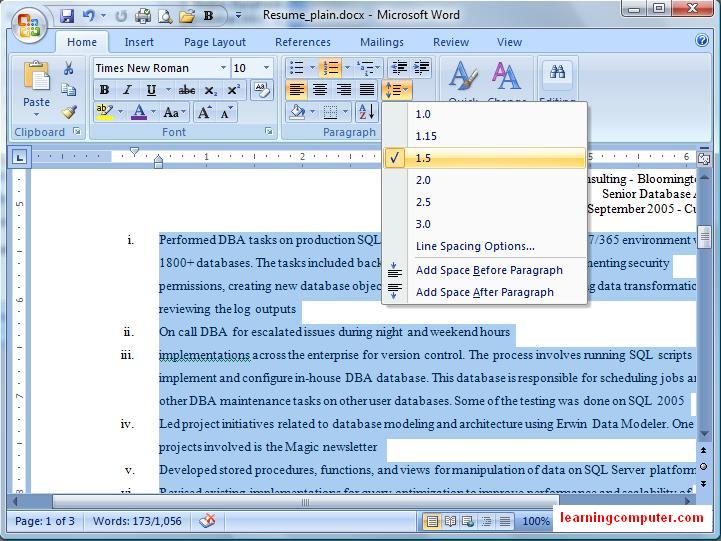
As a final touch to my position highlights at the consulting company in Bloomington Minnesota, I would like to add some more line spacing here. Currently it is using a single spacing which needs to be changed to 1.5 instead. I will highlight the text, click on the line spacing command and then choose 1.5.
This will apply the correct line spacing as follows.
The last feature I want to look at in the paragraph group is the ability to add indentation in a document. A good candidate for this in my resume is the Education section. I will highlight that entire area and then click on increase indent command (red square). When I did that, it moved the text to the right about half an inch.
This is illustrated by the red arrows shown below. Ok, I am done with this resume for now so I will go ahead and save it.

The next group, Styles is going to make the biggest impact in your document layout and design. Microsoft Word 2007 has done an excellent job of creating pre-defined quick text styles that you can easily put to work.
A style is a set of formatting settings, such as font type, size, color, paragraph alignment, spacing and graphic settings. When you use these ready made styles to format your document, you can quickly and easily apply a set of formatting choices consistently throughout your document.
Here is a screen capture of the different styles with a preview of what they look like on top.
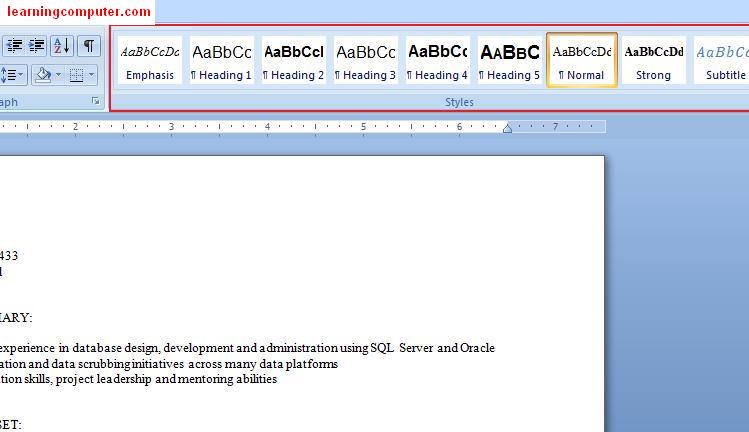
Notice in the document above we are using Normal style. Right next to it you will see some other gallery styles, including Heading 5, Strong, Subtitle etc. In order to work with the styles, you can simply highlight the text and choose one of the many pre-defined styles.
Let’s practice with one of these styles now. We are going to select my contact information in the resume, and choose one of the styles. This is what you need to do to make this happen. First select the text that you would like to change (step 1), then click on quick styles (step 2) and finally choose one of the available styles. Using these steps I was able to change my contact information to Intense Quote, very nice indeed.
Here’s what it looks like on my computer screen.

Another excellent function of this group is the Live Preview mode in Microsoft Word 2007. When you highlight certain text and choose a quick style, Microsoft will apply a temporary formatting to it that will let you review the style before you decide to accept, sort of like “Test drive before you buy”. You can even change the style in your document to a global level by choosing Style Set command under the styles group.
Here is a screen shot of this with the necessary steps in order of action.
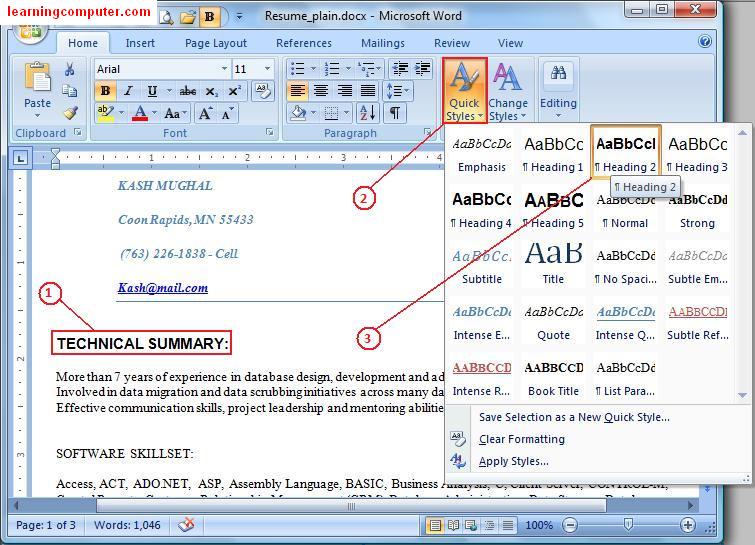
Using the same Quick Styles I’m going to apply the Heading 2 to Software Skillset and Professional Experience also.
These are visible by the red rectangle in the screen capture below.

My resume is looking quite good now as opposed to the plain one that I started with. However I still need to add a little more pizazz to this document. What can we do to achieve this? How about using one of the ready made style sets available from the styles group? When you select one of these style sets, you will notice that not only do the styles on the ribbon change but all styles in your document are updated as well.
Before using the style sets you need to define elements like headings, titles, quotes, and subtitles in your document. We already did that in the previous step so we are good to go. For my resume I will click on change styles, choose style set, and then select “Word 2007” style. Wow! Notice the dramatic change in my document as captured by the screen shot below!
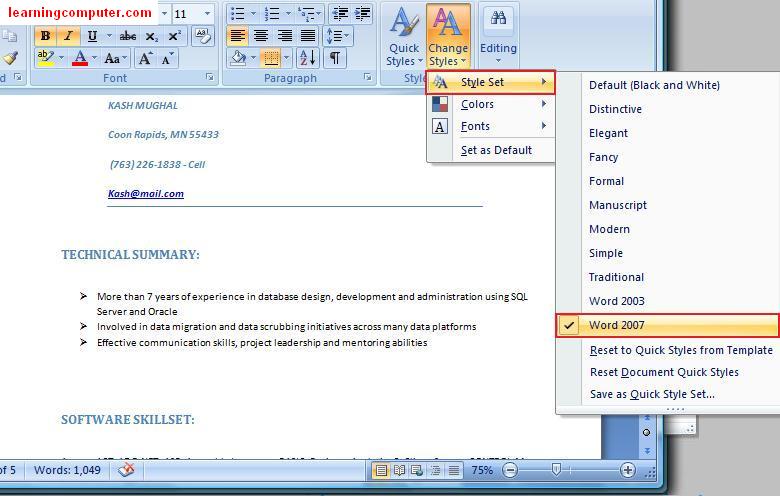
I think I have finally found what I was looking for. My resume looks awesome with selected color scheme, font choices and smooth graphical formatting. Let us go ahead and save this document now.
Here is a preview of the final product, just a little improvement over the original one, don’t you think?

The final option I wanted to talk about is the Editing group. This will help us in finding text, replacing text and selecting document elements. Let’s say you wanted to find a certain text or expression in your document, no problem. I can use the Find command to do just that. You can even change the text easily by using the replace command. In my case I want to replace the word DBA to database administrator in my resume.
I need to select the text first, click on Editing option and then choose Replace. This is shown below in the screen shot.
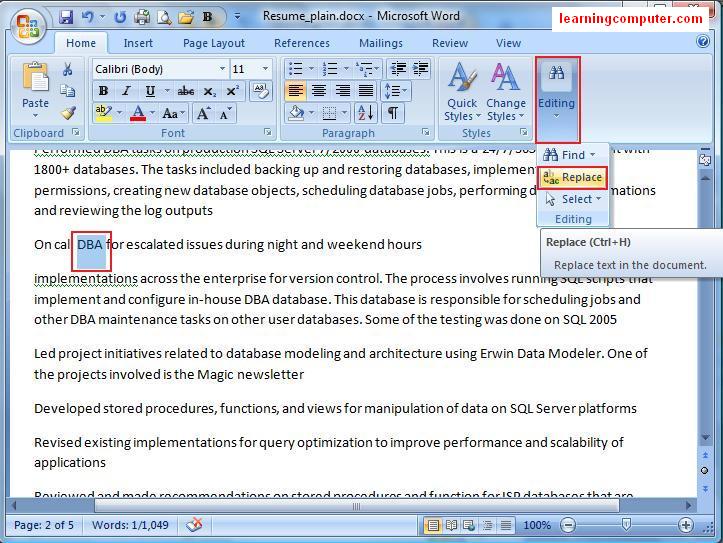
This will invoke the Find and Replace dialog box as shown below. The original word is in Find what textbox, the new word is in the Replace with textbox. As I click Replace, it will switch DBA to database administrator.
I have highlighted the first word that it found as shown below. This looks good so let’s go ahead and click on Replace All command button.
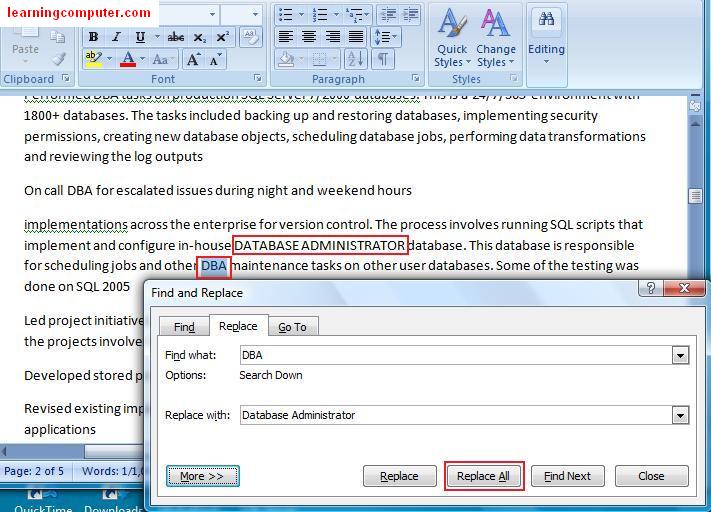
Looks like there were two other instances of this word in my resume so Microsoft Word 2007 was able to make the change with a breeze.
This is visible in the screen capture below. Click Yes and we are finished! Yippee!

Chapter 4. Formatting Text, Paragraphs, and Headings
Formatting is the fine art of making your documents effective and attractive. Good formatting distinguishes different parts of your text and helps your readers take in your message. You can apply formatting to just about every element of your document, from a single character to entire paragraphs. Body text needs to be readable and easy on the eyes. Headings should be big and bold, and they should also be consistent throughout your document. Important words need to resonate with emphasis. Quotes and references should be set off from the other text.
This chapter starts with the basics: how to format individual characters and wordsâselecting fonts and making characters bold, italicized, underlined, or capitalized. You learn how to format paragraphs with indents and spacing, and how to control the way Word breaks up the words in a line and the lines in a paragraph. Finally, you find out how to copy and reuse formatting with tools like the Format Painter and style sets.
Formatting Basics
Word deals with formatting on three levels encompassing small and specific on up to big and broadâthrough characters, paragraphs, and sections. You apply different types of formatting to each of these parts. Character formatting includes selecting a font, a font size, bold or italics, and so on. At the paragraph level, you apply indents, bullets, and line spacing. For each section of your document (even if thereâs only one), you set the page size, orientation, and margins, as described in the previous chapter. Sometimes it helps to think of the parts of a document as Russian nesting dolls: Characters go inside paragraphs, which go inside sections, which fit inside your document.
Each type of formatting has its own dialog box, giving you access to all possible settings. You can also apply most types of formatting via the ribbon, the mini-toolbar, or the keyboard shortcut.
-
Characters. Use the Font dialog box (Alt+H, FN) to format characters. Letters, numbers, and punctuation marks are all printable characters and, as such, you can format them. Once you select a character or a group of characters, you can apply any of the formatting commands on the Home tabâs Font group (Alt+H). You can choose a font and a size for any character in your document. You can make characters bold, underlined, superscript, or change them to just about any color of the rainbow.
Note
Prior to the use of computers, groups of letters, numbers, and punctuation of a certain style, such as Helvetica or Bodoni, were called
typefaces. The term font was more specific, referring to variations within a typeface such as bold, narrow, or italic. Today, the terms are interchangeable. Word uses the term font, probably because itâs shorter and therefore easier to fit into a dialog box. -
Paragraphs. Use the Paragraph dialog box (Alt+H, PG) to format paragraphs. You can set formatting for text alignment, indents, line spacing, line breaks, and paragraph breaks. You donât have to select a paragraph to format it; just click to place the insertion point within a paragraph. Because characters are part of paragraphs (remember those Russian nesting dolls), every paragraph includes a basic font description. When you select characters within a paragraph and change the font settings, you override the basic font description in the paragraphâs style. -
Sections. Use the Page Setup dialog box (Alt+P, SP) to format sections. When you change margins, page orientation, page size, and the number of columns per page (all described in Chapter 3), youâre formatting the section. Many documents have only one section, so when you make formatting changes to a section, youâre actually formatting the entire document.
Note
This chapter explains how to format characters and paragraphs. Section formatting is covered in Chapter 9, beginning in Section 9.2.
Formatting Characters
Every character in your document is formatted. The formatting describes the typeface, the size of the character, the color, and whether or not the character is underlined, bold, or capitalized. Itâs easy to change the formatting, and Word gives you quite a few different ways to do it. The easiest and most visual way is with the ribbon (Home â Font). You can further fine-tune the font formatting using the Font dialog box (Alt+H, FN).
For quick formatting, you may not need to go any further than the mini-toolbar that pops up when you select text for formatting. And when you get really good, you can do most of your formatting with keyboard shortcuts, never even slowing down long enough to reach for the mouse.
Whichever method you use, formatting is a two-step process. First, tell Word which text you want to format by selecting it. Then format away. Or, you can set up your formatting options first, and then begin to type. Your letters and words will be beautifully formatted from the get-go.
Formatting with the Ribbon or the Font Dialog Box
Since character formatting is one of the most often used Word features, Microsoft put the most popular settings right on the Home tab. If you donât see what youâre looking for there, then you must open the Font dialog box. The good thing about the dialog box is that it puts all your character formatting options in one place so you can quickly make multiple changes. Itâs one-stop shopping if you want to change the typeface and the size, and add that pink double-underline.
Here are the steps:
-
Select a group of characters, as shown in Figure 4-1
.You can use any of the selection methods described in Chapter 2. You can drag to select a single character. You can double-click to select a word. Or you can move the mouse cursor to the left side of a paragraph, and then double-click to select the whole paragraph.
Of course, if you havenât typed anything yet, you can always go right to the ribbon and make your formatting choices first. Then type away.

Figure 4-1. The Font group on the Home tab holds most of the common character formatting commands. Choices you make here apply to text youâve selected (like the word âsightsâ in this example). If you donât see the command you need, in the lower-right corner, click the dialog box launcher to open the Font dialog box (Figure 4-2).
-
Go to Home â Font or the Font dialog box (click the little launcher button shown in Figure 4-1 or press Alt+H, FN) and make your formatting choices.
Many of the buttons in the Font group act like toggles. So, when you select text and click the underline button, Word underlines all the characters in the selection. When you click the underline button again, the underline goes away.
If you canât find the command you want on the ribbon, or if you want to make several character formatting changes at once, then open the Font box (Figure 4-2).
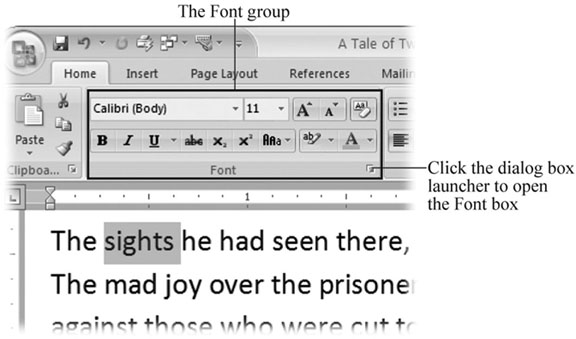
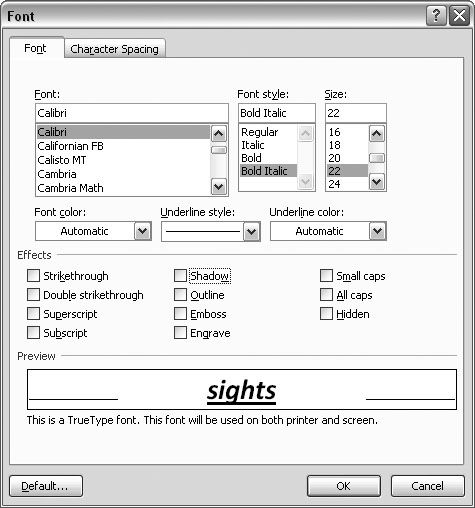
Figure 4-2. Open the Font box (Alt+H+FN) to change the typeface, style, size, color, and other effects. Like many dialog boxes, the Font box gives you access to more commands than you find on the ribbon.
Formatting with the Mini Toolbar
Wordâs Mini Toolbar isnât quite as much fun as your hotel roomâs mini-bar, but there are times when youâll be glad itâs there. A new feature in Word 2007, the Mini Toolbar pops up after youâve selected text (Figure 4-3). Itâs faint at first, but if you move your mouse toward it, the Mini Toolbar comes into focus showing commands, most of which are character formatting commands. Just click one of the buttons to format your selection (or move your mouse away from the toolbar if you want it to go away).
Formatting with Keyboard Shortcuts
When youâre typing away and the muses are moving you, itâs a lot easier to hit Ctrl+I to italicize a word than it is to take your hands off the keyboard and grab a mouse. Because most formatting commands work like toggles, formatting options like bold, underline, and italics become second nature. For example, to italicize a word, just press Ctrl+I at the beginning, type the word, and then press Ctrl+I at the end. Table 4-1 is your cheat sheet to every character formatting shortcut known to Word.
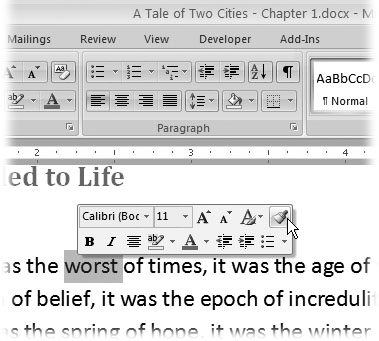
Figure 4-3. The mini-toolbar gives you access to the most commonly used commands. It just so happens that most of these commands are character formatting commands.
Table 4-1. As a result of Wordâs evolution, most formatting commands have more than one keyboard shortcut. A new set of keyboard shortcuts is part of the reorganization that came up with Word 2007âs new ribbon feature. But if commands like Ctrl+B for bold and Ctrl+U for underline are permanently burned into your brain, donât worry: Those commands from previous versions still work just fine.
|
Command |
Keyboard Shortcut |
Old Keyboard Shortcut |
Description |
|---|---|---|---|
|
Font |
Alt+H, FF; arrow keys; Enter |
Ctrl+D; arrow keys; Enter |
Alt+H, FF selects the font drop-down menu; use the arrow keys to highlight the font; press Enter to finish the selection. |
|
Font Size |
Alt+H, FS; arrow keys; Enter |
Ctrl+Shift+P; arrow keys; Enter |
Alt+H, FS selects the font size drop-down menu; use the arrow keys to highlight the size; press Enter to finish the selection. |
|
Increase Font Size |
Alt+H, FG |
Ctrl+> |
Increases font size. |
|
Decrease Font Size |
Alt+H, FK |
Ctrl+< |
Decreases font size. |
|
Bold |
Alt+H,1 |
Ctrl+B |
Toggles bold on and off. |
|
Italic |
Alt+H,2 |
Ctrl+I |
Toggles italics on and off. |
|
Underline |
Alt+H, 3; Enter |
Ctrl+U |
Toggles underline on and off. |
|
Double underline |
Alt+H, 3; down arrow; Enter |
Ctrl+Shift+D |
Toggles double underline on and off. |
|
Underline style |
Alt+H, 3; arrow keys |
 |
Alt+H, 3 selects the underline style drop-down menu; use the arrow keys to highlight the style; press Enter to finish the selection. |
|
Strikethrough |
Alt+H, 4 |
 |
Toggles strikethrough on and off. |
|
Subscript |
Alt+H, 5 |
Ctrl+= |
Toggles subscript on and off. |
|
Superscript |
Alt+H, 6 |
Ctrl++ |
Toggles superscript on and off. |
|
Change Case |
Alt+H, 7; arrow keys |
Shift+F3 |
Toggles through five case options: sentence case, lowercase, uppercase, capitalize each word, toggle case. |
|
Color |
Alt+H, FC; arrow keys; Enter |
 |
Alt+H, FS FC selects the font color drop-down menu; use the arrow keys to highlight the color; press Enter to finish the selection. |
|
Highlight Text |
Alt+H, I; Enter |
 |
Alt+H, I selects the highlight drop-down menu; Enter highlights the selection. |
|
Clear formatting |
Alt+H, E |
Ctrl+Spacebar |
Removes text formatting from the selection. |
Changing Capitalization
Any letter can be uppercase or lowercase, but when you get to words and sentences, you find some variations on the theme. Itâs not unusual to have a heading or a company name where all the letters are capitalized. Sentences start with an initial cap on the first word only, and titles usually have the major words capped. In an effort to automate anything that can possibly be automated, Microsoft provides the Change Case menu (Alt+H, 7) on the ribbon (Figure 4-4).
The Change Case command defies the usual rules about selecting before you apply character formatting. If you donât select anything, Word assumes you want to apply the Change Case command to an entire word, so the program selects the word at the insertion point. If youâve selected text, the command works, as youâd expect, only on the selection.

Figure 4-4. The Change Case menu gives you five ways to change the case of a selection. To open it, click the button that looks like two letter As.
Small caps for headers
Small caps (Figure 4-5) are another variation on the capitalization theme. You wonât find this option on the Change Case button; for small caps you have to use the Font dialog box, which you find on the right side under Effects (where underline or strikethrough are). Small caps are great for headings and letterhead (especially if youâre a lawyer or an accountant), but you wouldnât want to use them for body text. Itâs difficult to read all capitalized text for an entire paragraph.
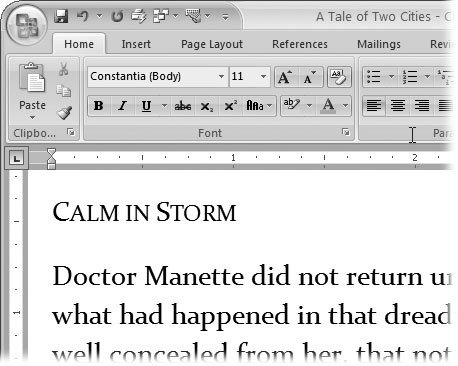
Figure 4-5. Small caps are a great way to distinguish a heading or subheading from body text, like the words âCalm in Storm.â Initial letters get full-sized capitals while the letters that would normally be lowercase get small capitals.
Formatting Paragraphs
Formatting a paragraph usually entails changing its shape. You may be squeezing it in with indents or stretching it out with additional line spacing. Other kinds of formatting change a paragraphâs very nature, like adding a border or making it part of a numbered or bulleted list. The Paragraph formatting group (Home â Paragraph) is right next door to the Font group (Figure 4-6). You donât need to select text to format a paragraph; just make sure the insertion point is in the paragraph you want to format. However, if you want to format several paragraphs at once, select them all before you apply a command.
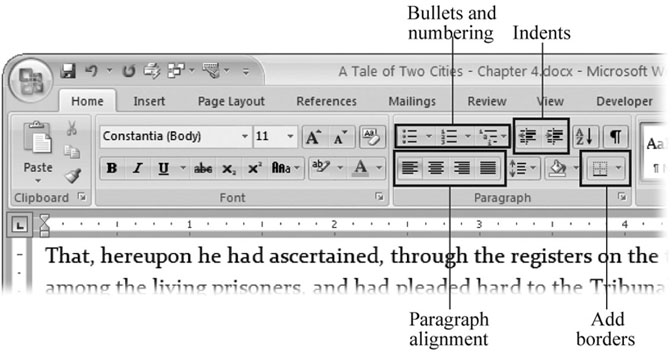
Figure 4-6. Paragraph formatting commands are in the Home â Paragraph group. Left to right, from the top, you find buttons to add bullets and numbers, apply indents, sort paragraphs, show the paragraph mark, align paragraphs, adjust line spacing, change the background color, and add borders.
Aligning Text
Itâs easy to apply alignment to text. With your insertion point in the paragraph you want to change, click one of the alignment buttons in the Paragraph group on the Home Tab. For example, Home â Paragraph â Left sets the current paragraphâs alignment. As shown in Figure 4-7, you have four choices when it comes to aligning your paragraphs:
-
Left (Alt+H, AL). Aligns the lines in the paragraph flush on the left side and ragged on the right. Left alignment is standard for letters, reports, and many business documents.
-
Centered (Alt+H, AC). Centers each line in the paragraph, leaving both left and right margins ragged. This setting is appropriate for headings and short chunks of text, as in invitations and advertisements. Avoid using centered text for long paragraphs, since itâs hard for readersâ eyes to track from the end of one line to the beginning of the next when the left margin is uneven.
-
Right (Alt+H, AR). Aligns the lines in the paragraph flush on the right side and ragged on the left. This unusual alignment is most often used for setting captions or quotations apart from the main text.
-
Justified (Alt+H, AJ). Adds space between letters and words so that both the left and right sides of the paragraph are straight and flush with the margins. Justified margins give text a more formal look suitable for textbooks or scholarly documents. If your justified text looks odd because big gaps appear between the letters or words, try using a long lineâthat is, putting more characters per line. You can do this by extending the margins (Alt+P, M) or by changing the size of your font (Alt+H, FS).
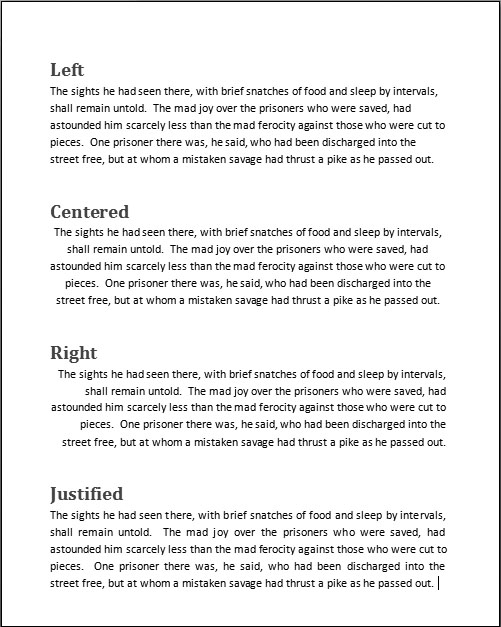
Figure 4-7. Set the alignment of your paragraphs using the buttons on the ribbon. Four settings are available: Left, Centered, Right, and Justified.
Indenting Paragraphs
One of the most common reasons for indenting a paragraph is to set off quoted text from the rest of the document. Usually, you move the paragraphâs left edge in about a half inch from the left margin. Word makes it easy to indent text in this way. Just use the Increase Indent button on the ribbon (shown back in Figure 4-6) or the shortcut Alt+H, AI. If you change your mind and want to remove the indent, use the companion command Decrease Indent (Alt+H, AO).
The ribbon buttons handle most everyday indentation chores, but what if you need to customize your indents? To do that, open the Paragraph dialog box to the Indents and Spacing tab (Alt+H, PG), and you see the Indentation tools in the middle of the tab (Figure 4-8).
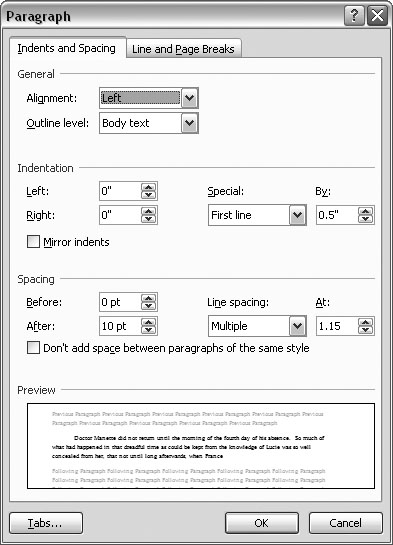
Figure 4-8. The Paragraph box is divided into four sections. From the top you see: General, Indentation, Spacing, and Preview. As you adjust your paragraph formatting using tools from the first three groups, you see the changes take place in an example paragraph in the Preview window.
The indentation tools in the Paragraph box let you set indents with much more precision than the simple Increase and Decrease buttons. For one thing, you can indent your paragraph from both margins using the Left and Right text boxes. Type a number in the box or use the arrow buttons to make an adjustment. Look in the Preview window at bottom to get a sense of the changes youâre making.
Novels, short stories, and other manuscripts often indent the first line of each paragraph. To set up this format, click the Special drop-down menu, and then choose âFirst line.â Type a number, in inches, in the By box on the right. A quarter inch (.25â) is usually an attractive first-line indent.
Tip
By the way, donât hit Tab to create a first-line indent. For one thing, it creates an amateurish, type-writer-like half-inch indent. And you lose all the benefits of paragraph formatting. For example, when you press Enter to start a new paragraph, Word automatically carries your settings forward, with a perfect first-line indent just like the paragraph above. If you use the Tab key, you have to remember to hit it at the beginning of every paragraph, and thereâs the danger of messing up your indents if you change the tab settings (Section 4.5).
For the reverse of the âFirst lineâ indent, choose the hanging indent where the first line extends to the left margin, while the rest of the paragraph is indented the amount shown in the By box. This kind of indentation makes great looking glossaries, bibliographies, and such.
Spacing Between Paragraphs
For documents like business letters or reports that use block-style paragraphs, thereâs usually a little space between each. You can adjust this spacing between paragraphs to set off some blocks of text from the rest.
Use the Paragraph dialog box (Figure 4-8) to adjust the distance between paragraphs. On the left, you can enter numbers to set the space before the paragraph and the space after. With body text paragraphs, itâs good to set the same, relatively small distance before and afterâsay, three points. For headers, you may want to put a little extra space before the header to distance it from the preceding text. That space makes it clear that the header is related to the text beneath it. Generally speaking, the more significant the header, the larger the type and the greater the spacing around it.
Spacing Between Lines
In the Paragraph box, to the right of the paragraph spacing controls, you find the âLine spacingâ tools. Use these controls to set the distance between lines within paragraphs. You have three presets and three custom settings:
-
Single keeps the lines close together, with a minimum amount of space between. Single spacing is usually easy to read, and it sure saves paper.
-
1.5 lines gives your text a little more breathing room, and still offers a nice professional look.
-
Double is the option preferred by teachers and editors, so thereâs plenty of room for their helpful comments.
-
At least is a good option if you have a mix of font sizes or include inline graphics with your text. This option ensures that everything fits, as Figure 4-9 illustrates. -
Exactly puts you in control. Type a number in the At box, and Word wonât mess with that setting. -
Multiple is the oddball of the bunch. Think of Multiple as a percentage of a single line space: 1=100 percent; .8=80 percent; 1.2=120 percent; and so on.
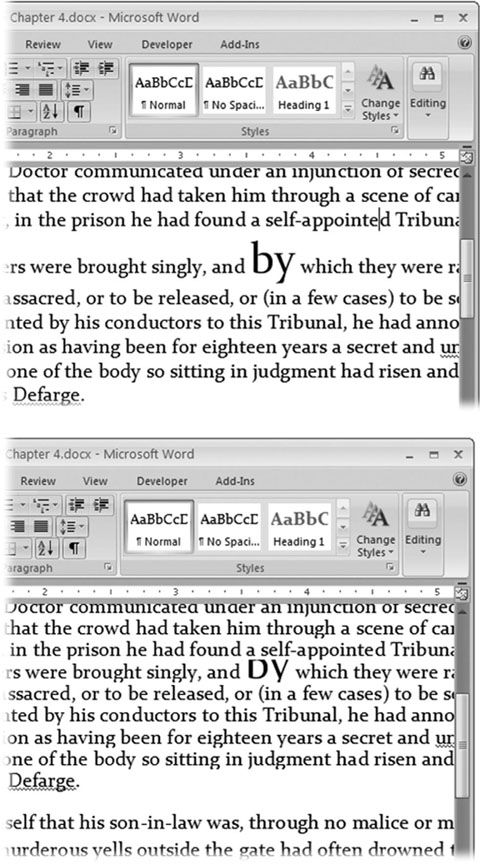
Figure 4-9. Line spacing controls the space between lines within a paragraph. These examples show the same paragraph, with two different settings. All the type is set to 11 points except for the word âby,â which is 24-point type. Top: Using the âAt leastâ option with 12 points entered in the At box, this setting adjusts so that the oversized word fits. Bottom: Using the Exactly option with 12 points in the At box, the b and y get clipped off.
Inserting Page Breaks and Line Breaks
Some things just look wrong, such as a heading at the bottom of a page with no text beneath it. That heading should be at the top of the next page. Sure, you could force it over there with a page break (Ctrl+Enter), but that can cause trouble if you edit your text and things move around. You could end up with a page break in some weird spot. The solution is to adjust your Line and Page Break settings so that headings and paragraphs behave the way you want them to.
On the Paragraph boxâs Line and Page Breaks tab (Figure 4-10), you can adjust how paragraphs handle these breaks. The behavior becomes part of the paragraphâs formatting and travels with the text no matter where you move the text or breaks. The keyboard shortcut to get there is Alt+H, PG, Alt+P. You can use four settings:
-
Widow/Orphan control. Single lines abandoned at the top (widows) or bottom (orphans) of the page look out of place. Turn on this checkbox, and Word keeps the whole family, er, paragraph together.
-
Keep with next. Certain paragraphs, like headings, need to stay attached to the paragraph that comes immediately after them. Choose the âKeep with nextâ option for your headings, and they always appear above following paragraph. -
Keep lines together. Sometimes you have a paragraph that shouldnât be split between two pages, like a one-paragraph quote or disclaimer. Use this option to keep the paragraph as one unit. -
Page break before. Use this command with major headings to make sure new sections of your document start on a new page.
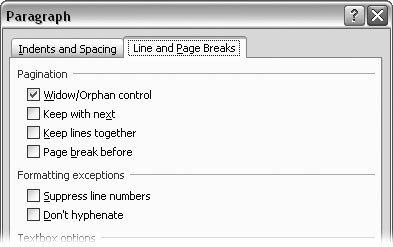
Figure 4-10. Use the Line and Page Break settings to control the appearance of your text and to avoid awkward transitions between pages.
Creating Bulleted and Numbered Lists
Bullets and numbers add impact and help organize information. The bullets in the previous section call attention to the Line and Page Breaks commands and show that the commands are related to each other. Numbered paragraphs send a different signal, implying that the items listed are sequential or have a hierarchy. This book uses numbered paragraphs for step-by-step instructions. Meeting minutes are usually numbered, both as a point of reference and to indicate the order of the meetingâs events.
Like the other paragraph formatting options, you donât have to select a paragraph to format it. Itâs enough just to have the insertion point in the paragraph. When using bullets or numbers, you usually want to format more than one paragraph. To do that, make a selection, and then click the bullet or number button.
Bulleted paragraphs
Itâs easy to turn an ordinary paragraph into a bulleted paragraphâWord does all the heavy lifting for you. You may spend more time choosing a bullet style than applying it.
Hereâs how to create a bulleted list:
-
Go to Home â Paragraph, and then click the triangle next to the Bullet button to open the Bullets menu (or press Alt+H, U).
At the top of the menu (Figure 4-11), you see bullet styles that you used recently. In the middle, you see your Bullet Library. The bottom section shows bullet styles that have already been used in the document. At the very bottom are two commands for customizing bullets.

Figure 4-11. The Bullet menu provides choices from the traditional filled circle to more contemporary options. If you have your own ideas for bullet design, at the bottom of the menu click Define New Bullet.
-
On the Bullets menu, click to choose a bullet style.
When you click a bullet to apply that style to the paragraph, a couple of things happen. Word adds the bullet and automatically formats the paragraph with a hanging indent (Section 4.3.2), so that the first line of the paragraph extends farther to the left than the other lines. The bullet appears in this overhang, calling attention to the bullet and setting off the paragraph from the other body text.
-
Type some text, and then press Enter to start a new paragraph.
When you hit Enter to create a new paragraph, Word assumes that youâre continuing with your bulleted list, so it adds the same bullet and indent automatically. You donât have to do anything; just keep on writing.
-
When youâre through with your bulleted list, press Enter, and then click the Home â Paragraph â Bullet button again to turn off bullet formatting.
The paragraph with the insertion point changes from a bulleted paragraph to a normal paragraph.
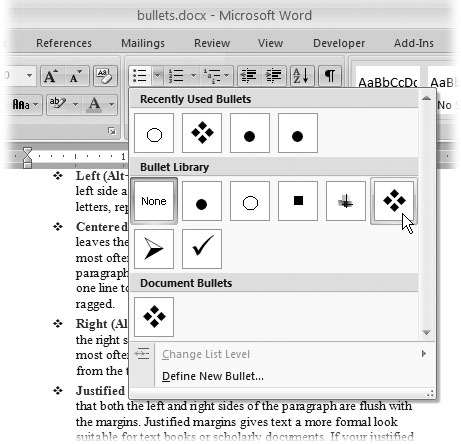
If you have a few paragraphs that youâve already written, and you want to change them to bulleted paragraphs, just select all the paragraphs, and then click the Bullet button.
Customizing bullets
You donât have to settle for the bullets shown on the menuâWord has more choices tucked away. You can even use your own graphics for bullets, like a miniaturized version of your company logo. To explore the Bullet options available to you, open the Bullet menu (Alt+H, U), and then, at the bottom of the menu, click Define New Bullet. The Define New Bullet Box opens, showing you three buttons at the top: Symbol, Picture, and Font. Use the Symbol to browse through additional bullet options that are built into Wordâs type libraries. Use the Font button to apply character styles to your choice such as font size, shadow, or bold formatting.
The middle button is the most interestingâit opens the Picture Bullet box (Figure 4-12) where you see a whole slew of bullets based on picture files. These files are the same sort used for drawings and photographs, with filename extensions like .jpg, .gif, .pct, and .emf. In addition to these dozens of bullet options, you can use your own picture or graphic files as bullets. Just click the Import button at the bottom-left corner to open the Add Clips to Organizer box. Use this Windows file box to select any picture on your computer and add it to your bullet library.
Numbered paragraphs
In most cases, numbered paragraphs work just like bulleted paragraphs. You can follow the step-by-step instructions in the previous section for making bulleted paragraphs to make numbered paragraphs. Just click the Numbering button, and then choose a number style (Figure 4-13).
The main distinction between the numbered paragraphs and the bulleted paragraphs is in the options. For numbered paragraphs, you can choose from Arabic numbers, Roman numerals, numbers set off by parentheses, and alphabetic sequences. You can even use words such as One, Two, Three, or First, Second, Third.
Multilevel lists
Multilevel lists are a more advanced numbering format. They help you create project and document outlines, as well as legal documents divided into articles and sections. In a multilevel list, each new level is indented (nudged to the right), and usually each new level has a new number format (Figure 4-14). In addition to outline and legal numbering, multilevel lists can use bullets instead of numbers. So for example, you can create a bulleted list that uses squares for level one, triangles for level two, and circles for level three. If you choose a bulleted multilevel list, the lines within the levels arenât sequenced; theyâre just bulleted.
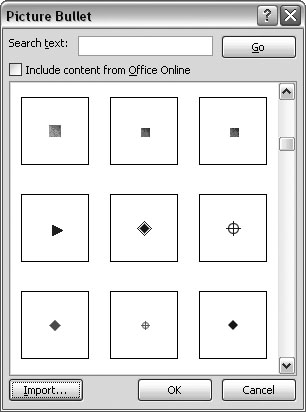
Figure 4-12. Open the Picture Bullet box to see bullets based on picture files like JPEG and GIF. If you have pictures or drawings on your computer that you want to use as bullets, then click the Import button in the lower-left corner.
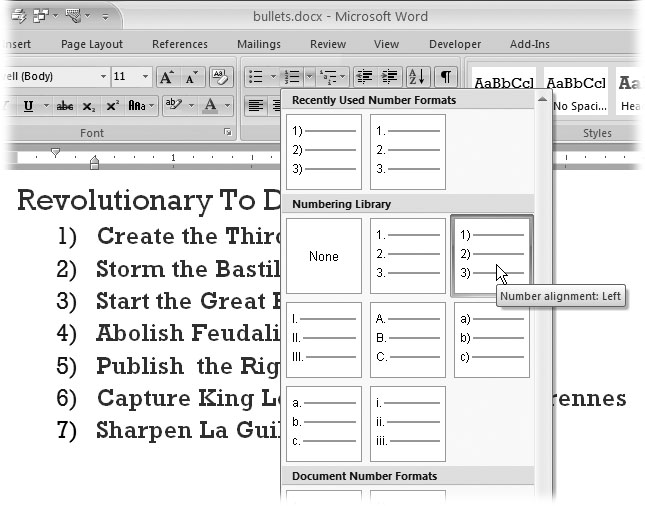
Figure 4-13. Word provides several styles for numbered paragraphs. In fact, a better term would be sequenced paragraphs, because not all of the styles use numbers. You find recently used styles at the top of the list. To customize your numbered lists, click Define New Number Format (not shown) at the bottom of the list.
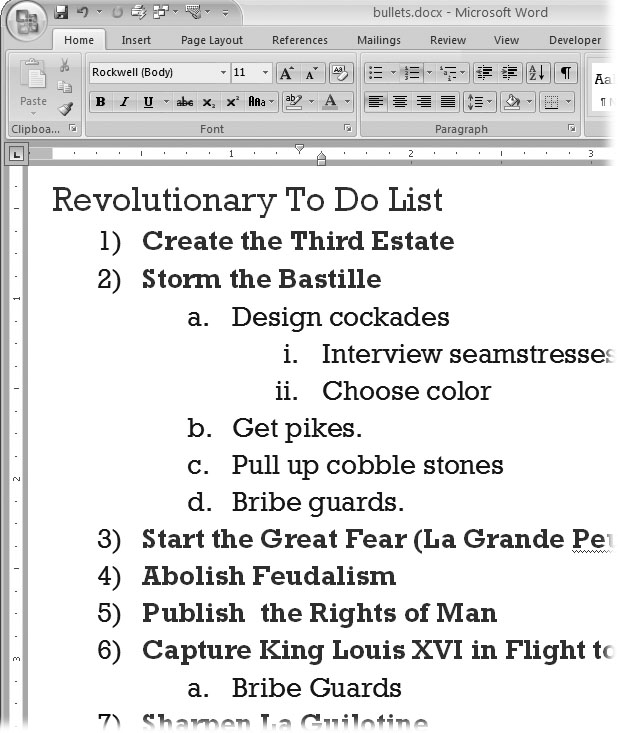
Figure 4-14. Multilevel lists add an extra twist to the numbered format. Theyâre like outlines and provide a new sequence of characters for each new outline level.
Setting Tabs
The lowly Tab key contains more power than you may think. Sure, you can use the Tab key to scoot the insertion point across the page in half-inch increments. But Wordâs tab tool is capable of much loftier feats: You can use it to design a dinner menu, create a playbill, or develop a series of consistently formatted reports.
Tab stops are all about precision alignment, giving you control over the way you present text and numbers to your readers. For example, on your dinner menu you can use tab leaders (dotted lines like the ones in this bookâs table of contents) so that your readerâs eye tracks from Wild Salmon to the exceptionally reasonable price youâre asking. Once you have settings you like, you can save and reuse them. (Howâs that for efficiency?)
Before you start working with tabs, you need to know a few basic terms:
-
Tabs. Technically considered tab characters, tabs are hidden formatting characters, similar to space characters. Tabs are embedded in your documentâs text. -
Tab stops. These paragraph settings define the position and characteristics of tabs in your document. Think of tab stops as definitions, describing your tabs. To define them, you use Word tools, like the Ruler or the Tabs dialog box. -
Tab key. The key on your computer keyboard that inserts tabs into your text.
Press the Tab key, and Word inserts a tab in the text at that point. The tab character makes the insertion point jump left to right and stop at the first tab stop it reaches. If you havenât set any new tab stops, Word uses the built-in set of tab stopsâone every half inch across the widthâthat every new, blank document starts out with.
How Tab Stops Work
Tab stop settings apply to paragraphs. If a paragraph has several lines, the tab stops are the same for all the lines within that paragraph. If you havenât deliberately set tab stops, Word provides built-in tab stops at half-inch intervals. These stops are left tab stops, meaning the text aligns on the left side. You can see all tab stops on the horizontal rulerâthey show as small vertical tick marks in the gray area below the number scale (Figure 4-15).

Figure 4-15. Tabs are just white space in your text, but for Word, theyâre these little arrow characters that position your text on the line. You can change your Word Options (Office button â Word Options â Display) to show tabs on your screen.
Tip
If you donât see tab stops in the ruler, click within a paragraph. Remember, tab stops are paragraph settings, so your insertion point must be in a paragraph to see them.
Viewing Tab Marks in Your Text
Tabs are invisible on the printed page, like spaces or paragraph marks. Sometimes, when your document behaves unexpectedly, it helps to reveal the hidden characters so you can see if tabs are the culprit. After all, when theyâre hidden, all you see is white space on the page, however, spaces, tabs, and indents each behave quite differently.
To view tabs within your text:
-
Choose Office button â Word Options to open the Word Options dialog box (Figure 4-16).
The Word Options button is at the bottom of the Office menu.

Figure 4-16. Use the Word Options box to reveal formatting characters like tabs, spaces, and paragraph marks. When you turn on the checkbox next to the mark, you see these nonprinting characters on your screen.
-
On the left side of the Word Options box, choose the Display option.
The panel on the right is divided into three parts. The top section shows page display options, the middle section shows formatting marks, and the bottom section holds printing options.
-
In the middle group, turn on the âTab charactersâ checkbox to make your tabs visible.
An icon next to this checkbox shows you the symbol for tab characters. This mark shows up on your computer screen but not in printed text.
-
Click OK to save the settings and close the dialog box.
The box closes and you see the tabs as small arrows in your text.
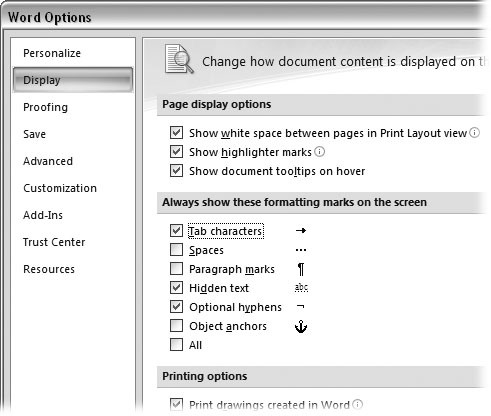
Deleting and Editing Tabs
Because tabs are characters within your document, you can delete, copy, and paste them, just as you would any other character or text fragment. Maybe you want to delete a tab just click immediately after a tab character, and then press the Backspace key. You can also use the Tabs box (Figure 4-17) for to control tabs.
With tabs, you can use almost any editing trick that youâd use on other characters. You can select and drag a tab to a different place in your text. You can use shortcut keys, such as Ctrl+X to cut a tab and Ctrl+V to paste it someplace else. (All of these activities are much, much easier when youâve set your Word Options to view tab marks as described previously.)
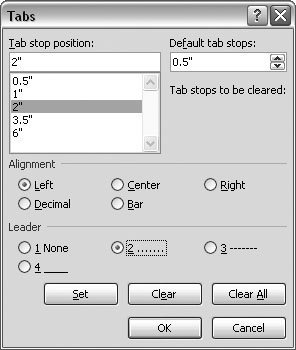
Figure 4-17. The Tabs box puts you in complete control of all things tabular. When you select a specific tab in the upper-left box, you can customize its alignment and leader characters.
Types of Tabs
Five types of tabs are available in Wordâone of which isnât a true tab but works well with the others:
-
Left tab. The most common type of tab, it aligns text at the left side; text flows from the tab stop to the right. When you start a new, blank document, Word provides left tabs every half inch.
-
Center tab. Keeps text centered at the tab stop. Text extends evenly left and right with the tab stop in the middle.
-
Right tab. Aligns text to the right. Text flows backwards from the tab stop, from right to left.
-
Decimal tab. Used to align numbers, whether or not they have decimals. Numbers align with the decimal point centered on the tab stop. Numbers without decimal points align similar to a right tab. -
Bar tab. The Bar tab is the oddball of the group and, no, it has nothing to do with your local watering hole. It also has nothing to do with aligning text. It inserts a vertical bar in your text as a divider. The bar appears in every line in the paragraph. This tab stop ignores tabs inserted in your text and behaves in the same manner whether or not tab characters are present.
Note
There may be a certain Microsoftian logic in grouping the bar tab with the tab feature, but Word provides other ways to place vertical lines on your pages that you may find more intuitive. You can use Insert â Insert Shapes â More and choose the line for free-form lines. Or you can use borders for paragraphs or tables.
Tab Leaders
Tab leaders help readers connect the dots by providing a trail from one tabbed item to the next. Theyâre ideal for creating professional-looking menus, playbills, and more.
Here are some examples:
	Hamlet, Prince of Denmark...........Sir Laurence Olivier
	Ophelia, daughter to Polonius.......Roseanne Barr
Four Leader options can be used with each type of tab stop except the bar tab:
	None                                No leader here
	Dotted..............................You've seen this before
	Dashed_ _ _ _ _ _ _ _ _ _ _ _ _ _ _ For a different, intermittent look
	Underline__________________________ When only a solid line will do
As visual aids, leaders are quite helpful, and they work equally well for text and numbers.
Using Wordâs Rulers
If youâre visually oriented, you may prefer the ruler for futzing with tab stops, page margins, and indents. Two rulers are availableâhorizontal and vertical. The horizontal ruler appears at the top of the page, giving you quick access to your tab, indent, and margin settings. To make the rulers visible, press Alt+W, R, or click the View Ruler button at the top of the right-hand scroll bar (Figure 4-18).
Tip
The ruler marks off your page in the measuring units of your choice. The factory setting uses inches, but if you want to make changes, you can do that in Word Options. Go to Office button â Word Options â Advanced. Scroll down to the group under Display, and then change the drop-down menu labeled âShow measurements in units ofâ to your preferred units of measurement.
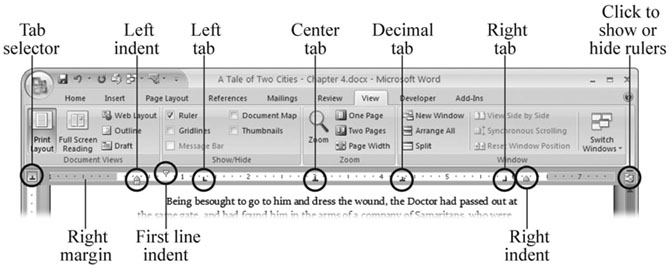
Figure 4-18. Wordâs ruler provides lots of information about the formatting of the current paragraph, that is, the paragraph that contains the insertion point. Use the button just above the scroll bar for a quick way to show and hide your ruler.
Managing Tab Settings with the Ruler
In Figure 4-18, the ruler measures the page in inches. The grayed areas at both ends of the ruler indicate the page margins. The numbers on the ruler mark the distance from the left margin in both directions, left and right. Note the number 1, at the left edge of the ruler in Figure 4-18.
Setting tab stops
Wordâs every-half-inch tab stops can work for many of your documents, but sooner or later, you may need to put a tab stop in a different place or change its style. No problemâitâs easy enough to do with the ruler.
Setting a new tab stop is a two-step process:
-
Using the selection box to the left of the ruler, choose the type of tab you want.
The icon in this box shows what kind of tab youâre about to applyâLeft, Center, Right, Decimal, or Bar. When you hold your cursor over the box for a second or two, a little screen tip appears describing the formatting option. Click the box to cycle through the tab stop and indent options.
-
Once youâve selected the tab type you want, click the ruler to position the tab.
Click the point on the ruler where you want to place the tab stop. An icon appears on the ruler showing the position and the type of tab stop.
Tip
If you find the tab icons a little confusing, hereâs some help: Think of the vertical line as the tab stop and the horizontal line at the bottom as the direction your text flows. For example, the Left tab icon is L shaped, indicating that text flows to the right, away from the tab stop. The Center tab icon has the vertical line in the middle.
You can add an almost limitless number of tab stopsâone for every tick mark on the ruler. If you need greater precision, use the Tab dialog box described in Section 4.5. Setting a tab stop removes all the built-in tab stops to its left, but the ones to the right remain.
Adjusting and removing tab stops with the ruler
If a tab stop isnât exactly where you want it, you donât have to delete itâjust drag it to a new position on the ruler. If you wish to remove a tab stop, drag it up or down off the ruler, and it disappears. When you make these changes, your document shows the consequences. Any tabs in your text shift over to the next readily available tab stop, which can be a built-in tab stop or one that youâve set.
Setting Margins with the Ruler
You can always use the Page Layout tools (Page Layout â Page Setup â Margins or Alt+P, M) to set your margins with a click of the mouse, but for visual control, nothing beats the ruler (Figure 4-19). The lighter part of the ruler shows the text area, and the darker part shows your margins. Making adjustments is simply a matter of clicking and dragging the margin to a new location. Keep in mind that changing your margin affects the entire document section; more often than not, that means it affects the entire document because many documents are a single section. (For more details on working with sections, see Section 9.2.)

Figure 4-19. Hold your cursor over the margin boundary on the ruler, and it changes to a double arrow, as shown here. The screen tip shows what youâre pointing toâthe right margin, in this case. Drag the boundary to a new location to change your document margins.
Tip
To avoid confusion, remember that indents are used to change the width of a single paragraph, while margins are used to change the paragraph width for an entire section or document.
Adjusting Paragraph Indents with the Ruler
Using the ruler to adjust indentation is similar to changing margins. Itâs just a matter of clicking and dragging. Indents are bit more complicated because you have a few more options, and that means more tools and widgets (Figure 4-20).
It can take awhile to get used to adjusting paragraph indents with the ruler. For one thing, you need a steady hand and accurate clicking to zero in on those little triangle buttons. The top triangle sets the first line indent and moves independently. The bottom triangle creates a hanging indent, and you can move it independently too, as long as you grab only that triangle. That little box below the triangle is your left indent, and if you drag it, both it and the top (first line) indent marker move together.
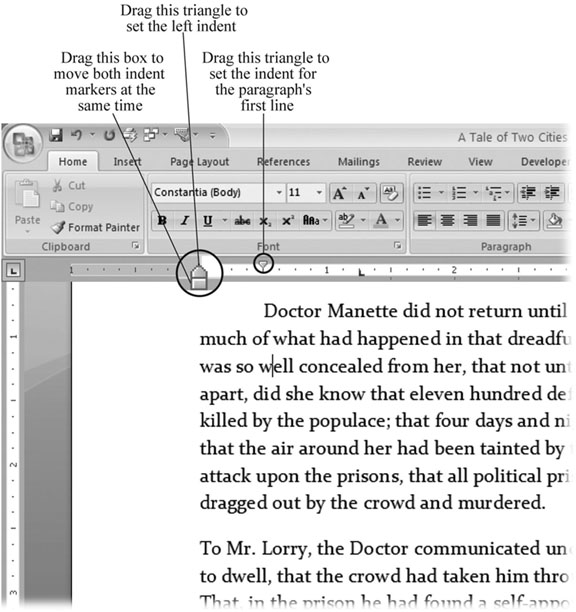
Figure 4-20. To adjust paragraph indents, slide the little triangles along the ruler. The changes you make affect the paragraph with the insertion point. If you want to make changes to more than one paragraph, make a multiple selection before you start.
Fast Formatting with Format Painter
Whether itâs a special heading or a paragraph of text, formatting a paragraph just the way you want it is a lot of work. Once you have the margins, indents, and tabs in place, and youâve got the font style and size set, youâve invested a chunk of time in the project. Fortunately, you can capitalize on that investment. The Format Painter works like magic. You can use it to copy the formatting of a word, heading, or paragraph onto something else. You donât have to worry about any of the formatting details. You donât even need to know how something is formatted, so long as you like the way it looks.
Hereâs how it works:
-
Select the character or paragraph with the formatting that you want to copy.
You can copy and paint either the character or the paragraph formatting. If you want to copy just text formatting (font, size, text color, and so on), select a few letters or a word with that formatting, not the whole paragraph. Selecting an entire paragraph, complete with the paragraph mark at the end, copies both the character formatting and the paragraph formatting. If you donât select anything, the Format Painter uses the formatting from the current paragraph, so to copy paragraph formatting alone (for example, tabs and indents), just click anywhere in the paragraph.
-
Go to Home â Clipboard and click the Format Painter button, or just press Alt+H, FP.
Your cursor acquires a tiny paintbrush icon. If you have only one quick change to make, just click the Format Painter once. However, if you want to copy the same formatting to several different locations, double-click the Format Painter. When you double-click, the button stays locked down, indicating that it will stay on and let you paint multiple times until youâre ready to stop.
-
Drag the Format Painter over the text or paragraph that you want to change.
Hereâs the fun part. Like magic, your selection takes on all the formatting that you copied. If you double-clicked for multiple format painting, you can keep on dragging over text or clicking paragraphs. When youâre through, hit Esc. The Format Painter button pops back up, and your cursor changes back to its normal I-beam appearance.
Formatting with Styles
Like the Format Painter, Wordâs styles are great time-savers because they let you apply a whole bunch of formatting commands in one fell swoop. Unlike Format Painter, Wordâs styles are permanent repositories of formatting information that you can always apply with one click. So, if youâve discovered or created the perfect style (formatting) for a heading, you can apply that same style to headings today, tomorrow, or a week from tomorrow.
Microsoft provides sets of predesigned Quick Styles. These sets include a Normal style for body text and a number of Heading styles. You can also find a variety of styles for lists, quotes, references, and for paragraphs or text that deserve special emphasis. With a click of your mouse, you can apply any one of these styles and make dramatic changes to your document (Figure 4-21).
Some styles define character formatting, such as font, font size, font style, and special effects such as underlining or strikethrough. Other styles define both character formatting and paragraph formatting. Paragraph formatting includes things like paragraph alignment, line spacing, bullets, numbering, indents, and tab settings.
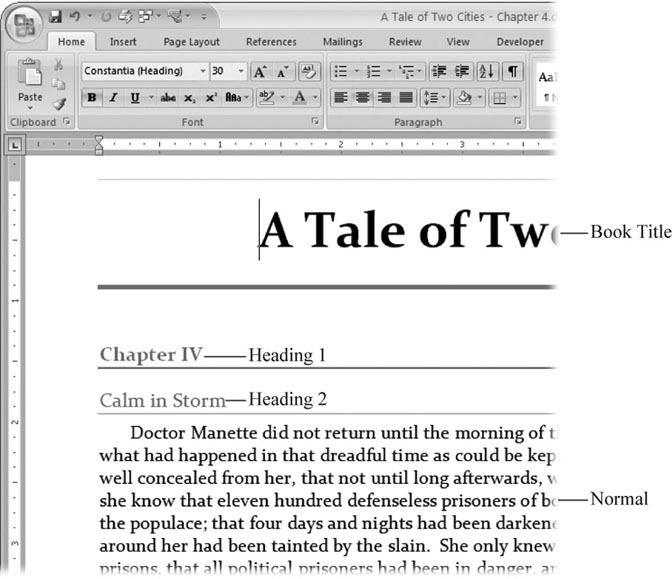
Figure 4-21. This attractive page uses four Quick Styles: Book Title style centers the text and sets the font to 30-point Constantia with colored borders above and below. Heading 1 for the chapter heading uses a different color and generous paragraph spacing. The Heading 2 spec uses a complementary color and closer paragraph spacing. Finally, the body text uses the Normal style, which provides, among other things, an indent for the first line of each paragraph.
Applying Quick Styles
Itâs easy to preview and apply a style to your text. The action takes place in the Styles group on the Home tab. Follow these steps:
-
Select the text or paragraph that you want to format.
When you want to apply a style to an entire paragraph, just click to put the insertion point in that paragraph. When you want to apply a style to text, you need to select the text first.
-
Go to Home â Styles and hold your cursor over a style to see a live preview in your document.
The Styles group shows a few styles right on the ribbon. To see more styles, use the arrows on the right to scroll through the list, or click the button at bottom to open the entire menu (Figure 4-22).
When you hold the mouse cursor over a style, the text in your document changes, showing you the effect of applying that style.
-
Click to apply the style.
When you click a style on the ribbon or in the menu, Word applies that style to your paragraph or text selection.
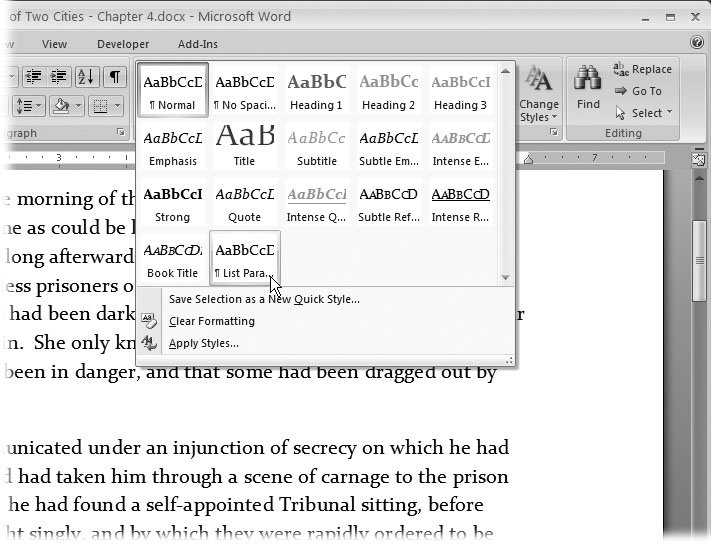
Figure 4-22. Each style is a collection of formatting commands that you can apply with a mouse click. To browse the available styles, go to Home â Styles. When you hold your mouse over a style, the text in your document changes, giving you a live preview of the style. Word offers dozens of predesigned Quick Styles, or you can create your own.
Modifying Styles
When you apply a style to a paragraph of text, you do more than just change its formatting. In essence, youâve attached that style to the paragraph. If you make changes to that style later, the paragraph reflects those changes. Imagine that you have a style called Heading 1 that centers the headings on the page. Youâve used this style repeatedly throughout your 400-page novel about the French Revolution. Say, you decide your novel would look better with that heading aligned on the left margin rather than centered. Instead of making the change to each individual heading, you edit the Heading 1 style. When you change the style definition, all your headings that are based on the Heading 1 style change to match.
Here are the steps to modifying a style. In this example, you give the Heading 1 style left alignment:
-
Go to Home â Styles and click the Styles dialog box launcher (Figure 4-23).
In the Styles box, you can click to apply any one of the styles to your current selection or paragraph. Even when the Styles box is open, you can click within your text to move the insertion point to a different paragraph. And you can use the scroll bar, the PageUP and PageDN keys, or any other method to navigate through your document.
When you hold your cursor over a style, a screen tip pops up showing you details. Turn on the Show Preview checkbox at bottom to see a more visual representation of each of the styles.

Figure 4-23. Open the Style dialog box to see a complete list of all available styles. On the right side, a paragraph mark shows that a style includes paragraph formatting. The lowercase âaâ shows that the style includes character formatting. Click the down arrow button to open a menu where you can modify the style definition.
-
Right-click Heading 1 (or whatever style you want to change), and then choose Modify from the shortcut menu.
The Modify Style dialog box opens (Figure 4-24). Here you can get under the hood and tinker with all the formatting options.
Tip
When you right-click anywhere on the style name, or click the V button in the Styles dialog box, a context menu shows you several choices for changing and working with the selected style. At the top of the list is âUpdate Heading 1 to Match Selection.â This option changes all the formatting in the selected style so that itâs identical to the current paragraph or selection.
-
In the lower-left corner of the Modify Style box, click the Format button, and then choose Paragraph.
The Paragraph dialog box opens. Yep, itâs exactly the same box you open when you click the Paragraph dialog box launcher on the ribbon or press Alt+H, PG (see Figure 4-8). In fact, the Format button leads you to many familiar dialog boxes, from Fonts to Borders to Tabs. The difference, of course, is that youâre now changing a style format, not just a few paragraphs.

Figure 4-24. The Modify Style box is command central for tinkering with your style definitions. The properties at the top determine the behavior of the styles when youâre working with text. The preview window in the center shows an example of the style in action. Use the format button in the lower-left corner to open dialog boxes to make changes in the character and paragraph formatting.
-
At the top of the Paragraph box, in the General group, click the Alignment drop-down menu, and then choose Left.
In this example, youâre just making a single change, but you can also make changes to any of the other formatting options in this box.
-
Close the Paragraph box, the Modify Style box, and the Styles box.
Everythingâs done except the cleanup. Close each of the boxes youâve opened to go back to your text and continue editing.
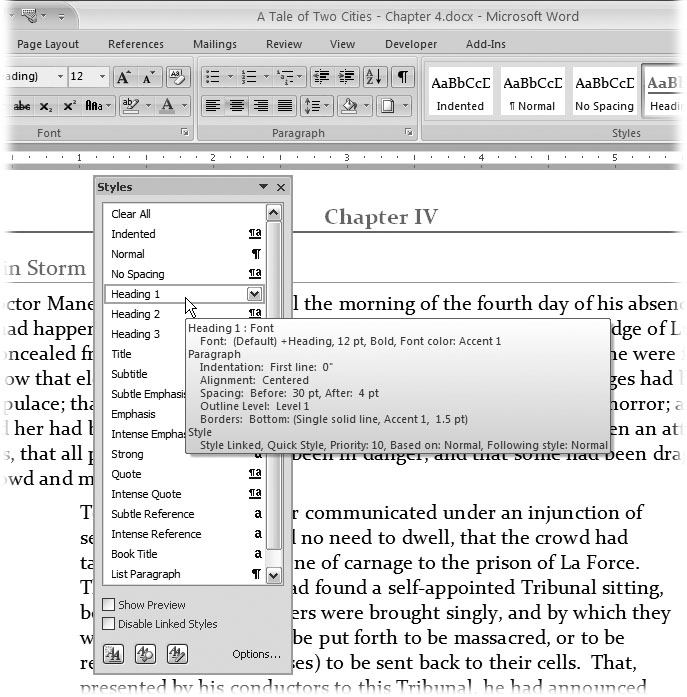

Managing Style Sets
A style set is a collection of styles. Microsoft includes several predesigned style sets with Word, with names like Classic, Distinctive, Elegant, Formal, and Modern. Go to Home â Styles â Change Styles (or press Alt+H, FQ) to see them listed under the Change Styles button (Figure 4-25). Each of Wordâs predesigned style sets includes a Normal style, several heading styles (Heading 1, Heading 2, and so on), and other paragraph and character styles (like Title, Subtitle, Intense, Strong, and Reference). Even though a style has the same name in different setsâlike Heading 1âthe formatting is likely to be quite different. So when you change your documentâs style set, you can get a radically different look.
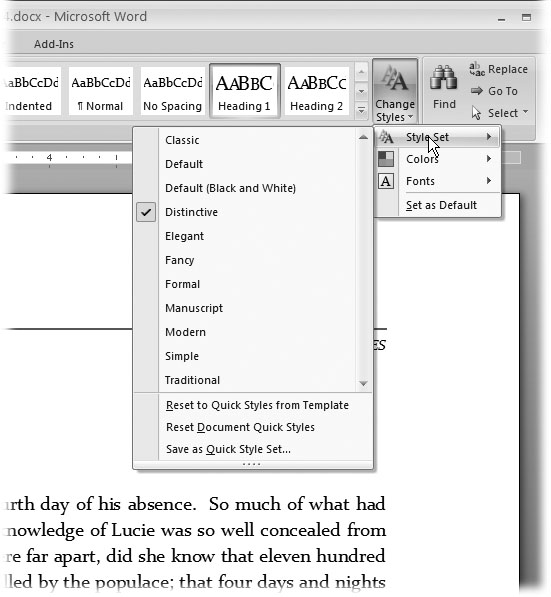
Figure 4-25. Click the Change Styles button, and then click Style Set to see the different style sets available. Using the Colors and Fonts options, you can make quick changes to the look of your document. Second thoughts? Click âReset to Quick Style from Templateâ to undo any changes made in haste. At the very bottom, you can use the âSave as Quick Style Setâ command to immortalize your current styles as a brand-new style set.
The style set thatâs in use has a checkmark next to the name. If you move your cursor over the name of a different style set, Live Preview shows you your text formatted with that new style set. To make the change permanent, just click the name. The menu closes, and your text has a whole new look.
Creating Your Own Style Set
The best way to create your own style set is to start with one of Microsoftâs predesigned sets, and then modify it. Hereâs a basic procedure for customize an existing style set to meet your needs.
-
Use live preview to browse the existing style sets and choose one thatâs a reasonably close match to what you have in mind.
For example, open a document to a place where you can see a few different types of styles, like body text, some headings, and maybe a numbered or bulleted list.
-
Go to Home â Styles â Change Styles â Style Set (Alt+H, GY). Work your way down the list of style sets, and click one that has a look thatâs similar to the one you want.
The Style Sets submenu lists the style sets available. Hold your mouse cursor over the name of a style set, and live preview shows you how that style set changes your document. In the next steps, youâll modify the style set to be exactly what you want.
-
If necessary, modify the colors and fonts using the options on the Change Styles menu.
The first and most obvious changes you can make are to the colors and fonts. The commands to make those changes are right there on the Change Styles menu (Home â Styles â Change Styles). The previewing procedure is the same: Just hold your mouse cursor over a Font or Color style, and you see your document change. Click to choose a color or font style.
Start with the Normal paragraph style. Consider the font, font size, color, and any other character formatting that you may want to change. (But donât get crazy; after all, this is the Normal paragraph style.) After the Normal paragraph style, move on to the Heading styles. The font size and color you choose for your headings set the tone for your entire document.
-
Examine the existing paragraph styles, and if necessary, make changes.
Consider the line spacing and indents for normal paragraph. Do you want more or less space around them on the page? Choose the paragraph spacing for each heading style. Think about bordersâperhaps youâd like a nice line above or below a heading.
Work your way through any of the existing paragraph or character styles that you know youâll use.
-
Consider the paragraph styles you need, and add new ones if theyâre missing.
After youâve modified the existing styles, think about styles that youâd like to have but arenât part of the set. Maybe you need a numbered list, or a special sidebar paragraph with a border running all the way around it. Create whatever styles you need, and then add them to your style set.
Donât worry if you canât think of everything just now. You can always add new styles later when youâre using the style set.
-
When youâre done customizing your style set, go to Home â Styles â More â Save Selection as Quick Style Set (or Atl+H, L), and then save it with a new name.
The Save command is at the very bottom of the submenu. As a last step, save your style with a name, and it becomes one of the available style sets (Figure 4-26).
A standard Windows Save dialog box opens. Type a name for your style set in the âFile nameâ text box, and then click Save. After youâve saved it, your customized style shows on the Change Styles menu with all the rest.
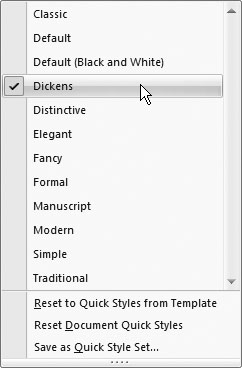
Figure 4-26. You can create a custom style set thatâs fine-tuned to your own specs. Once saved,
your style set shows up on the Change Styles menu.
Get Word 2007: The Missing Manual now with the O’Reilly learning platform.
O’Reilly members experience books, live events, courses curated by job role, and more from O’Reilly and nearly 200 top publishers.
4.3. Группа Шрифт вкладки Главная
Изменять параметры шрифта можно, используя не только вкладку Шрифт одноименного окна. Во многих случаях гораздо удобнее пользоваться инструментами группы Шрифт вкладки Главная на ленте (рис. 4.7).

Рис. 4.7. Группа Шрифт вкладки Главная
С помощью кнопок группы Шрифт можно выполнять все основные действия по оформлению текста:
• изменять начертание шрифта – делать полужирным

курсивным

подчеркнутым

зачеркнутым

Если щелкнуть на треугольнике справа от кнопки Подчеркнутый, то появится список, в котором можно выбрать тип, толщину и цвет линии подчеркивания (рис. 4.8);
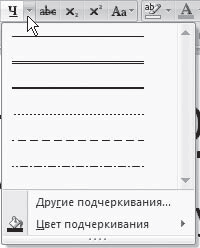
Рис. 4.8. Список вариантов линии подчеркивания
• создавать подстрочные

и надстрочные

индексы;
• изменять регистр

При щелчке на треугольнике справа от кнопки появляется меню, из которого можно выбрать нужное действие (рис. 4.9);

Рис. 4.9. Меню кнопки Регистр
• выделять текст цветом

(можно сравнить с выделением текста на листе бумаги маркером) и задавать цвет шрифта

Если щелкнуть на треугольниках справа от кнопок, то появится список доступных цве,
тов (рис. 4.10);

Рис. 4.10. Список доступных цветов шрифта
• задавать гарнитуру (тип) шрифта (рис. 4.11). Наиболее распространены гарнитуры Times New Roman, Arial, Courier New;

Рис. 4.11. Список гарнитур шрифта
• выбирать кегль (размер) шрифта (рис. 4.12);

Рис. 4.12. Список размеров шрифта
• увеличивать

или уменьшать

размер шрифта с шагом в один пункт;
• очищать формат, то есть убирать оформление

Данный текст является ознакомительным фрагментом.
Читайте также
Как увеличить шрифт на отдельных участках экрана
Как увеличить шрифт на отдельных участках экрана
Возможность увеличить шрифт на экране очень даже для нас полезная. Попробуем.1. Нажимаем на панели задач Пуск.2. Находим Все программы.
3. Кликаем на неё.4.
5. Выбираем Стандартные.
6. Далее по Специальные возможности.7. А
На шрифт и цвет товарищей нет
На шрифт и цвет товарищей нет
Начнем этот раздел с очередного мини-открытия. Оказывается, на многих страницах мы сами можем выбрать наиболее удобные для нас параметры просмотра, касающиеся шрифта и его цвета, а также цвета фона и гиперссылок.Возможным это становится
6.3. Шрифт
6.3. Шрифт
Информация, которая выводится на экран монитора, отображается с использованием определенного размера шрифта. При этом приложения, которые используют в своей работе системные шрифты, попадают под управление операционной системы и она сама может регулировать
7.2.2. Главная страница
7.2.2. Главная страница
Главная страница сервиса доступна по адресу http://maps.yandex.ru/. Информации на этой странице немного — список доступных карт и поле для поиска информации на карте. Щелчок на названии карты или региона переводит на страницу, где можно будет работать с
Самая главная тайна
Самая главная тайна
Сейчас я открою вам самую главную тайну. Как быстро нарастить группу в Facebook? Чем больше людей посетит вашу Welcome Page, тем быстрее вы наберете необходимое число друзей. Всё.Выше я уже приводил цифры конверсии, повторю их еще раз. В среднем в мире один
Главная страница сайта
Главная страница сайта
Главная страница сайта имеет самый высокий показатель отказов. Ее покидают 40–60 % посетителей, так как именно главная страница появляется в поиске по самым широким запросам, которые могут вводить представители разной целевой аудитории.Если
Вкладка Главная
Вкладка Главная
Небольшое вступление. На экране у нас уютно расположился текст сказки про маленький компьютер (см. рис. 1.8). Допустим, что-то нам в нем не нравится, и мы хотим это что-то изменить. Вы наверняка умеете пользоваться клавишами Backspace и Delete, но они удаляют символы
Шрифт
Шрифт
Вы, скорее всего, видели в разных документах Word, что одна и та же буква на экране может выглядеть совершенно по-разному.Итак, у букв есть три важнейших свойства, которые вы можете изменять в Word – шрифт, размер и начертание. Помогут вам в этом инструменты группы Шрифт
Вкладка Главная
Вкладка Главная
Начнем с вкладки Главная (рис. 3.8).Буфер обмена. Здесь для вас не будет никаких неожиданностей: команды Вырезать, Копировать, Вставить (работают горячие клавиши Ctrl+X, Ctrl+C, Ctrl+V) и кнопка вызова панели буфера обмена на 24 элемента. Как и в Word, вы можете запомнить 24
Урок № 97. Главная книга
Урок № 97. Главная книга
Главная книга – это один из основных документов бухгалтерской отчетности, который содержит информацию о корреспонденции каждого счета со всеми другими счетами, а также о сальдо по каждому счету.Чтобы сформировать Главную книгу, выполните
Панели Character (Шрифт) и Paragraph (Выравнивание)
Панели Character (Шрифт) и Paragraph (Выравнивание)
Панели Character (Шрифт) и Paragraph (Выравнивание) содержат в себе все необходимые опции, позволяющие настроить разнообразные параметры шрифта и выравнивания текста по изображению (рис. 4.26).
Рис. 4.26. Панели Character (Шрифт) и Paragraph
Группа Шрифт ленты
Группа Шрифт ленты
На вкладке Главная ленты расположена группа Шрифт, которая содержит инструменты форматирования для изменения шрифта и его атрибутов. Кроме того, в этой группе находится кнопка для выбора цвета заливки ячейки и кнопка выбора границ ячейки.
3.4. Главная диспетчерская процедура.
3.4. Главная диспетчерская процедура.
Она называется OnDispatch и объявлена какOnDispatch proc near, pDeviceObject:PDEVICE_OBJECT, pIrp:PIRPЗдесь нам важен указатель на структуру с данными запроса pIrp. Данная структура довольно сложна. Вы можете найти её объявление в файле usewdm.inc.Но нам понадобятся лишь
Как изменить шрифт и цвет печатаемого текста
Как изменить шрифт и цвет печатаемого текста
Fiction Book Designer поддерживает два типа назначения шрифтов: глобальные и локальные. Эти назначения включают в себя тип, размер и цвет шрифта и делаются через меню «Fonts» и «Colors». Глобальные назначения влияют на всю книгу в целом, тогда
Текущий шрифт Font
Текущий шрифт Font
Объект текущего шрифта возвращается функцией Font и имеет тип GraphABCFont:
function Font: GraphABCFont;
Класс GraphABCFont имеет следующий интерфейс: Кроме этого, можно изменять свойства текущего пера через объект Font.
type
GraphABCFont = class
property NETFont: System.Drawing.Font;
property Color: GraphABC.Color;
Last updated Monday, Dec. 5, 2022, at 11:12 a.m.
This article is based on legacy software.
You can format the text in your Word documents by changing the font, size, color, character formatting, and text alignment. This document provides instructions for many different formatting options that can give your document a unique look. For more information, refer to Paragraph Formatting Options.
Formatting Text
Some rules to remember when formatting your text include the following:
-
If you know what formatting options you want, you can enable them before you type. After you finish typing the section, you can disable them.
-
When formatting text that is already typed into the document, the first step is to select it. Only selected text will take on the format that you are applying. For instructions, refer to Selecting Text.
-
Using too many fonts, sizes, and other formatting in one document often looks cluttered and is hard to read. Try to limit yourself to no more than two or three fonts, sizes, and formats per document.
-
Once the text is formatted, deselect the text by clicking away from the text or pressing an arrow key. Selected text is vulnerable and may be deleted or changed unintentionally.
Changing Font, Size, and Color
Word allows you to change the font, size, and color from the Ribbon, the Font dialog box, or the Contextual toolbar. The Ribbon and Contextual toolbar options are easier and faster ways of changing the look of your text. However, the Font dialog box provides more options and allows you to preview your text through the Preview box.
Changing Font, Size, and Color: Ribbon Option
-
Select the desired text
-
From the Home tab, in the Font group, from the Font pull-down list, select the desired font
NOTE: As you hover your mouse over a font, Word previews it live on your selected text.

-
To select a different size, from the Font Size pull-down list, select the desired font size
-
To select a different color, click the
next to FONT COLOR » select the desired font color
 next to FONT COLOR
  » select the desired font color
Changing Font, Size, and Color: Contextual Toolbar Option
-
Select the desired text
The Contextual toolbar appears above the text. -
To select a different font, from the Font pull-down list, select the desired font
-
To select a different size, from the Font Size pull-down list, select the desired font size
-
To select a different color, click the
next to FONT COLOR » select the desired font color
Changing Font, Size, and Color: Menu Option
-
Select the desired text
-
From the Home tab, in the Font group, click FONT
The Font dialog box appears.NOTE: A preview and description of the selected font appear in the Preview section.
-
In the Font text box, type the desired font name
OR
From the Font scroll list, select the desired font -
In the Size text box, type the desired font size
OR
From the Size scroll list, select the desired size -
From the Font color pull-down list, select the desired font color
-
In the Effects section, select any additional font effects
EXAMPLES: Small caps, Superscript, Subscript -
Click OK

Changing Character Formatting
Word allows you to format text characters using the Ribbon, Contextual toolbar, menu, or keyboard options. The Ribbon, Contextual toolbar and keyboard options are faster; however, the menu option offers more options. Some of the styles you can apply are boldface, italics, underlining, shadow, superscript or subscript, single or double strike through, small or all caps, and color.
Changing Character Formatting: Ribbon Option
-
Select the text to be formatted
-
From the Home tab, in the Font group, click the appropriate formatting buttons
HINT: To deselect character formatting, select the text and click the formatting button a second time.
Changing Character Formatting: Contextual Toolbar Option
-
Select the text to be formatted
The Contextual toolbar appears on top of the text. -
On the Contextual toolbar, click one or more of the appropriate formatting buttons
HINT: To deselect character formatting, select the text and click the formatting button a second time.
Changing Character Formatting: Menu Option
-
Select the text to be formatted
-
From the Home tab, in the Font group, click FONT
The Font dialog box appears. -
In the Font style text box, type the desired style
OR
From the Font style scroll list, select the desired style -
If necessary, in the Effects section, select additional formatting options
EXAMPLE: Small caps, Shadow -
Click OK
Changing Character Formatting: Keyboard Option
-
Select the text to be formatted
-
Press the appropriate key(s):
Enhancement Keystroke Italics [Ctrl] + [I] Bold [Ctrl] + [B] Underline [Ctrl] + [U]
Was this article helpful?
Yes
No
View / Print PDF