

By default, you can’t freely move pictures (by drag-and-drop) to any position in a Microsoft Word document without also placing them somewhere in the text. But with a small change, you can drag images anywhere. Here’s how.
Make a Picture Freely Move in a Word Document
Using the method below, you can move a picture anywhere you want in your Word document—outside of the normal flow of text. You can even place the picture on top of an existing block of text if you want.
We’ll use a blank document to do this. Start by opening Microsoft Word on your Windows or Mac computer. On Word’s first screen, select “Blank Document” to create a new document.

In Word’s editing window that opens, click the “Insert” tab at the top.
In the “Insert” tab under the “Illustrations” section, click Pictures > This Device. This lets you add a picture from your computer.
Use the “File Explorer” window that opens to navigate to the folder containing your picture. Double-click the picture to add it to your Word document.
Back on Word’s editing screen, right-click the image that you just added and select Wrap Text > In Front of Text from the menu.
Your picture is now freely movable. Drag and drop it anywhere you want in your document.
Make All Future Pictures Freely Move in a Word Document
If you’d like to make all of your future pictures freely move in your Word documents, you can modify an option in Word’s settings menu. To do so, first, open Microsoft Word on your Windows or Mac computer.
On Word’s main screen in the lower-left corner, click “Options.”
Note: If you’re on Word’s document editing screen instead, click “File” at the top to see the “Options” option.
In the “Word Options” window, select “Advanced” in the sidebar on the left.
Scroll down the right pane to the “Cut, Copy, and Paste” section. In this section, find the “Insert/Paste Pictures As” option and click the drop-down menu next to it.
Select “In Front of Text” in the drop-down menu.
Click “OK” at the bottom of the “Word Options” window to close the window.
And that’s it. From now on, Word will allow you to freely move pictures on top of text in your documents.
If you ever need to remove many images from your Word document, it’s easy to remove all of them at once. This handy tip can save you a lot of time in the future. Good luck!
RELATED: How to Quickly Remove All Images from a Word Document
READ NEXT
- › How to Prevent Accidentally Dragging and Dropping Text in Microsoft Word
- › How to Move a Table in Microsoft Word
- › How to Perfectly Align Objects and Images in Microsoft Word
- › 8 Microsoft Word Tips for Professional Looking Documents
- › How to Overlay Images in Microsoft Word
- › How to Move Images in Google Docs
- › BLUETTI Slashed Hundreds off Its Best Power Stations for Easter Sale
- › HoloLens Now Has Windows 11 and Incredible 3D Ink Features
How-To Geek is where you turn when you want experts to explain technology. Since we launched in 2006, our articles have been read billions of times. Want to know more?
Word for Microsoft 365 Word for the web Word 2021 Word 2019 Word 2016 Word 2013 More…Less
Moving or repositioning a picture on page in Word is as simple as dragging it with your mouse. But sometimes it doesn’t work. The key to getting the results you want is to select Layout Options.

-
Select a picture.
-
Select the Layout Options icon.
-
Choose the layout options you want:

-
To bring your picture in front of the text and set it so it stays at a certain spot on the page, select In Front of Text (under With Text Wrapping), and then select Fix position on page.
-
To wrap text around the picture but have the picture move up or down as text is added or deleted, select Square (under With Text Wrapping), and then select Move with text.
-
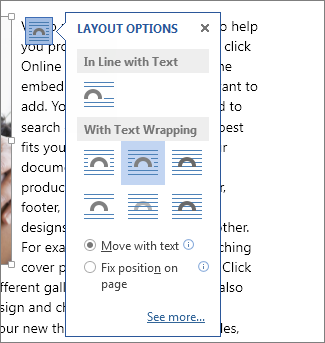
For or more information and examples of text wrapping, see Wrap text around pictures in Word
The picture is probably behind another object, like a block of text:
To select the picture, use the Selection pane:
-
Select Home > Select > Selection Pane.
-
In the Selection pane, select the picture.
To move a picture a tiny amount, select the picture, then hold down the Ctrl key and press an arrow key.
To move several objects at the same time, group them together:
-
Select the first object.
-
Hold down the Ctrl key and select the other objects.
-
Right-click one of the objects, point to Group, and then select Group.
Tip: If you are unable to group or multi-select pictures, it’s possible that the layout of your picture is inline with text. If so, please refer to Open Layout Options to change the picture layout to any option under With Text Wrapping.
For absolute control over the alignment and positioning of a picture, use the Layout box to set alignment relative to margins or columns, absolute position in inches, or relative position by percentage. This comes in handy when you want to place a picture a certain distance from something else, like a page margin.
-
Select the picture.
-
Select the Layout Options icon.
-
Select See more, and then make alignment and position adjustments on the Position tab.
If you can’t select any of the position options on the Position tab, select the Text Wrapping tab, and then select any option except the In line with text option.
If you have more than one picture that you want to overlap on a page, you can enable this in the Layout box.
-
Select a picture.
-
Select the Layout Options icon.
-
Select See more.
-
On the Position tab, in the Options group at the bottom, select the Allow overlap check box.
-
Repeat for each picture for which you want to enable overlapping.
In addition to aligning and positioning pictures on a page, you can also align pictures to each other, or to other objects on the page. Although picture-to-picture alignment is not available from the Layout Options icon or the Layout dialog box, it’s a common task that you might do while working with picture positioning and alignment.
-
Hold down the Ctrl key and select each object that you want to align.
-
Go to Picture Format or Picture Tools Format > Align, and then choose an option, such as Center, Top, or Bottom.
An object anchor  indicates where a picture or object is located in relation to the text in your document. Anchors do not appear for inline pictures; inline objects are tied to the place within the text where they were inserted and are treated like any text character—»in line with text.»
All other wrapping options (Square, Tight, Through, Top and Bottom, Behind Text, In Front of Text) are anchored to a particular place in the document; the anchor indicates the paragraph with which the object is associated. Select a picture, and then select the Layout Options icon to find out how your picture is inserted.
Notes: If you select a picture and it’s not inline with text, but you don’t see an object anchor, you can ensure that anchors are shown in two ways:
-
Show formatting marks On the Home tab, in the Paragraph group, select Show/Hide ¶.
-
Always show anchors Select File > Options > Display, and then select Object anchors.
Because anchors are simply a visual indication of a picture’s relative position on a page, they cannot be removed. However, by trying different text wrapping options, you should find all the flexibility you need in positioning a picture, regardless of its anchor.
For or more information and examples of text wrapping, see Wrap text around pictures in Word.
If you want to ensure that an image stays put even if the text around it is deleted, you can lock its anchor:
-
Select the picture.
-
Select the Layout Options icon.
-
Select See more, and then select Lock anchor.
Note: Because anchors are not used for pictures placed In Line with Text, anchor locking and all other positioning options are unavailable for inline images.
See also
Wrap text around pictures in Word
Rotate a text box, shape, WordArt, or picture in Word
Group or ungroup shapes, pictures, or other objects
If you inserted a picture into your document while using Word for the web, you can cut and paste it to move it within a document, and you can apply paragraph formatting, like vertical spacing and centering, to it. However, you cannot move a picture that was inserted while using the desktop version of Word if the picture has text wrapping or a fixed position on the page.
If you find that you cannot make changes to a picture, and you have the desktop version of Word, select Open in Word to open your document in Word and make changes to its layout.
When you are done, press Ctrl+S to save your document to its original location. You can then open the document again in Word for the web, and continue editing. Word for the web will retain the layout settings that you applied in the desktop version of Word.
Need more help?


Save 7
Similar
Share


Quick Navigation Guide
Tap or click on the thumbnails here to view more images. You can also scroll left or right above or use the arrow keys on your keyboard.
Moving Pictures — Free Google Slides theme
and PowerPoint template

By PoweredTemplate
Since July 18, 2004
ID: 05803
4.8 of 5(740)
- Standard
- Advanced
- Matching Design Set
- PowerPoint Template
-
2 Slides
- 4:3
- 800×600
- 72 DPI
Standard PoweredTemplate License
Free for personal and commercial use with attribution required.
How to attribute the author?
Report
Download Problems
Don’t want to attribute?
Over 74,000 resources from $8.25 / month
Go Premium
Attribution required
Free Download
Created
- July 8, 2009
Compatible with
Download Type
ZIP
File Type
PPT,
PPTX
Slides
2 Slides
Light & Dark Version
No
Data-Driven
No
Ratio
4:3
Editable Shapes
Yes
Dimensions
800×600
DPI
72 DPI
Font Included
No
Images Included
Yes
- PowerPoint Template
-
20 Slides
- 4:3
- 800×600
- 72 DPI
Premium resource
Unlock this file and gain access to other Premium resources.
Go Premium and Download!
| Already Premium? Sign in
Download
Report
Download Problems
Created
- July 8, 2009
Compatible with
Download Type
ZIP
File Type
PPT,
PPTX
Slides
20 Slides
Light & Dark Version
No
Data-Driven
No
Ratio
4:3
Editable Shapes
Yes
Dimensions
800×600
DPI
72 DPI
Font Included
No
Images Included
Yes
| File | Resolution | Size | Information |
|---|---|---|---|
| PowerPoint | — | 20 Slides | |
| Word | — | 3 Pages |
Download
This presentation template 14712 is complete compatible with Google Slides. Just download PPTX and open the theme in Google Slides.
Great PowerPoint template for presentations on movies, cinema, movie DVDs, watching films, cinema news, etc.
Download Free Samples. PowerPoint Templates Features.More…
Matching Design Set #05803

![]()
![]()
Moving Pictures PowerPoint Template

![]()
![]()
Moving Pictures Word Template
Related Items
![]()
![]()
![]()
![]()
![]()
![]()
![]()
![]()
See more
![]()
![]()
![]()
![]()
![]()
![]()
![]()
![]()
See more
![]()
![]()
![]()
![]()
![]()
![]()
![]()
![]()
See more
- All Items
- Presentation Templates
- PowerPoint Templates
- Moving Pictures PowerPoint Template
Learn how to freely move your pictures without restrictions
by Milan Stanojevic
Milan has been enthusiastic about technology ever since his childhood days, and this led him to take interest in all PC-related technologies. He’s a PC enthusiast and he… read more
Updated on February 13, 2023
Reviewed by
Vlad Turiceanu

Passionate about technology, Windows, and everything that has a power button, he spent most of his time developing new skills and learning more about the tech world. Coming… read more
- Word is one of the most popular applications in the Microsoft Office suite.
- Word can do all sorts of things, and in this article, we’ll show you how to move an image in Word.
- We will also show you how to wrap text around a picture.

Microsoft Word is the most popular word processor in the world, and it is heavily used by both home and office users.
Word has a wide array of features, and in today’s article, we’re going to show you how to move a picture in Word and how to wrap text around it.
How can I move pictures in Word?
1. Wrap text around it
- Open Word, create a new document, and add a picture to it.
- Now select the picture that you added.
- Go to the Layout tab and choose Wrap Text.

- Select any option from the menu except In Line with Text.

- The text will now wrap around the image.
- To move the image, simply click the image and drag it to the desired position.


You can also experiment with different layout options in order to find suitable text wrapping for your needs.
2. Move an image to an exact position
- Go to Layout > Wrap Text > More Layout Options. Alternatively, you can select the image, and go to Layout Options > See more.

- Now you’ll be able to set the exact position relative to column, page, characters, and other elements.


For more precision, you can also use the advanced layout options. To do that, follow the steps above.
This option is useful if you’re planning to print a document, and you need to ensure that your images are positioned perfectly for printing.
- How to Make a Checklist in Microsoft Word
- Fix: Microsoft Office not opening [Word, Excel, PowerPoint]
- Word Autosave Location: Where Is It And How to Access It
3. Freely move a picture using arrow keys
1. Open Microsoft Word.
2. Upload the image you want to add to it, then select it.
3. Go to Layout options.
4. Select any option from the With Text Wrapping section.
5. The text will now wrap around your image and you can move it freely.
An easy method to move a picture in Word is to change the Layout Option right from the image itself. You can also move your image pixel by pixel by using the arrow keys.
Wrapping text around an image in Word and moving the image is pretty simple, and you just need to use the Wrap Text feature in Word. Thus, you will be able to freely move a picture in Word.
After doing that, you should be able to move the image freely simply by dragging it to the desired position.
If you found this guide useful, let us know in the comments below.
Still having issues? Fix them with this tool:
SPONSORED
If the advices above haven’t solved your issue, your PC may experience deeper Windows problems. We recommend downloading this PC Repair tool (rated Great on TrustPilot.com) to easily address them. After installation, simply click the Start Scan button and then press on Repair All.
![]()
Newsletter
More than ever, pictures are critical to the effectiveness of your communication materials. With the image formatting and layout tools in Microsoft Word, it’s possible to add and manipulate pictures in your document—even if you’re a beginner.


Starting with a Microsoft Word template makes it even easier. With a well-designed Word template, the positioning and formatting of pictures have already been done for you. All you’ve got to do is to drag your pictures into the image placeholders.
Even if you’re using a template for Word, it’s good to know how to format pictures so you can make your document look exactly the way you want it to.
In this article, you’re going to see, step-by-step, how to work with pictures in Microsoft Word.
(Note: The screenshots below show Microsoft Word for Mac. The screens and steps may be slightly different if you’re using a different version of Word.)
How to Insert a Picture in Word
To add a picture to a Word document, click Insert > Pictures. From here, you’ve got three options:
1. Photo Browser
If you choose this option, you’ll be able to select an image from the existing photo sets on your computer. On a Mac, that includes photos in iPhoto and Photo Booth. When you find the picture you want to use, click on it, then drag it into the document.


2. Picture From File
This option lets you insert an image from another location on your computer. Find the image file, select it, then click Insert.


3. Online Pictures
Insert pictures in Word from the web by selecting Online Pictures…. This opens a Bing image search right inside your document. Type a keyword or phrase in the search bar.


By default, the Creative Commons only filter is checked. Keep this selected to make sure you don’t violate any copyright laws. Click on the filter icon to filter the image results by other parameters.


Select an image by clicking on it, then click Insert. You can select several images before clicking the Insert button.


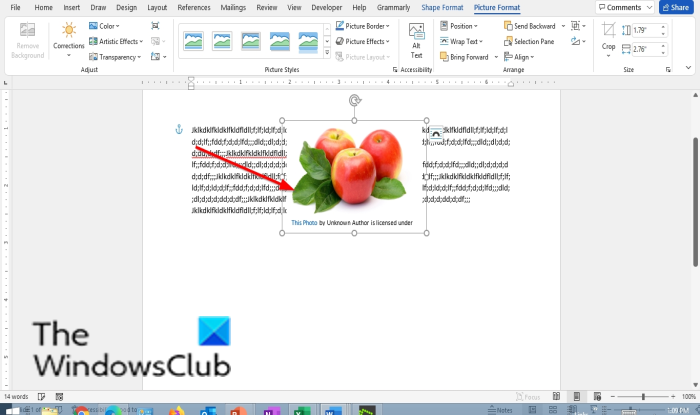
Microsoft Word automatically includes the image attribution and license details as a caption.


Note: While you can import many image formats into Word, the ones that work best are JPG and PNG.
How to Format Pictures in Word
After importing pictures into Word, you can apply different formatting settings to each Microsoft Word picture and control its appearance. Below are some of the most basic image formatting you can apply in Word:
1. Resize an Image
Resize a picture in two ways:
Resizing Method 1
Click on the picture. Press and hold the Shift key, then click and drag one of the sizing handles either towards or away from the center.


Holding the Shift key ensures that the proportion of the picture is retained. Otherwise, it would become distorted and your entire document will look amateurish.
Resizing Method 2
This method allows you to resize the picture to a specific length or width. Click on the picture, then click on the Picture Format tab. Type the length or width you wish the image to have.


By default, the original proportion of the image is retained even when you change either the length or width of the image. Keep this checked to avoid distorting the image.
2. Rotate or Flip Images
To rotate an image, do so either manually or by a specific amount.
Manual Image Rotation
To rotate an image manually, click on the image to select it. Click on the rotation handle and drag it in the direction you want.


Flip or Rotate an Image By a Specific Amount
Rotate a picture by a specific amount. Click on the picture, then go to Picture Format > Rotate. From here, you’ve got the option to:
- Rotate Right 90°
- Rotate Left 90°
- Flip Vertical
- Flip Horizontal
- Select More Rotation Options
To rotate a picture to an exact angle, choose Select More Rotation Options.


Type in the amount you wish to rotate the object, then click OK.


How to Crop Photos in Word
If you’re wondering how to crop a picture in Microsoft Word, it’s not difficult. Follow the steps below to not only crop an image, but also to dress it up by cropping it to a shape or adding decorative borders:
1. Basic Image Cropping
To crop a picture, select the picture, then go to Picture Format > Crop > Crop.
Black cropping handles appear on the sides of the picture. From here:
- Crop one side. Drag one side handle inward.
- Crop two adjacent sides at the same time. Drag one corner inward.
Click outside the image to apply the crop.
2. Crop Image to a Shape
To crop the picture to a specific shape, select the picture. Go to Picture Format > Crop > Crop to Shape. Select a shape from the selection that appears.


Click away from the picture to apply the new shape.


3. Frames and Borders
Borders are an easy way to dress up a picture in Microsoft Word. To add a border, select the picture, go to Picture Format. Click on the Picture Border button on the ribbon to reveal the border options.


From here, choose the color, weight, and dash style you wish to use for the border.


To add a frame, click on the picture, then go to Picture Format. Click on the Picture Quick Styles button on the ribbon. Select the border you want to use.


How to Use Image Editing Tools
There are many Word image editing tools. Learn how to format pictures in Word by removing the background or adjusting the brightness. Here’s how:
1. Remove Background
Microsoft Word allows you to remove the background from your pictures. This feature works best if the color of the background is distinct from the colors on the main subject of the picture.
To remove the background, select the image. Go to Picture Format > Remove Background.


Use the tools provided to select which parts of the image you wish to keep and which parts you want to remove.


The parts that’ll be removed are colored pink.
When you’re happy with the selection, click Keep Changes.


2. Sharpness and Brightness Corrections
Improve the sharpness and brightness of your pictures in Microsoft Word. To adjust these, select the picture. Go to Picture Format > Corrections. Select the sharpness and brightness/contrast settings you wish to use.


To more finely control these settings, go to Picture Format > Corrections > Picture Corrections Options. The Format Picture sidebar appears. It allows you to provide specific settings for sharpness, brightness, and contrast.


3. Picture Color
Microsoft Word also allows you to control the color saturation and tone of your picture. And you can recolor the entire picture for special effects. Select the picture, go to Picture Format > Color. Select any of the options that appear.


From here choose:
- More Variations. Recolors the image with a different color from the options provided.
- Set Transparent Color. Makes certain colors transparent so that the color of the background shows through.
- Picture Color Options. Opens the Format Picture sidebar, where you can fine-tune the settings for color saturation, tone, and recolor.
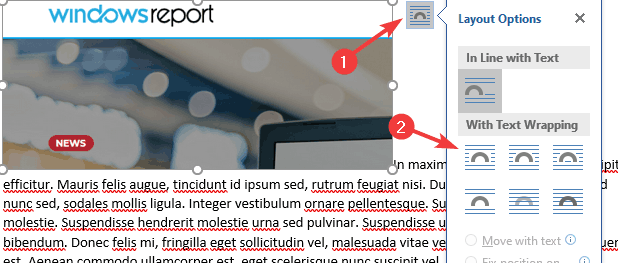
How to Use Layout Options
Microsoft Word’s layout options for images lets you control how photos are displayed alongside text.
By default, a picture is set to be «In line with text.» This means the picture is treated as an object that moves with the text. This means whatever formatting is applied to the text applies to the picture as well, which may not be how you want it to appear. When a picture is in line with text, you won’t be able to drag and drop it to a different part of the document.
To set up a picture’s layout options, select the image, then go to Picture Format > Position. Select one of the pre-configured layout options to position your picture on the page.


Gain more control by going to Picture Format > Wrap Text.


Select one of the text wrapping options:
- Square — wraps text around the picture in a square shape


- Tight — wraps text following the shape of the picture


- Through — shows text through all the “open” parts of the picture (may only be visible with certain picture shapes)


- Top and Bottom — wraps text only above and below the picture


These text wrapping options allow you to overlay pictures in Word or merge them together into a collage-type layout.
You’ve got other options:
- Behind text. Overlays the text in front of the picture
- In Front of Text. Places text behind the picture, covering it
- Edit Wrap Boundary. Lets you fine-tune how text wraps around the picture, which is especially useful if it’s irregularly shaped
- Move with text. Keeps the picture anchored to the text
- Fix position on page. Keeps the picture on the same position relative to the page, even if the text moves
- More Layout Options …. Gives you precise control over the picture layout
How to Move Pictures in Word and Arrange them on the Page
You may be wondering how to move a picture in Microsoft Word. The easiest way to move a picture is by clicking and dragging it. If this doesn’t work, the picture is probably set to be inline with text. Follow the instructions above to select a different text wrapping option.
To move multiple images, hold the shift key down as you click on each picture. Then, drag and drop them into place.
You can also move images using precise measurements. Select the image, go to Picture Format > Position > More Layout Options …. Specify the horizontal and vertical position of the picture relative to an element of the page.


Get Creative With Pictures in Word
Use the skills you learned above to add pictures in your Word documents and display them exactly the way you envision. As you’ve seen, it’s easy to control the appearance and placement of images on the page. By following the steps above, you can produce professional-looking documents all by yourself. However, we’ve only scratched the surface of the many ways you can work with pictures in Word!
Of course, if you prefer to have these design choices made for you, you’ve got the option to start with a Microsoft Word template. If you make a lot of Word documents, then you’ll like the cost-effectiveness of Envato Elements. You get unlimited downloads of templates as well as fonts, stock photos, and more for one low subscription price. On the other hand, GraphicRiver may be a better option if you only need the one-off template.
This gives you the ultimate convenience because professionally-designed Word templates have image placeholders. All you’ve got to do is to drag and drop your own pictures into the placeholders. The picture formatting steps in this article will help you fine-tune the image settings as you wish.
Now you, too, can get more creative—and effective—with pictures in Microsoft Word. But first, get your head start by downloading your favorite MS Word Template from Envato Elements or GraphicRiver.
 Please Note:
This article is written for users of the following Microsoft Word versions: 97, 2000, 2002, and 2003. If you are using a later version (Word 2007 or later), this tip may not work for you. For a version of this tip written specifically for later versions of Word, click here: Moving Images Behind Text.
![]()
Written by Allen Wyatt (last updated November 8, 2021)
This tip applies to Word 97, 2000, 2002, and 2003
Word allows you to place all sorts of graphic images in your documents. Many times you may want to place the images behind the text. Exactly how you do this depends on the type of images with which you are working. If you are working win an image you created by using the Drawing toolbar, you can follow these steps:
- Select the image.
- Choose the Order option from the Draw menu on the Drawing toolbar. Word displays a submenu.
- Choose Send Behind Text from the submenu. The image should move behind the text.
If you are using any other kind of image, perhaps one you have inserted from a graphics file, then the process is different:
- Select the image. The Picture toolbar should appear. (If the toolbar doesn’t appear, select Toolbars from the View menu and choose the Picture toolbar.)
- Click on the Text Wrapping tool on the toolbar. Word displays a list of wrapping methods you can choose.
- Choose the None option.
It is possible at this point that your text may now be visible over the top of your image. If it is not, follow the same steps you used for the images created with the Drawing toolbar.
WordTips is your source for cost-effective Microsoft Word training.
(Microsoft Word is the most popular word processing software in the world.)
This tip (698) applies to Microsoft Word 97, 2000, 2002, and 2003. You can find a version of this tip for the ribbon interface of Word (Word 2007 and later) here: Moving Images Behind Text.
Author Bio
With more than 50 non-fiction books and numerous magazine articles to his credit, Allen Wyatt is an internationally recognized author. He is president of Sharon Parq Associates, a computer and publishing services company. Learn more about Allen…
MORE FROM ALLEN
Embedding Fonts in a Document
Fonts are essential to getting your text to look just the way you want it to look. If you have a font that you use in a …
Discover More
Turning Off Worksheet Tabs
Look at the bottom of a worksheet and chances are you will see tabs for all the worksheets in the current workbook. Want …
Discover More
Creating Two Versions of the Same Document
You may often need to create two versions of the same document, one with everything and the other with a subset of what …
Discover More
More WordTips (menu)
Using Static Graphic Sizes
Sometimes graphic sizes can change on their own. Here’s how to stop that behavior.
Discover More
Using Object Anchors
An object anchor is used to signify the point at which an object is inserted into a document. If you want to see these …
Discover More
Sending Drawing Objects to the Back or Front
Drawing objects can be placed in a document in such a way that they overlap with each other. If you want to arrange those …
Discover More
Download PC Repair Tool to quickly find & fix Windows errors automatically
Microsoft Word is a great Word processing software developed by Microsoft. You can create and edit documents in Microsoft Word. It has many options to create a document, like adding images, formatting the text, etc. Sometimes, we need to adjust the position of an inserted image in Microsoft Word by moving it. By default, Word does not let users move an image. In this article, we will see how to move a picture freely in Microsoft Word.
Which option is used to move a picture?
In Microsoft Word, you can move a picture by using the Wrap Text feature. Right-click on an image and select Wrap Text. After that, you will see a number of options. The In Line with Text option does not let you move an image. Therefore, you have to select other options in the Wrap Text to move an image.
What is the Wrap Text feature in MS Word?
The Wrap Text feature in Microsoft Word enables text to wrap around the image so that the image does not interfere with line spacing. The feature lets Microsoft Word users choose how to wrap the text wraps around the selected object.
Why can’t I move pictures in Word?
When inserting an image into a document with text, you cannot move it around the text easily due to it being in line with text by default. To freely move a picture in your Microsoft Word, you should use the Wrap Text feature.
Follow the methods below to move pictures freely in Microsoft Word:
Enable a picture to move freely in a Word document
Open a Word document file.
Insert a picture into it.

Right-click the picture, hover the cursor over Wrap Text and select In Front of Text.
Now, you can move your picture freely around the text in your document.
Enable all pictures to move freely overall in a Word document
You can allow your future images to move freely in your document by customizing the Word settings.
Click the File tab on the menu bar.
Click Options in the backstage view.
A Word Options dialog box will open.
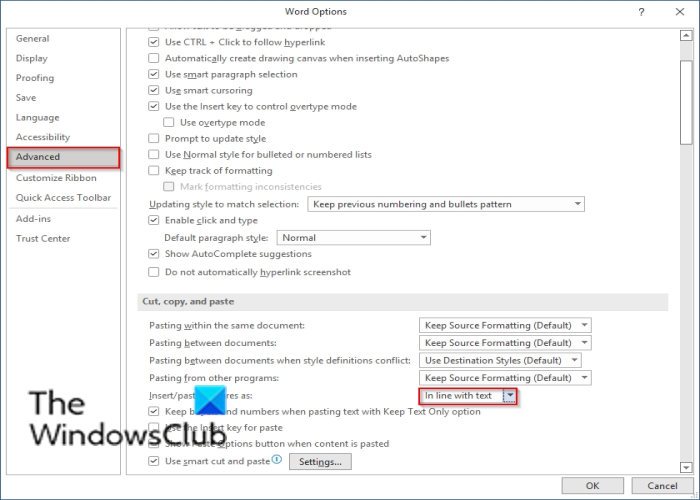
Click Advanced on the left pane.
In the section Cut, copy and paste, click the list button for Insert/paste picture as.
Then select In front of text from the list box.
Click OK.
Try to insert a photo into the Word document and try to move the image freely around the text.
Read: How to add Templates and insert Videos in Microsoft Word.
We hope this tutorial helps you understand how to move a picture freely in Microsoft Word.

Shantel has studied Data Operations, Records Management, and Computer Information Systems. She is quite proficient in using Office software. Her goal is to become a Database Administrator or a System Administrator.
When autocomplete results are available use up and down arrows to review and enter to select. Touch device users, explore by touch or with swipe gestures.
Getting lost in a sea of words, and the musky smell of age.
·
Similar ideas popular now


Richie Tenenbaum , Royal Tenenbaums.

People are always in about Rose, but…


ADVANCED POTION MAKING..Blank notebook, Harry potter. £16.00, via Etsy.

If only love worked like this more often


Barefoot in the park (I LOVE this movie!)

Robert Redford and Jane Fonda — BAREFOOT IN THE PARK (1967) ~ a delightfully funny comedy about a mismatched newlywed couple in New York, by playwright Neil Simon

Sofa, book and a cup of coffee.

books & tea. Necessities of life.


the secret of roan inish ~ such a beautiful, haunting movie

Reason number 10765 why we should teach Shakespeare in schools.


The Red Files by Lisa Bird-wilson

Trinidad in all shops | chapters.indigo.ca