
Excel for Microsoft 365 Outlook for Microsoft 365 PowerPoint for Microsoft 365 Excel 2021 Outlook 2021 PowerPoint 2021 Excel 2019 Outlook 2019 PowerPoint 2019 Excel 2016 Outlook 2016 PowerPoint 2016 Excel 2013 Outlook 2013 PowerPoint 2013 Project Professional 2013 Project Standard 2013 Excel 2010 Outlook 2010 PowerPoint 2010 More…Less
When you add pictures, shapes, or other objects to your Office documents, they automatically stack in individual layers as you add them. You can move individual shapes or other objects or groups of objects in a stack. For example, you can move objects up or down within a stack one layer at a time, or you can move them to the top or bottom of a stack in one move. You can overlap objects when you draw to create different effects.

Notes:
-
For information on aligning objects, see Align or arrange a picture, shape, text box, or WordArt.
-
For information about grouping objects, see Group or ungroup shapes, pictures, or other objects.
Move a picture, shape, text box, or WordArt
-
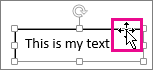
Click the border of the WordArt, text box, or shape that you want to move.
To move multiple text boxes or shapes, press and hold Ctrl while you click the borders.
-
When the cursor changes to the four headed arrow, drag it to the new location.

To move in small increments, press and hold Ctrl while pressing an arrow key. And to move the object horizontally or vertically only, press and hold Shift while you drag it.
Note: The incremental, or nudge, distance is a 1 pixel increment. What 1 screen pixel represents relative to the document area depends on the zoom percentage. When your document is zoomed in to 400%, 1 screen pixel is a relatively small nudge distance on the document. When your document is zoomed out to 25%, 1 screen pixel is a relatively large nudge distance on the document.
Depending on how far you’re moving the WordArt, shape, or text box, it might be easier to cut and paste it. Right-click the object, and then click Cut (or, press Ctrl+X). Press Ctrl+V to paste it. You can also cut and paste it into a different document, or between programs, such as from a PowerPoint slide to an Excel worksheet.
Move a text box, WordArt, or shape forward or backward in a stack
-
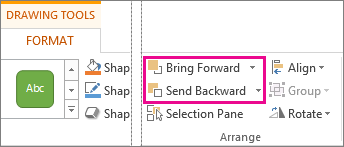
Click the WordArt, shape, or text box that you want to move up or down in the stack.
-
On the Drawing Tools Format tab, click either Bring Forward or Send Backward.
You’ll have the choice of moving the object up one layer (Bring Forward) or to the top of the stack (Bring to Front). Send Backward has similar options: down one layer (Send Backward) or to the bottom of the pile (Send to Back).
Tips:
-
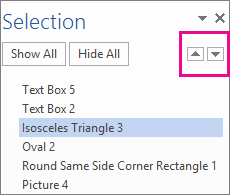
In Office 2016 and Office 2013, if you have a lot of WordArt, shapes, text boxes, or other objects, it may be easier to use up and down arrows in the Selection Pane to move objects. The Selection Pane is not available in Project or in Office 2010.
-
-

See also
-
Align or arrange a picture, shape, text box, or WordArt
-
Group or ungroup shapes, pictures, or other objects
Need more help?
Word offers many useful features for working with various objects, such as images, photographs, text boxes, shapes, WordArt objects. All visual objects, excluding tables and equations, are figures in Microsoft Word. One of the most challenging steps in formatting objects is placing them with the text content. The Layout dialog box controls the positioning of figures.
Position images, text boxes, shapes on the page
Word attaches the figure to the paragraph at the current cursor position when you insert a figure. However, you can move the visual object independently of the text and place it anywhere on the page.
To change the position, on the Picture Format (Graphics Format, Shape Format) tab, in the Arrange group, click the Position button:

- In Line with Text places an object in the paragraph on the same line as the surrounding text
- Position in Top Left with Square Text Wrapping places a figure in the upper left corner of the document page
- Position in Top Center with Square Text Wrapping
- Position in Top Right with Square Text Wrapping
- Position in Middle Left with Square Text Wrapping
- Position in Middle Center with Square Text Wrapping places a picture in the center of the document page
- Position in Middle Right with Square Text Wrapping
- Position in Bottom Left with Square Text Wrapping
- Position in Bottom Center with Square Text Wrapping
- Position in Bottom Right with Square Text Wrapping places a picture in the lower right corner of the document page
Using these options, position the object in a specific location relative to the page margins.
Use the anchor
When changing the text wrapping style from the In Line with Text to another one, Word adds an anchor to the object. In other words, all floating figures are anchored. Select the picture to see its anchor indicated by a small anchor icon ![]() (see how to display non-printing characters in a Word document).
(see how to display non-printing characters in a Word document).
Attention! The anchor and the figure are always on the same page but not in the same place on the page.
By default, the anchor is positioned at the beginning of the nearest paragraph above the upper-left corner of the figure. When you move the object across the page, the anchor moves, using the same logic to place the anchor.
Also, you can select the anchor and drag it to a new location on the page.
Change the layout
To choose additional options for positioning an object, choose More Layout Options… from the dropdown list:
In the Layout dialog box, on the Position tab:

Note: The available positions vary based on the selected text-wrapping option.
- In the Horizontal section, specify that a figure is positioned horizontally:
- Alignment places the object to the Left, Center, or Right relative to:
- Margin
- Page
- Column
- Character
- Left Margin
- Right Margin
- Inside Margin
- Outside Margin
For example:
- Alignment to the Left relative to Margin:

- Alignment to the Left relative to Page:
- Book layout defines where the figure appears on odd (large left margin) or even (large right margin) pages. You can position figures relative to the Inside or Outside of the Margin or Page.
This option is useful if you use the Mirrored margins.
For example, Book layout Inside of Margin:
The odd page The even page
- Absolute position specifies the exact distance to the right of:
- Margin
- Page
- Column
- Character
- Left Margin
- Right Margin
- Inside Margin
- Outside Margin
Measurements can be positive or negative. The figure will remain in the same position regardless of formatting changes.
For example:
- The Absolute position of -5 inches to the right of Right Margin:

- The Absolute position of 4 inches to the right of Page:
- Relative position specifies a percentage of the distance relative to:
- Margin
- Page
- Left Margin
- Right Margin
- Inside Margin
- Outside Margin
For example, Relative position of 20% relative to Margin:
Note: 8.5 inches page with 1-inch margins in each side = 6.5 inches * 20% = 1.3 inch
- Alignment places the object to the Left, Center, or Right relative to:
- In the Vertical section, specify that an object is positioned vertically:
- Alignment allows to set the object to the Top, Centered, Bottom, Inside, or Outside relative to:
- Margin
- Line
- Top Margin
- Bottom Margin
- Inside Margin
- Outside Margin
For example, Alignment to the Top relative to Margin:
- Absolute position specifies the exact distance to the right of:
- Margin
- Page
- Paragraph
- Line
- Top Margin
- Bottom Margin
- Inside Margin
- Outside Margin
Measurements can be positive or negative. The figure will remain in the same position regardless of formatting changes.
For example:
- The Absolute position of 3 inches to the right of Line:
- The Absolute position of -7 inches to the right of Bottom Margin:
- Relative position specifies a percentage of the distance relative to:
- Margin
- Page
- Top Margin
- Bottom Margin
- Inside Margin
- Outside Margin
For example, Relative position of 25% relative to Page:
Note: 11 inches page * 25% = 2.75 inches
- Alignment allows to set the object to the Top, Centered, Bottom, Inside, or Outside relative to:


Note: It is impossible to fix a figure on the page.
- In the Options section:
- Move object with text moves the figure along with the text in which it is located.
If this option is selected, the picture moves with a paragraph (anchored to a paragraph). When you delete or add any context before that paragraph, the figure will move with it.
If the Move object with text option is deselected, the picture is anchored to the page location. After deleting or adding context before the anchor, except when the paragraph moves to the next page — the figure moves and keeps its position relative to the page.
Note: This option works only for floating figures (see Text Wrapping for more details).
For example:
- Before moving:

- After moving with the selected Move object with text check box:

- After moving with the deselected Move object with text check box:
When you select this option, the horizontal and vertical alignment will change to Absolute positions relative to the margin (horizontal) and paragraph (vertical).
- Before moving:
- Lock anchor keeps the anchor at the same place (at the paragraph) when the figure is removed. Word changes the anchor symbol to the locked anchor
 .
.
The anchor symbol will remain to the left of the start of the anchored paragraph, regardless of the picture position.
For example:
- Before moving:

- After moving with the selected Lock anchor check box:
Note: An example is shown with hidden Headers and Footers.
However, if you select and drag a paragraph to another page, the picture shifts to another page.
- Before moving:
- Allow overlap allows to layer figures on top of each other.
For example:

To easily work with such figures, open the Selection pane. To change which figure in front or behind another one, use the Bring Forward or Send Backward buttons in the Arrange group on the Picture Format (Graphics Format, Shape Format) tab:

- Layout in table cell is the option from the older versions of Word and older file formats.
For example, in a *.doc file, you can’t put an image whose text wrapping style is set to Square inside a table cell unless the Layout in table cell option is selected:

- Move object with text moves the figure along with the text in which it is located.


To align a figure on the page simpler, see snap an object to the Grid or a Shape.
Main features of the anchor
- The anchor is related to the paragraph, not words, characters, or other objects.
- When you select the text where the figure is anchored, the figure also is highlighted.
- If you move or delete the text where the figure is anchored, the figure will also be moved or deleted.
- If the paragraph with the anchor is pushed to the next page, the anchored figure also jumps to the next page, even if the figure is located above the anchor.
Delete an anchor
The anchor cannot be deleted. An anchor is a feature of the floating figure.
If the anchor is visible, the figure is selected, and pressing the Delete key will delete the figure and anchor.
Select the figure and change the text wrapping style to the In Line with Text to remove the anchor. The figure will cease floating, and Word will stop showing its anchor when you select this figure.
Move a picture, shape, text box, or WordArt
- Click the border of the WordArt, text box, or shape that you want to move. To move multiple text boxes or shapes, press and hold Ctrl while you click the borders.
- When the cursor changes to the four headed arrow, drag it to the new location.
Contents
- 1 How do I move a text box in Word using the keyboard?
- 2 How do you adjust text boxes in Word?
- 3 Why can’t I move textbox in Word?
- 4 How do you move objects freely in Word?
- 5 How do I resize a text box?
- 6 How do I stretch a text box in Word?
- 7 How do I fix the size of a text box in Word?
- 8 How do I move a text box anywhere in Word?
- 9 How do I move a text box outside the margin?
- 10 How do I move a text box horizontally in Word?
- 11 Why can’t I move images in Word?
- 12 How do I move objects in small increments in Word for Mac?
- 13 How do I remove a text box but keep the text in Word?
- 14 Can I stretch text in Word?
- 15 How do I fit text to page width in Word?
- 16 How do I make my font taller?
How do I move a text box in Word using the keyboard?
To move in small increments, press and hold Ctrl while pressing an arrow key. And to move the object horizontally or vertically only, press and hold Shift while you drag it. Depending on how far you’re moving the WordArt, shape, or text box, it might be easier to cut and paste it.
How do you adjust text boxes in Word?
Adjust the text box margins
- Click the outer edge of the text box to select it.
- On the Shape Format tab, click Format Pane.
- Click the Shape Options tab if it isn’t already selected.
- Click the text box icon. , and then click Text Box.
- You can adjust the left, right, top, and bottom margins.
Why can’t I move textbox in Word?
If the text box is In Line With Text, it’s constrained by the margins. With any other text wrapping, you should be able to drag it anywhere. But it may be that all you need to do is change the internal margin of the text box: Right-click on the edge of the text box and choose Format Shape…
How do you move objects freely in Word?
First, confirm that the object is not set to In Line with Text: With the object selected click the Arrange button on the Shape Format contextual tab. From the Wrap Text choices select the method you prefer. You then should be able to freely drag the object to any location.
How do I resize a text box?
To change the size of an existing text box, follow these steps:
- Click once on the information within the text box.
- Use the mouse to point to one of the handles.
- Drag the handle to resize the text box.
- Release the mouse button when the text box is the size you want.
How do I stretch a text box in Word?
Stretch Text Horizontally
- Highlight the text you want to stretch.
- Select the “Home” tab, then click the small arrow in the Font section to open the Font dialog box.
- Select the “Advanced” tab.
- Increase the percentage value in the “Scale” field.
- Highlight the text you want to stretch.
How do I fix the size of a text box in Word?
Follow these general steps.
- Place the text box in your document.
- Adjust the width of your text box to reflect what you need.
- Right-click the text box and choose Format Text Box from the resulting Context menu.
- Make sure the Text Box tab is displayed.
- Make sure the Resize AutoShape to Fit Text check box is selected.
How do I move a text box anywhere in Word?
To move a text box:
- Click the text box you want to move.
- Hover the mouse over one of the edges of the text box. The mouse will change into a cross with arrows.
- Click and drag the text box to the desired location.
How do I move a text box outside the margin?
RECOMMENDED FOR YOU
- Click the Insert menu and Click Text Box in the Text group.
- Use the mouse to drag and drop a text box of the approximate size in the margin.
- Enter the text “Use Quick Styles.”
- On the Contextual Format ribbon, choose Middle from the Align Text dropdown in the Text group.
How do I move a text box horizontally in Word?
Enter the text in the shape or text box or table cell, and then select the text. Ctrl+Click the selected text, and then select Format Shape. On the Text Box tab in the dialog box, choose a direction from the Text Direction box.
Why can’t I move images in Word?
You must set the layout to something other than ‘in-line‘ before you can drag it around. You can only move them around if their layout property is set to something other than in-line, otherwise you can cut and paste to a new position, just like a font character.
How do I move objects in small increments in Word for Mac?
To move an object up, down, or sideways in small increments, click the object, hold down OPTION, and then press an arrow key.
How do I remove a text box but keep the text in Word?
Follow these steps:
- In your document, press Ctrl+A.
- Press Ctrl+C.
- Open a new, blank document.
- Make sure the Home tab of the ribbon is displayed.
- Click the down-arrow under the Paste tool (at the left side of the ribbon) and choose Paste Special.
- In the list of formats, choose Unformatted Text.
- Click on OK.
Can I stretch text in Word?
Stretch or scale the text horizontally
On the Home tab, click the Font Dialog Box Launcher, and then click the Advanced tab. Note: If you’re using Word 2007 the tab is called Character Spacing. In the Scale box, enter the percentage that you want. Percentages above 100 percent stretch the text.
How do I fit text to page width in Word?
To fit the columns to the text (or page margins if cells are empty), click [AutoFit] > select “AutoFit Contents.” To fit the table to the text, click [AutoFit] > select “AutoFit Window.” To keep Word from automatically adjusting your column size, click [AutoFit] > select “Fixed Column Width.”
How do I make my font taller?
Changing the Height of a Font
- Select the text you want to affect.
- Enlarge the font size to 15 points. (12 times 1.25 is 15.)
- Display the Advanced tab of the Font dialog box.
- Using the Scale control, specify a scaling of 80%.

By default, you can’t freely move pictures (by drag-and-drop) to any position in a Microsoft Word document without also placing them somewhere in the text. But with a small change, you can drag images anywhere. Here’s how.
Make a Picture Freely Move in a Word Document
Using the method below, you can move a picture anywhere you want in your Word document—outside of the normal flow of text. You can even place the picture on top of an existing block of text if you want.
We’ll use a blank document to do this. Start by opening Microsoft Word on your Windows or Mac computer. On Word’s first screen, select “Blank Document” to create a new document.

In Word’s editing window that opens, click the “Insert” tab at the top.
In the “Insert” tab under the “Illustrations” section, click Pictures > This Device. This lets you add a picture from your computer.
Use the “File Explorer” window that opens to navigate to the folder containing your picture. Double-click the picture to add it to your Word document.
Back on Word’s editing screen, right-click the image that you just added and select Wrap Text > In Front of Text from the menu.
Your picture is now freely movable. Drag and drop it anywhere you want in your document.
Make All Future Pictures Freely Move in a Word Document
If you’d like to make all of your future pictures freely move in your Word documents, you can modify an option in Word’s settings menu. To do so, first, open Microsoft Word on your Windows or Mac computer.
On Word’s main screen in the lower-left corner, click “Options.”
Note: If you’re on Word’s document editing screen instead, click “File” at the top to see the “Options” option.
In the “Word Options” window, select “Advanced” in the sidebar on the left.
Scroll down the right pane to the “Cut, Copy, and Paste” section. In this section, find the “Insert/Paste Pictures As” option and click the drop-down menu next to it.
Select “In Front of Text” in the drop-down menu.
Click “OK” at the bottom of the “Word Options” window to close the window.
And that’s it. From now on, Word will allow you to freely move pictures on top of text in your documents.
If you ever need to remove many images from your Word document, it’s easy to remove all of them at once. This handy tip can save you a lot of time in the future. Good luck!
RELATED: How to Quickly Remove All Images from a Word Document
READ NEXT
- › How to Prevent Accidentally Dragging and Dropping Text in Microsoft Word
- › How to Move a Table in Microsoft Word
- › How to Perfectly Align Objects and Images in Microsoft Word
- › 8 Microsoft Word Tips for Professional Looking Documents
- › How to Overlay Images in Microsoft Word
- › How to Move Images in Google Docs
- › BLUETTI Slashed Hundreds off Its Best Power Stations for Easter Sale
- › HoloLens Now Has Windows 11 and Incredible 3D Ink Features
How-To Geek is where you turn when you want experts to explain technology. Since we launched in 2006, our articles have been read billions of times. Want to know more?
Sometimes you may want to fine tune object placement in Word. This article will talk about how to move objects with greater precision.
When you move a text box or a picture in Word, they seem to be snapping to the nearest intersection of lines in the grid. But sometimes, we want to precisely control the placement of these objects. In this article will mainly look at 3 ways to move the object to exactly the location where you want.
Method 1: Hold Down “Alt” Key to Move the Object Precisely
For example, we want to move the text box below to exactly where we want. Follow these two steps:
- First, left click at the text box, and then hold down the“Alt”key on your keyboard.
- Then use our mouse to drag the text box to the new position you want.


Because we have been hold the “Alt” key, the grid will not have effect on the movement of objects. But note that this method will only turn off “snap to grid” temporarily.
Method 2: Reduce the Horizontal & Vertical Spacing of the Grids
Since there is an invisible grid in our Word, one simple way is to minimize the horizontal and verticals spacing of the grid. To do it, you can refer to this section.
- Place your cursor on the text box, and then left click at it.
- Switch to “Format” tab, and then click on “Align” drop down arrow, in the “Arrange” group.
- Select “Grid Settings” in the drop down list.

- In the subsequent “Drawing Grid” dialog box, enter a small value in the “Horizontal spacing” and “Vertical spacing” boxes. For example, here we enter “0.01”.
- Finally, click “OK” to save it. And this will apply to all your documents.


Method 3: Disable the Snap-to-grid Option Permanently
Another way is to disable “Snap to” option so that objects won’t snap to grid. And you can also turn off this option permanently. Follow this section to learn how.
- Head to the “Drawing Grid” dialog box again, by following the steps specified in last section.
- Click the tick in the “Snap objects to grid when the gridlines are not displayed” to deselect it. And then click “OK”.

Word is Susceptible to Corruptions
To sum up, we can precisely control the placement of text boxes or pictures in our Word. Though Word offers a host of useful options for common users, it cannot avoid file corruptions.
Therefore, it mandates the need of a specialized tool to repair word. With its advanced technology, it guarantees to recover your Word with an outstanding recovery rate.
Author Introduction
Kelly Zhao is a data recovery expert in DataNumen, Inc., which is the world leader in data recovery technologies, including excel recovery and pdf repair software products. For more information visit www.datanumen.com
Last Update: Jan 03, 2023
This is a question our experts keep getting from time to time. Now, we have got the complete detailed explanation and answer for everyone, who is interested!
Asked by: Chyna Smitham
Score: 4.8/5
(17 votes)
Double-click the picture to add it to your Word document. Back on Word’s editing screen, right-click the image that you just added and select Wrap Text > In Front of Text from the menu. Your picture is now freely movable. Drag and drop it anywhere you want in your document.
How do you move an object freely in Word?
First, confirm that the object is not set to In Line with Text: With the object selected click the Arrange button on the Shape Format contextual tab. From the Wrap Text choices select the method you prefer. You then should be able to freely drag the object to any location.
How do you move a picture in Word that is locked?
How Do I Lock a Photo in a Word Document So It Doesn’t Move?
- Step 1: Print Layout Settings. Click the «View» tab on the main menu ribbon and then select the «Print Layout» button in the Views tool group. …
- Step 2: Layout and Position. …
- Step 4: Fix the Position. …
- Step 5: Test the Lock. …
- Step 6: Drag the Anchor.
How do I resize and move a picture in Word?
Click on the picture. Press and hold the Shift key, then click and drag one of the sizing handles either towards or away from the center. Holding the Shift key ensures that the proportion of the picture is retained.
Why can’t I move pictures in Word?
You must set the layout to something other than ‘in-line‘ before you can drag it around. You can only move them around if their layout property is set to something other than in-line, otherwise you can cut and paste to a new position, just like a font character.
37 related questions found
How do I move a picture in Word on a Mac?
To insert an image into your document, follow these steps:
- Click where you want the image to appear.
- On the Insert menu, select Photo, then click Picture from File.
- Select the image file you want and click Insert.
How do you move an object in Microsoft Word?
Move a picture, shape, text box, or WordArt
- Click the border of the WordArt, text box, or shape that you want to move. To move multiple text boxes or shapes, press and hold Ctrl while you click the borders.
- When the cursor changes to the four headed arrow, drag it to the new location.
How do I fix the position of a picture in Word?
Open Layout Options
Select a picture. Select the Layout Options icon. To bring your picture in front of the text and set it so it stays at a certain spot on the page, select In Front of Text (under With Text Wrapping), and then select Fix position on page.
Where is the picture Position tab in Word?
Choose Picture Tools Format→Position button to open a menu of positions. Choose the position that shows the picture in the upper-right corner of the document.
What is lock anchor in Word?
When you turn on “Lock Anchor,” you can then move your image to any position on the same page as the anchor paragraph, and the object will stay in that position. However, if you move the anchor paragraph to another page, the object will also move to that page, but stay in the same relative position on the page.
How do you drag an image?
Press and hold your Shift key and release your mouse button to drop and center the image in the document.
- Step 1: Select The Document With The Image You Want To Move. …
- Step 2: Select The Move Tool. …
- Step 3: Drag The Image Onto The Other Document’s Tab. …
- Step 4: Drag From The Tab Into The Document.
How do you move a picture on word without snapping it?
Turn off the snap-to options
- Click a chart, picture, or object in the document.
- On the right end of the ribbon, select Format > Align > Grid Settings. …
- To turn off the Snap objects to grid when the gridlines are not displayed or Snap objects to other objects settings, clear the respective box.
How do I move text over a picture in Word?
Click the outside edge of the text box, and then drag the text box to position it over your photo. Make sure that the text box is still selected, and then, under Text Box Tools, on the Format tab, in the Text Box Styles group, do the following: Click Shape Fill, and then click No Fill.
How do I move pictures freely in Word 2007?
How to Move a Picture in Word 2007
- Launch Microsoft Word 2007 and open a document that contains a picture.
- Click the picture that you would like to move to select it.
- Hold down your left mouse button and drag the picture to a new location in the document.
How do you move pictures on a Mac?
In the Photos app on your Mac, select the photos you want to move. Do one of the following: Drag the selected photos to an album in the sidebar.
How do I put pictures side by side in Word?
Click and drag the first image to where you want it on the page. Release the mouse button. Click and drag the second image next to the first, where you want it to align. As the sides come close to each other, Word will automatically snap the second image into place next to the first.
How do you insert a move?
Option 2: Use the Keyboard Shortcuts
Insert: Ctrl+Insert. Move Row Up: Ctrl+Up. Move Row Down: Ctrl+Down.
How do I insert a picture into Word 2016 without moving the text?
You can add a picture in the top left corner of a document and have the text flow around it.
- Select a picture.
- Go to Picture Format or Format > Position, and under Format with Text Wrapping, select Top Left. Tip: You can drag the image around the document and align it any way you like.
What is a picture anchor in Word?
This option causes Word to paginate your document so that the object (the picture) is always on the same page as the object anchor. This is the best way to ensure that a floating picture is on the same page as the paragraph that describes what is in the picture.
What are the four settings that controls the positioning of an image in the text in Libreoffice Writer explain?
Positioning of an image is controlled by four settings: Text wrapping. Alignment. Anchoring.
 Please Note:
This article is written for users of the following Microsoft Word versions: 97, 2000, 2002, and 2003. If you are using a later version (Word 2007 or later), this tip may not work for you. For a version of this tip written specifically for later versions of Word, click here: Pictures Move on their Own.
![]()
Written by Allen Wyatt (last updated August 22, 2020)
This tip applies to Word 97, 2000, 2002, and 2003
Have you ever placed pictures in your document, expecting them to stay in a set location, and then you find that they moved around? This is not uncommon in Word, and typically can be traced to a misunderstanding about how Word handles pictures.
When you place a picture in a Word document, you can place it either inline or floating. The default placement method depends on the version of Word you are using. Inline pictures are great, and will stay exactly where you put them, because they are treated like any other character in a paragraph.
Inline pictures are wonderful for some purposes, particularly for larger pictures. Inline pictures, since they are treated just like text, follow the alignment of the paragraph in which they are placed. Thus, if you center the paragraph and the picture is the only thing in the paragraph, then the picture is centered. Likewise, you can left- or right-align the picture by simply using the paragraph alignment tools on the Formatting toolbar. The drawback to inline pictures, of course, is that text doesn’t wrap around them, and therefore you may not get the exact layout you want.
Floating pictures are a different story. Floating pictures can do just that—float. Also, the picture can be formatted so that text floats around the picture. To control the floating behavior of the pictures, Word provides an anchor that indicates a point in the document with which the picture is associated. You can see these anchors by choosing Tools | Options | View and making sure the Object Anchors check box is selected. When you subsequently click on a floating picture, you will see an actual anchor character at the point in your document where the selected picture is anchored.
To modify how the picture’s anchor behaves, you simply need to right-click on the picture and choose Format Picture from the Context menu. Word displays the Format Picture dialog box. Click the Advanced button on the Layout tab. (See Figure 1.) The resulting dialog box has a tab labeled Picture Position where you can specify the placement of the floating picture. (In other words, you can specify how the anchor should behave.)
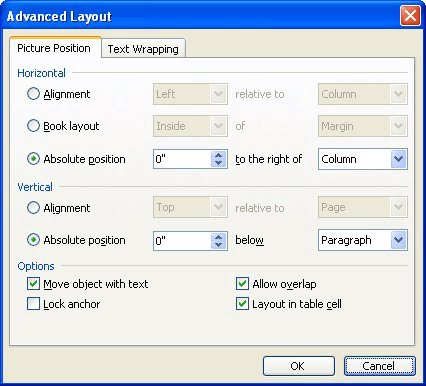
Figure 1. The Picture Position tab of the Advanced Layout dialog box.
There are two important check boxes on the Picture Position tab; both are at the bottom of the dialog box. The Move Object with Text check box controls whether the object moves as the text to which it is anchored moves. Thus, if a picture is anchored to a paragraph and you insert text before the paragraph, the picture is moved down as the paragraph—and its associated anchor—moves down the page. If the check box is cleared, then the anchor moves, but the picture stays put where you placed it. This check box is selected, by default, so pictures normally move with their underlying text. If you don’t want them to move, clear this check box.
The other important check box is Lock Anchor. This check box controls whether the anchor can move or not. Normally, if you click on a picture and drag it to a new location, the anchor for that picture is changed to the paragraph nearest the new location for the picture. If you lock the anchor, the anchor stays put, even though you moved the picture.
Many picture positioning problems can be solved by understanding the controls on the Picture Position tab. You should play with them to find out which combination of settings is best for your use of pictures.
That being said, some people find that they can get better control of where pictures are placed simply by placing the pictures inside other objects. For instance, you may want to create a single-celled table and place your picture in the table cell. Likewise, you may want to create a text box and place the picture in the text box. Either approach is appropriate if you are more comfortable working with tables and text boxes than you are in working directly with pictures. In addition, using pictures in this way gives you other options that you would normally have. For instance, you can apply borders to the table cell or to the text box, thereby creating a border around your picture.
WordTips is your source for cost-effective Microsoft Word training.
(Microsoft Word is the most popular word processing software in the world.)
This tip (1743) applies to Microsoft Word 97, 2000, 2002, and 2003. You can find a version of this tip for the ribbon interface of Word (Word 2007 and later) here: Pictures Move on their Own.
Author Bio
With more than 50 non-fiction books and numerous magazine articles to his credit, Allen Wyatt is an internationally recognized author. He is president of Sharon Parq Associates, a computer and publishing services company. Learn more about Allen…
MORE FROM ALLEN
Hiding Graphics
Do you need a printout where graphics can be turned on and off? This tip provides some concrete ways you can get just …
Discover More
Getting Rid of Fragment Warnings
Word provides a wide variety of tools that ostensibly help make you a better writer. One of those tools is the grammar …
Discover More
Automatically Displaying Thumbnails of a Graphic File
If you want to include a large number of images in your worksheet, you may also want a way to automatically add those …
Discover More
It is easy to have great success with Microsoft Word and your labels by knowing a few tips and tricks working with image placement.
Table of Contents:
-
Open Your Template
-
How to Wrap Your Images
-
Working with Text Boxes
-
Setting Precise Positions for Text & Images
-
Changing the Size of Your Images
-
Copy and Paste your Label
open your template
![]()
Dashleigh Label and Hangtag templates now compatible with Canva Online Designer.
Sign up for free.
Use our “Find your Template” page to download your label or hang tag Word template.
We recommend using the “Tables” version of our Word templates.
Un-hiding Gridlines
Certain versions of Microsoft Word hide the grid-lines of tables upon opening the file.
To un-hide your grid-lines:
-
TABLE > Show Grid-lines
-
LAYOUT > View Grid-lines
Now that you have opened your Microsoft Word template, you are ready to start designing.
Adding an image
-
Click the place in your document where you want the picture to appear.
-
Access the «Insert Picture» dialog box.
-
Browse to the photo you want to insert.
-
Click the file, then click «Insert.»
-
Modify the picture as necessary.
Print a Test Page
Before you add your label sheets to your printer, we recommend printing a test page before hand.
-
Make sure the printer settings are set to “Actual Size”
-
All margins and spacing measurements are available on the template download page of your specific labels.
Extra Tips & Tricks
How to Wrap Your Images:
Sometimes adding a new image can cause your previously placed images to move around your template.
The best way to make sure your images to stay in place is to change the «wrapping».
Best Image Layout Options:
Select the image after adding it to your template. Right click to select «Wrap Text» from the menu.

1. Set your Image to «Behind Text«. This is allow you to place an image in an exact place regardless of new images or text that you add to your template.
2. Set the image «fix position on page«. This will allow you to type into your template and the text will move around your image.
You can also set these wrapping conditions under the top menu select Format under the Drawing Tools tab. Select Wrap Text > More Layout Options.

Working with Text
We highly recommend adding your text to a text box instead of typing directly in the table cell. By adding your text to a text box, you can treat it like an image. This will allow you to move the text, rotate it and have the text float above or next to your image.
Select the text box after adding it to your template.
1. Add a text box from the Insert. Set the fill color to «No Fill» and set the outline to «no outline».

2. Set your Text Box to «In Front Text». This is allow you to place an image in an exact place regardless of new images or text that you add to your template.
3. Set the image «Fix Position on Page». This will allow you to type into your template and the text will move around your image.

Setting Precise Positions for Your Images and Text
If you want to be ultra precise with your images, we recommend setting the images in the Layout Options > Position Window.

You can find the exact margins and dimensions of your template on the same page that you downloading your templates. You can use these margins to define exactly where you want your images to place on the page.
Select the Image. In the top menu select Format under the Drawing Tools tab. Select Wrap Text > More Layout Options.
Use the specifications below to set your image in an exact spot. Change the inches in the absolute positions to move your images exactly into place. Use the «page» option under the absolute position dropdown to set your image exactly from the right and top borders of your page.
Selecting «Lock Anchor» will guarantee that the image does not move as you add new images.
Unselect «Move Object with Text» will also help keeping the image in place.
Changing the Size of Your Image

Select the Image. In the top menu select Format under the Drawing Tools tab.
Select Wrap Text > More Layout Options. In the Size Tab- use either the Absolute checkbox to use the inches.
Check the «lock aspect ratio» if you do not want the image to stretch or distort.
Moving the Image Behind the Template Outlines

Right Click the image you want to move. From the fly out menu select «Send to Back».
Select «Send to Back» again to move the image behind object on your Microsoft Word template.
How to Copy and Paste Your Label
Now that you have created your first label, you are ready to paste this label into the other template spaces on the page.

1. Select all components that you want to copy. While holding the «shift» key on the keyboard, select with your mouse all of the images and text boxes that are included in your label.
If you are having trouble selected all of the elements, you will need to set the Text Wrap to «Tight» for all components. (Picture Tools > Format > Text Wrap > Tight)

When all elements are selected.

2. Once everything is selected- you will want to group them as one image. To do this, while the elements are selected, in Picture Tools > Format > Group > Group. This will make the individual components look like one.
3. Once grouped, you image is now ready to copy. Select Ctrl+C on your keyboard to copy the element. Click into the next label. Select Ctrl+P to paste the grouped label. Continue this throughout the template.

