
Word for Microsoft 365 Word for the web Word 2021 Word 2019 Word 2016 Word 2013 More…Less
Moving or repositioning a picture on page in Word is as simple as dragging it with your mouse. But sometimes it doesn’t work. The key to getting the results you want is to select Layout Options.

-
Select a picture.
-
Select the Layout Options icon.
-
Choose the layout options you want:

-
To bring your picture in front of the text and set it so it stays at a certain spot on the page, select In Front of Text (under With Text Wrapping), and then select Fix position on page.
-
To wrap text around the picture but have the picture move up or down as text is added or deleted, select Square (under With Text Wrapping), and then select Move with text.
-
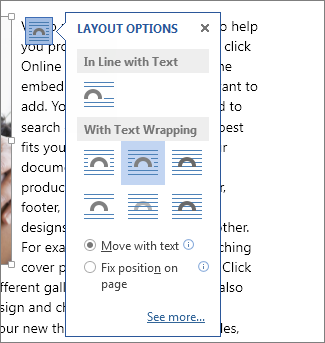
For or more information and examples of text wrapping, see Wrap text around pictures in Word
The picture is probably behind another object, like a block of text:
To select the picture, use the Selection pane:
-
Select Home > Select > Selection Pane.
-
In the Selection pane, select the picture.
To move a picture a tiny amount, select the picture, then hold down the Ctrl key and press an arrow key.
To move several objects at the same time, group them together:
-
Select the first object.
-
Hold down the Ctrl key and select the other objects.
-
Right-click one of the objects, point to Group, and then select Group.
Tip: If you are unable to group or multi-select pictures, it’s possible that the layout of your picture is inline with text. If so, please refer to Open Layout Options to change the picture layout to any option under With Text Wrapping.
For absolute control over the alignment and positioning of a picture, use the Layout box to set alignment relative to margins or columns, absolute position in inches, or relative position by percentage. This comes in handy when you want to place a picture a certain distance from something else, like a page margin.
-
Select the picture.
-
Select the Layout Options icon.
-
Select See more, and then make alignment and position adjustments on the Position tab.
If you can’t select any of the position options on the Position tab, select the Text Wrapping tab, and then select any option except the In line with text option.
If you have more than one picture that you want to overlap on a page, you can enable this in the Layout box.
-
Select a picture.
-
Select the Layout Options icon.
-
Select See more.
-
On the Position tab, in the Options group at the bottom, select the Allow overlap check box.
-
Repeat for each picture for which you want to enable overlapping.
In addition to aligning and positioning pictures on a page, you can also align pictures to each other, or to other objects on the page. Although picture-to-picture alignment is not available from the Layout Options icon or the Layout dialog box, it’s a common task that you might do while working with picture positioning and alignment.
-
Hold down the Ctrl key and select each object that you want to align.
-
Go to Picture Format or Picture Tools Format > Align, and then choose an option, such as Center, Top, or Bottom.
An object anchor  indicates where a picture or object is located in relation to the text in your document. Anchors do not appear for inline pictures; inline objects are tied to the place within the text where they were inserted and are treated like any text character—»in line with text.»
All other wrapping options (Square, Tight, Through, Top and Bottom, Behind Text, In Front of Text) are anchored to a particular place in the document; the anchor indicates the paragraph with which the object is associated. Select a picture, and then select the Layout Options icon to find out how your picture is inserted.
Notes: If you select a picture and it’s not inline with text, but you don’t see an object anchor, you can ensure that anchors are shown in two ways:
-
Show formatting marks On the Home tab, in the Paragraph group, select Show/Hide ¶.
-
Always show anchors Select File > Options > Display, and then select Object anchors.
Because anchors are simply a visual indication of a picture’s relative position on a page, they cannot be removed. However, by trying different text wrapping options, you should find all the flexibility you need in positioning a picture, regardless of its anchor.
For or more information and examples of text wrapping, see Wrap text around pictures in Word.
If you want to ensure that an image stays put even if the text around it is deleted, you can lock its anchor:
-
Select the picture.
-
Select the Layout Options icon.
-
Select See more, and then select Lock anchor.
Note: Because anchors are not used for pictures placed In Line with Text, anchor locking and all other positioning options are unavailable for inline images.
See also
Wrap text around pictures in Word
Rotate a text box, shape, WordArt, or picture in Word
Group or ungroup shapes, pictures, or other objects
If you inserted a picture into your document while using Word for the web, you can cut and paste it to move it within a document, and you can apply paragraph formatting, like vertical spacing and centering, to it. However, you cannot move a picture that was inserted while using the desktop version of Word if the picture has text wrapping or a fixed position on the page.
If you find that you cannot make changes to a picture, and you have the desktop version of Word, select Open in Word to open your document in Word and make changes to its layout.
When you are done, press Ctrl+S to save your document to its original location. You can then open the document again in Word for the web, and continue editing. Word for the web will retain the layout settings that you applied in the desktop version of Word.
Need more help?

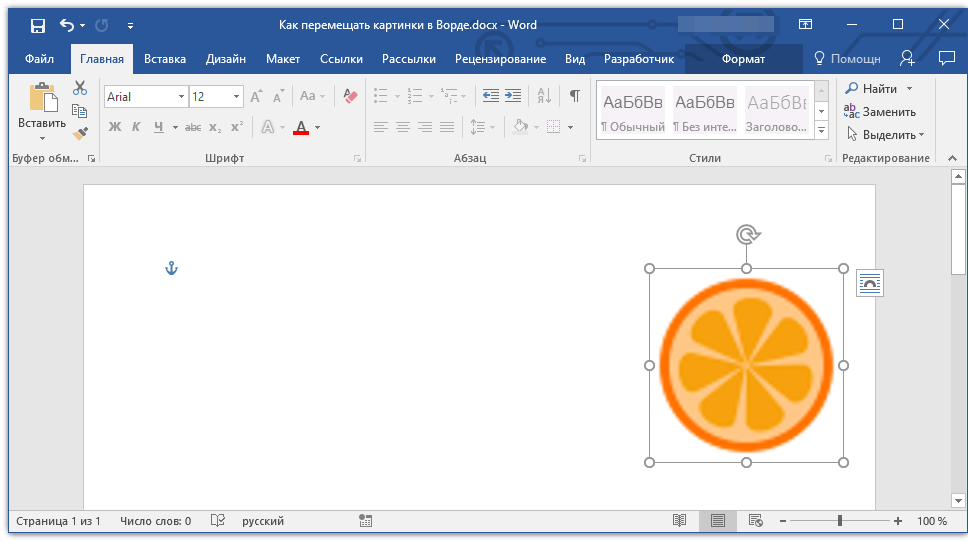
By default, you can’t freely move pictures (by drag-and-drop) to any position in a Microsoft Word document without also placing them somewhere in the text. But with a small change, you can drag images anywhere. Here’s how.
Make a Picture Freely Move in a Word Document
Using the method below, you can move a picture anywhere you want in your Word document—outside of the normal flow of text. You can even place the picture on top of an existing block of text if you want.
We’ll use a blank document to do this. Start by opening Microsoft Word on your Windows or Mac computer. On Word’s first screen, select “Blank Document” to create a new document.

In Word’s editing window that opens, click the “Insert” tab at the top.
In the “Insert” tab under the “Illustrations” section, click Pictures > This Device. This lets you add a picture from your computer.
Use the “File Explorer” window that opens to navigate to the folder containing your picture. Double-click the picture to add it to your Word document.
Back on Word’s editing screen, right-click the image that you just added and select Wrap Text > In Front of Text from the menu.
Your picture is now freely movable. Drag and drop it anywhere you want in your document.
Make All Future Pictures Freely Move in a Word Document
If you’d like to make all of your future pictures freely move in your Word documents, you can modify an option in Word’s settings menu. To do so, first, open Microsoft Word on your Windows or Mac computer.
On Word’s main screen in the lower-left corner, click “Options.”
Note: If you’re on Word’s document editing screen instead, click “File” at the top to see the “Options” option.
In the “Word Options” window, select “Advanced” in the sidebar on the left.
Scroll down the right pane to the “Cut, Copy, and Paste” section. In this section, find the “Insert/Paste Pictures As” option and click the drop-down menu next to it.
Select “In Front of Text” in the drop-down menu.
Click “OK” at the bottom of the “Word Options” window to close the window.
And that’s it. From now on, Word will allow you to freely move pictures on top of text in your documents.
If you ever need to remove many images from your Word document, it’s easy to remove all of them at once. This handy tip can save you a lot of time in the future. Good luck!
RELATED: How to Quickly Remove All Images from a Word Document
READ NEXT
- › How to Prevent Accidentally Dragging and Dropping Text in Microsoft Word
- › How to Move a Table in Microsoft Word
- › How to Perfectly Align Objects and Images in Microsoft Word
- › 8 Microsoft Word Tips for Professional Looking Documents
- › How to Overlay Images in Microsoft Word
- › How to Move Images in Google Docs
- › BLUETTI Slashed Hundreds off Its Best Power Stations for Easter Sale
- › HoloLens Now Has Windows 11 and Incredible 3D Ink Features
How-To Geek is where you turn when you want experts to explain technology. Since we launched in 2006, our articles have been read billions of times. Want to know more?
Оглавление
- Работа с рисунком с помощью значка в 2013 и 2016
- Перемещение с помощью вспомогательного окна и вкладки «Формат»
- Сдвиг изображения с помощью клавиш
В любом документе, пусть то будет учебная статья, реферат, курсовая или дипломная работа, всегда без исключения присутствуют картинки. Когда появляется необходимость переместить картинку в другое место, статья теряет прежний корректный вид. Чтобы такого не случалось, давайте разберемся как правильно и свободно перемещать изображения в Ворде.
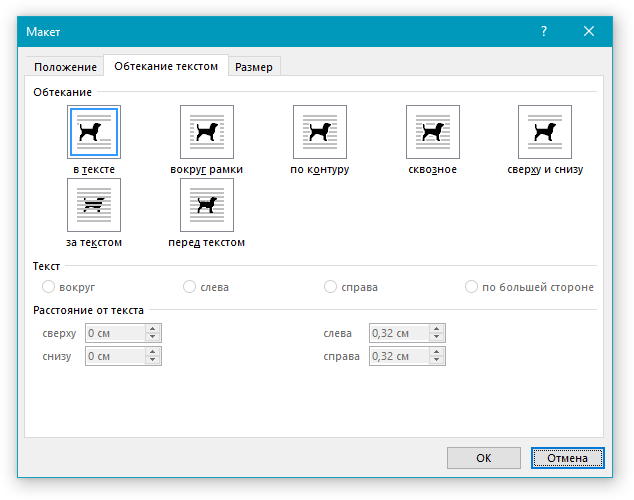
Работа с рисунком с помощью значка в 2013 и 2016
Если рисунок не перемещается по документу простым способом нажатия по нему, удерживания и перемещения по документу, или портит своим расположением структуру текста, то выберите должную версию Ворда ниже и повторите шаги.
Перемещение фото
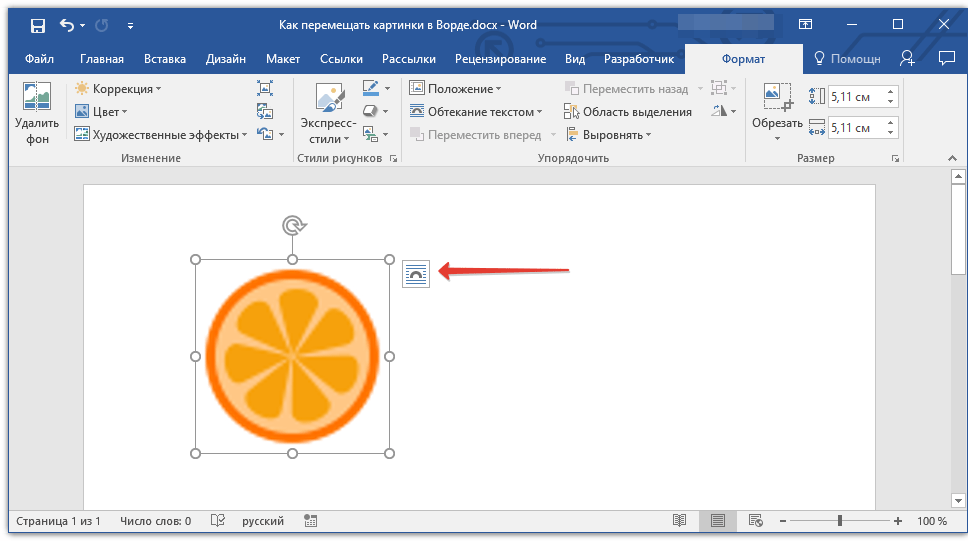
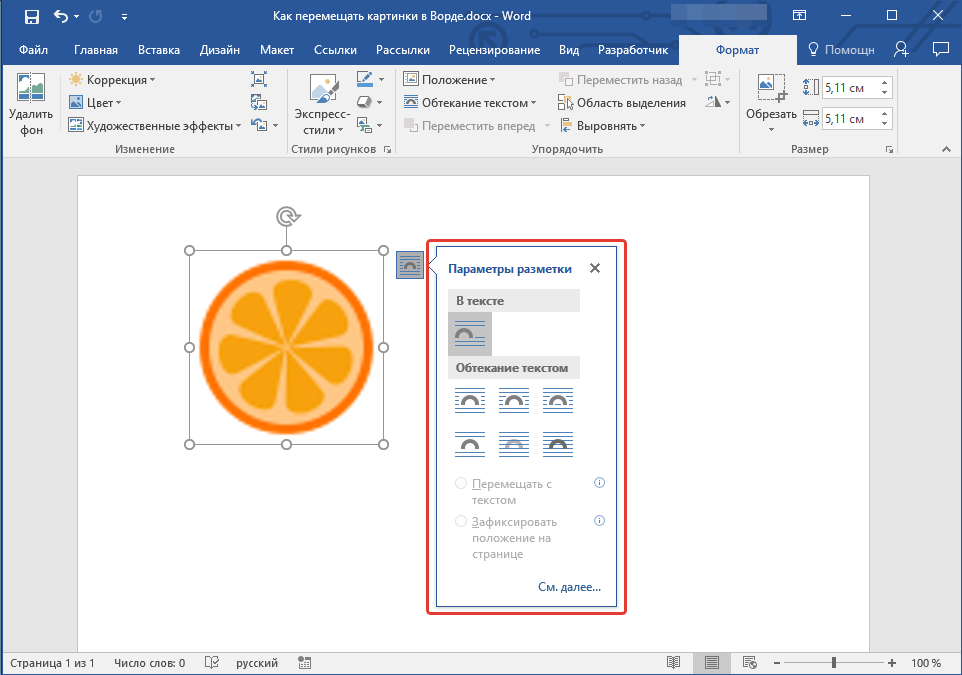
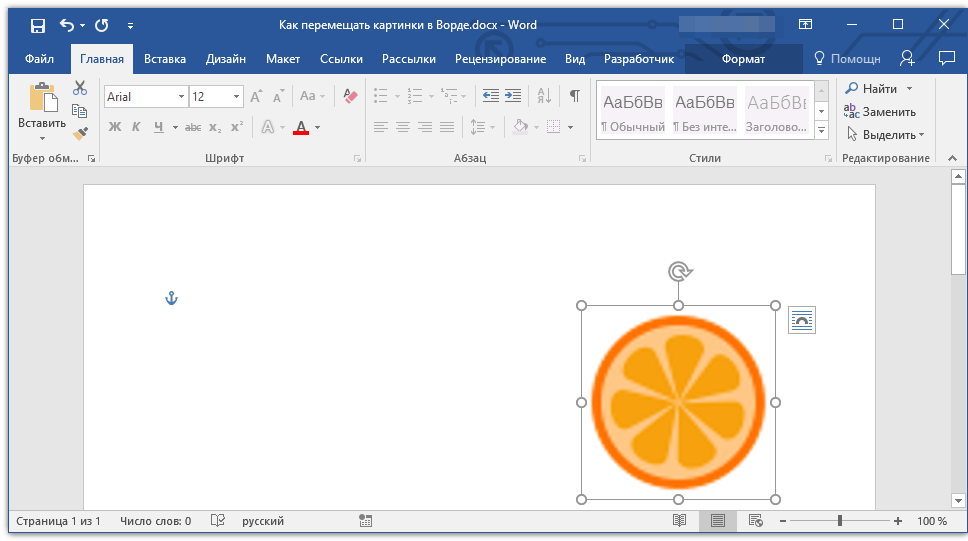
В Ворде 2016 и 2013 работая с изображением, появляется специальный символ, нажав на который можно быстро и свободно перемещать картинку. Для этого нужно:
- Нажать по изображению, тем самым его выделив;
- Кликнуть по значку «Параметры разметки» в верхнем правом углу от изображения;
- Выбрать подходящий вариант обтекания в подразделе «Обтекание текстом»;
- Для свободного перемещения лучше всего выбрать «Перед текстом»;

- Рядом с рисунком появится значок «якоря». Наличие якоря будет указывать точное место расположения объекта в момент перемещения;
- Теперь рисунок свободно передвигается по тексту.
Закрепление и привязка рисунка
Чтобы закрепить картинку нужно кликнуть по правой кнопке мыши и выбрать «Обтекание текстом», далее «Зафиксировать положение на странице». При дальнейших манипуляциях с текстом картинка не сдвинется. Рядом с ней появится знак якоря, что означает не сдвигаемый объект. 
На примере было установлено обтекание «Перед текстом». Если начать печатать текст над картинкой, то при увеличении объема он будет сдвигаться за картинку.
Внимание. Если сделать привязку к объекту, то изображение будет сдвигаться вместе с текстом, даже если к картинке применено «Зафиксировать положение на странице».
Нужно снять привязку. Нажав по картинке, перейдите во вкладку «Формат» — «Обтекание текстом» — «Дополнительные параметры разметки».

Далее в окне «Разметка» переключившись на раздел «Положение» снимите галочки в подпункте «Параметры».

Чтобы привязать к тексту рисунок наоборот поставьте галочки напротив «Перемещать вместе с текстом» и «Установить привязку».
Перемещение с помощью вспомогательного окна и вкладки «Формат»
Бывают моменты, когда при нажатии по рисунку не появляется специальный символ «Параметры разметки» как в Ворде2016. В таком случае, воспользуйтесь методом первым или вторым.
Перемещение рисунка в Ворде 2007-2016
Есть три метода сдвинуть фото в документе, для этого надо:
Метод 1. Вспомогательное меню
Нажать по фото правой клавишей мыши. Во вспомогательном окне указать «Обтекание текстом» и поставьте необходимый вид обтекания, к примеру, «Перед текстом»;

Теперь передвигать картинку можно без влияния на текст.
Метод 2. Вкладка «Формат»
Также можно использовать вкладку «Формат». Сделайте следующие шаги:
Кликните по картинке и перейдите на основную панель в окно «Работа с рисунками». Выберите «Обтекание текстом» и нужный вариант обтекания в списке. Удерживая рисунок мышью, переместите фото в нужное место в тексте.

Закрепление и привязка картинок к тексту в Ворде 2010 и 2007
Если надо закрепить картинку надо нажать по ней правой кнопкой мыши перейти в «Обтекание текстом» и указать обтекание «Перед текстом».

Опять кликнуть по фото правой кнопкой мыши и выбрать «Размер и положение» для Ворд 2010. Откроется окно «Разметка». Надо перейти во вкладку «Положение» и поставить галочку возле «Установить привязку». Сохраните изменения, нажав по кнопке «Ок».
Примечание. В Ворде 2007 нужно открыть «Обтекание текста» — «Дополнительные параметры» и в окне «Положение» поставить «Привязку».

Теперь двигая текст, картинка не будет сдвигаться с места.

Если нужно чтобы изображение сдвигалось вместе с текстом, укажите «Перемещать вместе с текстом».

Сдвиг изображения с помощью клавиш
При желании перемещать картинку строго горизонтально или вертикально можно удерживая клавишу «Shift».

Для маленьких сдвигов фотографии по статье надо удерживать клавишу «Ctrl» и управлять кнопками вверх, вниз, влево и вправо.

More than ever, pictures are critical to the effectiveness of your communication materials. With the image formatting and layout tools in Microsoft Word, it’s possible to add and manipulate pictures in your document—even if you’re a beginner.


Starting with a Microsoft Word template makes it even easier. With a well-designed Word template, the positioning and formatting of pictures have already been done for you. All you’ve got to do is to drag your pictures into the image placeholders.
Even if you’re using a template for Word, it’s good to know how to format pictures so you can make your document look exactly the way you want it to.
In this article, you’re going to see, step-by-step, how to work with pictures in Microsoft Word.
(Note: The screenshots below show Microsoft Word for Mac. The screens and steps may be slightly different if you’re using a different version of Word.)
How to Insert a Picture in Word
To add a picture to a Word document, click Insert > Pictures. From here, you’ve got three options:
1. Photo Browser
If you choose this option, you’ll be able to select an image from the existing photo sets on your computer. On a Mac, that includes photos in iPhoto and Photo Booth. When you find the picture you want to use, click on it, then drag it into the document.


2. Picture From File
This option lets you insert an image from another location on your computer. Find the image file, select it, then click Insert.


3. Online Pictures
Insert pictures in Word from the web by selecting Online Pictures…. This opens a Bing image search right inside your document. Type a keyword or phrase in the search bar.


By default, the Creative Commons only filter is checked. Keep this selected to make sure you don’t violate any copyright laws. Click on the filter icon to filter the image results by other parameters.


Select an image by clicking on it, then click Insert. You can select several images before clicking the Insert button.


Microsoft Word automatically includes the image attribution and license details as a caption.


Note: While you can import many image formats into Word, the ones that work best are JPG and PNG.
How to Format Pictures in Word
After importing pictures into Word, you can apply different formatting settings to each Microsoft Word picture and control its appearance. Below are some of the most basic image formatting you can apply in Word:
1. Resize an Image
Resize a picture in two ways:
Resizing Method 1
Click on the picture. Press and hold the Shift key, then click and drag one of the sizing handles either towards or away from the center.


Holding the Shift key ensures that the proportion of the picture is retained. Otherwise, it would become distorted and your entire document will look amateurish.
Resizing Method 2
This method allows you to resize the picture to a specific length or width. Click on the picture, then click on the Picture Format tab. Type the length or width you wish the image to have.


By default, the original proportion of the image is retained even when you change either the length or width of the image. Keep this checked to avoid distorting the image.
2. Rotate or Flip Images
To rotate an image, do so either manually or by a specific amount.
Manual Image Rotation
To rotate an image manually, click on the image to select it. Click on the rotation handle and drag it in the direction you want.


Flip or Rotate an Image By a Specific Amount
Rotate a picture by a specific amount. Click on the picture, then go to Picture Format > Rotate. From here, you’ve got the option to:
- Rotate Right 90°
- Rotate Left 90°
- Flip Vertical
- Flip Horizontal
- Select More Rotation Options
To rotate a picture to an exact angle, choose Select More Rotation Options.


Type in the amount you wish to rotate the object, then click OK.


How to Crop Photos in Word
If you’re wondering how to crop a picture in Microsoft Word, it’s not difficult. Follow the steps below to not only crop an image, but also to dress it up by cropping it to a shape or adding decorative borders:
1. Basic Image Cropping
To crop a picture, select the picture, then go to Picture Format > Crop > Crop.
Black cropping handles appear on the sides of the picture. From here:
- Crop one side. Drag one side handle inward.
- Crop two adjacent sides at the same time. Drag one corner inward.
Click outside the image to apply the crop.
2. Crop Image to a Shape
To crop the picture to a specific shape, select the picture. Go to Picture Format > Crop > Crop to Shape. Select a shape from the selection that appears.


Click away from the picture to apply the new shape.


3. Frames and Borders
Borders are an easy way to dress up a picture in Microsoft Word. To add a border, select the picture, go to Picture Format. Click on the Picture Border button on the ribbon to reveal the border options.


From here, choose the color, weight, and dash style you wish to use for the border.


To add a frame, click on the picture, then go to Picture Format. Click on the Picture Quick Styles button on the ribbon. Select the border you want to use.


How to Use Image Editing Tools
There are many Word image editing tools. Learn how to format pictures in Word by removing the background or adjusting the brightness. Here’s how:
1. Remove Background
Microsoft Word allows you to remove the background from your pictures. This feature works best if the color of the background is distinct from the colors on the main subject of the picture.
To remove the background, select the image. Go to Picture Format > Remove Background.


Use the tools provided to select which parts of the image you wish to keep and which parts you want to remove.


The parts that’ll be removed are colored pink.
When you’re happy with the selection, click Keep Changes.


2. Sharpness and Brightness Corrections
Improve the sharpness and brightness of your pictures in Microsoft Word. To adjust these, select the picture. Go to Picture Format > Corrections. Select the sharpness and brightness/contrast settings you wish to use.


To more finely control these settings, go to Picture Format > Corrections > Picture Corrections Options. The Format Picture sidebar appears. It allows you to provide specific settings for sharpness, brightness, and contrast.


3. Picture Color
Microsoft Word also allows you to control the color saturation and tone of your picture. And you can recolor the entire picture for special effects. Select the picture, go to Picture Format > Color. Select any of the options that appear.


From here choose:
- More Variations. Recolors the image with a different color from the options provided.
- Set Transparent Color. Makes certain colors transparent so that the color of the background shows through.
- Picture Color Options. Opens the Format Picture sidebar, where you can fine-tune the settings for color saturation, tone, and recolor.
How to Use Layout Options
Microsoft Word’s layout options for images lets you control how photos are displayed alongside text.
By default, a picture is set to be «In line with text.» This means the picture is treated as an object that moves with the text. This means whatever formatting is applied to the text applies to the picture as well, which may not be how you want it to appear. When a picture is in line with text, you won’t be able to drag and drop it to a different part of the document.
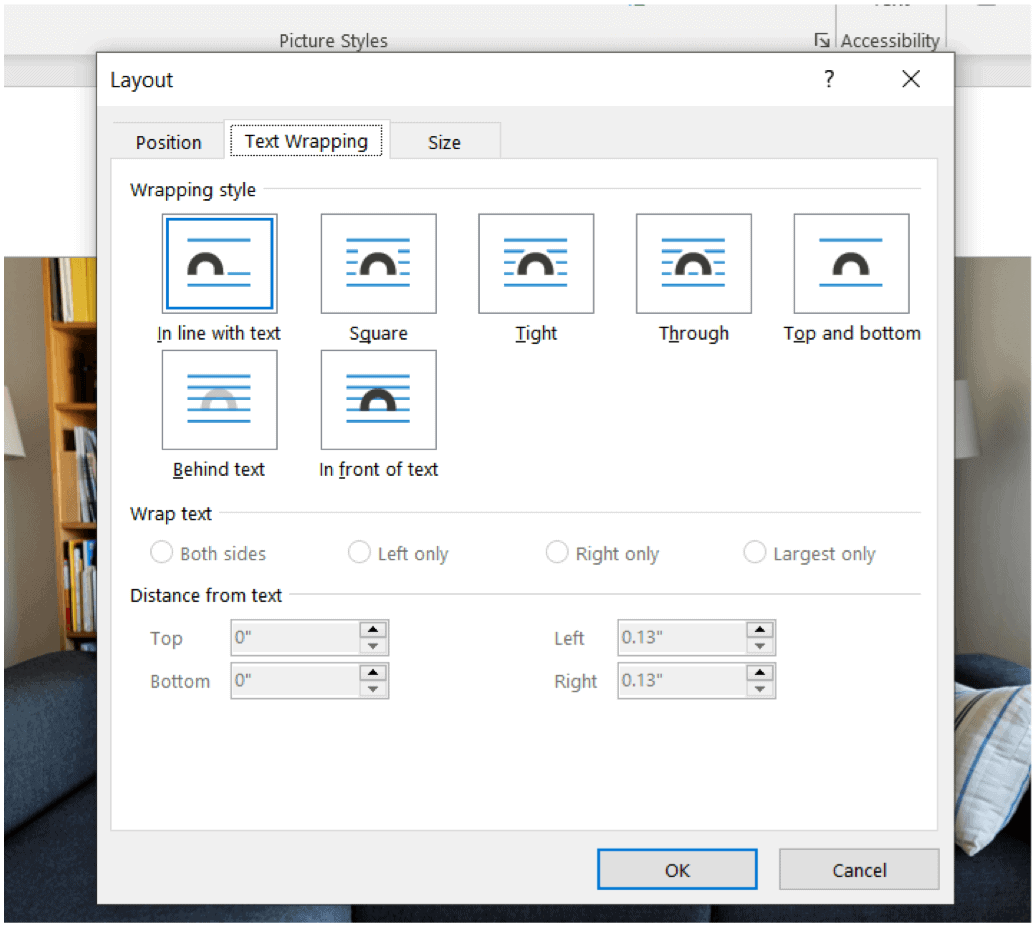
To set up a picture’s layout options, select the image, then go to Picture Format > Position. Select one of the pre-configured layout options to position your picture on the page.


Gain more control by going to Picture Format > Wrap Text.


Select one of the text wrapping options:
- Square — wraps text around the picture in a square shape


- Tight — wraps text following the shape of the picture


- Through — shows text through all the “open” parts of the picture (may only be visible with certain picture shapes)


- Top and Bottom — wraps text only above and below the picture


These text wrapping options allow you to overlay pictures in Word or merge them together into a collage-type layout.
You’ve got other options:
- Behind text. Overlays the text in front of the picture
- In Front of Text. Places text behind the picture, covering it
- Edit Wrap Boundary. Lets you fine-tune how text wraps around the picture, which is especially useful if it’s irregularly shaped
- Move with text. Keeps the picture anchored to the text
- Fix position on page. Keeps the picture on the same position relative to the page, even if the text moves
- More Layout Options …. Gives you precise control over the picture layout
How to Move Pictures in Word and Arrange them on the Page
You may be wondering how to move a picture in Microsoft Word. The easiest way to move a picture is by clicking and dragging it. If this doesn’t work, the picture is probably set to be inline with text. Follow the instructions above to select a different text wrapping option.
To move multiple images, hold the shift key down as you click on each picture. Then, drag and drop them into place.
You can also move images using precise measurements. Select the image, go to Picture Format > Position > More Layout Options …. Specify the horizontal and vertical position of the picture relative to an element of the page.


Get Creative With Pictures in Word
Use the skills you learned above to add pictures in your Word documents and display them exactly the way you envision. As you’ve seen, it’s easy to control the appearance and placement of images on the page. By following the steps above, you can produce professional-looking documents all by yourself. However, we’ve only scratched the surface of the many ways you can work with pictures in Word!
Of course, if you prefer to have these design choices made for you, you’ve got the option to start with a Microsoft Word template. If you make a lot of Word documents, then you’ll like the cost-effectiveness of Envato Elements. You get unlimited downloads of templates as well as fonts, stock photos, and more for one low subscription price. On the other hand, GraphicRiver may be a better option if you only need the one-off template.
This gives you the ultimate convenience because professionally-designed Word templates have image placeholders. All you’ve got to do is to drag and drop your own pictures into the placeholders. The picture formatting steps in this article will help you fine-tune the image settings as you wish.
Now you, too, can get more creative—and effective—with pictures in Microsoft Word. But first, get your head start by downloading your favorite MS Word Template from Envato Elements or GraphicRiver.

Зачастую, изображения в Microsoft Word должны не просто быть на странице документа, а присутствовать в строго обозначенном месте. Следовательно, картинку необходимо переместить, и для этого, в большинстве случаев, достаточно просто потянуть ее левой кнопкой мышки в необходимом направлении.
Урок: Изменение изображений в Ворд
В большинстве не значит, что всегда… Если в документе есть текст, около которого и расположен рисунок, такое «грубое» перемещение может нарушить форматирование. Для того, чтобы правильно переместить изображение в Word, следует подобрать правильные параметры разметки.
Урок: Как в Ворде форматировать текст
Если вы не знаете, как добавить картинку в документ Microsoft Word, воспользуйтесь нашей инструкцией.
Урок: Как в Ворде вставить изображение
Изображение, добавленное в документ, находится в специальной рамке, обозначающей его границы. В левом верхнем углу находится якорь — место привязки объекта, в правом верхнем — кнопка, с помощью которой и можно изменить параметры разметки.
Урок: Как в Word поставить якорь
Нажав на этот значок, вы можете выбрать подходящий параметр разметки.
Это же можно сделать и во вкладке «Формат», которая открывается после вставки рисунка в документ. Просто выберите там параметр «Обтекание текстом».

Примечание: «Обтекание текстом» — это и есть основной параметр, с помощью которого можно грамотно вписать картинку в документ с текстом. Если ваша задача — не просто переместить изображение на пустой странице, а красиво и правильно расположить его в документе, где есть текст, обязательно прочтите нашу статью.

Урок: Как сделать обтекание картинки текстом в Ворде
Кроме того, если стандартные параметры разметки вас не устраивают, в меню кнопки «Обтекание текстом» можно выбрать пункт «Дополнительные параметры разметки» и выполнить там необходимые настройки.
Параметры «Перемещать с текстом» и «Зафиксировать положение на странице» говорят сами за себя. При выборе первого картинка будет перемещаться вместе с текстовым содержимым документа, которое, конечно же, может изменяться и дополняться. Во втором — изображение будет находиться в конкретном месте документа, чтобы не происходило с текстом и любыми другими объектами, содержащимися в документе.
Выбрав параметры «За текстом» или «Перед текстом», вы сможете свободно перемещать картинку по документу, не оказывая влияния на текст и его положение. В первом случае текст будет находиться поверх изображения, во втором — за ним. Если это необходимо, вы всегда можете изменить прозрачность рисунка.
Урок: Как изменить прозрачность картинки в Word
Если вам нужно переместить изображение в строго вертикальном или горизонтальном направлении, зажмите клавишу «SHIFT» и потяните его мышкой в нужном направлении.
Для перемещения картинки небольшими шагами кликните по ней мышкой, зажмите клавишу «CTRL» и перемещайте объект с помощью стрелок на клавиатуре.
При необходимости повернуть изображение, воспользуйтесь нашей инструкцией.
Урок: Как в Ворде повернуть рисунок
Вот и все, теперь вы знаете, как перемещать картинки в Microsoft Word. Продолжайте осваивать возможности этой программы, а мы сделаем все возможное для того, чтобы облегчить для вас этот процесс.
Download PC Repair Tool to quickly find & fix Windows errors automatically
Microsoft Word is a great Word processing software developed by Microsoft. You can create and edit documents in Microsoft Word. It has many options to create a document, like adding images, formatting the text, etc. Sometimes, we need to adjust the position of an inserted image in Microsoft Word by moving it. By default, Word does not let users move an image. In this article, we will see how to move a picture freely in Microsoft Word.
Which option is used to move a picture?
In Microsoft Word, you can move a picture by using the Wrap Text feature. Right-click on an image and select Wrap Text. After that, you will see a number of options. The In Line with Text option does not let you move an image. Therefore, you have to select other options in the Wrap Text to move an image.
What is the Wrap Text feature in MS Word?
The Wrap Text feature in Microsoft Word enables text to wrap around the image so that the image does not interfere with line spacing. The feature lets Microsoft Word users choose how to wrap the text wraps around the selected object.
Why can’t I move pictures in Word?
When inserting an image into a document with text, you cannot move it around the text easily due to it being in line with text by default. To freely move a picture in your Microsoft Word, you should use the Wrap Text feature.
Follow the methods below to move pictures freely in Microsoft Word:
Enable a picture to move freely in a Word document
Open a Word document file.
Insert a picture into it.

Right-click the picture, hover the cursor over Wrap Text and select In Front of Text.
Now, you can move your picture freely around the text in your document.
Enable all pictures to move freely overall in a Word document
You can allow your future images to move freely in your document by customizing the Word settings.
Click the File tab on the menu bar.
Click Options in the backstage view.
A Word Options dialog box will open.
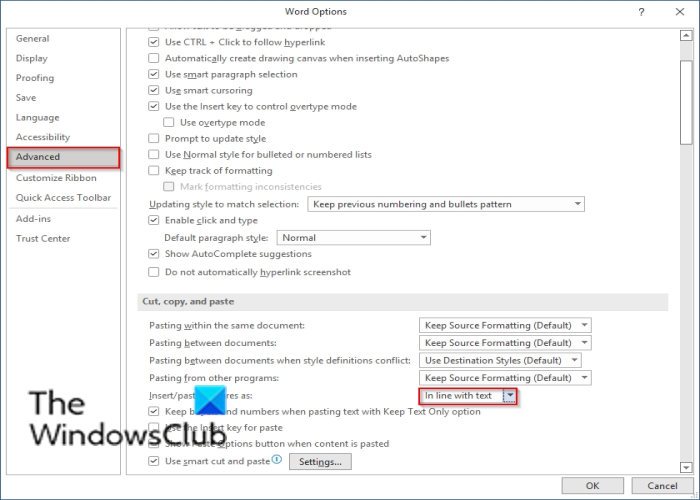
Click Advanced on the left pane.
In the section Cut, copy and paste, click the list button for Insert/paste picture as.
Then select In front of text from the list box.
Click OK.
Try to insert a photo into the Word document and try to move the image freely around the text.
Read: How to add Templates and insert Videos in Microsoft Word.
We hope this tutorial helps you understand how to move a picture freely in Microsoft Word.

Shantel has studied Data Operations, Records Management, and Computer Information Systems. She is quite proficient in using Office software. Her goal is to become a Database Administrator or a System Administrator.
Microsoft Office assists users to move photos in Word, insert pictures and place them correctly. Pictures in Word, are like furniture in the living room, it is must seat them where it is not only enticing to see but also appreciatable. While Microsoft has not made it straightforward to move pictures in Word, it does offers to do so. The only trouble is finding the tools and that’s where you step in a different microcosmos—it is not easy to find them if you do not know where you are looking. Well, you need not worry about any further clicks more. Let’s look at a simplistic answer on how to move images in Word.
Add Picture in Word
Before you begin adding Images in Microsoft Word, you will have to configure the Word initially to play around with pictures.
To Enable Picture in Word
- Open Word and click on the File option.
- Then click on— Option (in the sidebar, bottom of your screen).
Word Options - Clicking that you will see the Page Display Option, where you have to opt the Object Anchors option, that has to be toggled on.
Page Display Option
Another thing that you have to change is How Word treats your Image.
Inside the Word option above:
- You will find a tab of the Advance option.
- In the Cut, Copy, Paste— you will find Insert Picture as an option.
- You have to change it to Square.
Do not forget to click on the—Ok—option each time you change a setting
Now, when you add the Picture in Word, it will treat the Images as objects unlike Text before. You can now drag the move the Pictures in Word wherever you think is suitable, and Text will wrap itself around it. Just click on the picture in Word to reveal the resize and movable buttons around the Image.
How to Edit Picture in Word?
Now, you will notice that it’s relatively simple to move Pictures in Word freely, but it is still not perfect. And, it is where the Layout option kicks in. Following the Layout tab; you will find the option—Position.
- Click on it, to discover more Layout options (You’ll find it at the bottom of the box).
Layout options in Word
This allows you to be precise about the positioning and Layout of the Pitcures in Word, rather than using the preset options.
- By default, Pitcures in Word are preset to be one positioned in One Column option; and these will allow you to treat the Pitcures in Word to Two or more.
- The second option is Text wrapping, which will allow you to place the Pictures in Word behind Text, or in front of it. Also, you can determine that the Text is wrapped on only sides or from right-or-left.
- And, the third option lets you decide and unlock the Aspect Ratio of the Picture in Word, so you keep it relatively the same as the original Picture.
Conclusion
The Microsoft Word is, has and will be better than any other word processors out there. Also, it befalls pre-installed with Windows that is the love of users when it comes to Operating Systems. Though, it entails some time to understand it initially, but doing so will you get your way-in quickly in the machine world. Hope our article will help you flawlessly insert the picture into Word. For further questions or comments, please note down below in the comment section.
Experienced Mobile Developer with a demonstrated history of working in the computer software industry. Skilled in Android/Kotlin, iOS/Swift, Node.js/TypeScript. Strong engineering professional strengthening my foundations at Oklahoma State University. My Linkedin: Profile
Though Microsoft Word largely focuses on using those keys in front of you, it also provides some useful tools related to photos. In this how-to, you’ll learn how to move photos freely in just a few steps. Adding a picture or two can add some spark to your document that wouldn’t be possible with text alone. Here’s how to do it.
To position images in Word:
- Open Microsoft Word.
- Then, open your document.
- Go to Insert > Pictures and add your image. You can select your picture from the computer or online.
- Right-click on the image.
- Select the size and position from the menu.

- Choose Text Wrapping at the top.
- Finally, select In Front of Text.
Your image will now float above the text so you can put it anywhere without disrupting the rest of the document.
More With Microsoft Word
Not surprisingly, there’s a lot more you can do with Word, even with tables, including using different headers and footers for each page, adjusting the grammar settings, shrinking text to fit on one page, and more.
You can find Microsoft Word inside the Microsoft 365 suite. For home use, the Microsoft 365 suite is currently available in three varieties, including a Family, Personal, and Home & Student plan. Price-wise, the first is $100 per year (or $10/month) and includes Word, Excel, PowerPoint, OneNote, and Outlook for Mac. Membership covers up to six users. The Personal version is for one individual and is $70/year or $6.99 per month. Finally, the student plan is a one-time purchase of $150 and includes Word, Excel, and PowerPoint.
Business users can select from Basic, Standard, and Premium plans, starting at $5 per user/month.
Keep coming back to groovyPost as we often public new how-tos about Microsoft Word and the rest of the Microsoft 365 suite. We’re also covering the latest Windows 11 news before its release.
![]()