
Move or copy worksheets or worksheet data
You can move or copy a worksheet in the same workbook to organize your workbook exactly how you want.

You can use the Move or Copy Sheet command to move or copy entire worksheets (also known as sheets), to other locations in the same or a different workbook. You can use the Cut and Copy commands to move or copy a portion of the data to other worksheets or workbooks.
Move a worksheet within a workbook
-
Select the worksheet tab, and drag it to where you want it.
Caution: When you move a sheet to another workbook, check any formulas or charts that refer to data on the sheet because moving the sheet might cause errors or produce unintended results in your data. Similarly, if you move a sheet that is referred to by 3-D references, the calculation might include or leave out data on the sheet.
Copy a worksheet in the same workbook
-
Press CTRL and drag the worksheet tab to the tab location you want.
OR
-
Right click on the worksheet tab and select Move or Copy.
-
Select the Create a copy checkbox.
-
Under Before sheet, select where you want to place the copy.
-
Select OK.
When you need to reorganize your data, you can easily change the order of sheets in a workbook, or move or copy a sheet to another workbook. But be aware that calculations or charts that are based on sheet data may become inaccurate if you move the sheet.
Move a sheet
-
Drag the sheet tab to the location that you want along the row of sheet tabs.
Copy a sheet
-
Hold down OPTION.
-
Drag the sheet tab to the location that you want the copied sheet to appear along the row of sheet tabs.
Important: Release the mouse button before you release the OPTION key.
Move a sheet to another workbook
Caution: When you move a sheet to another workbook, check any formulas or charts that refer to data on the sheet because moving the sheet might cause errors or produce unintended results in your data. Similarly, if you move a sheet that is referred to by 3-D references, the calculation might include or leave out data on the sheet.
-
Open the workbook that you want to move the sheet to.
-
On the Window menu, click the workbook that contains the sheet that you want to move.
Click the sheet that you want to copy to the other workbook.
-
On the Edit menu, click Sheet > Move or Copy Sheet.
-
On the To book menu, click the workbook that you want to move the sheet to.
Tip: To create a new workbook that contains the moved sheet, click new book.
-
In the Before sheet box, click the sheet that you want to insert the moved sheet before, or click move to end.
-
Click OK.
Copy a sheet to another workbook
-
Open the workbook that you want to copy the sheet to.
-
On the Window menu, click the workbook that contains the sheet that you want to copy.
Click the sheet that you want to copy.
-
On the Edit menu, click Sheet > Move or Copy Sheet.
-
On the To book menu, click the workbook that you want to copy the sheet to.
Tip: To create a new workbook that contains the moved sheet, click new book.
-
In the Before sheet box, click the sheet that you want to insert the copied sheet before, or click move to end.
-
Select the Create a copy check box.
-
Click OK.
Change the color of a sheet tab
Coloring the sheet tabs can help you keep track of your information in a large workbook.
-
Hold down CONTROL and click the sheet tab.
-
Click Tab Color, and then click the color that you want to use.
In Excel for the web, you can duplicate (or copy) worksheets within the current workbook. Simply right-click the tab name at the bottom of the sheet and click Duplicate.
Note: You may receive an error when you are trying to duplicate a worksheet that contains a chart, picture, or shape. If you get an error, you can duplicate the sheet manually.
If you have elements in your worksheet that interfere with duplicating it, you can still create a copy of the worksheet manually by copying all the data and pasting it into a new sheet. Here’s how:
-
Select all the data in the worksheet.
Keyboard shortcut: Press CTRL+Spacebar, on the keyboard, and then press Shift+Spacebar.
-
Copy all the data on the sheet by pressing CTRL+C.
-
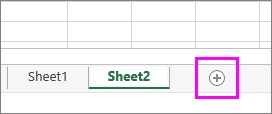
Click the plus sign to add a new blank worksheet.

-
Click the first cell in the new sheet and press CTRL+V to paste the data.
Note: You will lose any conditional formatting applied to the cells when you paste them into the new worksheet.
In Excel for the web, the option to move or copy a sheet isn’t available when you right-click a sheet tab, as it is in the Excel desktop application. In Excel for the web, you can achieve the same result by copying all of the data in the worksheet and pasting it into a blank worksheet in the other workbook.
Follow these steps to move or copy a worksheet to another workbook in Excel for the web:
-
Select all the data in the worksheet.
Keyboard shortcut: Press CTRL+Spacebar and then press Shift+Spacebar.
-
Copy all the data on the sheet by pressing CTRL+C.
-
Open the workbook in which you want to paste the data, then click the + in the status bar to add a new blank worksheet.
-
Click the first cell in the new worksheet, then press CTRL+V to paste the data into that worksheet.
Note: You will lose any conditional formatting applied to the cells when you paste them into the other workbook.
Need more help?
You can always ask an expert in the Excel Tech Community or get support in the Answers community.
Need more help?
Want more options?
Explore subscription benefits, browse training courses, learn how to secure your device, and more.
Communities help you ask and answer questions, give feedback, and hear from experts with rich knowledge.
When you move or copy rows and columns, by default Excel moves or copies all data that they contain, including formulas and their resulting values, comments, cell formats, and hidden cells.
When you copy cells that contain a formula, the relative cell references are not adjusted. Therefore, the contents of cells and of any cells that point to them might display the #REF! error value. If that happens, you can adjust the references manually. For more information, see Detect errors in formulas.
You can use the Cut command or Copy command to move or copy selected cells, rows, and columns, but you can also move or copy them by using the mouse.
By default, Excel displays the Paste Options button. If you need to redisplay it, go to Advanced in Excel Options. For more information, see Advanced options.
-
Select the cell, row, or column that you want to move or copy.
-
Do one of the following:
-
To move rows or columns, on the Home tab, in the Clipboard group, click Cut
or press CTRL+X. -
To copy rows or columns, on the Home tab, in the Clipboard group, click Copy
or press CTRL+C.
-
-
Right-click a row or column below or to the right of where you want to move or copy your selection, and then do one of the following:
-
When you are moving rows or columns, click Insert Cut Cells.
-
When you are copying rows or columns, click Insert Copied Cells.
Tip: To move or copy a selection to a different worksheet or workbook, click another worksheet tab or switch to another workbook, and then select the upper-left cell of the paste area.
-
 or press CTRL+X.
 or press CTRL+C.
Note: Excel displays an animated moving border around cells that were cut or copied. To cancel a moving border, press Esc.
By default, drag-and-drop editing is turned on so that you can use the mouse to move and copy cells.
-
Select the row or column that you want to move or copy.
-
Do one of the following:
-
Cut and replace
Point to the border of the selection. When the pointer becomes a move pointer, drag the rows or columns to another location. Excel warns you if you are going to replace a column. Press Cancel to avoid replacing. -
Copy and replace Hold down CTRL while you point to the border of the selection. When the pointer becomes a copy pointer
, drag the rows or columns to another location. Excel doesn’t warn you if you are going to replace a column. Press CTRL+Z if you don’t want to replace a row or column. -
Cut and insert Hold down SHIFT while you point to the border of the selection. When the pointer becomes a move pointer
, drag the rows or columns to another location. -
Copy and insert Hold down SHIFT and CTRL while you point to the border of the selection. When the pointer becomes a move pointer
, drag the rows or columns to another location.
Note: Make sure that you hold down CTRL or SHIFT during the drag-and-drop operation. If you release CTRL or SHIFT before you release the mouse button, you will move the rows or columns instead of copying them.
-
 , drag the rows or columns to another location. Excel warns you if you are going to replace a column. Press Cancel to avoid replacing.
 , drag the rows or columns to another location. Excel doesn’t warn you if you are going to replace a column. Press CTRL+Z if you don’t want to replace a row or column.
Note: You cannot move or copy nonadjacent rows and columns by using the mouse.
If some cells, rows, or columns on the worksheet are not displayed, you have the option of copying all cells or only the visible cells. For example, you can choose to copy only the displayed summary data on an outlined worksheet.
-
Select the row or column that you want to move or copy.
-
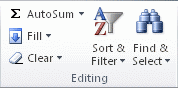
On the Home tab, in the Editing group, click Find & Select, and then click Go To Special.
-
Under Select, click Visible cells only, and then click OK.
-
On the Home tab, in the Clipboard group, click Copy
or press Ctrl+C. . -
Select the upper-left cell of the paste area.
Tip: To move or copy a selection to a different worksheet or workbook, click another worksheet tab or switch to another workbook, and then select the upper-left cell of the paste area.
-
On the Home tab, in the Clipboard group, click Paste
or press Ctrl+V.If you click the arrow below Paste
, you can choose from several paste options to apply to your selection.
 or press Ctrl+V.
Excel pastes the copied data into consecutive rows or columns. If the paste area contains hidden rows or columns, you might have to unhide the paste area to see all of the copied cells.
When you copy or paste hidden or filtered data to another application or another instance of Excel, only visible cells are copied.
-
Select the row or column that you want to move or copy.
-
On the Home tab, in the Clipboard group, click Copy
or press Ctrl+C. -
Select the upper-left cell of the paste area.
-
On the Home tab, in the Clipboard group, click the arrow below Paste
, and then click Paste Special. -
Select the Skip blanks check box.
-
Double-click the cell that contains the data that you want to move or copy. You can also edit and select cell data in the formula bar.
-
Select the row or column that you want to move or copy.
-
On the Home tab, in the Clipboard group, do one of the following:
-
To move the selection, click Cut
or press Ctrl+X. -
To copy the selection, click Copy
or press Ctrl+C.
-
-
In the cell, click where you want to paste the characters, or double-click another cell to move or copy the data.
-
On the Home tab, in the Clipboard group, click Paste
or press Ctrl+V. -
Press ENTER.
Note: When you double-click a cell or press F2 to edit the active cell, the arrow keys work only within that cell. To use the arrow keys to move to another cell, first press Enter to complete your editing changes to the active cell.
When you paste copied data, you can do any of the following:
-
Paste only the cell formatting, such as font color or fill color (and not the contents of the cells).
-
Convert any formulas in the cell to the calculated values without overwriting the existing formatting.
-
Paste only the formulas (and not the calculated values).
Procedure
-
Select the row or column that you want to move or copy.
-
On the Home tab, in the Clipboard group, click Copy
or press Ctrl+C.
-
Select the upper-left cell of the paste area or the cell where you want to paste the value, cell format, or formula.
-
On the Home tab, in the Clipboard group, click the arrow below Paste
, and then do one of the following:-
To paste values only, click Values.
-
To paste cell formats only, click Formatting.
-
To paste formulas only, click Formulas.
-
When you paste copied data, the pasted data uses the column width settings of the target cells. To correct the column widths so that they match the source cells, follow these steps.
-
Select the row or column that you want to move or copy.
-
On the Home tab, in the Clipboard group, do one of the following:
-
To move cells, click Cut
or press Ctrl+X. -
To copy cells, click Copy
or press Ctrl+C.
-
-
Select the upper-left cell of the paste area.
Tip: To move or copy a selection to a different worksheet or workbook, click another worksheet tab or switch to another workbook, and then select the upper-left cell of the paste area.
-
On the Home tab, in the Clipboard group, click the arrow under Paste
, and then click Keep Source Column Widths.
You can use the Cut command or Copy command to move or copy selected cells, rows, and columns, but you can also move or copy them by using the mouse.
-
Select the cell, row, or column that you want to move or copy.
-
Do one of the following:
-
To move rows or columns, on the Home tab, in the Clipboard group, click Cut
or press CTRL+X. -
To copy rows or columns, on the Home tab, in the Clipboard group, click Copy
or press CTRL+C.
-
-
Right-click a row or column below or to the right of where you want to move or copy your selection, and then do one of the following:
-
When you are moving rows or columns, click Insert Cut Cells.
-
When you are copying rows or columns, click Insert Copied Cells.
Tip: To move or copy a selection to a different worksheet or workbook, click another worksheet tab or switch to another workbook, and then select the upper-left cell of the paste area.
-
Note: Excel displays an animated moving border around cells that were cut or copied. To cancel a moving border, press Esc.
-
Select the row or column that you want to move or copy.
-
Do one of the following:
-
Cut and insert
Point to the border of the selection. When the pointer becomes a hand pointer, drag the row or column to another location -
Cut and replace Hold down SHIFT while you point to the border of the selection. When the pointer becomes a move pointer
, drag the row or column to another location. Excel warns you if you are going to replace a row or column. Press Cancel to avoid replacing. -
Copy and insert Hold down CTRL while you point to the border of the selection. When the pointer becomes a move pointer
, drag the row or column to another location. -
Copy and replace Hold down SHIFT and CTRL while you point to the border of the selection. When the pointer becomes a move pointer
, drag the row or column to another location. Excel warns you if you are going to replace a row or column. Press Cancel to avoid replacing.
Note: Make sure that you hold down CTRL or SHIFT during the drag-and-drop operation. If you release CTRL or SHIFT before you release the mouse button, you will move the rows or columns instead of copying them.
-
 , drag the row or column to another location
Note: You cannot move or copy nonadjacent rows and columns by using the mouse.
-
Double-click the cell that contains the data that you want to move or copy. You can also edit and select cell data in the formula bar.
-
Select the row or column that you want to move or copy.
-
On the Home tab, in the Clipboard group, do one of the following:
-
To move the selection, click Cut
or press Ctrl+X. -
To copy the selection, click Copy
or press Ctrl+C.
-
-
In the cell, click where you want to paste the characters, or double-click another cell to move or copy the data.
-
On the Home tab, in the Clipboard group, click Paste
or press Ctrl+V. -
Press ENTER.
Note: When you double-click a cell or press F2 to edit the active cell, the arrow keys work only within that cell. To use the arrow keys to move to another cell, first press Enter to complete your editing changes to the active cell.
When you paste copied data, you can do any of the following:
-
Paste only the cell formatting, such as font color or fill color (and not the contents of the cells).
-
Convert any formulas in the cell to the calculated values without overwriting the existing formatting.
-
Paste only the formulas (and not the calculated values).
Procedure
-
Select the row or column that you want to move or copy.
-
On the Home tab, in the Clipboard group, click Copy
or press Ctrl+C.
-
Select the upper-left cell of the paste area or the cell where you want to paste the value, cell format, or formula.
-
On the Home tab, in the Clipboard group, click the arrow below Paste
, and then do one of the following:-
To paste values only, click Paste Values.
-
To paste cell formats only, click Paste Formatting.
-
To paste formulas only, click Paste Formulas.
-
You can move or copy selected cells, rows, and columns by using the mouse and Transpose.
-
Select the cells or range of cells that you want to move or copy.
-
Point to the border of the cell or range that you selected.
-
When the pointer becomes a
, do one of the following:
 , do one of the following:
|
To |
Do this |
|---|---|
|
Move cells |
Drag the cells to another location. |
|
Copy cells |
Hold down OPTION and drag the cells to another location. |
Note: When you drag or paste cells to a new location, if there is pre-existing data in that location, Excel will overwrite the original data.
-
Select the rows or columns that you want to move or copy.
-
Point to the border of the cell or range that you selected.
-
When the pointer becomes a
, do one of the following:
|
To |
Do this |
|---|---|
|
Move rows or columns |
Drag the rows or columns to another location. |
|
Copy rows or columns |
Hold down OPTION and drag the rows or columns to another location. |
|
Move or copy data between existing rows or columns |
Hold down SHIFT and drag your row or column between existing rows or columns. Excel makes space for the new row or column. |
-
Copy the rows or columns that you want to transpose.
-
Select the destination cell (the first cell of the row or column into which you want to paste your data) for the rows or columns that you are transposing.
-
On the Home tab, under Edit, click the arrow next to Paste, and then click Transpose.
Note: Columns and rows cannot overlap. For example, if you select values in Column C, and try to paste them into a row that overlaps Column C, Excel displays an error message. The destination area of a pasted column or row must be outside the original values.
See also
Insert or delete cells, rows, columns
Copying Moving and Pasting Data in Excel
Effectively Manage Your
Projects and Resources
ANALYSISTABS.COM provides free and premium project management tools, templates and dashboards for effectively managing the projects and analyzing the data.
We’re a crew of professionals expertise in Excel VBA, Business Analysis, Project Management. We’re Sharing our map to Project success with innovative tools, templates, tutorials and tips.
Project Management
Excel VBA
Download Free Excel 2007, 2010, 2013 Add-in for Creating Innovative Dashboards, Tools for Data Mining, Analysis, Visualization. Learn VBA for MS Excel, Word, PowerPoint, Access, Outlook to develop applications for retail, insurance, banking, finance, telecom, healthcare domains.
Page load link
Go to Top
Transcript
In this lesson, we’ll look at how to move data from one place to another in Excel. The most common way to move information is to use cut and paste. We’ll cover three options: using buttons on the ribbon, using keyboard shortcuts, and using the right-click menu.
Let’s take a look.
The most basic way to move content in Excel is to select one or more cells, then click the «cut» button on the ribbon, move to another location, and click the «paste» button on the ribbon.
When you cut content, notice that Excel doesn’t immediately remove the content. Instead, the cut data is highlighted by a moving dashed
line—sometimes called «marching ants.» This indicates that the cut information is on the clipboard and ready to move to a new location.
If you decide you don’t want to move the data after all, just press the escape key and the marching ants will disappear.
In addition to the buttons on the ribbon, you can use the keyboard shortcuts for cut and paste. Control-x to cut; control-v to paste.
You can also right-mouse click to cut and paste.
Finally, you can move entire rows and columns using cut and paste. Just make sure to select the column letter or the row number to get a complete selection.
Because columns and rows are very big objects, be sure you don’t accidentally overwrite important information elsewhere on the worksheet.

Author![]()
Dave Bruns
Hi — I’m Dave Bruns, and I run Exceljet with my wife, Lisa. Our goal is to help you work faster in Excel. We create short videos, and clear examples of formulas, functions, pivot tables, conditional formatting, and charts.
Watch Video – The best way to Move Rows / Columns in Excel
Sometimes when working with data in Excel, you may have a need to move rows and columns in the dataset.
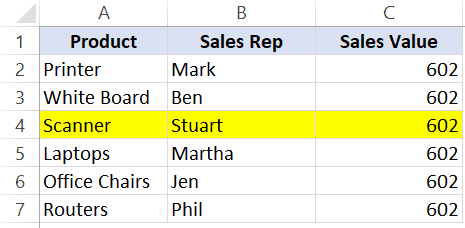
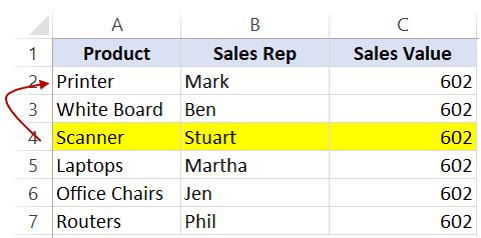
For example, in the below dataset, I want to quickly move the highlighted row to the top.
Now, are you thinking of copying this row, inserting the copied row where you want it, and then deleting it?
If yes – well that’s one way to do this.
But there is a lot faster way to move rows and columns in Excel.
In this tutorial, I will show you a fast way to move rows and columns in Excel – using an amazing shortcut.
Move Rows in Excel
Suppose I have the following dataset and I want to move the highlighted row to the second row (just below the headers):
Here are the steps to do this:
- Select the row that you want to move.
- Hold the Shift Key from your keyboard.
- Move your cursor to the edge of the selection. It would display the move icon (a four directional arrow icon).
- Click on the edge (with left mouse button) while still holding the shift key.
- Move it to the row where you want this row to be shifted
- Leave the mouse button when you see a bold line right below the row where you want to move this row.
- Leave the Shift-key (remember to keep the Shift key pressed till the end)
Below is a video that shows how to move a row using this method.
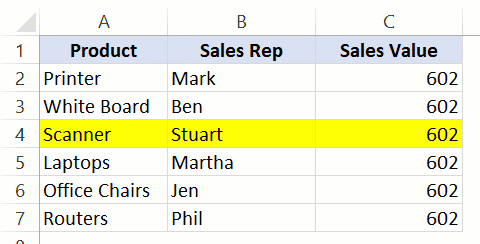
Note that in this example, I have moved the selected cells only.
If you want to move the entire row, you can select the entire row and then follow the same steps.
Here are some important things to know about this method:
- You can move contiguous rows (or some cells from the contiguous rows). You can’t move non-contiguous rows using this method. For example, you can’t move row # 4 and 6 at the same time. However, you can move row #5 and 6 at the same time by selecting it.
- When you move some cells in a row/column using this method, it will not impact any other data in the worksheet. In the above example, any data outside (above/below or to the right/left of this table) remains unaffected.
Move Columns in Excel
The same technique can also be used to move columns in Excel.
Here are the steps:
- Select the column (or contiguous columns) that you want to move.
- Hold the Shift Key from your keyboard.
- Move your cursor to the edge of the selection. It would display the move icon (a four directional arrow icon).
- Click on the edge (with left mouse button) while still holding the shift key.
- Move it to the column where you want this row to be shifted
- Leave the mouse button when you see a bold line to the edge of the column where you want to move this column.
- Leave the Shift-key (remember to keep the Shift key pressed till the end).
You May Also Like the Following Excel Tutorials:
- Quickly select blank cells in Excel.
- Quickly select a far-off cell/range in Excel.
- Keyboard and Mouse tricks that will reinvent the way you Excel.
- Highlight every other row in Excel.
- Insert New Cells in Excel.
- Highlight Active Row/Column in a dataset.
- Delete rows based on cell value in Excel
- Insert New Columns in Excel
Do you regularly work out of multiple Excel sheets? If so, you should know how to transfer data from one sheet to another automatically. This enormous time-saver doesn’t involve complicated formulas or add-ons, and it’s especially practical if you want to transfer specific data from one worksheet to another for reports. Below, you’ll learn two simple methods to copy data from one Excel sheet to another. These methods also link the sheets so that any changes you make to one sheet’s dataset automatically apply to the other. Finally, you’ll learn how to move data from one Excel sheet to another based on criteria by using the filter feature.
If you want to transfer data from one Google Sheet to another automatically, you can do that easily using Layer. Layer is a free add-on that allows you to share sheets or ranges of your main spreadsheet with different people. On top of that, you get to monitor and approve edits and changes made to the shared files before they’re merged back into your master file, giving you more control over your data.
Install the Layer Google Sheets Add-On today and Get Free Access to all the paid features, so you can start managing, automating, and scaling your processes on top of Google Sheets!
Two methods for automatically transferring data from one Excel worksheet to another
While there are various methods for transferring data from one Excel worksheet to another, the two simplest are the Copy and Paste Link and the Worksheet Reference methods.
How to Link Sheets in Excel?
Use Copy and Paste Link to automatically transfer data from one Excel worksheet to another
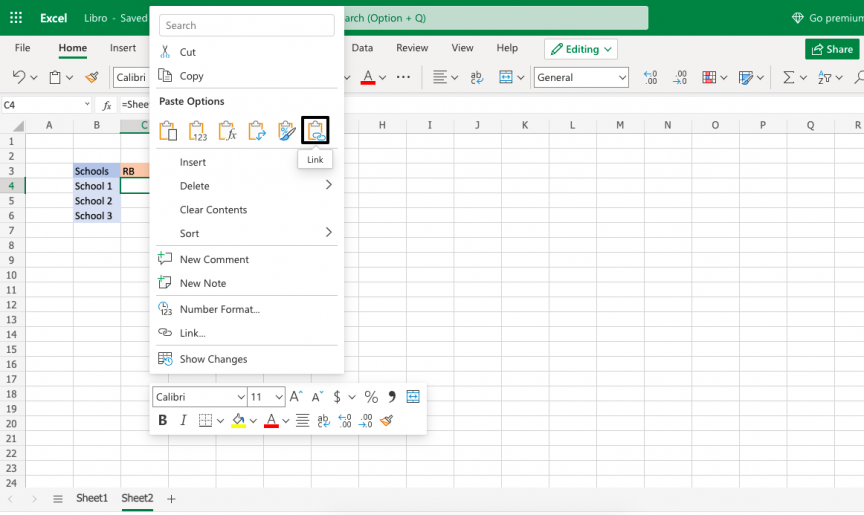
While you’re probably familiar with the standard Copy and Paste function, Excel offers multiple paste options. One of these is Link, which allows you to paste a value from another worksheet and link the pasted value to the copied value. In other words, if you change the original value you copied, the pasted value will automatically change as well.
These steps will show you how to use the Copy and Paste Link function:
- 1. Open two spreadsheets containing the same simple dataset.


- 2. In sheet 1, select a cell and type Ctrl + C / Cmd + C to copy it.

- 3. In sheet 2, right-click on the equivalent cell and go to the Paste > Link.
- 4. To prove they’re linked, return to sheet 1 and change the value in the cell you copied.

- 5. Finally, return to sheet 2 to see that the value has also changed.

How to VLOOKUP in Excel with Two Spreadsheets?
Sometimes our data may be spread out among different Excel sheets or workbooks. Here’s how to do VLOOKUP in Excel with two spreadsheets
READ MORE

Use worksheet reference to automatically transfer data from one Excel worksheet to another
This method is more manual than the Copy and Paste method but is equally simple and useful to know, just in case. The following steps will teach you how to use the worksheet reference method to transfer data from one Excel worksheet to another automatically:
- 1. Open two spreadsheets containing the same, simple dataset.


- 2. In sheet 2, double-click on a cell to the right of the dataset and type ‘=’.

- 3. Go to sheet 1, click any cell from the dataset, and press Enter.

You should automatically be returned to Sheet 2, where the cell previously containing ‘=’ now contains the value you chose to transfer from Sheet 1.

- 4. To prove they’re linked, return to Sheet 1 and change the value you chose to transfer.
Sheet 2 will automatically have changed the value to your chosen new value.

Move data from one Excel sheet to another based on criteria using the filter feature
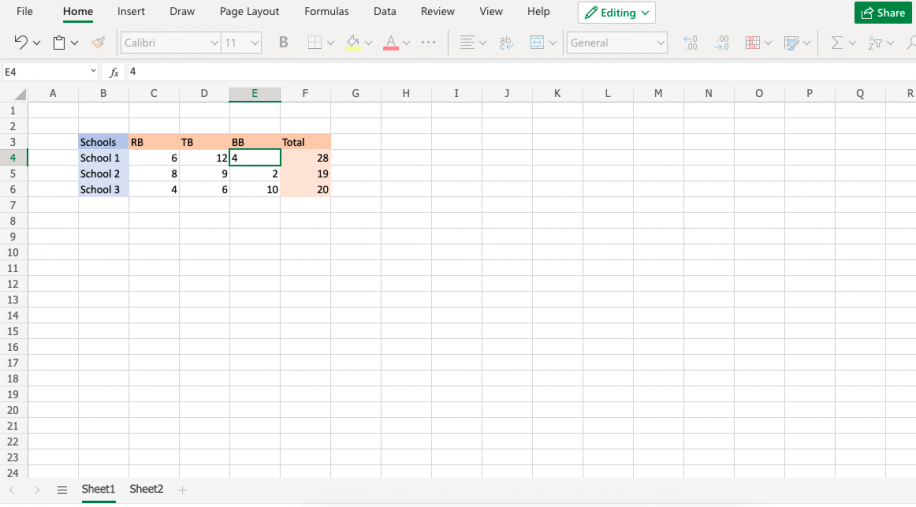
In this example, you will learn how to filter data based on column criteria so that you keep only what you need. Then, you can copy and paste the data into a new sheet, as demonstrated in the above example.
- 1. Open a dataset on an Excel worksheet with filterable criteria.

- 2. Select the criteria column from which you want to filter and go to Data > Filter.

- 3. Click the small arrow beside the column header to open a drop-down menu.
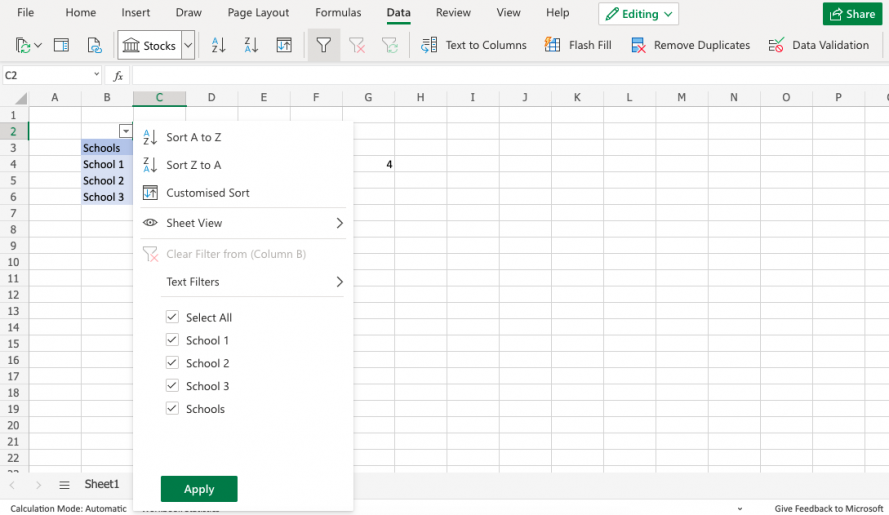
- 4. At the bottom of this menu, tick the box of the row(s) that you want to keep and click “Apply”.

You should now see only the data you wanted to keep.

To move this data to another sheet, follow the steps that show you how to copy and paste to automatically transfer data from one Excel worksheet to another.
Want to Boost Your Team’s Productivity and Efficiency?
Transform the way your team collaborates with Confluence, a remote-friendly workspace designed to bring knowledge and collaboration together. Say goodbye to scattered information and disjointed communication, and embrace a platform that empowers your team to accomplish more, together.
Key Features and Benefits:
- Centralized Knowledge: Access your team’s collective wisdom with ease.
- Collaborative Workspace: Foster engagement with flexible project tools.
- Seamless Communication: Connect your entire organization effortlessly.
- Preserve Ideas: Capture insights without losing them in chats or notifications.
- Comprehensive Platform: Manage all content in one organized location.
- Open Teamwork: Empower employees to contribute, share, and grow.
- Superior Integrations: Sync with tools like Slack, Jira, Trello, and more.
Limited-Time Offer: Sign up for Confluence today and claim your forever-free plan, revolutionizing your team’s collaboration experience.
Conclusion
So, if you didn’t know before how useful it is to link and transfer data from one Excel worksheet to another automatically, you do now. With the Copy and Paste Link and worksheet reference method, you can transfer data effectively in a matter of minutes. What’s more, you’ll never have to worry about these spreadsheets again — any update in one will be automatically transferred to the other immediately. You can also move data from one Excel sheet to another based on criteria by filtering your data to transfer only what you want. This is great for transferring data for important reports, saving you lots of time from unnecessary copy and pasting, and report editing.
If you work with multiple worksheets in Excel and found this article helpful, you should also check out these related posts: How to do VLOOKUP in excel with two spreadsheets, and How to use IMPORTRANGE in Google Sheets.
Hady is Content Lead at Layer.
Hady has a passion for tech, marketing, and spreadsheets. Besides his Computer Science degree, he has vast experience in developing, launching, and scaling content marketing processes at SaaS startups.
Originally published Feb 3 2022, Updated Mar 22 2023
Have you ever thought about what will you do if you need to transfer data from one Excel worksheet to another automatically?
or how will you update one Excel worksheet from another sheet, copy data from one sheet to another in Excel?
Keeping knowledge of these things is very important mainly when you are working with a large-size Excel worksheet having lots of data in it.
If you don’t have any clue about this, then this blog will help you out. As in this post, we will discuss how to copy data from one cell to another in Excel automatically?
Also, learn how to automatically update one Excel worksheet from another sheet, transfer data from one Excel worksheet to another automatically, and many more things in detail.
So, just go through this blog carefully.
Practical Scenario
Okay, first I should mention that I’m a complete amateur when it comes to excel. No VBA or macro experience, so if you’re not sure whether I know something yet, I probably don’t.
I have a workbook with 6 worksheets inside; one of the sheets is a master; it’s simply the other 6 sheets compiled into 1 big one. I need to set it up so that any new data entered into the new separate sheets is automatically entered into the master sheet, in the first blank row.
The columns are not the same across all the sheets. Hopefully, this will be easier for the pros here than it’s been for me, I’ve been banging my head against the wall on this one. I’ll be checking this thread religiously, so if you need any more information just let me know…
Thanks in advance for any help.
Source: https://ccm.net/forum/affich-1019001-automatically-update-master-worksheet-from-other-worksheets
Methods To Transfer Data From One Excel Workbook To Another
There are many different ways to transfer data from one Excel workbook to another and they are as follows:
Method #1: Automatically Update One Excel Worksheet From Another Sheet
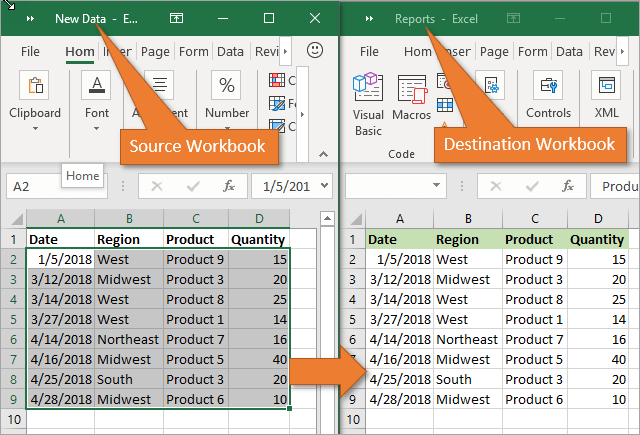
In MS Excel workbook, we can easily update the data by linking one worksheet to another. This link is known as a dynamic formula that transfers data from one Excel workbook to another automatically.
One Excel workbook is called the source worksheet, where this link carries the worksheet data automatically, and the other workbook is called the destination worksheet in which it automatically updates the worksheet data and contains the link formula.
The following are the two different points to link the Excel workbook data for the automatic updates.
1) With the use of Copy and Paste option
- In the source worksheet, select and copy the data that you want to link in another worksheet
- Now in the destination worksheet, Paste the data where you have linked the cell source worksheet
- After that choose the Paste Link menu from the Other Paste Options in the Excel workbook
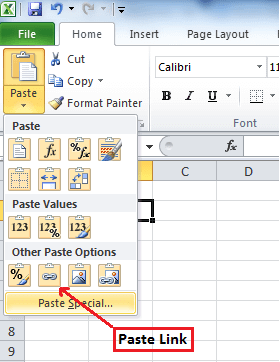
- Save all your work from the source worksheet before closing it
2) Manually enter the formula
- Open your destination worksheet, tap to the cell that is having a link formula and put an equal sign (=) across it
- Now go to the source sheet and tap to the cell which is having data. press Enter from your keyboard and save your tasks.
Note- Always remember one thing that the format of the source worksheet and the destination worksheet both are the same.
Method #2: Update Excel Spreadsheet With Data From Another Spreadsheet
To update Excel spreadsheets with data from another spreadsheet, just follow the points given below which will be applicable for the Excel version 2019, 2016, 2013, 2010, 2007.
- At first, go to the Data menu
- Select Refresh All option

- Here you have to see that when or how the connection is refreshed
- Now click on any cell that contains the connected data
- Again in the Data menu, click on the arrow which is next to Refresh All option and select Connection Properties
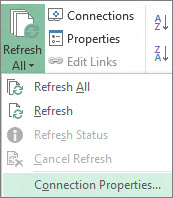
- After that in the Usage menu, set the options that you want to change
- On the Usage tab, set any options you want to change.
Note – If the size of the Excel data workbook is large, then I will recommend checking the Enable background refresh menu on a regular basis.
Method #3: How To Copy Data From One Cell To Another In Excel Automatically
To copy data from one cell to another in Excel, just go through the following points given below:
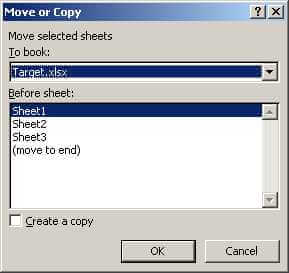
- First, open the source worksheet and the destination worksheet.
- In the source worksheet, navigate to the sheet that you want to move or copy
- Now, click on the Home menu and choose the Format option
- Then, select the Move Or Copy Sheet from the Organize Sheets part
- After that, again in the Home menu choose the Format option in the cells group
- Here in the Move Or Copy dialog option, select the target sheet and Excel will only display the open worksheets in the list

- Else, if you want to copy the worksheet instead of moving, then kindly make a copy of the Excel workbook before

- Lastly, select the OK button to copy or move the targeted Excel spreadsheet.
Method #4: How To Copy Data From One Sheet To Another In Excel Using Formula
You can copy data from one sheet to another in Excel using formula. Here are the steps to be followed:
- For copy and paste the Excel cell in the present Excel worksheet, as for example; copy cell A1 to D5, you can just select the destination cell D5, then enter =A1 and press the Enter key to get the A1 value.
- For copying and pasting cells from one worksheet to another worksheet such as copy cell A1 of Sheet1 to D5 of Sheet2, please select the cell D5 in Sheet2, then enter =Sheet1!A1 and press the Enter key to obtain the value.
Method #5: Copy Data From One Excel Sheet To Another Using Macros
With the help of macros, you can copy data from one worksheet to another but before this here are some important tips that you must take care of:
- You should keep the file extension correctly in your Excel workbook.
- It’s not necessary that your spreadsheet should be macro enable for doing the task.
- The code that you choose can also be stored in a different worksheet.
- As the codes already specify the details, so there is no need to activate the Excel workbook or cells first.
- Thus, given below is the code for performing this task.
Sub OpenWorkbook()
‘Open a workbook
‘Open method requires full file path to be referenced.
Workbooks.Open “C:UsersusernameDocumentsNew Data.xlsx”‘Open method has additional parameters
‘Workbooks.Open(FileName, UpdateLinks, ReadOnly, Format, Password, WriteResPassword, IgnoreReadOnlyRecommended, Origin, Delimiter, Editable, Notify, Converter, AddToMru, Local, CorruptLoad)End Sub
Sub CloseWorkbook()
‘Close a workbook
Workbooks(“New Data.xlsx”).Close SaveChanges:=True
‘Close method has additional parameters
‘Workbooks.Close(SaveChanges, Filename, RouteWorkbook)End Sub
Recommended Solution: MS Excel Repair & Recovery Tool
When you are performing your work in MS Excel and if by mistake or accidentally you do not save your workbook data or your worksheet gets deleted, then here we have a professional recovery tool for you, i.e. MS Excel Repair & Recovery Tool.
With the help of this tool, you can easily recover all lost data or corrupted Excel files also. This is a very useful software to get back all types of MS Excel files with ease.
* Free version of the product only previews recoverable data.
Steps to Utilize MS Excel Repair & Recovery Tool:
Conclusion:
Well, I tried my level best to provide the best possible ways to transfer data from one Excel worksheet to another automatically. So from now on, you don’t have to worry about how to copy data from one cell to another in Excel automatically.
I hope you are satisfied with the above methods provided to you about Excel worksheet update.
Thus, make proper use of them and in the future also if you want to know about this, you can take the help of the specified solutions.


Priyanka is an entrepreneur & content marketing expert. She writes tech blogs and has expertise in MS Office, Excel, and other tech subjects. Her distinctive art of presenting tech information in the easy-to-understand language is very impressive. When not writing, she loves unplanned travels.
In this tutorial, learn how to move data from one cell to another in Microsoft Excel Sheet. You can shift your data to other cell or column using a keyboard or mouse. There are various methods which are given below to change the place of data.
So, let’s start learning each method with the step-by-step- guide given below.
Move Data From One Cell to Another Using Mouse in Excel
To move data to other cells or columns using the only mouse, you have to follow the below steps. Use only your mouse to perform this task in a few easy steps.
Step 1 Enter Data in Excel
First of all, you have to enter any number of data in the Excel Sheet. Let’ take an example of data as given in the image below.

The example contains numbers in column B from cell B2 to B7. you have to now move this data to the cells of column D. Follow the next steps after entering the data.
Step 2 Select Data with Hover Over the Corner and Hold Mouse Left Button
Select your entire data using your mouse. After that, you have to hover over the corner of the selected data. You can hover to any corner position to the left, right, top and bottom.
Now, hold your mouse left button when you get the pointer sign as  .
.

The above example showing the selected data. You can also find the pointer sign when you hover over the corner. Click the corner when you get the sign  in the mouse pointer. Now, Keep your mouse hold for the next step.
Step 3 Drag-n-drop to the Cell to Move Data in Excel
You have to now drag your mouse to the required column cell. Drop the data when you reach the required cell to move to. It drops the whole data you have selected to move to the other cells.

The above example showing the image which you get when you drag your mouse.
Step 4 Final Moved Data
This is the final output contains the moved data to the cell of column D. The data copied from cell D2 to D7.

You can also move any of your data after selection using your mouse. If you want to move your data using a keyboard, you have to use the step-by-step process given below.
Shift One Cell Data to Another Using Only Keyboard in Excel Sheet
This is the method of only using the keyboard to change your data position. It’s the simple cut and paste method to shift data to other column cells.
Step 1 Put Your Data in Cell of Excel Sheet
Here, you also have to enter your data first in any cell of the Excel. Perhaps, you want to move the data already exist in the Excel sheet.

It depends upon you for which data you use. You can use any data to shift to other column cells. The above example showing the same data you have used in the above section.
Step 2 Select the Data Data Using Keyboard
Now, select your chosen data which you have to shift to the other cell. Use your keyboard left and right arrow key to move to the required data. Combination of shift and the arrow keys can be used to select the entire data.

The above image showing the selected data to shift to the other column cells.
Step 3 Press ‘CTRL + X’ to Cut Data
You have to cut the selected cell to shift to the other column cell. For this, press the keyboard key ‘CTRL + X’ to cut the data in Excel Sheet.

The above image showing the screen which you will get after pressing ‘CTRL + X’. This showing you are using the above data to cut in Excel Sheet.
Step 4 Go to Cell to Paste Data
After you perform the above step, you have to go to the cell where you want to place data. Press keyboard arrow keys to visit the required place for data.

The above example showing that you want to shift data to column D and start from cell D2.
Step 5 Press ‘CTRL + V’ to Paste and Move Data
The final step is to press the keyboard shortcut key ‘CTRL + V’. This is the key to paste the cut data to any required place of Excel Sheet.

The above image showing the shifted data to column D.
Change Data from One Column to Another in Excel
In addition to above all, you can also change or move one column data to another column. You have to first choose the data which you want to move. After that, follow the step-by-step guide given below with screenshots.
Step 1 Mouse Hover Over the Column Containing the Data
You have to first take your mouse to the column name which contains the required data. The pointer of the mouse changes to a down arrow like shape as given in the image.

The above image showing the data and the mouse pointer showing down arrow.
Step 2 Click Column Name to Select Data
Click the column name whose data you have to move. It selects all the cell of the clicked column name.

The above image showing the selected column containing the data to move.
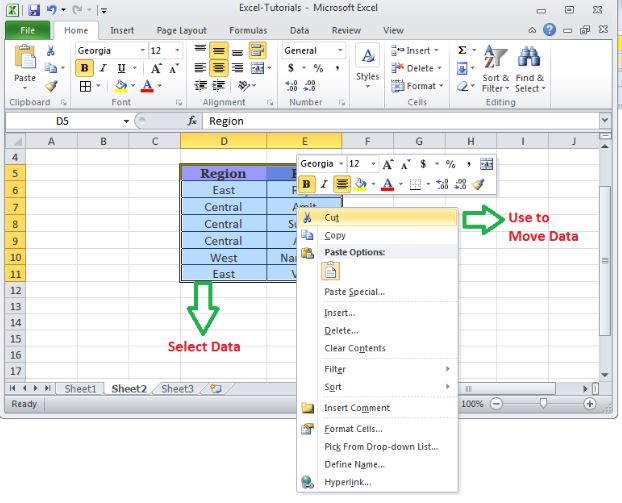
Step 3 Mouse Right Click and Select ‘Cut’ Option
Now, you have to click the mouse right button to get various menu options. In the menu options, you have to select the ‘Cut’ option given on the menu.

You will get a highlighting column selection as showing in the image below.

Step 4 Click Column Name Where You Want to Shift Data
Click the column name to which you want to move the data. You will get a down arrow pointer for the mouse when you take your mouse to the column name.

The above example showing the select column where you have to place the data.
Step 5 Finally, press ‘CTRL + V’ to Paste Data
The final step is to paste the data using the keyboard shortcut ‘CTRL + V’. The below example image showing the pasted data to the new column.

You May Also Like to Read
- Copy Data In Alternate Rows Selected In Excel
- Quickly Select All Cells Of A Column In Excel
- Autofill Dates, Months And Current Time In Excel Sheet
Reference
MS Office Excel Doc to Move Cell and Cell Content
When working with large amounts of data in Excel, you might find the need to copy and paste something that you’ve already written, or perhaps wholly move a selection. Whether you are working with data within a single worksheet, multiple worksheets, or even various workbooks, there are easy shortcuts you can use the cut, copy, and paste.
These instructions apply to Excel 2019, 2016, 2013, 2010, and Excel for Microsoft 365.
Copying Data in Microsoft Excel
Copying data in Excel is convenient when you need to duplicate functions, formulas, charts, and other data. The new location can be on the same or different worksheet or even in a completely different workbook.
As in all Microsoft programs, there is more than one way of accomplishing a task. In Excel, you can copy and move data in three ways:
- Using a keyboard shortcut.
- Using the right-click context menu.
- Using menu options on the Home tab of the ribbon.
When the copy command is activated, the clipboard temporarily stores a duplicate of the selected data until you paste it into the destination cell or cells.
Other methods of copying data that don’t involve using the clipboard include using the fill handle and drag and drop with the mouse.
Copy and Paste Data in Excel With Shortcut Keys
The easiest way to cut, copy, and paste, arguably, is with keyboard shortcuts. The keyboard key combinations for copying and pasting data are:
Ctrl + C — activates the copy command
Ctrl + V — activates the paste command
- Click a cell or multiple cells to highlight them.
- Press and hold down the Ctrl key on the keyboard.
- Press and release the C key without releasing the Ctrl key.
- A moving border (sometimes called marching ants) will surround the selected cell(s).
- Click the destination cell — when copying multiple cells of data, click the cell in the top left corner of the destination range.
- Press and hold down the Ctrl key on the keyboard.
- Press and release the V key without releasing the Ctrl key.
- The duplicated data should now be in both the original and destination locations.
The arrow keys on the keyboard can be used instead of the mouse pointer to select both the source and destination cells when copying and pasting data.
- To select multiple adjacent cells with the arrow keys, press and hold down the Shift key.
- To select multiple non-adjacent cells with the arrow keys, use the Ctrl key.
Copy Data in Excel With the Context Menu
While the options available in the context menu, or right-click menu, usually change depending upon the object selected, the cut, copy and paste commands are always available.
- Click on a cell or multiple cells to highlight them.
- Right-click on the selected cell(s) to open the context menu.
- Choose copy from the available menu options.
- A moving black border will surround the selected cell(s).
- Click on the destination cell — when copying multiple cells of data, click on the cell in the top left corner of the destination range.
- Right-click on the selected cell(s) to open the context menu.
- Choose paste from the available menu options.
- The duplicated data should now be in both the original and destination locations.
Copy Data With the Ribbon
The copy and paste commands are in the Clipboard section on the left-hand side of the Home tab of the ribbon.
- Click on a cell or multiple cells to highlight them.
- Click on the Copy icon on the ribbon.
- A moving black border will surround the selected cell(s).
- Click on the destination cell — when copying multiple cells of data, click on the cell in the top left corner of the destination range.
- Click on the Paste icon on the ribbon.
- The duplicated data should now be in both the original and destination locations.
Moving Data in Microsoft Excel
There is no move command in Excel. To move data, you need to cut and paste it from one location to the new one. You can use cut/paste in Excel to relocate functions, formulas, charts, and other data. The new location can be in the same or different worksheet or even in a completely different workbook.
As with copying, there are three ways to cut data in Excel:
- Using a keyboard shortcut.
- Using the right-click context menu.
- Using menu options on the Home tab of the ribbon.
When you cut data in Excel, the clipboard temporarily stores it, just like when you copy data.
Move Data in Excel With Shortcut Keys
The keyboard key combinations used to copy data are:
Ctrl + X — activates the cut command
Ctrl + V — activates the paste command
- Click on a cell or multiple cells to highlight them.
- Press and hold down the Ctrl key on the keyboard.
- Press and release the X without releasing the Ctrl key.
- A moving black border will surround the selected cell(s).
- Click on the destination cell — when moving multiple cells of data, click on the cell in the top left corner of the destination range.
- Press and hold down the Ctrl key on the keyboard.
- Press and release the V key without releasing the Ctrl key.
- The selected data should now be in the destination location only.
The arrow keys on the keyboard can be used instead of the mouse pointer to select both the source and destination cells when cutting and pasting data.
- To select multiple adjacent cells with the arrow keys, press and hold down the Shift key.
- To select multiple non-adjacent cells with the arrow keys, use the Ctrl key.
Move Data in Excel With the Context Menu
When you right-click on a cell, the context menu always includes the cut, copy, and paste commands.
- Click on a cell or multiple cells to highlight them.
- Right-click on the selected cell(s) to open the context menu.
- Choose cut from the available menu options.
- A moving border (sometimes called marching ants) will surround the selected cell(s).
- Click on the destination cell — when copying multiple cells of data, click on the cell in the top left corner of the destination range.
- Right-click on the selected cell(s) to open the context menu.
- Choose paste from the available menu options.
- The selected data should now be only in the destination location.
Move Data in Excel With the Ribbon
The cut and paste commands are in the Clipboard section on the Home tab of the ribbon.
- Click on a cell or multiple cells to highlight them.
- Click on the Cut icon on the ribbon.
- A moving black border will surround the selected cell(s).
- Click on the destination cell — when copying multiple cells of data, click on the cell in the top left corner of the destination range.
- Click on the Paste icon on the ribbon.
- The selected data should now be in the destination location only.
Thanks for letting us know!
Get the Latest Tech News Delivered Every Day
Subscribe
Select the data you desire to move, right click on it then choose the cut option then select the cell where you want to shift the data. Right click on the particular cell and select paste option. Cell Data will be moved to the desired location.

Please Share