
To move a row or column using the mouse, follow these steps:
- Select the entire row or column that you want to move.
- Click on the highlighted row or column and hold down the mouse button.
- Drag the row or column to the place where you want it to be.
- Release the mouse button.
Contents
- 1 Why can’t I move my columns in Word?
- 2 Can you swap columns in a table in Word?
- 3 How do I swap columns and rows in Word?
- 4 How do I move columns in Word without affecting other cells?
- 5 How do I move columns to columns in Word?
- 6 How do I fix columns in Word?
- 7 How do I switch two columns in a table?
- 8 How do you switch columns in a table?
- 9 How do I invert two columns in Word?
- 10 How do I swap lines in Word?
- 11 How do I change a table to column in Word?
- 12 How do you resize a column or width?
- 13 How do you change the width of a column without changing the whole?
- 14 How do I move one side of a table in Word?
- 15 How do I move my cursor between columns in a Word document?
- 16 How do you fix a fixed column width in Word?
- 17 How do I remove a column break in Word?
- 18 How do you move columns in Word for Mac?
- 19 How do you move a line right in Word?
- 20 How do you move multiple lines in Word?
Why can’t I move my columns in Word?
Double-check the column settings you have in place to make sure the formatting is configured as required. Select the section of the text you’re working with, then choose “Columns” and “More Columns” from the Page Layout menu tab.
Can you swap columns in a table in Word?
Select the column you want to move. Press Ctrl+X, click on the cut tool on the toolbar, or choose Cut from the Edit menu. This removes the column from the table and copies it to the Clipboard. Move the insertion point to the beginning of the top cell of the column before which you want to place the column you just cut.
How do I swap columns and rows in Word?
Select an empty cell below your pasted table. Click the arrow under the “Paste” button on the ribbon and choose the “Transpose” option. Your table will appear flipped.
How do I move columns in Word without affecting other cells?
Case 1: Adjust the Width of One Column without Affecting Others
- First, click “View” tab and then check the “Ruler” box in “Show” group.
- Next you can see the ruler on the top of the document. And there are tabs on the ruler above each column border. Click on one of these tabs to adjust a specific column.
How do I move columns to columns in Word?
Press Alt+Page Down on the keyboard if you want to switch from current column to next column. Have in mind, this won’t work if next column is empty. If you are in next column you can switch to the top of the previous column by pressing Alt+Page Up on your keyboard.
How do I fix columns in Word?
To fit the columns to the text (or page margins if cells are empty), click [AutoFit] > select “AutoFit Contents.” To fit the table to the text, click [AutoFit] > select “AutoFit Window.” To keep Word from automatically adjusting your column size, click [AutoFit] > select “Fixed Column Width.”
How do I switch two columns in a table?
Move the mouse to the right edge of the column until your cursor changes to four arrows pointing in all directions. Left click on the edge of the column and hold the Shift key. Drag the column to the one you want to swap it with.
How do you switch columns in a table?
Shift Key
- First, select a column.
- Hover over the border of the selection.
- Press and hold the Shift key on your keyboard.
- Click and hold the left mouse button.
- Move the column to the new position.
- Release the left mouse button.
- Release the shift key.
How do I invert two columns in Word?
Select the list, choose Table » Convert » Text to Table, make sure the Tabs option is selected and that the “Number of columns” box shows the right number of columns, and click the OK button to perform the conversion.
How do I swap lines in Word?
Word provides a handy shortcut that allows you to easily move rows around in a table. Simply follow these steps: Position the insertion point in the row you want to move or select the rows you want to move. While holding down the Shift and Alt keys, press the Up Arrow or Down Arrow to move the row.
How do I change a table to column in Word?
Convert a Table to Text
- With the table selected, click the Layout tab.
- Expand the Data group, if necessary.
- Click the Convert to Text button.
- Choose how you want the cells separated. You can separate the columns with new paragraph marks, tabs, or commas. You could also specify another custom separator.
- Click OK.
How do you resize a column or width?
Select the column or columns that you want to change. On the Home tab, in the Cells group, click Format. Under Cell Size, click Column Width. In the Column width box, type the value that you want.
How do you change the width of a column without changing the whole?
To use AutoFit, click a cell in the row or column you want to change. Within the ribbon menu, click “Home.” Under “Cells,” click the “Format” button. Under “Cell Size” click “AutoFit Column Width” or “AutoFit Row Height” as desired.
How do I move one side of a table in Word?
Shift +Tab keys To move one cell backward in a table. Arrow keys Allow you to move left, right, up and down.
How do I move my cursor between columns in a Word document?
If you are working with multiple columns in your document, you may need to jump from column to column at times. The standard way to do this (using the keyboard) is to use the Alt key in conjunction with the up and down arrow keys. If you press Alt+Down Arrow, the insertion point is moved to the top of the next column.
How do you fix a fixed column width in Word?
Select your table. On the Layout tab, in the Cell Size group, click AutoFit. Click Fixed Column Width.
How do I remove a column break in Word?
To remove column breaks:
- By default, breaks are hidden. If you want to show the breaks in your document, click the Show/Hide command on the Home tab.
- Place the insertion point to the left of the break you want to delete.
- Press the delete key to remove the break.
How do you move columns in Word for Mac?
Move columns: After selecting the columns, click and hold one of the column letters until the columns appear to rise off the table, then drag them to the right or left of another column.
How do you move a line right in Word?
Align the text left or right
- Select the text that you want to align.
- On the Home tab, in the Paragraph group, click Align Left or Align Right .
How do you move multiple lines in Word?
Margin+click and drag
If you drag while holding down the mouse, Word will select multiple lines, even paragraphs. Word will stop selecting when you stop dragging.
To move lines in a WORD table up and down I use Shift + Alt + Up/Down.
Is there a similar way to move columns in a table to the left or to the right?
I’ve searched many advice sites but couldn’t find a reference to this (the advice is usually to drag and drop or to cut and paste etc).
It doesn’t appear in the relevant Microsoft site, but since the keys to move lines up and down aren’t mentioned directly either (the combination Shift + Alt + Up is only mentioned for moving paragraphs in text) —
I’m still keeping a little flame of hope that such a thing does exist…
Anyone?
![]()
clhy
6,2238 gold badges33 silver badges66 bronze badges
asked Jun 7, 2016 at 7:36
![]()
1
This can be done with standard keyboard shortcuts, cutting and pasting, so not the same as moving column by column like with the rows, but still affective and quick:
- Select the entire column you want to move
- Press Ctrl+X, this removes the column from the table and copies it to the Clipboard
- Move the insertion point to the beginning of the top cell of the column before which you want to place the column you just cut
- Press Ctrl+V
Alternatively you can do the same via dragging and dropping:
- Select the entire column that you want to move
- Click on the highlighted column, and hold down the left mouse button. Shortly the pointer should change to a “ghost” insertion point with a small box next to the pointer arrow
- Drag the column to the place where you want it to be. You should position the insertion point in the column before which your movedcolumn will appear.
- Release the mouse button, the column is now moved
answered Nov 28, 2017 at 12:20
![]()
boardtcboardtc
4544 silver badges11 bronze badges
I’ll admit it — I’m not a big fan of adding columns in Microsoft Word. Not that there’s anything wrong with columns, per se. Columns work fine (until they don’t). But in a legal office environment, I usually format blocks of information with tables because they’re a bit easier to control.
That said, I have seen lots of legal professionals insert multiple columns in Microsoft Word to format things like service lists in Certificates of Service. Hey, to each her [his] own.
So if you want to format text with columns in Microsoft Word documents, here’s what you need to know:
Inserting columns: the basic primer
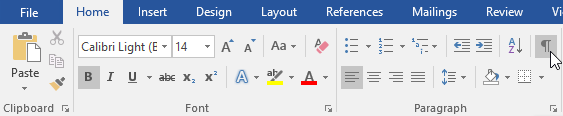
Everything starts from the Layout tab (known as Page Layout in versions 2007-2010) on the Ribbon:

Click on More Columns, and you’re taken to a dialog box that allows you to set up your columns exactly the way you want them.
The default is one column — just a regular document. You can use one of the presets (the two-column layout is useful for the service list application I mentioned above). Or you can customize it within an inch of its life. Width? Space between columns 1 and 2, or 2 and 3, or …? How about a line between them (like a newsletter would have)? You decide!
(If you don’t want your columns to all be the same width, be sure to uncheck the “Equal column width” checkbox at the bottom of the dialog box. Then, you’ll be able to customize the width of each column separately.)

Navigating between columns
Once you’ve set up your columns, you come to the tricky part. This is part of the reason I usually opt for tables rather than columns. If you use tables, moving between the cells is easy — just use the Tab key. To insert a column, however, you need to know a few tricks.
Say you’re typing in the first column of your document and you want to end that column there and start typing in the second column. To do that, you have to insert a column break. You can insert a column break in one of two ways:
- Press CTRL-SHIFT-ENTER simultaneously; or
- Go to the Layout tab, click Breaks, and choose Column

Personally, I’d go with Option 1 (assuming I remember the key combination in the heat of the moment).
Once you’ve inserted a column break, your cursor is in the next column, ready for you to type. When you insert a column break in your last column (the one farthest to the right), the cursor will go to the first column on the next page.
Viewing column boundaries
To me, it’s tough to work with columns (or tables, for that matter) if I can’t really see them. To turn on the column boundaries so you can see your columns laid out on the page, go to the File tab (or click the Office button in version 2007) and click Options, then go to Advanced and check the box next to Show text boundaries:

When columns are only part of your document
But what if only part of your document consists of multiple columns?
If you go back to the Columns dialog box (via Layout > Columns > More Columns), you’ll notice a drop-down at the bottom of the box:

If you choose This Point Forward, that will allow you to insert columns at the point your cursor is sitting in. Once you’ve inserted your columnar data, then go back to the Format Columns dialog box and choose the One Column format (being careful to once again choose This Point Forward in that bottom drop-down), and your document will return to the single-column format without disturbing the multi-column insertion you’ve just worked so hard on.
But what if you want to insert a two- or three- (or more-) column block of text into the middle of a one-column, normal document?
You may want to use a slightly different procedure, depending on whether you’re creating a brand-new document or you’re inserting a multi-column layout into the middle of an existing single-column document. You’re using the same dialog box, but if you’re editing an existing document and placing a multi-column layout in the middle, you’ll need to take a couple of extra precautions to ensure you don’t inadvertently create a formatting nightmare.
Inserting multi-columns into a new document
Let’s say you’re typing along in a brand-new document and decide that the next bit of text needs to be in two (or more) columns. There’s no text after the point where your cursor is right now, so you can switch back to single-column format once you get done inserting the multi-column section.
If you go back to the Columns dialog box (via Layout > Columns > More Columns), you’ll notice a drop-down at the bottom of the box:
If you choose This Point Forward, that will allow you to insert columns at the point your cursor is sitting in. Once you’ve inserted your columnar data, then go back to the Format Columns dialog box and choose the One Column format (being careful to once again choose This Point Forward in that bottom drop-down), and your document will return to the single-column format without disturbing the multi-column insertion you’ve just worked so hard on.
Inserting columns into the middle of an existing document
If you’re editing an existing document and you want to insert a multi-column layout somewhere in the middle of text you’ve already got typed, the “this point forward” method may result in a temporary and fixable but still infuriating mess.
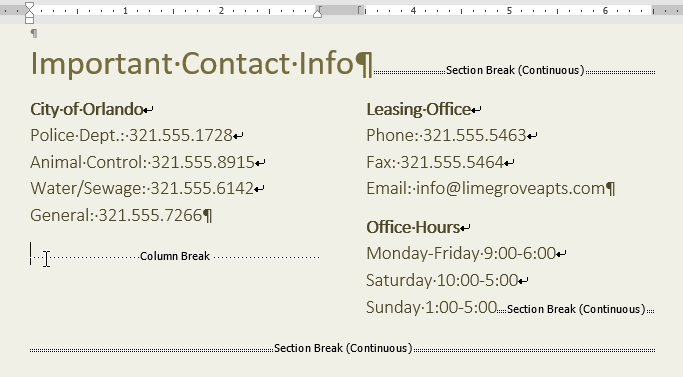
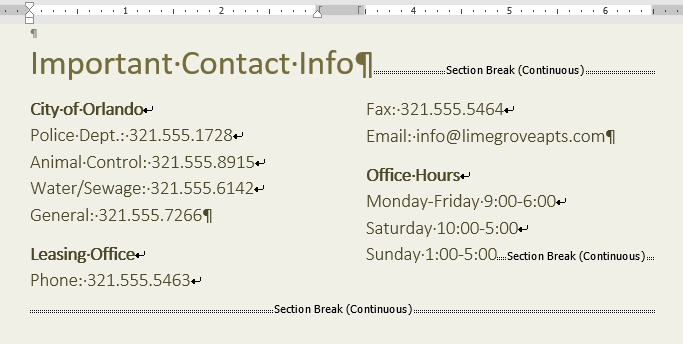
Here’s how to avoid it: Insert section breaks before and after the point at which you want to insert your columns:

… then in Apply to:, choose This section instead:

Here’s a video demonstration:
Video: Inserting a column into the middle of an existing document (without creating a mess)
How do you see yourself using columns in your documents?
 Please Note:
This article is written for users of the following Microsoft Word versions: 2007, 2010, 2013, 2016, 2019, and Word in Microsoft 365. If you are using an earlier version (Word 2003 or earlier), this tip may not work for you. For a version of this tip written specifically for earlier versions of Word, click here: Moving Rows and Columns with the Mouse.
![]()
Written by Allen Wyatt (last updated August 29, 2020)
This tip applies to Word 2007, 2010, 2013, 2016, 2019, and Word in Microsoft 365
As long as you have the Allow Text to be Dragged and Dropped option turned on (in the Word Options dialog box, click on Advanced and then look in the Editing Options section), Word allows you to use the mouse for many routine editing tasks. One such task involves moving rows or columns within a table.
To move a row or column using the mouse, follow these steps:
- Select the entire row or column that you want to move.
- Click on the highlighted row or column and hold down the mouse button. Shortly the pointer should change to a «ghost» insertion point with a small box next to the pointer arrow.
- Drag the row or column to the place where you want it to be. You should position the insertion point in the row or column before which your moved row or column will appear.
- Release the mouse button. The row or column is moved.
WordTips is your source for cost-effective Microsoft Word training.
(Microsoft Word is the most popular word processing software in the world.)
This tip (9655) applies to Microsoft Word 2007, 2010, 2013, 2016, 2019, and Word in Microsoft 365. You can find a version of this tip for the older menu interface of Word here: Moving Rows and Columns with the Mouse.
Author Bio
With more than 50 non-fiction books and numerous magazine articles to his credit, Allen Wyatt is an internationally recognized author. He is president of Sharon Parq Associates, a computer and publishing services company. Learn more about Allen…
MORE FROM ALLEN
Finding Documents Containing Multiple Occurrences of a Word
Searching for documents that contain a particular word is rather straightforward. The task becomes a bit trickier when …
Discover More
Changing Characters on Keyboard Keys
Want to assign some fancy characters to keyboard keys for characters you seldom use? There are a couple of ways you can …
Discover More
Read-Only Files
Read-only documents (those that cannot be updated) are part and parcel of working with Word. There are many ways that a …
Discover More
More WordTips (ribbon)
Repeating Table Rows with Manual Page Breaks
Need to make sure part of a table is on one page and part on another? The way to do so is not to use manual page breaks, …
Discover More
Working with Table Columns and Rows
Need to add or delete columns and rows from a table? It’s easy to do using the tools provided in Word.
Discover More
Moving Table Rows Quickly
One of the most esoteric shortcuts available in Word is one that allows you to move table rows, either within a table or …
Discover More
Word 2013
You can format your document in a newspaper-style column layout by adding columns. On the Page Layout tab, click Columns, then click the layout you want.
-
To apply columns to only part of your document, with your cursor, select the text that you want to format.
-
On the Page Layout tab, click Columns, then click More Columns.
-
Click Selected text from the Apply to box.
Word 2016
You can format your document in a newspaper-style column layout by adding columns. On the Layout tab, click Columns, then click the layout you want.
-
To apply columns to only part of your document, with your cursor, select the text that you want to format.
-
On the Layout tab, click Columns, then click More Columns.
-
Click Selected text from the Apply to box.
Need more help?
Want more options?
Explore subscription benefits, browse training courses, learn how to secure your device, and more.
Communities help you ask and answer questions, give feedback, and hear from experts with rich knowledge.
Lesson 15: Columns
/en/word2016/breaks/content/
Introduction
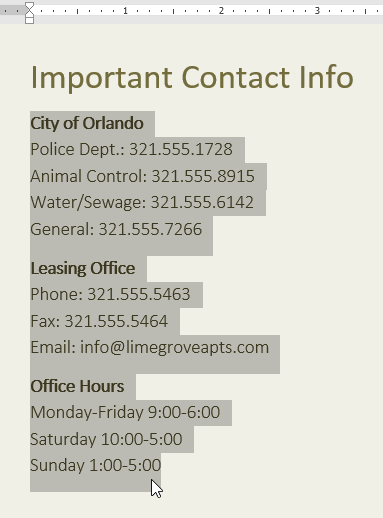
Sometimes the information you include in your document is best displayed in columns. Not only can columns help improve readability, but some types of documents—like newspaper articles, newsletters, and flyers—are often written in column format. Word also allows you to adjust your columns by adding column breaks.
Optional: Download our practice document.
Watch the video below to learn more about columns in Word.
To add columns to a document:
- Select the text you want to format.

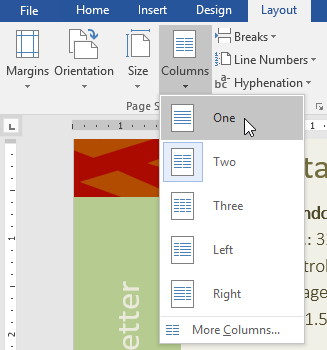
- Select the Layout tab, then click the Columns command. A drop-down menu will appear.
- Select the number of columns you want to create.
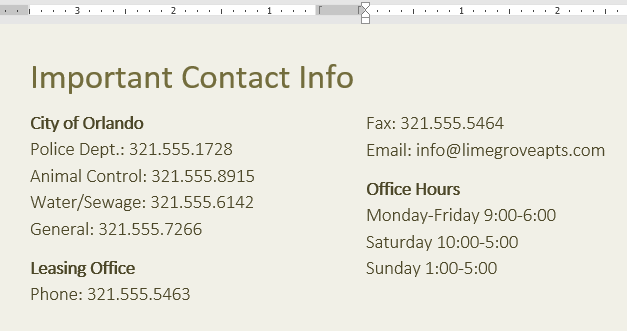
- The text will format into columns.
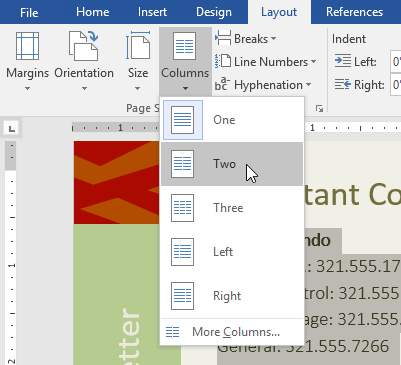
Your column choices aren’t limited to the drop-down menu that appears. Select More Columns at the bottom of the menu to access the Columns dialog box. Click the arrows next to Number of columns: to adjust the number of columns.

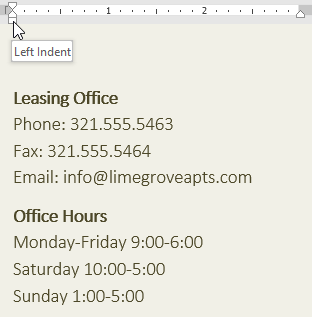
If you want to adjust the spacing and alignment of columns, click and drag the indent markers on the Ruler until the columns appear the way you want.
To remove columns:
To remove column formatting, place the insertion point anywhere in the columns, then click the Columns command on the Layout tab. Select One from the drop-down menu that appears.
Adding column breaks
Once you’ve created columns, the text will automatically flow from one column to the next. Sometimes, though, you may want to control exactly where each column begins. You can do this by creating a column break.
To add a column break:
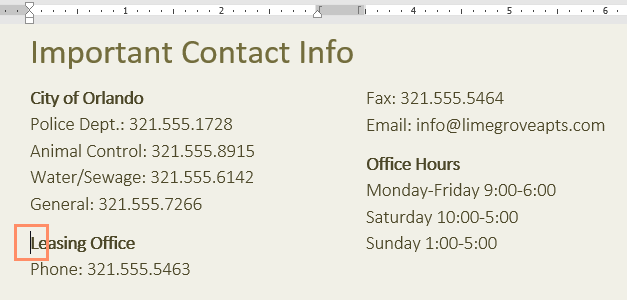
In our example below, we’ll add a column break that will move text to the beginning of the next column.
- Place the insertion point at the beginning of the text you want to move.
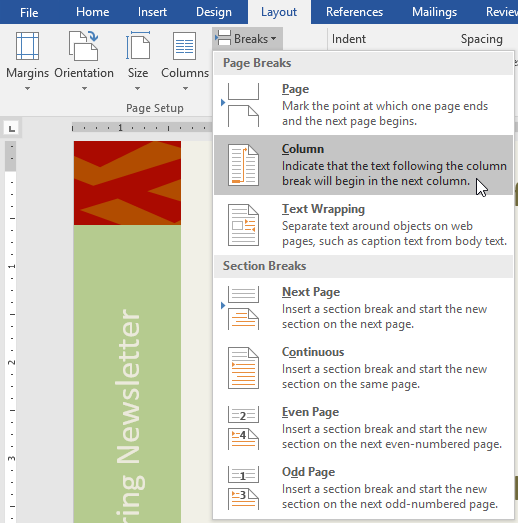
- Select the Layout tab, then click the Breaks command. A drop-down menu will appear.
- Select Column from the menu.
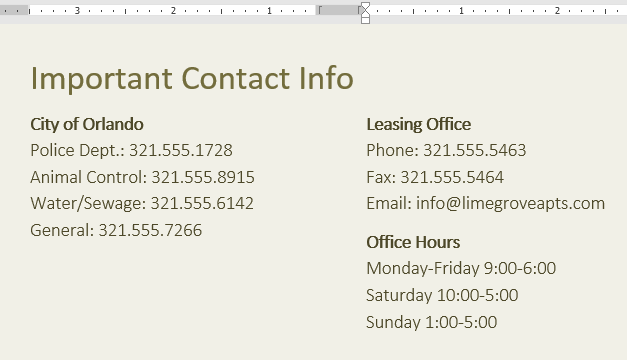
- The text will move to the beginning of the column. In our example, it moved to the beginning of the next column.
To learn more about adding breaks to your document, visit our lesson on Breaks.
To remove column breaks:
- By default, breaks are hidden. If you want to show the breaks in your document, click the Show/Hide command on the Home tab.
- Place the insertion point to the left of the break you want to delete.
- Press the delete key to remove the break.
Challenge!
- Open our practice document.
- Scroll to page 3.
- Select all of the text in the bulleted list below Community Reminders and format it as two columns.
- Place your cursor at the beginning of the fourth bullet in front of the word Visitors.
- Insert a column break.
- When you’re finished, your page should look something like this:


/en/word2016/headers-and-footers/content/
Thursday, January 13th, 2011

One of the most difficult things that people find with working with columns in Word is moving between the columns.
The reason is that the process itself is anything but easy.
The Tab key, which will move you between cells in columns in a table, doesn’t work inside newspaper style columns in Word so that key is out.
Instead, to move or jump from one column to the next you’ll press Alt + Page Down to go to the column on the right (the second column) or Alt + Page Up to move to the first column.
When you click Alt + Page Down, if you are in column 1 you’ll go to the very top of column 2. If you keep pressing the key you’ll flip between the top character in each column.
If you’re somewhere in column 2, when you press Alt + Page Up you’ll go to the top of column 1.
These are the only specialist keys for moving or switching between columns – we could use more – like jumping from a line in one column to the same line in the one next to it – but nada! Sorry!
Helen Bradley
Labels: columns, jump, move between columns, shortcut keys, switch, Word, Word 2003, Word 2007, Word 2010
Labels:Uncategorized