
When you work in Microsoft Word, you’ll have to rearrange pages. It’s not always clear how to do that, so use these tips to make it a lot easier!

Can you move pages in Word? Depending on the type of document you’re creating in Microsoft Word, you may find yourself in this situation. It is especially likely for lengthy documents—moving a page on Word can make or break the document in the right circumstances.
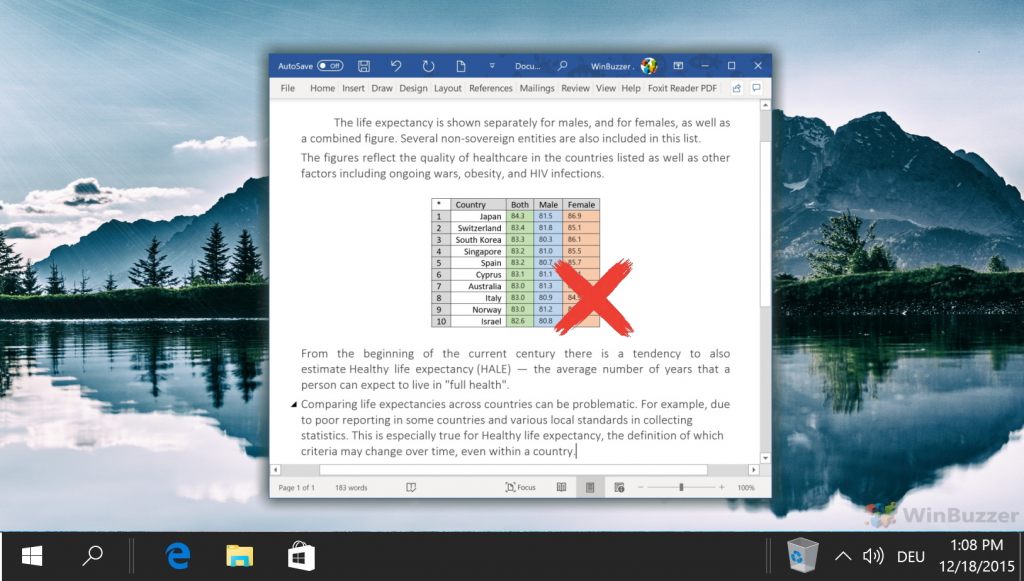
Unlike PowerPoint, you cannot rearrange the slides in Word. That’s because Word is a word processor, so it’s one long scrolling document. PowerPoint, on the other hand, is an application that has slides as its own elements.
But there are ways to rearrange and move Microsoft Word pages. You can rearrange them online or offline using three easy methods.
How to Interchange Pages in Word With the Navigation Pane
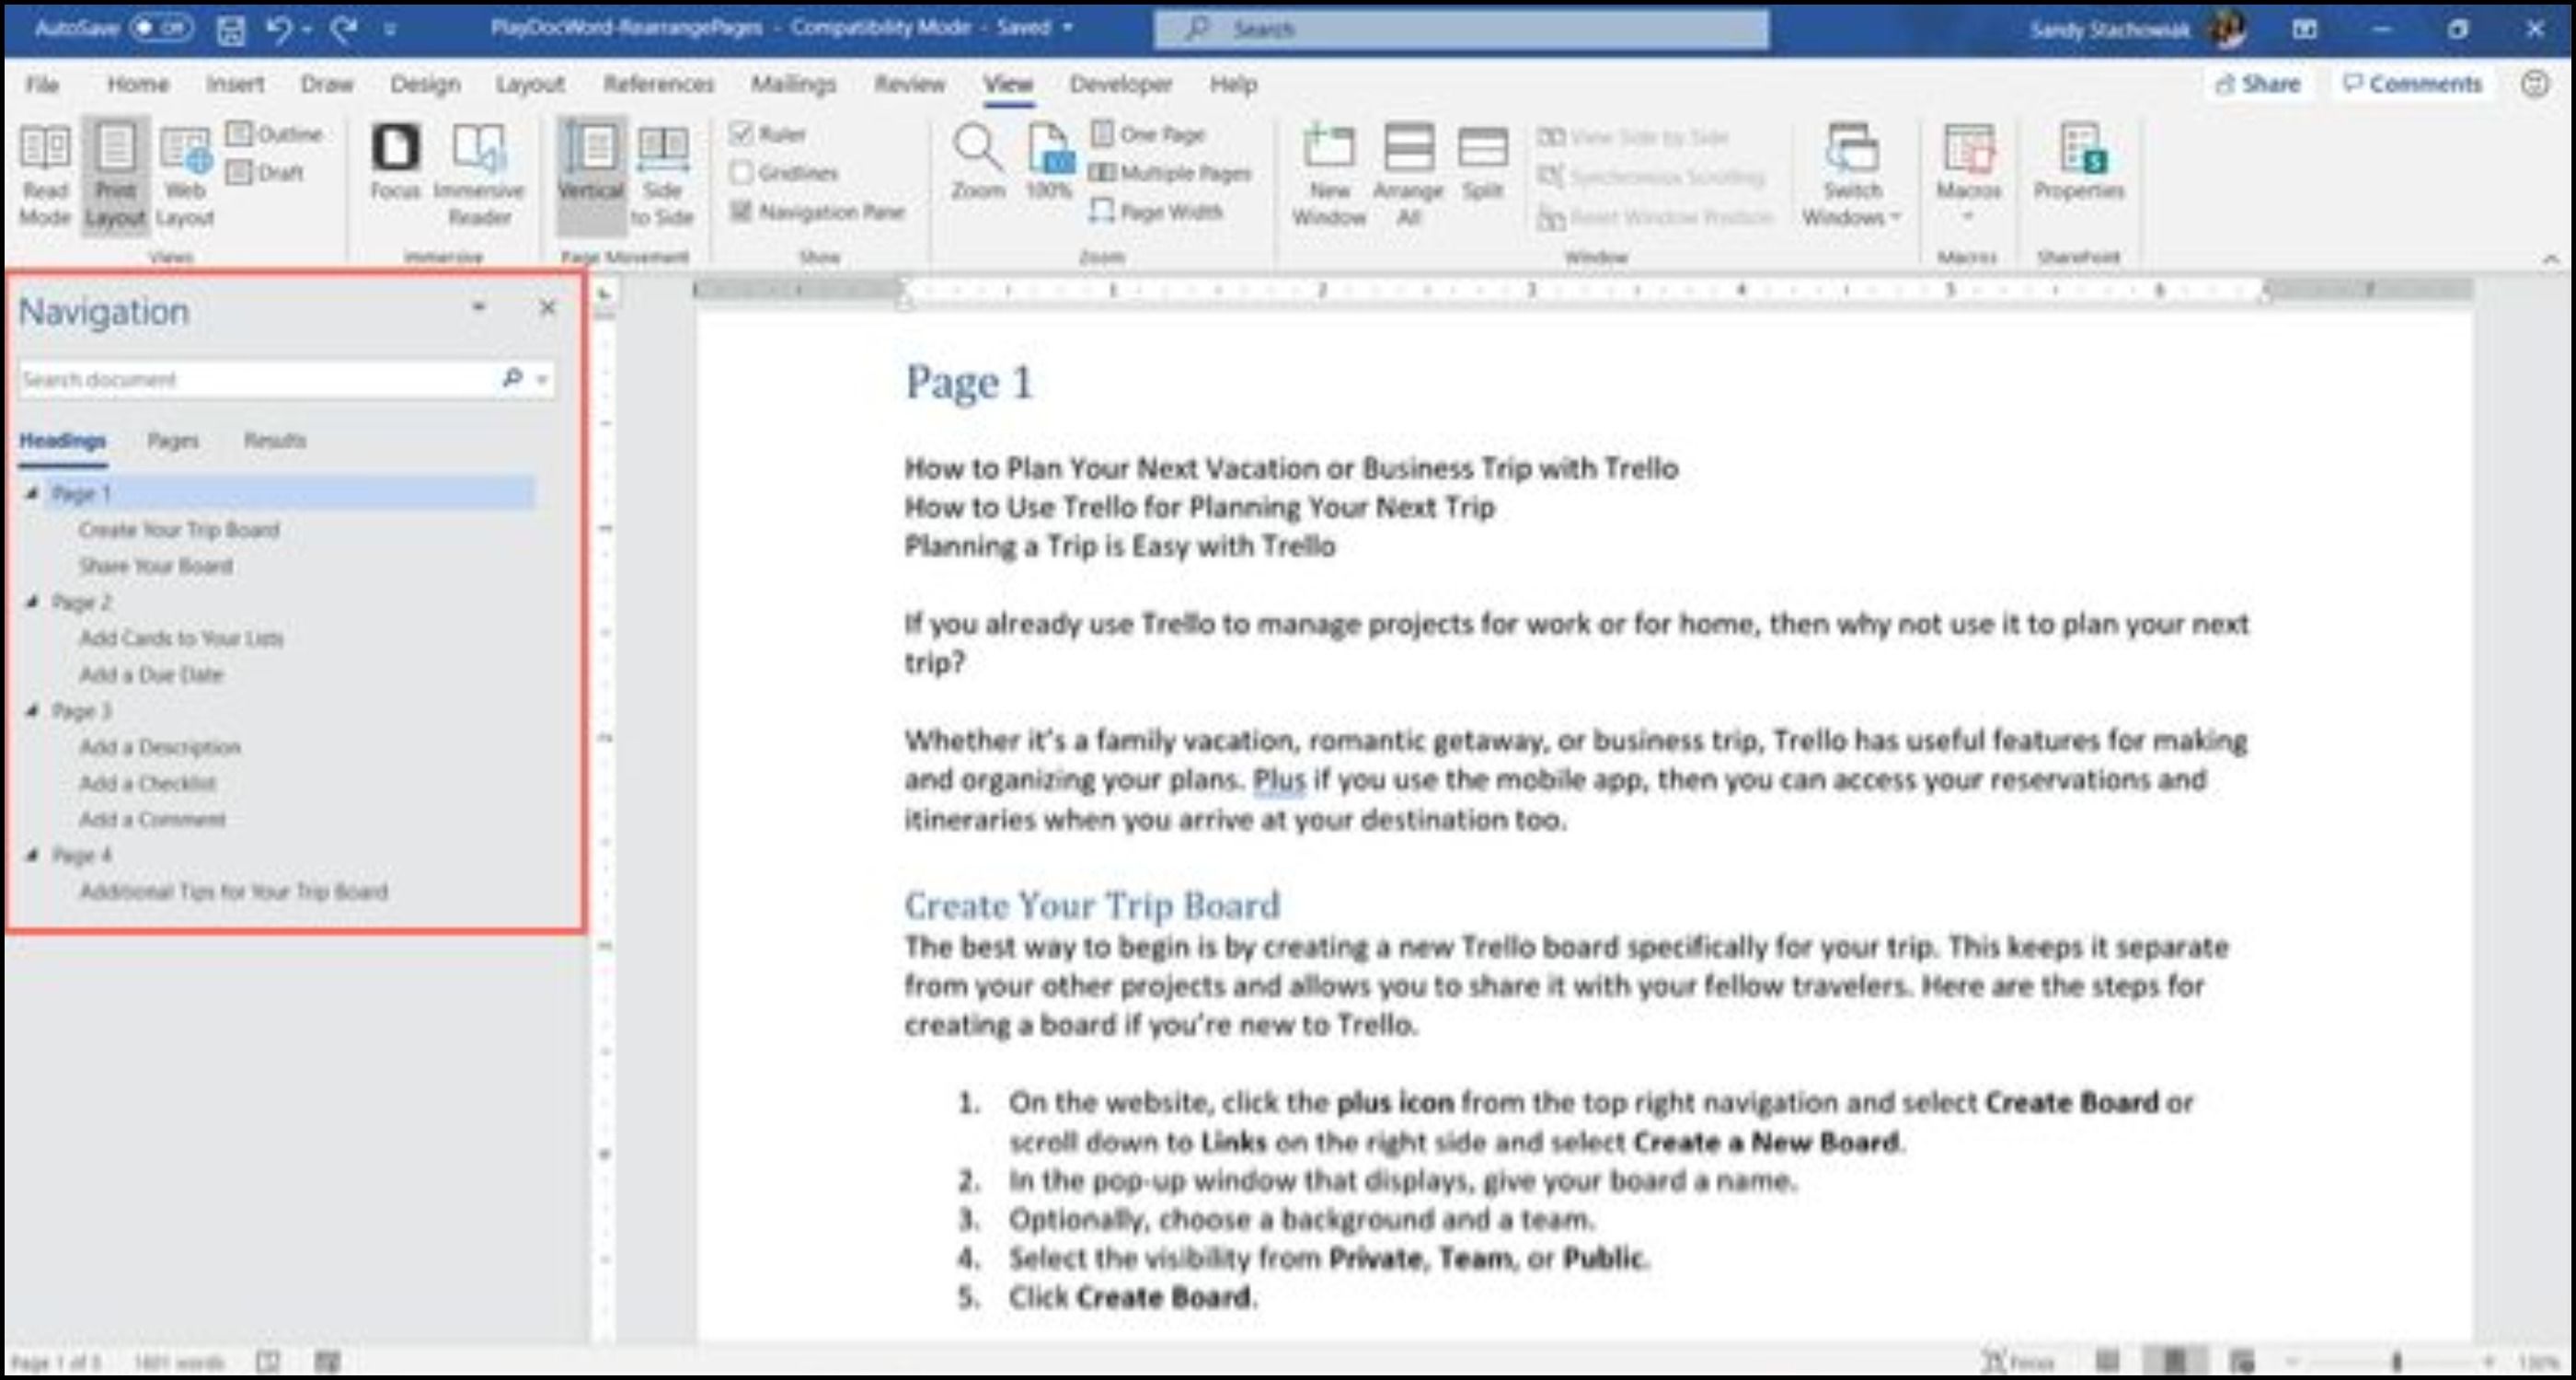
The Navigation Pane in Word is a handy tool for jumping to certain spots in your document without having to scroll or search.
For this reason, the Navigation Pane method is the way to go if you use headings in your document. And it’s most helpful if you have a heading at the top of each page.
- Click the View tab and check the box for Navigation Pane.
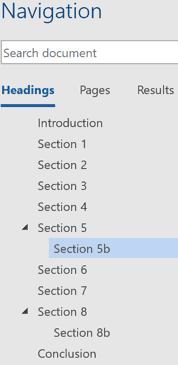
- When the tool opens on the left side of your document, click Headings in the pane.
- Select the heading for the page you want to move and drag it to its new location in the Headings list.
As you drag the heading, you’ll see a dark line appear. When the line is in a spot where you want to move the heading (page), release.

You’ll then see the heading and its contents in the new position; your document will reflect this change as well.
Tips to Switch Pages in Word With the Navigation Pane Method
Here are a couple of tips to help you reorder pages. Word offers more than a few formatting options.
Formatting Text With Headings
If you want to use this method to rearrange Word pages but don’t currently have your text formatted with headings:
- Click the Home tab.
- Select your text, and choose a heading in the Styles section of the ribbon in Microsoft Word.
- Reorder pages, removing the headings if you like.
Order of Headings in the Pane
Remember that all headings in the Navigation Pane are listed in descending order. So the order will be Heading 1 at the top, then Heading 2, Heading 3, and so on. To move an entire page, or section, use the highest-level heading for that section.
How to Move Pages in a Word Document With Keyboard Cut and Paste
Using the Navigation Pane isn’t practical for your type of document? You may be wondering: how do I rearrange pages in Word without it?
There are many options in Word. Rearrange pages by cutting and pasting, if you have to. If you prefer to maneuver this way with your keyboard, here’s how to arrange pages in Microsoft Word in that style.
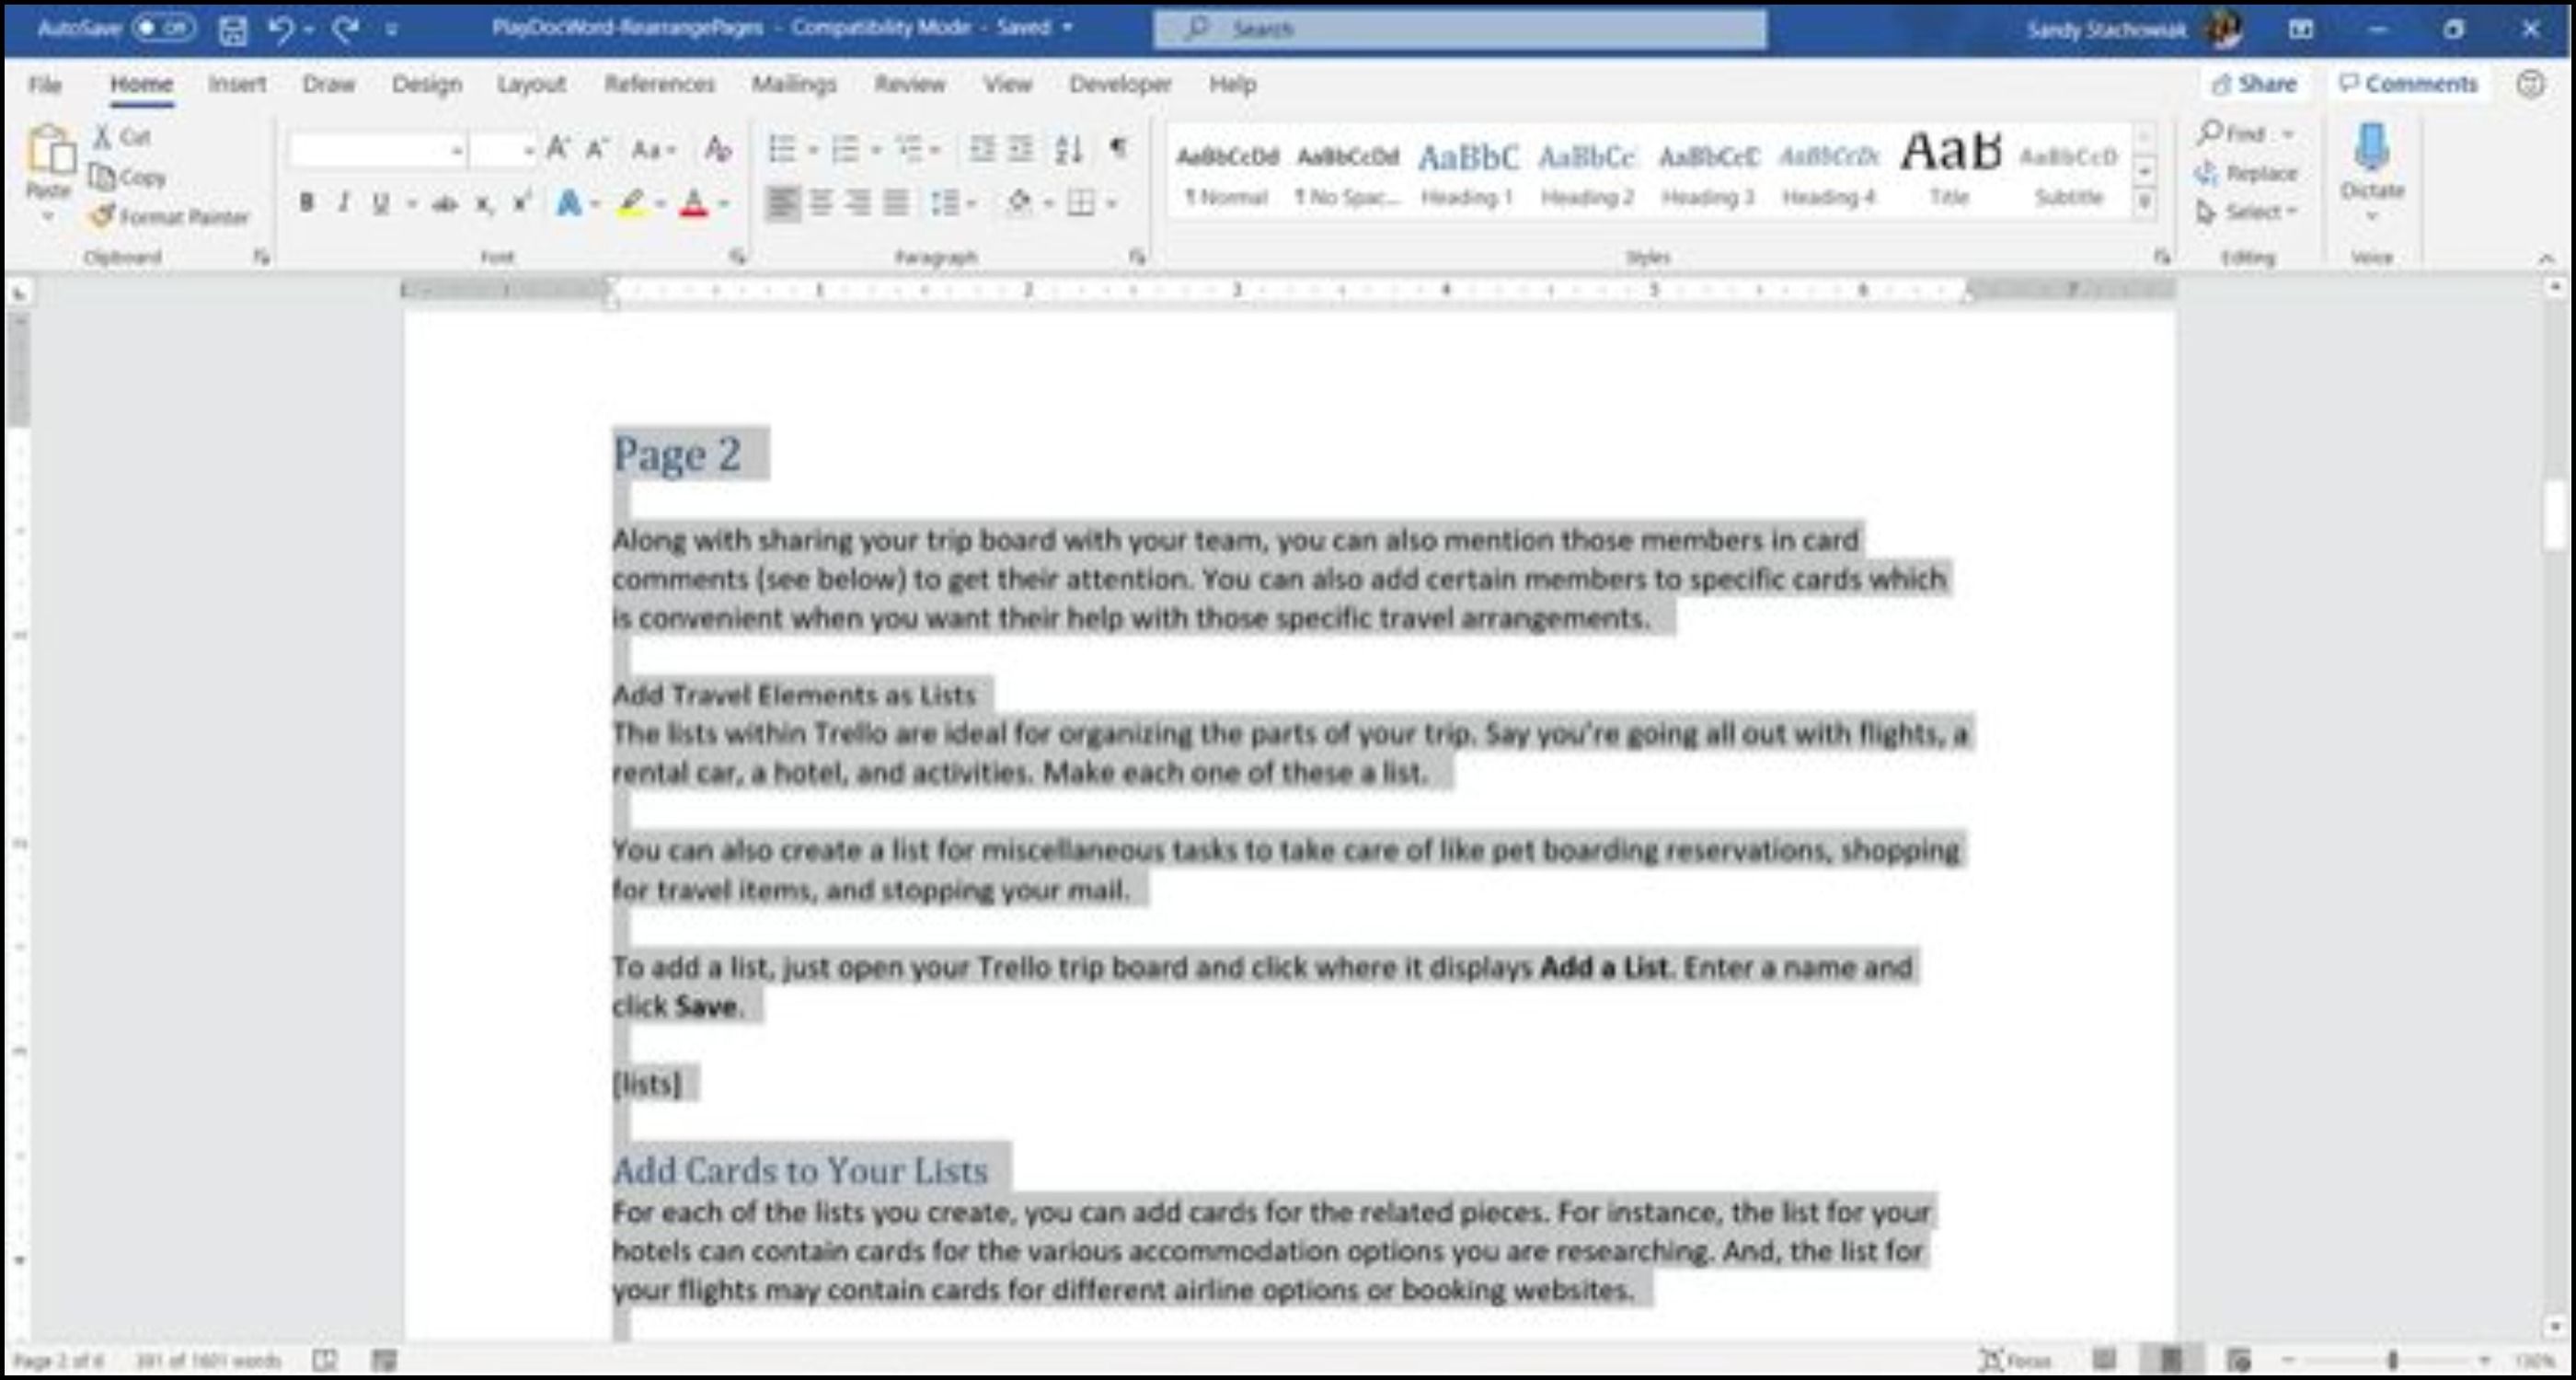
- Place your cursor at the very beginning of the text on the page you want to move.
- Hold your Shift key and press the Page Down (Pg Dn) key. This will grab a screen’s worth of text.
- If you need to select more, continue holding Shift and press Page Down again. You can do this until you have it all.
- Press Control (Ctrl) + X to cut the text you selected.
- Move your cursor to the spot where you want the page moved to and press Control (Ctrl) + V to move the page. Word does all the rest.
How to Change Order of Pages in Word With Mouse Cut and Paste
Maybe you’re a pro with your mouse and would rather use it than the keyboard while moving pages in Word. You’ll do the same thing to cut and paste the text, but a little differently.
How to Switch Page Order in Word With Your Mouse
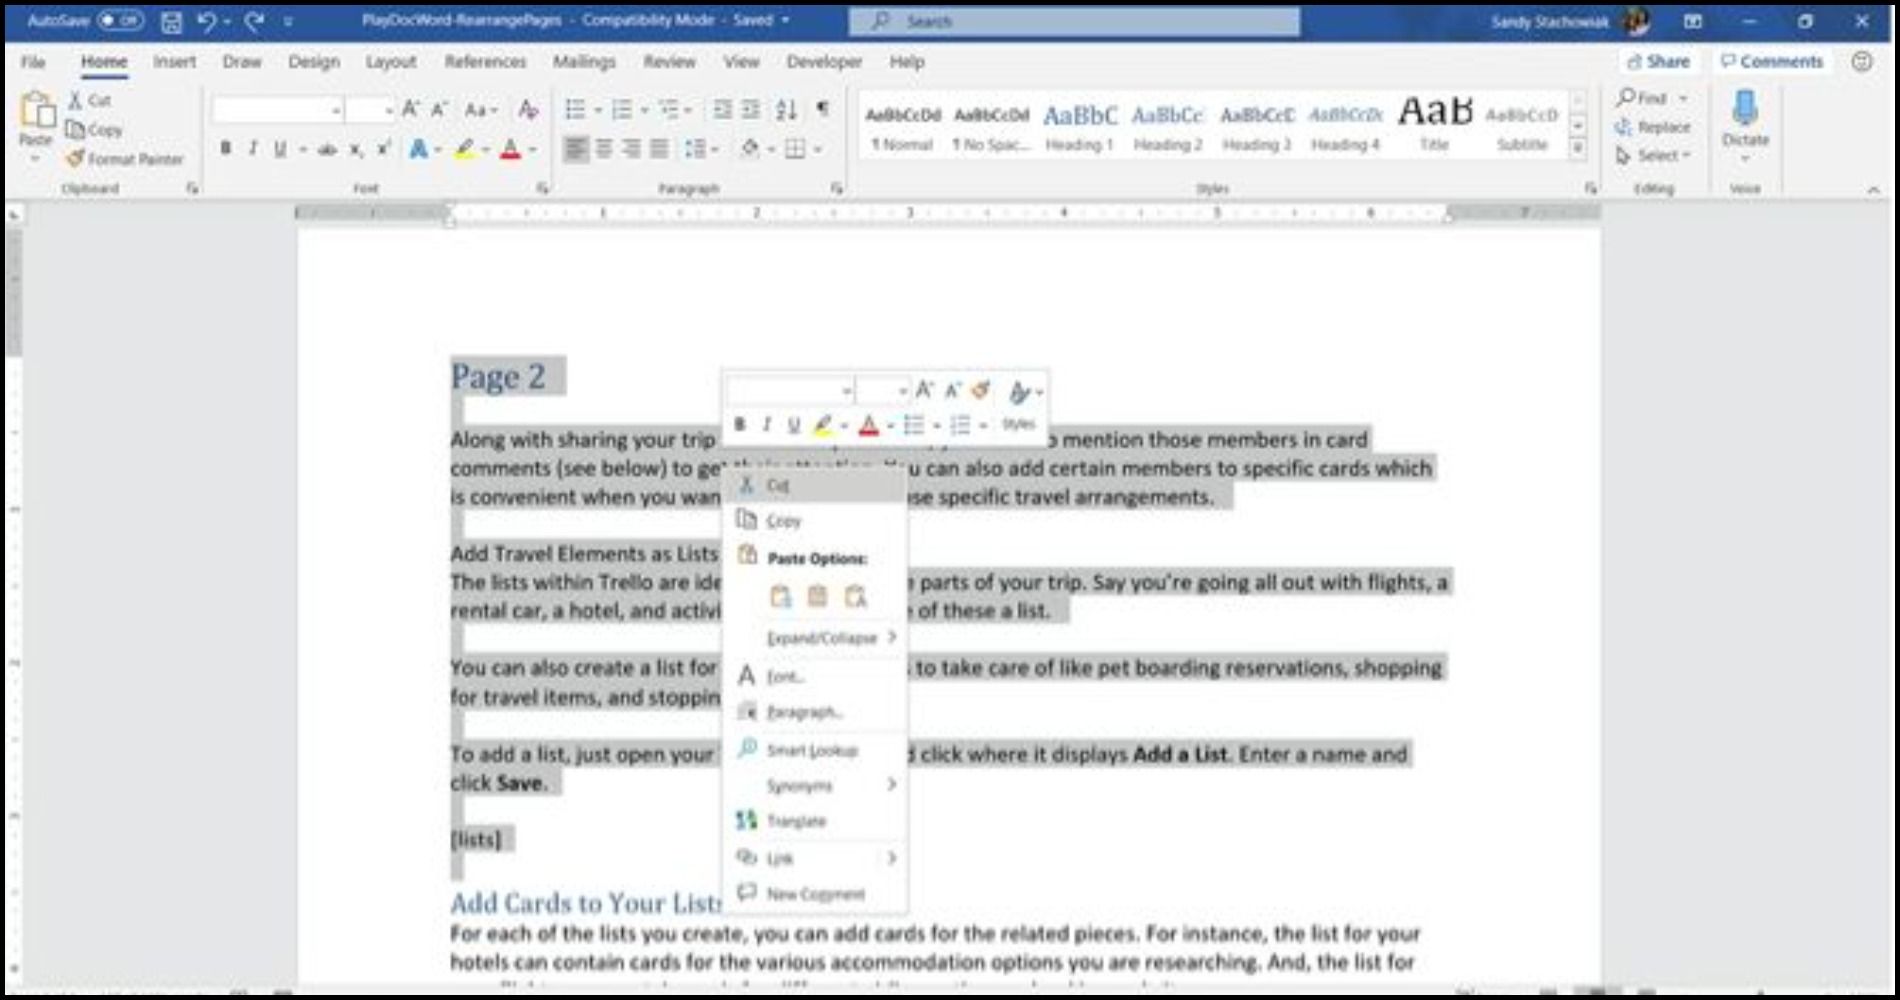
- Place your cursor at the beginning of the text on the page you want to move.
- Hold the left mouse button while you drag through all of the text on the page, then release.
- Right-click and choose Cut, or click Cut on the Home tab under Clipboard.
- Move your cursor to the spot where you want the page moved to, right-click, and pick Paste from the shortcut menu or click Paste on the Home tab under Clipboard.
 How to Move Pages Around in Word With the Cut and Paste Methods
 How to Move Pages Around in Word With the Cut and Paste Methods
You may be wondering how to shift pages in Word most effectively via these means. Regardless if you use your keyboard or mouse, here are a few tips to help you move a page in Word using this method.
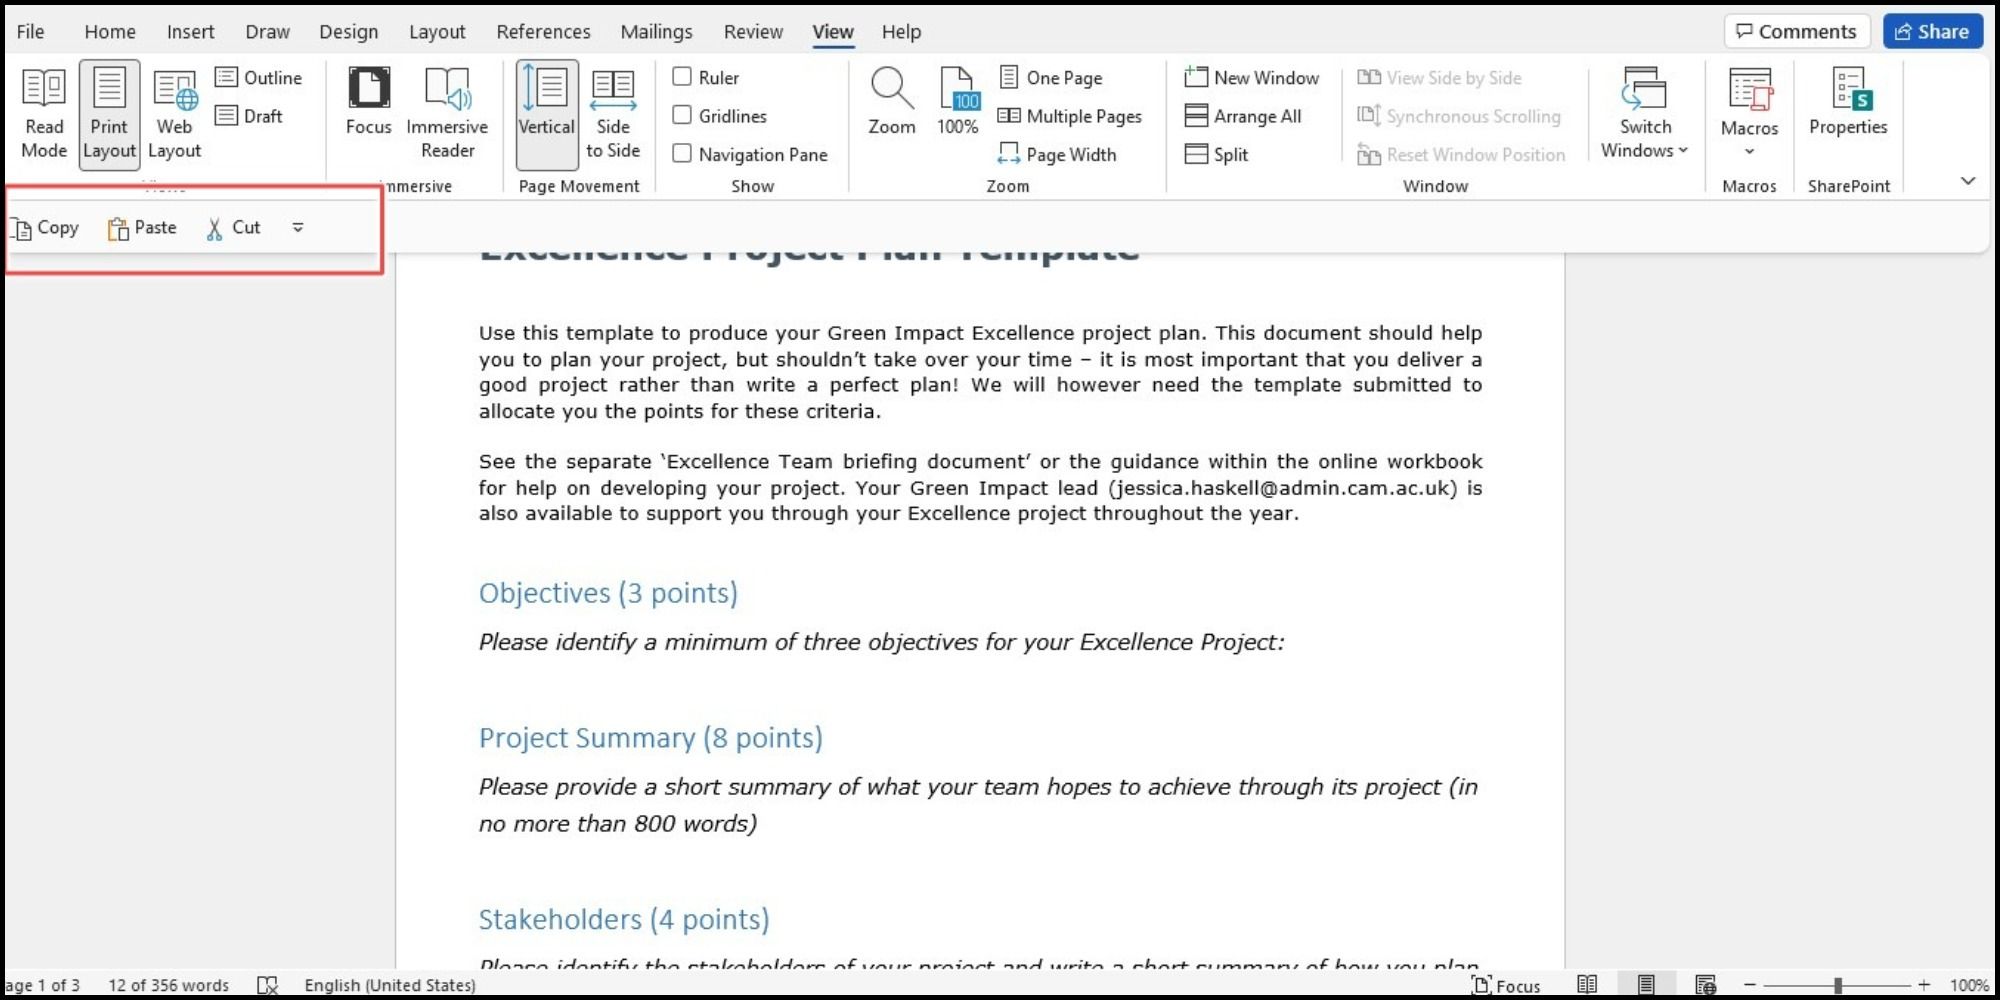
Reorder Pages in Word Using the Quick Access Toolbar
If you would like to swap pages in Word with custom settings like the Cut and Paste commands in the Quick Access Toolbar, here’s what you need to do:
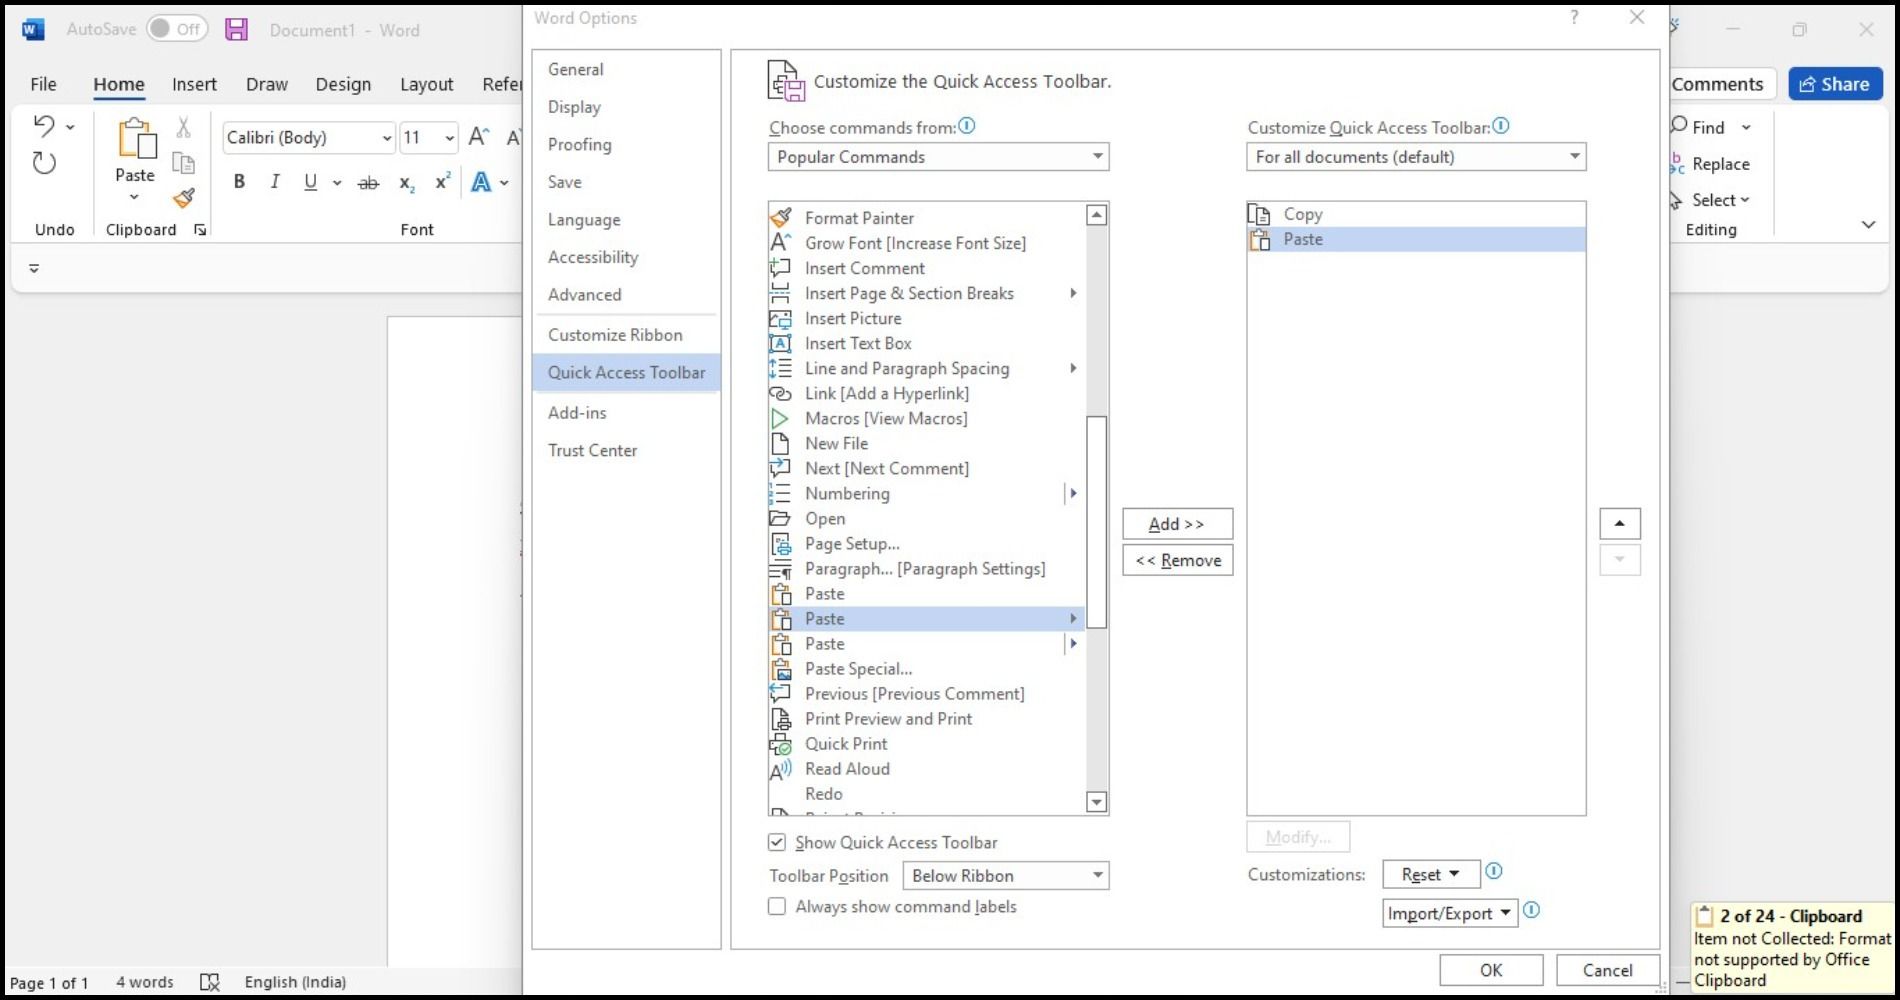
- To get started, open up the Quick Access Toolbar by right-clicking anywhere on the ribbon at the top of the document.
- Enable Show Quick Access Toolbar.
- Click on the dropdown Menu and scroll down and select More Commands.
- A new window will pop up where you can select specific commands that you wish to add to the Quick Access Toolbar.
- Find Cut and Paste in the list of options and tap the Add button to include them to the toolbar. Check Always show command labels at the bottom of the list.
- Hit OK to save your changes and close out the window. The icons will now appear in the toolbar.
Here’s how to cut-and-paste text using the Quick Access Toolbar on Word:
1. Select the text you want to remove.
2. Click the Cut icon in the Quick Access Toolbar.
3. Move your cursor to the desired area in the document and click Paste.
Remember Undo Move
If you make a mistake during the cut-and-paste process, remember that you can undo what you just did. Click the Undo Move button in your Quick Access Toolbar. This will undo your last change, but you can click the arrow next to the button to go back through your history changes.
Copy Instead of Cut
If cutting text from your document makes you nervous, you can use a copy, paste, delete method instead of reorganizing pages in Word. Follow the same steps for using your keyboard or mouse to select the text, but, rather than choosing Cut, choose Copy.
Then, once you paste that selected text into the spot where you want it, you can go back and delete it where you copied it from originally. This will take longer than a simple cut and paste. However, this method of how to change pages in Word might feel safer for you.
Ever end up with weird formatting when you paste something from the web into your Word document? We recommend some helpful ways to strip formatting while using copy and paste functions, for both Windows and Mac users.
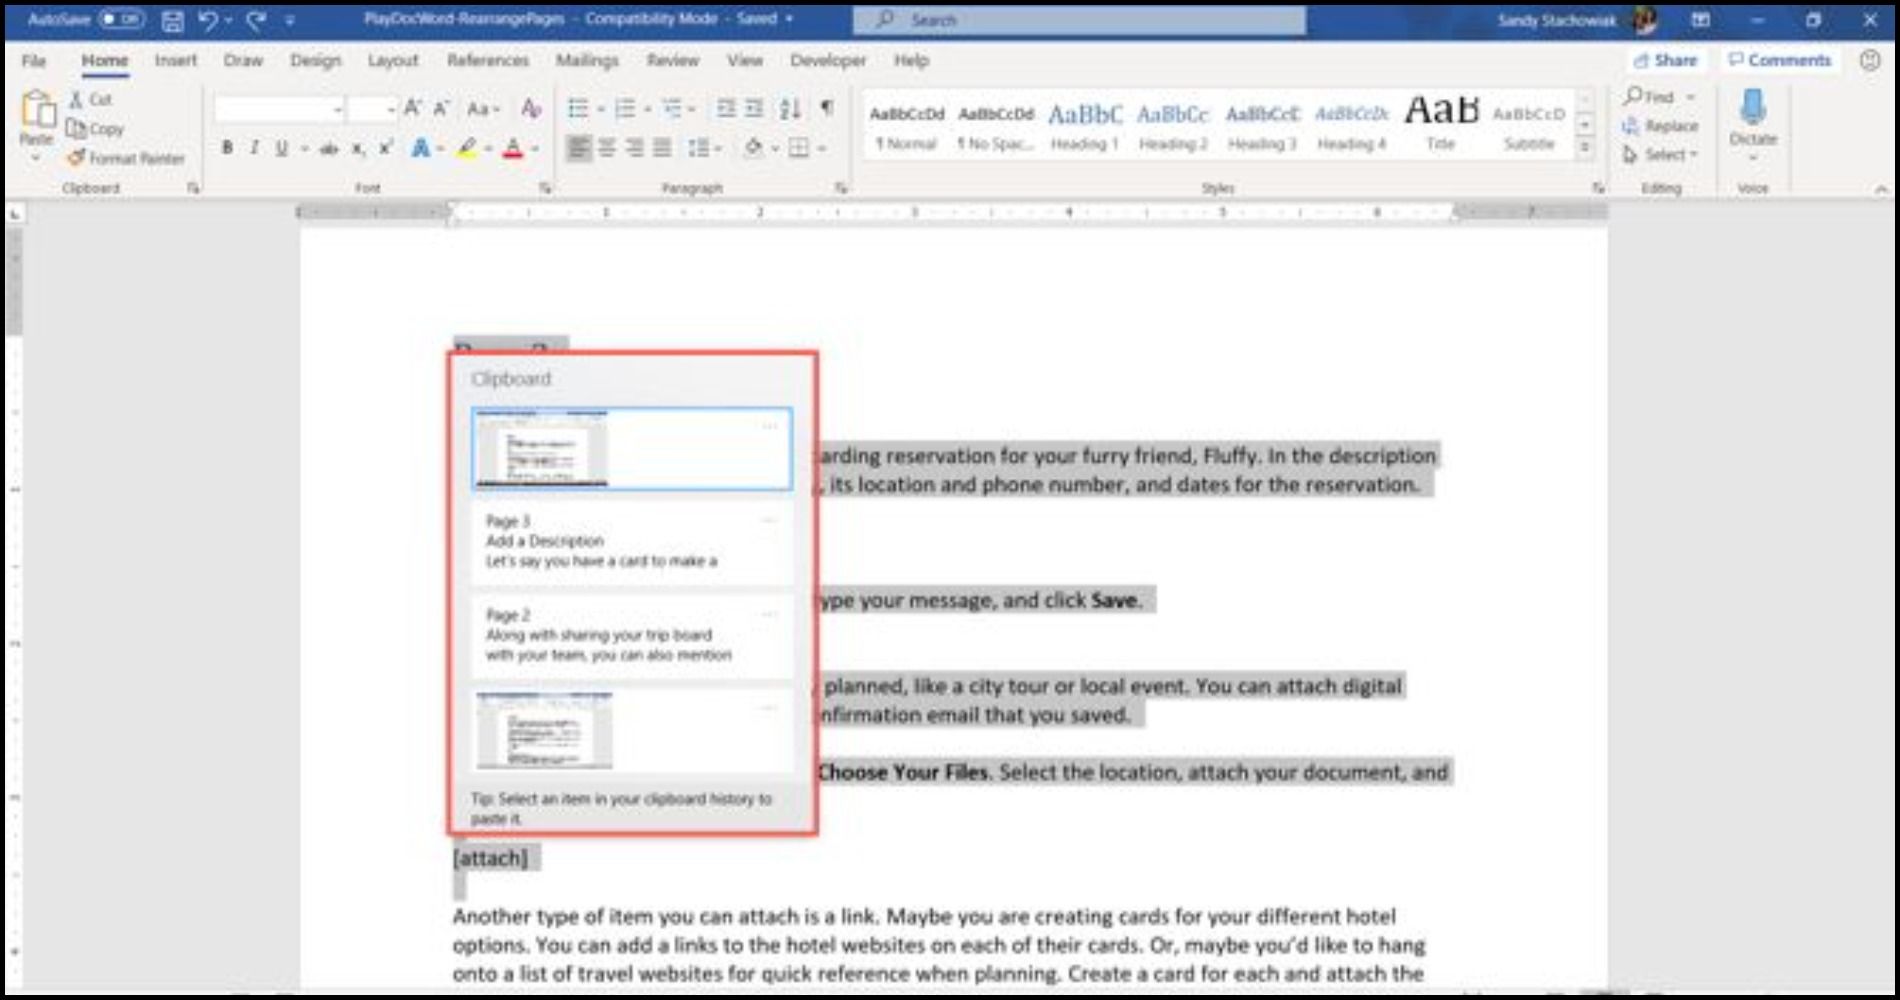
How to Swap Pages in Word Using Your Clipboard History
Another cool way how to arrange pages in Word is via the Clipboard History tool on Windows. The Clipboard is a feature that allows you to copy and paste information from one place to another.
- Move your cursor to the spot in your Word document where you want the page you just cut (or copied) in Word.
- Move pages using the keyboard shortcut Windows key + V to open your clipboard history. Alternatively, on the Home tab, you can click the Clipboard section to open up the pop-up window on the left.
- Then, click an item in the history window to paste it and move pages around in Word.
With the release of Windows 11, there are many new features to explore! You can use the improved Clipboard Manager in Windows 11 to copy and paste symbols, GIFs, and emojis for a truly personalized experience.
Carefully Handle Your Word Pages
You should be able to arrange Word pages using one of these methods. Every user of Microsoft Word will be able to move a page differently.
These tips can help you reorganize the pages of your brochure, your manuscript, or even just your homework. We’ve only discussed a few approaches to rearranging Word pages; each one has its advantages. Thankfully, there’s a way to change the page order in Word, no matter what type of project you’re working on.
Typing up a document in Microsoft Word can prove to be nothing short of a power struggle, especially when there’s document formatting and layout to take into account. Various aspects of formatting a document and perfecting its layout can be significantly difficult, one of the worst ones being moving around pages existing pages in a document. Word simply creates new pages as needed when you’re typing up a document, but it’s when you want to move around pages that already exist that things get a bit tricky. Why? Well, Word does not have a native option or feature that allows users to freely and easily move pages around in a Word document, at least not under normal circumstances.
That’s not to say that it is impossible to move pages around in a Word document, however – it is certainly possible, and not too difficult either. In addition, one way or another, it is possible to move entire pages around in all versions of Word. There are two different ways a Word user can move existing pages in a Word document – they can either move pages using headings (if they’re using Word 2010 or later) or by moving every single word on the pages they want to move to a new location in the document (the pages will automatically be moved when you move their content). Without further ado, here’s how you can move existing pages in a Word document:
Method 1: Using the Navigation Pane (Word 2010 or later)
First and foremost, you can move pages in a Word document using the Navigation Pane feature to move entire headings and all the content that comes under them. This method can only be used on Word 2010 or an ever newer version of the word processor, and only works if you have added headings to the document. To move pages in a Word document using this method, you need to:
- Open the Word document you want to rearrange pages in.
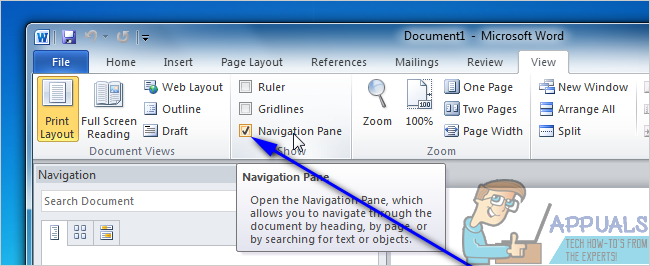
- Navigate to the View tab in Word’s toolbar.
- In the Show section, check the checkbox located directly beside the Navigation Pane option to enable the Navigation Pane.

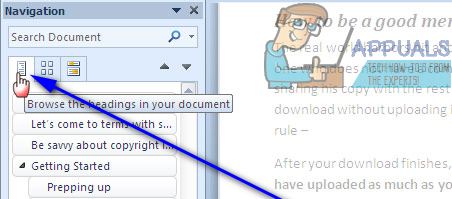
- Navigate to the Browse the headings in your document tab in the Navigation Pane. The Word document will not look like one very long page, and it will be broken down into different sections by headings.

- Click on the heading of the section of text you want to move to a new location in the Word document, and with the click still held, drag the heading to the new location you want it in. Everything under the heading will be moved to the new location with the heading, and Word will automatically reformat and move the document’s pages as required.
Method 2: Move the contents of the target page to a new location
You move pages in any Word document on any version of Microsoft Word by simply cutting the contents of the target page(s) from their current location and pasting them to whatever location in the document you you to move them to. In order to do so, simply:
- Open the Word document you want to rearrange pages in.
- Right-click and drag your mouse pointer over everything on the page(s) you want to move to highlight and select the contents.
- Press Ctrl + X to Cut the selection of text. The page(s) the text was on will be eliminated once it has been Cut.
- Place your mouse pointer in the location within the Word document you want the pages moved to.
- Press Ctrl + V to Paste the contents of the target page(s). The contents will be moved to the new location and Word will automatically create space to accommodate the text that you have pasted, successfully moving the target page(s) from their previous location to the new location you have chosen.

Kevin Arrows
Kevin Arrows is a highly experienced and knowledgeable technology specialist with over a decade of industry experience. He holds a Microsoft Certified Technology Specialist (MCTS) certification and has a deep passion for staying up-to-date on the latest tech developments. Kevin has written extensively on a wide range of tech-related topics, showcasing his expertise and knowledge in areas such as software development, cybersecurity, and cloud computing. His contributions to the tech field have been widely recognized and respected by his peers, and he is highly regarded for his ability to explain complex technical concepts in a clear and concise manner.
Back to top button
You can do this until you have it all. Press Control (Ctrl) + X to cut the text you selected. Move your cursor to the spot where you want the page moved to and press Control (Ctrl) + V to move the page. Word does all the rest.
Contents
- 1 Can I rearrange the pages in Word?
- 2 How do I move a page number down in Word?
- 3 How do you move to the top of a Word document?
- 4 How do I change the page order in Word 2013?
- 5 How do I move a page in Word Mac?
- 6 How do I rearrange pages in Pages?
- 7 How do you put page numbers outside the border in Word?
- 8 How do I change page numbers and margins in Word?
- 9 How do you go back to the top of a page in a Word document with a hyperlink?
- 10 How do you scroll a page in Word?
- 11 How do I change my page from vertical to moving?
- 12 How do I change the first page in Word?
- 13 Can you move pages around in pages?
- 14 How do you move pages around in Word 2007?
- 15 How do you move text in pages?
- 16 How do you make a 0.2 hanging indent?
- 17 How do I fix the layout of a Word document?
- 18 How do I drag margins in Word?
- 19 How do I change the top and bottom margins in Word?
- 20 How do you move to the top of a Word document on a Mac?
Can I rearrange the pages in Word?
Word doesn’t offer an easy, built-in option to easily rearrange pages if you don’t use headings. The only way to do it is to cut and paste the text and manually rearrange it instead.Using your mouse or trackpad, drag your cursor down to select the text you want to move.
How do I move a page number down in Word?
Move one page’s order/number down in Word
- Enable the Navigation Pane by checking the Navigation Pane option on the View tab.
- In the Navigation Pane, please click the Pages tab, and then click the specified page you will move to end.
- Now the cursor jumps to the beginning of the specified page.
How do you move to the top of a Word document?
Go to beginning of a document: [Ctrl]+[Home] Go to the bottom of a screen: [Ctrl]+[Page Down] Go to the top of a screen: [Ctrl]+[Page Up] Go to a specified location (page, bookmark, section): [Ctrl]+G or [F5]
How do I change the page order in Word 2013?
Step 1: Open your document in Word 2013.
- Step 2: Click before the first character of the first word on the page that you want to move.
- Step 3: Use the scroll bar on the right side of the window to adjust the page view so that the bottom of the page is visible.
How do I move a page in Word Mac?
Click and hold the mouse and slide it up or down the outline wherever you’d like that section to go. You’ll see a line appear where the section will go once you release the mouse. Release the mouse to drop that entire section in the new location. On a Mac, it looks a bit different, but it’s the same principle.
How do I rearrange pages in Pages?
Rearrange pages or sections
Click View in the toolbar, choose Show Page Thumbnails, select the page or section thumbnail, then drag it to where you want it in the page hierarchy.
How do you put page numbers outside the border in Word?
Double-click at the top or bottom of your doc or go Insert>Header or Insert>Footer. Then insert your page number at “the current location”. If you have to, you can play with the Header/Footer position and move the numbering outside your borders.
How do I change page numbers and margins in Word?
Change default margins
- Select Layout > Margins > Custom Margins.
- Set your margins.
- Select Set As Default.
- Confirm your selection.
How do you go back to the top of a page in a Word document with a hyperlink?
Scroll to the bottom of the page or to the spot where you want to insert the hyperlink. Type in a short phrase, such as “Back to Top,” indicating that you will jump to the top of the page by clicking on the text.
How do you scroll a page in Word?
To move page by page, you can hold down the Ctrl key and press Page Up or Page Down. You can also use View>Navigation Pane and click on the page icons to move a page at a time.
How do I change my page from vertical to moving?
For instance, if you’re viewing pages one and two and scroll down, you’ll then see pages two and three. To return to a one-page view in Word, select the View tab and in the Page Movement section of the ribbon, click Vertical.
How do I change the first page in Word?
Start page numbering later in your document
- Go to Insert > Header or Footer > Edit Header or Edit Footer.
- Select Different First Page.
- In the header or footer area, you should see a label on the first page that says First Page Header.
- Select Close Header and Footer or press Esc to exit.
Can you move pages around in pages?
Move a section or page: In the sidebar, select the section (in a word-processing document) or page (in a page layout document) you want to move, then drag it to where you want it in the document. You can move multiple pages at a time, but only one section at a time.
How do you move pages around in Word 2007?
Go to the page to move and click at the very top of the page. Hold down the “Shift” key and arrow down to the bottom of the page. You can also press the “PageDown” key, which selects one screen at a time. Release the key at the end of the page you need to move.
How do you move text in pages?
To drag and drop text
- Select the text you want to move . click here to view image.
- Move the cursor over the selected text.
- Click and hold your mouse button over the selected text, and drag it to its new location, releasing the mouse button when the cursor is where you want the text .
How do you make a 0.2 hanging indent?
Create a hanging indent
- Select the text where you want to add a hanging indent.
- Go to Home > Paragraph dialog launcher. > Indents and Spacing.
- Under Special, select Hanging. You can adjust the depth of the indent using the By field.
- Select OK.
How do I fix the layout of a Word document?
Change the default layout
- Open the template or a document based on the template whose default settings you want to change.
- On the Format menu, click Document, and then click the Layout tab.
- Make any changes that you want, and then click Default.
How do I drag margins in Word?
Hold your mouse over the line separating the white and gray area. You’ll see the pointer turn to a double arrow and will likely see a tooltip letting you know you’re point at the margin. Now, just click and drag that line left or right to adjust that margin.
How do I change the top and bottom margins in Word?
Set Margins for a Section of Your Document
- Select the section in the document where you want a different margin size.
- Select Layout > Margins > Custom Margins.
- Type new values for the Top, Bottom, Right, and Left margins.
- From the Apply to list, select This Section.
- Select OK when you’re done.
How do you move to the top of a Word document on a Mac?
To the top of the next page: Command + Page Down or Command + Fn + Down arrow. To the top of the previous page: Command + Page Up or Command + Fn + Up arrow. To the beginning of the document: Command + Home or Command + Fn + Left arrow. To the end of the document: Command + End or Command + Fn + Right arrow.
As the Word document gets bigger, it becomes difficult to manage it as if anything goes wrong there might be a possibility of important content deletion. Rather than starting the work again to arrange the word pages, you could consider rearranging the pages so that they end up in better order.In many cases, while creating a dossier or a report, you might need to rearrange the pages. However, unlike PPT, you cannot drag and reorder pages in Word. Nevertheless, there are few ways to Move the pages in Word. Scroll through the sections below for a better understanding of how to move pages in Word Documents. On this page, you can even find the method to fix the damaged Word files.
- Navigation Pane
- Simple Cut and Paste
Reorder Pages in Word Using Navigation Pane
If you have organized your Word document with headings applied using the Styles section in the Home tab on the ribbon bar, then this method will work. Otherwise, if your document doesn’t have headings, you’ll need to use the cut and paste method described in the next segment.

- Go to the View tab in the menu and checkmark the Navigation Pane option
- You can see the navigation pane on the left of the Word document

- Set the Navigation pane to Headings to see the sections on your document
- Right-click on the section you want to move around in the Word document and click on select
- Select the heading for the page you want to move and drag it to its new location in the Headings list.
- As you drag the heading, you’ll see a dark line appear. When the line is in the spot where you want to move the heading (page), release.
- Once the desired content is selected just implement Cut and paste task as mentioned earlier
- This way of moving the pages in Word is more precise.
Now you will be able to see the heading and its contents in the new position and your document will reflect the rearrangement of the pages.
The process remains the same even in the case of rearranging the word files on Mac.
Reorder Pages in Word Using Cut and Paste
I feel we all can admit that Cut, Copy, and Paste hands down the best and most familiar way of rearranging, it makes all our life easy, just as in this situation. To rearrange any piece of content in a document, you just have to select, the content, cut it, and paste it in the required place. Following are the instructions on how to do it.
Method 1: How to Cut Pages from Word Document?
- Place the courser at the desired location.
- Hold the CTRL+Shift button and press the right arrow key to select the content you want to move
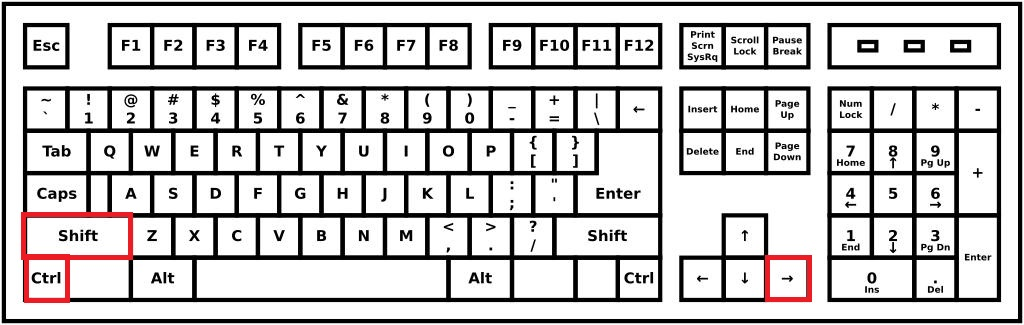
- After selecting the content, tap Ctrl+X to cut the content
- Again place the content in the desired location and press Ctrl+V to paste
The same task can also be done with the help of Mouse. However, while using a mouse to move the pages in Word you have to be cautious.
Method 2: How to Move the Pages in Word using Mouse?
- Similarly, place the courser at the desired location
- Using the mouse, make a left-click and drag the mouse to select the desired content
- Be with at most caution before selecting, because if you move your Mouse too fast, you might select the content which should not be moved.
- So, double-check the content before implementing the Cut utility
- Now, right-click on the selected content and select the Cut option
- Place the cursor at the desired location and right-click a now select paste option.
Both these options methods will help you to reorder the text in word, but it might be a little crude method to implement. So, what can be a better way to reorganize pages in word.
Note: Use the Undo Move (Control + Z)
If you made any mistake while performing the cut and paste process, remember that you can undo what you just did. Click the Undo Move button in your Quick Access Toolbar. This will undo your last change, but you can click the arrow next to the button to go back through your history changes.
Method 3: Use Your Clipboard History
- Move your cursor to the Word page where you want the doc you just cut (or copied) in Word.
- Move pages using the keyboard shortcut Windows key + V to open your clipboard history.
- Then, click an item in the history window to Paste it and move pages around in Word.
In case you crash your Word file while editing and ended up corrupting the Word file, you can repair it using the Remo Word Repair tool. Remo Word Repair is fully free, easy to use, and has a user-friendly interface. This advanced Word file repair tool works with a read-only mode interface to safely repair .doc & .docx files without altering the original content. Download this free tool now!
Free Download
For Windows
How do you Delete Extra pages in a Word Document / Blank Pages – Added Tip
Delete Blank pages in Word Document — Windows
- Press Ctrl+G to open the find and replace dialogue box
- Now enter the blank page number and press enter to go to the empty or extra page
- Now enter the command page in the find and replace dialogue box and press enter
- Click on the close button on the Find and replace dialogue box
- Hit the delete button to delete the extra page on the Word document or delete the blank page on a word document
Delete Blank Pages in Word Document – Mac OS
- Tap Command+Options+G to launch the find and replace dialogue box
- Enter page number followed by page command
- Hit enter and close the find and replace dialogue box
- Press delete key
Generally, Word documents have a lot of important information, if you ever accidentally deleted or lost you can recover the corrupted word documents using Remo Word Repairing tool.
Molly is the Lead Technical Specialist with distinguished knowledge and understanding of Mac computers and operating systems. Being a veteran photographer and video recovery specialist, Molly’s expertise on video formats and file repair has helped restore a lot of videos and cherished memories of users.
As a technical specialist she also believes in learning and spreading knowledge about the current and trending aspects of various media formats, Adobe Photoshop and macOS troubleshooting. A full-fledged learner, caffeine-lover and a firm-believer that technology would make the world a better place.
Articles: 171
Contents
- 1 How to Rearrange Pages in Word via the Navigation Pane
- 2 How to Move Pages in Word by Copy and Paste
- 3 Extra: How to Delete a Page in Word
- 4 Extra: How to Make One Page Landscape in Word
When you pen a small document, it’s quite easy to put everything in a logical order. You start at the beginning and finish at the end. Once a document gets longer, however, it gets unwieldy. You start to realize that perhaps you would be better off introducing a certain concept sooner, or switching two chapters or your novel around. In these cases, it’s very useful to know how to rearrange pages in Word.
How to reorder pages in Word
There are a few ways to move pages in Word, but the most effective involve the use of the Word navigation pane or some simple copy and pasting. It’s these two methods that we’ll be covering today.
Before we start, we do recommend that you perform these changes on a separate version of your document. If you save your document out as “documentname-rearranged”, you can look at both versions and see which flows the best. With that said, let’s get started:
How to Rearrange Pages in Word via the Navigation Pane
The navigation pane is an incredibly useful tool for large documents – particularly if you have split your document into separate parts with the relevant headings. Technically, the method we’ll show below won’t show you how to move pages in Word. Instead, you’ll be reordering those ever-important headings and all of the text in their section. Many times, this is faster and more useful than moving individual pages.
Here’s how you can do so:
- Add headings to your document
If you haven’t already, split your document into sections by adding Heading 1 to your main title, Heading 2 to their sub-sections, and Heading 3 for sections within that. You can do so by opening the “Home” tab in your ribbon and clicking on the preset heading options in the styles section.

- Open the headings section of the Word navigation pane
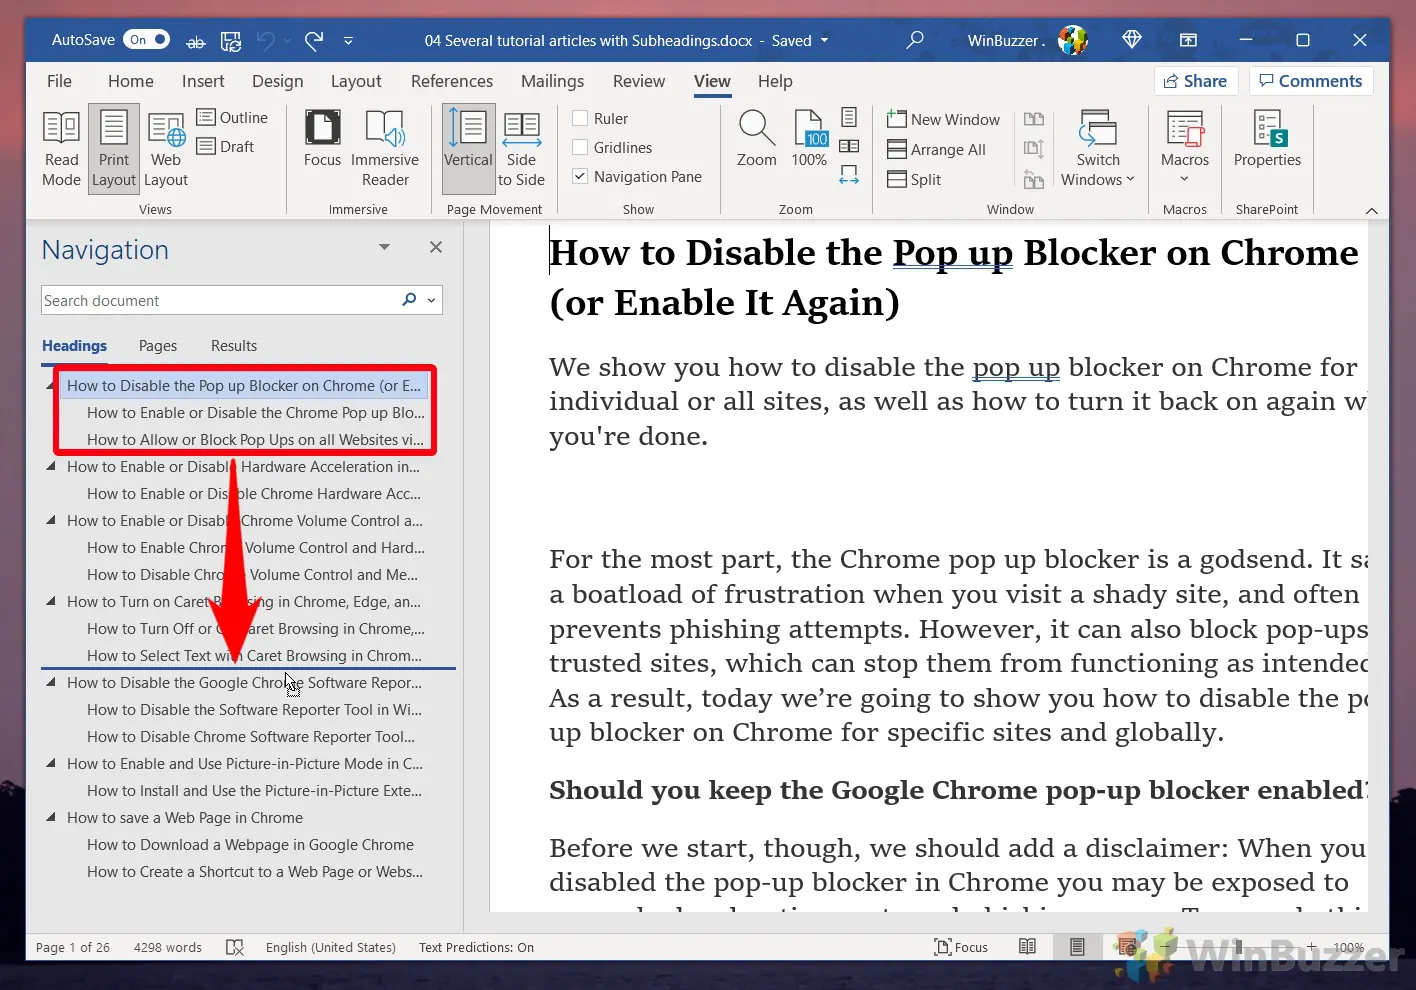
Open the “View” tab in your ribbon and tick the “Navigation Pane” option in the “Show” section. When it opens on the left, make sure you’re in the “Headings” tab.

- Click and drag your heading to rearrange pages in Word
You can click and drag on any heading in the navigation pane to move it before or after another heading in your document. Once you let go of your mouse button, the heading all of its content will be moved to that section of your document.

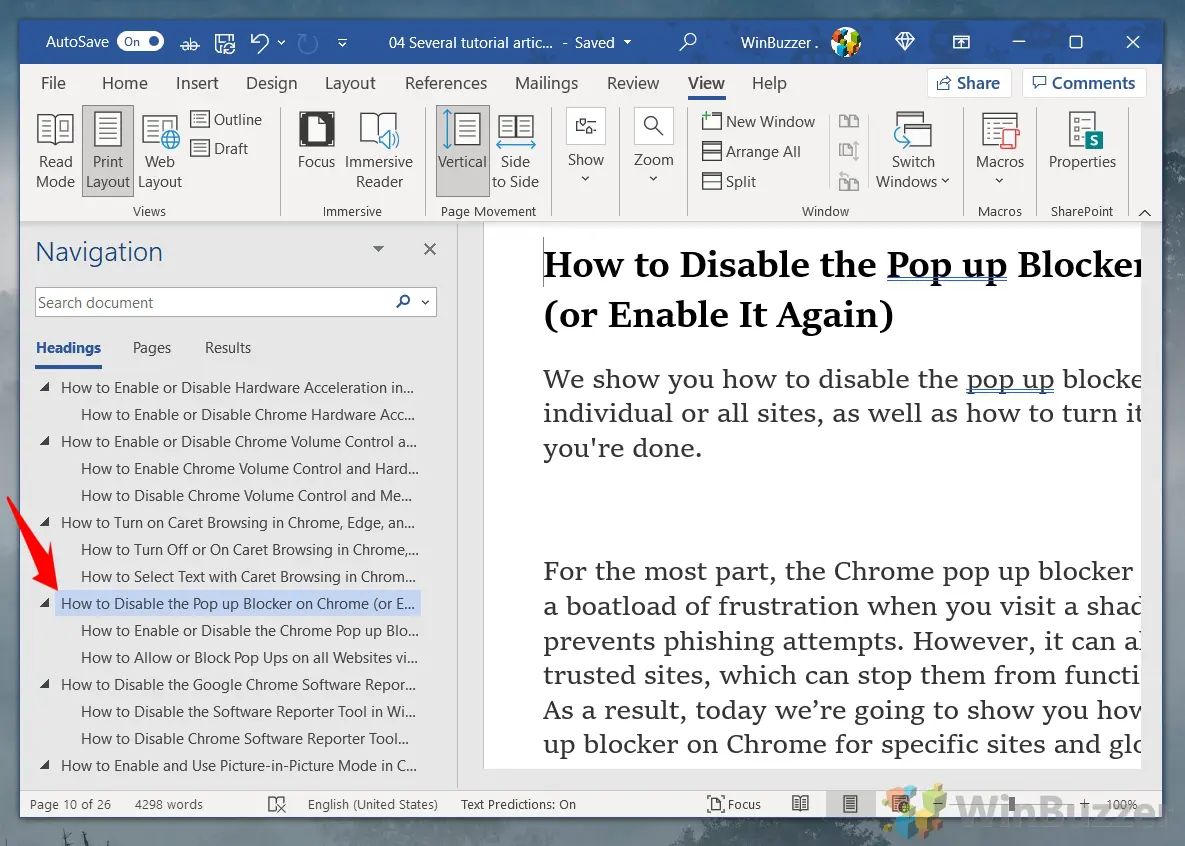
- Click on your heading in the Word navigation pane to view the changes
It should now comfortably sit in the place you released your mouse button. You can now make further adjustments to content and order as required.


How to Move Pages in Word by Copy and Paste
We’ve shown you how to reorder pages in Word based on their headings, but what if you want to swap two specific pages within a section? Here’s how to copy a whole page in Word and paste it elsewhere:
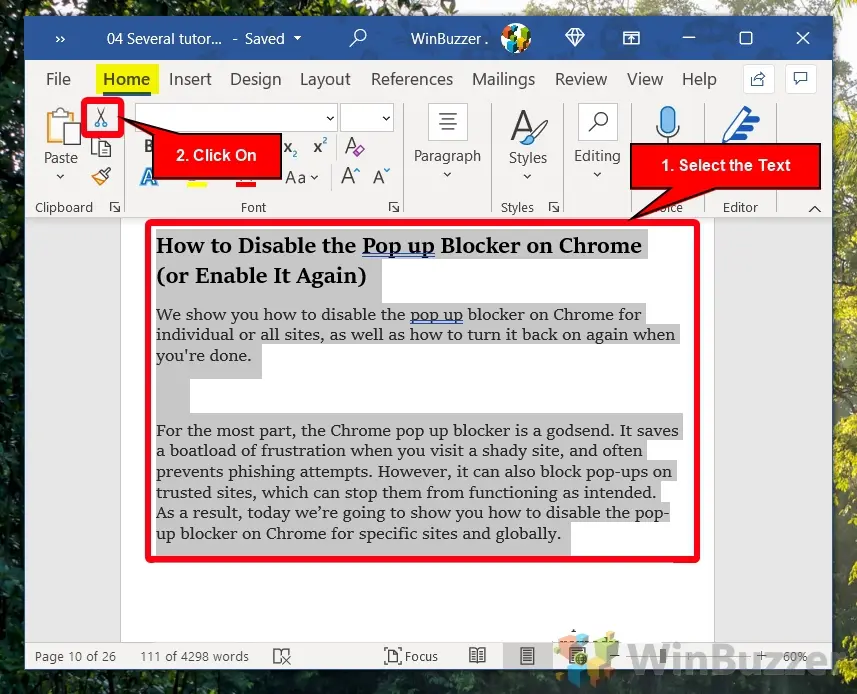
- Select your text and use the cut tool
Set your cursor at the very start of the page you want to move and hold Shift on your keyboard. Then, click at the bottom of the page to select all of the text. Alternatively, you can just click and drag.
With your text selected, click open the “Home” tab of your ribbon and press the scissors icon in the top left or press Ctrl + X on your keyboard. This will cut your text causing it to temporarily disappear. Don’t worry, we’ll return it again, but make sure you don’t copy anything else until you finish the next step.

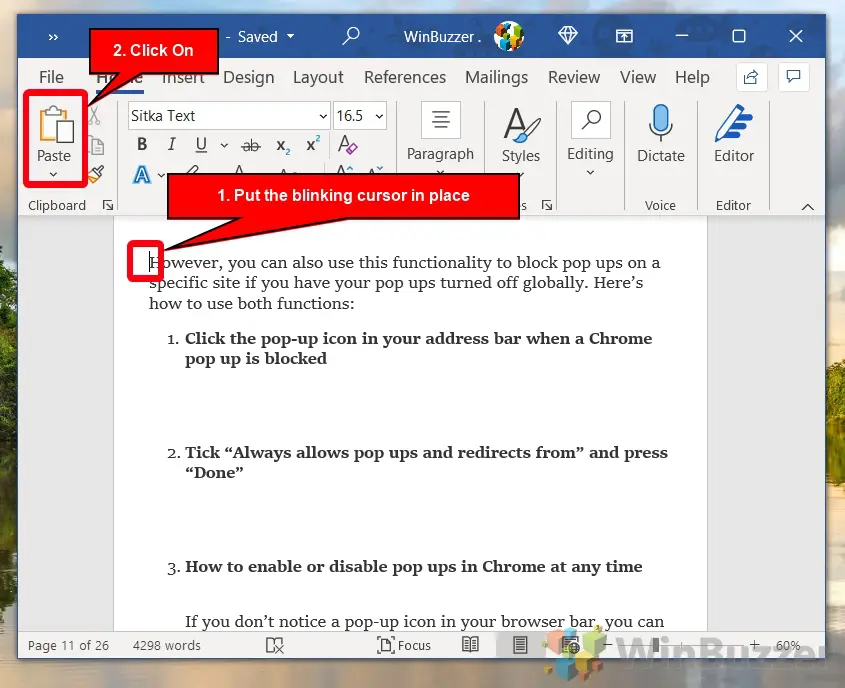
- Put your cursor at the start of your target page and paste your contents
The paste button is next to the scissor icon in the home tab, and should look like a clipboard. You can alternatively press Ctrl + V.

Now you know how to rearrange pages in Word and move them using the copy and paste tools. However, what if you decide there’s a page you don’t want in there at all? You can follow our guide on how to delete a page in Word to safely remove it without affecting your other content.
Extra: How to Make One Page Landscape in Word
If instead, you’re wondering how to rotate a page, you can follow our guide on how to make one page landscape in Word.

There might be a time when you wanted to rearrange pages in Word document. Even though it depends primarily on your work purpose, it’s likely that you want to move your pages in any given Word document, especially for long documents.
Sadly, it isn’t possible to find a way to reorder your word document. This is because Microsoft Word is an application used to process words, but not the document. As a result, you would only see an ongoing document. You shouldn’t try to compare Word with PowerPoint, where you can easily rearrange slides. But you need not worry, we will show three effortless to move, change order of pages or rearrange pages in Word document.
Rearrange Pages in Word Using Navigation Pane
Microsoft Word comes with a pretty handy tool called Navigation Pane. It helps you navigate throughout the document you are working on. If you maintain a heading on each page, Navigation Pane is an easy method to change the order of pages in a Word document.
Note that this method is only applicable if your document contains headings on the top of each page. In order to rearrange pages using Navigation Pane in word, follow these steps:
- Click on the View tab located on top of the Ribbon bar.
- Click on the Navigation Pane located in the “Show” section under the View tab.
- When the Navigation Pane appears, click the Headings option.
- Now choose the heading of the page you want to move and wait until you see a dark line.
- Move or drag the dark line to the position you want, and your page will be moved accordingly.
Once the heading is moved, its contents will also move along with the heading letting you rearrange pages in word. Although here are some of the things you might need to remember.

If you don’t have any text with headings format, you should add some headings to your document. You can do that by choosing a text, then going to the Home tab and selecting a heading from the options.
The Heading will be listed in the order they were placed in the text, from top to bottom —Heading 1, Heading 2, Heading 3 etc. in ascending order.
Move Pages in Word using Keyboard Cut and Paste Option

If your document doesn’t have the option use Navigation Pane option, then the copy and paste might be a better option to check out. Copying and pasting the text can be done using your mouse. You can also use your keyboard, if you prefer that way. Here’s how to use copy and paste to move pages in a Word document.
- Head over to the top of the page you want to move. Now, place your cursor at the beginning of the text you would like to move.
- Hold down the Shift Key on your keyboard and press the PgDn (Page Down) key on the keyboard. This will select the text to the end of the page. You can also select additional text by holding down the Shift Key and pressing the Page Down (PgDn) key again.
- Press Control (Ctrl )+ X on your keyboard to cut the selected text.
- Now move your cursor to the place where you want to move the text. Then press Control (Ctrl) + V to paste the text that you cut in Step 3.
This will cut and move the text to rearrange pages in word document.
Change or Re-order Pages in Word Using Mouse Cut and Paste Option
If you don’t like using a keyboard to cut and paste option, then you can also use your mouse to move Pages around in a Word document. Here’s how you can do it.
- Head over to the top of the page you want to move. Now, place your cursor at the beginning of the text you would like to move.
- Click and hold down the left button on your mouse and drag over the text you want to cut. This will highlight the text you want to move.
- Right-click the selected text and click on Cut.
- Move the cursor to the place where you want to move the text. Right-click and select the Paste option on the shortcut menu.
If you cut and move the text, you might misplace the text. If you do it by accident, then you can always Undo the any step by pressing the Ctrl + Z on keyboard. Instead, you can also use the Undo option in the Quick Access toolbar.

It is always better to use the Copy option over Cut option. This will maintain the previous text if you don’t want to lose your text that you want to move. Once pasted, you can delete the original text later.
We hope that you understood how to rearrange text in Word using the above methods. The above procedure vary in their effectiveness. It is better to choose your preferred way. So it’s better which method you choose to rearrange pages in Word. These methods work with every version of the Microsoft Office, but if you still face any problem, you can comment down your questions below.
Yes, you can rearrange pages, even in lengthy documents
Updated on January 12, 2021
What to Know
- Add headings to each page, then select the text > Home > Heading 1. Then, go to the last line of each page and click Insert > Page Break.
- Open the navigation pane and click and drag the headings to move the pages in the order you want them.
- You can also use cut and paste to rearrange pages, but it’s much more tedious.
This article includes instructions on moving pages in Microsoft Word 2019, 2016, and Office 365 using the Navigation pane and copy and paste.
How To Set up the Navigation Pane To Rearrange Pages
Microsoft Word doesn’t see a document as a collection of separate pages but as one long page. Because of this, rearranging Word docs can be complicated. One of the easier ways to move pages in Word is by using the Navigation pane.
To rearrange your pages in the Navigation Pane, you have to place a heading on each page of your document using Microsoft Styles.
-
Open the Microsoft Word document you want to rearrange. At the top of the first page, create a hard return by pressing Enter on the keyboard.
-
Type the information you want to use to indicate each page in the document. In this example, that information is Page [number].
You can use any text that makes sense to you, because you’ll probably remove it later, so if you prefer headings that are relevant to the text on the page, use that. The one thing you probably don’t want to do is use the exact same text on each page since that will make it difficult to tell in the Navigation pane what page is what when you start rearranging things.
-
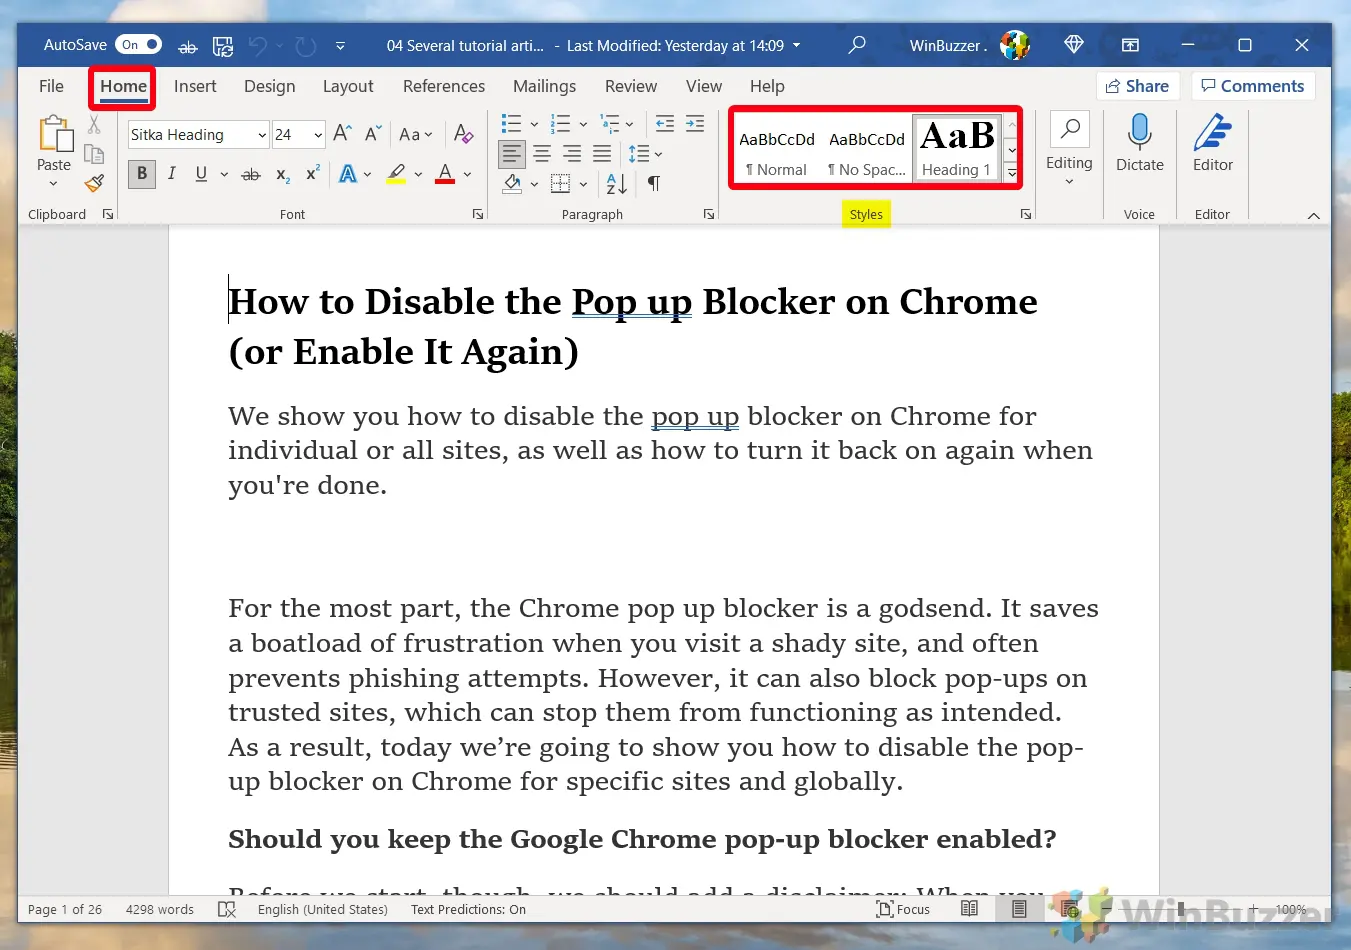
Next, select the text and click Home.
-
In the Styles selector, select Heading 1.
-
Next, go to the bottom of the page and place your cursor at the end of the last line (or at the end of the last full sentence) and click Insert.
-
From the Insert ribbon select Page Break. This creates a clean page that can be easily moved from the Navigation pane.
-
Repeat that process for each page in your document.
How To Rearrange Pages in Word With the Navigation Pane
Once all your pages are ready, then you can begin to move them around in your Word document until they are in the order you prefer.
-
If it’s not already open, you’ll need to open the Navigation pane in your document. To do that click View.
-
On the View ribbon, make sure there is a tick in the box next to Navigation Pane. If there is not, click the option to select it.
-
The Navigation pane should appear on the left side of your screen. There, you can click and drag any of the headings that are shown.
-
As you drag a heading, you’ll notice a dark blue line appears below each heading as you drag past it. If you release the heading at that point, it will be moved to the location of the dark blue line.
-
As the pages are moved, the document in the main Editing Pane will also move around and the text you moved (which should be the text of the entire page) will be highlighted. You’ll also see the headings in the Navigation Pane in the new order.
Tips for Changing the Page Order Using the Navigation Pane
Moving pages around in Word is easy with the Navigation pane as long as there are headings in the document. If what you’re after is to move sections of a document, you can do that as well as long as there is a heading structure in your document.
For example, if you already have a multi-page document that you’ve used any level headings in when you enable the Navigation pane, that structure will appear. You can then click and drag the headings and only the text under that heading will be moved.
One thing to keep in mind, however, is if you’re moving a section that uses lower-level headings, the lower level headings will move along with the top-level heading. So if you have a section with Heading 1, two Heading 2s, and a Heading 3, the Heading 2s and Heading 3s will move along with the Heading 1.
Although Microsoft Word has some very well-designed styles that include multiple levels of headings, you can create your own styles with heading designations and use those as well.
Moving Pages in Word with Cut & Paste Actions
Another way that you can move pages in your document is to cut & paste the text from one location to another. To do this, highlight the text you want to move, use the keyboard shortcut Ctrl + X to cut it, and then move your cursor to the place you want the text moved to in the document and use the keyboard shortcut Ctrl + V.
Cut & Paste in Word is a fast way to move small amounts of text around a document, but if you’re trying to move sections that are pages long, using the heading structure and Navigation pane is a much faster (and easier) way to rearrange your document.
Thanks for letting us know!
Get the Latest Tech News Delivered Every Day
Subscribe
While working on a document, you’ll often need to move the text cursor around to change where you’re typing.
Move the Insertion Point
The insertion point is the blinking vertical bar that represents where text will be inserted as you type.
- Click anywhere inside the document.

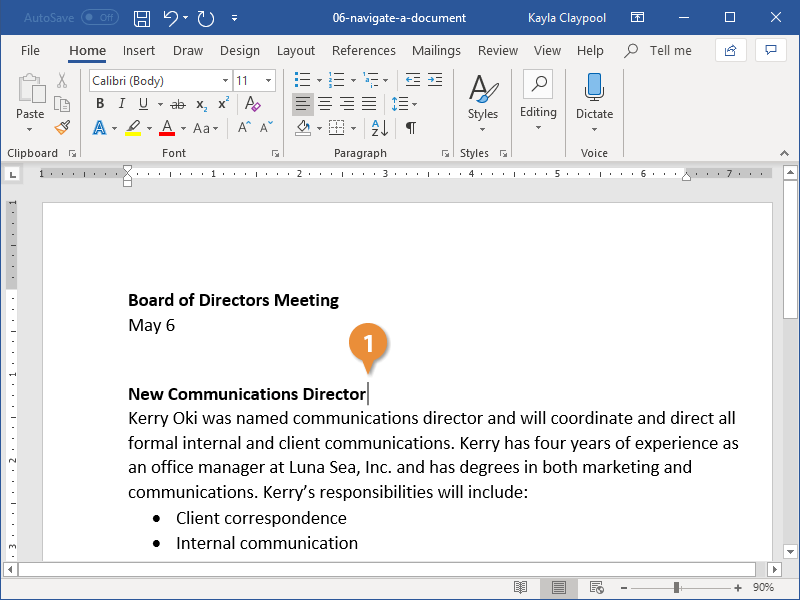
The insertion point moves to where you clicked—or, at least, as close as possible. If you click in a margin, or after the end of the text toward the bottom of the page, the insertion point moves to the closest point it can.
You can also move the insertion point around using the keyboard. This method is described in the table below.
| Press | To Move the Insertion Point |
|---|---|
| Arrows (↑ ↓ ← →) | Up or down one line; or left or right one character. |
| Home | To the beginning of the current line. |
| End | To the end of the current line. |
| Page Up | Up one screen, while also scrolling the page the same distance. |
| Page Down | Down one screen, while also scrolling the page the same distance. |
| Ctrl + Arrows (↑ ↓ ← →) | Up or down one paragraph; or left or right one word. |
| Ctrl + Home | To the beginning of the document. |
| Ctrl + End | To the end of the document. |
Scroll in a Document
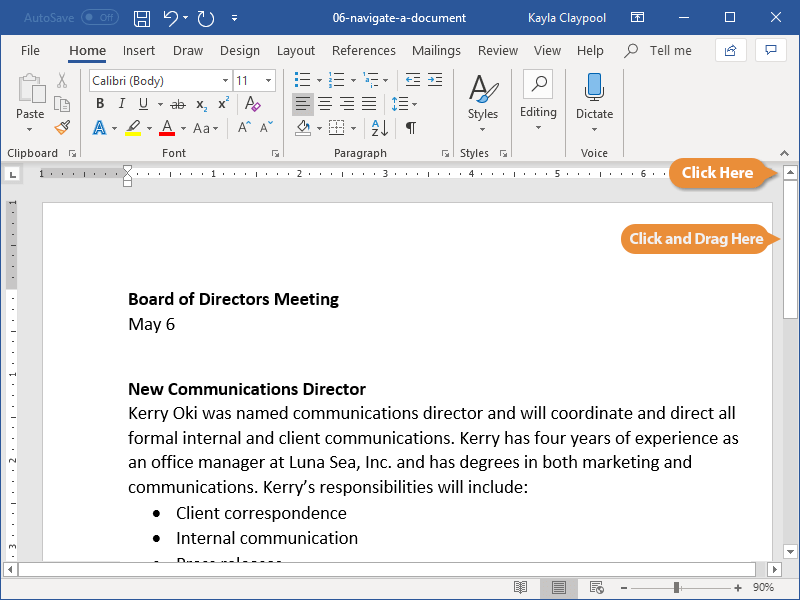
When a document gets long enough, it can be tough to navigate through the whole thing with just the keyboard. You can use the scroll bars on the right and bottom sides of the window to move through the document quickly.
- Click the arrow buttons at the top, bottom, and sides of the scroll bar to scroll one line at a time.
- Click and drag a scroll bar to move quickly though a document, releasing it when you’ve reached the page you want.
Use the Navigation Pane
If you have a longer document with multiple pages, or you’ve set up your document into sections with headings, you can use the Navigation Pane to move quickly through sections and pages.
- Click the View tab on the ribbon.
- Select the Navigation Pane checkbox in the Show group.
The Navigation Pane appears on the left side of the screen, showing headings used in the document. Clicking one will jump to that heading.
- Click Pages.
The Navigation Pane now shows every page in the document, represented by a thumbnail.
- Click a page in the Navigation Pane.
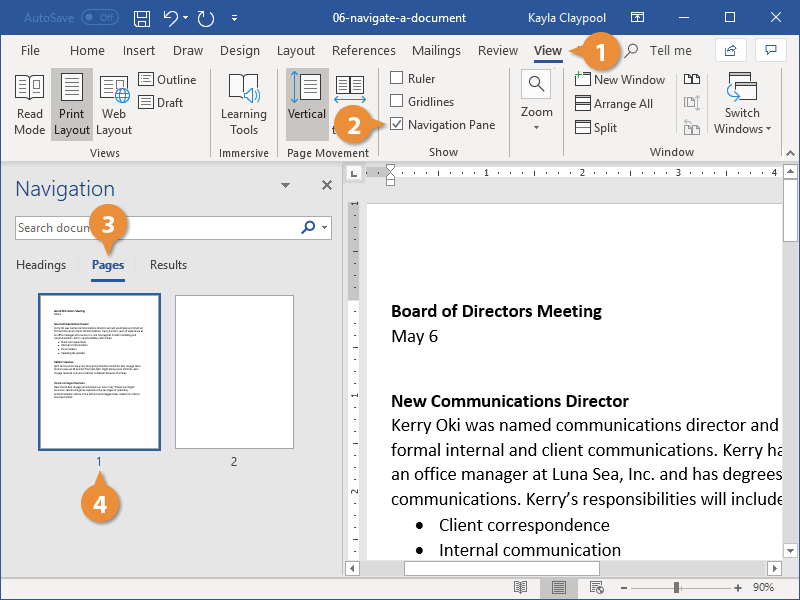
Word navigates right to the selected page.

FREE Quick Reference
Click to Download
Free to distribute with our compliments; we hope you will consider our paid training.

Do you need to rearrange the pages in a Microsoft Word document? Here’s how to do it effectively.
The bigger a Word document gets, the more unwieldy it becomes. Rather than starting from scratch, you could consider rearranging the pages so that they end up in better order.
There are a few ways to do this. You can take advantage of the navigation pane in Word to rearrange sections by headings or use the tried-and-tested cut and paste approach instead. Here’s how to rearrange pages in Word using both methods.
Using the Navigation Pane
The easiest method to rearrange pages in Word is to use the navigation pane to move pages from A to B. Technically, this doesn’t allow you to move pages, but it does allow you to move entire sections if you’ve used headings to split up your document.
This is a better method–if a section in your document carried onto multiple pages, but you only moved a single page, your document would no longer make any sense. As we’ve mentioned, this will only work if your document has been organized with headings applied using the Styles section in the Home tab on the ribbon bar.

If your document doesn’t use headings, you’ll need to use the cut and paste method described below.
To use the navigation pane to rearrange your document, you’ll first need to click on the View tab on the ribbon bar. Under the Show section, click the checkbox next to the Navigation Pane option.

This will bring up the navigation pane in a menu on the left-hand side.
You’ll see a list of your headings in the Headings tab. Main section headings made using the Heading 2 style will appear prominently, with sub-headings made with the Heading 3 and 4 styles shown underneath these.

Clicking on any of these headings or sub-headings will bring you to the start of those sections in the editing screen.
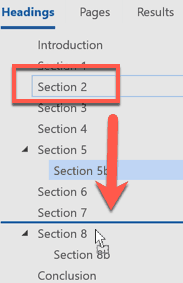
To rearrange any of these sections, use your mouse or trackpad to drag them into a new position in the navigation pane.

Once dropped, the heading and all of its content will be moved into a new position on your document. Section 2 of a sample document was moved below Section 7 in the navigation pane in the example below.

You can repeat these steps if you’re looking to move multiple sections.
Cutting and Pasting Pages in Word
Using the navigation pane to move sections by their headings only works if you’re using headings in your document. Word doesn’t offer an easy, built-in option to easily rearrange pages if you don’t use headings.
The only way to do it is to cut and paste the text and manually rearrange it instead. To do this, find the starting position for the content you’re looking to move. If this is at the start of a page, place your blinking cursor there.
Using your mouse or trackpad, drag your cursor down to select the text you want to move.

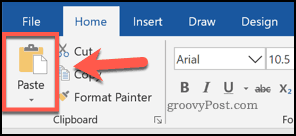
You’ll need to cut the selected text next. Press Ctrl+X on your keyboard, or press the Cut button in the Home tab on the ribbon bar instead.

This will remove the text and place it on your clipboard. You’ll need to place the blinking cursor in a position to paste your content next. Once the cursor is in place, press Ctrl+V on your keyboard to paste it back into your document.
Alternatively, press the Paste button in the Home tab on the ribbon bar.
The section you cut will appear in its new position immediately following the blinking cursor. You can repeat this to change the layout of your document further, should you need to.
Building a Better Document in Word
If you want to know how to rearrange pages in Word, you may have already forgotten the golden rule of document creation—planning. These methods will help you out change a document layout after it’s already been created. You might want to consider some methods for building better Word documents in the future, however.
One option is to use building blocks in Microsoft Word to help you create templates for documents you create regularly. If you’re editing a document, take advantage of Word keyboard shortcuts to quickly make changes.
![]()