
Office 2021 Office 2021 for Mac Office 2019 Office 2019 for Mac Office 2016 Office 2016 for Mac Office 2013 Office 2010 Word 2007 PowerPoint 2007 More…Less
Most applications (such as Microsoft Word, Excel, and PowerPoint) include fonts that are automatically installed when you install the software. For example, applications that are created especially for document design projects, such as Microsoft Publisher, often come with quite a few extra fonts that you can use with any other program on your computer.
However, sometimes you may want to install custom fonts that you’ve created, purchased or downloaded from somewhere else. In this article we’ll talk about how to install those fonts so you can use them in Microsoft Office.
Locate custom fonts on the Web
In addition to acquiring and using fonts installed with other applications, you can download fonts from the Internet. Some fonts on the Internet are sold commercially, some are distributed as shareware, and some are free. The Microsoft Typography site site provides links to other font foundries (the companies or individuals outside of Microsoft who create and distribute fonts) where you can find additional fonts.
After you find a font that you would like to use with an Office application, you can download it and install it through the operating system that you are currently using on your computer. Because fonts work with the operating system, they are not downloaded to Office directly. You should go through the system’s Fonts folder in Windows Control Panel and the font will work with Office automatically. On the Mac you use the Font Book to add the font and then copy it to the Windows Office Compatible folder.
Many third parties outside of Microsoft package their fonts in .zip files to reduce file size and to make downloading faster. If you have downloaded a font that is saved in .zip format double-click the zip file to open it.
Install a custom font you have downloaded
Once you’ve downloaded the font you want to install you need to install it in the operating system. Once the font is properly installed in the operating system Microsoft Office will be able to see and use it. For detailed instructions select the operating system you’re using from the drop-down box below.
-
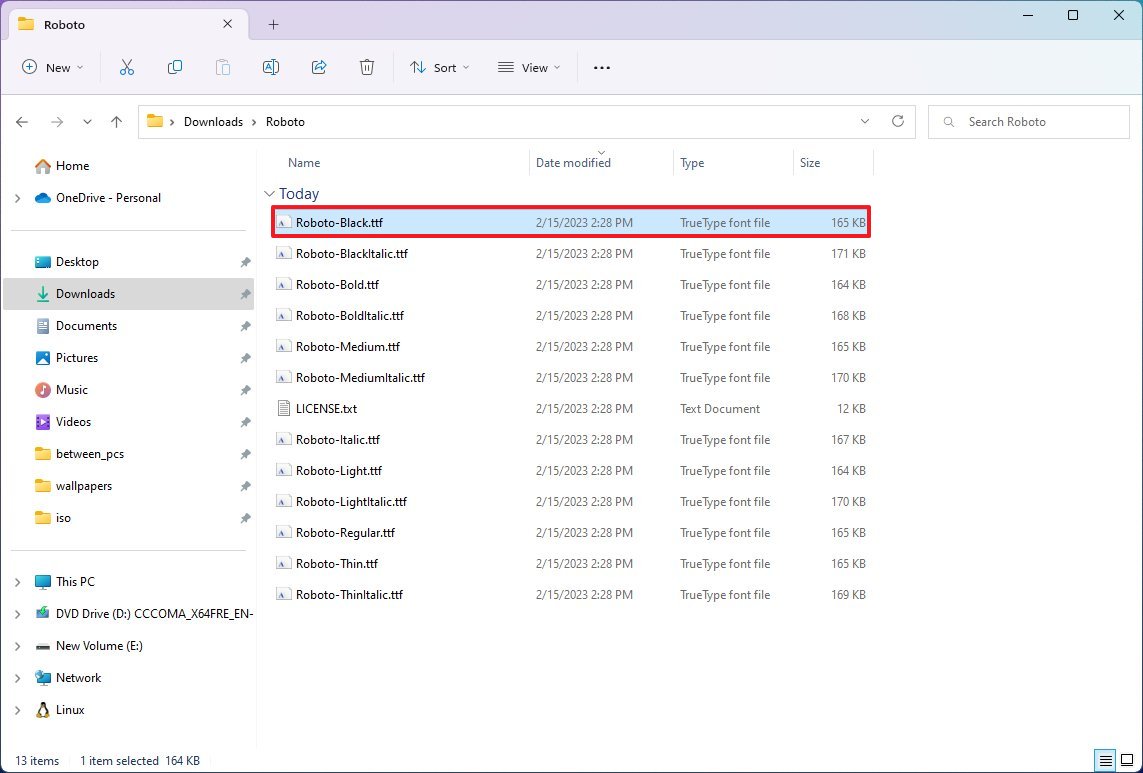
Find the font file that you downloaded, keeping in mind that it may be contained within a .zip file. It’s probably located in your downloads folder.
-
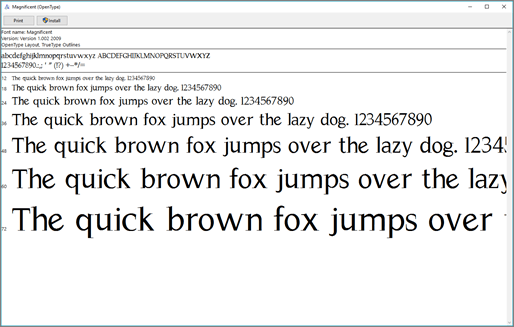
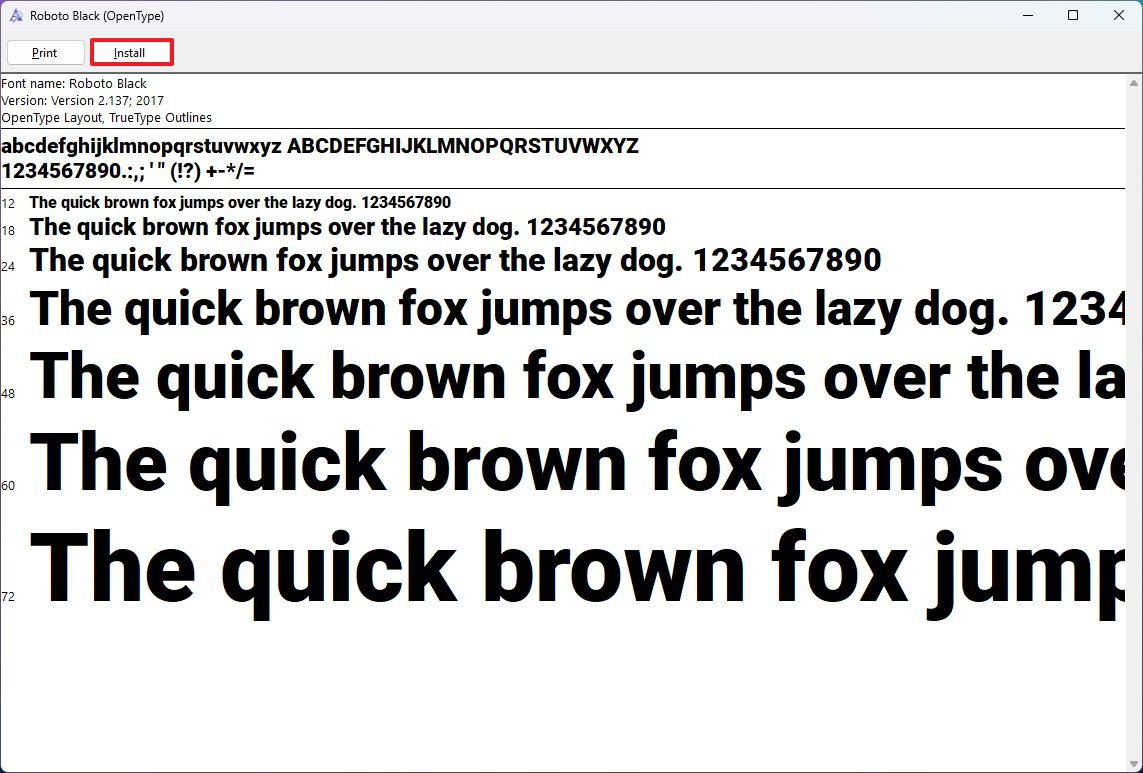
Double-click the font file to open it in the Font Previewer

-
If you’re satisfied that this is the font you want, click Install at the top left.
-
Close the Font Previewer, and open your Office program. You should now see your new font included on the font list.

-
Find the font file you downloaded — it likely has a .ttf or .otf extension and it’s probably in your downloads folder. Double-click on it.
Note: If the font file has a .zip extension you need to open that .zip file and open the font file from there.
-
It will open in the font previewer. Click Install Font. It will open in the Font Book.
-
Close the Font Book. Your font should now be available to Microsoft Office.
Note: If you’re using Office 2011 for Mac, you may need to drag and drop the font to the Windows Office Compatible collection in the Font Book to make it available to Microsoft Office.
Sharing files that contain non-standard fonts
When you install a custom font, each font will work only with the computer you’ve installed it on. Custom fonts that you’ve installed on your computer might not display the same way on a different computer. Text that is formatted in a font that is not installed on a computer will display in Times New Roman or the default font.
Therefore, if you plan to share Microsoft Office Word, PowerPoint, or Excel files with other people, you’ll want to know which fonts are native to the version of Office that the recipient is using. If it isn’t native, you may have to embed or distribute the font along with the Word file, PowerPoint presentation, or Excel spreadsheet. For more information about this see Fonts that are installed with Microsoft Office.
See also
-
Microsoft Typography
-
Change or set the default Font in Microsoft Office
-
Language Accessory Pack for Office
Do you have ideas for how we can improve Microsoft Office?
See How do I give feedback on Microsoft Office?
Need more help?
Want more options?
Explore subscription benefits, browse training courses, learn how to secure your device, and more.
Communities help you ask and answer questions, give feedback, and hear from experts with rich knowledge.
Free Fonts for Every Project
Style matters.
As a creative designer, you understand exactly how important it is to use the right font for every project. The style of the words on the page influences the overall tone of the content, draws the eye to particular points, and affects readability.
But with so many free downloadable fonts available on the web, it’s getting more and more difficult to find the fonts that can actually elevate your work.
And that’s why we’ve put together our collection of the best free fonts available. You can download each one of these fonts free to use in your projects. There are even free fonts for commercial use. And to help you find exactly what you’re looking for, we’ve broken it down into a few categories.
Free Sans Serif Fonts
Sans Serif fonts are fonts that don’t have serifs (the small lines often seen at the ends of most letters.) They’re popular for their modern, simple, and minimalist style. Because of this styling, you’ll often see sans serif fonts used in short blocks of text. They’re also usually the default font style in many apps and websites.
Need a san serif font? Check out Story Choice Sans Serif and Sans Serif Plus 7
Free Serif Fonts
Serif fonts include a small stroke (known as a serif) at the end of the lines in most letters. Serif fonts have a classic look to them, and the serifs are also known to aid in the readability of text. Because of this, serif fonts are popular fonts for long blocks of text like books, newspapers, and magazine articles.
If you’re searching for free serif fonts, check out popular fonts like NIGHTMARE PILLS and Playfair Display.
Free Brush Fonts
Brush fonts include artistic details meant to make them appear hand-painted. You can typically see lines that make each individual letter look as though someone took the time to handcraft the words rather than type them. These artistic details make brush fonts a popular choice for greeting cards, posters, and rustic themed websites.
Check out Calligraphy and Angel Tears if you’re looking for great brush fonts to include in your next project.
Free Handwriting Fonts
Handwritten notes are indisputably more intimate than typed letters, and that’s exactly the feeling that free handwriting fonts bring to a project. Handwriting fonts imitate real handwriting, making them appear authentic, intimate, and classic. These fonts are available in many different styles, from whimsical to elegant and everything in-between.
Looking to download free fonts in the handwriting style? Take a look at Hello Ketta and Great Day! Or browse our selection of cursive font styles.
Free Retro and Vintage Fonts
Conjuring the essence of years gone by isn’t always easy, but using the right retro and vintage fonts can help you achieve the feel you’re striving for. Perfect for posters, cards, and website headings, these fonts are pure nostalgia from a simpler time.
Whether you’re looking for a font that reminds you of the bravado of the New Wave era or makes you want to go to a hop from 1958, we have the vintage fonts you need. Check out Retro New Version or Bratsy Script for some inspiration.
Free Graffiti Fonts
Looking to add an urban edge to your next project? Graffiti fonts can help you capture a rebellious, streetwise feel. Plus, they’re artistic and can be incorporated into just about any project you might be working on. From posters to greeting cards and website headings, these fonts will give you the stand-out style you’re looking for.
Explore fonts like Ghang and Fat Wandals to capture the edgy, artistic vibe of graffiti in your next project.
Free Tattoo Fonts
Whether you’re searching for the perfect font to use in your next tattoo or you’re just looking to bring the style of a classic tattoo to your next project, there are hundreds of free tattoo fonts for you to choose from. These free fonts range in style from bold and rebellious to elegant and artistic, so there’s always one to match the project you’re working on.
Check out Easy November and S&S GreyHood Seven for some inspiration.
Free Unusual Fonts
Some free fonts are so unique that they need a category all their own! These original and unique designs are the definition of imagination. You’ll find unusual fonts to compliment any project you can think of—greeting cards, posters, party invitations, and more.
Take a look at Poland Canned into Space and Bogeyman Eroded to take a look at a few of our favorite unusual free fonts.
No matter what kind of project you’re working on, you’re sure to find free font downloads that fit your needs right here at Fontspace. Our library of over 66,000 fonts has everything from classic serif fonts to creative and cool fonts, and everything else in-between.
Have more questions? Contact us today or use our font generator. Our team is always happy to help!
You can split fonts into two main styles. There are serif fonts (with lines flicking out of each letter) and sans-serif fonts (without the lines). Serif fonts tend to be easier to read, but they look more formal. This article will show you some of the best ones in Word.
The best serif fonts in Microsoft Word are Times New Roman, Garamond, and Palatino Linotype. They all work well to show a more formal look in your writing. They’re also very easy to read, making them solid choices if you’re looking to write an essay or academic paper.
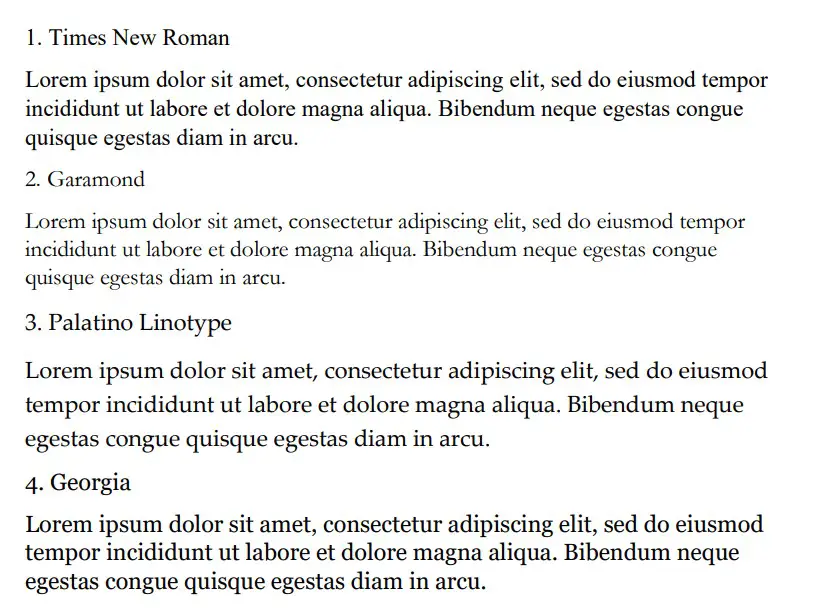
Times New Roman
Times New Roman is the default Microsoft Word font. You really can’t go wrong with it. Everyone knows what it looks like, and everyone uses it as the default serif font in Word. If you don’t actively change your font, it’s likely that you’re writing in Times New Roman.
It is a very professional font that has been proven to be one of the easiest to read on paper. It also makes your writing look more trustworthy, which works wonders when you use it for something like an academic or scientific paper.
You will find that Times New Roman is one of the most popular fonts in the world. It’s such a good choice because of how popular it is, and it can fit in just about anywhere in your writing. It works well for titles and in the main body of the text.
Garamond
Garamond is another great serif font that works really well. It comes in at a close second to Times New Roman, which is saying a lot considering how popular Times New Roman is. Garamond is fairly easy to read, and it even comes in slightly smaller in size.
Garamond is a great font that makes your writing much more concise. The smaller size of this font allows you to fit more words onto your page without feeling like you’re writing an essay full of gibberish and waffle.
If people decided to choose a different serif font in place of Times New Roman, it’s likely that Garamond would rank quite highly as their next favorite pick.
Palatino Linotype
Palatino Linotype is a great font choice that a lot of people enjoy using. It feels a bit fresher than some of the other serif fonts, and the size of the letters makes it a little more appealing when you are writing it for more informal purposes.
You will find that Palatino Linotype looks good wherever you put it. It can be both in a heading or in the main text body. As long as you like the look of the font, you’ll find a great place to put it to make sure it fits in.
The letters on Palatino Linotype feel a little more “open” than those of Times New Roman and Garamond. That’s what makes it a better choice if you’re looking for something that’s a little bit easier to read or comes across with more informal energy.
Georgia
Georgia is a very popular choice that a lot of essay writers are recommended to use. Many academics also vouch for Georgia, making it a really good choice if you’re looking to capture a more formal and trustworthy look.
People say that Georgia works really well as a heading. While this is definitely true, there is nothing wrong with using it as part of the main body of your text either. It can work in just about any situation, which makes it a great serif font choice.
While it’s not as popular as Times New Roman, it’s definitely up there in terms of how many people use it. It’s a fairly generic serif font, so there aren’t any specific style choices that stand it out from some of the rest.
Cambria
Cambria is another great serif font that is a default choice in Microsoft Word. While it isn’t automatically set as a font choice, it is automatic if you use the specific Word style that allows you to write headings and sub-headings.
Cambria is one of the best choices to introduce new ideas with headings and sub-headings. Of course, you don’t have to be limited to including it as a heading. If you want it as the text body, too, that’s fine.
You’ll find that this ranks highly in popularity compared to many of the other fonts. It looks really good on the page because of the more “square” feel that the letters have.
Bodoni MT
Bodoni MT is a classical serif font that works well. People like to use this font for novels, which shows that it must be an easy-to-read choice. The purpose of novels is to have thousands of words page after page, so having an easy-to-read font is always going to be ideal.
Bodoni MT is one of the thicker fonts on this list. It almost looks like it is written in bold, which really helps it to stand out from some of the other options. It works really well when it’s used to write multiple words at the same time.
The serif style looks very similar to some of the best fonts on this list, too. While this doesn’t allow Bodoni MT to be unique, it does allow it to have a familiar look and feel to it.
Bookman Old Style
Bookman Old Style is another great font that is common for novels. Again, if it works well in novels, you can bet that it works well in any situation when you might need someone to read through what you’re writing carefully.
Bookman Old Style is a large font. It allows the letters to appear more free and open compared to many of the other choices. This makes it a great font that’s worth trying out.
Lucida Bright
Lucida Bright is a good font choice. It’s part of the famous Lucida font family, and it works really well to show a large serif style. Lucida Bright is one of the larger fonts on this list, making it a great choice if you’re trying to make your writing really easy to read.
Some people would argue that Lucida Bright is too large for most formal documents. It does mean that you’ll take up a few extra pages because of your larger font choice, but this isn’t always a problem. Sometimes, it’s refreshing to include a larger font.
Modern No. 20
Modern No. 20 is an interesting serif font that doesn’t often get used. It’s a great choice nonetheless, and it applies to situations where some of the other serif fonts might feel a bit too pretentious or samey.
Modern No. 20 has very sharp serifs on its letters. While all of the fonts discussed so far have decent serif accents, Modern No. 20 seems to have some of the largest serifs that really help it to bring a unique style to your writing.
It’s much smaller than most of the other options too. It makes for a great choice if you’re trying to include a lot of information in one area without feeling like you have to fill up a lot of pages to get it to work.
Rockwell
Rockwell is a great option that many people like to use. It comes from the Rockwell family, which has made its name with more obvious and impactful fonts like ExtraBold and Condensed. Rockwell on its own is a great option for your serif-font needs.
It fits a similar style to most of the other serif fonts. There is nothing particularly unique that makes it stand out, which is usually a good thing. People don’t like their serif fonts to look out of place in their writing, and Rockwell will fit in no matter where you put it.
Poor Richard
Poor Richard is a great font in Microsoft Word that deserves more attention. It’s a very attractive font that comes with small lower-case letters. The capital letters tend to dwarf the lower-case ones, making it an interesting font style that the other serif fonts don’t have.
This font style is both a blessing and a curse, depending on how you look at it. It’s a blessing because it means that Poor Richard has a unique personality that allows it to stand out from the rest of the serif crowd.
It’s a curse because the uniqueness and size of the font in its style mean it doesn’t work very well formally. You’ll find that Poor Richard is a much better serif font for your informal writing.
Perpetua
Perpetua follows the same general idea as Poor Richard. It’s not all that popular, but it deserves to be. It’s a great font with an interesting style (most of which comes from the way some of the letters go below the written line, like the “p’s” and “q’s”).
Perpetua works really well in formal and informal contexts. It’s worth trying to use it yourself to see whether you can get along with it. A lot of people think it’s an attractive font, but it doesn’t often get used because it’s not a very well-known name.
You may also like:
12 Smallest Fonts In Microsoft Word
12 Best Cursive Fonts in Microsoft Word
12 Most Scary Fonts for Halooween in Microsoft Word

Martin holds a Master’s degree in Finance and International Business. He has six years of experience in professional communication with clients, executives, and colleagues. Furthermore, he has teaching experience from Aarhus University. Martin has been featured as an expert in communication and teaching on Forbes and Shopify. Read more about Martin here.
(Image credit: Future)
Although Office comes with a number of fonts, sometimes you may need to add new styles to make text stand out on your document or spreadsheet. However, none of the apps, including Word, Excel, PowerPoint, or Outlook, have the option to install new fonts.
If you have to install a new style or an entire font family, you must first download and install the font files (TrueType «.ttf» or OpenType «.otf») on Windows 11 (or 10) to make them available to all your apps using a Microsoft 365 subscription, the standalone version of Office 2021, Office 2019, or an older version.
In this how-to guide, we walk you through the steps to install (and uninstall) new font styles for Word, PowerPoint, Outlook, and other Office apps.
How to install new fonts in Office from Microsoft Store
Whether you use Windows 11 or 10, you can use the Microsoft Store to download and install many different fonts.
Windows 11
To install new fonts for Office from the Microsoft Store on Windows 11, use these steps:
- Open Settings.
- Click on Personalization.
- Click the Fonts page on the right side.
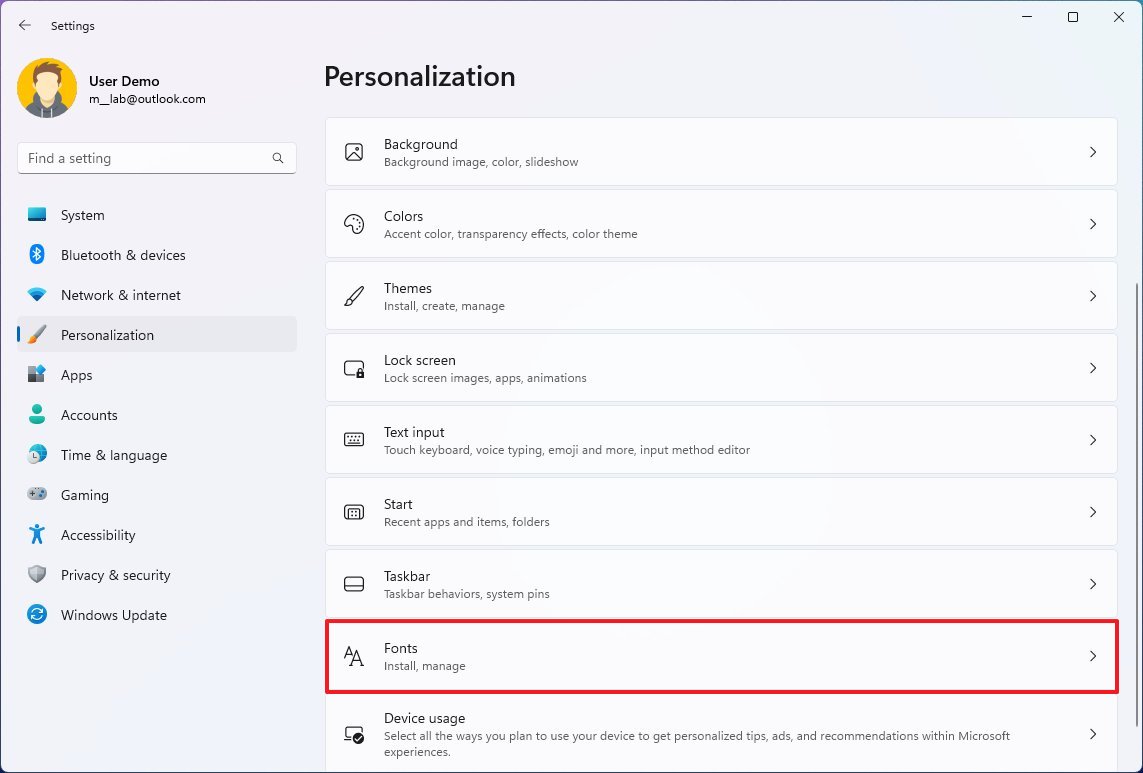
- Click the «Get more fonts in Microsoft Store» option.
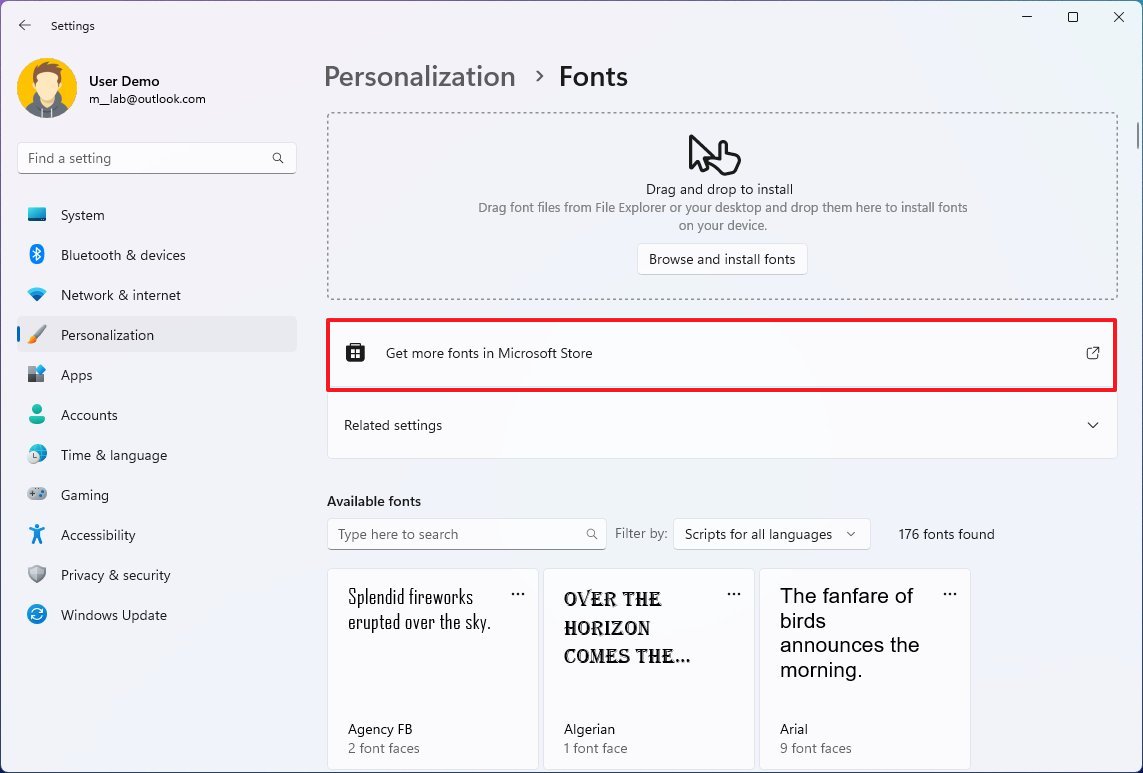
- Select the font family.
- Click the Get (or Install) button.
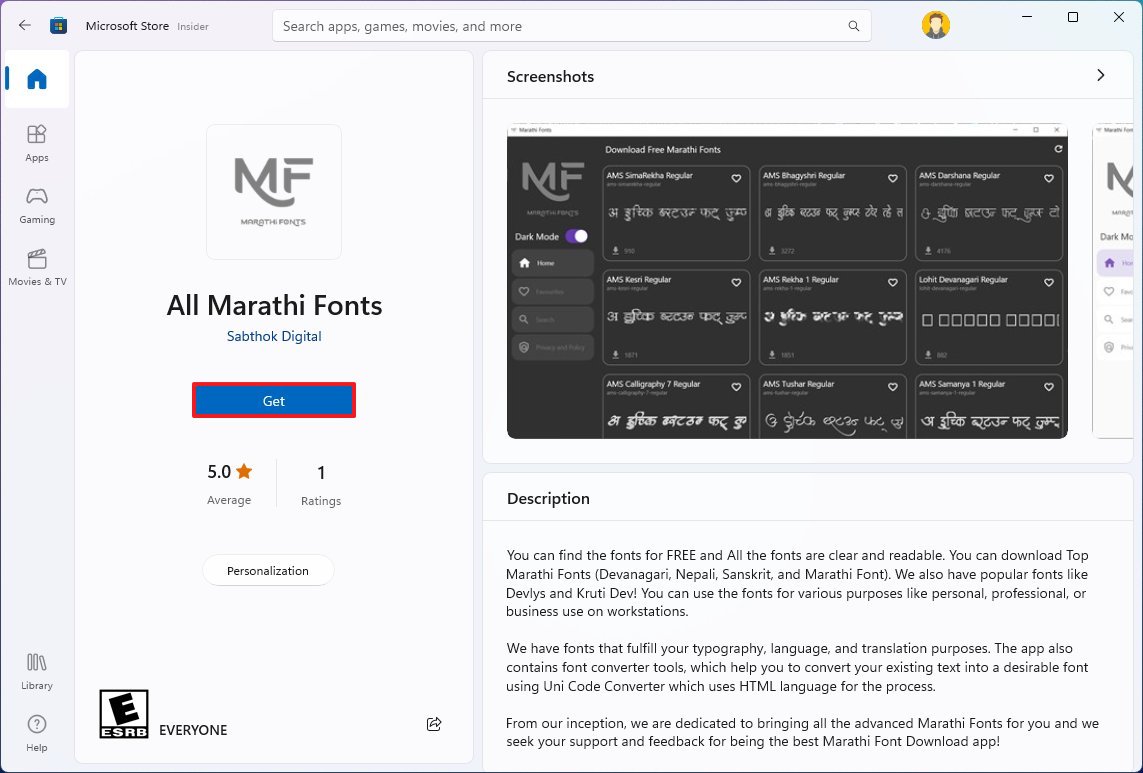
After you complete the steps, the fonts will be available on Windows 11 and through out the Office apps.
Windows 10
To make available new fonts in your Office apps on Windows 10, use these steps:
- Open Settings.
- Click on Personalization.
- Click on Fonts.
- Click the «Get more fonts in Microsoft Store» option.
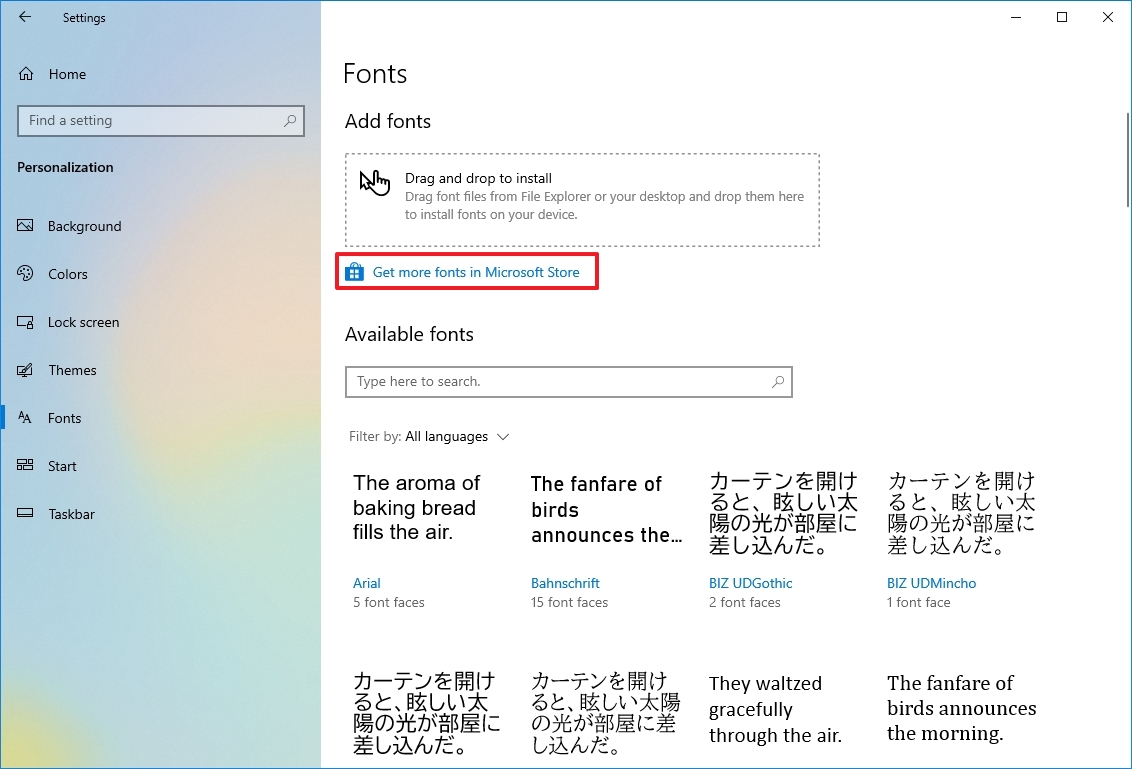
- Select the font family to use with your Office apps.
- Click the Get (or Install) button.
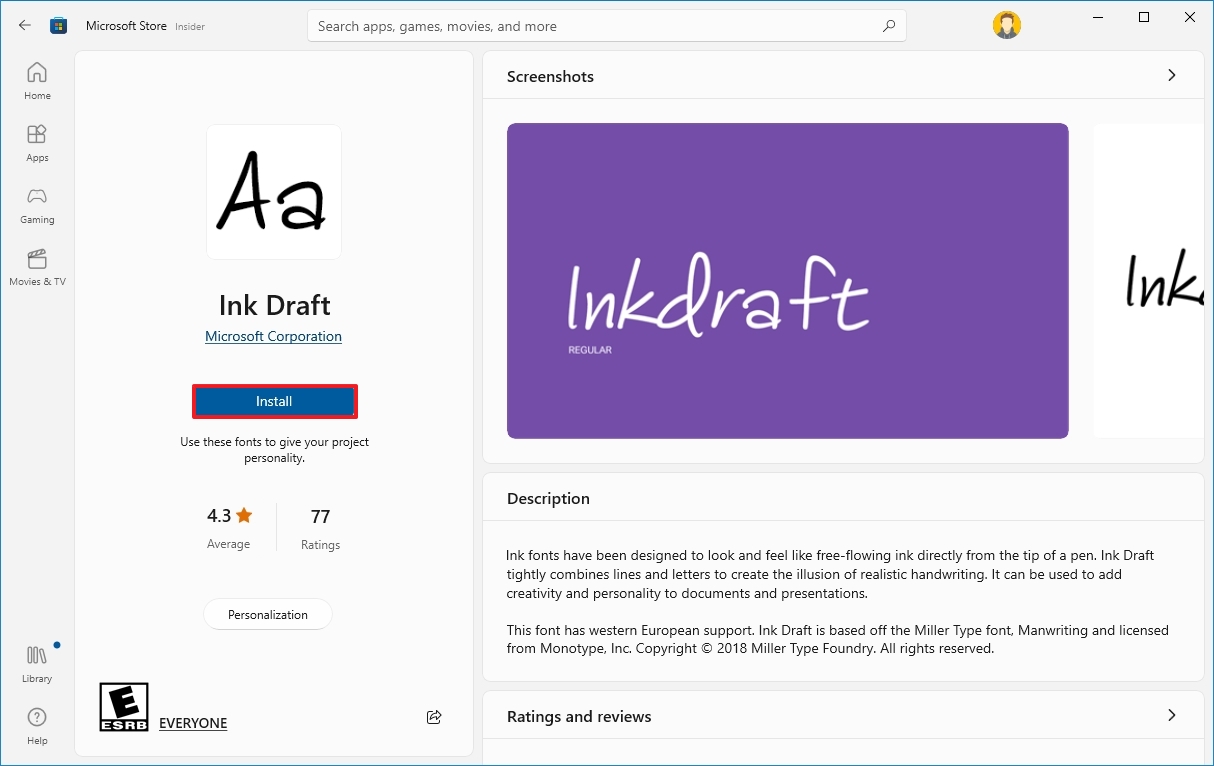
Once you complete these steps, the new font will be available in Word, Excel, PowerPoint, and any other app that includes support for system fonts.
How to install new fonts in Office from installer
If you have a custom font or get one of the font families that are freely available from companies like Google, you can install them in different ways.
Self-installer on Windows 11 or 10
To use new fonts in Microsoft Word or another Office app using a file, use these steps on Windows 11 or 10:
- Open File Explorer.
- Browse to the folder with the font files.
- Quick tip: If you downloaded the font on a zipped file, use these steps to unzip the files before trying to install them.
- Click the Install button.
After you complete the steps, the new font will be available for all Microsoft Office apps. You may need to repeat the steps to install additional styles for a particular family.
File Explorer context menu on Windows 11 or 10
To add a new font on Windows 11 (or 10) to use in Office, use these steps:
- Open File Explorer.
- Browse to the folder with the font files.
- Right-click the font file and select the Install option to add the new font.
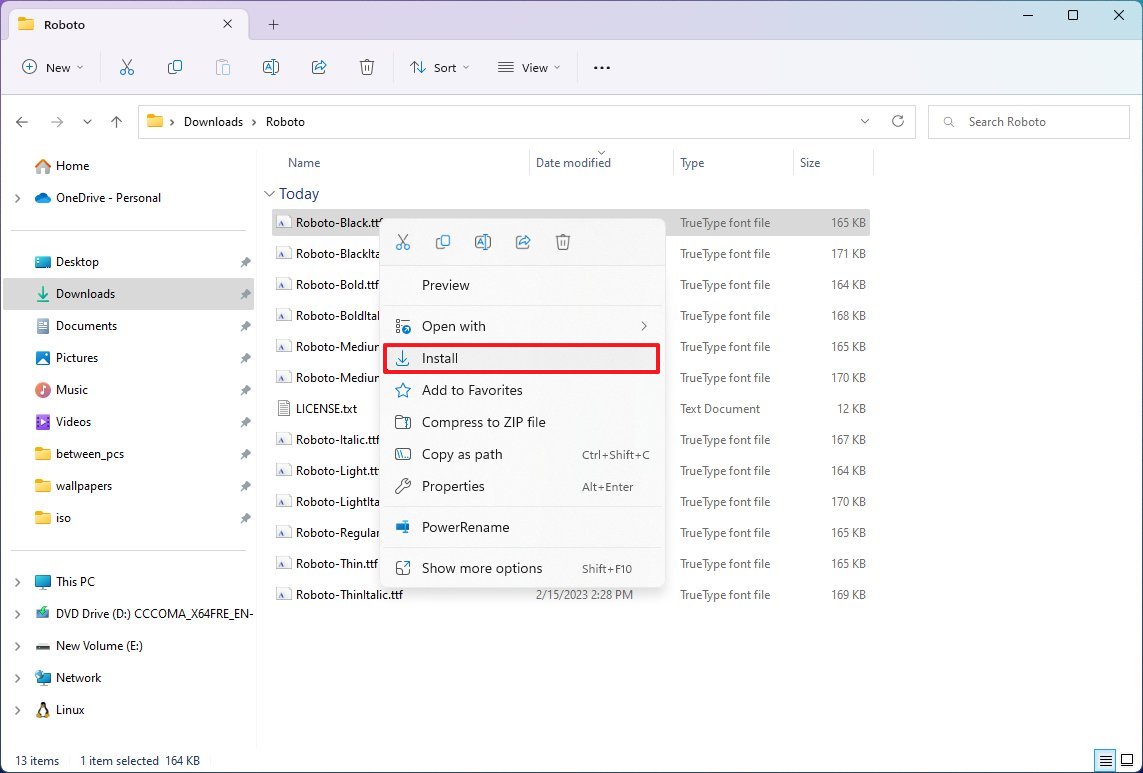
Once you complete these steps, the next time you start a new Office document, the new fonts will be available from the «Font» settings in the «Home» tab.
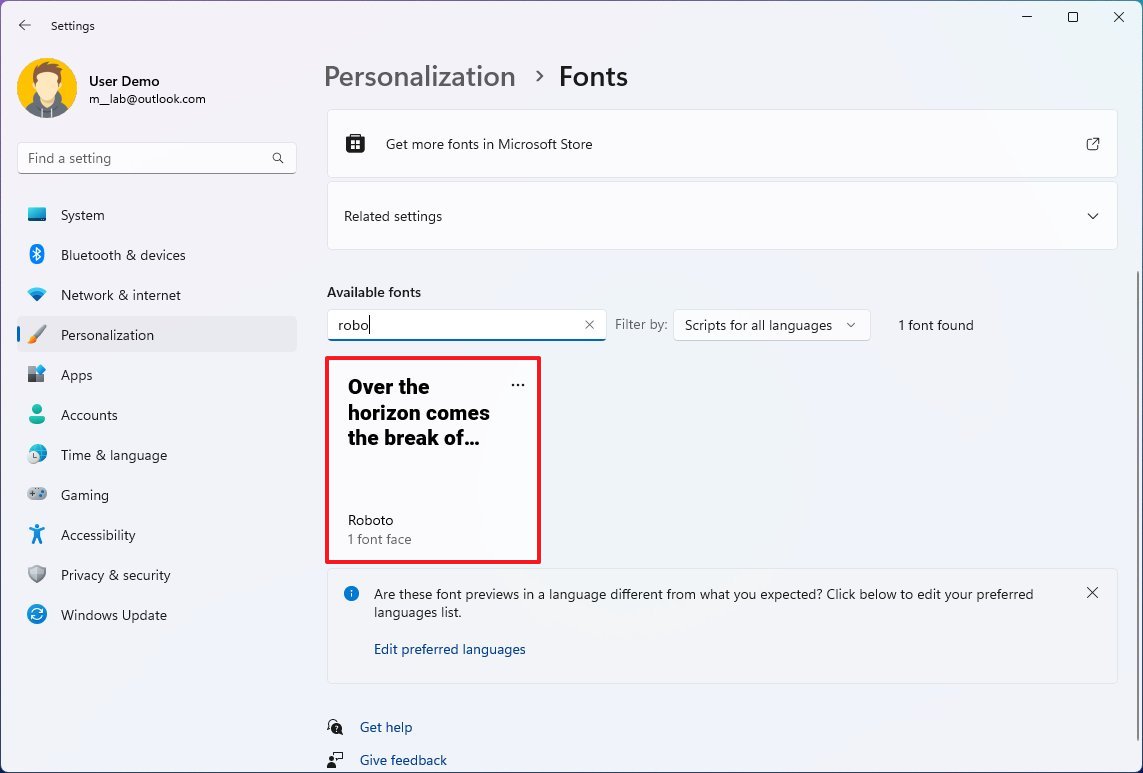
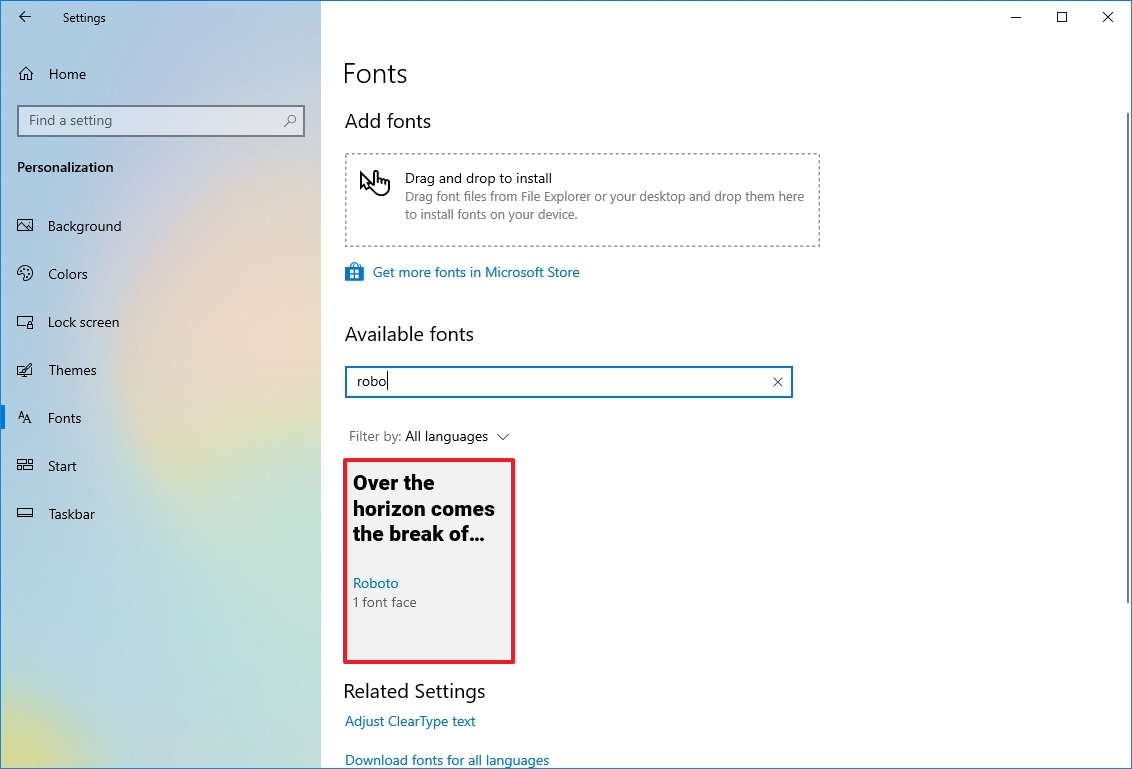
Settings app
On Windows 11 or 10, you can use the «Fonts» settings page to quickly install fonts that will then be accessible from the Office apps.
Windows 11
To install fonts manually from the Windows 11 Settings app, use these steps:
- Open Settings.
- Click on Personalization.
- Click the Fonts page on the right side.
- Select, drag, and drop all the files into the «Drag and drop to install» box to install fonts.
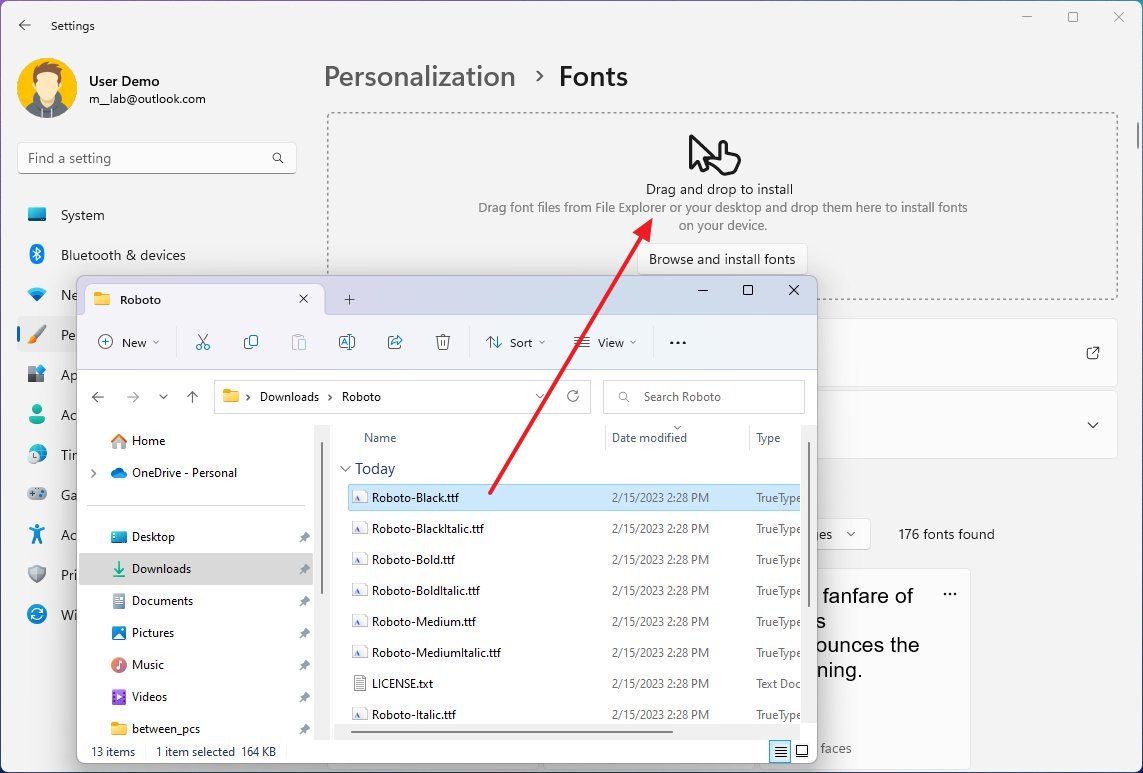
After you complete the steps, the family of fonts will be available for Word, Excel, and the other Office apps.
Windows 10
To install fonts manually from the Windows 10 Settings app, use these steps:
- Open Settings.
- Click on Personalization.
- Click on Fonts.
- Select, drag, and drop all the font files into the «Add fonts» box to install them.
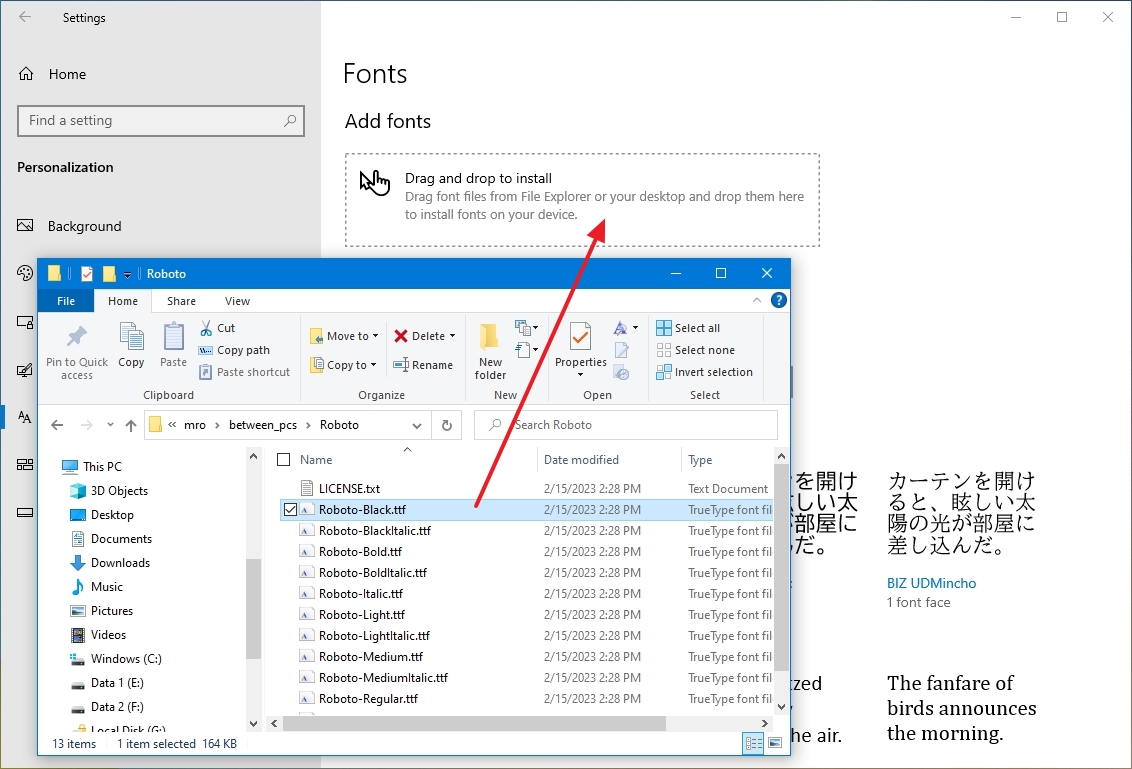
Once you complete the steps, the fonts will be available in all the Office apps.
How to uninstall fonts in Office from Settings
If you’re no longer using a particular font on your Office apps, the Settings app also includes an option to uninstall fonts from your device.
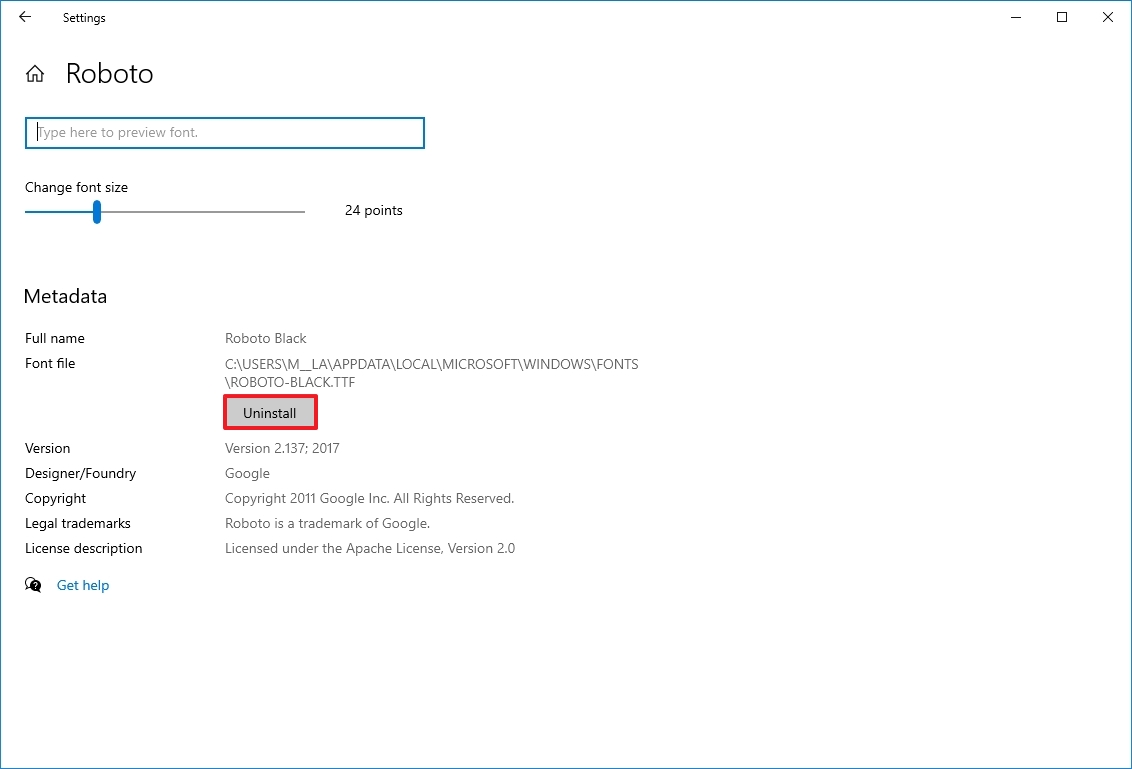
Windows 11
To uninstall fonts on Windows 11, use these steps:
- Open Settings.
- Click on Personalization.
- Click the Fonts page on the right side.
- Click the font you want to remove.
- Under «Metadata, click the Uninstall button.
- Click the Uninstall button again.
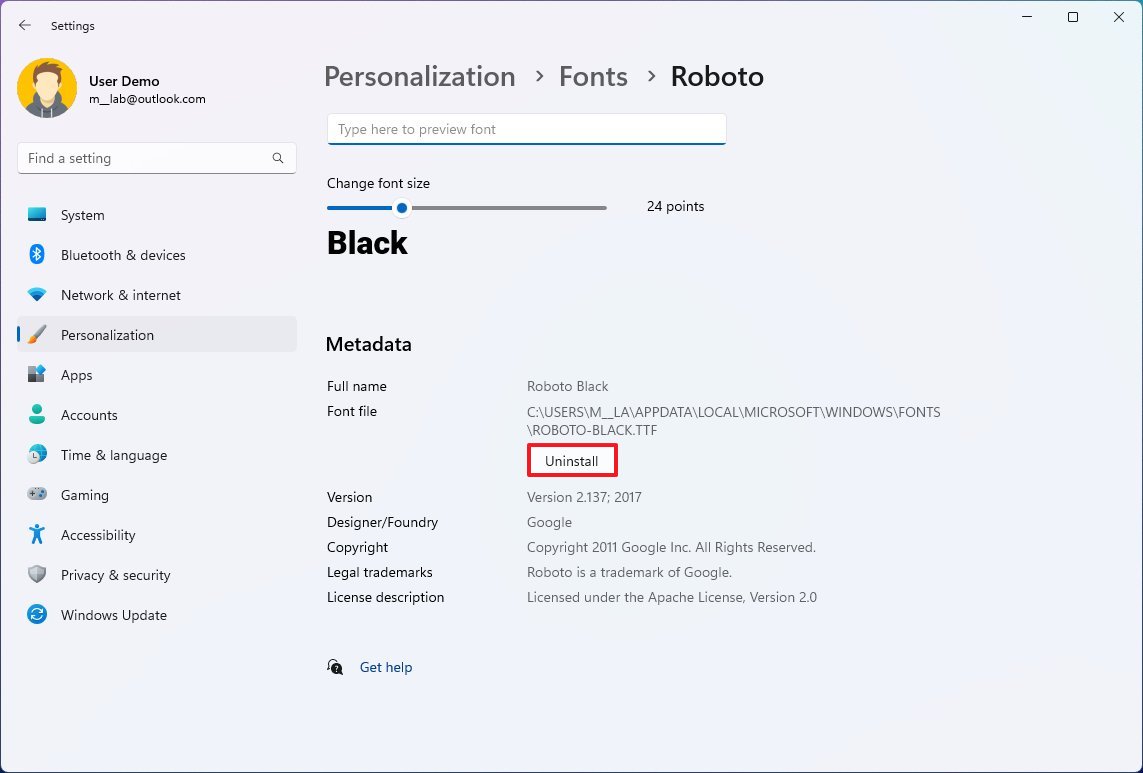
After you complete the steps, the font will be removed from Windows 11 and Office apps.
Windows 10
To remove a font from Windows 10 and Office, use these steps:
- Open Settings.
- Click on Personalization.
- Click on Fonts.
- Select the font you want to delete.
- Under «Metadata, click the Uninstall button.
- Click the Uninstall button again.
Once you complete the steps, the font you uninstalled will no longer be available on Windows 10 or Office.
More resources
For more helpful articles, coverage, and answers to common questions about Windows 10 and Windows 11, visit the following resources:
- Windows 11 on Windows Central — All you need to know
- Windows 10 on Windows Central — All you need to know

(opens in new tab)
Cutting-edge operating system
A refreshed design in Windows 11 enables you to do what you want effortlessly and safely, with biometric logins for encrypted authentication and advanced antivirus defenses.
All the latest news, reviews, and guides for Windows and Xbox diehards.
Mauro Huculak is technical writer for WindowsCentral.com. His primary focus is to write comprehensive how-tos to help users get the most out of Windows 10 and its many related technologies. He has an IT background with professional certifications from Microsoft, Cisco, and CompTIA, and he’s a recognized member of the Microsoft MVP community.
Редактор Microsoft Word предоставляет пользователям широкий набор инструментов для оформления документов. Стандартные возможности — выбор шрифта и установка его размера, начертание, цвет и многое другое. Именно о шрифтах пойдет речь в данном материале. Мы научимся работать с ними, скачаем и установим новые шрифты для word. Это позволит нам еще больше расширить возможности визуального оформления. Обязательно скачайте нашу коллекцию шрифтов — пролистайте страницу чуть ниже!
Рекомендую хорошую инструкцию от наших партнеров. Много пользователей Вконтакте, пытаются найти страницы друзей и знакомых, используя их номер телефона. Сейчас появилась возможность это сделать. Подробности по ссылке.
Оглавление:
- Шрифты для скачивания
- Установка шрифтов для word
- Использование шрифтов
- Заключение
- Наши рекомендации
- Стоит почитать
Красивые русские шрифты для скачивания
Для вас мы приготовили набор из 250-и русских (кириллических) шрифтов, которые можно использовать в программе Word. Вы обязательно найдете подходящий. Скачать его можно по ссылке ниже (см. как скачивать файлы из интернет).
250 шрифтов:
[wpfilebase tag=file id=8 /]
В сети достаточно ресурсов, которые предлагают вашему вниманию всевозможные шрифты, на любой вкус. Вы самостоятельно можете поискать их. Мы в свою очередь хотим порекомендовать вам следующие сайты, на которых мы подбирали шрифты для скачивания.
fonts.by
— удобный предпросмотр, большой выбор. Все шрифты разделены на категории, благодаря чему, найти нужный не составит большого труда.
fontov.net
— огромный выбор, в том числе редкие варианты.
Обратите внимание — если вы скачайте русские шрифты (кириллические), то работать они будут только с русской раскладкой (см. как изменить раскладку клавиатуры). Точно также с латинскими. Некоторые шрифты универсальны — нужно смотреть каждый отдельно.
Тут сразу нужно отметить одну особенность, которая сильно облегчает работу. Если вы используйте операционную систему windows, то все новые шрифты устанавливаются непосредственно на нее, а не отдельно для каждой программы. Таким образом, установив один раз, они станут доступны для использования во всех программах, где это возможно.
Обратите внимание. Вы просили рассказать, как перевести pdf в word, статья уже опубликована.
Для начала, нужный шрифт следует скачать с нашего сайта, или найти в интернете. Если вам попадется архив, его следует разархивировать в любое место на жестком диске. Вам должны быть доступны шрифты с расширением .ttf, .otf и др.
В нашем примере, мы будем использовать красивые шрифты для word, которые вы могли скачать по ссылке в начале статьи.

Все шрифты хранятся в папке C:/windows/fonts — буква диска соответствуют той, в которую установлена операционная система.
Самый простой способ установить шрифт, это просто скопировать его в эту папку. Попробуйте, он сразу станет доступен в Microsoft Word.
Следующий способ универсален для всех версий Windows. Нажимаем «Пуск«, затем «Панель управления» и «Шрифты«.

Нажмите в строке меню кнопку «Файл«, затем «Установить шрифт«. Выберите нужный и завершите операция нажатием «Ок«.
Если меню не отображается, нажмите кнопку «Alt«
Обратите внимание. Формулы в word можно набирать любым шрифтом. Они позволят вам добавить любое математическое выражение. Это удобно, когда вы создаете реферат или дипломную работу.
Красивые шрифты: используем их для оформления текста документа
Мы рассмотрим процесс на примере Word 2010. Для всех прочих версий (2007, 2003 и тд.) процесс аналогичен.
Запускайте редактор. Теперь в ленте «Главная«, в блоке «Шрифт«, выберите нужный из выпадающего меню.

Теперь выбранный шрифт активен, и он будет применен к набранному с клавиатуры тексту.
Статья в тему: переключение раскладки клавиатуры. Из нее вы узнаете, как быстро переключать язык ввода. Это пригодится вам, если в тексте вашего документа много фраз на английском и русском языке.
Тот же самый результат будет достигнут, если выделить уже имеющийся текст, и выбрать желаемый шрифт из списка.
Пошаговая видео инструкция.
Заключение
В сети много всевозможных шрифтов на любой вкус. С ними вы сделайте свой документ уникальным. В независимости от того, с какого источника вы скачаете шрифт, наша инструкцию поможет вам установить его.
Хотим посоветовать Вам интересную статью, посвященную закрытию профиля в Твиттер. Вы можете спрятать свои данные — инструкцию доступна вот здесь.
Наши рекомендации
Инструкция для пользователей — сноски в Word. В нижней части документа, вы можете дать любое пояснение. Оформите его в виде сноски.
Создание оглавления в Word позволяет реализовать навигацию по документу. Это сделает его более удобным для просмотра и чтения.
С нами вы узнаете, как сделать лист с альбомной ориентацией.
Стоит почитать
Зачем искать информацию на других сайтах, если все собрано у нас?
- Пошаговая настройка outlook для gmail.com
- Как работают горячие клавиши в ворде 2010
- Эмулятор андроид для пк
- Восстановление системы Windows
- Как в 8 windows поменять язык