
Применение оператора With для упрощения кода VBA Excel и ускорения его работы. Синтаксис оператора With, параметры, поясняющие примеры.
Оператор With предназначен для выполнения последовательности операторов (строк кода) для отдельного объекта или пользовательского типа данных.
Применение оператора With упрощает написание и восприятие кода VBA Excel, а также ускоряет его работу.
Синтаксис
Синтаксис оператора With в VBA Excel:
|
With object [statements] End With |
Параметры
Параметры оператора With:
| Параметр | Описание |
|---|---|
| object | Имя объекта или пользовательского типа данных. |
| statements | Один или несколько операторов (строк кода), которые выполняются в отношении указанного объекта. |
Примеры
В следующей процедуре выполняется несколько идущих подряд операторов (строк кода) в отношении одного и того же объекта Range("A1:E5"):
|
Sub Primer1() Range(«A1:E5»).Value = «Тест» Range(«A1:E5»).Interior.Color = vbMagenta Range(«A1:E5»).Font.Size = 14 Range(«A1:E5»).Font.Color = vbYellow Range(«A1:E5»).Font.Italic = True Range(«A1:E5»).Borders.LineStyle = True End Sub |
Если в процедуре выполняется несколько идущих подряд операторов в отношении одного и того же объекта, то оператор With позволяет указать объект только один раз:
|
Sub Primer2() With Range(«A1:E5») .Value = «Тест» .Interior.Color = vbMagenta .Font.Size = 14 .Font.Color = vbYellow .Font.Italic = True .Borders.LineStyle = True End With End Sub |
Такое написание кода делает его более понятным, а выполнение – более быстрым.
Конструкции с оператором With можно вкладывать одну в другую:
|
Sub Primer3() With Range(«A1:E5») .Value = «Тест» .Interior.Color = vbMagenta With .Font .Size = 14 .Color = vbYellow .Italic = True End With .Borders.LineStyle = True End With End Sub |
Такой код удобен, когда необходимо выполнить ряд операторов по отношению к некоторому объекту [Range("A1:E5")], а также по отношению к одному из содержащихся в нем объектов [Range("A1:E5").Font].
Примечания
Примечания от разработчика:
- После входа в блок With параметр object изменить нельзя. Следовательно, один оператор With не может быть использован для изменения нескольких объектов.
- Во вложенном блоке With необходимо указывать полные ссылки на любые элементы объекта из внешнего блока With.
- Не рекомендуется использовать переходы в блоки With или из них.
Home / VBA / VBA With Statement (With – End With)
Key Points
- Use the VBA With Statement to minimize the code.
- You can use a single object at a time while using the With Statement.
What is VBA With Statement
VBA With is a statement to specify an object for once and then run multiple statements for it. In simple words, by using the “WITH” statement to specify an object, and after that, you can access all the properties and methods in one go. It starts with the “With” and ends with “End With”.
Syntax of VBA With Statement
Following is the syntax that you need to use for using With statement in VBA:
With [OBJECT]
      [Statement]
End With
- With: It’s the starting keyword for the statement that tells VBA that you are specifying the object mentioned.
- Object: Here, you need to specify the object that you want to use.
- Statement: A statement(s) that you want to run with the specified object.
- End With: It’s the ending keyword for the statement.
Example to understand the VBA With Statement
Let’s take an example to understand with the statement in depth. Let’s say you want to change, the font color, size, and font name of cell A1. For doing all these three things you need to access three different properties of VBA font and the code would be:
Range("A1").Font.Color = RGB(0, 0, 255)
Range("A1").Font.Size = 16
Range("A1").Font.Name = "Consolas"
But here we going to use the With Statement instead of the above code. To use the VBA With Statement, you can use the following steps:
- First, type the keyboard “With”.
- After that, use the VBA Range to specify the cell A1 with using the font object to specify the font object.

- Next, you need to enter the code for all three properties and the values that you want to apply.

- In the end, use the keyword “End With” to end the statement.


Here’s the code that you have just written.
Sub MyMacro()

With Range("A1").Font
        .Color = RGB(0, 0, 255)
        .Size = 16
        .Name = "Consolas"
End With

End Sub
Now let’s have a look at both codes and try to understand what is the difference that we have got by using the “With” statement.

In the first code, you have used the font object three times and then further used the property that you want to access and want to make changes to it.
But in the second code, you have used the With statement and specified the font object at once. And then three lines of code within the “With” statement to access all three properties.
When you use the “With” statement and specify an object, it tells VBA that all the statements that you have written need to run with the object mentioned. It not only gives you a structured code but also makes a macro run faster and gives it greater efficiency.
Nested With Statement
I told you in the starting that you can only specify a single object to use the With statement. But there is a way to use more than one or even multiple objects with it. That’s by using VBA LOOPS, and we are going to use FOR EACH LOOP to loop through multiple objects and use the “With”.
Let me tell you an example; you need to loop through all the worksheets and do apply all the following things to all the cells in each worksheet.
- Font Size: 16
- Font: Verdena
And in the workbook, you have five worksheets, as I have in the following example:

Use the following steps to write a nested “With” statement.
- First, you need to declare a variable to use a worksheet object.

- After that, as I said, you need to use For Each Loop. So, you need to write a code with the loop that can loop through all the worksheets.

- Now, enter the with statement which can apply font setting that we have discussed above. For referrring to all the cells in the worksheet you can use the “Cells” while specifing the object.


Here’s the full code that you have just written.
Sub MyMacro()

Dim ws As Worksheet

For Each ws In ActiveWorkbook.Worksheets
    With Cells
        .Font.Size = 16
        .Font.Name = "Verdena"
    End With
Next ws

End Sub
With Statement in Excel VBA
In this article, we will see an outline on Excel VBA With. With is a statement in programming languages. It is one of the most commonly used statement which is used with an END statement. The object which is referred to is mentioned after the with keyword and the whole process is ended with End With statement. A VBA With Statement cannot be without an end with a statement so it is mandatory to close the series of statements. The key feature of the with the statement is that we can access the properties of the object without referring to the object multiple times. The method to access the properties of the object lies in the dot keyword. When we put a dot keyword we can see a multiple number of options to access the properties of the object. Let us learn how to use With statement in some of the examples below.
How to Use With Statement in Excel VBA?
We will learn how to use the With Statement in Excel by using the VBA Code.
You can download this VBA With Excel Template here – VBA With Excel Template
VBA With – Example #1
Let us first begin with a basic example in which we will use the With statement for accessing the range value of an object and then assign a custom value to it. For this, follow the steps below:
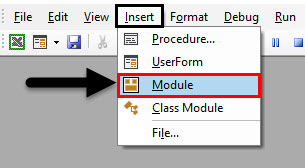
Step 1: Insert a new module inside Visual Basic Editor (VBE). Click on Insert tab > select Module.
Step 2: Define a new subprocedure within the inserted module that can hold your macro.
Code:
Sub Example1()

End Sub

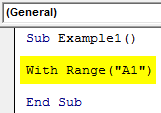
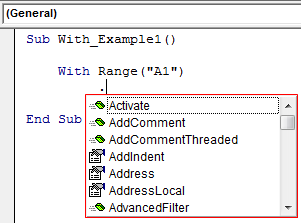
Step 3: Since we are beginning with the most basic with statement.
Code:
Sub Example1()

With Range("A1")

End Sub
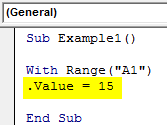
Step 4: When we type a dot (.) we can see a range of different functions associated with the object.
Code:
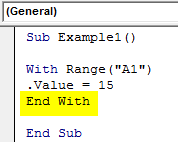
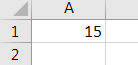
Sub Example1()

With Range("A1")
.Value = 15

End Sub
Step 5: Always remember to close the with statement with an End statement.
Code:
Sub Example1()

With Range("A1")
.Value = 15
End With

End Sub
Step 6: Now, run this code by hitting the Run button or F5.
VBA With – Example #2
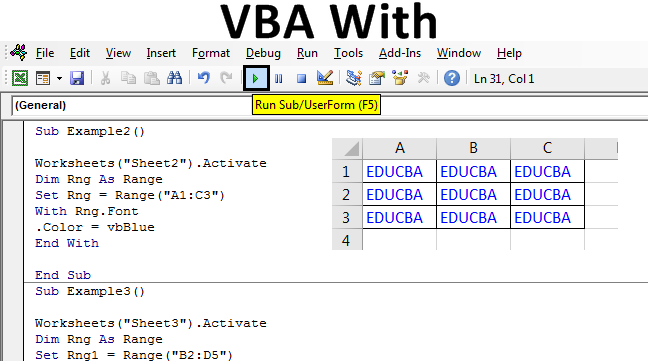
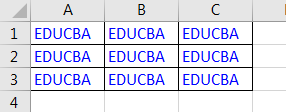
In this example, we will see how to change one of the fonts or the color of the property of the object. I have some data in Sheet 2 in the cells A1 to C3 in normal black color and I want to change the text font to blue using With Statement. First, let us see the current data in sheet 2 as follows. For this, follow the steps below:
Step 1: Now in the same module declare another subprocedure as follows.
Code:
Sub Example2()

End Sub
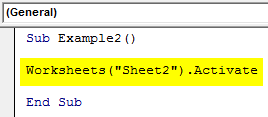
Step 2: Also we have now more than one sheet in this workbook so let us activate sheet 2 with the following code.
Code:
Sub Example2()

Worksheets("Sheet2").Activate

End Sub
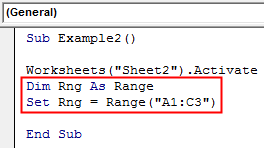
Step 3: Now declare a variable as Range data type which will store the range for our data as shown below and set the range to the range which has our data in sheet 2.
Code:
Sub Example2()

Worksheets("Sheet2").Activate
Dim Rng As Range
Set Rng = Range("A1:C3")

End Sub
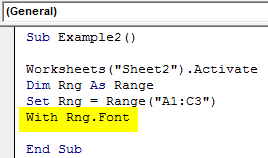
Step 4: Access the Font property of the Rng variable using the with statement with the following code shown below.
Code:
Sub Example2()

Worksheets("Sheet2").Activate
Dim Rng As Range
Set Rng = Range("A1:C3")
With Rng.Font

End Sub
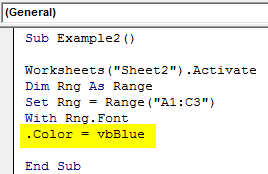
Step 5: Now we can use the dot (.) operator to change the color of the range using the following code and change the color of the text in the cell range.
Code:
Sub Example2()

Worksheets("Sheet2").Activate
Dim Rng As Range
Set Rng = Range("A1:C3")
With Rng.Font
.Color = vbBlue

End Sub
Step 6: Now let us end the with statement with the END WITH statement as follows.
Code:
Sub Example2()

Worksheets("Sheet2").Activate
Dim Rng As Range
Set Rng = Range("A1:C3")
With Rng.Font
.Color = vbBlue
End With

End Sub
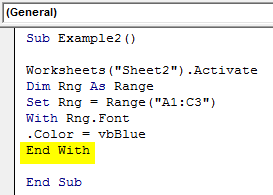
Step 7: When we execute the code we get the following result in sheet 2.
VBA With – Example #3
In this very basic example, we will see another font feature to manipulate using the With statement. For this example, we have similar text in cells B2 to D5 and they are in normal fonts. We want to change the font to Bold and Italic using the With statement. First, let us look at the data in sheet 3 as follows. For this, follow the steps below:
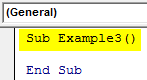
Step 1: Now in the same module declare another subprocedure as follows.
Code:
Sub Example3()

End Sub
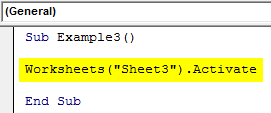
Step 2: Also we have now more than one sheet in this workbook so let us activate sheet 3 with the following code.
Code:
Sub Example3()

Worksheets("Sheet3").Activate

End Sub
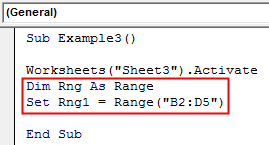
Step 3: Now declare a variable as Range data type which will store the range for our data as shown below and set the range to the range which has our data in sheet 3.
Code:
Sub Example3()

Worksheets("Sheet3").Activate
Dim Rng As Range
Set Rng1 = Range("B2:D5")

End Sub
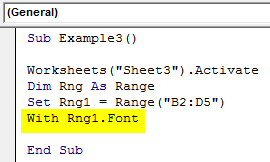
Step 4: Access the Font property of the Rng variable using the with statement.
Code:
Sub Example3()

Worksheets("Sheet3").Activate
Dim Rng As Range
Set Rng1 = Range("B2:D5")
With Rng1.Font

End Sub
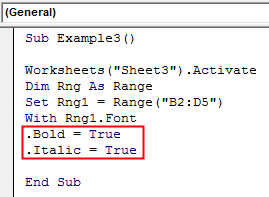
Step 5: Now again we use the dot (.) operator in the code to change the font to Bold and Italic.
Code:
Sub Example3()

Worksheets("Sheet3").Activate
Dim Rng As Range
Set Rng1 = Range("B2:D5")
With Rng1.Font
.Bold = True
.Italic = True

End Sub
Step 6: Let us end the Statements using the End statement as shown below.
Code:
Sub Example3()

Worksheets("Sheet3").Activate
Dim Rng As Range
Set Rng1 = Range("B2:D5")
With Rng1.Font
.Bold = True
.Italic = True
End With

End Sub
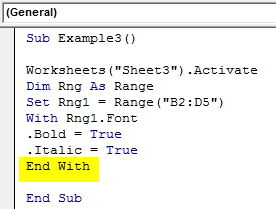
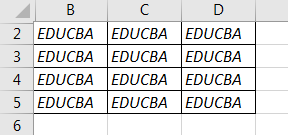
Step 7: When we execute the above code we can see the result in sheet 3 as follows.
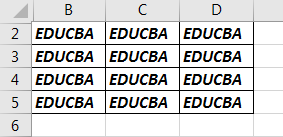
As with the above examples, we can see how important with statement is in our day to day coding. Also, it removes the repetitive steps involved when we are trying to access the properties of an object. We can also use Loop statements in the With statements to define the criteria which we want to access for the object.
How to Use VBA With (Real Example)?
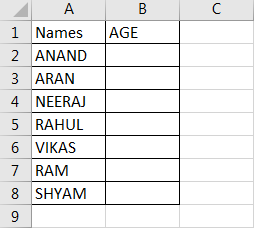
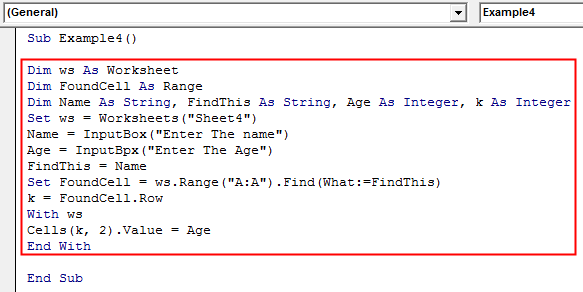
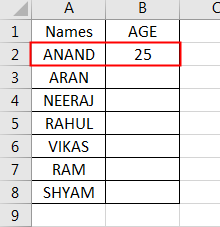
We have seen the basic uses of With statement in the above examples. Now let us use With statement for a real-life problem. We will make a code that will ask for a Name from user and Age, the code will then check the name in the list and paste the value of age beside the corresponding name. The data is in sheet 4 as follows.
So the code we will be using for this as shown below and we will execute it and then understand it step by step.
Code:
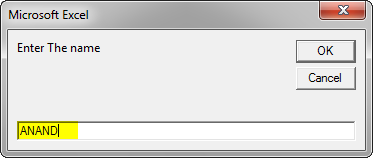
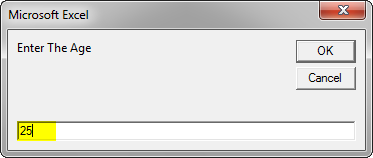
Sub Example4()

Dim ws As Worksheet
Dim FoundCell As Range
Dim Name As String, FindThis As String, Age As Integer, k As Integer
Set ws = Worksheets("Sheet4")
Name = InputBox("Enter The name")
Age = InputBox("Enter The Age")
FindThis = Name
Set FoundCell = ws.Range("A:A").Find(What:=FindThis)
k = FoundCell.Row
With ws
Cells(k, 2).Value = Age
End With

End Sub
When we execute the code we get the following two pop-ups:
When we press OK for Age we can see the result displayed in Sheet 4 as follows.
Now let us understand the code step by step:
- When we ask the user to input the name the code finds it in column A.
- When the value provided by the user is found the row for the value is stored in a variable.
- Now in the With statement, we use the Cells Properties to change the values adjacent to the cells found with the values with the age provided by the user.
Things to Remember
There are few things which we need to remember about With statement in VBA:
- With Statement starts with referencing the Object property.
- With Statements are always ended with End With Statement.
- The properties of the object are accessed by the dot (.) keyword.
With Statements can also be used with the Loop statements.
Recommended Articles
This is a guide to VBA With. Here we discuss How to Use the With Statement in Excel VBA along with practical examples and downloadable excel template. You can also go through our other suggested articles –
- VBA Collection
- VBA Square Root
- VBA SendKeys
- VBA Name Worksheet
With Statement in Excel VBA
A With statement is used in VBA to access all the properties and methods of a mentioned object. Therefore, we need to supply which VBA objectThe “Object Required” error, also known as Error 424, is a VBA run-time error that occurs when you provide an invalid object, i.e., one that is not available in VBA’s object hierarchy.read more we are referring to first, close the With statement with End With, then inside this statement. Then, we can perform all the property changes and methods of the mentioned object.
Table of contents
- With Statement in Excel VBA
- How to Use With Statement in Excel VBA?
- Example #1
- Example #2
- Example #3
- Things to Remember
- Recommended Articles
- How to Use With Statement in Excel VBA?
Below is the syntax of With Statement in VBA.
With [OBJECT]

     [Code… What needs to be done?]

End With
The object is nothing but a range of cells or cells we are referring to, and then we can change the properties and perform all the methods associated with that specific cell or cell.
How to Use With Statement in Excel VBA?
Below are some examples of using With statements in Excel VBA.
You can download this VBA With Excel Template here – VBA With Excel Template
Example #1
Assume you have a certain value in the A1 cell. We have entered the text as “Excel VBA” in cell A1.

Now, we need to do some tasks for this cell, i.e., formatting in excelFormatting is a useful feature in Excel that allows you to change the appearance of the data in a worksheet. Formatting can be done in a variety of ways. For example, we can use the styles and format tab on the home tab to change the font of a cell or a table.read more.
We want to change the font size, name, and interior color, insert a border, etc. Typically, we refer to the cell using VBA RANGE objectRange is a property in VBA that helps specify a particular cell, a range of cells, a row, a column, or a three-dimensional range. In the context of the Excel worksheet, the VBA range object includes a single cell or multiple cells spread across various rows and columns.read more.
Code:
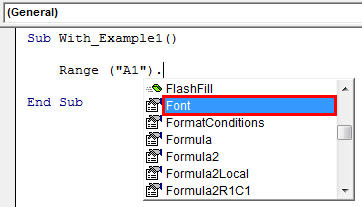
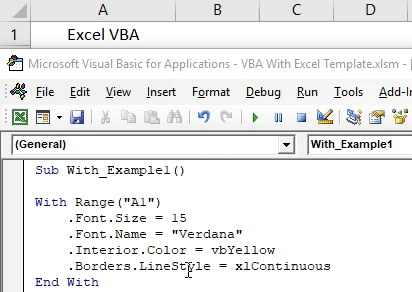
Sub With_Example1()

    Range ("A1")

End Sub

Now, we access this cell’s “font” property to change the font size.
Under the FONT property, we access the Size property and enter size by putting an equal sign.
Code:
Sub With_Example1()

    Range("A1").Font.Size = 15

End Sub

Now similarly, we do other formatting tasks, as shown below.
Code:
Sub With_Example1()

    Range("A1").Font.Size = 15
    Range("A1").Font.Name = "Verdana"
    Range("A1").Interior.Color = vbYellow
    Range("A1").Borders.LineStyle = xlContinuous

End Sub

It will do all the mentioned tasks, but if you look at the code to perform every formatting activity. We have supplied the cell address every time. It makes the code look lengthy and time-consuming.
Now, we will use VBA With a statement to reduce the entry of cell addresses every time. Open WITH statement in Excel VBA and supply cell address.
Code:
Sub With_Example1()

    With Range("A1")

End Sub

Inside the With statement, put a dot to see all the properties and methods of cell A1.
The first formatting activity is changing font size, so access FONT. Under this, access the SIZE property.
Code:
Sub With_Example1()

    With Range("A1")
         .Font.Size = 15

End Sub

Similarly, supply other formatting codes and close VBA With statement.
Code:
Sub With_Example1()

    With Range("A1")
         .Font.Size = 15
         .Font.Name = "Verdana"
         .Interior.Color = vbYellow
         .Borders.LineStyle = xlContinuous
    End With

End Sub
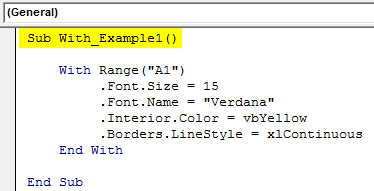
Run the code to see all the formatting in the mentioned object, i.e., cell A1.
So, all the formatting applies to the cell. Look how cool this technique is.
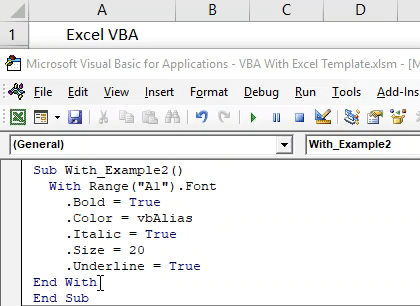
Example #2
If you want to change all the properties related to the font, you can mention the cell and FONT property.
Code:
Sub With_Example2()

    With Range("A1").Font

    End With

End Sub

Inside the VBA With Statement, we can see the IntelliSense list. It will show properties and methods related to FONT property only.

We can perform any set of activities with this now.
Code:
Sub With_Example2()

    With Range("A1").Font
         .Bold = True 'Font will be Bold
         .Color = vbAlias 'Font color will be Alias
         .Italic = True 'Font will be italic style
         .Size = 20 ' Font size will be 20
         .Underline = True 'Font will be underlined
    End With

End Sub
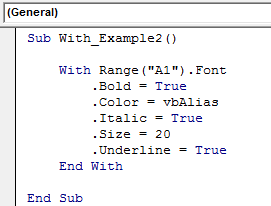
It will show the result of this below.
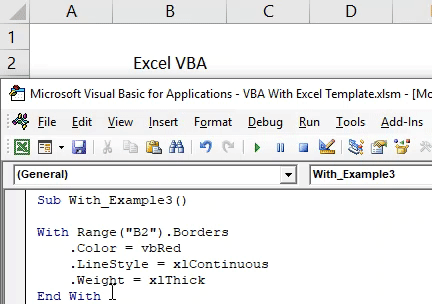
Example #3
The below code will access only cell border-related properties.
Code:
Sub With_Example3()

    With Range("B2").Borders
         .Color = vbRed 'Border color will be red
         .LineStyle = xlContinuous 'Full border
         .Weight = xlThick 'Thick border
    End With

End Sub

The result of this code is as follows.
Things to Remember
- A With statement is used to minimize the code.
- We need to supply the object first for the With statement.
- Once we supply the specific object, we can access only that object’s properties and methods.
Recommended Articles
This article has been a guide to VBA With. Here, we discuss how to use With…End With Statement in Excel VBA along with examples and downloadable Excel sheet. You can learn more about VBA from the following articles: –
- VBA Delete Sheet
- VBA If Else
- VBA Type Statement
- Named Range in VBA
Return to VBA Code Examples
This article will demonstrate how to use With and End With in VBA
Excel provides us with the opportunity to learn VBA by recording macros. These macros record literally everything that we do on the screen and convert the actions into VBA code. We can then analyze this code and learn from it.
When we record a macro in VBA, most significantly when we are changing the format of cells, the macro will more often than not use the With… End With Syntax in it’s recording. Understanding what these mean and are used for is an important part of VBA.
Recording a Macro
To record a macro in Excel, in the Ribbon, select View > Macro > Record Macro.
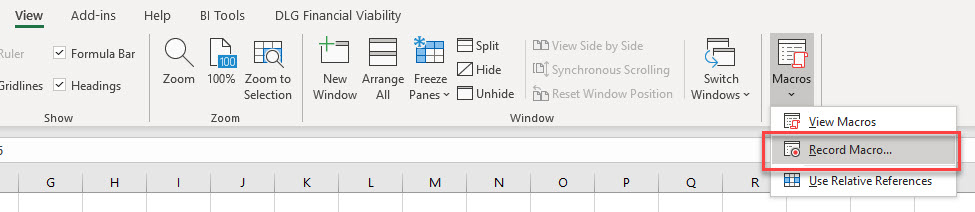
OR
Developer > Record Macro

Note: If you don’t see the Developer Ribbon, you’ll need to enable it. Click HERE to learn how to do this.
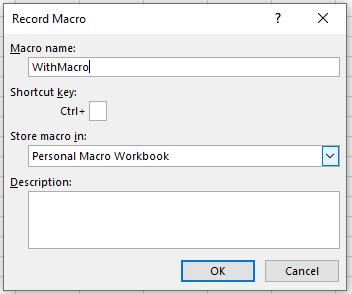
Type in the name for the macro, and click OK.
Highlight some cells, and then format them for Bold, change the color to red and amend the font size. Then click Stop in the bottom left hand corner of the screen to stop recording macro.
WITH Statement Syntax
To view / edit your recorded Macro: In the Ribbon, select View > Macros > View Macros. Select the macro just recorded, and then click Edit.
OR
In the Ribbon, select Developer > Visual Basic to switch to the VBE Window.
The recorded macro may look something like the example below
Sub WithMacro()
  Range("A2:C10").Select
  Selection.Font.Bold = True
  Selection.Font.Size = 12
  With Selection.Font
    .Color = -16776961
    .TintAndShade = 0
  End With
End Sub
Firstly, we have selected the range A2:C10.
We have then set the bold to true and the font size to 12. Note that the code “Selection.Font” is repeated for these lines.
The macro has then recorded us changing the color of the text – note that this time, the Selection.Font has a WITH in front of it, and the 2 properties that are being amended (the color and the tintandshade) have a period (.) in front of them. The area of code is then completed with an END WITH.
To simplify this code, we can move the Bold and the Size to be within the WITH statement, and therefore remove the need to repeat the the word Selection.
Sub WithMacro()
  Range("A2:C10").Select
  With Selection.Font
   .Bold = True
   .Size = 12
   .Color = -16776961
   .TintAndShade = 0
  End With
End Sub
The Syntax of a WITH… END WITH statement is therefore very simply:
WITH Object
'properties to format/change
END WITH
We could have amended the code in a different way:
Sub RemoveWith()
 Range("A2:C10").Select
 Selection.Font.Bold = True
 Selection.Font.Size = 12
 Selection.Font.Color = -16776961
 Selection.Font.TintAndShade = 0
End Sub
In the above example, we have added in the words Selection.Font to each line of the code. We have therefore referred repetitively to the Selection.Font Object in the code.
However, using the WITH statement means that we need only refer to this Object once in the code. It is a cleaner way of coding – it tells VBA to begin at WITH and the end at END WITH – the code to run is all enclosed within those 2 words. It makes the macro run faster and more efficiently (especially for longer macros), and adds structure to your code.
VBA Coding Made Easy
Stop searching for VBA code online. Learn more about AutoMacro — A VBA Code Builder that allows beginners to code procedures from scratch with minimal coding knowledge and with many time-saving features for all users!

Learn More!