
Ok, this seems nuts and I’ve been researching it for a couple of hours but I can’t find anything that works. This post is going to be pretty devoid of code, but I’m going to explain very quickly exactly what I’m trying to do.
So I have a listbox that I’ve successfully populated and it works just fine. At some point as directed by the user, the user will select a row from the listbox, call it RecordBox, Review some information, maybe add some, and then click a «save» command button. Upon Clicking this save button I’d like to copy the selected row from RecordBox to the second listbox. Call it DetailsBox I suppose.
I either need a way to take data displayed in the form in the form of captions, combobox entries, and text box entries, add a row to «DetailsBox» and copy the information to the particular columns of that row, or I need to simply copy the selected row from RecordBox to DetailsBox.
Anyway, if some of the code would be helpful, just ask, but there really isnt any aside from the command button click event.
I hope that would be enough information.
ListBox in Excel VBA – Adding, Clearing, Multiple Selection Examples

ListBox VBA Excel Example Macros Codes for Adding new Items,Moving all Items, selected Items from ListBox to another ListBox,clearing,Multi selection. VBA ListBox in Excel is one of finest control in the Excel. You can show the list of items in the listbox and user can select any item and do different operations. In this tutorial, we will explain different example on using ListBox in VBA Excel .
ListBox VBA Excel – Example Cases:
- Load Items to ListBox while opening Workbook
- Move all Items from ListBox1 to ListBox2
- Move all Items from ListBox2 to ListBox1
- Move selected Items from ListBox1 to ListBox2
- Move selected Items from ListBox2 to ListBox1
- Clear ListBox Items
- Select Multiple Items from ListBox
- DownLoad:Example File
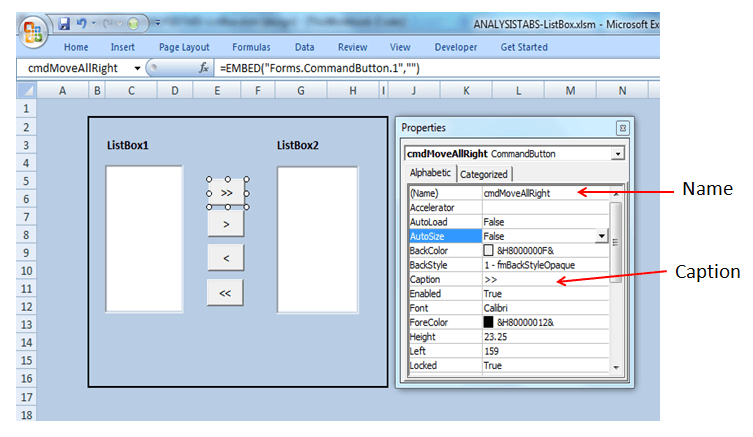
ListBox VBA Excel -Sample ListBox Design:
- GoTo Developer Tab from Menu
- GoTo Insert from Controls Part
- Insert two ListBox’s and four Buttons from ActiveX Controls
- Select 1st Button and then Right Click Goto Properties and click on it
- Rename 1st button Name as “cmdMoveAllRight” and enter Caption as “>>”
- Select 2nd Button and Rename it as “cmdMoveSelRight” and enter Caption as “>”
- Select 3rd Button and Rename it as “cmdMoveSelLeft” and enter Caption as “<«
- Select 4th Button and Rename it as “cmdMoveAllLeft” and enter Caption as “<<«
- The final design should be as shown below
Screen Shot:
Load Items to ListBox while opening Workbook
You can load the items in the ListBox while opening the Excel Workbook. The following example will show you how to populate the items while opening excel file.
Code:
Private Sub Workbook_Open()

    'Add Items to ListBox1 in Sheet1 while opening workbook
    With Sheet1.ListBox1
        .AddItem "East"
        .AddItem "West"
        .AddItem "South"
        .AddItem "North"
    End With

End Sub
Output:
Here is the screen-shot of the ListBox with items.

Instructions:
- Open an excel workbook
- Press Alt+F11 to open VBA Editor
- From Project Explorer Double Click on ThisWorkbook
- Copy the above code and Paste in the code window
- Save the file as macro enabled workbook and Close it
- Open the file to see the output
- You should the see the Items in ListBox1
Move all Items from ListBox1 to ListBox2
You can move the items from one ListBox to another ListBox. It is helpful while developing tools. You can give provide the users to select items and add into another ListBox.
Code:
Private Sub cmdMoveAllRight_Click()

    'Variable Declaration
    Dim iCnt As Integer

    'Move Items from ListBox1 to ListBox2
    For iCnt = 0 To Me.ListBox1.ListCount - 1
        Me.ListBox2.AddItem Me.ListBox1.List(iCnt)
    Next iCnt

    'Clear ListBox1 After moving Items from ListBox1 to ListBox2
    Me.ListBox1.Clear

End Sub
Output:
Here is the screen-shot to show you moving the items from one ListBox to another.

Instructions:
- Please follow the above mentioned design steps
- Double Click on the 1st button or Right Click on 1st button and then click on View Code
- Copy the above code and Paste in the code window
- Goto Sheet1 and then Click on “>>” button
- Now all ListBox1 Items are available in ListBox2
- Save the file as macro enabled workbook
Move all Items from ListBox2 to ListBox1
The following example will show you how to move all items in on-shot from one ListBox to another ListBox.
Code:
Private Sub cmdMoveAllLeft_Click()

    'Variable Declaration
    Dim iCnt As Integer

    'Move Items from ListBox1 to ListBox2
    For iCnt = 0 To Me.ListBox2.ListCount - 1
        Me.ListBox1.AddItem Me.ListBox2.List(iCnt)
    Next iCnt

    'Clear ListBox1 After moving Items from ListBox1 to ListBox2
    Me.ListBox2.Clear

End Sub
Output:
Here is the sample screen-shot.

Instructions:
- Please follow the above mentioned design steps
- Double Click on the 4th button or Right Click on 4th button and then click on View Code
- Copy the above code and Paste in the code window
- Goto Sheet1 and then Click on “<<» button
- Now all ListBox2 Items are available in ListBox1
- Save the file as macro enabled workbook
Move selected Items from ListBox1 to ListBox2
You can move only selected items form One ListBox to another ListBox. See the below example…
Code:
Private Sub cmdMoveSelLeft_Click()

    'Variable Declaration
    Dim iCnt As Integer

    'Move Selected Items from Listbox1 to Listbox2
    For iCnt = 0 To Me.ListBox2.ListCount - 1
        If Me.ListBox2.Selected(iCnt) = True Then
            Me.ListBox1.AddItem Me.ListBox2.List(iCnt)
        End If
    Next

    For iCnt = Me.ListBox2.ListCount - 1 To 0 Step -1
        If Me.ListBox2.Selected(iCnt) = True Then
            Me.ListBox2.RemoveItem iCnt
        End If
    Next

End Sub
Output:
Here is the sample screen-shot.

Instructions:
- Please follow the above mentioned design steps
- Double Click on the 2nd button or Right Click on 2nd button and then click on View Code
- Copy the above code and Paste in the code window
- Goto Sheet1 and selct items from ListBox1, Which we want to move to ListBox2
- Click on “>” button
- Now ListBox1 selected Items are available in ListBox2
- Save the file as macro enabled workbook
Move selected Items from ListBox2 to ListBox1
You can move only selected items form One ListBox to another ListBox. See the below example…
Code:
Private Sub cmdMoveSelRight_Click()

    'Variable Declaration
    Dim iCnt As Integer

    'Move Selected Items from Listbox1 to Listbox2
    For iCnt = 0 To Me.ListBox1.ListCount - 1
        If Me.ListBox1.Selected(iCnt) = True Then
            Me.ListBox2.AddItem Me.ListBox1.List(iCnt)
        End If
    Next

    For iCnt = Me.ListBox1.ListCount - 1 To 0 Step -1
        If Me.ListBox1.Selected(iCnt) = True Then
            Me.ListBox1.RemoveItem iCnt
        End If
    Next

End Sub
Output:

Instructions:
- Please follow the above mentioned design steps
- Double Click on the 3rd button or Right Click on 3rd button and then click on View Code
- Copy the above code and Paste in the code window
- Goto Sheet1 and selct items from ListBox2, Which we want to move to ListBox1
- Click on “<» button
- Now ListBox2 selected Items are available in ListBox1
- Save the file as macro enabled workbook
Clear ListBox Items
You can clear the ListBox using Clear method. The following procedure will show how to clear the ListBox items, this procedure will clear ListBox items before loading an items to ListBox.
Code:
Sub Clear_ListBox()

    'Clear ListBox Items
    With Sheet1
        .ListBox1.Clear
        .ListBox2.Clear
    End With

End Sub
Instructions:
- Open an excel workbook
- Press Alt+F11 to open VBA Editor
- Insert a new module from Insert menu
- Copy the above code and Paste in the code window
- We can call this procedure to clear ListBox items before loading items to ListBox
- It will clear items from ListBox
- Save the file as macro enabled workbook
Select Multiple Items from ListBox
The following example will show selecting multiple items.
Code:
Sub SelectMultipleItems_ListBix()

    'To Select Multiple Items in ListBox
    With Sheet1
        .ListBox1.MultiSelect = fmMultiSelectMulti
        .ListBox2.MultiSelect = fmMultiSelectMulti
    End With
End Sub
Output:

Instructions:
- Open an excel workbook
- Press Alt+F11 to open VBA Editor
- Insert a new module from Insert menu
- Copy the above code and Paste in the code window
- You can call above procedure to select multiple items from ListBox
- You should see output as shown above
- Save the file as macro enabled workbook
Example File
Download the example file and Explore it.
Excel VBA ListBox Examples
Excel VBA ListBox Properties:
- BackColor: To sets the back color of ListBox control.
- BorderStyle: To sets the border style of ListBox control.
- Height: To sets the height of the ListBox control.
- Left: To sets the left position of the ListBox control.
- MultiSelect: To select single or multiple list Items of ListBox Control.
- TextAlign: To Align the ListBox list items.
- Top: To sets the top position of the ListBox Control.
- Width: To sets the width of the ListBox control.
A Powerful & Multi-purpose Templates for project management. Now seamlessly manage your projects, tasks, meetings, presentations, teams, customers, stakeholders and time. This page describes all the amazing new features and options that come with our premium templates.
Save Up to 85% LIMITED TIME OFFER

All-in-One Pack
120+ Project Management Templates
Essential Pack
50+ Project Management Templates
Excel Pack
50+ Excel PM Templates
PowerPoint Pack
50+ Excel PM Templates
MS Word Pack
25+ Word PM Templates
Ultimate Project Management Template
Ultimate Resource Management Template
Project Portfolio Management Templates
Related Posts
- ListBox VBA Excel – Example Cases:
- ListBox VBA Excel -Sample ListBox Design:
- Excel VBA ListBox Properties:
VBA Reference
Effortlessly
Manage Your Projects
120+ Project Management Templates
Seamlessly manage your projects with our powerful & multi-purpose templates for project management.
120+ PM Templates Includes:
21 Comments
-
Gaetan
November 30, 2013 at 7:05 AM — Replyhi,
Thanks for your example, very well written.
I was wodnering if you could simplify the code this way ?
Private Sub cmdMoveSelLeft_Click()
‘Variable Declaration
Dim iCnt As IntegerFor iCnt = Me.ListBox2.ListCount – 1 To 0 Step -1
If Me.ListBox2.Selected(iCnt) = True Then
Me.ListBox1.AddItem Me.ListBox2.List(iCnt)
Me.ListBox2.RemoveItem iCnt
End If
NextEnd Sub
Or even more simplified by using one sub with parameters, parameters being the name of the controls. Somthing like this :
Sub transfert_one_or_several_items(source As String, destination As String)
Dim i As Integer
For i = Controls(source).ListCount – 1 To 0 Step -1
If Controls(source).Selected(i) Then
Controls(destination).AddItem Controls(source).List(i)
Controls(source).RemoveItem (i)
End If
Next
End SubRegards
Gaetan
http://www.vba101.com -
PNRao
December 1, 2013 at 9:59 PM — ReplyHello Gaetan,
Thanks for your suggestions. Our focus is providing fundamental concepts on VBA with proper examples to explain the use in real-time (particularly for data analysis applications).
Yes, we can simplify the codes even further, it will be easy for advanced programs. We will provide more simpler way of writing VBA Programs and best practices in near future.Thanks
PNRao! -
Joe
December 27, 2013 at 5:55 AM — ReplyIs there a way to save the selection you make? It seems, if you make a selection and save the workbook it won’t save upon re-opening (e.g. if i choose “south” then save, then I re-open, “south isn’t in Listbox2).
-
PNRao
December 28, 2013 at 3:54 AM — ReplyHi Joe,
Excel will not save selected options in the listbox. However, you can save selected items using VBA.1. Put the selected option in a Range on BeforeSave Event:
Example: in your case, we put ‘South’ in Sheet1 at Range A12. Populate the Items in the Range while opening the workbook (On Workbook Open Event)
Listbox2.value=Sheet1.Range(“A1”)Hope this clarifies your doubt.
Thanks-PNRao!
-
Mike
January 22, 2014 at 6:21 AM — ReplyHi!
this is very helpful for a starter like me..
Im just wondering on how to code if i want to fill the list box by values which is in another sheet in a column.
this is for easy maintenance. Not hardcoding all the needed values.Thanks,
Mike -
PNRao
January 22, 2014 at 11:28 PM — ReplyHi Mike,
You can do this in two different ways.
1. Without using VBA: Place a listbox form control (Not an activeX Control)in your worksheet. Then right click on it and choose the input range to fill the items in the listbox.
(To insert listbox: Goto Developer Tab in the ribbon => under developer tab click on the Insert in the Controls group under)2. Using VBA: Loop through the range using for or do while loop and add the item to an activex listbox:
place a listbox (activex control) in your worksheet, let’s assue you have placed a listbox (ListBox1) in Sheet1. And you have the the data in Sheet2 for Range A1 to A10. The following procedure will populate the list box, you can call this in the workbook open event.Sub populateListbox()
Sheet1.ListBox1.Clear
For i = 1 To 10
Sheet1.ListBox1.AddItem Sheet2.Cells(i, 1)
Next
End SubHope this helps.
Thanks-PNRao! -
Jov
February 25, 2014 at 6:46 AM — ReplyHi, This is very help like me as newbie. what if i have a userform with 3 textboxes which i want to fill the listbox using textboxes data.
Thanks
Jov
-
PNRao
February 25, 2014 at 11:20 PM — ReplyHi Jov,
Thanks for your comments.
You can use same method like:
ListBox1.Clear

ListBox1.AddItem TextBox1.Value

ListBox1.AddItem TextBox2.Value

ListBox1.AddItem TextBox3.Value
if you have many textboxes, you can do something like below:
ListBox1.Clear

For iCntr=1 to 10

ListBox1.AddItem Me.Controls("TextBox" &iCntr).Value

Next
Hope this helps!
Thanks
PNRao -
Erin
June 23, 2014 at 11:05 PM — ReplyI followed excatly all of the steps as outlined – and although my items move between for the “all” buttons they do not move for the “select” buttons. Is there something else I can do for the “select” buttons? Thanks.
-
Alex
August 4, 2014 at 10:47 PM — ReplyHi,
I may have two problems with the code you’re providing.
First with this line:
Me.ListBox1.RemoveItem iCnt
There, VBA’s always giving me an error.Second with the saving of the values:
I’m using a range for my listbox values so they can be save. In fact, all the items in my list that are selected are being send to cells and when I reopen, I use ListFillRange to repopulate my ListBox. The problem is that I would like to modify my selection after reopening the file and VBA won’t allow it because the ListBox can’t be clear. -
PNRao
August 17, 2014 at 11:48 AM — ReplyHi Alex,
It should work fine, could you please provide me the example file.
Thanks-PNRao!
-
Thadak
September 17, 2014 at 2:03 AM — ReplyHi,
Thanks for your code … really helpful in our project.
I have one question… we are hardcoding the source values in Listbox1 similarly like your code. when we select the values to Listbox2 and again when you move back that value from listbox2 to listbox1 … that value is going to last row of Listbox1. Is there any way to get display in Listbox1 as we hardcoded in the source? -
Nagarjuna
November 17, 2014 at 11:37 PM — Replyhi,
I am new to VBA macro and also VBA code. I have an excel sheet containing following respective columns :-Region Company, SicCode, Address, City, ZIP, ContactName, Telephone, etc………….
Here i have to perform some data cleaning work like to eliminate exceptions from company names ( -,”,’,, @, numbers, etc.,) , SicCode exceptions ( should only contain numbers, not alphabets and no special characters), zip code exceptions ( should be in 6 characters and one space between 3 characters like “A1B 2NO”, should not be like “A1B2NO”), Contact name should be in alphabets in proper no leading and trailing spaces, telephone should be in numberic and should not contain special characters (ex: “(123) 123 1234” ).for all these data clean, how can i write the code and execute. pls help me in session.
-
Hi,
May i request you to kindly give codes and examples to change the range of listbox connected to a worksheet depending on the rows of data. i have a worksheet with 25 rows of data, which is a list of distributors. When the option to display the list is selected thru a command button to run the macro, If i added 10 more names, my listbox should display all 35 names. But, if i delete 10 names, from the original, it should display only 15 names. i.e, end range of listbox should be able to change to last row of data. To say, originally A1:A25, if 10 names added, A1:A35, if 5 names deleted then A1:A30 and so on. -
Bitten
May 3, 2015 at 6:35 PM — ReplyHello,
thank you Villa for this useful example. However, I noticed that there is something missing in subs called ‘cmdMoveSelLeft_Click()’ and ‘cmdMoveSelRight_Click()’. I mean, when you select the last item on the list (let’s it is listbox1, but the same happens with listbox2), then, while it is moved from listbox1 to listbox2, all the items are automatically removed from listbox1.
This part of code is responsible for this situation:
For iCnt = Me.ListBox1.ListCount – 1 To 0 Step -1
If Me.ListBox1.Selected(iCnt) = True Then
Me.ListBox1.RemoveItem iCntEnd If
NextI guess you should add ‘exit for’ at the end of your if-statement, so the code will look like this:
If Me.ListBox1.Selected(iCnt) = True Then
Me.ListBox1.RemoveItem iCnt
Exit For
End IfThis should solve the problem I described above.
-
iasmer
May 8, 2015 at 12:38 PM — ReplyThank You for convenient code. I use part of it for move items from left listbox to right on user form, but slightly optimise:
‘=== [ < ]
‘Move Selected Items from Listbox2 to Listbox1
Private Sub cmb_Move_Left_Click()
Dim iCnt%, j%
j = 0
iCnt = Me.lbx_NewNames.ListCount – 1
While j ]
‘Move Selected Items from Listbox1 to Listbox2
Private Sub cmb_Move_Right_Click()
Dim iCnt%, j%
j = 0
iCnt = Me.lbx_OldNames.ListCount – 1
While j <= iCnt
If Me.lbx_OldNames.Selected(j) = True Then
Me.lbx_NewNames.AddItem Me.lbx_OldNames.List(j)
Me.lbx_OldNames.RemoveItem j
iCnt = iCnt – 1
End If
j = j + 1
Wend
End SubMay be someone find this useful
-
Amol
March 11, 2016 at 2:43 AM — ReplyIf I have many controls like textbox,combobox & DTpicker then how to pull listbox items in there
Any idea ?
Thanks in advanced
-
raghu
January 10, 2017 at 1:56 PM — Replymultiple selection from listbox1 to listbox2 not working
-
raghu
January 10, 2017 at 4:45 PM — ReplyHow to copy paste columns of the list items selected in listbox???
-
raghu
January 10, 2017 at 4:45 PM — ReplyHow to copy paste columns of the list items selected in list box in worksheet???
Effectively Manage Your
Projects and Resources
ANALYSISTABS.COM provides free and premium project management tools, templates and dashboards for effectively managing the projects and analyzing the data.
We’re a crew of professionals expertise in Excel VBA, Business Analysis, Project Management. We’re Sharing our map to Project success with innovative tools, templates, tutorials and tips.
Project Management
Excel VBA
Download Free Excel 2007, 2010, 2013 Add-in for Creating Innovative Dashboards, Tools for Data Mining, Analysis, Visualization. Learn VBA for MS Excel, Word, PowerPoint, Access, Outlook to develop applications for retail, insurance, banking, finance, telecom, healthcare domains.
Page load link

3 Realtime VBA Projects
with Source Code!
Go to Top
|
kyzavr 2 / 2 / 0 Регистрация: 22.05.2013 Сообщений: 136 |
||||
|
1 |
||||
|
13.04.2017, 02:31. Показов 2830. Ответов 16 Метки нет (Все метки)
Здравствуйте, столкнулся задачей которую необходимо сделать в ексельке с VBA . На данный момент поиск реализован вот так
Миниатюры
0 |


|
140 / 123 / 50 Регистрация: 10.11.2011 Сообщений: 620 |
|
|
13.04.2017, 06:26 |
2 |
|
Файл приложите ,а не картинку.
0 |

|
2 / 2 / 0 Регистрация: 22.05.2013 Сообщений: 136 |
|
|
13.04.2017, 12:44 [ТС] |
3 |
|
К сожалению файл не прикладывается (( не знаю почему формат .xlsm не поддерживается Кликните здесь для просмотра всего текста https://yadi.sk/d/4YYVpSLY3GvhNz
0 |
|
3217 / 966 / 223 Регистрация: 29.05.2010 Сообщений: 2,085 |
|
|
13.04.2017, 12:57 |
4 |
|
В архив, а потом прикрепить.
0 |
|
2 / 2 / 0 Регистрация: 22.05.2013 Сообщений: 136 |
|
|
13.04.2017, 13:00 [ТС] |
5 |
|
вот
0 |
|
3827 / 2254 / 751 Регистрация: 02.11.2012 Сообщений: 5,930 |
|
|
13.04.2017, 13:49 |
6 |
|
запись только одна или несколько заносится во второй листбокс?
0 |
|
kyzavr 2 / 2 / 0 Регистрация: 22.05.2013 Сообщений: 136 |
||||||||
|
13.04.2017, 15:50 [ТС] |
7 |
|||||||
|
Грубо говоря хочу чтобы выбрать одну строку — добавил в листбокс2 И справа в сумме выводилось бы 2100 Добавлено через 31 минуту Кликните здесь для просмотра всего текста
Добавлено через 10 минут
0 |
|
3827 / 2254 / 751 Регистрация: 02.11.2012 Сообщений: 5,930 |
|
|
13.04.2017, 16:09 |
8 |
|
у вас нет проверки если оба OptionButton пусты.
1 |
|
kyzavr 2 / 2 / 0 Регистрация: 22.05.2013 Сообщений: 136 |
||||||||||||
|
13.04.2017, 16:25 [ТС] |
9 |
|||||||||||
|
я сделал просто активным первый сразу
Но возникла проблема как посчитать сумму тех кто добавил.
прямо перед всем кодом (не знаю верно ли это)
Но он выдает только значения строк но не суммирует их. Где ошибка?
0 |
|
2 / 2 / 0 Регистрация: 22.05.2013 Сообщений: 136 |
|
|
13.04.2017, 16:27 [ТС] |
10 |
|
вот файлик
0 |
|
Vlad999 3827 / 2254 / 751 Регистрация: 02.11.2012 Сообщений: 5,930 |
||||||||
|
13.04.2017, 16:40 |
11 |
|||||||
|
Решениемой вариант
в модуль в самом верху пишем
1 |
 Сообщение было отмечено kyzavr как решение
|
2 / 2 / 0 Регистрация: 22.05.2013 Сообщений: 136 |
|
|
13.04.2017, 16:47 [ТС] |
12 |
|
Спасибо, сейчас попробую, а в модуль это куда)? на фото)? я просто не совсем еще понимаю как тут что)) Миниатюры
0 |
|
kyzavr 2 / 2 / 0 Регистрация: 22.05.2013 Сообщений: 136 |
||||
|
13.04.2017, 16:55 [ТС] |
13 |
|||
|
Добавил
в модуль ЭтаКнига (надеюсь правильно)
0 |
|
3827 / 2254 / 751 Регистрация: 02.11.2012 Сообщений: 5,930 |
|
|
13.04.2017, 17:09 |
14 |
|
не туда вставили. двойной клик по Module1 (на картинке слева) откроется окно, там висит код открытия формы, вот туда и вставляем.
1 |
|
kyzavr 2 / 2 / 0 Регистрация: 22.05.2013 Сообщений: 136 |
||||
|
13.04.2017, 17:19 [ТС] |
15 |
|||
|
Ааа понял спасибо, это как бы макросы+) у меня там просто вызов кнопки висел
Создал второй модуль) Теперь и мой вариантик сработал =) Правда совсем забыл добавить куда-нибудь значение из количества =)
0 |
|
3827 / 2254 / 751 Регистрация: 02.11.2012 Сообщений: 5,930 |
|
|
13.04.2017, 17:33 |
16 |
|
Создал второй модуль) не обязательно. можно было в том же добавить. Не плодите модули без надобности.
1 |

|
kyzavr 2 / 2 / 0 Регистрация: 22.05.2013 Сообщений: 136 |
||||||||||||||||
|
13.04.2017, 23:02 [ТС] |
17 |
|||||||||||||||
|
Да я уже это понял, добавлял в конец, а надо было в топ. Добавлено через 2 часа 9 минут
Добавлено через 32 минуты
Добавлено через 1 час 54 минуты
Но возник вопрос, как сделать чтобы в строке поиска поиск был не по совпадению по одному столбику а по двум? например мне нужно и по названию принтера и по картриджу
0 |
Элемент управления пользовательской формы ListBox для выбора и ввода информации в VBA Excel. Свойства списка, его заполнение, извлечение данных, примеры кода.

UserForm.ListBox – это элемент управления пользовательской формы, предназначенный для передачи в код VBA информации, выбранной пользователем из одностолбцового или многостолбцового списка.
Список используется в тех случаях, когда необходимо добавить в форму информацию, которая заранее известна, а ее отдельные позиции можно сгруппировать в список. Элемент управления ListBox оправдывает себя при небольших списках, так как большой список будет занимать много места на форме.
Использование полос прокрутки уменьшает преимущество ListBox перед элементом управления ComboBox, которое заключается в том, что при открытии формы все позиции для выбора на виду без дополнительных действий со стороны пользователя. При выборе информации из большого списка удобнее использовать ComboBox.
Элемент управления ListBox позволяет выбрать несколько позиций из списка, но эта возможность не имеет практического смысла. Ввести информацию в ListBox с помощью клавиатуры или вставить из буфера обмена невозможно.
Свойства списка
| Свойство | Описание |
|---|---|
| ColumnCount | Указывает количество столбцов в списке. Значение по умолчанию = 1. |
| ColumnHeads | Добавляет строку заголовков в ListBox. True – заголовки столбцов включены, False – заголовки столбцов выключены. Значение по умолчанию = False. |
| ColumnWidths | Ширина столбцов. Значения для нескольких столбцов указываются в одну строку через точку с запятой (;). |
| ControlSource | Ссылка на ячейку для ее привязки к элементу управления ListBox. |
| ControlTipText | Текст всплывающей подсказки при наведении курсора на ListBox. |
| Enabled | Возможность выбора элементов списка. True – выбор включен, False – выключен*. Значение по умолчанию = True. |
| Font | Шрифт, начертание и размер текста в списке. |
| Height | Высота элемента управления ListBox. |
| Left | Расстояние от левого края внутренней границы пользовательской формы до левого края элемента управления ListBox. |
| List | Позволяет заполнить список данными из одномерного или двухмерного массива, а также обращаться к отдельным элементам списка по индексам для записи и чтения. |
| ListIndex | Номер выбранной пользователем строки. Нумерация начинается с нуля. Если ничего не выбрано, ListIndex = -1. |
| Locked | Запрет возможности выбора элементов списка. True – выбор запрещен**, False – выбор разрешен. Значение по умолчанию = False. |
| MultiSelect*** | Определяет возможность однострочного или многострочного выбора. 0 (fmMultiSelectSingle) – однострочный выбор, 1 (fmMultiSelectMulti) и 2 (fmMultiSelectExtended) – многострочный выбор. |
| RowSource | Источник строк для элемента управления ListBox (адрес диапазона на рабочем листе Excel). |
| TabIndex | Целое число, определяющее позицию элемента управления в очереди на получение фокуса при табуляции. Отсчет начинается с 0. |
| Text | Текстовое содержимое выбранной строки списка (из первого столбца при ColumnCount > 1). Тип данных String, значение по умолчанию = пустая строка. |
| TextAlign | Выравнивание текста: 1 (fmTextAlignLeft) – по левому краю, 2 (fmTextAlignCenter) – по центру, 3 (fmTextAlignRight) – по правому краю. |
| Top | Расстояние от верхнего края внутренней границы пользовательской формы до верхнего края элемента управления ListBox. |
| Value | Значение выбранной строки списка (из первого столбца при ColumnCount > 1). Value – свойство списка по умолчанию. Тип данных Variant, значение по умолчанию = Null. |
| Visible | Видимость списка. True – ListBox отображается на пользовательской форме, False – ListBox скрыт. |
| Width | Ширина элемента управления. |
* При Enabled в значении False возможен только вывод информации в список для просмотра.
** Для элемента управления ListBox действие свойства Locked в значении True аналогично действию свойства Enabled в значении False.
*** Если включен многострочный выбор, свойства Text и Value всегда возвращают значения по умолчанию (пустая строка и Null).
В таблице перечислены только основные, часто используемые свойства списка. Еще больше доступных свойств отображено в окне Properties элемента управления ListBox, а все методы, события и свойства – в окне Object Browser.
Вызывается Object Browser нажатием клавиши «F2». Слева выберите объект ListBox, а справа смотрите его методы, события и свойства.
Свойства BackColor, BorderColor, BorderStyle отвечают за внешнее оформление списка и его границ. Попробуйте выбирать доступные значения этих свойств в окне Properties, наблюдая за изменениями внешнего вида элемента управления ListBox на проекте пользовательской формы.
Способы заполнения ListBox
Используйте метод AddItem для загрузки элементов в список по одному:
|
With UserForm1.ListBox1 .AddItem «Значение 1» .AddItem «Значение 2» .AddItem «Значение 3» End With |
Используйте свойство List, чтобы скопировать одномерный массив значений в элемент управления ListBox.
|
UserForm1.ListBox1.List = Array(«Текст 1», _ «Текст 2», «Текст 3», «Текст 4», «Текст 5») |
Вместо функции Array можно использовать переменные одномерных и двухмерных массивов. При загрузке значений из двухмерного массива, требуется предварительно указать количество столбцов в списке.
Используйте свойство RowSource, чтобы загрузить в список значения из диапазона ячеек рабочего листа:
|
UserForm1.ListBox1.RowSource = «Лист1!A1:A6» |
При загрузке данных из диапазона, содержащего более одного столбца, требуется предварительно указать количество столбцов в списке:
|
With UserForm1.ListBox1 ‘Указываем количество столбцов .ColumnCount = 5 .RowSource = «‘Лист со списком’!A1:E10» End With |
В качестве имени листа используется имя ярлыка. Если имя листа содержит пробелы, оно заключается в одинарные кавычки.
Подробнее о заполнении элемента управления ListBox вы можете ознакомиться в отдельной статье с наглядными примерами.
Привязка списка к ячейке
Для привязки списка к ячейке на рабочем листе используется свойство ControlSource. Суть привязки заключается в том, что при выборе строки в элементе управления, значение свойства Value копируется в привязанную ячейку.
Если привязанная к списку ячейка содержит значение одной из строк элемента управления ListBox, то при запуске пользовательской формы список откроется с выделенной строкой, содержащей это значение. Если привязанная ячейка при загрузке формы пустая, то список откроется без выделения какой-либо строки.
В случае, когда при открытии формы в привязанной к списку ячейке содержится значение, которого нет ни в одной из строк элемента управления ListBox, будет сгенерирована ошибка.
Привязать ячейку к списку можно, указав адрес ячейки в поле свойства ControlSource в окне Properties элемента управления ListBox. Или присвоить адрес ячейки свойству ControlSource в коде VBA Excel:
|
UserForm1.ListBox1.ControlSource = «Лист1!A2» |
Теперь значение выбранной строки в списке автоматически копируется в ячейку «A2» на листе «Лист1»:

В окне Properties адрес указывается без двойных кавычек. Если имя листа содержит пробелы, оно заключается в одинарные кавычки.
Извлечение информации из списка
Первоначально элемент управления ListBox открывается со строками, ни одна из которых не выбрана. При выборе (выделении) строки, ее значение записывается в свойства Value и Text.
Из этих свойств мы с помощью кода VBA Excel извлекаем информацию, выбранную в списке пользователем:
|
Dim myVar as Variant, myTxt As String myVar = UserForm1.ListBox1.Value ‘или myTxt = UserForm1.ListBox1.Text |
Вторую строку кода можно записать myVar = UserForm1.ListBox1, так как Value является свойством списка по умолчанию.
Если ни одна позиция в списке не выбрана, свойство Value возвращает значение Null, а свойство Text – пустую строку. Если выбрана строка в многостолбцовом списке, в свойства Value и Text будет записана информация из первого столбца.
Что делать, если понадобятся данные из других столбцов многостолбцового списка, кроме первого?
Для получения данных из любого столбца элемента управления ListBox используется свойство List, а для определения выбранной пользователем строки – ListIndex.
Для тестирования приведенного ниже кода скопируйте таблицу и вставьте ее в диапазон «A1:D4» на листе с ярлыком «Лист1»:
| Звери | Лев | Тапир | Вивера |
| Птицы | Грач | Сорока | Филин |
| Рыбы | Карась | Налим | Парусник |
| Насекомые | Оса | Жук | Муравей |
Создайте в редакторе VBA Excel пользовательскую форму и добавьте на нее список с именем ListBox1. Откройте модуль формы и вставьте в него следующие процедуры:
|
Private Sub UserForm_Initialize() With Me.ListBox1 ‘Указываем, что у нас 4 столбца .ColumnCount = 4 ‘Задаем размеры столбцов .ColumnWidths = «50;50;50;50» ‘Импортируем данные .RowSource = «Лист1!A1:D4» ‘Привязываем список к ячейке «F1» .ControlSource = «F1» End With End Sub Private Sub UserForm_Click() MsgBox Me.ListBox1.List(Me.ListBox1.ListIndex, 2) End Sub |
В процедуре UserForm_Initialize() присваиваем значения некоторым свойствам элемента управления ListBox1 перед открытием пользовательской формы. Процедура UserForm_Click() при однократном клике по форме выводит в MsgBox значение из третьего столбца выделенной пользователем строки.

Теперь при выборе строки в списке, значение свойства Value будет записываться в ячейку «F1», а при клике по форме функция MsgBox выведет значение третьего столбца выделенной строки.
Обратите внимание, что при первом запуске формы, когда ячейка «F1» пуста и ни одна строка в ListBox не выбрана, клик по форме приведет к ошибке. Это произойдет из-за того, что свойство ListIndex возвратит значение -1, а это недопустимый номер строки для свойства List.
Если для списка разрешен многострочный выбор (MultiSelect = fmMultiSelectMulti или MultiSelect = fmMultiSelectExtended), тогда, независимо от количества выбранных строк, свойство Value будет возвращать значение Null, а свойство Text – пустую строку. Свойство ListIndex будет возвращать номер строки, которую кликнули последней, независимо от того, что это было – выбор или отмена выбора.
Иногда перед загрузкой в ListBox требуется отобрать уникальные элементы из имеющегося списка. Смотрите, как это сделать с помощью объектов Collection и Dictionary.
The VBA ListBox is a very useful control. If you are creating any kind of UserForm application you will most likely use it.
In this post, I’m going to show you everything you need to know about the VBA ListBox so you can avoid the common pitfalls and get up and running quickly and easily.

What is the VBA ListBox used for?
The ListBox is used to display a list of items to the user so that the user can then select one or more. The ListBox can have multiple columns and so it is useful for tasks like displaying records.
VBA ListBox versus the VBA ComboBox
The ListBox is very similar to the ComboBox which also allows the user to select an item from a list of items. The main differences are:
- The Listbox allows multiple selections. The Combobox only allows one selection.
- Items in the ListBox are always visible. The Combobox items are only visible when you click on the “down” icon.
- The ComboBox has the ability to filter the contents when you type.
The VBA ListBox Properties Quick Guide
| Function | Operation | Example |
|---|---|---|
| AddItem | Add an item | listbox.AddItem «Spain» |
| Clear | Remove all Items | listbox.Clear |
| ColumnCount | Set the number of visible columns | ComboBox1.ColumnCount = 2 |
| ColumnHeads | Make the column row visible | ComboBox1.ColumnHeads = True |
| List | Range to Listbox ListBox to Range |
Listbox.List = Range(«A1:A4»).Value Range(«A1:A4»).Value = Listbox.List |
| List | Update a column value | Listbox.List(1,2) = «New value» |
| ListCount | Get the number of items | cnt = listbox.ListCount |
| ListIndex | Get/set selected item | Idx = listbox.ListIndex combo.ListIndex = 0 |
| RemoveItem | Remove an item | listbox.Remove 1 |
| RowSource | Add a range of values from a worksheet | ComboBox1.RowSource = Sheet1.Range(«A2:B3»).Address |
| Value | Get the value of selected Item | Dim sCountry As String sCountry = listbox.Value |
How to Add Items to the ListBox
There are 3 ways to add items to the VBA Listbox:
- One at a time using the AddItem property.
- Adding an array/range using the List property.
- Adding a Range using the RowSource property.
The List and RowSource properties are the most commonly used. The table below provides a quick comparison of these properties:
| Task | RowSource | List |
|---|---|---|
| Column Headers | Yes | No |
| Update values in ListBox | No | Yes |
| Add new items | No | Yes |
| Data type | Range | Array(including Range.Value) |
| If source data changes | Listbox is automatically updated. | ListBox is not updated. |
VBA ListBox List Property
The List property allows you to add to contents of an array to a ListBox. As Range.Value is an array you can copy the contents of any range to the Listbox.
Here are some examples of using the List property:
' Add the contents of an array
ListBox1.List = Array("Apple", "Orange", "Banana")

' Add the contents of a Range
ListBox1.List = Range("A1:E5").Value
You can also use the List property to write from the ListBox to an array or range:
Range("A1:B3").Value = ListBox1.List
Important Note: If there is only one item in a range then VBA doesn’t covert it to an array. Instead, it converts the range to a string/double/date etc.
Sheet1.Range("A1:A2").Value ' Array
Sheet1.Range("A1").Value ' Single value variable
In this case, you need to use AddItem to add the value to the ListBox:
 If myRange.Count = 1 Then
    ListBox1.AddItem myRange
 Else
    ListBox1.List = myRange.Value
 End If
The List Property and Column Headers
The ListBox only displays column headers if you use RowSource. Otherwise, they are not available. The best way to add column headers(and it’s not a great way) is to add Labels above the ListBox columns. One advantage is that you can use the click event of the Label if you want to implement something like sorting.
Updating Items using the List Property
You can update individual items in the ListBox using the List Property.
Imagine we have a ListBox with data like this:

If we want to change Nelson in row 3, column 2 we do it like this:
ListBox1.List(2, 1) = "SMITH"
The result we get is:

The List property rows and columns are zero-based so this means row 1 is 0, row 2 is 1, row 3 is 2 and so on:

VBA ListBox RowSource
The RowSource property allows us to add a range to the ListBox. This is different from the List Property in that the Range is linked to the ListBox. If data in the Range changes then the data in the ListBox will update automatically.
When we use RowSource the data in the ListBox is read-only. We can change the RowSource range but we cannot change the values in the ListBox.
How to use RowSource
We add the RowSource range as a string like this:
ListBox1.RowSource = "Sheet1!A1:A5"
If you don’t specify the sheet the VBA will use the active sheet
ListBox1.RowSource = "A1:A5"
If you are using the Address of a range object with RowSource then it is important to use the External parameter. This will ensure that RowSource will read from the sheet of the range rather than the active sheet:
 ' Get the range
 Dim rg As Range
 Set rg = Sheet1.Range("A1:A5")

 ' Address will be $A$1:$A$5 which will use the active sheet
 ListBox1.RowSource = rg.Address
 Debug.Print ListBox1.RowSource

 ' Address will be [Book2]Sheet1!$A$1:$A$5 which will use Sheet1
 ListBox1.RowSource = rg.Address(External:=True)
 Debug.Print ListBox1.RowSource
RowSource Column Headers
Column headers are automatically added to the ListBox when you use the RowSource property. The ColumnHeads property must be set to True or the headers will not appear. You can set this property in the code or in the properties window of the ListBox.
ListBox1.ColumnHeads = True
The column headers are taken from the row above the range used for the RowSource. For example, if your range is A2 to C5 then the column header will use the range A1 to C1:
Here is an example: We want to add the data below to our ListBox and we want A1 to C1 to be the header.

We set the RowSource property to A2:C5 and set the ColumnHeads property to true:
With ListBox1
    .RowSource = "sheet1!A2:C5"
    .ColumnHeads = True
    .ColumnWidths = "80;80;80"
End With
The result will look like this:

VBA ListBox AddItem
It is very rare that you would use the AddItem property to fill the ListBox. List and RowSource are much more efficient. AddItem is normally used when the Listbox already has items and you want to add a new item.
The AddItem property is simple to use. You provide the item you want to add as a parameter. The ListBox will automatically add it as the last item:
With ListBox
    .AddItem "Apple"
    .AddItem "Orange"
End With
If you want to Insert the item at a certain position you can use the second parameter. Keep in mind that this is a zero-based position, so if you want the item in position one then the value is 0, position 2 the value is 1, and so on.
With ListBox1
    .AddItem "Apple"
    .AddItem "Orange"

    ' Add "Banana" to position 1(Index 0)
    .AddItem "Banana", 0
End With
The order will be:
Banana
Apple
Orange
If you want to add multiple columns with AddItem then you need to use the List property after you use AddItem:
 With listboxFruit
    .List = myRange.Value
    .AddItem "Banana"

    ' Add to the second column of 'Banana' row
    .List(2, 1) = "$2.99"
 End With
One reason for using AddItem is if you are adding from data that isn’t sequential so you cannot use the List or RowSource properties:
 Dim cell As Range
 ' Fill items with first letter is A
 For Each cell In Sheet1.Range("A1:A50")
    If Left(cell.Value, 1) = "A" Then
        comboBoxFruit.AddItem cell.Value
    End If
 Next
Important Note: If you fill a ListBox with RowSource then you cannot use AddItem to add a new item. If you try you will get a “Runtime Error 70 – Permission Denied”.
VBA ListBox Selected Items
If only one item is selected then you can use ListIndex to get the selected row. Remember that it is zero-based so row 1 in the ListBox is at ListIndex 0, row 2 at ListIndex 1 and so on.
MsgBox "The selected item is " & ListBox1.ListIndex
If the ListBox has multiple columns then you can use the ListIndex and List properties together to return a value in the selected row:
  ' Display the value from the second column of the selected row
  MsgBox ListBox1.List(ListBox1.ListIndex, 2)
If multiple items are selected then you can use the GetSelectedRows function which returns a collection of selected rows:
 Sub Example()

    ' Store the row numbers of selected items to a collection
    Dim selectedRows As Collection
    Set selectedRows = GetSelectedRows()

    ' Print the selected rows numbers to the Immediate Window
    Dim row As Long
    For Each row In selectedRows
        ' Print to the Immediate Window Ctrl + G
        Debug.Print row
    Next row

 End Sub

 ' Returns a collection of all the selected items
 Function GetSelectedRows() As Collection

    ' Create the collection
    Dim coll As New Collection

    ' Read through each item in the listbox
    Dim i As Long
    For i = 0 To listboxFruit.ListCount - 1

        ' Check if item at position i is selected
        If listboxFruit.Selected(i) Then
            coll.Add i
        End If
    Next i

    Set GetSelectedRows = coll

End Function
Reading Data from the VBA Listbox
To read data from the ListBox we can use the ListBox.Value property. This only works when the ListBox is set to only select one item i.e. MultiSelect is set to frmMultiSelectSingle(see the section VBA ListBox MultiSelect below for more about this).
Single selection only with one column
When only one item is selected we can use the Value property to get the currently selected item:
 Dim fruit As String
 fruit = ListBox1.Value
Keep in mind that if there are multiple columns, Value will only return the value in the first column.
Single selection only with multiple columns
If the ListBox has Multiple columns you can use the Value property to get the value in the first column. You need to read through the List property to get the values in the other column(s). The List property is essentially an array so you can treat it like one.
In the example below we read through the columns of row 1(the index of row 1 is 0):
 With ListBox1

     For j = LBound(.List, 2) To UBound(.List, 2)
         ' Print the columns of the first row to the Immediate Window
         Debug.Print .List(0, j)
     Next j

 End With
Normally you want to print the values in the selected row. You can use the ListIndex property to get the selected item(Note that ListIndex returns the last selected items so it won’t work where there are multiple items selected):
 ' ExcelMacroMastery.com
 Sub ReadValuesFromSelectedRow()

    ' Write contents of the row to the Immediate Window(Ctrl G)
    With ListBox1
        For j = LBound(.List, 2) To UBound(.List, 2)
            ' Print the columns of the selected row to the Immediate Window
            Debug.Print .List(.ListIndex, j) Next j
    End With
 End Sub
Multiple selections
If the ListBox has multiple selections and you want to get all the data from each then you can use the GetSelectedRows() sub from the section VBA ListBox Selected Items. This will get a collection of all selected rows. You can use this to print the data from the selected rows:
Sub PrintMultiSelectedRows()

    ' Get all the selected rows
    Dim selectedRows As Collection
    Set selectedRows = GetSelectedRows(Me.ListBox1)

    Dim i As Long, j As Long, currentRow As Long
    ' Read through the selected rows
    For i = 1 To selectedRows.Count
        With ListBox1

            ' Get the current row
            currentRow = selectedRows(i)

            ' Print row header
            Debug.Print vbNewLine & "Row : " & currentRow

            ' Read items in the current row
            For j = LBound(.List, 2) To UBound(ListBox1.List, 2)
                ' Print the columns of the first row to the Immediate Window
                Debug.Print .List(currentRow, j)
            Next j

        End With
    Next i

End Sub

Function GetSelectedRows(currentListbox As MSForms.ListBox) As Collection

    ' Create the collection
    Dim coll As New Collection

    ' Read through each item in the listbox
    Dim i As Long
    For i = 0 To currentListbox.ListCount - 1

        ' Check if item at position i is selected
        If currentListbox.Selected(i) Then
            coll.Add i
        End If
    Next i

    Set GetSelectedRows = coll

End Function
VBA ListBox MultiSelect
We can use the MultiSelect property of the ListBox to allow the user to select either a single item or multiple items:

There are 3 selections:
- 0 = frmMultiSelectSingle – [Default]Multiple selection isn’t allowed.
- 1 = frmMultiSelectMulti – Multiple items are selected or deselected by choosing them with the mouse or by pressing the Spacebar.
- 2 = frmMultiSelectExtended – Multiple items are selected by holding down Shift and choosing them with the mouse, or by holding down Shift and pressing an arrow key to extend the selection from the previously selected item to the current item. You can also select items by dragging with the mouse. Holding down Ctrl and choosing an item selects or deselects that item.
VBA ListBox Columns
You can have multiple columns in a ListBox. For example, you can load a Range or two-dimensional array to a ListBox using List or RowSource.
Often when you load data with multiple columns only one column appears. This can be very confusing when you are using the Listbox. To get the columns to appear you have to set the ColumnCount property to the number of Columns.
You should also make sure that the ColumnWidths property is correct or one of the columns may not appear.
You can do it like this:
With listboxFruit
    .RowSource = "Sheet1!A2:B4"
    .ColumnCount = 2
    .ColumnWidths = "100,100"
End With
In a real-world application, you could set the RowSource and ColumnCount properties like this:
With listboxFruit
    .RowSource = myRange.Address(External:=True)
    .ColumnCount = myRange.Columns.Count
End With
See the AddItem section for how to add data to the other columns when you are using the AddItem property.
VBA ListBox Column Headers
Column Headers are another confusing element of the ListBox. If you use the RowSource property to add data to the ListBox then the line above the Range will be automatically used as the header.
For the Column headers to appear the ColumnHeads property must be set to true. You can do this in the properties window of the ListBox or in the code list this:
ListBox1.ColumnHeads = True
If you use the List or AddItem property to fill the ListBox then the column headers are not available. The best solution, albeit a frustrating one, is to use labels above the ListBox. I know it sounds crazy but that unfortunately is the reality. The one advantage is that you can use the Label click event which is useful if you plan to sort the data by a column.
Creating a ListBox Dynamically
Controls are normally created at design time but you can also create them dynamically at run time:
    Dim myListbox As MSForms.ListBox
    Set myListbox = Controls.Add("Forms.ListBox.1")
If you want to add an event to a dynamic control you can do it like this:
- First of all create a Class like this:
Public WithEvents myListBox As MSForms.ListBox

Private Sub myListBox_Change()
  MsgBox "Selection changed"
End Sub
- Name the class clsListBoxEvents. Create a variable of this class object in the UserForm like this:
Private listBoxEvents As New clsListBoxEvents
- Attach the events to the ListBox:
Sub CreateDynamicListBox()

    ' Create the ListBox
    Dim newListBox As MSForms.ListBox
    Set newListBox = Controls.Add("Forms.ListBox.1")

    ' Add some items
    newListBox.List = Array("Apple", "Orange", "Pear")

    ' Connect the ListBox to the ListBox events class
    Set listBoxEvents.myListBox = newListBox

End Sub
Note that you can attach events to any ListBox. It doesn’t have to be created dynamically to do this.
Loop through ListBoxes
If you want to loop through all the ListBoxes on a UserForm you can do it like this:
 Dim ctrl As Variant
 For Each ctrl In Me.Controls
    If TypeName(ctrl) = "ListBox" Then
        Debug.Print ctrl.Name
    End If
 Next ctrl
YouTube Video
Check out this video where I use the ListBox. The source code for the video is available from here
What’s Next?
Free VBA Tutorial If you are new to VBA or you want to sharpen your existing VBA skills then why not try out this Free VBA Tutorial.
Related Training: Get full access to the Excel VBA training webinars and all the tutorials.
(NOTE: Planning to build or manage a VBA Application? Learn how to build 10 Excel VBA applications from scratch.)