
In this Article
- VBA Loop Quick Examples
- For Each Loops
- For Next Loops
- Do While Loops
- Do Until Loops
- VBA Loop Builder
- VBA For Next Loop
- For Loop Syntax
- For Loop Step
- For Loop Step – Inverse
- Nested For Loop
- Exit For
- Continue For
- VBA For Each Loop
- For Each Cell in Range
- For Each Worksheet in Workbook
- For Each Open Workbook
- For Each Shape in Worksheet
- For Each Shape in Each Worksheet in Workbook
- For Each – IF Loop
- VBA Do While Loop
- Do While
- Loop While
- VBA Do Until Loop
- Do Until
- Loop Until
- Exit Do Loop
- End or Break Loop
- More Loop Examples
- Loop Through Rows
- Loop Through Columns
- Loop Through Files in a Folder
- Loop Through Array
- Loops in Access VBA
To work effectively in VBA, you must understand Loops.
Loops allow you to repeat a code block a set number of times or repeat a code block on a each object in a set of objects.
First we will show you a few examples to show you what loops are capable of. Then we will teach you everything about loops.
VBA Loop Quick Examples
For Each Loops
For Each Loops loop through every object in a collection, such as every worksheet in workbook or every cell in a range.
Loop Through all Worksheets in Workbook
This code will loop through all worksheets in the workbook, unhiding each sheet:
Sub LoopThroughSheets()
Dim ws As Worksheet

    For Each ws In Worksheets
        ws.Visible = True
    Next

End Sub
Loop Through All Cells in Range
This code will loop through a range of cells, testing if the cell value is negative, positive, or zero:
Sub If_Loop()
Dim Cell as Range

  For Each Cell In Range("A2:A6")
    If Cell.Value > 0 Then
      Cell.Offset(0, 1).Value = "Positive"
    ElseIf Cell.Value < 0 Then
      Cell.Offset(0, 1).Value = "Negative"
    Else
      Cell.Offset(0, 1).Value = "Zero"
     End If
  Next Cell

End Sub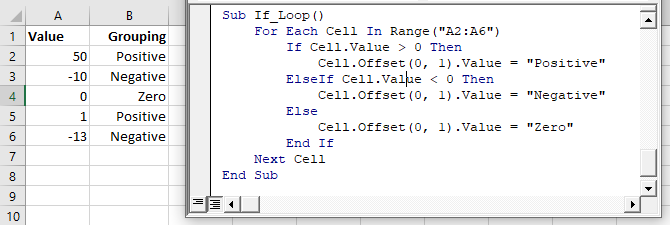
For Next Loops
Another type of “For” Loop is the For Next Loop. The For Next Loop allows you to loop through integers.
This code will loop through integers 1 through 10, displaying each with a message box:
Sub ForLoop()
    Dim i As Integer
    For i = 1 To 10
        MsgBox i
    Next i
End Sub
Do While Loops
Do While Loops will loop while a condition is met. This code will also loop through integers 1 through 10, displaying each with a message box.
Sub DoWhileLoop()
    Dim n As Integer
    n = 1
    Do While n < 11
        MsgBox n
        n = n + 1
    Loop
End Sub
Do Until Loops
Conversely, Do Until Loops will loop until a condition is met. This code does the same thing as the previous two examples.
Sub DoUntilLoop()
    Dim n As Integer
    n = 1
    Do Until n >= 10
        MsgBox n
        n = n + 1
    Loop
End Sub
We will discuss this below, but you need to be extremely careful when creating Do While or Do Until loops so that you don’t create a never ending loop.
VBA Loop Builder
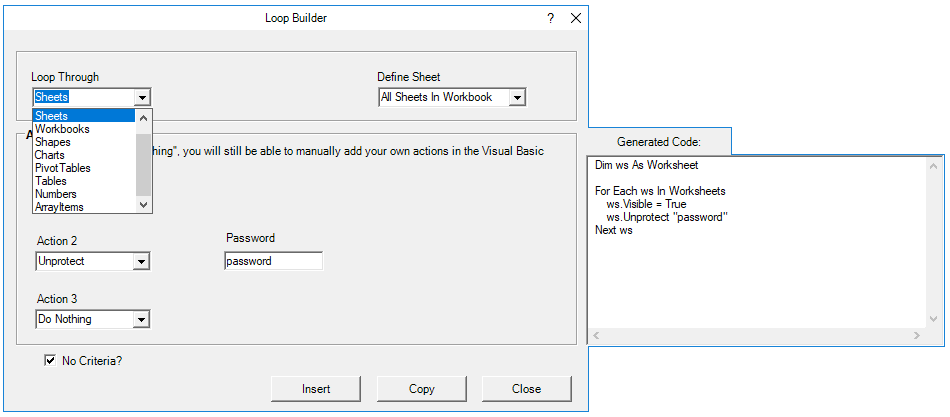
This is a screenshot of the “Loop Builder” from our Premium VBA Add-in: AutoMacro. The Loop Builder allows you to quickly and easily build loops to loop through different objects, or numbers. You can perform actions on each object and/or select only objects that meet certain criteria.
The add-in also contains many other code builders, an extensive VBA code library, and an assortment of coding tools. It’s a must have for any VBA developer.
Now we will cover the different types of loops in depth.
VBA Coding Made Easy
Stop searching for VBA code online. Learn more about AutoMacro — A VBA Code Builder that allows beginners to code procedures from scratch with minimal coding knowledge and with many time-saving features for all users!

Learn More
VBA For Next Loop
For Loop Syntax
The For Next Loop allows you to repeat a block of code a specified number of times. The syntax is:
[Dim Counter as Integer]

For Counter = Start to End [Step Value]
    [Do Something]
Next [Counter]
Where the items in brackets are optional.
- [Dim Counter as Long] – Declares the counter variable. Required if Option Explicit is declared at the top of your module.
- Counter – An integer variable used to count
- Start – The start value (Ex. 1)
- End – The end value (Ex. 10)
- [Step Value] – Allows you to count every n integers instead of every 1 integer. You can also go in reverse with a negative value (ex. Step -1)
- [Do Something] – The code that will repeat
- Next [Counter] – Closing statement to the For Next Loop. You can include the Counter or not. However, I strongly recommend including the counter as it makes your code easier to read.
If that’s confusing, don’t worry. We will review some examples:
Count to 10
This code will count to 10 using a For-Next Loop:
Sub ForEach_CountTo10()

Dim n As Integer
For n = 1 To 10
    MsgBox n
Next n

End Sub
For Loop Step
Count to 10 – Only Even Numbers
This code will count to 10 only counting even numbers:
Sub ForEach_CountTo10_Even()

Dim n As Integer
For n = 2 To 10 Step 2
    MsgBox n
Next n

End Sub
Notice we added “Step 2”. This tells the For Loop to “step” through the counter by 2. We can also use a negative step value to step in reverse:
VBA Programming | Code Generator does work for you!
For Loop Step – Inverse
Countdown from 10
This code will countdown from 10:
Sub ForEach_Countdown_Inverse()

Dim n As Integer
For n = 10 To 1 Step -1
    MsgBox n
Next n
MsgBox "Lift Off"

End Sub
Delete Rows if Cell is Blank
I’ve most frequently used a negative step For-Loop to loop through ranges of cells, deleting rows that meet certain criteria. If you loop from the top rows to the bottom rows, as you delete rows you will mess up your counter.
This example will delete rows with blank cells (starting from the bottom row):
Sub ForEach_DeleteRows_BlankCells()

Dim n As Integer
For n = 10 To 1 Step -1
    If Range("a" & n).Value = "" Then
        Range("a" & n).EntireRow.Delete
    End If
Next n

End Sub
Nested For Loop
You can “nest” one For Loop inside another For Loop. We will use Nested For Loops to create a multiplication table:
Sub Nested_ForEach_MultiplicationTable()

Dim row As Integer, col As Integer

For row = 1 To 9
    For col = 1 To 9
        Cells(row + 1, col + 1).Value = row * col
    Next col
Next row

End Sub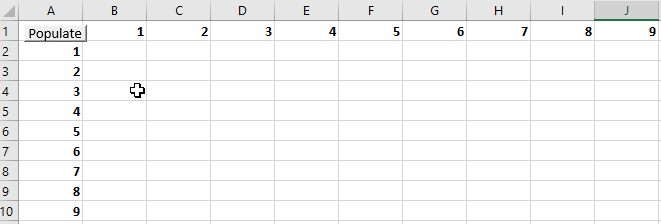
Exit For
The Exit For statement allows you to exit a For Next loop immediately.
You would usually use Exit For along with an If Statement, exiting the For Next Loop if a certain condition is met.
For example, you might use a For Loop to find a cell. Once that cell is found, you can exit the loop to speed up your code.
This code will loop through rows 1 to 1000, looking for “error” in column A. If it’s found, the code will select the cell, alert you to the found error, and exit the loop:
Sub ExitFor_Loop()

Dim i As Integer

For i = 1 To 1000
    If Range("A" & i).Value = "error" Then
        Range("A" & i).Select
        MsgBox "Error Found"
        Exit For
    End If
Next i

End Sub
Important: In the case of Nested For Loops, Exit For only exits the current For Loop, not all active Loops.
Continue For
VBA does not have the “Continue” command that’s found in Visual Basic. Instead, you will need to use “Exit”.
AutoMacro | Ultimate VBA Add-in | Click for Free Trial!
VBA For Each Loop
The VBA For Each Loop will loop through all objects in a collection:
- All cells in a range
- All worksheets in a workbook
- All shapes in a worksheet
- All open workbooks
You can also use Nested For Each Loops to:
- All cells in a range on all worksheets
- All shapes on all worksheets
- All sheets in all open workbooks
- and so on…
The syntax is:
For Each Object in Collection
[Do Something]
Next [Object]
Where:
- Object – Variable representing a Range, Worksheet, Workbook, Shape, etc. (ex. rng)
- Collection – Collection of objects (ex. Range(“a1:a10”)
- [Do Something] – Code block to run on each object
- Next [Object] – Closing statement. [Object] is optional, however strongly recommended.
For Each Cell in Range
This code will loop through each cell in a range:
Sub ForEachCell_inRange()

Dim cell As Range

For Each cell In Range("a1:a10")
    cell.Value = cell.Offset(0,1).Value
Next cell

End Sub
For Each Worksheet in Workbook
This code will loop through all worksheets in a workbook, unprotecting each sheet:
Sub ForEachSheet_inWorkbook()

Dim ws As Worksheet

For Each ws In Worksheets
    ws.Unprotect "password"
Next ws

End Sub
For Each Open Workbook
This code will save and close all open workbooks:
Sub ForEachWB_inWorkbooks()

Dim wb As Workbook

For Each wb In Workbooks
    wb.Close SaveChanges:=True
Next wb

End Sub
AutoMacro | Ultimate VBA Add-in | Click for Free Trial!
For Each Shape in Worksheet
This code will delete all shapes in the active sheet.
Sub ForEachShape()

Dim shp As Shape

For Each shp In ActiveSheet.Shapes
    shp.Delete
Next shp

End Sub
For Each Shape in Each Worksheet in Workbook
You can also nest For Each Loops. Here we will loop through all shapes in all worksheets in the active workbook:
Sub ForEachShape_inAllWorksheets()

Dim shp As Shape, ws As Worksheet

For Each ws In Worksheets
    For Each shp In ws.Shapes
        shp.Delete
    Next shp
Next ws

End Sub
For Each – IF Loop
As we’ve mentioned before, you can use an If statement within a loop, performing actions only if certain criteria is met.
This code will hide all blank rows in a range:
Sub ForEachCell_inRange()

Dim cell As Range

For Each cell In Range("a1:a10")
    If cell.Value = "" Then _
       cell.EntireRow.Hidden = True
Next cell

End Sub
VBA Do While Loop
The VBA Do While and Do Until (see next section) are very similar. They will repeat a loop while (or until) a condition is met.
The Do While Loop will repeat a loop while a condition is met.
Here is the Do While Syntax:
Do While Condition
[Do Something]
Loop
Where:
- Condition – The condition to test
- [Do Something] – The code block to repeat
You can also set up a Do While loop with the Condition at the end of the loop:
Do
[Do Something]
Loop While Condition
We will demo each one and show how they differ:
AutoMacro | Ultimate VBA Add-in | Click for Free Trial!
Do While
Here is the Do While loop example we demonstrated previously:
Sub DoWhileLoop()
    Dim n As Integer
    n = 1
    Do While n < 11
        MsgBox n
        n = n + 1
    Loop
End Sub
Loop While
Now let’s run the same procedure, except we will move the condition to the end of the loop:
Sub DoLoopWhile()
    Dim n As Integer
    n = 1
    Do
        MsgBox n
        n = n + 1
    Loop While n < 11
End Sub
VBA Do Until Loop
Do Until Loops will repeat a loop until a certain condition is met. The syntax is essentially the same as the Do While loops:
Do Until Condition
[Do Something]
Loop
and similarly the condition can go at the start or the end of the loop:
Do
[Do Something]
Loop Until Condition
Do Until
This do Until loop will count to 10, like our previous examples
Sub DoUntilLoop()
    Dim n As Integer
    n = 1
    Do Until n > 10
        MsgBox n
        n = n + 1
    Loop
End Sub
AutoMacro | Ultimate VBA Add-in | Click for Free Trial!
Loop Until
This Loop Until loop will count to 10:
Sub DoLoopUntil()
    Dim n As Integer
    n = 1
    Do
        MsgBox n
        n = n + 1
    Loop Until n > 10
End Sub
Exit Do Loop
Similar to using Exit For to exit a For Loop, you use the Exit Do command to exit a Do Loop immediately
Exit DoHere is an example of Exit Do:
Sub ExitDo_Loop()

Dim i As Integer
i = 1

Do Until i > 1000
    If Range("A" & i).Value = "error" Then
        Range("A" & i).Select
        MsgBox "Error Found"
        Exit Do
    End If
    i = i + 1
Loop

End Sub
End or Break Loop
As we mentioned above, you can use the Exit For or Exit Do to exit loops:
Exit ForExit DoHowever, these commands must be added to your code before you run your loop.
If you are trying to “break” a loop that’s currently running, you can try pressing ESC or CTRL + Pause Break on the keyboard. However, this may not work. If it doesn’t work, you’ll need to wait for your loop to end or, in the case of an endless loop, use CTRL + ALT + Delete to force close Excel.
This is why I try to avoid Do loops, it’s easier to accidentally create an endless loop forcing you to restart Excel, potentially losing your work.
More Loop Examples
AutoMacro | Ultimate VBA Add-in | Click for Free Trial!
Loop Through Rows
This will loop through all the rows in a column:
Public Sub LoopThroughRows()

Dim cell As Range

For Each cell In Range("A:A")
    If cell.value <> "" Then MsgBox cell.address & ": " & cell.Value
Next cell

End Sub
Loop Through Columns
This will loop through all columns in a row:
Public Sub LoopThroughColumns()

Dim cell As Range

For Each cell In Range("1:1")
    If cell.Value <> "" Then MsgBox cell.Address & ": " & cell.Value
Next cell

End Sub
Loop Through Files in a Folder
This code will loop through all files in a folder, creating a list:
Sub LoopThroughFiles ()

Dim oFSO As Object
Dim oFolder As Object
Dim oFile As Object
Dim i As Integer

Set oFSO = CreateObject("Scripting.FileSystemObject")

Set oFolder = oFSO.GetFolder("C:Demo)

i = 2

For Each oFile In oFolder.Files
    Range("A" & i).value = oFile.Name
    i = i + 1
Next oFile

End Sub
Loop Through Array
This code will loop through the array ‘arrList’:
For i = LBound(arrList) To UBound(arrList)
    MsgBox arrList(i)
Next i
The LBound function gets the “lower bound” of the array and UBound gets the “upper bound”.
Loops in Access VBA
Most of the examples above will also work in Access VBA. However, in Access, we loop through the Recordset Object rather than the Range Object.
Sub LoopThroughRecords()
   On Error Resume Next
   Dim dbs As Database
   Dim rst As Recordset
   Set dbs = CurrentDb
   Set rst = dbs.OpenRecordset("tblClients", dbOpenDynaset)
   With rst
      .MoveLast
      .MoveFirst
      Do Until .EOF = True
         MsgBox (rst.Fields("ClientName"))
        .MoveNext
     Loop
   End With
   rst.Close
   Set rst = Nothing
   Set dbs = Nothing
End SubI need to simply go through all the cells in a Excel Spreadsheet and check the values in the cells. The cells may contain text, numbers or be blank. I am not very familiar / comfortable working with the concept of ‘Range’. Therefore, any sample codes would be greatly appreciated. (I did try to google it, but the code snippets I found didn’t quite do what I needed)
Thank you.
![]()
braX
11.5k5 gold badges20 silver badges33 bronze badges
asked Sep 16, 2008 at 15:47
![]()
If you only need to look at the cells that are in use you can use:
sub IterateCells()

   For Each Cell in ActiveSheet.UsedRange.Cells
      'do some stuff
   Next

End Sub
that will hit everything in the range from A1 to the last cell with data (the bottom right-most cell)
answered Sep 16, 2008 at 15:58
![]()
coricori
8,6367 gold badges45 silver badges81 bronze badges
2
Sub CheckValues1()
    Dim rwIndex As Integer
    Dim colIndex As Integer
    For rwIndex = 1 To 10
            For colIndex = 1 To 5
                If Cells(rwIndex, colIndex).Value <> 0 Then _
                    Cells(rwIndex, colIndex).Value = 0
            Next colIndex
    Next rwIndex
End Sub
Found this snippet on http://www.java2s.com/Code/VBA-Excel-Access-Word/Excel/Checksvaluesinarange10rowsby5columns.htm It seems to be quite useful as a function to illustrate the means to check values in cells in an ordered fashion.
Just imagine it as being a 2d Array of sorts and apply the same logic to loop through cells.
answered Sep 16, 2008 at 15:57
![]()
betelgeucebetelgeuce
8385 silver badges18 bronze badges
1
If you’re just looking at values of cells you can store the values in an array of variant type. It seems that getting the value of an element in an array can be much faster than interacting with Excel, so you can see some difference in performance using an array of all cell values compared to repeatedly getting single cells.
Dim ValArray as Variant
ValArray = Range("A1:IV" & Rows.Count).Value
Then you can get a cell value just by checking ValArray( row , column )
![]()
JimmyPena
8,6986 gold badges43 silver badges64 bronze badges
answered Sep 17, 2008 at 20:55
![]()
Jon FournierJon Fournier
4,2493 gold badges32 silver badges43 bronze badges
1
You can use a For Each to iterate through all the cells in a defined range.
Public Sub IterateThroughRange()

Dim wb As Workbook
Dim ws As Worksheet
Dim rng As Range
Dim cell As Range

Set wb = Application.Workbooks(1)
Set ws = wb.Sheets(1)
Set rng = ws.Range("A1", "C3")

For Each cell In rng.Cells
    cell.Value = cell.Address
Next cell

End Sub
answered Sep 16, 2008 at 15:58
![]()
theotheo
8,3613 gold badges23 silver badges22 bronze badges
For a VB or C# app, one way to do this is by using Office Interop. This depends on which version of Excel you’re working with.
For Excel 2003, this MSDN article is a good place to start.
Understanding the Excel Object Model from a Visual Studio 2005 Developer’s Perspective
You’ll basically need to do the following:
- Start the Excel application.
- Open the Excel workbook.
- Retrieve the worksheet from the workbook by name or index.
- Iterate through all the Cells in the worksheet which were retrieved as a range.
- Sample (untested) code excerpt below for the last step.
    Excel.Range allCellsRng;
    string lowerRightCell = "IV65536";
    allCellsRng = ws.get_Range("A1", lowerRightCell).Cells;
    foreach (Range cell in allCellsRng)
    {
        if (null == cell.Value2 || isBlank(cell.Value2))
        {
          // Do something.
        }
        else if (isText(cell.Value2))
        {
          // Do something.
        }
        else if (isNumeric(cell.Value2))
        {
          // Do something.
        }
    }
For Excel 2007, try this MSDN reference.
answered Sep 16, 2008 at 16:24
![]()
Cory EngebretsonCory Engebretson
7,6234 gold badges21 silver badges17 bronze badges
There are several methods to accomplish this, each of which has advantages and disadvantages; First and foremost, you’re going to need to have an instance of a Worksheet object, Application.ActiveSheet works if you just want the one the user is looking at.
The Worksheet object has three properties that can be used to access cell data (Cells, Rows, Columns) and a method that can be used to obtain a block of cell data, (get_Range).
Ranges can be resized and such, but you may need to use the properties mentioned above to find out where the boundaries of your data are. The advantage to a Range becomes apparent when you are working with large amounts of data because VSTO add-ins are hosted outside the boundaries of the Excel application itself, so all calls to Excel have to be passed through a layer with overhead; obtaining a Range allows you to get/set all of the data you want in one call which can have huge performance benefits, but it requires you to use explicit details rather than iterating through each entry.
This MSDN forum post shows a VB.Net developer asking a question about getting the results of a Range as an array
answered Sep 16, 2008 at 16:01
![]()
TheXenocideTheXenocide
1,0208 silver badges22 bronze badges
You basically can loop over a Range
Get a sheet
myWs = (Worksheet)MyWb.Worksheets[1];
Get the Range you’re interested in If you really want to check every cell use Excel’s limits
The Excel 2007 «Big Grid» increases
the maximum number of rows per
worksheet from 65,536 to over 1
million, and the number of columns
from 256 (IV) to 16,384 (XFD).
from here http://msdn.microsoft.com/en-us/library/aa730921.aspx#Office2007excelPerf_BigGridIncreasedLimitsExcel
and then loop over the range
        Range myBigRange = myWs.get_Range("A1", "A256");

        string myValue;

        foreach(Range myCell in myBigRange )
        {
            myValue = myCell.Value2.ToString();
        }
answered Sep 16, 2008 at 16:06
![]()
w4ikw4ik
1,2762 gold badges19 silver badges33 bronze badges
In Excel VBA, this function will give you the content of any cell in any worksheet.
Function getCellContent(Byref ws As Worksheet, ByVal rowindex As Integer, ByVal colindex As Integer) as String
    getCellContent = CStr(ws.Cells(rowindex, colindex))
End Function
So if you want to check the value of cells, just put the function in a loop, give it the reference to the worksheet you want and the row index and column index of the cell. Row index and column index both start from 1, meaning that cell A1 will be ws.Cells(1,1) and so on.
answered Sep 16, 2008 at 15:57
![]()
Martin08Martin08
20.9k22 gold badges84 silver badges93 bronze badges
My VBA skills are a little rusty, but this is the general idea of what I’d do.
The easiest way to do this would be to iterate through a loop for every column:
public sub CellProcessing()
on error goto errHandler

    dim MAX_ROW as Integer   'how many rows in the spreadsheet
    dim i as Integer
    dim cols as String

    for i = 1 to MAX_ROW
        'perform checks on the cell here
        'access the cell with Range("A" & i) to get cell A1 where i = 1
    next i

exitHandler:
    exit sub
errHandler:
    msgbox "Error " & err.Number & ": " & err.Description
    resume exitHandler
end sub
it seems that the color syntax highlighting doesn’t like vba, but hopefully this will help somewhat (at least give you a starting point to work from).
- Brisketeer
answered Sep 16, 2008 at 16:06
To get the most out of Excel and VBA, you need to know how to use loops efficiently.
In VBA, loops allow you to go through a set of objects/values and analyze it one by one. You can also perform specific tasks for each loop.
Here is a simple example of using VBA loops in Excel.
Suppose you have a dataset and you want to highlight all the cells in even rows. You can use a VBA loop to go through the range and analyze each cell row number. If it turns out to be even, you give it a color, else you leave it as is.
Now this, of course, is very simple of looping in Excel VBA (and you can also do this using conditional formatting).
In real life, you can do a lot more with VBA loops in Excel that can help you automate tasks.
Here are some more practical examples where VBA loops can be useful:
- Looping through a range of cells and analyzing each cell (highlight cells with a specific text in it).
- Looping through all the worksheets and do something with each (such as protect/unprotect it).
- Loop through all the open workbooks (and save each workbook or close all except the active workbook).
- Loop through all the characters in a cell (and extract the numeric part from a string).
- Loop through all the values an array.
- Loop through all the charts/objects (and give a border or change the background color).
Now to best use loops in Excel VBA, you need to know about the different kinds that exist and the correct syntax of each.

In this tutorial, I’ll showcase different types of Excel VBA loops and cover a few examples for each loop
Note: This is going to be a huge tutorial, where I will try and cover each VBA loop in some detail. I recommend you bookmark this page for future reference.
If you’re interested in learning VBA the easy way, check out my Online Excel VBA Training.
For Next Loop
The ‘For Next’ loop allows you to go through a block of code for the specified number of times.
For example, if I ask you to add the integers from 1 to 10 manually, you would add the first two numbers, then add the third number to the result, then add the fourth number to the result, as so on..
Isn’t it?
The same logic is used in the For Next loop in VBA.
You specify how many times you want the loop to run and also specify what you want the code to do each time the loop is run.
Below is the syntax of the For Next loop:
For Counter = Start To End [Step Value]
[Code Block to Execute]
Next [counter]
In the For Next loop, you can use a Counter (or any variable) that will be used to run the loop. This counter allows you to run this loop for a required number of times.
For example, if I want to add the first 10 positive integers, then my Counter value would be from 1 to 10.
Let’s have a look at a few examples to better understand how For Next loop works.
Example 1 – Adding the first 10 positive integers
Below is the code that will add the first 10 positive integers using a For Next loop.
It will then display a message box showing the sum of these numbers.
Sub AddNumbers()
Dim Total As Integer
Dim Count As Integer
Total = 0
For Count = 1 To 10
Total = Total + Count
Next Count
MsgBox Total
End Sub
In this code, the value of Total is set to 0 before getting into the For Next loop.
Once it gets into the loop, it holds the total value after every loop. So after the first loop, when Counter is 1, ‘Total’ value becomes 1, and after the second loop it becomes 3 (1+2), and so on.
And finally, when the loop ends, ‘Total’ variable has the sum of the first 10 positive integers.
A MsgBox then simply displays the result in a message box.
Example 2 – Adding the first 5 Even Positive Integers
To sum the first five even positive integers (i.e, 2,4,6,8, and 10), you need a similar code with a condition to only consider the even numbers and ignore the odd numbers.
Here is a code that will do it:
Sub AddEvenNumbers()
Dim Total As Integer
Dim Count As Integer
Total = 0
For Count = 2 To 10 Step 2
Total = Total + Count
Next Count
MsgBox Total
End Sub
Note that we started the Count value from 2 and also used ‘Step 2‘.
When you use ‘Step 2’, it tells the code to increment the ‘Count’ value by 2 every time the loop is run.
So the Count value starts from 2 and then becomes 4, 6, 8 and 10 as the looping occurs.
NOTE: Another way of doing this could be to run the loop from 1 to 10 and within the loop check whether the number is even or odd. However, using Step, in this case, is a more efficient way as it does not require the loop to run 10 times, but only 5 times.
The Step value can also be negative. In such as case, the Counter starts at a higher value and keeps getting decremented by the specified Step value.
Example 3 – Entering Serial Number in the Selected Cells
You can also use the For Next loop to go through a collection of objects (such as cells or worksheets or workbooks),
Here is an example that quickly enters serial numbers in all the selected cells.
Sub EnterSerialNumber()
Dim Rng As Range
Dim Counter As Integer
Dim RowCount As Integer
Set Rng = Selection
RowCount = Rng.Rows.Count
For Counter = 1 To RowCount
ActiveCell.Offset(Counter - 1, 0).Value = Counter
Next Counter
End Sub
The above code first counts the number of selected rows and then assigns this value to the variable RowCount. We then run the loop from ‘1 to RowCount’.
Also note that since selection can be any number of rows, we have Set the variable Rng to Selection (with the line ‘Set Rng = Selection’). Now we can use the ‘Rng’ variable to refer to the selection in our code.
Example 4 – Protect All Worksheets in the Active Workbook
You can use the ‘For Next’ loop to go through all the worksheets in the active workbook, and protect (or unprotect) each of the worksheets.
Below is the code that will do this:
Sub ProtectWorksheets()
Dim i As Integer
For i = 1 To ActiveWorkbook.Worksheets.Count
Worksheets(i).Protect
Next i
End Sub
The above code counts the number of sheets by using ActiveWorkbook.Worksheets.Count. This tells VBA how many times the loop needs to be run.
In each instance, it refers to the Ith workbook (using Worksheets(i)) and protects it.
You can use this same code to Unprotect worksheets too. Just change the line Worksheets(i).Protect to Worksheets(i).UnProtect.
Nested ‘For Next’ Loops
You can use nested ‘For Next’ loops to get more complex automation done in Excel. A nested ‘For Next’ loop would mean that there is a ‘For Next’ loop within a ‘For Next’ loop.
Let me show you how to use this using an example.
Suppose I have 5 workbooks open in my system and I want to protect all the worksheets in all these workbooks.
Below is the code that will do this:
Sub ProtectWorksheets()
Dim i As Integer
Dim j As Integer
For i = 1 To Workbooks.Count
For j = 1 To Workbooks(i).Worksheets.Count
Workbooks(i).Worksheets(j).Protect
Next j
Next i
End Sub
The above is a nested For Next loop as we have used one For Next loop within another.
‘EXIT For’ Statements in For Next Loops
‘Exit For’ statement allows you to exit the ‘For Next’ loop completely.
You can use it in cases where you want the For Next loop to end when a certain condition is met.
Let’s take an example where you have a set of numbers in Column A and you want to highlight all the negative numbers in red font. In this case, we need to analyze each cell for its value and then change the font color accordingly.
But to make the code more efficient, we can first check if there are any negative values in the list or not. If there are no negative values, we can use the Exit For the statement to simply come out of the code.
Below is the code that does this:
Sub HghlightNegative()
Dim Rng As Range
Set Rng = Range("A1", Range("A1").End(xlDown))
Counter = Rng.Count
For i = 1 To Counter
If WorksheetFunction.Min(Rng) >= 0 Then Exit For
If Rng(i).Value < 0 Then Rng(i).Font.Color = vbRed
Next i
End Sub
When you use the ‘Exit For’ statement within a nested ‘For Next’ loop, it will come out of the loop in which it is executed and go on to execute the next line in the code after the For Next loop.
For example, in the below code, the ‘Exit For’ statement will get you out of the inner loop, but the outer loop would continue to work.
Sub SampleCode()
For i = 1 To 10
For j = 1 to 10
Exit For
Next J
Next i
End Sub
Do While Loop
A ‘Do While’ loop allows you to check for a condition and run the loop while that condition is met (or is TRUE).
There are two types of syntax in the Do While Loop.
Do [While condition]
[Code block to Execute]
Loop
and
Do
[Code block to Execute]
Loop [While condition]
The difference between these two is that in the first, the While condition is checked first before any code block is executed, and in the second case, the code block is executed first and then the While condition is checked.
This means that if the While condition is False is both the cases, the code will still run at least once in the second case (as the ‘While’ condition is checked after the code has been executed once).
Now let’s see some examples of using Do While loops in VBA.
Example 1 – Add First 10 Positive Integers using VBA
Suppose you want to add the first ten positive integers using the Do While loop in VBA.
To do this, you can use the Do While loop until the next number is less than or equal to 10. As soon as the number is greater than 1o, your loop would stop.
Here is the VBA code that will run this Do While loop and the show the result in a message box.
Sub AddFirst10PositiveIntegers()
Dim i As Integer
i = 1
Do While i <= 10
Result = Result + i
i = i + 1
Loop
MsgBox Result
End Sub
The above loop continues to work until the value of ‘i’ becomes 11. As soon as it becomes 11, the loop ends (as the While condition becomes False).
Within the loop, we have used a Result variable that holds the final value Once the loop is completed, a message box shows the value of the ‘Result’ variable.
Example 2 – Enter Dates For the Current Month
Let’s say you want to enter all the dates of the current month into a worksheet column.
You can do that by using the following Do While loop code:
Sub EnterCurrentMonthDates()
Dim CMDate As Date
Dim i As Integer
i = 0
CMDate = DateSerial(Year(Date), Month(Date), 1)
Do While Month(CMDate) = Month(Date)
Range("A1").Offset(i, 0) = CMDate
i = i + 1
CMDate = CMDate + 1
Loop
End Sub
The above code would enter all the dates in the first column of the worksheet (starting from A1). The loops continue till the Month value of the variable ‘CMDate’ matches that of the current month.
Exit Do Statement
You can use the Exit Do statement to come out of the loop. As soon as the code executes the ‘Exit Do’ line, it comes out of the Do While loop and passes the control to the next line right after the loop.
For example, if you want to enter the first 10 dates only, then you can exit the loop as soon as the first 10 dates are entered.
The below code will do this:
Sub EnterCurrentMonthDates()
Dim CMDate As Date
Dim i As Integer
i = 0
CMDate = DateSerial(Year(Date), Month(Date), 1)
Do While Month(CMDate) = Month(Date)
Range("A1").Offset(i, 0) = CMDate
i = i + 1
If i >= 10 Then Exit Do
CMDate = CMDate + 1
Loop
End Sub
In the above code, the IF statement is used to check if the value of i is greater than 10 or not. As soon as the value of ‘i’ becomes 10, Exit Do statement is executed and the loop ends.
Do Until Loop
‘Do Until’ loops are very much like the ‘Do While’ loops.
In ‘Do While’, the loop runs till the given condition is met, while in ‘Do Until’, it loops until the specified condition is met.
There are two types of syntax in the Do Until Loop.
Do [Until condition]
[Code block to Execute]
Loop
and
Do
[Code block to Execute]
Loop [Until condition]
The difference between these two is that in the first, the Until condition is checked first before any code block is executed, and in the second case, the code block is executed first and then the Until condition is checked.
This means that if the Until condition is TRUE is both cases, the code will still run at least once in the second case (as the ‘Until’ condition is checked after the code has been executed once).
Now let’s see some examples of using Do Until loops in VBA.
Note: All the examples for Do Until are the same as that of Do While. These have been modified to show you how the Do Until loop works.
Example 1 – Add First 10 Positive Integers using VBA
Suppose you want to add the first ten positive integers using the Do Until loop in VBA.
To do this, you need to run the loop until the next number is less than or equal to 10. As soon as the number is greater than 1o, your loop would stop.
Here is the VBA code that will run this loop and show the result in a message box.
Sub AddFirst10PositiveIntegers()
Dim i As Integer
i = 1
Do Until i > 10
Result = Result + i
i = i + 1
Loop
MsgBox Result
End Sub
The above loop continues to work until the value of ‘i’ becomes 11. As soon as it becomes 11, the loop ends (as the ‘Until’ condition becomes True).
Example 2 – Enter Dates For the Current Month
Let’s say you want to enter all the dates of the current month into a worksheet column.
You can do that by using the following Do Until loop code:
Sub EnterCurrentMonthDates()
Dim CMDate As Date
Dim i As Integer
i = 0
CMDate = DateSerial(Year(Date), Month(Date), 1)
Do Until Month(CMDate) <> Month(Date)
Range("A1").Offset(i, 0) = CMDate
i = i + 1
CMDate = CMDate + 1
Loop
End Sub
The above code would enter all the dates in the first column of the worksheet (starting from A1). The loop continues until the Month of variable CMDate is not equal to that of the current month.
Exit Do Statement
You can use the ‘Exit Do’ statement to come out of the loop.
As soon as the code executes the ‘Exit Do’ line, it comes out of the Do Until loop and passes the control to the next line right after the loop.
For example, if you want to enter the first 10 dates only, then you can exit the loop as soon as the first 10 dates are entered.
The below code will do this:
Sub EnterCurrentMonthDates()
Dim CMDate As Date
Dim i As Integer
i = 0
CMDate = DateSerial(Year(Date), Month(Date), 1)
Do Until Month(CMDate) <> Month(Date)
Range("A1").Offset(i, 0) = CMDate
i = i + 1
If i >= 10 Then Exit Do
CMDate = CMDate + 1
Loop
End Sub
In the above code, as soon as the value of ‘i’ becomes 10, Exit Do statment is executed and the loop ends.
For Each
In VBA, you can loop through a set of collections using the ‘For Each’ loop.
Here are some examples of collections in Excel VBA:
- A collection of all the open Workbooks.
- A collection of all worksheets in a workbook.
- A collection of all the cells in a range of selected cells.
- A collection of all the charts or shapes in the workbook.
Using the ‘For Each’ loop, you can go through each of the objects in a collection and perform some action on it.
For example, you can go through all the worksheets in a workbook and protect these, or you can go through all the cells in the selection and change the formatting.
With the ‘For Each’ loop (also referred to as the ‘For Each-Next’ loop), you don’t need to know how many objects are there in a collection.
‘For Each’ loop would automatically go through each object and perform the specified action. For example, if you want to protect all the worksheets in a workbook, the code would be the same whether you have a workbook with 3 worksheets or 30 worksheets.
Here is the syntax of For Each-Next loop in Excel VBA.
For Each element In collection
[Code Block to Execute]
Next [element]
Now let’s see a couple of examples of using the For Each Loop in Excel.
Example 1 – Go through All the Worksheets in a Workbook (and Protect it)
Suppose you have a workbook where you want to protect all the worksheets.
Below For Each-Next loop can do this easily:
Sub ProtectSheets()
Dim ws As Worksheet
For Each ws In ActiveWorkbook.Worksheets
ws.Protect
Next ws
End Sub
In the above code, we have defined ‘ws’ variable as a Worksheet object. This tells VBA that ‘ws’ should be interpreted as a worksheet object in the code.
Now we use the ‘For Each’ statement to go through each ‘ws’ (which is a worksheet object) in the collection of all the worksheets in the active workbook (given by ActiveWorkbook.Worksheets).
Note that unlike other loops where we have tried to protect all the worksheets in a workbook, here we don’t need to worry about how many worksheets are there in the workbook.
We don’t need to count these to run the loop. For Each loop ensures that all the objects are analyzed one by one.
Example 2 – Go through All the Open Workbooks (and Save All)
If you work with multiple workbooks at the same time, it can come in handy to be able to save all these workbooks at once.
Below VBA code can do this for us:
Sub SaveAllWorkbooks()
Dim wb As Workbook
For Each wb In Workbooks
wb.Save
Next wb
End Sub
Note that in this code, you don’t get a prompt that asks you to save the workbook in a specific location (if saving it for the first time).
It saves it in the default folder (it was the ‘Documents’ folder in my case). This code works best when these files are already saved and you’re making changes and you want to save all the workbooks quickly.
Example 3 – Go through All the Cells in a Selection (Highlight negative values)
Using the ‘For Each’ loop, you can loop through all the cells in a specific range or in the selected range.
This can be helpful when you want to analyze each cell and perform an action based on it.
For example, below is the code that will go through all the cells in the selection and change the cell color of the cells with negative values to red.
Sub HighlightNegativeCells()
Dim Cll As Range
For Each Cll In Selection
If Cll.Value < 0 Then
Cll.Interior.Color = vbRed
End If
Next Cll
End Sub
(Note I’ve used Cll as a short variable name for Cell. It’s advisable not to use object names such as Sheets or Range as variable names)
In the above code, the For Each-Next loop goes through the collection of cells in the selection. IF statement is used to identify if the cell value is negative or not. In case it is, the cell is given a red interior color, else it goes to the next cell.
In case you don’t have a selection, and instead want VBA to select all the filled cells in a column, starting from a specific cell (just like we use Control + Shift + Down arrow key to select all filled cells), you can use the below code:
Sub HighlightNegativeCells()
Dim Cll As Range
Dim Rng As Range
Set Rng = Range("A1", Range("A1").End(xlDown))
For Each Cll In Rng
If Cll.Value < 0 Then
Cll.Interior.Color = vbRed
End If
Next Cll
End Sub
In the above example, it doesn’t matter how many filled cells are there. It will start from cell A1 and analyze all the contiguous filled cells in the column.
You also don’t need to have cell A1 selected. You can have any far-off cell selected and when the code runs, it will still consider all the cells in column A (starting from A1) and color the negative cells.
‘Exit For’ Statment
You can use the ‘Exit For’ statement in the For Each-Next loop to come out of the loop. This is usually done in case a specific condition is met.
For example, in Example 3, as we are going through a set of cells, it can be more efficient to check if there are any negative values or not. In case there are no negative values, we can simply exit the loop and save some VBA processing time.
Below is the VBA code that will do this:
Sub HighlightNegativeCells()
Dim Cll As Range
For Each Cll In Selection
If WorksheetFunction.Min(Selection) >= 0 Then Exit For
If Cll.Value < 0 Then
Cll.Interior.Color = vbRed
End If
Next Cll
End Sub
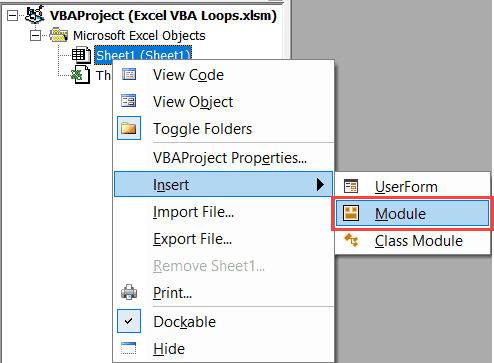
Where to Put the VBA Code
Wondering where the VBA code goes in your Excel workbook?
Excel has a VBA backend called the VBA editor. You need to copy and paste the code in the VB Editor module code window.
Here are the steps to do this:
- Go to the Developer tab.

- Click on the Visual Basic option. This will open the VB editor in the backend.
- In the Project Explorer pane in the VB Editor, right-click on any object for the workbook in which you want to insert the code. If you don’t see the Project Explorer go to the View tab and click on Project Explorer.
- Go to Insert and click on Module. This will insert a module object for your workbook.

- Copy and paste the code in the module window.


You May Also Like the Following Excel Tutorials:
- How to record a macro in Excel.
- Creating User-defined functions in Excel.
- Excel VBA Msgbox
- How to Run a Macro in Excel.
- How to Create and Use Add-ins in Excel.
- Excel VBA Events – An Easy (and Complete) Guide.
- How to Sort Data in Excel using VBA (A Step-by-Step Guide).
- 24 Useful Excel Macro Examples for VBA Beginners (Ready-to-use).
- How to Use Excel VBA InStr Function (with practical EXAMPLES).
- Excel Personal Macro Workbook | Save & Use Macros in All Workbooks.
- Using Select Case in Excel VBA.
The art of Excel VBA programming is in the manipulation of properties of objects of Excel. The more skillfully you can play with these objects and properties, the more powerful the macros you can build.
The number one object in Excel you have to process is by far the Range object. In this article, I am going to walk you through the critical skills to loop through ranges in Excel worksheets.
Loop through cells in a range
The main skill to loop through a range is with FOR-NEXT loops. There are two FOR-NEXT loop conventions, which are both very useful when we loop through ranges. I would highly recommend to learn both skills.
Method 1: with a range variable
In the Range object, there are many Cell objects. We can therefore think of a Range as a group of Cells. We can effectively use the “For Each element In group” convention of the For-Next statement to loop through every Cell inside a Range.

The macro LoopCells1 loops through every cell in Range “A1:C5” and applies a sequential counter into the content of each cell.
Sub LoopCells1()
Dim cell As Range
Dim counter As Integer

'loop through each cell object element within a range
For Each cell In Range("A1:C5").Cells
    counter = counter + 1	'denotes the nth cell
    cell.Value = counter
Next
End Sub
The result after running the macro looks like this:

Method 2: with a numeric variable
Most VBA users are more confident with the For-Next loop convention of:
For counter = start To end
This convention can also be used to loop through cells within a range. The macro “LoopCells2” demonstrates how to loop through each cell in range A1:C5 by referring to the index number of cells. The loop begins with the index number of 1 to the upper bound which is the total number of cells in the range.
Sub LoopCells2()
Dim c As Long
Dim counter As Integer

'loop through each cell within a range by calling the index number of the cells
For c = 1 To Range("A1:C5").Cells.Count
    'put the index number into cell
    Range("A1:C5").Cells(c).Value = c
Next
End Sub
The result after running the macro “LoopCells2” looks identical to the result of the previous macro “LoopCells1”.

Important note on numeric variable type
One limitation of this method is with the upper limit of the numeric variable being declared and used in the For-Next loop. There are a few points you need to bear in mind:
- Avoid declaring an Integer typing variable for this purpose because the number of cells in a worksheet is far more than 32,767.
- Declare a Long variable instead, so that the loop can process up to 2,147,483,648 cells, which serves most cases.
- Declaring a Double variable type won’t solve the limitation.
- In case your process exceeded the limit of even a long variable, you will have to restructure your For-Next loop to use the “For Each element In group” convention.
But even with such limitations, this is still a very useful method. It’s often used because, in most situations, the limits of the variable type won’t be reached.
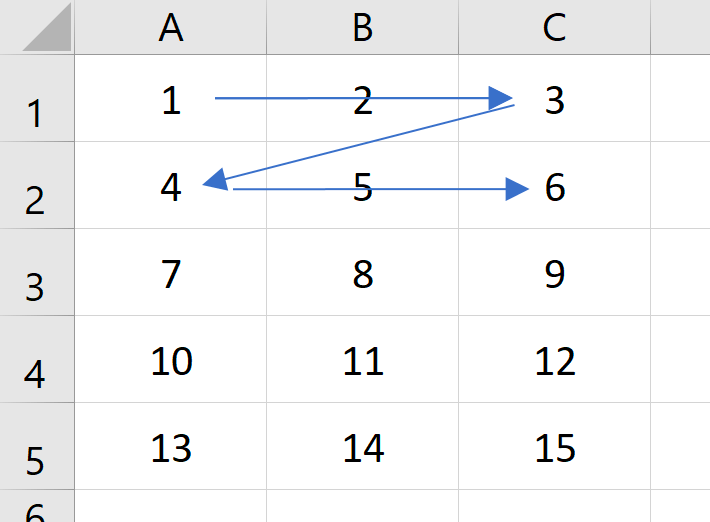
Note on order of cells being processed
When using either of the two methods above, the cells in the range are being processed in the same sequence: from left to right, then from top to bottom. The picture below visualizes such sequence:
If you want the cells to be processed in a different order, you need to learn other strategies which will be explained in the next few sections.
Loop through rows or columns in a range
Sometimes we want to loop through each row in a range (from top to bottom). Similar to looping through cells, we can do it with both conventions of the For-Next statement, either with a range object variable or a numeric variable.
Method 1: with a range variable
Sub LoopRows1()
Dim r As Range
Dim MyString As String

'Loop through each row, and apply a yellow colow fill
For Each r In Range("A1:C5").Rows
    r.Interior.ColorIndex = 6
Next
End Sub
To loop through columns, we just need to change the first line of the For-Next loop to go through the columns instead. In the example below, we want to loop through each column in range A1:C5, and change the column heading to Proper Case (first letter of each word in capital).

Sub LoopColumn1()
Dim c As Range
Dim MyString As String

'Loop through each column and set first cell to Proper Case
For Each c In Range("A1:C5").Columns
    c.Cells(1).Value = StrConv(c.Cells(1).Value, vbProperCase)
Next
End Sub
Method 2: with a numeric variable
In this example, we want to loop through every column in a data table. (See picture of our sample data below.) If a column contains numeric data, we set the NumberFormat to 2 decimal places.

'apply 0.00 number format to columns with numeric values
Sub FormatNumericColumns()
Dim c As Integer
Dim MyString As String

With Range("A1").CurrentRegion
For c = 1 To .Columns.Count
    'test 2nd cell of column for numeric value
    If IsNumeric(.Columns(c).Cells(2).Value) Then
        .Columns(c).NumberFormat = "0.00"
    End If
Next
End Sub
The result of the macro looks like the image below. The number format of the last 3 columns with numeric data has been set to 2 decimal places.

(The dates in the first column are not considered by the VBA IsNumeric function as numeric. Please read my other article all about IsNumeric for more detail on this topic.)
Advanced strategies
Deleting columns (or rows)
Here we want to write a macro to delete the three columns with headings with the word “delete” (the yellow columns). We can tackle this problem with a For-Next loop we learned in the sections above.

First Attempt:
We can try to loop through each column with the “For Each element In group” convention. The macro below looks simple and straight-forward enough, looping through each column (element) within the group of columns in range A1:C5.
Sub DeleteColmns1()
Dim c As Range
Dim x As Integer
    With Range("A1:E5")
        For Each c In .Columns
            If c.Cells(1).Value = "delete" Then
                c.Delete
            End If
        Next
    End With
End Sub
The result of the macro looks like the picture below. The macro has failed to delete all the three columns.

Reminder: When looping through a range, if you want to apply structural change to the range, NEVER use the “For Each element In group” convention because it may create unexpected results. In some cases, (e.g. insert columns), it will even cause an infinite loop and your Excel may be frozen and you’ll have to force quit Excel and lose your unsaved work.
Second Attempt:
Now, how about using the “For counter = start To end” convention?
Sub DeleteColmns2()
Dim tmp As Integer
Dim x As Integer
    With Range("A1:E5")
        For x = 1 To .Columns.Count
            If .Columns(x).Cells(1).Value = "delete" Then
                .Columns(x).Delete
            End If
        Next
    End With
End Sub
The result looks identical to that of the previous macro:

If we looked at the result more carefully, we noticed that the original 2nd and 4th column were deleted, but the original 3rd column was not. This was because when the 2nd column was deleted (when x=2), the 3rd column has become the 2nd column which has been skipped when the For-Next loop proceed to process x = 3.
Solution:
So, how do we tackle this problem? The answer is with the For-Next statement convention of “For counter = end To start step -1″, which processes the range from back to front (from the last column backward to the first column).
Sub DeleteColumnFinal()
Dim x As Integer
    With Range("A1").CurrentRegion
        For x = .Columns.Count To 1 Step -1
            If .Columns(x).Cells(1).Value = "delete" Then
                .Columns(x).Delete
            End If
        Next
    End With
End Sub
Loop though every n-th row in a range
We have a data table, and we want to apply a yellow shading (fill) to the odd number rows. And we don’t want to shade the first row which contains the field headings.

Solution 1:
We can use the “For counter = start To end” convention to tackle this problem. We can loop through each row beginning from the 2nd row (which bypassed the field headings). If the row number is odd, we apply a yellow color.
'Shade alternate (even) rows of data
Sub ShadeRows1()
Dim r As Long
With Range("A1").CurrentRegion
    For r = 1 To .Rows.Count
        If r / 2 = Int(r / 2) Then 'even rows
            .Rows(r).Interior.ColorIndex = 6
        End If
    Next
End With
End Sub

To enhance the macro to shade every n-th row, simply change the 2 in line 5 to n. For example:
If r / 3 = Int(r / 3) Then 'every 3 rows
Solution 2:
We can also use the “For counter = start to end step 2” convention. In the macro “ShadeRows2”, the loop begins from the 2nd row and then the 4th row, then 6th row, etc.
'Shade alternate (odd) rows of data from the 3rd row
Sub ShadeRows2()
Dim r As Long
With Range("A1").CurrentRegion
    'begin from 2nd and shade every other row
    For r = 2 To .Rows.Count Step 2
        .Rows(r).Interior.ColorIndex = 6
    Next
End With
End Sub
To enhance the macro to shade every 3rd row, simple change the 2 in line 5 to 3. For example:
For r = 3 To .Rows.Count Step 3
Conclusion
We have gone through in detail the different approaches to loop through a range in VBA, including the pitfalls and a couple of special scenarios. These techniques can also be applied in combination or with other VBA techniques to achieve more powerful automation with worksheet ranges in your macros.
Свойство Cells объекта Range в VBA Excel, представляющее коллекцию ячеек заданного диапазона. Обращение к ячейкам диапазона с помощью свойства Cells.
Range.Cells – свойство, возвращающее коллекцию всех ячеек указанного диапазона.
Свойство Cells объекта Worksheet
Обращение к ячейке «A1» активного рабочего листа с помощью свойства Cells:
|
‘по индексу (порядковому номеру) ячейки MsgBox Cells(1).Address ‘Результат: $A$1 ‘по номеру строки и номеру столбца MsgBox Cells(1, 1).Address ‘Результат: $A$1 ‘по номеру строки и буквенному обозначению столбца MsgBox Cells(1, «A»).Address ‘Результат: $A$1 |
В данном случае в качестве объекта Range выступает диапазон всего активного рабочего листа (ActiveSheet). Полный путь к ячейке «A1» можно записать так:
|
MsgBox ThisWorkbook.ActiveSheet.Cells(1).Address ‘Результат: $A$1 MsgBox ThisWorkbook.ActiveSheet.Cells(1, 1).Address ‘Результат: $A$1 MsgBox ThisWorkbook.ActiveSheet.Cells(1, «A»).Address ‘Результат: $A$1 |
Обращение в VBA Excel к ячейке «C5» с помощью свойства Cells по имени рабочего листа (Worksheet) в другой книге Excel:
|
MsgBox Workbooks(«Книга1.xlsm»).Worksheets(«Лист1»).Cells(65539).Address ‘Результат: $C$5 в Excel 2016 MsgBox Workbooks(«Книга1.xlsm»).Worksheets(«Лист1»).Cells(5, 3).Address ‘Результат: $C$5 MsgBox Workbooks(«Книга1.xlsm»).Worksheets(«Лист1»).Cells(5, «C»).Address ‘Результат: $C$5 |
Обращение к диапазону «C5:G10» с помощью свойства Cells активного рабочего листа:
|
MsgBox Range(Cells(5, 3), Cells(10, 7)).Address ‘Результат: $C$5:$G$10 |
Обращение в VBA Excel к ячейкам заданного диапазона с помощью свойства Cells рассмотрим на коллекции ячеек диапазона «C5:G10». Обращаться будем к ячейке «D8» активного листа:
|
MsgBox Range(«C5:G10»).Cells(17).Address ‘Результат: $D$8 MsgBox Range(«C5:G10»).Cells(4, 2).Address ‘Результат: $D$8 MsgBox Range(«C5:G10»).Cells(4, «B»).Address ‘Результат: $D$8 |
Обратите внимание, что отсчет номеров строк, номеров и буквенных обозначений столбцов для указания адреса ячейки внутри диапазона ведется от верхней левой ячейки данного диапазона.
Обход диапазона ячеек циклом
Обход ячеек циклом For Each… Next
Обход ячеек циклом For Each… Next — это самый простой способ обхода всех ячеек заданного диапазона. Он может быть применен, например, для присвоения ячейкам свойств и значений или поиска ячейки с определенным свойством или значением.
Присвоение ячейкам диапазона «B3:F10» числовых значений, соответствующих их порядковым номерам (индексам) в диапазоне:
|
Sub Primer1() Dim myCell As Range, n As Long For Each myCell In Range(«B3:F10») n = n + 1 myCell = n Next End Sub |
Поиск в диапазоне «B3:F10», заполненном предыдущим кодом VBA Excel значениями, ячейки со значением «27», окрашивание ее в зеленый цвет и выход из цикла:
|
Sub Primer2() Dim myCell As Range, n As Long For Each myCell In Range(«B3:F10») If myCell = 27 Then myCell.Interior.Color = vbGreen Exit For End If Next End Sub |
Обход диапазона циклом For… Next
Цикл For… Next позволяет указывать переменные в качестве индексов ячеек или номеров строк и столбцов для обхода ячеек заданного диапазона.
Присвоение ячейкам диапазона «B3:F10» числовых значений, соответствующих их порядковым номерам (индексам) в диапазоне, с помощью цикла For… Next:
|
Sub Primer3() Dim i As Long, n As Long With Range(«B3:F10») n = .Cells.Count For i = 1 To n .Cells(i) = i Next End With End Sub |
Если в блоке с оператором With вместо строки .Cells(i) = i указать строку без точки впереди — Cells(i) = i, то свойство Cells будет относиться не к диапазону Range("B3:F10"), а к рабочему листу (объекту ActiveSheet). В этом случае, порядковыми номерами будут заполнены первые 40 ячеек первой строки активного рабочего листа.
Применение в качестве параметров свойства Cells объекта Range переменных, задающих номера строк и номера столбцов указанного диапазона при обходе его ячеек циклом For… Next:
|
Sub Primer4() Dim i1 As Long, i2 As Long, r As Long, c As Long With Range(«B3:F10») r = .Rows.Count c = .Columns.Count For i1 = 1 To r For i2 = 1 To c .Cells(i1, i2) = (i1 — 1) * c + i2 Next Next End With End Sub |
Номер ячейки на рабочем листе
Определение порядкового номера (индекса) активной ячейки на рабочем листе Excel с помощью кода VBA:
|
Sub Primer5() Dim n As Double n = (ActiveCell.Row — 1) * CDbl(Cells.Columns.Count) + ActiveCell.Column MsgBox n End Sub |