
A toolbar is just a collection of icons that provides a shortcut to using the drop-down menu. Toolbars offer quick shortcuts to commonly used commands.When you first open Word there are two toolbars displayed, the Standard and Formatting toolbars.
Contents
- 1 Where is the toolbar on word?
- 2 How do I use the toolbar in Word?
- 3 What is toolbar and menu bar?
- 4 Why is my toolbar not showing in Word?
- 5 What is the function of the toolbar?
- 6 What is the difference between taskbar and toolbar?
- 7 Which toolbar is on the title bar?
- 8 How do I make my toolbar open in Word?
- 9 How do I get the toolbar back?
- 10 What are the two types of toolbar?
- 11 What is the role of toolbar in MS Word write different toolbars and their functions?
- 12 What are the tools in the toolbar?
- 13 What is standard toolbar?
- 14 What is menu bar short answer?
- 15 Why can’t I see my toolbar?
- 16 Why is my taskbar not working?
- 17 Where is the browser toolbar?
- 18 What is the toolbar across the top called?
- 19 Where is toolbar in Chrome?
- 20 What is formatting toolbar in MS Word?
Where is the toolbar on word?
Toolbars provide shortcuts to menu commands. Toolbars are generally located just below the Menu bar.
How do I use the toolbar in Word?
Click the appropriate ribbon tab to display the menu ribbon with the command you want to add to the “Quick Access” toolbar. Right-click the command you want to add to the toolbar. A popup menu will appear. Select “Add to Quick Access toolbar” on the popup menu.
What is toolbar and menu bar?
The toolbar, also called bar or standard toolbar, is a row of buttons, often near the top of an application window, that controls software functions. The boxes are below the menu bar and often contain images corresponding with the function they control, as demonstrated in the image below.
Why is my toolbar not showing in Word?
To restore the toolbars and menus, simply turn full-screen mode off. From within Word, press Alt-v (this will display the View menu), and then click Full-Screen Mode. You may need to restart Word for this change to take effect.
What is the function of the toolbar?
The toolbar, also called a bar or standard toolbar (originally known as ribbon) is a graphical control element on which on-screen icons can be used. A toolbar often allows for quick access to functions that are commonly in the program.
What is the difference between taskbar and toolbar?
is that toolbar is (graphical user interface) a row of buttons, usually marked with icons, used to activate the functions of an application or operating system while taskbar is (computing) the application desktop bar which is used to launch and monitor applications in microsoft windows 95 and later operating systems.
Which toolbar is on the title bar?
It lies next to the Quick Access Toolbar. It displays the title of the currently open document or application. It is present on almost all windows displayed on your computer.
How do I make my toolbar open in Word?
Press Ctrl+F1 (this is an on/off toggle). Double-click any of the tabs (Home, View, etc.). Right-click any of the tabs or the Quick Access Toolbar and uncheck “Minimize the ribbon”.
How do I get the toolbar back?
To do so:
- Click View (on Windows, press the Alt key first)
- Select Toolbars.
- Click a toolbar that you want to enable (e.g., Bookmarks Toolbar)
- Repeat for remaining toolbars if needed.
What are the two types of toolbar?
System toolbars. Application toolbars. User-defined toolbars.
What is the role of toolbar in MS Word write different toolbars and their functions?
The toolbar included in Microsoft Word permits us to open, print, and save documents and we can also change the style, font and size of the text. Just like several programs, we can customize the Word toolbar by adding or deleting the options. We can also move the toolbar to the various portions of the screen.
What are the tools in the toolbar?
2. The Standard Toolbar. The standard toolbar is shown in Figure 4-32. The Standard Toolbar gives the user access to file operations, printing, movement of data blocks, the undo system, and to some of the powerful tools like the function creator and the graphing system.
What is standard toolbar?
The Standard toolbar is located just below the menu bar. It contains buttons representing commands such as New, Open, Save, and Print.It contains buttons representing text modifying commands, such as font, text size, bold, numbering, and bullets.
A menu bar is a graphical control element which contains drop-down menus. The menu bar’s purpose is to supply a common housing for window- or application-specific menus which provide access to such functions as opening files, interacting with an application, or displaying help documentation or manuals.
Why can’t I see my toolbar?
Press the Windows key on the keyboard to bring up the Start Menu. This should also make the taskbar appear. Right-Click on the now-visible taskbar and select Taskbar Settings.The taskbar should now be permanently visible.
Why is my taskbar not working?
First Fix: Restart the Explorer Process
Restarting it can thus clear up any minor hiccups, such as your taskbar not working. To restart this process, press Ctrl + Shift + Esc to launch the Task Manager. Click More details at the bottom if you only see the simple window.Right-click it and choose Restart.
Where is the browser toolbar?
Where Is My Browser Toolbar? The browser toolbar is on the bottom of your web browser. Take Google Chrome as an example, you can see the extensions you have installed on your web browser and the bookmarks you save.
What is the toolbar across the top called?
Menu bar. This toolbar contains various commands that often lead to dialog menus (covered later on this page). Windows computers have this bar at the top of windows; Macs have this bar at the top of the screen instead.
Where is toolbar in Chrome?
How to get your toolbar back in Google Chrome
- Open Google Chrome.
- Select “More Tools” from the drop-down menu, toward the center of the list, and then “Extensions.”
- Find the extension you’d like to make visible on the toolbar again — it should have a small switch icon at the bottom-right of its box.
What is formatting toolbar in MS Word?
The formatting toolbar provides access to several text formatting functions such as font size and color, text alignment, lists, and the like.Makes the selected text italic. Makes the selected text underlined. Removes all formatting from the selected text.
| The ToolbarA toolbar is a bar containing buttons and options that you use to carry out commands. With toolbars, commands become just handy and easily accessible to users. The buttons contained in them are used to access commands more quickly than by opening the menus and the respective dialog boxes.
ScreenTips So, any time you are at a loss as to the name or use of a toolbar button, simply rest the mouse pointer over such button and immediately, you’ll see a little text pop-up below the pointer, saying something. This is a ScreenTip or ToolTip. In case the ScreenTips don’t appear when you move the pointer over a button, it is possible the feature has been disabled/turned off. You can turn it on by doing the following:
That’s all. Those are the steps you’ll also take to deactivate the feature, for one reason or another, though not advisable. HOW TO DISPLAY/INVOKE A (MISSING) TOOLBAR |
Displaying A Toolbar Using the View Menu
- On the Menu bar, click View. This displays the View menu.
- Then, on the View menu, point to Toolbars item.
- Select and click the name of the desired toolbar from the Toolbars sub-menu.The toolbar you selected will then appear on screen.
This now displays the Toolbars sub-menu, in which the names of certain toolbars are shown. Here, you’ll find that some of the toolbar names have a check mark to the left of them, while some have none. The check mark indicates the toolbar bearing it is already displayed on screen.
 |
| Fig: Showing or hiding a toolbar using the View menu |
Those are the steps you’ll also follow to hide a toolbar you no longer want on screen at a particular moment.
NOTE:
If you can’t find the particular toolbar you are really looking for on the Toolbars sub-menu, click Customize, and then click the Toolbars tab in the Customize dialog box that appears. In the Toolbars list, click the checkbox next to the name of the toolbar you want and then click Close. See figure below.
 |
| Fig: Showing or hiding a toolbar using the Customize dialog box |
To Display a Desired Toolbar Using a Shortcut
Simply right-click an empty space on any toolbar, and then click the name of toolbar you want.
TIP: If you do not see the toolbar you’re looking for on the shortcut menu, click the Toolbar Options arrow, point to Add or Remove Buttons, click Customize, click the Toolbars tab in the Customize dialog box, and then, in the toolbars list, click the checkbox next to the toolbar you want and click Close when you are through.
 |
| Fig: Displaying the Customize dialog box via the Toolbar Options button |
At this juncture, I’m quite confident to a reasonable extent that how to determine the name of any toolbar button/icon should never be a problem to you, since the ScreenTips are there to «tell-tale». Right now, your problem, I guess, should be: «What exactly is the function of each of these toolbar buttons/icons?» Well, if you have asked that question, it simply shows you are bright and ready to learn. The good news is, you are not helpless: I have dedicated the following sections to expatiate a little on the Standard toolbar, Formatting toolbar, and the Drawing toolbar, since you will be using them constantly.
Standard Toolbar
You have learned that the Standard toolbar is, by default, docked directly below the Menu bar, and that it contains buttons used for performing tasks similar to the commands available in the Menu bar. Let’s now take a moment to identify the name and purpose/use of each of the buttons on the Standard toolbar.
|
NAME |
ICON |
USE |
| New |
|
Creates a new blank document based on the default or current template. |
| Open |
|
Opens a document previously created and saved in Word. |
| Save |
|
Saves new changes to the current document or file, with its filename, location and document format. |
|
|
Sends the content of the current document as the body of an E-mail message. |
|
| Search |
|
Finds files, Web pages and Outlook items based on the search criteria you enter. |
|
|
Prints the active document or selection. | |
| Print Preview |
|
Shows how a document or file will look when you print it. |
| Spelling |
|
Checks spelling in the active document, file or item. |
| Cut |
|
Removes the selected item from the active document and places it in the Clipboard. |
| Copy |
|
Copies selected text or object to the Clipboard. |
| Paste |
|
Pastes the item you cut or copied into (the position of the insertion point) the document from the Clipboard. |
| Format Painter |
|
Copies the format from a selected text or object and applies it to the text or object you click. |
| Undo |
|
Reverses the last action or deletes the last entry you typed. Click the arrow next to this icon to select and reverse multiple actions at a time. |
| Redo |
|
Reverses the action of the last Undo command. Click the arrow next to this icon to select and reverse multiple Undo command actions. |
| Insert Hyperlink |
|
Inserts a new hyperlink or edits the selected hyperlink. |
| Tables and Borders |
|
Displays Tables and Borders toolbar, which offers tools for editing/formatting a table and its content. |
| Insert Table |
|
Inserts a table in the document. Click and drag to specify the number of rows and columns. |
| Insert Microsoft Excel Worksheet |
|
Inserts a new Microsoft Excel worksheet at the insertion point. Click and drag to specify the number of rows and columns. Use the Excel tools on the toolbar to edit the table. |
| Columns |
|
Changes the number of columns in a document or a section of a document. |
| Drawing |
|
Shows or hides the Drawing toolbar. |
| Document Map |
|
Used to turn on or off the Document Map. Document Map shows the outline structure of a document so that you can quickly navigate through the document and keep track of your location in it. |
| Zoom |
|
Used to «zoom in» to get a close-up view of a document or «zoom out» to see more of the page at a reduced size. |
| Show/Hide |
|
Shows or hides non-printing characters, such as tab characters, paragraph marks and hidden text. |
| Office Assistant (Microsoft Office Help) |
|
Opens Help or invokes the Office Assistant to provide help topics and tips to help you accomplish your task. |


Formatting Toolbar
The Formatting toolbar offers shortcut buttons to help format a document quickly. From the Formatting toolbar, you can quickly apply formatting attributes such as Font; Font Color; Alignment; Line Spacing; Bullets and Numbering, etc, document text, to save time.
The following table provides a list of Formatting toolbar buttons and a brief description of each.
|
NAME |
ICON |
USE |
| Style |
|
Opens a Style drop-down list from which you can select one. |
| Font |
|
Changes the font of the selected text or number. Click the drop-down arrow beside the box and select a font from the list. |
| Font Size |
|
Changes the size of the selected text or number. Enter a size value in the box, or select an appropriate size from the drop-down list. |
| Bold |
|
Applies or removes bold formatting to or from a selected text or number. |
| Italic |
|
Makes selected text or number italic, but removes italic from selected text or number if it’s already italic. |
| Underline |
|
Underlines (rules a line) or removes underline formatting from selected text or number. |
| Align Left |
|
Aligns the selected text, number or inline object to the left with a jagged edge. |
| Center |
|
Aligns selected text, numbers or inline objects to the center. |
| Align Right |
|
Aligns the selected text, number or inline objects to the right, with a jagged edge. |
| Justify |
|
Aligns the selected paragraphs to both the left and right margins or indents. |
| Numbering |
|
Adds numbers to or removes numbers numbers from selected paragraphs. |
| Bullets |
|
Adds bullets to or removes bullets from the selected paragraphs. |
| Decrease Indent |
|
Indents the selected paragraph to the previous tab stop or indents the content of the selected item to the left by one character width of the standard font. |
| Increase Indent |
|
Indents the selected paragraph to the next tab stop or indents the content of the selected item to the right by one character width of the standard font. |
| Outside Border |
|
Adds or removes a border around the selected text, paragraphs, cells, pictures or other objects. |
| Highlight |
|
Marks text so that it is highlighted and stands out from the surrounding text. |
| Font Color |
|
Formats the selected text with the color you click |


Drawing Toolbar
The Drawing toolbar is located at the bottom of the window, between the Horizontal Scroll bar and the Status bar. Like every other toolbar, this also contains smart icons representing shortcuts to Main menu commands in Word.
It holds buttons/tools used in creating drwaings, such as rectangles, ovals, lines, arrows, WordArt text, etc. It also offers tools for inserting organizational charts and ready-made pictures and Clip Arts from their different locations.
Also included in this toolbar are tools for formatting inserted objects and for adding special effects such as shadow or 3-D to lines, rectangles, ovals, etc. Like every other toolbar also, the Drawing toolbar can be displayed or hidden.
The following table shows a list of tools offered on the Drawing toolbar, and their functions:
|
NAME |
ICON |
USE |
| Draw |
|
Offers a number of options for defining the relative positions, arrangements, rotation, etc, of drawings in a document. It also offers tools for changing the shape of AutoShapes. |
| Select Objects |
|
Changes the pointer to a selection arrow so you can click to select objects in the active window. |
| AutoShapes |
|
Offers a group of ready-made shapes that include basic shapes, such as rectangles and circles, including a variety of lines and connectors, block arrows, flowchart symbols, stars and banners, and callouts. |
| Line |
|
Allows you to draw a straight line where you click or drag in the active window. |
| Arrow |
|
Draws or inserts a line with an arrow head where you click or drag in the active window. |
| Rectangle |
|
Draws a rectangle where you click and drag on the active window. You can also draw a square using this tool by holding SHIFT while you drag. |
| Oval |
|
Draws an oval where you click and drag in the active document. To draw a (perfect) circle, hold down SHIFT while you drag. |
| Text Box |
|
Draws a text box with horizontal direction where you click and drag in the active document. |
| Insert WordArt |
|
Creates decorative text by inserting a Microsoft Office drawing objects. |
| Insert Diagram |
|
Creates an organizational chart or a circle, radial, pyramid, or Venn or target diagram in your document. |
| Clip Art |
|
Opens the Clip Gallery where you can select the clip art image you want to insert in your document or update your clip art collection. |
| Insert Picture |
|
Inserts an existing picture in your active document at the insertion point. |
| Fill Color |
|
Adds, modifies, or removes the fill color or effects from the selected object. |
| Line Color |
|
Adds, modifies, or removes the line color from the selected object. |
| Font Color |
|
Allows you to add, modify, or remove the text color of the selected text. |
| Line Style |
|
Used to select a thickness for the selected line. |
| Dash Style |
|
Allows you to control the appearance of the selected line. |
| Arrow Style |
|
Allows you to select the style of arrowhead. |
| Shadow Style |
|
Allows you to select the shadow appearance of the selected drawing object. |
| 3-D Style |
|
Allows you to add depth to drawing objects such as lines, AutoShapes, and freeform objects. |


Thank you for taking your time to read this tutorial. Please visit this blog again for future updates and helpful tips. Your visits will surely be worth it. I sincerely appreciate your visits and presence here. If you are finding these tutorials and tips informative and helpful, please kindly recommend this blog to your friends. If, on the other hand, there is any area you feel improvement is needed, please kindly forward a piece of advice. These will be highly welcomed and appreciated. Feel free to drop comments or ask questions using the comment box below. Your comments will be promptly reviewed and published and your questions speedily looked into and answered in the best possible manner. Thanks.
In this article, you will learn the different parts of Microsoft Word Windows 2019. This is a lesson – 03 of Microsoft Word. You may also read previous lessons to learn the complete Microsoft Word.
Microsoft Word is application software for writing texts, and different types of documents can be easily developed in a practical way.
In other words, it is a word processor that allows you to create and edit text. As long as you know what the parts of Microsoft Word are and what they are used for. With this software, the user will be able to write and design texts where they will be able to use different fonts, colors, and sizes, with the different commands of Word.
In this section, we will make references to the basic parts of Microsoft Word Windows 2019. This program is a part of the Microsoft Office package developed by Microsoft. Along with other programs, there is a number of visual appearances and program window layout that can make the work easier. Let’s understand the basic parts of Microsoft Word Windows 2019.
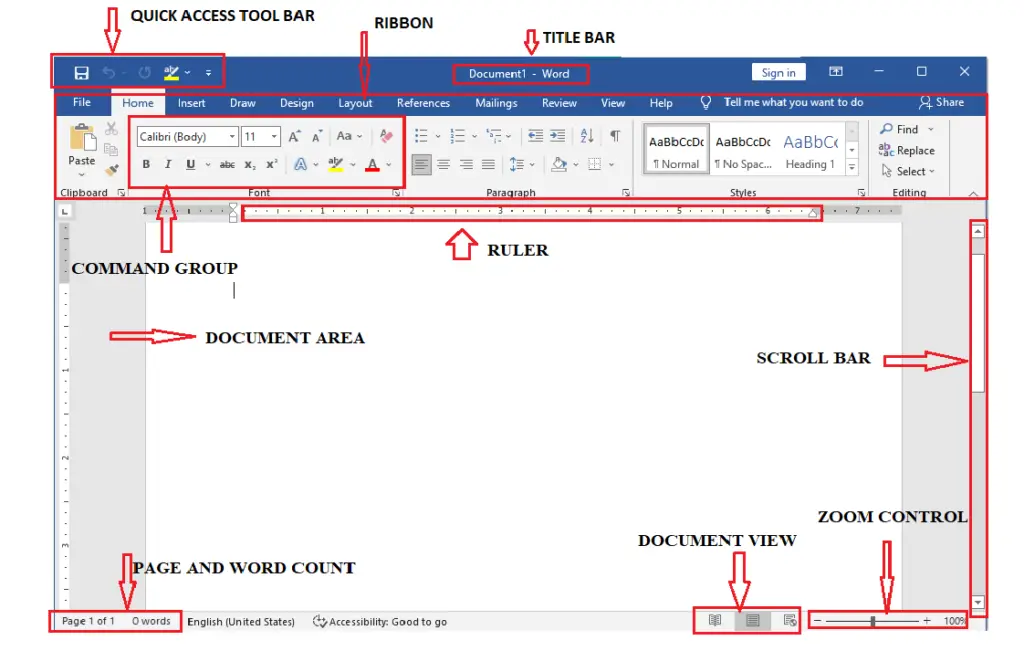
In the below screenshot, you can see and learn about the various important parts of Microsoft Word Windows. If you learn the name of these parts then you will be used easily MS word application.

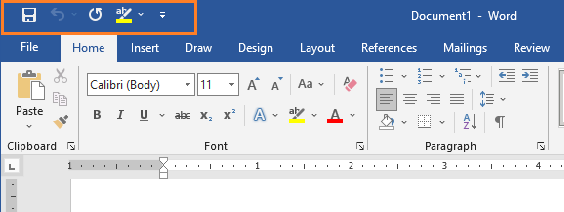
Quick Access Toolbar:
This bar is one of the most important parts of Microsoft Word Windows 2019. It is also located at the top of the screen, in the left corner just above the File Tab. It is the place for the most frequently used commands. You can customize this Toolbar by clicking the little arrow that displays some more commands such as “New” which refers to opening a new document, “Open” which implies displaying a document that we have saved on our computer, “Undo” reverse the previous action or “Redo” do the action again, and “Save” to save the current document.
Title bar:
The title bar is also one of the parts of the Microsoft Word window. It is located at the center and top of the document window and shows the name of the program or document. There, when we open a Microsoft Word document, we can read the title as Document1 – Word. It refers to a general name displayed by the program software. When we save our document, we can replace that name with a personalized one related to our file.
In this bar, on the right side, there are three more buttons known as window controls. It allows to perform of three commands i.e., minimize, maximize, and close the document or file.
The 1st is the “X” icon that is used to close the window of the Microsoft Word document we are working on. And the 02nd component is a double box icon which is located in the center of the previous ones and used to maximize or enlarge the document. The 03rd icon is a dash “_” used to minimize the document we are working on.
File Tab:
In Microsoft Word 2019, the File tab replaces the Microsoft Office button from Word 2007. Microsoft Office button is the circular button that is located in some operating systems at the bottom and in others at the top, on the left side. You can click it to see the backstage view. In this tab, where you can see the previously opened or saved files, create a new document, print a document, and do other operations.
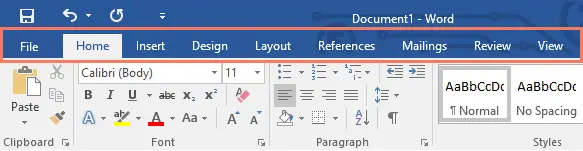
Ribbon of Microsoft Word:
The Ribbon is one of the basic parts of Microsoft Word widow and contains organized commands in three layers.
- Tabs or Menu: These are the horizontal menu that appears at the top of the Ribbon and contain groups of related commands, i.e., File, Home, Insert, Design, Layout, References, Mailings, Review, View, and Help are examples of ribbon tabs.
- Groups: These are the organized related commands displayed below each tab or menu. The name of each group appears below the group on the Ribbon. For example, a group of commands related to a paragraph or a group of commands related to the font, etc.
- Commands: Commands appear within each group as mentioned above. For example, when we press the “File” tab, some commands or functions such as “New”, “Open” “Save”, “Save as” etc. are displayed.
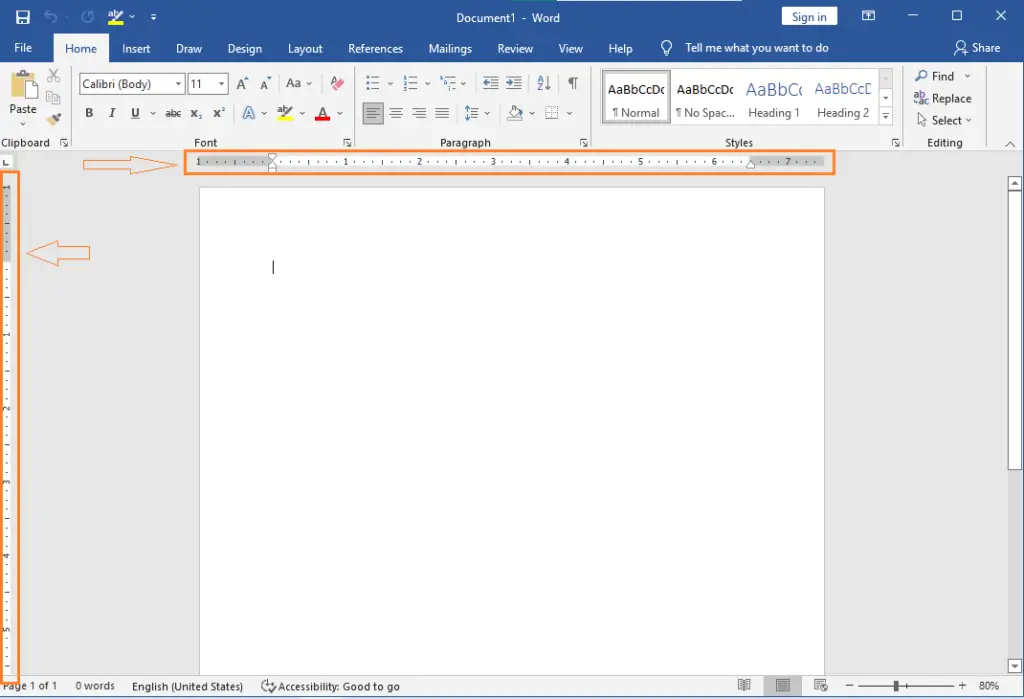
Rulers:
Microsoft Word has two rulers – one is a horizontal ruler and the second is a vertical ruler. The horizontal ruler seems just under the Ribbon. It is used to set the size of the margins and tab stop position of the document. The vertical ruler appears on the left side of the document window and is used to measure the vertical position of elements on the page.
Scrollbar:
It is one of the parts of MS Word widow, which is characterized by being a long bar that is generally located on the right side of the document. It consists of an open bar containing an arrow that allows the user to scroll up and down more quickly.
Help icon:
The Help Icon can be used to find online-related queries. This provides helpful tutorials on various functions and commands related to MS word.
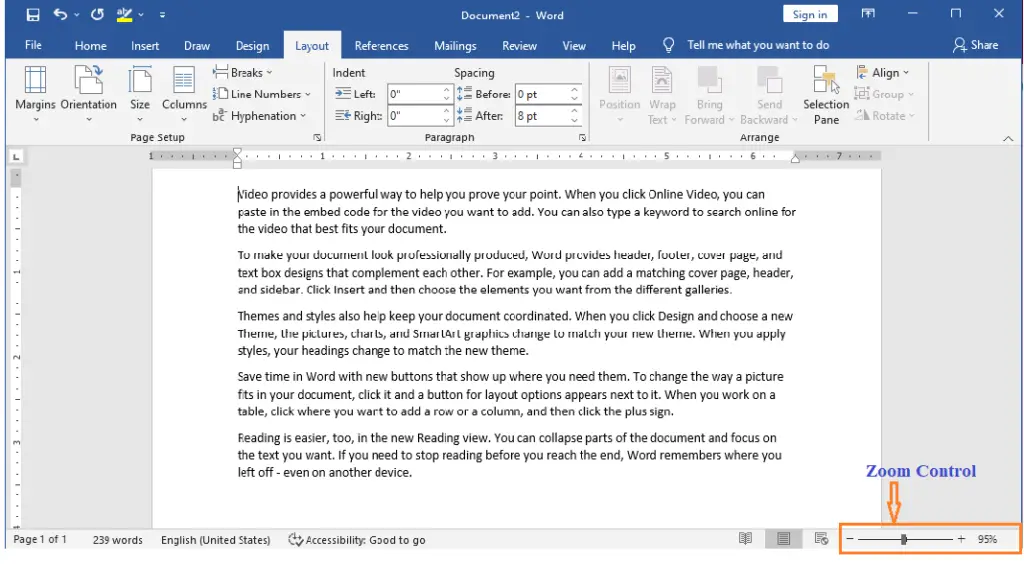
Zoom Control Buttons:
The zoom slider allows you to resize the document to view it according to the user’s requirements. It allows you to zoom in or zoom out from 0% to 500% wide range. The zoom controls consist of a slider that you can slide left (zoom in) or right (zoom out); you can also click the plus or minus sign buttons to increase or minus decrease the zoom factor.
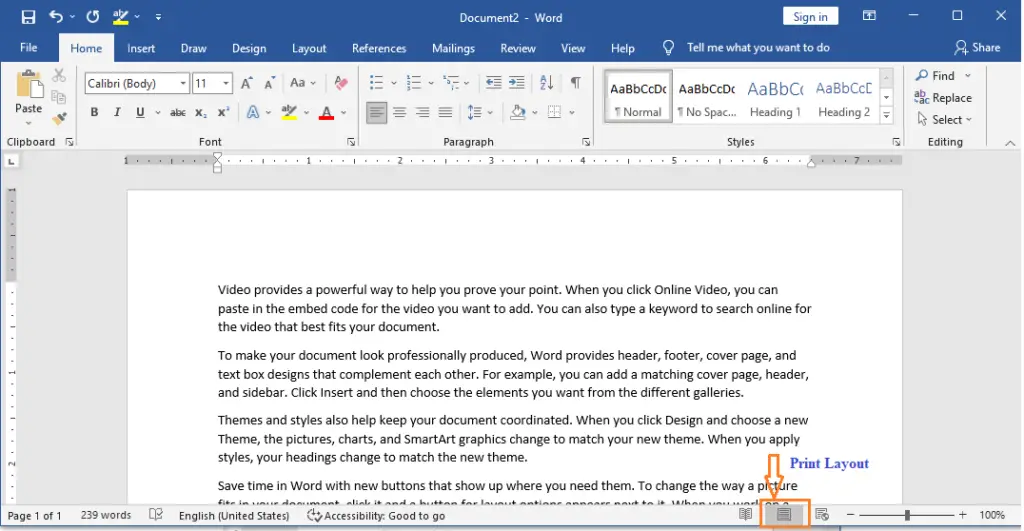
View Buttons:
It is a group of buttons located to the left of the Zoom control, and near the bottom of the screen. It lets you switch the various Word document views.
- Print Layout view− This view displays pages exactly as they will show in print.
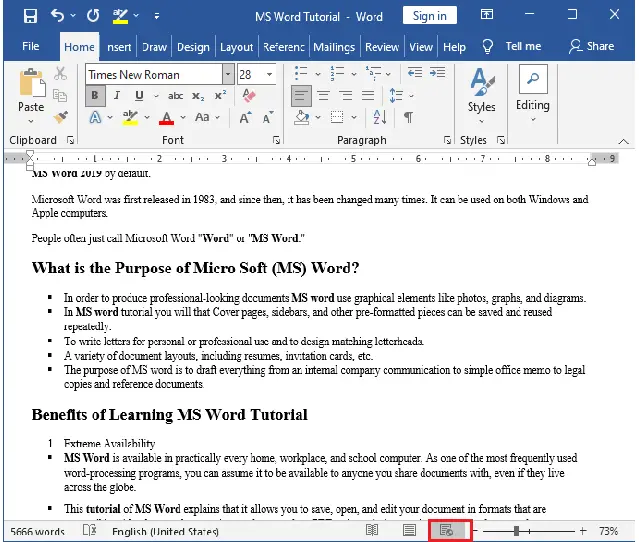
- Read Mode− This displays a full-screen view of the document.
- Web Layout − This displays a document view that appears on a Web browser, such as Internet Explorer.
- Outline view− This lets you display your document in outline form. For this view, we will first create using Word’s standard heading styles.
- Draft view− This displays only the text of your document as it appears on the printed page. No headers and footers are shown in this view.
Document or Work Area:
If we open MS Word on the computer then we can see different parts of the MS Word window on the screen. The document or work area is the area where we can type documents, letters, memos, or simply communication will be developed. The vertical flashing bar is called Cursor and the insertion point represents the location where text can write. It is generally white and can see when we open the MS Word application. These allow giving width and flexibility to the document.
Status Bar:
It is located at the bottom of the document and displays the information related to the word document. From left to right, it shows the total number of pages, word count, language, translator, error notifications, and sections among other information.
In this bar, we can visualize the document we are working on in five ways, e.g. print layout, full-screen reading, web layout, and outline view.
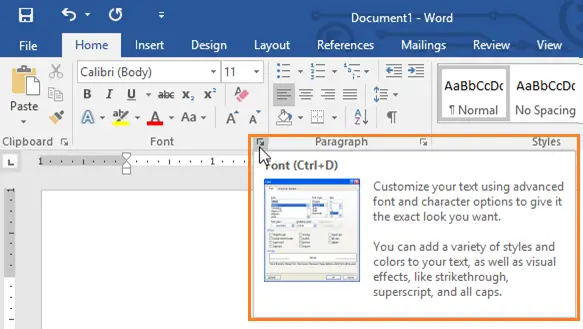
Dialog Box Launcher:
We can see a small arrow in the lower-right corner of many groups on the Ribbon that display some commands. By clicking this arrow, the downward window will open that provides more options about the group.
In this chapter, you’ll learn about the MS Word Window different parts and functions available in Word 2019. What follows is the default Word window that appears when you launch the program.
Let’s break down this window and see what are they.
Table of contents
- What is MS Word window?
- Steps on how to Start MS Word
- What are the Basic Parts of MS Word Window?
- Different Parts of MS Word Window and its Functions
- File Tab of MS Word Window
- Quick Access Toolbar
- Title Bar of MS Word
- Ribbon of MS Word Window
- Showing and Hiding the Ribbon
- Rulers
- View Buttons
- Read Mode
- Print Layout view
- Web Layout view
- Using the Tell me feature
- Status Bar
- Dialog Box Launcher
- Summary
Microsoft Word window is a word processing program that lets you make letters, resumes, and many other types of documents. In this lesson, you’ll learn how to move around the Word window and get to know some of its most important parts, like the Ribbon, Quick Access Toolbar, and Backstage view.
Microsoft Word is part of the Microsoft Office productivity software suite, but it can also be bought on its own. Microsoft Word was first released in 1983, and since then, it has been changed many times. It can be used on both Windows and Apple computers.
All recent versions of Microsoft Word, such as Word 2019, Word 2016, and Office 365, can use the steps in this tutorial. There might be some small differences, but these versions are mostly the same.
Steps on how to Start MS Word
In this part, we’ll talk about how to use Word 2019 for the first time. We will learn how to start an application in Word 2019 in a few easy steps. If you have Microsoft Office 2019 on your computer, follow these steps to open the Word program:
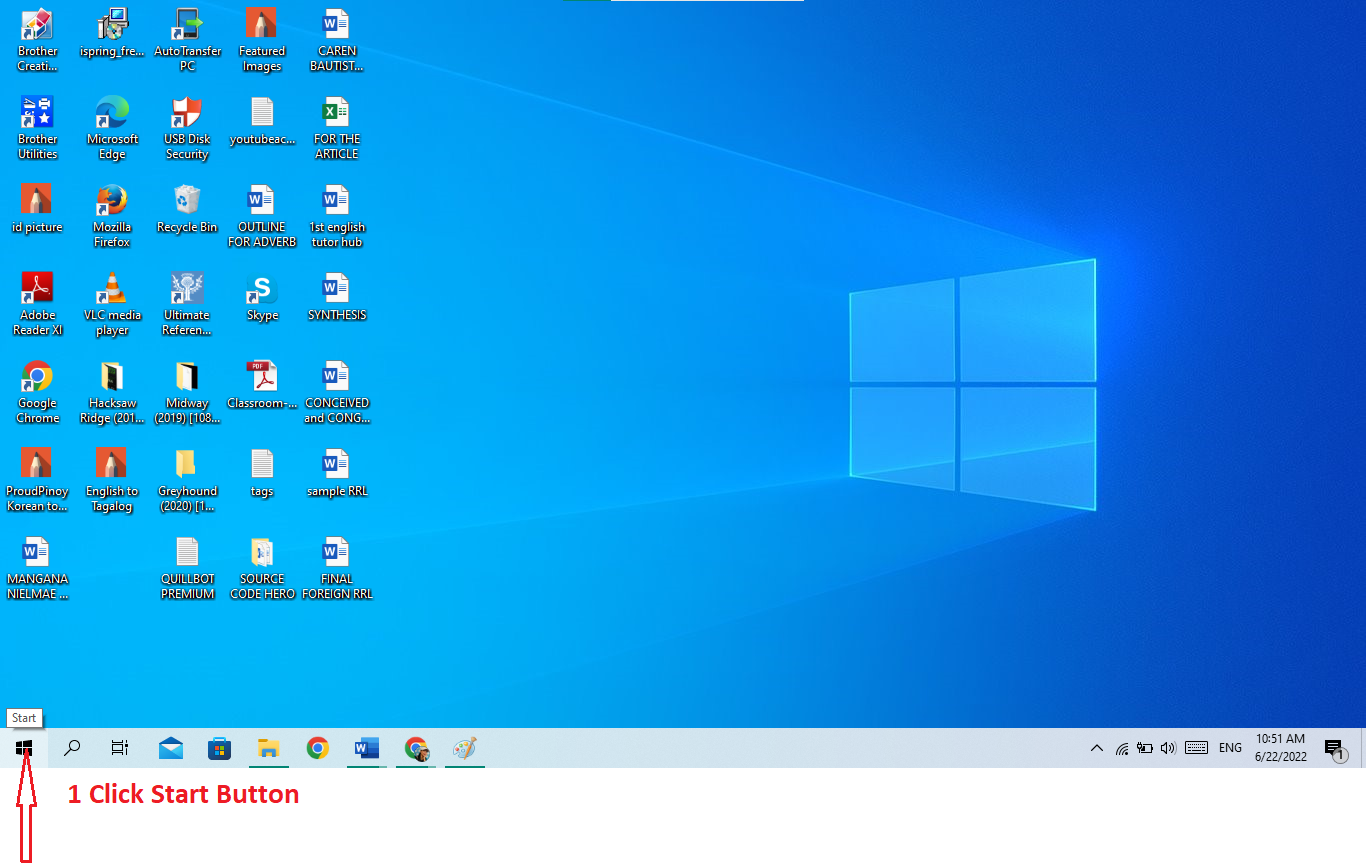
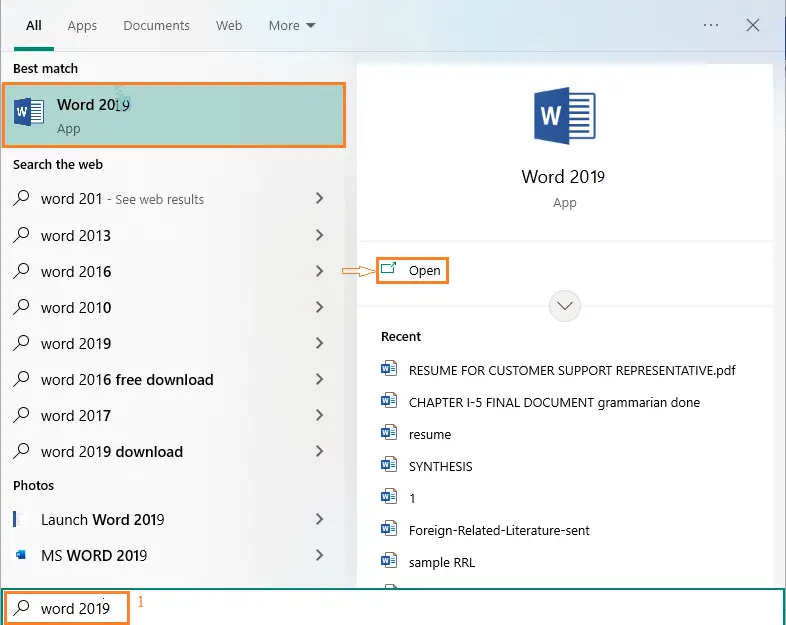
- Step 1 − Click the Start button.

- Step 2− Search for Microsoft Office Word.

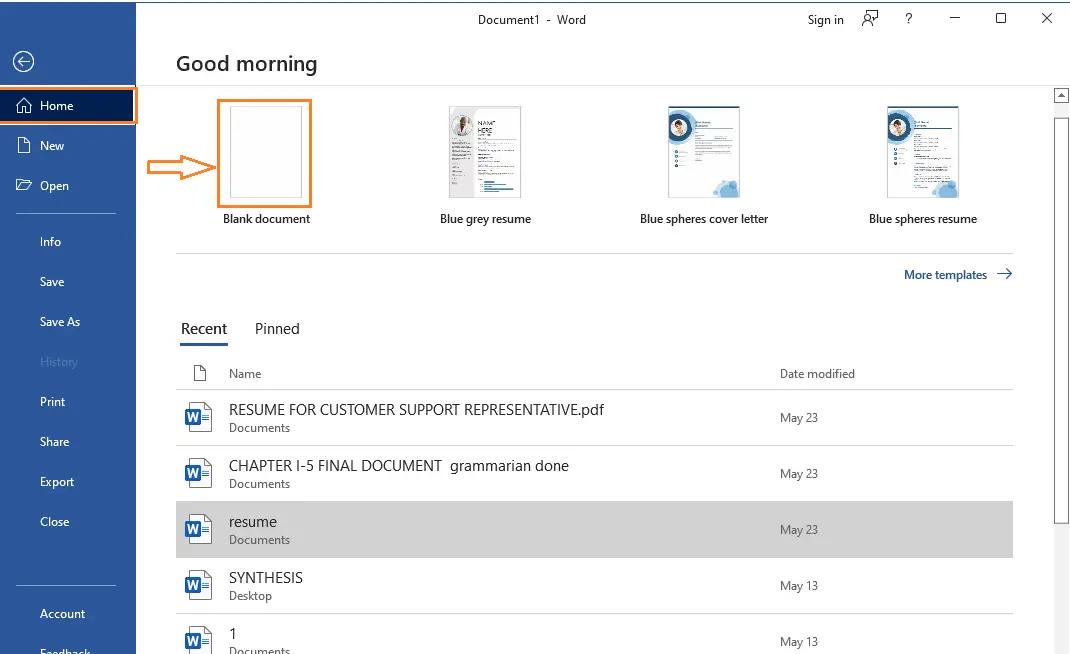
- Step 3– After you see Microsoft Word 2019 from menu click it. This will launch the Microsoft Word 2019 application and you will see the following window. After you Microsoft Word 2019 is open, Click new and blank Document to explore MS Word Window.

What are the Basic Parts of MS Word Window?
The Basic Parts of the MS Word Window specifically are the title bar, quick access toolbar, ribbon, ruler, and the view button. It is the portion of the screen that displays the contents of a document file.
Below is an illustration of the parts of a document window in MS Word.
Different Parts of MS Word Window and its Functions
The following are parts of MS Word window and its functions:
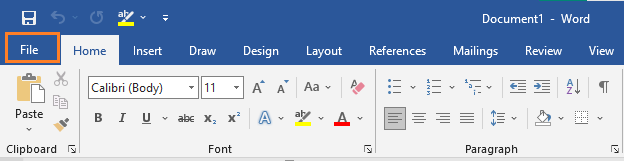
File Tab of MS Word Window
The File tab is replaced in Office button in Word 2007. You can click it to see the back stage view. This is where you go to open or save a file, make a new document, print a document, or do anything else that has to do with files.
Quick Access Toolbar
This Quick Access Toolbar is one of Microsoft Word Window 2019’s most important parts. It is also at the top left corner of the screen, right above the File Tab. It is where the commands you use most often are kept. By default, it includes the Save, Undo, and Redo commands You can change the way this toolbar looks to suit your needs.
Title Bar of MS Word
The title bar is a component of the Word window. It is situated at the top and middle of the document window and displays the program or document’s name. When we open that particular document in Microsoft Word, the title will appear to us as Document1 – Word. It is referring to a generic name that is shown by the software of the program. When we save our document, we have the option of giving it a new name that is more appropriately associated with our file.
Ribbon of MS Word Window
The Ribbon contains multiple tabs, which you can find near the top of the MS Word window. Word uses a tabbed Ribbon system instead of traditional menus. The Ribbon contains all of the commands you will need to perform common tasks in Word. It has multiple tabs, each with several groups of commands.
Ribbon contains commands organized in three components:
- Tabs − These appear across the top of the Ribbon and contain groups of related commands. Home, Insert, Page Layout are examples of ribbon tabs.
- Groups − They organize related commands; each group name appears below the group on the Ribbon. For example, group of commands related to fonts or group of commands related to alignment, etc.

- Commands − Commands appear within each group as mentioned above. Some groups also have a small arrow in the bottom-right corner that you can click for even more options.
Showing and Hiding the Ribbon
If the Ribbon is taking up too much room on your screen, you can hide it. To do this, click the arrow in the upper-right corner of the Ribbon, then choose the option you want from the dropdown menu in your MS Word window:
- Auto-hide Ribbon: Auto-hide makes your document fill the whole screen and hides the Ribbon completely. Click the “Expand Ribbon” button at the top of the screen to show the Ribbon.
- Show Tabs: When this option is turned on, all command groups will be hidden when they are not being used. Tabs will still be shown. To bring up the Ribbon, just click on a tab.
- Show Tabs and Commands: This option makes the Ribbon bigger. You will be able to see all of the tabs and commands. When you open Word for the first time, this option is already chosen.
Rulers
Word has two rulers: one horizontal and one vertical. The horizontal ruler, which appears just below the Ribbon, is used to set margins and tab stops. The vertical ruler, which can be found on the left edge of the Word window, is used to determine the vertical position of elements on the page.
Zoom Control
The zoom control consists of a slider that you can slide left or right to zoom in or out; you can increase or decrease the zoom factor by clicking the + buttons. Zooming in allows you to get a better look at your text.
To zoom in or out, click and drag the zoom control slider in the bottom-right corner of the Word window. You can also select the + or – commands to zoom in or out by smaller increments. The number next to the slider displays the current zoom percentage, also called the zoom level.
View Buttons
Word View Buttons gives you a number of ways to change how your document is shown. Further, this part of the window allows you to choose and view your document in Read Mode, Print Layout, or Web Layout. You can use these views for different tasks, especially if you want to print the document.
Here are the various ways to view your document:
Read Mode
This view opens the document to a full screen. This view is great for reading large amounts of text or simply reviewing your work.

Print Layout view
This Print Layout view displays pages exactly as they will appear when printed. This is the default document view in Word. It shows what the document will look like on the printed page.
Web Layout view
This Web Layout view shows how a document appears when viewed by a Web browser, such as Internet Explorer. This view displays the document as a webpage, which can be helpful if you’re using Word to publish content online.
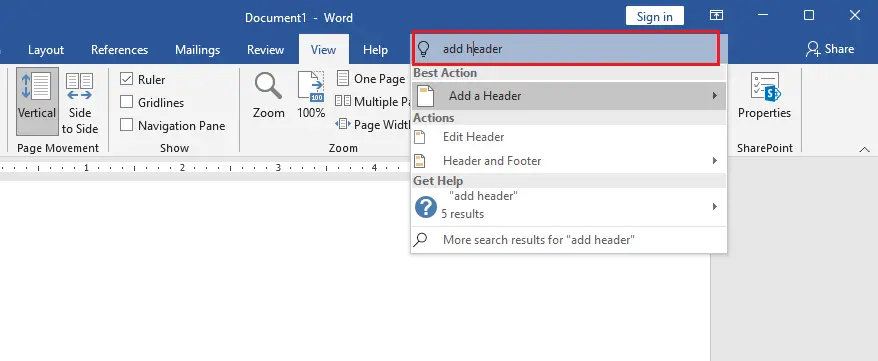
Using the Tell me feature
If you’re having trouble finding a command you want, the Tell Me feature can help. It works just like a regular search bar. Type what you’re looking for, and a list of options will appear. You can then use the command directly from the menu without having to find it on the Ribbon.
Status Bar
This Status Bar is a part of the window that displays the document information as well as the insertion point location. From left to right, this bar contains the total number of pages and words in the document, language, etc.
You can configure the status bar by right-clicking anywhere on it and by selecting or deselecting options from the provided list.
Dialog Box Launcher
This Dialog Box Launcher appears as very small arrow in the lower-right corner of many groups on the Ribbon. Clicking this button opens a dialog box or task pane that provides more options about the group.
Summary
In this tutorial, we discussed the MS Word Window and Identify each parts and functions. We discovered that it aids in the creation of new documents.
We also talked about the various functions that can be found in Word. Basically, these parts of Word window will assist you as you go along and create your document.
If you like these types of tutorials, we also have identifying different parts of a Microsoft PowerPoint window and different parts of an Excel window with its functions.
PREVIOUS
NEXT

Home > Microsoft Word > How to Use the Quick Access Toolbar in Microsoft Word 2013
The Quick Access Toolbar is a very useful feature in MS Word 2013. It’s where the most necessary commands for working with documents are found. You can customize these commands according to your needs. If you have problems using the Quick Access Toolbar or if you’re new to MS Word 2013, read this article on how to use the Quick Access Toolbar in MS Word 2013.
How to use the Quick Access Toolbar in Microsoft Word 2013
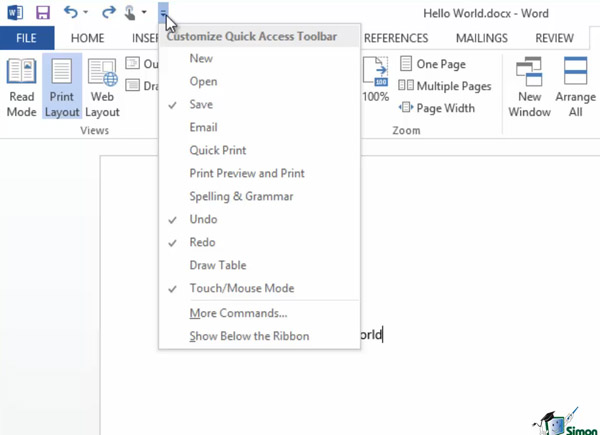
The Quick Access Toolbar is found in the upper left-hand area of MS Word, on top of the Ribbon field. It has a group of small icons, each with its own action or command to carry out. These include Save, Undo, Redo and the Touch/Mouse button. This set of buttons can differ and depend on local customization.

You can use the drop-down button behind the Quick Access Toolbar—named Customize Quick Access Toolbar—to customize it. After clicking on this, you’ll see a long list of commands. Some of them are ticked, some are not, depending on which buttons are installed on the Quick Access Toolbar.
If you tick any of the unmarked commands, they will show up on the Quick Access Toolbar immediately. For example, check Open, and its icon will be available on the Quick Access Toolbar after that. You can also add or remove any of the buttons from the Quick Access Toolbar by doing this.
The Customize Quick Access Toolbar window also contains More Commands. After selecting this, you’ll get the page Word Options, where you can see the Quick Access Toolbar menu. Click it, and the next dialog window will come up.

On the left side window named Choose commands from, you can select any of the additional commands, such as Font, Cut, Copy, and others, which will be accessible on the Quick Access Toolbar after selecting and adding.
At the same time, you’ll see current Toolbar buttons in the right part of the window named Customize Quick Access Toolbar. Use Add>> and Remove>> to add and remove buttons. After selecting any of the commands from the right side part of the window, and pressing Add>>, you’ll automatically see them in the left side window. You can remove them by pressing Remove>>.
Switching between Popular commands and All commands will give you more variety in terms of the commands which can be added on the Quick Access Toolbar. Click OK after making your choice. Selected command icons will be available on the Quick Access Toolbar from now on. You can keep as many buttons as you need for your work and remove them after you’re finished.
If you prefer seeing the Quick Access Toolbar below the Ribbon, go to Customize Quick Access Toolbar and select Show below the Ribbon.
As you can see, the Quick Access Toolbar is very useful for getting access to the buttons or commands you need.

Simon Calder

Chris “Simon” Calder was working as a Project Manager in IT for one of Los Angeles’ most prestigious cultural institutions, LACMA.He taught himself to use Microsoft Project from a giant textbook and hated every moment of it. Online learning was in its infancy then, but he spotted an opportunity and made an online MS Project course — the rest, as they say, is history!