
Word for Microsoft 365 Word 2021 Word 2019 Word 2016 Word 2013 Word 2010 Word 2007 More…Less
Options is where you can view and update settings for Word, your documents, your personal information and your preferences. General options lets you change user interface, personalization, and startup settings for your copy of Word and documents.
To see general options for working with Word, click File > Options > General.
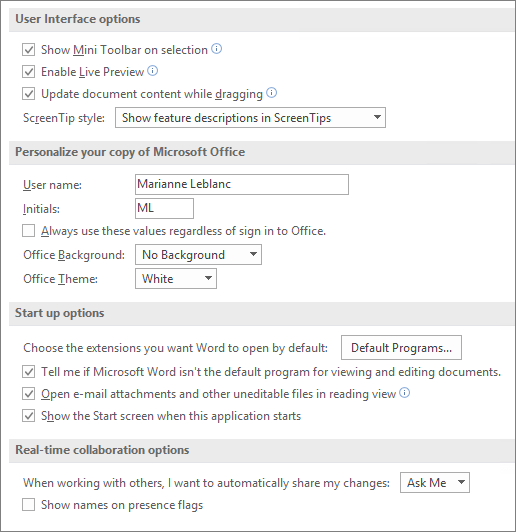
Show Mini Toolbar on selection
Select this option to show the Mini toolbar when you select text. The Mini toolbar provides quick access to formatting tools.
Enable Live Preview
Select this option to preview the effects of formatting changes in the document.
Update document content while dragging
Select this option if you want Word to adjust the layout when you drag objects such as pictures and text boxes.
ScreenTip style
Select a style to control whether Word displays screentips and feature descriptions with button names.
User name
Type a name in the User name box to change your user name.
Note: This user name is associated with any revisions you make to documents when using the Track Changes feature. It’s also the author name associated with the documents that you create. For example, in predesigned cover pages that include the author name, Word displays this user name automatically.
Initials
Type your initials in the Initials box to change the initials associated with your user name.
Note: These initials are associated with any comments you add when you review documents.
Always use these values regardless of sign in to Office
Select this option if you want Word to display this user name and these initials even if you sign into Office with an account that displays different information.
Office Background
Choose from a list of built-in background patterns.
Office Theme
Choose from a list of built-in Office themes.
Choose the extensions you want to open by default
Click Default programs to see and change the list of file types that Word opens by default.
Tell me if Word isn’t the default program for viewing and editing documents
Select this option if you want to be prompted to set Word as your default application for viewing and editing documents.
Open e-mail attachments and other uneditable files in reading view
Clear this check box to open e-mail attachments in Print Layout view instead of reading view.
Show the start screen when Word starts
Clear this check box if you want to bypass the start screen when you open Word.
To see general options for working with Word, click File > Options > General.
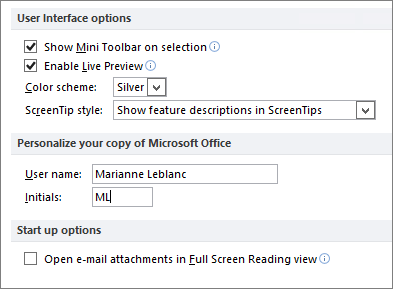
Show Mini Toolbar on selection
Select this option to show the Mini toolbar when you select text. The Mini toolbar provides quick access to formatting tools.
Enable Live Preview
Select this option to preview the effects of formatting changes in the document.
Color scheme Select an option from the list to change the color scheme of the programs.
ScreenTip style
Select a style from the list to control the display of the names of buttons and additional helpful information. Select Show feature descriptions in ScreenTips for names and helpful information, select Don’t show feature descriptions in ScreenTips for button names only, or select Don’t show ScreenTips for neither.
User name
Type a name in the User name box to change your user name.
Note: The name that appears here will be associated with revisions that you make when you review documents by using the Track Changes feature. It is also the author name that is associated with the documents that you create. For example, in predesigned cover pages that include the author name, the name that appears in the User name box is used automatically.
Initials
Type your initials in the Initials box to change the initials that are associated with your user name.
Note: The initials that appear here are associated with comments that you add when you review documents.
Open e-mail attachments in Full Screen Reading view
Selected by default, this option displays documents in Full Screen Reading view when they are opened from e-mail attachments. Clear this check box to open e-mail attachments in Print Layout view.
To see popular options for working with Word, click the Microsoft Office Button  , click Word Options, and then click Popular.
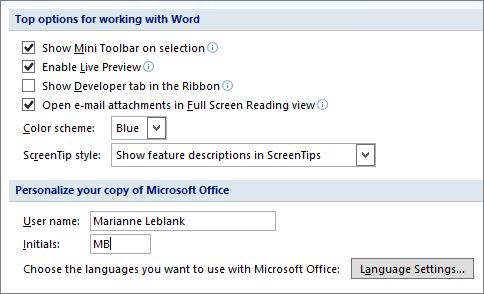
Show Mini Toolbar on selection
Select this option to show the Mini toolbar when you select text. The Mini toolbar provides quick access to formatting tools.
Enable Live Preview
Select this option to preview the effects of formatting changes in the document.
Show Developer tab in the Ribbon
Select this option to show the Developer tab on the Ribbon in 2007 Microsoft Office system programs. The Ribbon is a component of the Microsoft Office Fluent user interface. The Developer tab includes macro and form authoring tools, as well as XML-related features. Clear this check box to hide the Developer tab.
Always use ClearType
Selected by default, this option turns on ClearType to make the text easier to read. If you change this setting, you must restart Microsoft Office Word for the setting to take effect.
Notes:
-
This setting applies to all Office programs.
-
On computers running Microsoft Windows XP, turning this option on overrides the ClearType setting in Windows. This option is not available on computers running Windows Vista.
Open e-mail attachments in Full Screen Reading view
Selected by default, this option displays documents in Full Screen Reading view when they are opened from e-mail attachments. Clear this check box to open e-mail attachments in Print Layout view.
Color scheme Select an option from the list to change the color scheme of the programs.
ScreenTip style
Select a style from the list to control the display of the names of buttons and additional helpful information. Select Show feature descriptions in ScreenTips for names and helpful information, select Don’t show feature descriptions in ScreenTips for button names only, or select Don’t show ScreenTips for neither.
User name
Type a name in the User name box to change your user name.
Note: The name that appears here will be associated with revisions that you make when you review documents by using the Track Changes feature. It is also the author name that is associated with the documents that you create. For example, in predesigned cover pages that include the author name, the name that appears in the User name box is used automatically.
Initials
Type your initials in the Initials box to change the initials that are associated with your user name.
Note: The initials that appear here are associated with comments that you add when you review documents.
Choose the languages you want to use with Office
Click Language Settings to turn on the features necessary for the languages you want to use in 2007 Microsoft Office system.
We’re listening!
Updated May 11, 2018 thanks to customer feedback.
Was this article helpful? If so, please let us know at the bottom of this page. If it wasn’t helpful, let us know what was confusing or missing. Please include the Word and Operating System versions you’re using. We’ll use your feedback to double-check the facts, add info, and update this article.
Need more help?
Want more options?
Explore subscription benefits, browse training courses, learn how to secure your device, and more.
Communities help you ask and answer questions, give feedback, and hear from experts with rich knowledge.
Change How Word Looks on Screen to Be More Productive
How do you change views in Word documents?
Updated on December 4, 2019
Microsoft Word provides several ways to view a document you’re working on. Each is suitable for different aspects of working with a document, and some are better suited for multi-page documents than single pages. If you’ve always worked in the default view, you may find other views that make you more productive.
Instructions in this article apply to Word for Microsoft 365, Word 2019, Word 2016, Word 2013, and Word 2010.
Change Layouts
Word documents open in the Print Layout by default. You can select an alternative layout at any time.
-
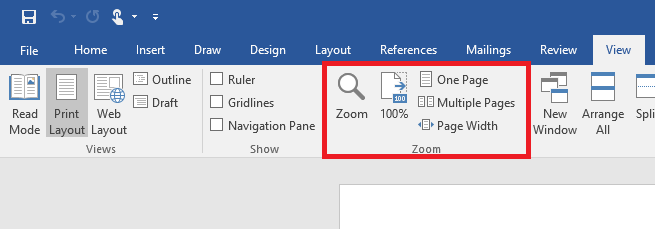
Go to the Ribbon and select the View tab.
-
In the Views group, select one of the other available layouts available to change the layout.
Change Layouts With the Icons Under the Document
Another way to change layouts on the fly is to use the buttons at the bottom of the Word document window. The current layout icon is highlighted. To switch to a different layout, select the corresponding icon.
Word Layout Options
Current versions of Word provide the following layout options:
- Print Layout is the default layout and the one you see most often.
- Web Layout is suitable if you are designing a web page in Word. Web Layout view shows how the document will look as a web page.
- Outline generates an outline version of the contents of the document. You can control the number of levels that are shown and whether the text is formatted. Use Outline view to organize and navigate through a lengthy document.
- Draft view displays only basic text without any formatting or graphics. It is Word’s equivalent of a plain text editor.
- Read Mode hides the writing tools and menus, leaving leave more room for the document pages.
- Focus Mode is a simplified view of the document without any distractions and is available in Microsoft 365. If you need the ribbon, move the mouse to the top of the screen and the ribbon will drop down.
Other Ways to Change How Word Displays
Also in the View tab are other ways to control how a Word document looks on screen.
- Zoom opens a dialog box you can use to specify the percentage of zoom you want. Choose from Word-supplied choices or enter any percentage you like.
- Zoom to 100% instantly returns the document to 100% size.
- One Page or Multiple Pages toggles the view so that either one page of the document displays on the screen or thumbnails of several pages display on the screen.
- Page Width expands the width of the working document to the screen size, usually displaying only the top part of the document.
- Ruler and Gridlines make it easier to measure distance and objects in a document and line up objects on the page.
- Navigation Pane adds a column to the left of the document that holds thumbnails for every page. It is useful for navigating through documents that have more than one page.
- Split displays parts of two pages at the same time, which is useful when you want to copy text or graphics from one page and paste to another.
Thanks for letting us know!
Get the Latest Tech News Delivered Every Day
Subscribe
![]()
Written by Allen Wyatt (last updated September 7, 2019)
This tip applies to Word 97, 2000, 2002, and 2003
It seems that Word can be customized in an almost unlimited number of ways. One way in which you can customize Word is by specifying how information will appear when it is viewed on your screen. The types of customizations available, however, depend on the View you are using. (Views—such as Normal, Page Layout, and Outline—have been covered in other WordTips.) The upshot of this is that you should check the View tab of the Options dialog box (choose Options from the Tools menu, then click on View) in each of your different Views. At the top of the dialog box you can see a notation of which View you are using, and the rest of the dialog box contains the specific options Word maintains for that View.
The behavior of the View tab is a bit different in Word 2000 and Word 2002. In these versions, Word doesn’t differ the controls in the View tab based on the view you are using. Instead, all available controls are shown in the tab, but they are organized differently than in previous versions of Word.
WordTips is your source for cost-effective Microsoft Word training.
(Microsoft Word is the most popular word processing software in the world.)
This tip (652) applies to Microsoft Word 97, 2000, 2002, and 2003.
Author Bio
With more than 50 non-fiction books and numerous magazine articles to his credit, Allen Wyatt is an internationally recognized author. He is president of Sharon Parq Associates, a computer and publishing services company. Learn more about Allen…
MORE FROM ALLEN
Setting Default Label Formats
Setting default formats for envelopes is easy; setting them for labels is not so easy. Here are some ideas on things you …
Discover More
Macros Run Fine Individually, but Not Collectively
Developing macros can be rewarding, but it can also be challenging. Getting individual macros to run properly is hard …
Discover More
Entering Tabs in a Table
When you press the Tab key while entering info into a table, Word dutifully moves to the next table cell. If you don’t …
Discover More
More WordTips (menu)
Turning On Property Information Prompting
You may want to make sure that users of a document fill in the properties associated with a document. In most versions of …
Discover More
Returning Word to Default Settings
Want to set everything back to a pristine state in Word? Doing so is more involved than you may believe.
Discover More
Factory Default Settings for Word
Do you long for a way to reset Word to a «factory default» condition? It is almost impossible to get things to the way …
Discover More
When you first get started with Word, all of your documents, new and old, open at the app’s default View settings: Print Layout at 100 percent Zoom. If you use a large external display or just don’t want to have to squint at the page, you may want to zoom in. Or if you have super vision or for some peculiar reason just really enjoy working on tiny pages, you can also zoom out accordingly.
Word’s View options let you zoom on pages, so the documents themselves get larger or smaller, and you can fit multiple pages into a single screen for more effective navigation. You should note, however, that zooming is different than merely increasing or decreasing font size. For more details on how to customize Word’s font settings, read:
How to change font defaults in Microsoft Word 2016 for Windows
Unfortunately, Microsoft does not currently let you modify or save Zoom-level defaults. However, Word does «remember» these settings, so any new documents you create or open should display with your last-used View and Zoom settings.
Here’s how to master Word 2016’s View and Zoom options.
How to zoom in or out on a Word document
Zooming in and out on Word documents is easy.
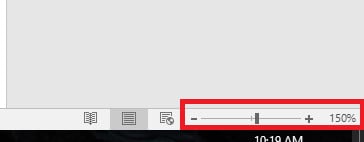
- You can simply drag the horizontal slider in the bottom-right corner of your display toward the left and the minus sign to decrease page size or drag the slider to the right toward the plus sign to increase it.
- Click the View tab at the top of the Word screen.
- In the third box from the left, labeled Zoom, click the magnifying glass to open a pop-up box, and then choose the specific Zoom percentage you want.
Word also provides a number of advanced ways to view document pages. For example, Read Mode shows two pages side by side, like in a book, with horizontal navigation controls. Word’s Web Layout displays document text in one long page, like a web page, that you can scroll down to view.
How to master Word’s advanced View and Zoom settings
- To toggle Read Mode on and off, click the icon all the way to the left of the Zoom slider at the bottom-right corner of your Word screen. It looks like an open book.
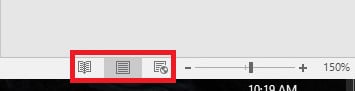
- To toggle Web Layout on and off, click the icon to the immediate left of the Zoom slider at the bottom-right corner of your Word screen. It looks like a document behind a tiny globe.
You can also customize Word’s Zoom levels using some other View options.
- Click either the magnifying glass in the Zoom box of the View tab at the top of your Word screen or the percentage next to the Zoom slider in the bottom right-hand corner of your display, to open the Zoom settings pop-up box.
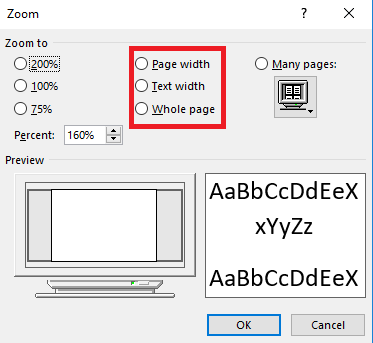
- Within the Zoom settings box, select the Page width option to make Word auto-zoom to find the zoom percentage that best fits an entire page to your display width, whatever its size.
- Choose the Text width option to make Word auto-zoom to find the zoom percentage that best fits the full width of the text on your page to your display.
- Choose the Whole page option to make Word auto-zoom to find the maximum zoom percentage at which you can view an entire page, from top to bottom, without scrolling. This usually means pages get smaller.
- Finally, the Many pages options lets you view multiple document pages on one screen, in rows, though the docs are often quite small. And you can customize the option to display pages in a number of different formations, such as 1×4 (one document’s height by four documents’ width, to fit your display), 1×3, 1×2 and 1×1, or 2×4 (two rows of documents high by four documents’ width, to fit your display), 2×3, 2×2 and 2×1.
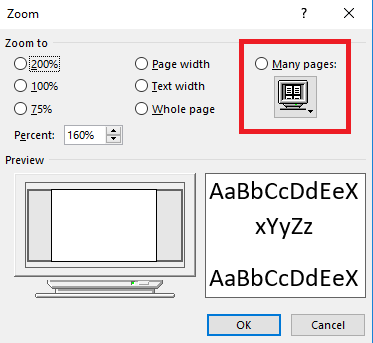
- To enable the Many pages setting and pick your formation, select the circle next to the option and then click the icon (it looks like an old cathode-ray display) in the Zoom settings pop-up box. Another overlay will appear that lets you pick your preferred formation.
To disable any of the view options listed above, simply change your zoom percentage using the slide at the bottom right of your Word screen or the Zoom box in Words’ View tab.
For more related resources, check out:
- How to skip the Start screen in Microsoft Word 2016 for Windows
- Office 365 vs. Office 2016: Which should you buy?
- See all Office 365 subscription options on Microsoft.com (opens in new tab)
All the latest news, reviews, and guides for Windows and Xbox diehards.
Al Sacco is content director of Future PLC’s Mobile Technology Vertical, which includes AndroidCentral.com, iMore.com and WindowsCentral.com. He is a veteran reporter, writer, reviewer and editor who has professionally covered and evaluated IT and mobile technology, and countless associated gadgets and accessories, for more than a decade. You can keep up with Al on Twitter and Instagram.
На этом уроки вы научитесь правильно делать такую операцию, как настройка Word. Разработчики заложили в эту программу массу возможностей. Для правильной работы необходимо посмотреть возможности программы и отметить те параметры, которые помогут вам быстро и качественно работать с документами.
Операция «Настройка Word» делается один раз. Строго говоря, настроить Word следует с первой минуты работы в этой замечательной программе. Но я хотела, чтобы вы сделали эту операцию с пониманием своих действий. Поэтому мы добрались к настройке только к 17 уроку. Тем не менее некоторые вещи вам придётся принять на веру. Но это не значит, что я не расскажу в следующих уроках об этих вещах.
По окончании урока вы сможете:
- Настроить программу Word
1. Переход на вкладку Файл

2. Выбор команды Параметры

3. Работа с закладкой Экран
3.1. Выбор команды Обновлять поля перед печатью
3.2. Выбор команд Обновлять связи перед печатью
Если вы уже собирали ОГЛАВЛЕНИЕ в своём документе, то наверняка сталкивались с таким явлением: необходимость обновить ОГЛАВЛЕНИЕ перед печатью документа. Но вот ситуация: вы забыли это сделать и документ пошёл на принтер с новыми добавленными главами, а ОГЛАВЛЕНИЕ осталось прежним. То есть ОГЛАВЛЕНИЕ не соответствует действительности.
В окне Параметры на закладке Экран отметьте галочкой «Обновлять поля перед печатью» и «Обновлять связанные данные перед печатью» (я выделила эти поля красной рамочкой).

Даже если Вы забудете обновить ОГЛАВЛЕНИЕ, в любом случае перед печатью ВЫ увидите на экране запрос на обновление ОГЛАВЛЕНИЯ.
4. Работа с закладкой Правописание
Перейдите на закладку Правописание.
Щелчок ЛМ по клавише Параметры автозамены открывает диалоговое окно Автозамена. С ним «общаться» будем ниже.
 Отметьте галочками следующие пункты:
- Русский: требовать точного использования ё
Включается проверка буквы «ё», достаточно корректная, но не различает слово «ее» от «её», хотя подчёркивает, как ошибку. Но, используя мою любимую команду Замена, мы легко заменим по всему документу «ее» на «её». - Проверять орфографию в процессе набора текста
- Отмечать ошибки грамматики в процессе набора текста Сложные слова
- Во время проверки орфографии также проверять грамматику Имейте в виду, что в этом случае слова с ошибками в вашем документе буду подчёркнуты красной волнистой линией, а грамматические и пунктуационные ошибки – синей волнистой линией. Если вас это будет раздражать, то снимите эти галочки, но в этом случае не забудьте включать время от времени проверку орфографии.
4.1. Работа с диалоговым окном «Автозамена» Откройте диалоговое окно Автозамена, щёлкнув по клавише Параметры автозамены ЛМ. Очень интересное окно. В окне 5 закладок. С закладками «Автозамена», «Автозамена математическими символами» и «Действия» я познакомлю на одном из следующих уроков. Например, вы научитесь, как сделать, чтобы при нажатии одной клавиши появлялся нужный вам текст.
А вот закладки «Автоформат при вводе» и «Автоформат» очень важны для профессиональной работы с документом.
На уроке 15 Лишние стили текста я говорила о причинах появления большого количества стилей текста в области задач Стили. И одна из причин – это автоматическое определение нового стиля на базе встроенного стиля. Вот с этой бедой мы сейчас поборемся.
Откройте закладку «Автоформат при вводе».
4.3. Отмена автоформата при вводе текста Снимите все галочки, в области, отмеченной красной рамкой. В этом случае при вводе текста встроенные стили не будут автоматически появляться в области задач Стили
4.4. Отмена автоформата при редактировании текста Снимите все галочки, в области, отмеченной красной рамкой. В этом случае при редактировании текста встроенные стили не будут автоматически появляться в области задач Стили.
Смело нажимайте ОК. Мы сделали очень важное дело: мы не позволили Word’у решать за нас, какие стили попадут в наш список Стилей текста.
5. Работа с закладкой Дополнительно
5.1. Автоматическое создание нового полотна при рисовании
Переходим к вкладке Дополнительно. Вкладка очень длинная и снабжена полосой прокрутки. Сразу же поставьте галочку на опции «Автоматически создавать полотно при вставке автофигур»:

Для чего это нужно?
Начиная работу с автофигурами, лучше всего начинать с создания полотна. Объект Полотно, это некоторый контейнер (я называю его «заплаткой») в документе. На нём вы сможете размещать большое количество фигур, менять их размер, форму и упорядочивать и так далее.
Этот контейнер имеет:
- границы, которые вы можете менять при необходимости
- независимые средства редактирования
- функции группировки объектов, находящихся в полотне
- функции обтекания текстом (это важно!)
По умолчанию фигуры создаются без полотна. Чтобы создать новое полотно, используется вкладка Вставка, на которой в группе команд Иллюстрации есть кнопка Фигуры. Если здесь выбрать команду Новое полотно, то полотно будет создано в документе, и Word автоматически переключится на вкладку Средства рисования.
Но, если мы поставили галочку на опции «Автоматически создавать полотно при вставке автофигур», то полотно создаётся автоматически, как только мы прикоснёмся к любой автофигуре: Это очень удобно, если вам приходится много рисовать.
Мы посвятим несколько уроков возможностям рисования в Word’е.
Прокручиваем закладку Дополнительно вниз.
5.1. Вырезание, копирование, вставка
Посмотрите, как выглядит часть под названием «Вырезание, копирование и вставка» до нашего вмешательства:
 На уроке 15 Лишние стили текста я говорила о причинах появления лишних стилей. Причина 3 – Копирование текста из других программ и Причина 4 – Копирование текста, который имеет назначенный стиль, из одного документа в другой. На уроке 16 Буфер обмена мы научились пользоваться специальной вставкой буфера обмена для того, чтобы «не тащить» в новый документ лишние стили.
Давайте зададим параметры работы буфера обмена: Обязательно снимите галочку опции «Сохранять маркеры и нумерацию при вставке текста в режиме «Сохранить только текст»».
Для чего это нужно?
На уроке 16 Буфер обмена мы убедились, что режим «Сохранить только текст» преобразует автоматическую нумерацию в текст, от которого потом придётся избавляться. А если мы снимаем галочку, то можем копировать сколь угодно сложный список – при вставке ни нумерация, ни маркеры сохраняться не будут:
 Настроив таким образом работу буфера обмена, в дальнейшем мы сэкономим кучу времени сил, избавим себя от появления лишних стилей в документах. Смело копируйте текст из любой программы и безбоязненно вставляйте в новый документ – работа буфера обмена вас приятно удивит. Теперь не надо раскрывать кнопку выпадающего меню Буфера обмена и искать кнопки специальной вставки – просто нажимайте большую кнопку:
5.2. Обновление полей, содержащих записанные исправления
Полезная функция при рецензировании.
5.3. Конвертация текста любого формата в читабельный
Для чего это нужно?
- При открытии файла формата, отличного от *.docx или *.doc , содержимое файла корректно конвертируется в читабельный текст.
Если вы откроете такой файл, то появится окно: Вам остаётся только выбрать, из какого формата будет преобразовываться файл.
 - При повторном открытии документа все связи будут автоматически обновляться.
 Вам остаётся только выбрать, из какого формата будет преобразовываться файл.
5.4. Расположение файлов
По умолчанию Word предлагает сохранить ваши документы в папке C:UsersklimenkoeDocuments. Разумеется вместо «klimenkoe» будет стоять ваше имя. Но ведь удобно, чтобы документы сохранялись в соответствующих папках. Я, например, работаю со съёмного диска. И каждый раз при сохранении документа мне приходится разыскивать место хранения рабочих файлов. В окне Параметры Word щёлкните ЛМ по клавише Расположение файлов:
 Появится окно:
 Щёлкните ЛМ по клавише Изменить:
 Перейдите в то место, в котором будут сохраняться ваши документы:
 Говорим ОК:
 Ещё раз ОК.
Для чего это нужно?
Теперь при сохранении документа вы нажимаете Обзор: и вам сразу предлагается заказанное вами место сохранения. В моём случае это:
 Так как мне приходится работать в разных проектах, то по мере необходимости я меняю место расположения файлов.
6. Заканчиваем операцию под кодовым названием «Настройка Word»
Итак, мы внесли все необходимые изменения в окне Параметры Word. Теперь смело щёлкаем по кнопке ОК – теперь эти функции Word’а будут постоянны:
Настройка Word делается один раз. В идеале в организации программа Word на всех компьютерах должна быть настроена таким образом.
Теперь вы сможете:
- Настроить программу Word
Урок получился длинным и, полагаю, достаточно тяжёлым. Но, если вы хотите увеличить производительность труда, совершенно необходимо освоить операцию «Настройка Word». Не хотелось бы вас пугать, но я ещё не всё рассказала о настройках параметров Word.
Время от времени мы будем обращаться к окну настройки, а сейчас самое время отдохнуть. Заслужили!