
Excel for Microsoft 365 Word for Microsoft 365 Access for Microsoft 365 Project Online Desktop Client Publisher for Microsoft 365 Word for the web OneNote for the web PowerPoint for the web Excel 2021 Word 2021 Access 2021 Project Professional 2021 Project Standard 2021 Publisher 2021 OneNote 2021 Excel 2019 Word 2019 Access 2019 Project Professional 2019 Project Standard 2019 Publisher 2019 Excel 2016 Word 2016 Access 2016 OneNote 2016 Project Professional 2016 Project Standard 2016 Publisher 2016 Office 2016 for Mac Excel 2013 Word 2013 Access 2013 OneNote 2013 Project Professional 2013 Project Standard 2013 Publisher 2013 Project Online Excel 2010 Word 2010 Access 2010 OneNote 2010 Project 2010 Project Standard 2010 Publisher 2010 Office 2010 Excel Starter 2010 More…Less
You can use the Office programs to save or convert your files to PDFs so that you can share them or print them using commercial printers. And you won’t need any other software or add-ins.
Use PDF format when you want a file that:
-
Looks the same on most computers.
-
Has a smaller file size.
-
Complies with an industry format.
Examples include resumes, legal documents, newsletters, files that are intended to be read (not edited) and printed, and files that are intended for professional printing.
Important: Many programs, including Microsoft Word, have the ability to open and edit PDF files. Simply sharing something as a PDF is not sufficient to guarantee the recipient can’t edit the file.
To see step-by-step instructions, select an Office program from the drop-down list.
-
Open the table or report you want to publish as a PDF.
-
On the External Data tab, in the Export group, select PDF or XPS.

-
In the File Name field, type or select a name for the document.
-
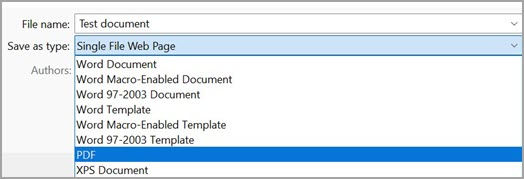
In the Save as type list, select PDF (*.pdf) .
-
If the document requires high print quality, select Standard (publishing online and printing) .
-
If file size is more important than print quality, select Minimum size (publishing online).
-
-
Select Options to set the page to be printed, to choose whether markup should be printed, and to select output options. Select OK .
-
Select Publish.

Note: You can’t save Power View sheets as PDF files.
-
Select the File tab.
-
Select Save As .
To see the Save As dialog box in Excel 2013 or Excel 2016, you have to choose a location and folder. -
In the File Name box, enter a name for the file, if you haven’t already.
-
In the Save as type list, select PDF (*.pdf) .
-
If you want the file to open in the selected format after saving, select the Open file after publishing check box .
-
If the document requires high print quality, select Standard (publishing online and printing) .
-
If file size is more important than print quality, select Minimum size (publishing online) .
-
-
Select Options to set the page to be printed, to choose whether markup should be printed, and to select output options. For more information on the Options dialog box in Excel, see More about PDF options . Select OK when finished.
-
Select Save .
-
Select the File tab.
-
Select Export .
-
Under Export Current , select what part of the notebook you want to save as PDF.
-
Under Select Format , select PDF (*.pdf) , and then select Export .
-
In the Save As dialog box, in the File Name field, enter a name for the notebook.
-
Select Save .
-
Select the File tab.
-
Select Save As .
To see the Save As dialog box in PowerPoint 2013 or PowerPoint 2016 , you have to choose a location and folder. -
In the File Name box, enter a name for the file, if you haven’t already.
-
In the Save as type list, select PDF (*.pdf) .
-
If you want the file to open in the selected format after saving, select the Open file after publishing check box.
-
If the document requires high print quality, select Standard (publishing online and printing) .
-
If the file size is more important than print quality, select Minimum size (publishing online) .
-
-
Select Options to set the page to be printed, to choose whether markup should be printed, and to select output options. Select OK when finished.
-
Select Save .
-
On the File tab, choose Save As .
To see the Save As dialog box in Project 2013 or Project 2016, you have to choose a location and folder. -
In the File Name box, enter a name for the file, if you haven’t already.
-
In the Save as type list, select PDF Files (*.pdf) or XPS Files (*.xps) , and then choose Save .
-
In the Document Export Options dialog box, select a Publish Range , whether to Include Non-printing Information , and ISO 19500-1 compliance (PDF only).
Formatting tips
Project doesn’t support every PDF or XPS formatting feature, but you can still use some print options to change the look of the final doc.
Choose File > Print , and then change any of these options:
-
Dates
-
Orientation
-
Paper Size
-
Page Setup
In the Page Setup dialog box, you can change options on these tabs:
-
Margins
-
Legend
-
View
-
Select the File tab.
-
Select Save As .
To see the Save As dialog box in Publisher 2013 or Publisher 2016, you have to choose a location and folder. -
In the File Name box, enter a name for the file, if you haven’t already.
-
In the Save as type list, select PDF (*.pdf) .
-
If you want to change how the document is optimized, select Change . (Select Options in Publisher 2013 or Publisher 2016.)
-
Make any changes you want to the picture resolution and non-printing information.
-
Select Print Options to make changes to the printing options for the document.
-
Select OK when finished.
-
-
If you want the file to open in the selected format after saving, select the Open file after publishing check box.
-
Select Save .
-
Select the File tab.
-
Select Save As .
To see the Save As dialog box in Visio 2013 or Visio 2016, you have to choose a location and folder. -
In the File Name box, enter a name for the file, if you haven’t already.
-
In the Save as type list, select PDF (*.pdf) .
-
If you want the file to open in the selected format after saving, select the Automatically view file after saving check box.
-
If the document requires high print quality, select Standard (publishing online and printing) .
-
If file size is more important than print quality, select Minimum size (publishing online) .
-
-
Select Options to set the page to be printed, to choose whether markup should be printed, and to select output options. Select OK .
-
Select Save .
-
If the file was previously saved, select File > Save a Copy.
If the file is unsaved, select File > Save As. -
Select Browse to choose the location on your computer where you want to save the file.
-
In the drop-down list, select PDF.
-
Select Save.
Select More Options > Options to customize your PDF.
-
To make a PDF file from only some of the pages in your document, choose an option under Page range.
-
To include tracked changes in the PDF, under Publish what, select Document showing markup. Otherwise, make sure Document is selected.
-
To create a set of bookmarks in the PDF file, select Create bookmarks using. Then, choose Headings or, if you added bookmarks to your document, Word Bookmarks.
-
If you want to include document properties in the PDF, make sure Document properties is selected.
-
To make the document easier for screen-reading software to read, select Document structure tags for accessibility.
-
ISO 19005-1 compliant (PDF/A) This option outputs the PDF document as version 1.7 PDF, which is an archiving standard. PDF/A helps to insure that a document will look the same when it’s opened later on a different computer.
-
Bitmap text when fonts may not be embedded If fonts can’t be embedded into the document, the PDF uses bitmap images of the text so that the PDF looks the same as the original document. If this option isn’t selected and the file uses a font that can’t be embedded, then the PDF reader might substitute another font.
-
Encrypt the document with a password To restrict access so only people with the password can open the PDF, select this option. When you select OK, Word opens the Encrypt PDF Document box, where you can type and re-enter a password.
Open and copy content from a PDF with Word
You can copy any content you want from a PDF by opening it in Word.
Go to File > Open and browse to the PDF file. Word opens the PDF content in a new file. You can copy any content you want from it, including images and diagrams.
To save your file as a PDF in Office for Mac, follow these easy steps:
-
Select File.
-
Choose Save As.
-
Select File Format at the bottom of the window.
-
Choose PDF from the list of available file formats.
-
Give your file a name, if it doesn’t already have one, then select Export.
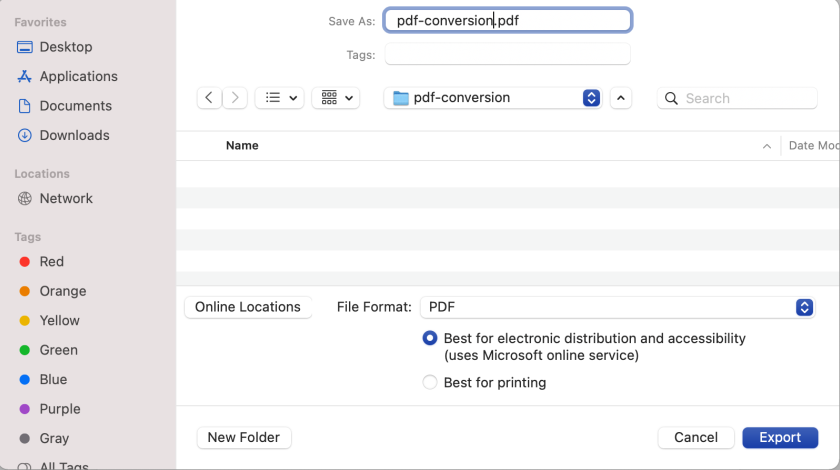
Note: When using Best for printing, the hyperlinks may not convert correctly. This is a known issue in Word for Mac.
Important:
-
When using Online Service , only font that Microsoft has the legal rights to can be used. If the documentation contains custom font, it will be substituted and may cause problems. This can be avoided by embedding the fonts into the document.
-
Learn more about embedding fonts by visiting:
-
Benefits of embedding custom fonts
-
Some of your fonts can’t be saved with the presentation
You can use Word, PowerPoint, and OneNote for the Web to convert your doc into a PDF.
-
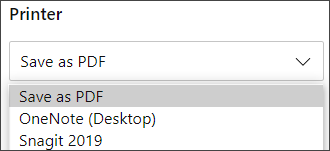
Select File > Print > Print (in PowerPoint you will select one of three formats).
-
In the dropdown menu under Printer , select Save as PDF and then select Save.
-
Then in the Explorer menu that opens you can name the PDF and choose where to save it and then select Save.
This will generate a basic PDF that preserves the layout and format of your original document.
If you need more control over the options for your PDF, such as adding bookmarks, use the desktop app to convert your doc to a PDF. Select Open in Desktop App in the toolbar of PowerPoint and OneNote to start using the desktop app, and in Word select the Editing dropdown first and then select Open in Desktop App .

If you don’t own the desktop app, you can try or buy Microsoft 365.
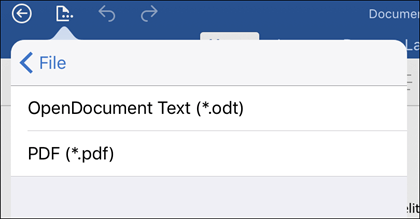
To export your Word document or Excel workbook to PDF format on iOS tap the File button at the top left, choose Export and then PDF.
Portable Document Format (PDF) preserves document formatting and enables file sharing. When the PDF format file is viewed online or printed, it retains the format that you intended. The PDF format is also useful for documents that will be reproduced using commercial printing methods. PDF is accepted as a valid format by many agencies and organizations, and viewers are available on a wider variety of platforms than XPS.
XML Paper Specification (XPS) is an electronic file format that preserves document formatting and enables file sharing. The XPS format ensures that when the file is viewed online or printed, it retains exactly the format that you intended, and that data in the file cannot be easily changed.
Important: Most modern web browsers can open and display a PDF file. If you have an older operating system, however, you may need a PDF reader installed on your device such as the Acrobat Reader, available from Adobe Systems.
See also
-
Edit or make changes to a PDF file
-
Create accessible PDFs
Need more help?
This tutorial shows how to convert Microsoft Word files to PDFs. There are several ways to accomplish this task in Microsoft Word, so today we will focus on the method I believe is the most user-friendly.
In the final section, we will also briefly discuss the Adobe Acrobat PDFMaker add-in and look at how to use it. (The Acrobat PDFMaker add-in is not required to follow the steps in the main section below.)
Do you need to convert a PDF to a Microsoft Word file? Please see my other tutorial titled “How to Convert PDFs to Microsoft Word Files in Adobe Acrobat.”
This tutorial is available as a YouTube video showing all the steps in real time.
Watch more than 200 other writing-related software tutorials on my YouTube channel.
The images below are from Word for Microsoft 365. These steps also apply to Word 2021, Word 2019, and Word 2016. The steps will be similar in Word 2013 and Word 2010.
How to Convert a Microsoft Word File to a PDF
- Open the Word file (.docx file) you want to convert to a PDF.
Pro Tip: Windows users can use the keyboard shortcut f12 or fn + f12 to open the Save As dialog box and skip to step 5.
- Select the File tab in the ribbon.

- Select the Save As option in the Backstage view.

- Select the Browse option.

- Select the location where you want to save your PDF in the Save As dialog box.

- Select PDF (*.pdf) from the Save as type menu.

- (Optional Step) Select the Options button if you want to select additional options.

- (Optional Step) Select additional options from the Options dialog box, such as converting only a specific page range.
After making your choices, select the OK button.

- (Optional Step) Select Optimize for Standard or Minimum size.
Pro Tip: The Minimum size option is helpful if the standard (original) size is too big to email. However, the recipient of the email will not be able to convert the PDF back to the original file size.

- (Optional Step) Deselect Open file after publishing if you do not want the PDF to open in a compatible application, such as Adobe Acrobat, Acrobat Reader, or a web browser after the conversion process is complete.

- Select the Save button.

What Is the Adobe Acrobat PDFMaker Add-in?
Adobe Acrobat PDFMaker is a plug-in (which Microsoft calls an add-in) that allows you to streamline the process of converting PDFs in Windows.
Acrobat PDFMaker comes with Adobe Acrobat Pro DC, Adobe Acrobat 2020, and Adobe Acrobat 2017. By default, it will be added to your Office applications upon installation of Acrobat. In Word, it will normally appear in the Home tab of the ribbon.

It will also appear in the Backstage view.

How to Use the Acrobat PDFMaker Add-in
- Open the Word file (.docx file) you want to convert to a PDF.
- Select the Home tab and then select the Create and Share Adobe PDF button (see figure 11).
Alternatively, select the File tab (see figure 1) and then select Save as Adobe PDF from the Backstage view (see figure 12).
- Select the Yes button in the alert box stating that your file must be saved. (This alert box won’t appear if your file was recently saved.)

- Select the location where you want to save the PDF in the Save Adobe PDF File As dialog box.
- (Optional Step) Uncheck View Result if you do not want the PDF to open in Adobe Acrobat or another compatible application after the conversion process is complete.

- (Optional Step) Select Restrict Editing if you want to set security restrictions.

- (Optional Step) Select security choices from the Adobe PDFMaker Security dialog box:
-
- Set a password to open the PDF.
- Set a password to edit or print the PDF.
- Select restrictions for editing, printing, or copying content.
After making your choices, select the OK button.

- (Optional Step) Select the Options button for additional options.

- Select additional options from the Acrobat PDFMaker PDF Options dialog box, including choosing to convert a specific page range.
After making your choices, select the OK button.

- Select the Save button.

Related Resources
How to Combine Files into One PDF in Adobe Acrobat
How to Insert PDFs into Microsoft Word Documents (PC & Mac)
How to Redact PDFs in Adobe Acrobat Pro
How to Export PDF Tables from Adobe Acrobat to Excel (PC & Mac)
Updated February 27, 2023
![]()
Download Article
An easy-to-use guide to turn your Word documents into viewable PDFs
![]()
Download Article
Do you want to convert your Word document into an easy-to-send PDF file? PDFs are compatible with all platforms, so turning your Word document into a PDF ensures that more people can open the file. It’s incredibly easy to convert a Word document to PDF—we’ll show you how to do it on any PC or Mac!
-
1
Open the Microsoft Word document. Double-click the Word document to open it in Microsoft Word.
- If you haven’t yet created the document, open Word, then click Blank document and create the document as needed before proceeding.
-
2
Click File. It’s in the top-left corner of the Word window. Doing so opens a pop-out window.
Advertisement
-
3
Click Export. This option is in the left-hand column of options. You should see several new options appear in the middle of the window.
-
4
Click Create PDF/XPS Document. It’s in the upper-left corner of the window.
-
5
Click Create PDF/XPS. This option is in the middle of the window. Doing so prompts a pop-up window.
-
6
Select a save location. On the left side of the window, click the folder in which you want to store the PDF version of your Word file.
- Since the PDF is a different file type than the Word document, you can store the PDF in the same file location as the Word file.
- You can also enter a new file name in the «File name» text box if you like.
-
7
Click Publish. It’s in the bottom-right corner of the window. This will create a PDF copy of your Word document in your specified location.


Advertisement
-
1
Open the Microsoft Word document. Double-click the Word document to open it in Microsoft Word.
- If you haven’t yet created the document, open Word, then click Blank Document and create the document as needed before proceeding.
-
2
Click File. It’s in the upper-left corner of your Mac’s screen. A drop-down menu will appear.
-
3
Click Save As…. This option is in the drop-down menu. Doing so opens a new window.
-
4
Enter a file name. Type whatever you want to name the PDF into the «Name» text box at the top of the window.
-
5
Select a save location. On the left side of the window, click the folder in which you want to save your PDF.
-
6
Click the «File Format» text box. It’s at the bottom of the window. A drop-down menu will appear.
-
7
Click PDF. This option is in the «Export» section of the drop-down menu.
- You may have to scroll down in the drop-down menu to see this option.
-
8
Click Export. It’s a blue button in the bottom-right corner of the window. Doing so saves your PDF in the specified file location.


Advertisement
-
1
-
2
Click Choose file. It’s in the middle of the SmallPDF page. Doing so will open either a File Explorer (Windows) or a Finder (Mac) window.
-
3
Select your Word document. Go to your Word document’s location, then click the Word document to select it.
-
4
Click Open. It’s in the bottom-right corner of the window. Doing so will upload the Word document to SmallPDF.
- On a Mac, you may click Choose here instead.
-
5
Click Download File. This option is in the lower-left side of the SmallPDF page. Your PDF will download onto your computer, though you may have to select a storage location and/or confirm the download depending on your browser’s settings.
- It may take a few seconds for this option to appear if your Word document is large or your Internet connection is slow.


Advertisement
-
1
Open Google Drive. Go to https://drive.google.com/ in your computer’s web browser. This will open your Google Drive page if you’re logged in.
- If you aren’t logged in, click Go to Google Drive, then enter your email address and password when prompted.
-
2
Click + New. It’s in the top-left side of the Google Drive window. A drop-down menu will appear.
-
3
Click File upload. It’s in the drop-down menu. Doing this will open either a File Explorer (Windows) or a Finder (Mac) window.
-
4
Select your Word document. Go to your Word document’s location, then click the Word document to select it.
-
5
Click Open. It’s in the bottom-right corner of the window. Your Word document will upload to Google Drive.
- On a Mac, you may click Choose here instead.
-
6
Open the Word document. Once the Word file finishes uploading to Google Drive, double-click it in Google Drive to open it in your browser.
-
7
Click File. It’s in the upper-left side of the window. Doing so prompts a drop-down menu.
- On a Mac, make sure you’re clicking File in your browser window and not in the menu bar at the top of the screen.
-
8
Select Download as. This option is in the middle of the drop-down menu. Selecting it prompts a pop-out menu.
-
9
Click PDF document. It’s in the pop-out menu. A PDF version of the Word document will immediately download onto your computer.
- Depending on your browser’s settings, you may have to confirm the download and/or select a save location before the file will actually download.


Advertisement
Add New Question
-
Question
Why doesn’t Microsoft Word give me the option to «Save as PDF» in the file menu?

A special type of software (technically called add-in) has the ability to convert Microsoft Word documents to PDF. However, Word 2007 does not include this add-in by default. To convert to PDF with Microsoft Word 2007, you have to download the add-in from Microsoft’s website.
-
Question
I need to convert a PDF file to a Microsoft Word document. Is there a way to do this?
Open up your PDF document and select «Save as —> Word Document.» You’ll need to clean it up afterwards (remove paragraph signs, reformat, etc.).
-
Question
How do I fix the glitches and formatting errors that show up in the new PDF file?
The latest versions (after MS Office 2007) allow you to save the document as a pdf, thus avoiding formatting errors. Go to Files->Save As and select «.pdf format» from Save As Type. Click to save.
See more answers
Ask a Question
200 characters left
Include your email address to get a message when this question is answered.
Submit
Advertisement
-
To open your PDF in your computer’s default PDF reader, simply double-click it; if you have more than one PDF reader, you may be prompted to select one after double-clicking the PDF.
-
You can also use the «Save as» menu to convert your Word document to a PDF on a Windows computer.
Advertisement
-
When converting sensitive documents (e.g., credit card statements), avoid using SmallPDF. While their site is secure, it’s best to keep such documents offline as much as possible.
Advertisement
About This Article
Article SummaryX
1. Go to https://smallpdf.com/word-to-pdf in your web browser.
2. Click Choose file.
3. Double-click the Word file you want to convert.
4. Click Download File when the PDF is available.
Did this summary help you?
Thanks to all authors for creating a page that has been read 4,795,631 times.
Is this article up to date?
This PDF converter is your go-to solution to convert Word to PDF online. Convert Microsoft Word documents to the popular and practical Adobe PDF format. Convert DOC to PDF or DOCX to PDF.
Convert Word to PDF Online
for free and wherever you want
Using PDF2Go to convert your Word document to PDF is fast, easy and instant. All you need is a stable internet connection and your file.
Upload your Word document via drag and drop, browsing, a cloud storage or by giving a link. Then, all you need to do is to click on “Save Changes” and wait until we converted your file for you.
Afterwards, you can download, save or further edit your PDF.
Installing a program on your computer comes with risks. Malware and viruses just wait for an opening. While mobile apps seem safer, they often come with annoying advertisements or suspicious access to your phone.
That’s why PDF2Go lets you convert online! No viruses, no installations. All you need is an internet connection.
The PDF document format comes with many advantages. It retains formatting and thus looks the same when you print or share it with others. It’s highly compatible and there are readers available for all computer systems, phones and even e-book readers.
Use these and many more advantages by using a trusty PDF converter like PDF2Go.
Uploading your Word document to convert to PDF has never been safer. We make sure that your file is safe every step of the way. Plus, we do not obtain any right on your file, it stays yours and yours only.
More information can be found in our Privacy Policy.
We are specialized to convert Word to PDF. But this is not our limit! Next to DOC and DOCX, you can convert other text documents, presentations and even images!
For example:
ODT, RTF, TXT, Microsoft PowerPoint PPT, JPG, PNG, GIF and more
You are not bound to your computer! PDF2Go is an online PDF converter. This means you can use the service from any computer, at work or at home, and even on holidays!
PDF2Go works on tablets and smartphones as well!
Rate this tool
4.7 / 5
You need to convert and download at least 1 file to provide feedback
Feedback sent
Thank you for your vote
Автор: Амиль | Дата публикации: 15.03.2019 | В разделе: Windows инструкции
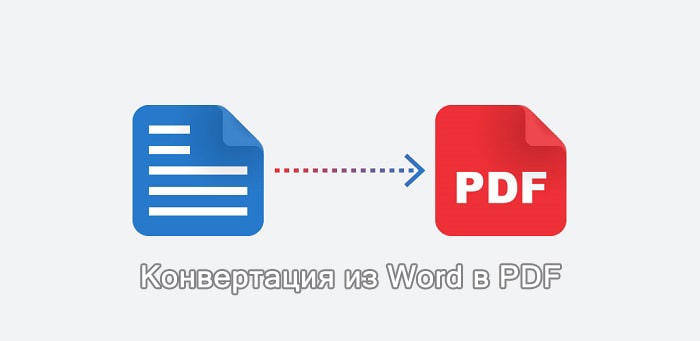
С проблемой несовместимости документов с расширением *.doc и *.docx сталкиваются все пользователи ПК, работающие в текстовом редакторе. Особые трудности с открытием файлов возникают при пересылке данных, когда отправитель не знает, какая именно версия Microsoft Word используется получателем. Чтобы избежать недоразумений, передают объекты в формате *.pdf. Документы с таким расширением обязательно откроются на ПК. Выясним, как преобразовать Word в PDF различными способами.
Способ №1: используя Microsoft Office
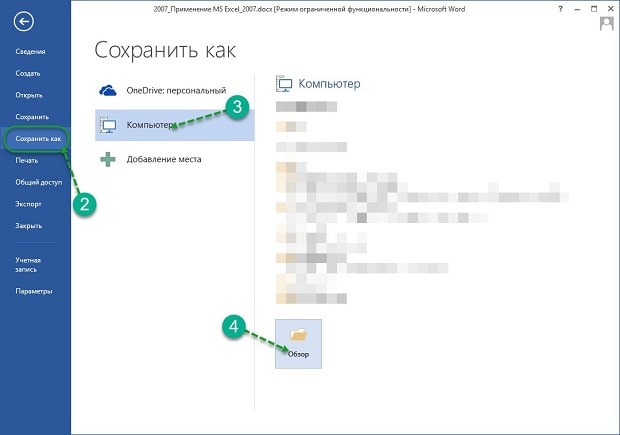
Работая с текстовым редактором Microsoft Word, можно научиться сохранять данные в различных форматах. В перечне типов файлов есть и PDF. Алгоритм сохранения данных следующий:
- Открыть файл Word;
- В горизонтальном меню найти блок «Файл», перейти;
- Выбрать пункт «Сохранить как»;
- Указать «Компьютер»;
- Внизу списка найти и нажать кнопку «Обзор»;
- В новом окне найти поле «Тип файла» и Открыть стрелочкой меню;
- Выбрать из списка PDF и нажать «Сохранить».

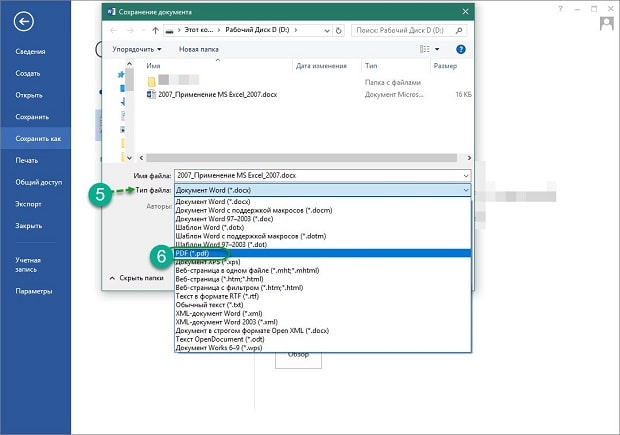
Далее проверить, что в указанной при сохранении объекта папке появился новый документ с расширением *.pdf. Пользоваться встроенным функционалом Microsoft Office и удобно, и безопасно.
Способ №2: используя онлайн-сервисы
Если с пересохранением в редакторе Microsoft Office возникли проблемы, можно воспользоваться специальными онлайн ресурсами. Поиск в Интернете выдаст огромное количество сервисов. Но не все они окажутся полезными и понятными. Среди русскоязычных ресурсов с понятным интерфейсом и быстрой конвертацией, можно выделить следующие три:
- https://www.pdf2go.com/ru/word-to-pdf;
- https://pdf.io/ru/doc2pdf/;
- https://smallpdf.com/ru/word-to-pdf.
Наиболее простым считается сервис pdf.io/ru/doc2pdf. У него максимально облегченный интерфейс — всего одна активная кнопка. Есть возможность загружать объекты как с дисков компьютера, так и с Google Диск, Dropbox и др. Алгоритм работы с онлайн сервисом следующий:
- Перейти по ссылке;
- Нажать на кнопку «Выбрать файл»;
- В новом окне указать путь к документу, указать «Открыть»;
- Нажать на кнопку «Скачать».


Сохраненный в новом формате объект попадет в папку «Загрузки», если при настройке браузера не был указан иной путь хранения данных. Время конвертирования зависит от размера исходного документа. Если процедура занимает несколько минут, это нормально. Этим способом преобразования данных из *.docx в *.pdf можно воспользоваться при стабильном доступе к сети.
Способ №3: используя сторонние программные продукты
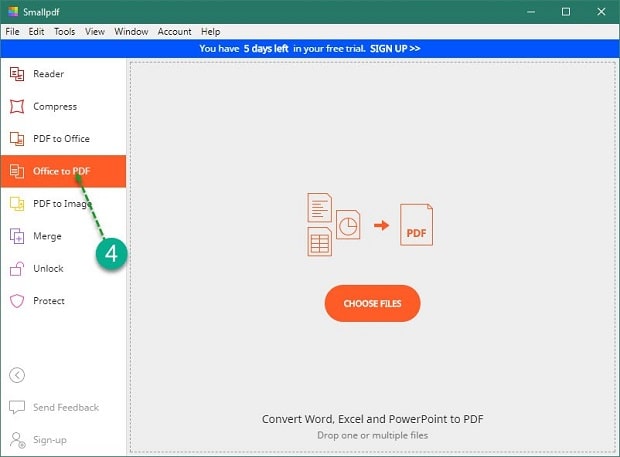
Для того чтобы преобразовать ПДФ в Ворд, можно применять функциональное вспомогательное программное обеспечение. Оно устанавливается на ПК отдельно. Среди предлагаемых разработчиками программ, внимание стоит обратить на Smallpdf. Софт распространяется в сети бесплатно, имеет стандартную инсталляцию и дружелюбный интерфейс. Новичкам в вопросах конвертации данных будет несложно разобраться с меню программного продукта. Но все-таки главное его преимущество — независимость от Интернета.
Официальный сайт для загрузки: https://smallpdf.com/ru/desktop
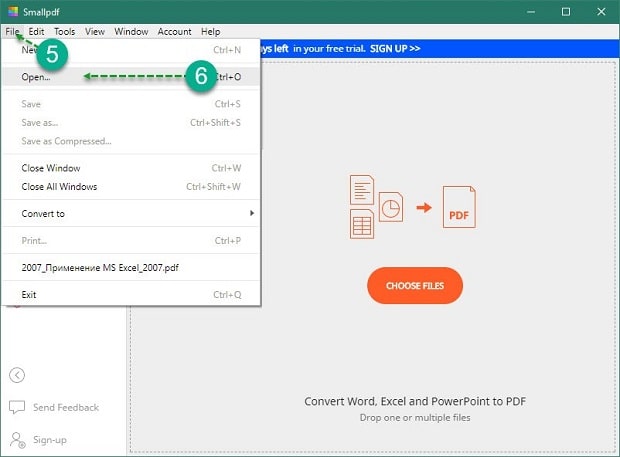
- Скачайте и установите программу;
- В блоке слева указать «Office to PDF»;
- В меню «File» выбрать пункт «Open» или в центральном блоке «Choose Files»;
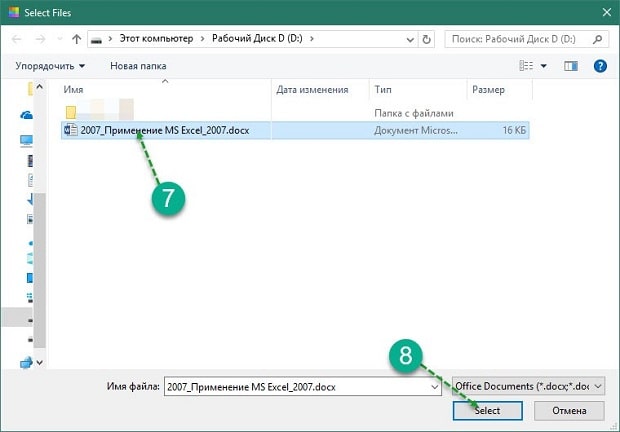
- В новом окне указать путь к объекту и выбрать «Select»;
- Нажать на кнопку «Convert 1 file».
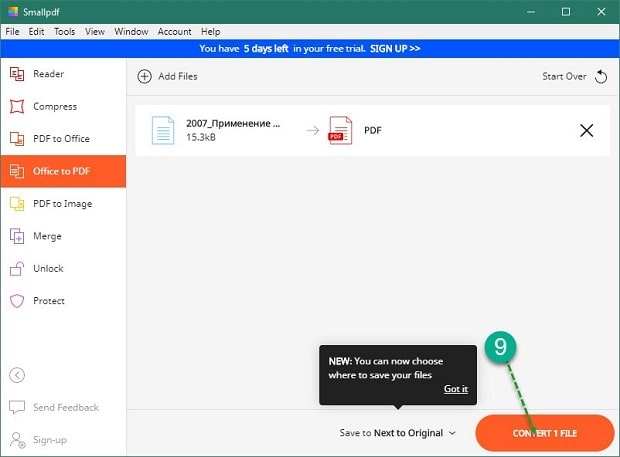
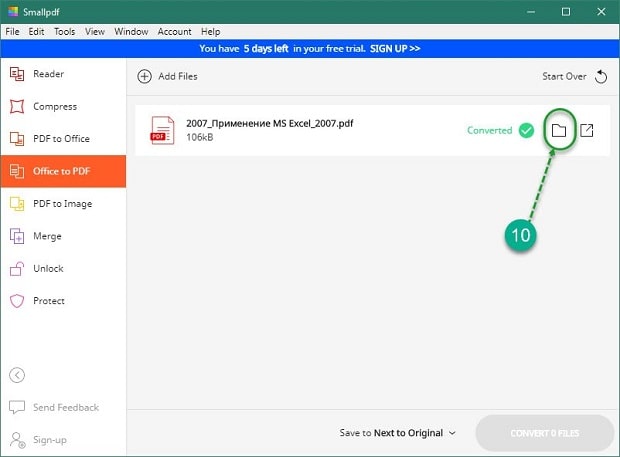
Конвертация выполнится в течение нескольких секунд. Объект пересохраняется в новом формате в ту же папке, где находится оригинал (если не выбран новый путь). Если местоположение документа забыто, программа подскажет, куда была сохранена информация. Для этого нужно нажать в центральном блоке на иконку папки рядом с названием преобразованного файла.
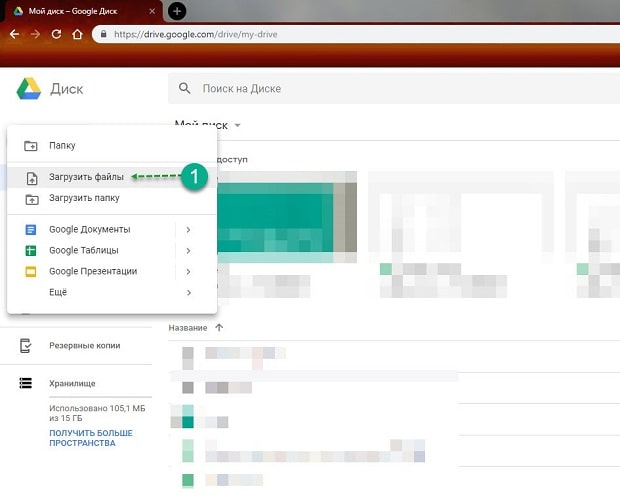
Способ №4: используя Google Диск
Очень удобный способ пересохранения документов Microsoft Word в ПДФ. Но он зависим от стабильной работы Интернета. Если доступ к сети есть, аккаунт зарегистрирован, конвертация займет не больше 2 минут. Действуют так:
- Войти в аккаунт Google;
- Перейти в Google Диск;
- В левом блоке меню нажать на кнопку «Создать»;
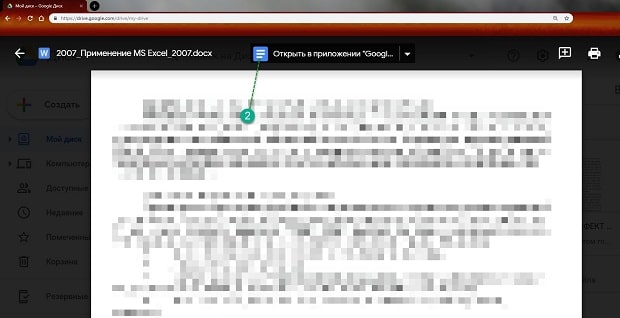
- Выбрать «Загрузить файлы» и открыть добавленный объект;
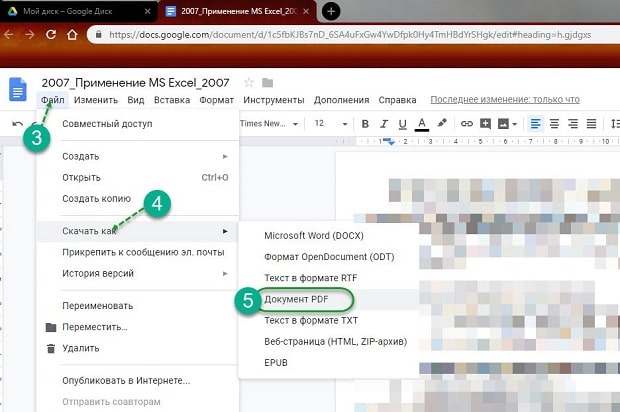
- Нажать на кнопку «Открыть в приложении» (кнопка расположена по середине в верхней части);
- Перейти в меню «Файл», далее Выбрать «Скачать как» и указать «Документ PDF».
Файл отправится в загрузку и будет доступен вам в нужном формате. Важные и объемные документы лучше преобразовывать при помощи встроенной функции Microsoft Office или Google Диск. Использование этих ресурсов не приведет к потере данных, сократит время на установку дополнительного софта.
Другие инструкции: