
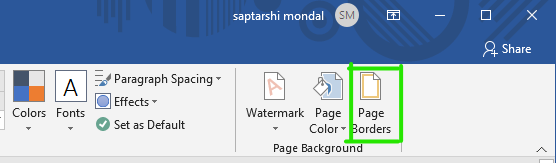
Add a border to a page
-
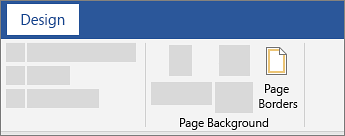
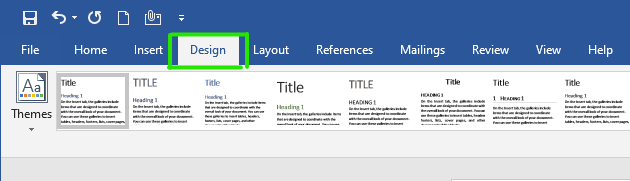
Go to Design > Page Borders.

-
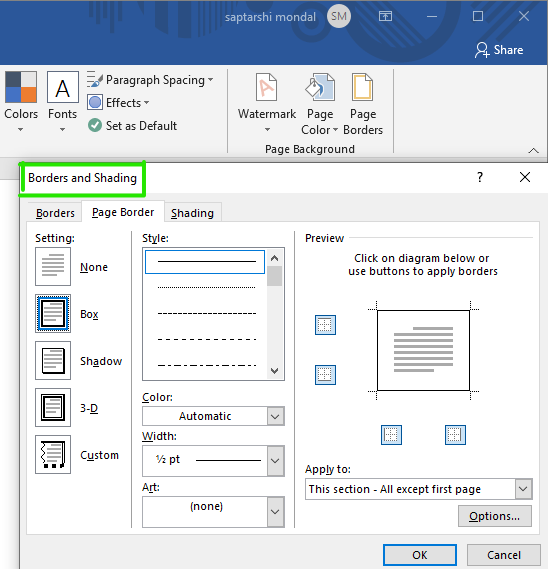
Make selections for how you want the border to look.
-
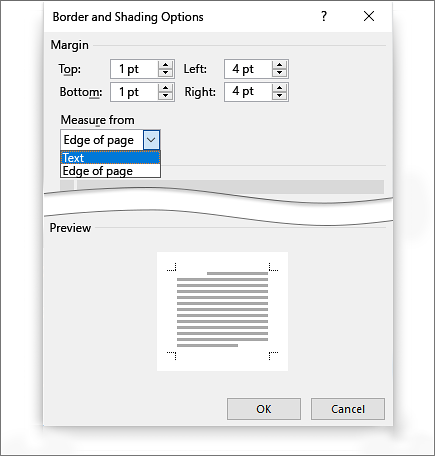
To adjust the distance between the border and the edge of the page, select Options. Make your changes and select OK.
-
Select OK.

If the page you want to add a border to is in the middle of your document, you must first add section breaks.
-
Go to Design > Page Borders.
-
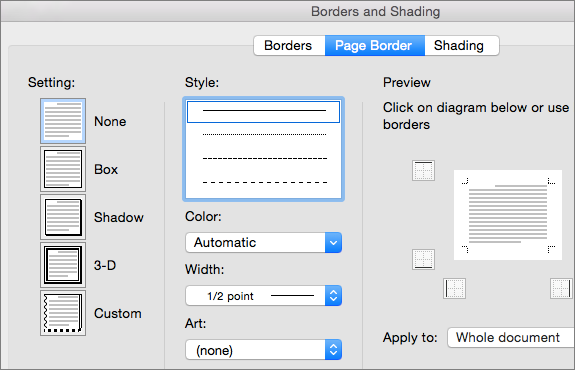
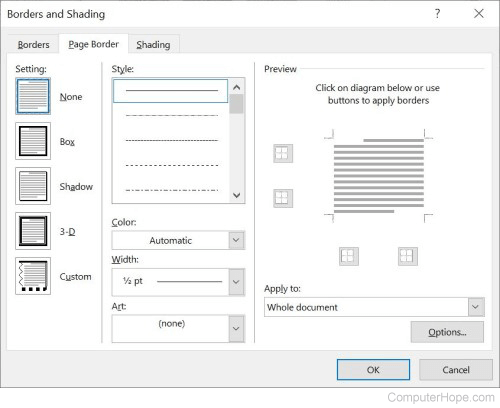
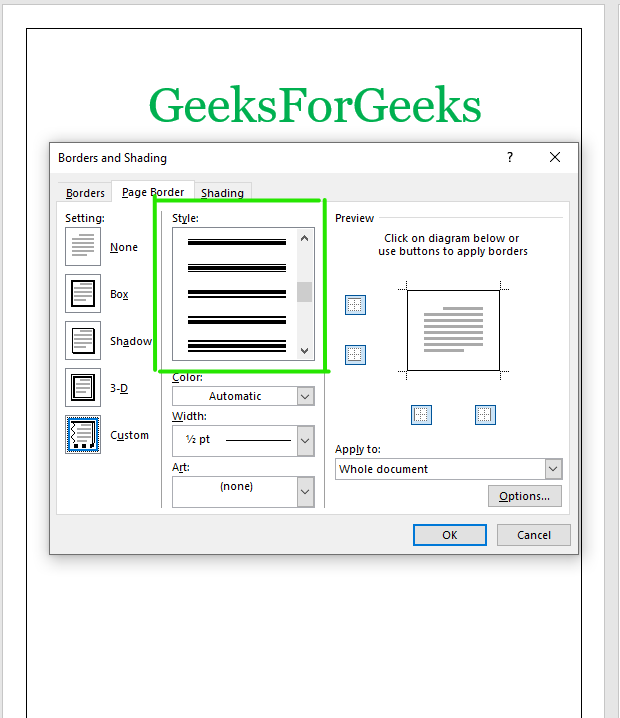
In the Borders and Shading box, design your border:
-
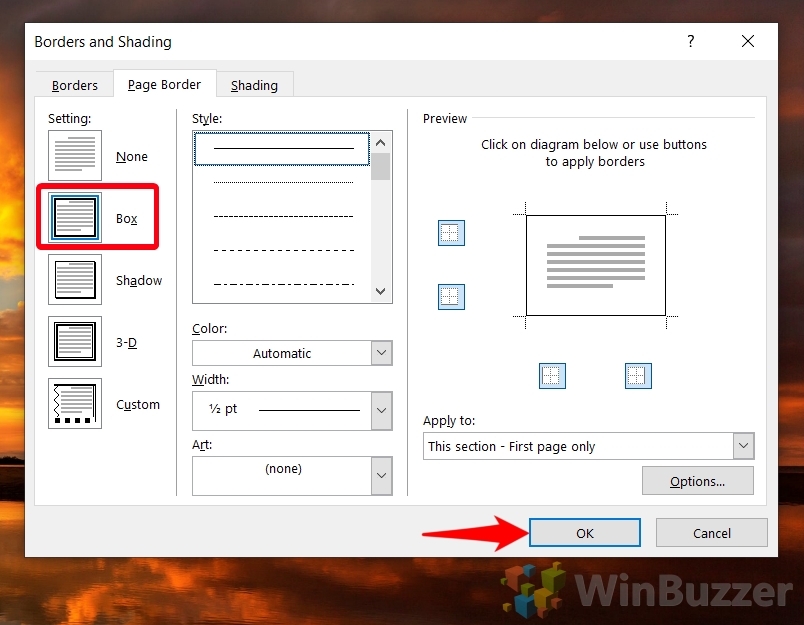
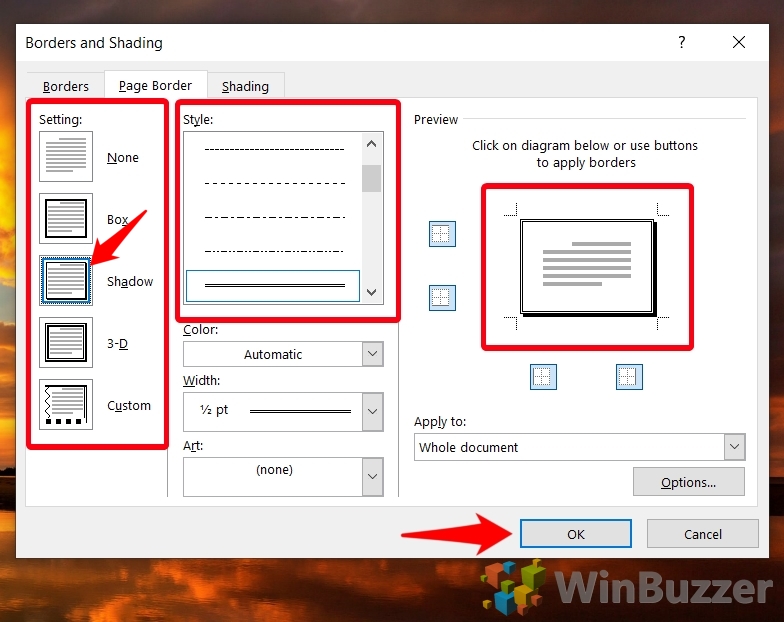
Under Setting on the left, choose the border style you want.
If you want to remove a border, select None.
-
Under Style, select the line style you want.
-
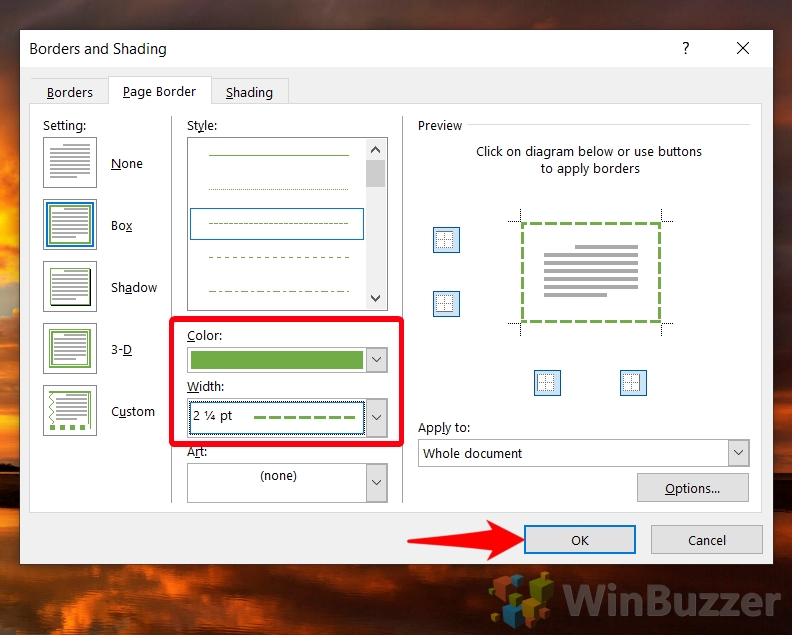
Select the arrow under Color and choose a border color.
-
Select the arrow under Width and choose the width you want.
Tip: If you want a clip-art border instead, select the arrow under Art and choose a border graphic.
-
-
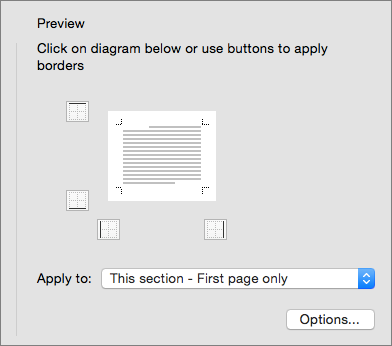
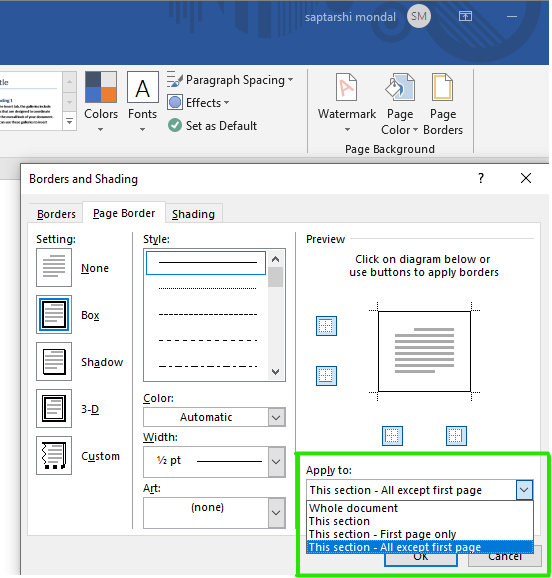
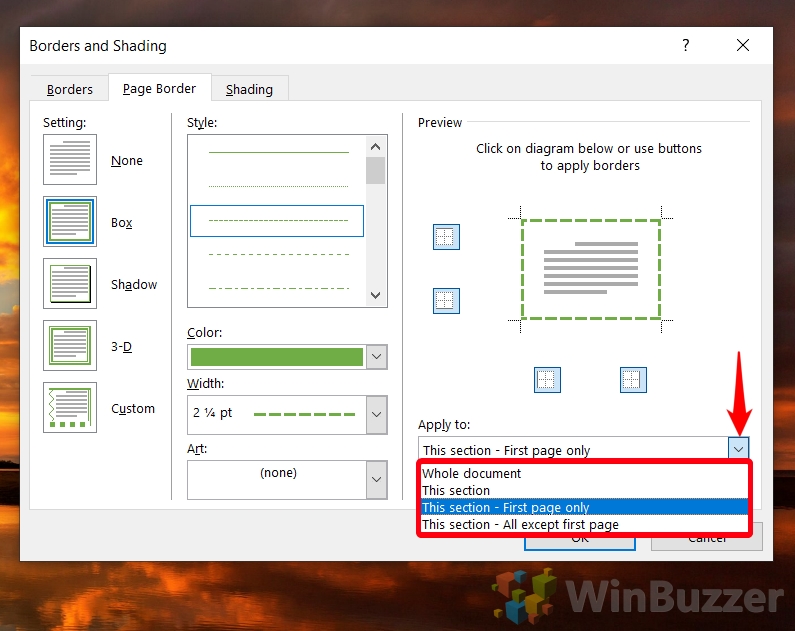
Next, select the arrow to the right of Apply to and choose This section — First page only.
This setting also works if you’re adding the border to the first page in your document.
-
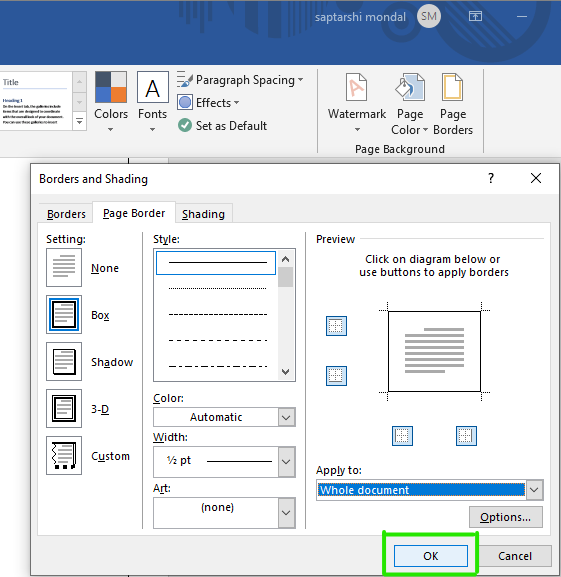
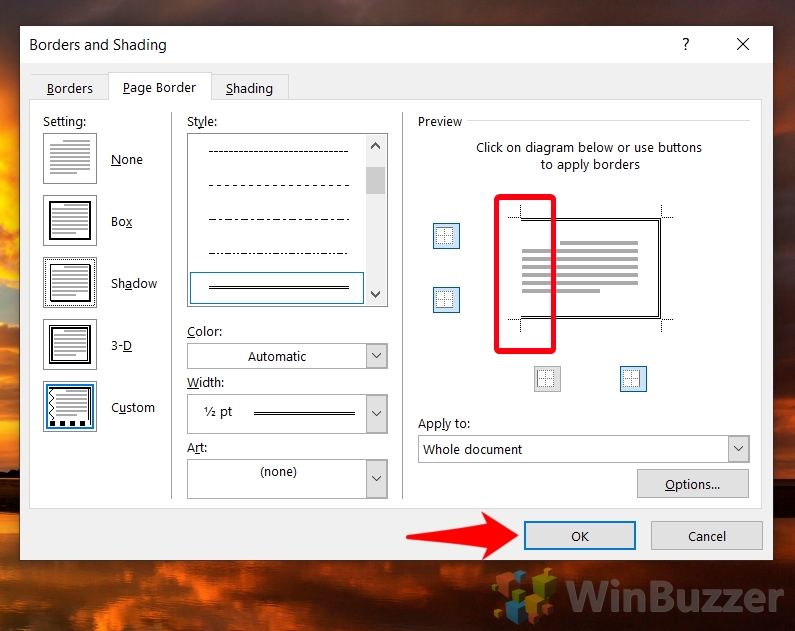
The Preview box confirms your border styles. To remove the border from one side, select that line in the Preview box.
Tip: To change where the border appears on the page, select Options and adjust the margin settings.
When finished, Select OK.

Word for the web does not let you edit, delete, or add new borders to text.
If you’ve added borders around text in a document you created with the Word desktop app, Word for the web will preserve them.
A potential workaround is to insert a table that contains only one cell, then paste or type your text into that cell.
Need more help?
![]()
Download Article
Learn how to insert a lined or art border in Microsoft Word documents on desktop
![]()
Download Article
- Adding a Page Border (Windows)
- Adding a Page Border (Mac)
- Adding a Text Border
- Q&A
|
|
|
Do you want to make an outside border in your Microsoft Word documents? You can easily add a solid or dotted border to an entire page or selected content. You can also use Microsoft Word’s included designs to create an artistic border for themed event flyers. This wikiHow will show you how to create a border around text, images, or pages in Microsoft Word using your Windows or Mac computer.
Things You Should Know
- To add a page border, click «Design» → «Page Borders». Select a border setting, style, and page application. Click «OK».
- To add a border around text or images, select the content. Click the «Home» tab and click the arrow next to the border icon. Click «Borders and Shading…»
- Select a border setting, style, and page application. Click «OK».
-
1
Open a project in Microsoft Word. This looks like a W on top of a blue square. Microsoft Word is available to install for Windows.[1]
- You must have a subscription to use Office 365.
- Use this method to add a lined border around a Microsoft Word document. This is different from changing the margins.
-
2
Click Design. This will be in the top toolbar, between Draw and Layout.
Advertisement
-
3
Click Page Borders. You can find this at the left side of the Design section, next to Page Color. It will have an icon of a page with a yellow border.
- A new window will open.
-
4
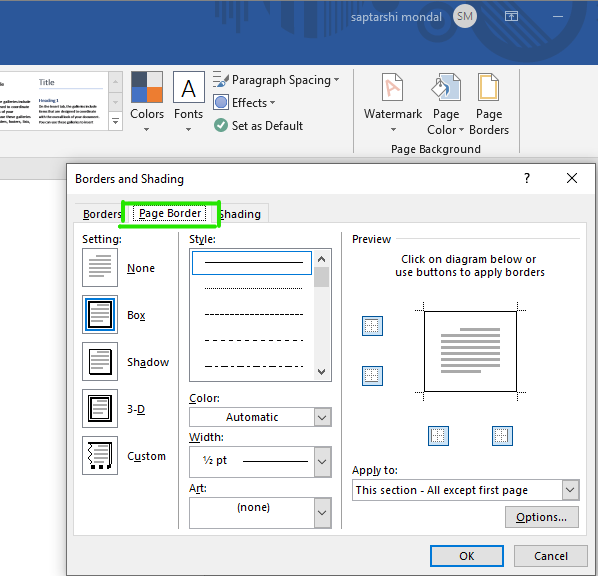
Click Page Border. This is the middle tab on the Borders and Shading window. You may already be on this tab.
-
5
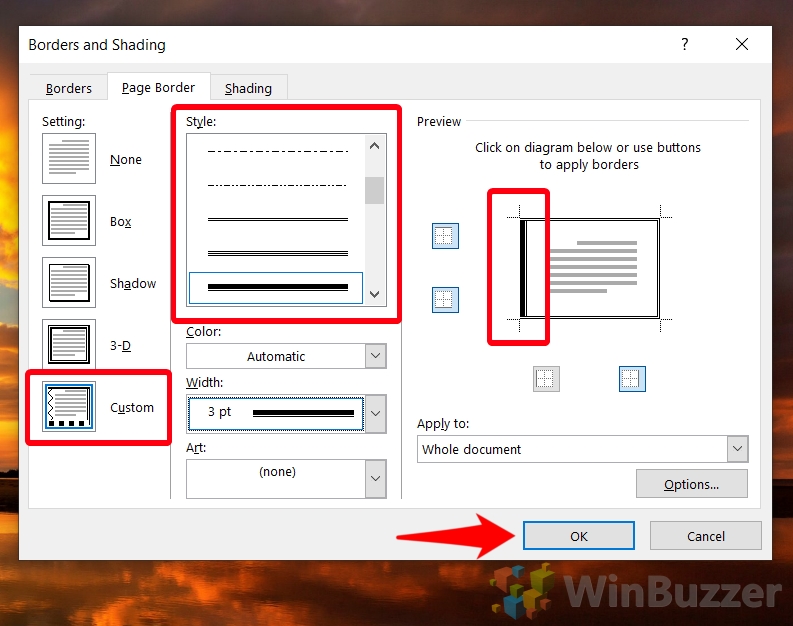
Select a border setting. In the left-most column, click the border option that you want to use. Select from: None, Box, Shadow, 3-D, and Custom.
- If you want a simple border to go all the way around your page, select Box.
- To add a border with fun images, click the Art drop-down menu and select from Word’s art gallery. This border can be used for themed flyers for holidays and events.
-
6
Select a border style. In the «Style» column, scroll down until you find the border style you want to use, then click the style. Select from the various solid and dotted line styles.
- If needed, you can also change the border’s color and width from the Color and Width drop-down menus, respectively.
-
7
Select pages to use. If you created a new section earlier in this method, click the «Apply to» drop-down box, then click the section to which you want to apply the border in the resulting drop-down menu.
- To apply the border to the first page of your section, click This section — first page only in the drop-down menu.
-
8
Click OK. It’s at the bottom of the page. This will apply the border to your document’s specified page(s).

Advertisement
-
1
Open a project in Microsoft Word. This looks like a W on top of a blue square. Microsoft Word is available to install for Mac.[2]
- You must have a subscription to use Office 365.
-
2
Click Design. This will be in the top toolbar, between Draw and Layout.
-
3
Click Page Borders. You can find this at the left side of the Design section, next to Page Color. It will have an icon of a page with a yellow border.
- The Borders and Shading window will open, set to the Page Border tab. If it isn’t already on the Page Border tab, click it now.
-
4
Select a border setting. In the left-most column, click the border option that you want to use. Select from: None, Box, Shadow, 3-D, and Custom.
- If you want a simple border to go all the way around your page, select Box.
- To add a border with fun images, click the Art drop-down menu and select from Word’s art gallery. This border can be used for themed flyers for holidays and events.
-
5
Select a border style. In the «Style» column, scroll down until you find the border style you want to use, then click the style. Select from the various solid and dotted line styles.
- If needed, you can also change the border’s color and width from the Color and Width drop-down menus, respectively.
-
6
Select pages to use. If you created a new section earlier in this method, click the «Apply to» drop-down box, then click the section to which you want to apply the border in the resulting drop-down menu.
- To apply the border to the first page of your section, click This section — first page only in the drop-down menu.
-
7
Click OK. This is the blue button. This will apply the border to your document’s specified page(s).
Advertisement
-
1
Open a project in Microsoft Word. This looks like a W on top of a blue square.
-
2
Click Home. This is in the top toolbar, between File and Insert.
-
3
Select content. Click and drag your mouse across the text or image(s) around which you want to place a border.
- This method will place a border around an entire selection of images and text together.
- If you want to place a border around a single image, double-click the image. Select a preset style from the Picture Styles section, or click Picture Border to set the color, weight, and design of the border.[3]
-
4
Click
next to the «Borders» button. The Borders button resembles a square divided into four smaller squares; you’ll find it in the «Paragraph» section of options in the toolbar, just right of the paint bucket icon. A drop-down menu will open.
- On a Mac, click the Format menu item at the top of the screen instead.
-
5
Click Borders and Shading…. It’s at the bottom of the drop-down menu. A new window will open.
- On a Mac, you’ll find this option in the middle of the Format drop-down menu.
-
6
Select a border setting. In the left-most column, click the border option that you want to use. Select from: None, Box, Shadow, 3-D, and Custom.
- If you want a simple border to go all the way around your text, select Box.
-
7
Select a border style. In the «Style» column, scroll down until you find the border style you want to use, then click the style. Select from the various solid and dotted line styles.
- If needed, you can also change the border’s color and width from the Color and Width drop-down menus, respectively.
- To add a border with images, click the Art drop-down menu and select a design.
-
8
Select pages to use. If you created a new section earlier in this method, click the «Apply to» drop-down box, then click the section to which you want to apply the border in the resulting drop-down menu.
- To apply the border to the first page of your section, click This section — first page only in the drop-down menu.
-
9
Click OK. This will apply the border to your document’s specified page(s).
- Be sure to save your document when you’re finished.
- You can also use Microsoft Word to create a booklet or another handout flyer.


Advertisement
Add New Question
-
Question
How can I place a border around a picture I’ve inserted into a document?

You do what is shown above, but instead, you click on the picture before you go through the steps.
-
Question
How do I put a border around a table in Microsoft Word?
Go into Format —> Borders and Shading. There you’ll find options for borders you can apply to the table.
-
Question
What three options can I set regarding a picture border?
The three option you can set are: small, medium and large.
Ask a Question
200 characters left
Include your email address to get a message when this question is answered.
Submit
Advertisement
Thanks for submitting a tip for review!
About This Article
Thanks to all authors for creating a page that has been read 971,313 times.
Is this article up to date?
Updated: 05/16/2020 by
Microsoft Word gives you hundreds of page border options, allowing you to surround a page with a clean or fancy border, like a frame for a picture. You can also set a border to provide a shadow or 3D effect.
Add a border
- Open Microsoft Word.
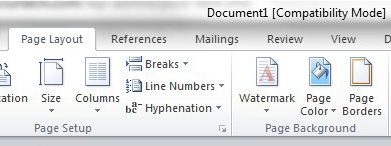
- Click the Page Layout tab. In Word 2013 and 2016, click the Design tab instead.
- In the Page Background group, click the Page Borders option.
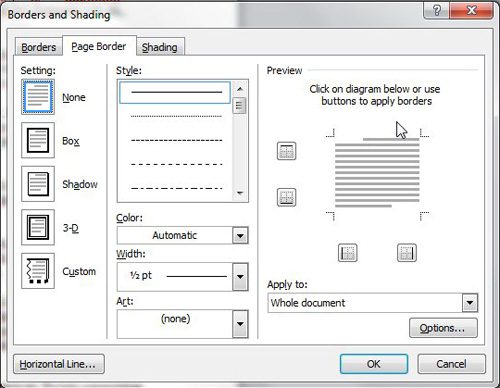
- In the Borders and Shading window (shown below), if not already selected, click the Page Border tab.
- Select Box if you want a square border around your page.
- Select the Style of border you want on the page, which can be solid, dotted, or dashed. Select the Color and Width of the border. If you want to select artwork to use as the border, click the down arrow for the Art drop-down menu. In the example below, we’re using the hearts art as a border.

Tip
By default, the borders are applied to the whole document, which means every page has the same border. Clicking the down arrow on Apply to gives you the option to select the first page only, selected page, all pages but the first page, and other options.
- Once you’ve selected all the border options you want to use in your document, click the OK button to apply the border.
Modify a border
- Open Microsoft Word.
- Click the Page Layout tab. In Word 2013 and 2016, click the Design tab instead.
- In the Page Background group, click the Page Borders option.
- In the Borders and Shading window (shown below), if not already selected, click the Page Border tab.
- Make the desired changes to the border that is currently set for the document or page. You can change the type of border in the Settings section, choosing from Box, Shadow, 3-D, or Custom. You can also change the style, color, and width of the order, and add or change art used in the border.
- When you have finished making the desired changes to the border, click the OK button to apply the changes.
Remove a border
- Open Microsoft Word.
- Click the Page Layout tab. In Word 2013 and 2016, click the Design tab instead.
- In the Page Background group, click the Page Borders option.
- In the Borders and Shading window (shown below), if not already selected, click the Page Border tab.
- Select None to remove any border on the page.
- Click the OK button to remove the border.

Adding a page border to your document can be a subtle way to make your Microsoft Word documents stand out. You can customize the style, thickness, and number of pages for a border to apply to your Word document.
Creating a page border in Microsoft Word will depend on your version of Microsoft Office. For Office 365 and Office 2019, open a Word document and click the “Design” tab in the ribbon.
If you have an older version of Office, click the “Layout” or “Page Layout” tab instead.
From here, click the “Page Borders” button, in the “Page Background” section of the ribbon.

By default, the “Borders and Shading” box that opens should default to the “Page Border” tab. If it doesn’t, click on that tab to enter your border settings.
Click “Box” to add a typical box border to your document. You can use the default style, color, and border width, or change these settings from the various drop-down menus.
Click “OK” to apply the page border to your Word document.
By default, this border style is ten applied to every page.
Your document editing view will update to show the new border applied.
Alternative Page Border Styles and Formatting
The box page format is the default style, but alternative border styles and formatting options are available for you to use instead.
The box border is the most basic, adding a solid line with no shadow to your page. Even that can be customized with different types of lines, widths, and colors.
Custom Page Border Settings and Styles
Other than the box border, you can also apply a border with a shadow, a “3D” style border, and a custom border with mix-and-match options for each side.
To do that, select one of the options from the “Setting” section in the “Page Border” tab of the “Borders and Shading” dialog box. Your chosen style will appear for you to review in the “Preview” section before you apply it to your document.
Applying or Removing Individual Border Lines
If you want to apply or remove individual border lines from your document (for instance, removing the border from the bottom of a page), you can do this from the “Preview” section.
If a border is applied, click on the border line to remove it. To apply it again, click on the line to make it re-appear.
Applying Custom Border Lines
Clicking on individual border lines in the “Preview” section is also how you can apply different styles to different lines when the “Custom” border setting is selected.
To do this, click the “Custom” button in the “Setting” column, select a line style from the “Style” drop-down menu, and then click on one of the border lines in the “Preview” box.
Changing Border Width and Color
You can make your border stand out with different colors and border widths. A wider border width will make your border stand out more in your document.
Border widths start from 1/4 pts and go up to 6 pts. A preview of your chosen border width appears in the “Preview” section. You can select any color you choose, either from the predefined options or by using the RGB color chart.
To change the border width or color, select your chosen options from the “Color” and “Width” drop-down menus. If you have the “Custom” border setting applied, you’ll need to click on each border line in the “Preview” section to apply your chosen settings to those lines.
Adding a Border to a Single Page
Microsoft Word will usually apply border styles to each page, but you can apply a page border to an individual page or exclude certain pages like your front page.
To do this, enter the “Page Border” settings menu (Layout/Design/Page Layout > Page Borders) and click the “Apply To” drop-down menu.
If you want to apply a border to an individual page, make sure you’re active on that page in the Word document before entering the menu.
From the “Apply To” drop-down menu, select “This Section” to apply it to the page you’re currently on. To apply your border to the first page only, select “This Section – First Page Only” or, to apply it to all pages except the first page, select “This Section – All Except First Page” instead.
Click “OK” to save when you’re ready. This will then apply your page border to the pages you’ve specified, rather than to the entire document.
READ NEXT
- › How to Put a Border Around Text in Microsoft Word
- › How to Insert a Vertical Line in Microsoft Word: 5 Methods
- › How to Remove Borders in Microsoft Word
- › This New Google TV Streaming Device Costs Just $20
- › HoloLens Now Has Windows 11 and Incredible 3D Ink Features
- › The New NVIDIA GeForce RTX 4070 Is Like an RTX 3080 for $599
- › Google Chrome Is Getting Faster
- › BLUETTI Slashed Hundreds off Its Best Power Stations for Easter Sale
 This tutorial shows how to insert page borders in Microsoft Word. We will also look at how to remove page borders.
Page borders can be added to your entire document or specific sections within your document. In addition, you can choose to include or exclude the border from the first page of your document or section.
Table of Contents
- How to Insert Page Borders
- How to Remove Page Borders
This tutorial’s companion video shows all the steps in real time.
Watch more than 150 other writing-related software tutorials on my YouTube channel.
The images below are from Word for Microsoft 365. These steps also apply to Word for Microsoft 365 for Mac (a.k.a., Word for Mac), Word 2021, Word 2019, Word 2016, and Word 2013 (PC only).
Important Note: If you want to add page borders to a specific section in your document, create the section break first. For more information, please see “How to Insert Section Breaks in Microsoft Word (PC & Mac).”
- If your document has sections, place your cursor in the section in which you want to insert the page borders.
- Select the Design tab in the ribbon.

- Select the Page Borders button in the Page Background group.

- Select Box, Shadow, 3-D, or Custom in the Borders and Shading dialog box.
Pro Tip: Word’s application of these options will depend on the other border options you choose in this dialog box. Therefore, you may need to experiment with a variety of options to achieve the desired results.

- Select a line style, color, and width.
Alternatively, select an art option such as apples, hearts, trees, or stars.

- (Optional) Select or deselect the top, bottom, left, or right buttons in the Preview section to toggle the border on or off on specific sides of the page.

- (Optional) Select Whole document, This section, This section—First page only, or This section—All except first page in the Apply to menu.
Pro Tip: Even if your document doesn’t have sections, you can select This section—First page only or This section—All except first page to include or exclude the border from the first page of the entire document.

- (Optional) Select the Options button to adjust the border placement in relation to the edge of the page or text.

- Select the OK button.

Your new page border should now appear in your document.

How to Remove Page Borders
- If your document has sections, place your cursor in the section in which you want to remove the page borders.
- Select the Design tab in the ribbon (see figure 1).
- Select the Page Borders button in the Page Background group (see figure 2).
- Select None in the Borders and Shading dialog box.

- Select Whole document or This section in the Apply to menu (see figure 6).
- Select the OK button (see figure 8).
The page borders should now be removed from the document or section.
Related Resources
How to Insert PDFs into Microsoft Word Documents (PC & Mac)
How to Insert Headers and Footers on Specific Pages in Microsoft Word (PC & Mac)
Once in a while, you may find yourself wanting to spice up the layout of your Microsoft Word project, but without going overboard on design elements. This is when Word borders can be a good addition to your page design.


Borders for Word documents can be designed in a variety of styles, from formal and all-business to creative and whimsical.
Need to take your Word project from blah to breathtaking? Take a few minutes to add a Word page border. With the presets and customizations available, you can quickly add page borders that are appropriate for your project. Follow these steps to learn how to add a page border in Word or insert a border template.
This guide shows you how to add a border in Word. There are many settings and options to choose from that make it possible for you to configure the borders to look just the way you want them to.
You’ll also learn how to find and use Microsoft Word border templates to achieve a different look. You’ll discover great sources for Word border templates, as well as how to insert and set them up in your document.
How to Add Page Borders in Word (Quickstart Video)
Are you ready to dress up your Word documents with attractive page borders? The following video can give you a head start on how to add a page border in Word.

For more detailed info on how to insert page borders in Word plus some extra tips, review the tutorial below.
How to Add a Border in Microsoft Word
With just a few clicks of your mouse, you can create borders for Word documents.
To add a border in a Word document, go to Design > Page Borders.


The Borders and Shading panel opens.


From here, you’ve got several options, and the choices you make are the key for how to decorate a page border.


On the left-most part of the panel, pick the border Setting:
- None. This is the default setting. If you select this, there will be no border on the page.
- Box. This setting creates a line border on the page.
- Shadow. This creates a border with a shadow.
- 3-D. This creates a border that’s got depth.
- Custom. This setting lets you combine different types of borders for Microsoft Word on a single page or document.
As you make a selection, note that the Preview side of the panel shows you what the border will look like.


Here are some more detailed steps you can take to customize your border settings:
1. Set Custom Page Border Settings and Styles
In the next section of the Border and Shading panel, you can customize the various attributes of the border.


Choose from the many selections of:
- Style. Select a style for your border.
- Color. Specify a color for the border.
- Width. Change the thickness of the border.
- Art. This setting lets you create a border with built-in clip art. Scroll down to see all the art available.


By choosing from a variety of styles, colors, widths, and art, you can create a diverse assortment of borders. You don’t have to settle for any of the default settings for Word borders. You can create a border that perfectly aligns with your visual branding, the topic of your project, and the tone you wish to convey.
2. Remove Individual Border Lines
If you’ll recall, the Preview part of the Borders and Shading panel lets you see what the border will look like with the settings you selected.
This is also where you can specify where you would like the border to appear. It doesn’t have to be on all four sides of the page! Click on the buttons to select and de-select each side of the border. When a side is de-selected, then the border line doesn’t appear on that side.


For example, when I de-select the Left and Right Borders, they disappear from the Preview.


3. Where to Apply the Border
In the next part of the Borders and Shading panel, you specify which part of the Word document to apply the border you’ve just formatted.


These are the choices available to you:
- Whole document. This setting inserts the border on every page of your document.
- This section only. This setting inserts the border only in the current section you’re working in. You must create the section first for this option to be available.
- This section — First page only. This setting inserts the border only on the first page of the current section you’re working in. You must create the section first for this option to be available.
- This section — All except first page. This setting inserts the border on all the pages of the current section you’re working in, except the section’s first page. You must create the section first for this option to be available.
If you’re not yet familiar with sections, read this tutorial on how to create and use sections in Word.
4. Choose Border Options
There are more border attributes within your control!
Click on the Options button.


The Border and Shading Options panel opens. From here, you can set the Margins. This determines the amount of space between the border and the edge of the page, or the between the border and the text on the page.


The Border and Shading Options panel also has its own Preview section that shows you how your choices will affect the border. When you’re happy with the settings you’ve chosen, click OK.
Don’t worry, you can always go back and make changes to the border you’ve created.
How to Change a Page Border
There are so many options and settings to configure when you create a border. You may find that you want to change any of them after you’ve created the border. Follow these steps for how to change a page border you’ve made.
To edit a page border you’ve already created, go to Design > Page Borders.
This launches the Border and Shading Options panel. Adjust the attributes you want to change.
When you’re happy with the settings, click OK. The border has been modified, based on the changes you made.
Here are more instructions for changing borders:
Remove a Page Border in Word
Sometimes you add a border to your Word document … and then you change your mind. Maybe it doesn’t look good, or you simply decide that a plain and clean layout is better.
If this happens, don’t despair. Removing a page border in Word is easy.
To remove an existing border in Word, click Design > Page Borders.
Under Setting on the Border and Shading Options panel, click None.


The border has been removed.
How to Use a Word Border Template
You can also skip the design process altogether by using a Word border template.
The first step is to find a border image. Envato Elements is a terrific source of graphic images to use as a border in your Word project.
Sign into your Elements account.


In the search bar, select Graphics, then type “borders.” Click the search icon.


If you wish, you can refine the search results by using a filter and/or sorting the results.
To get more details about a particular border template, click on the thumbnail. This opens the product page.


From here, you can learn more about the image package:
- preview of the images included
- list of file types
- application requirements
- image dimensions
To download a border image, click on one of the Download buttons.


The Add this file to a project dialog opens.


Choose a project to add the file into or create a new project. Then, click Add & Download.


The files are downloaded and saved into your computer as a zip file. You may need to double-click on the zip file to unzip it. When unzipped, the border template files may come in separate folders, like these:


To insert the border into your Word project, click on Insert > Pictures > Picture from file….


Locate the border file you want to use, then click Insert.


The border has now been added to the page.


With the border image selected, use any of the buttons on the Picture Format ribbon to change the border.


In this example, let’s change the color of the border. Click on the Color button. The Color panel opens. Choose any of the preset Color Saturation, Color Tone, or Recolor options.


Or click More Variations > More Colors… to select a specific color that’s not on any of the Recolor choices.


For this example, I chose mustard yellow.


If you’re going to have text on the page, remember to change the text wrapping on the border image. Select the image, then click on Picture Format > Arrange > Wrap Text > Behind Text.


This means any text you add to the page will be visible on top of the border image and won’t get hidden beneath it.
Also, make sure to de-select Move with Text, which is checked by default. Fix Position on Page should be checked instead.


This ensures that the border stays in place even when you type text on the page.


Get an Extensive Selection of Templates for Word
Aside from border templates for Word documents, you can also find great Microsoft Word templates, graphics, fonts, stock photos, soundtracks, and other creative assets from Envato Elements.


Envato Elements a cost-effective source because for a fixed monthly subscription. You get unlimited downloads of any creative components. These are a big help when you need to create many Word projects and other communication materials.
But for one-off projects, GraphicRiver is a good alternative source for Microsoft Word templates and professional graphics. In the GraphicRiver marketplace, you pay per use. This a la carte approach means you only pay for what you download. So, if you’re working on a few projects, then this could be the more cost-effective source.
FAQs on Word
As you go over this tutorial, do you have questions about Word? Below are some of the most frequently asked questions about Word. I’ve included links to relevant articles to help you learn how to use Microsoft Word, even if you’re a complete beginner.
1. What’s MS Word Used For?
If you’re new to Word or have never used it for, you may wonder if you should even get started. Word is Microsoft’s desktop publishing software and it’s one of the most widely used computer applications in the world! Using Word, you can create all sorts of documents, both printed and web-based.
Even though some alternatives have cropped up — including free ones — MS Word continues to be popular in offices, homes, and schools.
2. Which Is Better, MS Word or Google Docs?
Google Docs is an alternative to MS Word that’s free and web-based. It offers many benefits, and you may wonder if it’s even better than Microsoft Word. As someone who uses both applications almost daily, all I can tell you is … it depends.
Either Word or Google Docs may be the best tool for the job — depending on what the job is! Read this post for the details.
3. Does Word Offer Clip Art?
Microsoft Word doesn’t have a built-in library of clip art. But it does allow you to browse and insert clip art from the web without ever leaving the application. You can also find clip art from sources like Envato Elements and GraphicRiver, and insert it into your Word project. This article shows you how to do all this, step by step.
4. Can I Change the Default Font in Word?
In a word, yes! Word lets you easily change the default Word and replace it with any of the fonts that come pre-installed. Or download professionally designed fonts in marketplaces like Envato Elements and GraphicRiver. This gives you total control over the design of your Word project. Click below for a full tutorial.
5. How Do You Add a Background Image in Word?
The procedure for inserting a background image in Word is just like adding a border image. Finding the right image, positioning it properly on the page, and applying the appropriate image effects will take your document’s design and layout to the next level — even if you’re not a professional designer. This article shows you how:
Spice Up Your Word Projects With Borders
To give your Word project a little oomph, try adding a border. Word lets you add a border that’s aligned with the style, tone, and design of your project. Whether your project is formal or whimsical, you’ll be able to add the appropriate border by calibrating the various options and settings available in Word.
Add a border in Word by using and customizing any of the preset styles. Follow the detailed steps above to learn how to create and change Word borders.
Another alternative is to insert a Word border template from Elements or GraphicRiver. Find Word templates in Elements if you’re a heavy user of Word. You’ll maximize your subscription because you get unlimited downloads for one monthly fee.
For a single Word document, GraphicRiver offers hundreds of templates for Word on a pay-per-use basis.
Whether you get them from Elements or GraphicRiver, border templates allow you to bring professional designs into your Word project. And with various modifications available to you, you’ll be transforming the templates into projects that are truly your own.
Editorial Note: This tutorial has been updated with a video from Andrew Childress.
Everyday in business or any other field lots of information or documents files are there that are required to be stored for future use. For anyone, it is very difficult to store that information for a long time. Earlier letters, office files, documents, projects, and information are stored in a form of a registrar, file, or by paperwork but finding it may be difficult for us. It takes a lot of time. To resolve this issue Microsoft brings software called MS Word.
Microsoft Word is a software tool that allows users to create documents like articles, letters, projects files very easily. It has various features like editing and formatting, graphics, designs, font styles, printing documents, etc.
Features of MS Word
- Various Page Designs
- Tables
- 3D models, chart, and icons
- WordArt
- Page Layout formats
- Inserting Online pictures and video
- Text color and many more.
Page Borders in MS Word
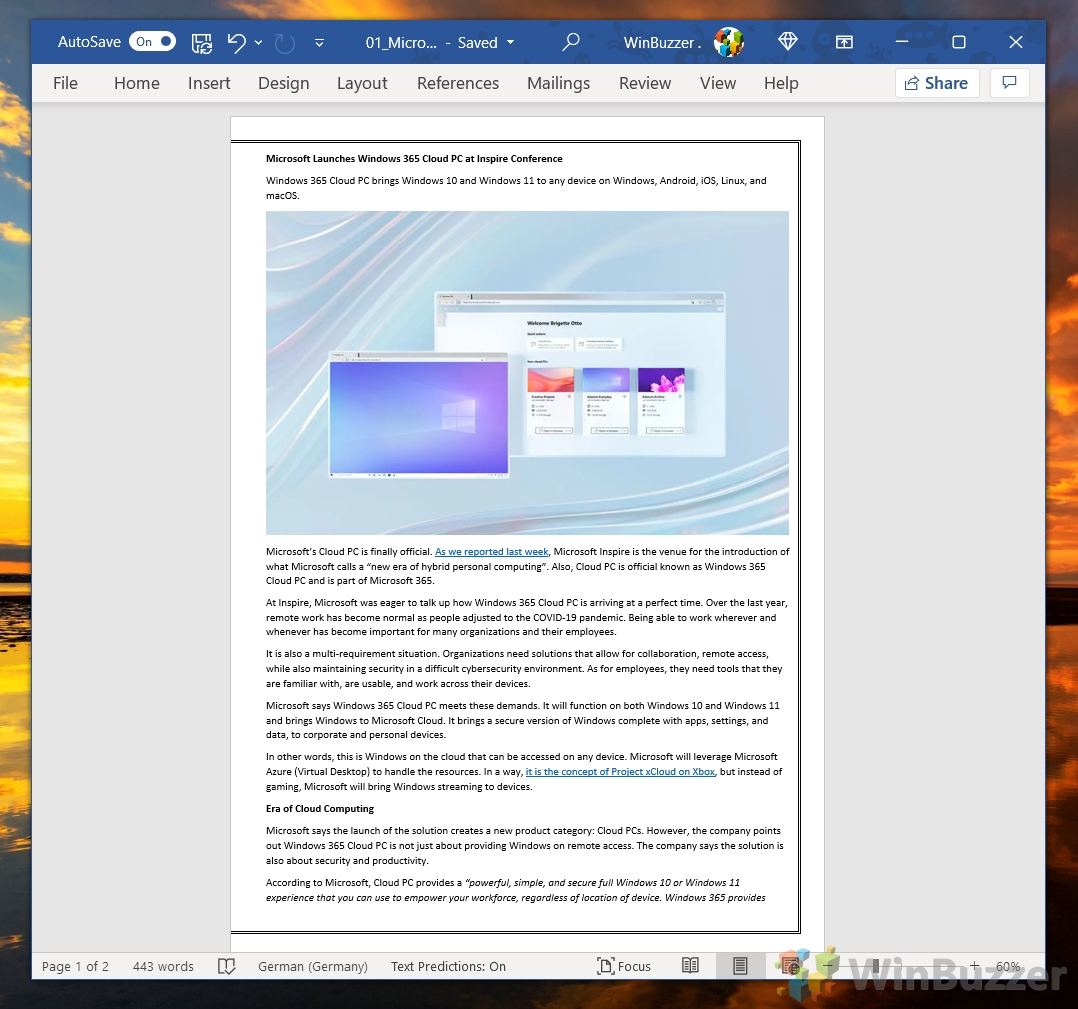
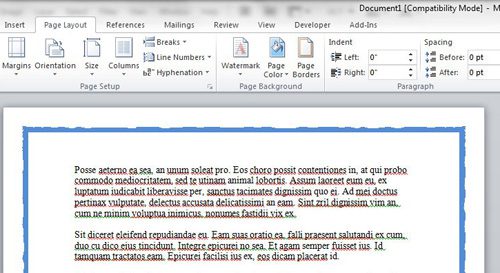
In MS Word there is a feature called page border. A page border is a border that appears outside the margins on each page in the document. It looks very attractive when you apply the page border. There are many styles available on the page border. Also, you can customize your own page border like thickness, color, design, size of the border. Some images are shown below:


Steps to Apply Page Border
Step 1: On the navigation menu click on the Design option.
Step 2: On the right side of the menu click on the Page Border option.
Step 3: A Border and Shading dialog box will open.
Step 4: Then Click on the Page Border option.
There are many options to choose page border style. Select option according to you.
Step 5: Select on box option as shown:
You can also choose a different border style, color by simply clicking on the style option and select your style as shown:
Step 6: Click on Apply to option as shown here:
There are 4 options:
- Whole Document – By selecting this option page border will apply to all the pages of your document.
- This section – Page border will apply only on one page that is the current page of the document.
- This section – first page only – Page border will apply only in the first page, remaining page remains without border
- This section – all except first page – Page border will apply in all the pages except the front or first page of your document.
Step 7: Then click on OK option.
Finally, page border will apply to your documents.

Contents
- 1 How to Add a Basic Border in Word
- 2 How to Set Alternate Microsoft Word Border Styles and Formatting
- 3 How to Insert a Border in Word for a Single Page
- 4 How to Delete a Page in Word or Add Line Numbers
Page borders are a useful tool. They make your document stand out without looking tacky, while providing a guide should somebody want to staple or hole punch. Today we’re going to show you how to add a border in Word, which has various pre-built design options to spice up your document.
Setting page borders in Word differs by version
The process to create Microsoft Word borders will vary slightly depending on your version. We’re going to assume you have an Office 365 subscription or Office 2019. If you have an older version, look to the layout or page layout tab instead.
In newer versions of Word, there are three in-built page border variants: box, shadow, and 3-D. You can also set custom borders if you wish. The first is the most suitable for an enterprise setting, but the others can be a bit of fun. We’ll show you how to choose between them to suit your preference. Let’s get started:
If you came here for a plain, black border, this section is for you. You can get from blank page to professional-looking border for Word in just a few clicks:
- Open the “Design” tab and click “Page Borders”

- Select “Box” and click “OK”

- Check your new page borders in Word page view
You should see that the border neatly hugs the edge of your text and images without overlapping.


How to Set Alternate Microsoft Word Border Styles and Formatting
If a plain black line is a little too boring for you, you can make use of the Word page border options to customize the shadow, thickness, line style, and more.
- Switch to another border setting and change line style
Instead of choosing a lined “Box” as borders for pages, you can use “None” for the standard invisible border design, or choose “Shadow” or “3-D” for a 3-D effect. “Custom” allows defining your own page border design. Border line style, color and thickness can also be changed. Press “OK” to apply the changes.

- Preview your page borders in your main document window

- Remove an individual border line
If you’d like to remove a specific border line, you can do so by clicking it in the preview on the right-hand side and then pressing “OK”.

- Check your page borders in Word page view
You should see that border you selected is completely gone and the line instead reaches right to the edge of the page.

- Modify the style of a specific Word border line
If you want a single border to be in a different style, you can instead click “Custom”, select a line style, and then click on the border you want to change in the preview window. Press “OK” to apply the changes to your document.

- Check your border line’s new style

7. How to change the colour and width of page borders in Word
If you have a dark document background or black is too boring, you can change your border color and width in the same menu.
Click on the “Color” and “Width” dropdown to do so, then click “OK” to apply the changes. This works for both your border as a whole and a specific border line.
8. View your new border colour and width and adjust as necessary
How to Insert a Border in Word for a Single Page
Quite often it makes sense to only have a border on the first page – for use on a cover page for example. Here’s how you can do that:
- Click the dropdown underneath “Apply to” and choose “This section – First page only”
Selecting this option will apply the border to your first page only. If you want to apply it to a different page, you can click on the page in your document and choose “This section” instead.Alternatively, if you want a border everywhere but the first page, choose “This section – All except first page”.
Press “OK” to apply the changes.
- Make sure the page border in Word applied correctly

How to Delete a Page in Word or Add Line Numbers
Now that you’ve applied your borders, you may notice a blank page at the end of your document with a border around it. You can follow our how to delete a page in Word tutorial to remedy this.
Or, if you want to make your document even more useful, why not learn how to add or remove line numbers? This way, readers can reference any part of your document with ease.
В данной статье показаны действия, с помощью которых можно добавить или изменить границу страницы в документе Microsoft Word.
Граница привлекает внимание и придает документу стильный вид. При необходимости можно создать границу с использованием разнообразных стилей, толщины и цвета линий или выбрать художественную границу с интересной темой.
Как добавить границу страницы в Word
Чтобы добавить границу страницы, откройте документ и перейдите на вкладку Конструктор, в группе «Фон страницы» нажмите кнопку Границы страниц.

Затем в открывшемся окне «Границы и заливка», на вкладке Страница, можно выбрать тип границы, стиль, цвет, ширину границы, или установить в качестве границы один из доступных рисунков. После того как сделаете выбор, нажмите кнопку OK чтобы сохранить изменения.

Ниже на скриншоте показан пример страницы с границей.

Как изменить расстояние между границей и краем страницы
Чтобы изменить расстояние между границей и краем страницы, откройте документ и перейдите на вкладку Конструктор, в группе «Фон страницы» нажмите кнопку Границы страниц.

В открывшемся окне «Границы и заливка», на вкладке Страница, нажмите кнопку Параметры…

Затем в окне «Параметры границы и заливки», можно настроить верхнее, нижнее, левое и правое расстояние между границей и краем страницы, щелкнув стрелки вверх и вниз рядом с каждым параметром. Также можно установить границу относительно края страницы или относительно текста. После выбора необходимых значений параметров, нажмите кнопку OK.

Затем в окне «Границы и заливка», нажмите кнопку OK чтобы применить изменения.

Используя рассмотренные выше действия, можно добавить или изменить границу страницы в документе Microsoft Word.
Last updated: March 13, 2019
Microsoft Word is an extraordinarily popular software choice for creating documents, but it is largely used as a means for putting ink to paper to create a digital representation of the thoughts in your head. Few people give consideration to the visual appeal of their Word documents, and even fewer consider page borders for Microsoft Word documents as an option for adding some visual appeal to their writings.
However, by adding page borders for Microsoft Word documents, you can make your document stand out among other choices that only contain black text on white paper, which can mean the difference between that document being read or simply overlooked.
Page Border in Word 2010- How to Add One (Quick Summary)
- Click Page Layout at the top of the window.
- Select the Page Borders button.
- Choose the type of border and style, then click OK.
There is a very minor change to this procedure in some newer versions of Word, which we will outline in the next section.
Page Border in Word for Office 365
- Click the Design tab at the top of the window.
- Click the Page Borders button at the far-right of the ribbon.
- Select the type of border and the styling for it, then click OK.
You can read below for additional information on adding page borders in Word, as well as some pictures for the steps.
Page Borders for Microsoft Word 2010 Procedure
This section goes a little more into depth on the processing of adding a page border in Word. When you’re done with your border, you may want to look into adding a background picture, too, if that’s something you think your document could use.
Step 1 – Launch Microsoft Word, then open the document to which you want to add your page borders for Microsoft Word. Note that you can also double-click a Microsoft Word document to automatically open it with Microsoft Word. In Microsoft Word 2010, click the Office button at the top-left corner of the window, click Open, then double-click the file you want to open.
Step 2 – Click the Page Layout tab at the top of the window (as mentioned above, you may need to click the Design tab in some newer versions of Word, then click the Page Borders icon in the Page Background section of the ribbon at the top of the window. If your Microsoft Word window size is reduced, then the icon may be eliminated and replaced with a Page Borders text option instead. Either way, clicking the Page Borders option will open a Borders and Shading pop-up window on top of the Microsoft Word window.
Step 3 – Click the type of page borders for Microsoft Word option that you want to apply to your document from the selection at the left side of the window. The available options include Box, Shadow, 3-D and Custom.
Step 4 – Click the Style, Color, Width and Art options from the center of the window. Note that there are a virtually limitless possibility of combinations that you can use to create page borders for Microsoft Word documents, so don’t settle for your first option. You should be able to find a combination of options that suits your needs.
Step 5 – Click the drop-down menu under Apply To: at the right side of the window, then select the portion of your document to which you want to apply these page border settings. For example, you could select the This section – all except first page option if you wanted to apply a page border to every page of your document except the title page.
Step 6 (optional) – Click the Options button at the bottom-right corner of the window, then make any adjustments to how the page borders for your Microsoft Word document will be applied in relation to your margins.
Step 7 – Click the OK button to apply your page border options to your Microsoft Word document.
Now that you have applied page borders for Microsoft Word settings to your document, you are free to apply other visual adjustments to the document as well. In particular, check out the other options on the Page Layout ribbon, such as Themes, Page Setup and Page Background, which offer a variety of other options to compliment page borders for Microsoft Word. You can even change the orientation of the document if you don’t want to keep the portrait option.

Matthew Burleigh has been writing tech tutorials since 2008. His writing has appeared on dozens of different websites and been read over 50 million times.
After receiving his Bachelor’s and Master’s degrees in Computer Science he spent several years working in IT management for small businesses. However, he now works full time writing content online and creating websites.
His main writing topics include iPhones, Microsoft Office, Google Apps, Android, and Photoshop, but he has also written about many other tech topics as well.
Read his full bio here.