
Word for Microsoft 365 Word 2021 Word 2019 Word 2016 Word 2013 Word 2010 More…Less
This article presents basic concepts in Microsoft Word to help new users get started in creating sophisticated, professional-looking documents.
-
Click the Start button
 or press the Windows key on your keyboard to display the Start menu.
 -
In the list of applications, find Word and click it. The startup screen appears and Word starts.
Tip: The first time you start Word, the Microsoft Software License Agreement might appear.
 or press the Windows key on your keyboard to display the Start menu.
To quit Word, click the x button  in the upper-right corner of your screen.
If you made any changes since you last saved the document, a message box appears asking if you want to save changes. To save the changes, click Yes. To quit without saving the changes, click No. If you clicked the x button by mistake, click Cancel.
Top of Page
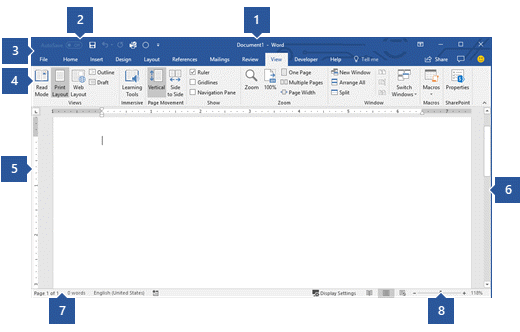
1 Title Bar: Displays the file name of the document that is being edited and the name of the software you are using. It also includes the standard Minimize, Restore, and Close buttons.
2 Quick Access Toolbar: Commands that are frequently used, such as Save, Undo, and Redo are located here. At the end of the Quick Access Toolbar is a pull-down menu where you can add other commonly used or commonly needed commands.
3 File Tab: Click this button to find commands that act on the document itself rather than the content of the document, such as New, Open, Save as, Print, and Close.
4 Ribbon: Commands needed for your work are located here. The appearance of the Ribbon will change depending on the size of your monitor. Word will compress the ribbon by changing the arrangement of the controls to accommodate smaller monitors.
5 Edit Window: Shows the contents of the document you are editing.
6 Scroll Bar: Lets you change the display position of the document you are editing.
7 Status Bar: Displays information about the document you are editing.
8 Zoom slide control: Lets you change the zoom settings of the document you are editing.
Top of Page
In Word, you must save your document so you can quit the program without losing your work. When you save the document, it is stored as a file on your computer or in a network location. Later, you can open the file, change it, and print it.
To save a document, do the following:
-
Click the Save button in the Quick Access toolbar. The Save As window appears.
-
Choose a location where you want to save the document and enter a file name in the File name box. To change the file name, type in a new file name.
-
Click Save.
You can open a Word document to resume your work. To open a document, do the following:
-
Open File Explorer, and click Documents. A list of documents appears.
-
If the document you want to work on is on the list, click the file name to open the document. If the document isn’t on the list, navigate to the location where you stored your file, and double-click the file. The Word startup screen appears, and then the document is displayed.
Tip: You can also open a document from within Word by clicking the File tab and then clicking Open. To open a document you saved recently, click Recent.
Top of Page
Before you edit or format text, you must first select the text. Follow the steps below to select text.
-
Place the curser at the beginning of the text you’d like to edit or format and then press the left mouse button.
-
While holding down the left mouse button, move it to the right (called “dragging”) to select the text. A background color is added in the location of the selected text to indicate the selection range.
You can find most text formatting tools by clicking the Home tab and then choosing from the Font group.
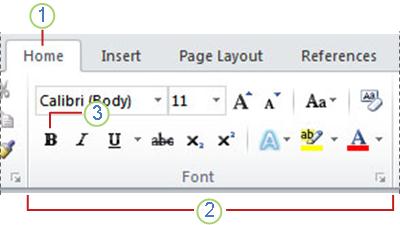
1 This is the Home tab.
2 This is the Font group on the Home tab.
3 This is the Bold button. See the table below for the names and functions of all the buttons in the Font group.
|
Button |
Name |
Function |
|---|---|---|
|
|
Font |
Changes the font. |
|
|
Font Size |
Changes the size of the text. |
|
|
Grow Font |
Increases the text size. |
|
|
Shrink Font |
Decreases the text size. |
|
|
Change Case |
Change all the selected text to uppercase, lowercase, or other common capitalizations. |
|
|
Clear Formatting |
Clears all formatting for the selected text, leaving only the plain text. |
|
|
Bold |
Makes the selected text bold. |
|
|
Italic |
Italicizes the selected text. |
|
|
Underline |
Draws a line under the selected text. Click the dropdown arrow to select the type of underline. |
|
|
Strikethrough |
Draws a line through the middle of selected text. |
|
|
Subscript |
Creates subscript characters. |
|
|
Superscript |
Creates superscript characters. |
|
|
Text Effects |
Apply a visual effect to selected text, such as shadow, glow, or reflection. |
|
|
Text Highlight Color |
Makes text look like it was marked with a highlighter pen. |
|
|
Font Color |
Changes the text color. |


Top of Page
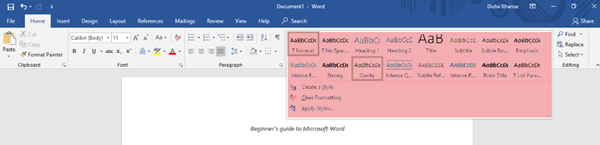
Styles allow you to quickly format major elements in your document, such as headings, titles, and subtitles. Follow the steps below to apply styles to the text in your document.
-
Highlight the text you want to change.
-
On the Home tab in the Styles group, pause the pointer over any style to see a live preview directly in your document. To see the complete list of styles, click the More arrow to open the Styles pane.
-
To apply the style that’s most appropriate for your text, just click it.
When you’re done applying styles to the individual elements, Word lets you use a style set to change the look of your whole document all at once.
-
On the Design tab, in the Document Formatting group, choose one of the predefined style sets, such as Basic or Casual. Pause the pointer over any style set to see a live preview directly in your document. To see more predefined style sets, click the down arrow on the right side of the Document Formatting group.
-
To apply the style set that’s most appropriate for your text, just click it.
Top of Page
With Word, you can easily change the spacing between lines and paragraphs in your document.
-
On the Design tab, click Paragraph Spacing to see a drop-down list of paragraph spacing options. Pause the pointer over any paragraph spacing style to see a live preview directly in your document.
-
When you find the look you want, click it.
Tip: To define your own paragraph spacing, choose Custom Paragraph Spacing.
Top of Page
It’s easy to preview what the layout of your document will look like when printed without actually printing.
-
Click the File tab.
-
Click Print to see a preview of your document.
-
Review the Settings for any properties you might want to change.
-
When the properties for your printer and document appear the way that you want them to, click Print.

Top of Page
To use Word, look for the Word icon in the Start menu and click it.
-
Click the Start button
to display the Start menu. -
Point to All Programs, Microsoft Office, and then clickMicrosoft Word 2010.
-
The startup screen appears, and Word starts.
 to display the Start menu.
Tip: The first time you start Word, the Microsoft Software License Agreement might appear.
To quit, choose the Exit command on the File tab.
-
Click the File tab.
-
Choose Exit.
If you made any changes since you last saved the document, a message box appears asking if you want to save changes. To save the changes, click Yes. To quit without saving the changes, click No. If you clicked the Exit button by mistake, click Cancel.
Top of Page
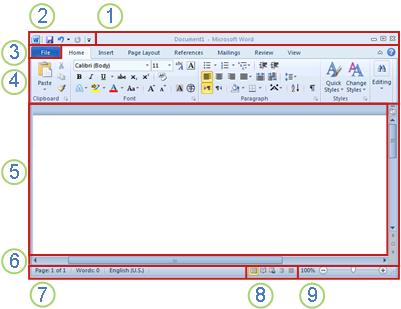
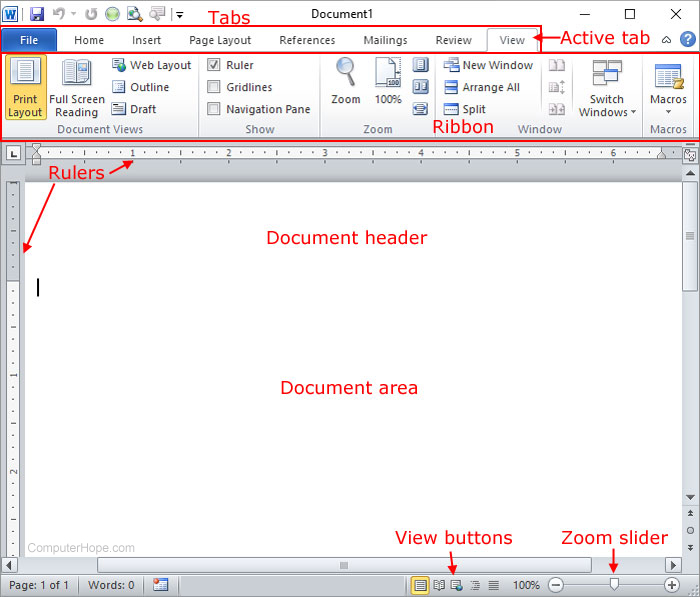
1 Title Bar: Displays the file name of the document that is being edited and the name of the software you are using. It also includes the standard Minimize, Restore, and Close buttons.
2 Quick Access Toolbar: Commands that are frequently used, such as Save, Undo, and Redo are located here. At the end of the Quick Access Toolbar is a pull-down menu where you can add other commonly used or commonly needed commands.
3 File Tab: Click this button to find commands that act on the document itself rather than the content of the document, such as New, Open, Save as, Print, and Close.
4 Ribbon: Commands needed for your work are located here. The appearance of the Ribbon will change depending on the size of your monitor. Word will compress the ribbon by changing the arrangement of the controls to accommodate smaller monitors.
5 Edit Window: Shows the contents of the document you are editing.
6 Scroll Bar: Lets you change the display position of the document you are editing.
7 Status Bar: Displays information about the document you are editing.
8 View Buttons: Lets you change the display mode of the document you are editing to fit your needs.
9 Zoom slide control: Lets you change the zoom settings of the document you are editing.
Top of Page
In Word, you must save your document so you can quit the program without losing your work. When you save the document, it is stored as a file on your computer. Later, you can open the file, change it, and print it.
To save a document, do the following:
-
Click the Save button in the Quick Access toolbar.
-
Specify the location where you want to save the document in the Save in box. The first time you save your document, the first line of text in the document is pre-filled in as the file name in the File name box. To change the file name, type in a new file name.
-
Click Save.
-
The document is saved as a file. The file name in the Title Bar changes to reflect the saved file name.
You can open a Word document to resume your work. To open a document, do the following:
-
Click the Start button, and then click Documents.
-
Navigate to the location where you stored your file, and double-click the file. The Word startup screen appears, and then the document is displayed.
Tip: You can also open a document from within Word by clicking the File tab and then clicking Open. To open a document you saved recently, click on Recent
.
Top of Page
Before you edit or format text, you must first select the text. Follow the steps below to select text.
-
Place the curser at the beginning of the text you’d like to edit or format and then press the left mouse button.
-
While holding down the left mouse button, move it to the right (called “dragging”) to select the text. A background color is added in the location of the selected text to indicate the selection range.
Most text formatting tools are found by clicking the Home tab and then choosing from the Font group.
1 This is the Home tab.
2 This is the Font group on the Home tab.
3 This is the Bold button. See the table below for the names and functions of all the buttons in the Font group.
|
Button |
Name |
Function |
|---|---|---|
|
|
Font |
Changes the font. |
|
|
Font Size |
Changes the size of the text. |
|
|
Grow Font |
Increases the text size. |
|
|
Shrink Font |
Decreases the text size. |
|
|
Change Case |
Change all the selected text to uppercase, lowercase, or other common capitalizations. |
|
|
Clear Formatting |
Clears all formatting for the selected text, leaving only the plain text. |
|
|
Bold |
Makes the selected text bold. |
|
|
Italic |
Italicizes the selected text. |
|
|
Underline |
Draws a line under the selected text. Click the dropdown arrow to select the type of underline. |
|
|
Strikethrough |
Draws a line through the middle of selected text. |
|
|
Subscript |
Creates subscript characters. |
|
|
Superscript |
Creates superscript characters. |
|
|
Text Effects |
Apply a visual effect to selected text, such as shadow, glow, or reflection. |
|
|
Text Highlight Color |
Makes text look like it was marked with a highlighter pen. |
|
|
Font Color |
Changes the text color. |
Top of Page
Styles allow you to quickly format major elements in your document, such as headings, titles, and subtitles. Follow the steps below to apply styles to the text in your document.
-
Highlight the text you want to change.
-
On the Home tab in the Styles group, pause the pointer over any style to see a live preview directly in your document.
-
To apply the style that’s most appropriate for your text, just click it.
When you’re done applying styles to the individual elements, Word 2010 lets you change the look of your whole document all at once.
-
On the Home tab, in the Styles group, click Change Styles.
-
Point to Style Set to find predefined style sets. Pause the pointer over any style set to see a live preview directly in your document.
-
When you find the look you want, click it.
Top of Page
With Word 2010, you can easily change the spacing between lines and paragraphs in your document.
-
On the Home tab, in the Styles group, click Change Styles.
-
Point to Paragraph Spacing to find a selection of built-in paragraph spacing styles. Pause the pointer over any paragraph spacing style to see a live preview directly in your document.
-
When you find the look you want, click it.
Tip: To define your own paragraph spacing, choose Custom Paragraph Spacing.
Top of Page
It’s easy to preview what the layout of your document will look like when printed without actually printing.
-
Click the File tab.
-
Click Print to see a preview of your document.
-
Review the Settings for any properties you might want to change.
-
When the properties for your printer and document appear the way that you want them to, click Print.
Top of Page
Need more help?
Want more options?
Explore subscription benefits, browse training courses, learn how to secure your device, and more.
Communities help you ask and answer questions, give feedback, and hear from experts with rich knowledge.
This Microsoft Word beginner guide provides free & basic lessons, tutorials & fundamentals for learning MS Office Word software. Microsoft Word is everyone’s favorite text editor. With so many features, it can meet all your requirements. It may look complicated to use initially, but once you get the hang of it, things start falling in place. This blog post is for those who want to learn the basic functions and features and know more about Microsoft Word.
To start the Microsoft Word application, click on the START button > Microsoft Office > Word or simply search for ‘Word’ in the search box and then click on the result. Once it is opened, select New document.
This is how the opened blank Microsoft Word document will look like.

Now let us take a look at the features that it has to offer.
1] Title and the Quick Access Toolbar
At the top, you have the Title of the document, the Quick Access Toolbar and a few other functions such as Minimize, Restore Down / Maximize, Close and Ribbon Display Options.
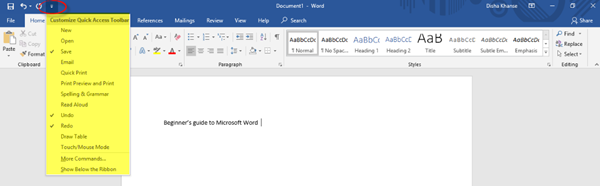
In the Quick Access Toolbar to the left of the Title Bar, you will find the Save button (Ctrl+S), wherein you can save the document in the desired folder; the Undo Typing button (Ctrl+Z); the Repeat Typing button (Ctrl+Y); and the Customize Quick Access Toolbar, wherein you have the various commands as shown in the image below.
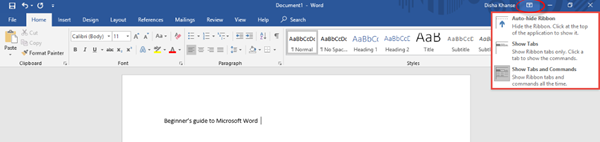
In the Ribbon Display Options, it is possible to Auto-hide the ribbon, show the ribbon tabs only or show the tabs and commands all the time. Refer to the image below.
Below the Title Bar, you will see what is called the Ribbon which consists of various tabs such as File, Home, Insert, Design, Layout, References, Mailings, Review, View, Help, Search. Now let us go through every Tab and its commands.
2] Home
The Home tab is the default tab in Microsoft Word. This tab comprises of features related to the clipboard, font, paragraph, styles, and editing.
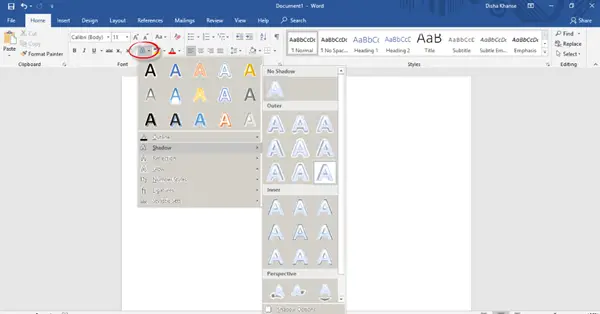
In the Clipboard section, you will find commands such as copy, cut and paste. Next, we have the Font section. Here you can change the font and the font size for your text, change the case, apply bold or italic formatting, underline, change the font color and highlight text and also add various text effects and typography. Go ahead and explore all the different options to make your text look great and innovative!

The Paragraph section includes the alignment options where you can choose to align your text in the center, left, right or justify it (that is, evenly distribute the text between the margins).
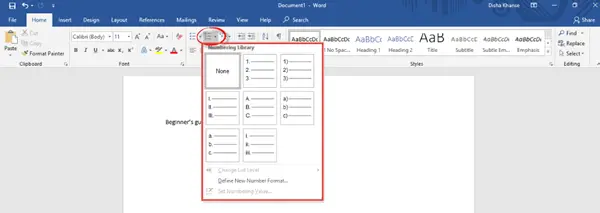
You can add or remove borders, increase or decrease indent, adjust the line and paragraph spacing, and also add bullets and numbers from the bullets and numbering libraries.
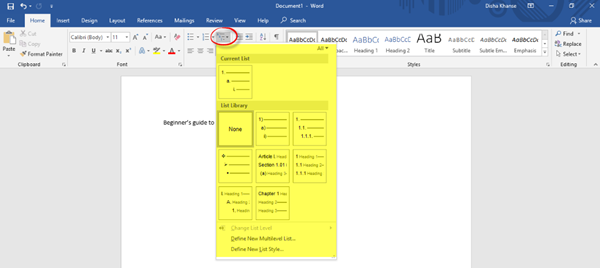
You can also create a multilevel list to organize items or create an outline.
From the Styles section, you can select any style of your choice to change the way your document looks. In the Editing section, you can find text or any content in the document and also replace a specific word or text with something else.
3] Insert
The next tab is the Insert tab.

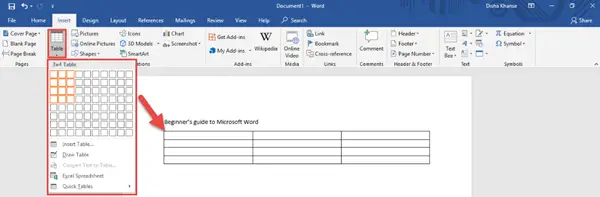
You can add a stylish cover page from the numerous styles available to make your document look more professional and also add a blank page from the Pages section. Another important feature is inserting a table, a picture from your picture gallery, an online picture from the web, shapes, 3D models, charts, SmartArt and screenshots from the Tables and the Illustrations section. Refer to the images below for guidance.
You can insert Tables.
You can insert Shapes.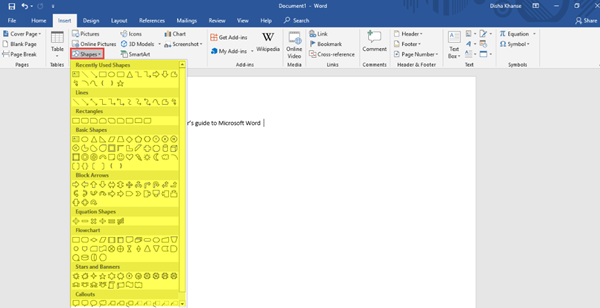
You can insert SmartArt – and more!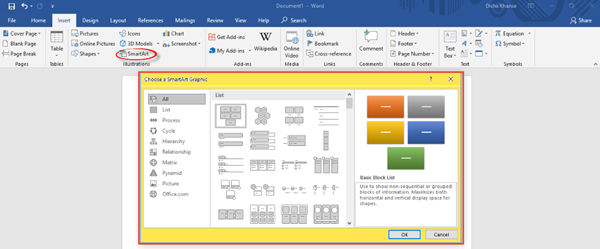
In the Header & Footer section, you can add a built-in header and a footer or from online sources. You can also add page numbers to your document.
Similarly, there are a lot of other features and commands in the Add-ins, Media, Links, Comments, Text and Symbols sections.
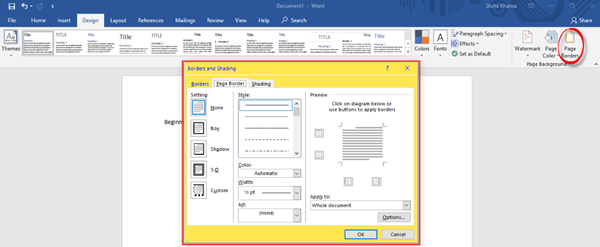
4] Design
The Design tab comprises of commands related to Document Formatting and Page Background. To make your document look more consistent and classy, choose the right theme of your liking from the various options available. Additional features include colors, fonts, effects, and paragraph spacing.
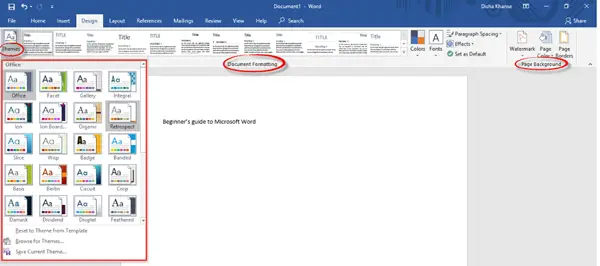
If you wish to go for a splash of color for the document background, you can change the page color as well, add Watermark and page borders.
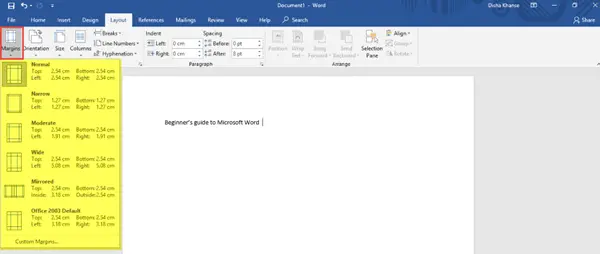
5] Layout
In this tab, in the Page Setup section, you can adjust margins for the entire document or for a particular section; and also customize it. You can change the Page Orientation to Landscape or Portrait; choose the page size for your document, and add or remove columns.
You can also decide the Size for the document.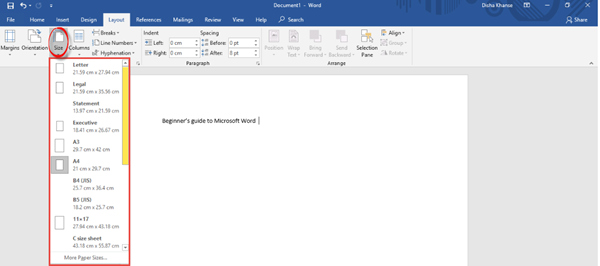
Find the settings to increase or decrease the Indent and Spacing in the Paragraph section.
Other features related to the placement of text and pictures, grouping multiple images and rotation options will be found in the Arrange section.
6] References
In the References tab, you will find different commands related to the table of contents, footnotes, research, citations and bibliography, captions, index and table of authorities.

7] Mailings
Here, you will find settings that will help you to create envelopes and labels, start the mail merge wherein you can send it to multiple recipients, write and insert fields, preview results and finish mail merge.

8] Review
The Review tab includes various functions related to proofing, speech, accessibility, language, comments, tracking, changes, compare, protect and ink. Out of all these, the Spelling and Grammar function (F7) is of utmost importance. Do check for spelling and grammatical errors after you are done writing your document.

9] View
In the View tab, you can change the views such as Read Mode, Print Layout, Web Layout, etc. Feel free to explore the additional features from the immersive, page movement, show, zoom, window, macros, and SharePoint sections.

10] Help
In the Help tab, you can contact an office support agent and give feedback.

11] Search
In the Search tab, you can type any feature that you are looking for and get help.
12] File
In the File tab, you can save the document, print and share the document, and also publish it.

In this post, I have tried to cover all the basic and useful features and functions of Microsoft Word.
This is my first blog post and I hope it was helpful to you. Your suggestions are most welcome.
Do try out all these features in order to make your MS Word document absolutely presentable and perfect!
Next, you might want to take a look at our Microsoft Word Tips And Tricks post.
Introduction to Microsoft Word: Microsoft Word is a powerful word processing application software and is part of the MS Office Suite of Applications. Word is used to sort, share, and store data with different formats such as Real-Time Format (RTF), Unformed, HTML Format, Unformulated Unicode Text, Picture Enhanced Meta File Format,etc.
It is a widely used application software to create general and special-purpose documents, letters, tabloids, legal documents, statements, and many more.
In word processing and other related applications, the user interface means that the user and the application in the computer system interact in a certain way with the Ribbon, Tabs, Groups, Commands, etc. and provide limited options for saving and using data or process-related work in the application using input devices and software.
A Graphical User Interface to Word

Table of Contents
- User Interface to Word
- A Graphical User Interface to Word
- Quick Access Tool Bar:
- Title bar:
- Tabs or Menus:
- Tell me:
- Sign in:
- Share:
- File Menu:
- Ribbon
- Groups
- Commands:
- Window Control Buttons:
- Rulers:
- Tab Stops (or) Tab Selector
- Insertion:
- Mouse Pointer:
- Document Area in Microsoft Word GUI:
- Scrollbar:
- Status bar:
- Page Information:
- Word Count – A Feature of MS Word:
- Check Proof Errors:
- Page View Options
- Zoom Slider
- Conclusion:
Quick Access Tool Bar:

A Quick Access Toolbar shows up at the upper left corner of the title bar. By default, it contains a set of three commands: save, undo, and redo. You can add more commands to it or expel it.
Title bar:

The title bar appears at the top of an application. It shows you the name of the document and the application currently being used. The document name and the application name appear in the middle of the title bar.

In the user interface of Microsoft Word, tabs and menus are part of the Ribbon. And these appear below the title bar. Each tab contains different groups, and each group contains one or more commands.
Tell me:

Search quickly and use the word features and commands. These are bold, italic, underline, insert table, shapes, hyperlinks, paste options, and so on. Use them in your document however you want.
Sign in:

It is a free Microsoft account used to access Microsoft services. You can save and get your documents from anywhere by using the service. You can also use this account to sign in to OneDrive, Skype, and the Microsoft Store, and to purchase and activate Microsoft products.

You can save your work on different platforms by sharing it with others. These platforms are Google Cloud, OneDrive, e-mail, blogs, people, etc.
MS Word File Menu Options and Commands: The File menu controls and accesses the record elements of MS Office products. Officially, a File menu handles the documents by using the commands. The rundown of file menu commands is information, New, Open, Save, Save as, Print, Share, Export, Account, Share, Option, and Close.
Ribbon

The Ribbon is all about the collection of groups, tools, and functions in the MS-Office suite of applications that you can see under each tab.
Groups

The group is a collection of commands that is also part of the ribbon and appears on all the tabs. The tabs are Home, Insert, Design, Layout, References, Mailings, Review, and View.
For example, the groups on the Home tab include Clipboard, Font, Paragraph, Styles, and Editing.
Commands:

Commands are the heart of the user interface for Microsoft Word. And each command is part of a group, and each work in a word is accessible by using the commands or other shortcut keys.
Examples of commands are Cut, Copy, Paste, Format Painter, Bold, Italic, etc.

Window Control Buttons:
Minimize, Restore, Maximize, and Close buttons are additionallycalled ” Control Buttons.” It shows up in the upper-right corner of Word and other applications in Microsoft Office and other programmes. Window Control Buttons enable you to control an application file in the user interface in Microsoft Word.
Rulers:

In the user introduction and user interface to Microsoft Word, the ruler appears to be like a measurement scale. vertically at the left end of the document and horizontally at the bottom of the ribbon (top of the word document).
In word processing, we can use the ruler for setting margins, different indentations (Indent), and marking different tabs by using the tab selector. You can see the tab selector at the left end of the ruler.
Tab Stops (or) Tab Selector

In the user interface of MS Word, tab stop is used to align the text in different ways. The tap stops include Left Tab, Center Tab, Right Tab, Decimal Tab, and Bar Tab, along with First Line and Hanging Indents.
Insertion:

Insertion is a blinking vertical line, often called a text cursor. You can enter or paste the data only at the cursor position in the document. Controlling the cursor is dependent on the mouse pointer, arrowkeys, enter, home, end, page up and page down keys, backspace, delete, and space keys, etc.
Mouse Pointer:

In the user interface of Microsoft Word, the mouse pointer looks like an arrow in a computer system. You can change it in the system settings.
The mouse pointer is used to select the contents and objects, position a cursor, open links, files, and many more in your computer system.
So let’s see how to use the different shapes of the cursor when you move it over the items in a Word document.
- Looking like a Vertical line: To position a cursor and type something into the document, table, etc.
- One-Headed Arrow: Selection, and Open
- Two-Headed Arrows: Resizing Table and Objects (like Shapes and Pictures)
- Four-Headed Arrows: Moving the Objects, like Shapes and Pictures
- Hand Symbol: Opening a file by clicking on the Hyperlink
- Up and Down arrows: Double-Click in between the two-page dividers to hide or show the spaces.
Document Area in Microsoft Word GUI:

In the interface, the white space area in which you can type, edit, and store the data is called the document area.
Scrollbar:

In the user interface of MS Word, scrolling is the action of viewing any part of the document by moving up, down, left, and right. You can scroll a document when it is more than 165% zoomed.
There are two scrollbars you can see in your Word documents a Vertical Scrollbar and Horizontal Scrollbar.
Status bar:

On the bottom bar, you can see a list of commands (word features) such as page information, word count, check for proofreading errors, language selection, page view options, and the zoom slider from the beginning to the end. A status bar appears at the bottom of an application.
Page Information:

In the introduction and user interface to Microsoft Word, page information appears at the bottom left corner of the status bar. It gives information on which page is present and how many pages there are in the document.
Word Count – A Feature of MS Word:

In the user interface for Microsoft Word, we can see the total number of words that are counted on the taskbar, called the “Word Count.”
So, here, not only can you see the total number of words, but also the total number of pages, lines, paragraphs, and characters with or without spaces by clicking it.
Check Proof Errors:

It checks and corrects the grammatical and spelling errors in a word and other suites of applications.
Page View Options

Page View: Page options appear at the right but one on the taskbar as in the screenshot above. These are explained below.
Read Mode: Read Mode is easier to read the content of the document.
Print Layout: In the Print Layout Mode, You can see a document’s appearing as if it is printed.
Web Layout: In the Web Layout Mode, your document appears to look like a Webpage.
Zoom Slider

The Zoom Slider appears at the bottom right corner of the status bar. With the help of this, we can zoom in and out of the document.
Conclusion:
An introduction to Microsoft Word and a user interface for Microsoft Word are very important for those who are going to learn Word.
MS Word can be easily understood by fully reading its introduction, interface, and features, as described above. Besides this, beginners must start with MS Word while going to learn any suite of Office applications such as MS-Excel, MS-Ppt, MS-access etc.
What is Microsoft Office?
Microsoft Office suite includes Word, Excel, PowerPoint, Access, Publisher, OneNote and Outlook, and it is supported by Windows, Macintosh, Linux computers, and Android mobiles.
What is a User Interface in Microsoft Word?
The graphical interface means that the user and the application in the computer system interact in a certain way, providing limited options for recording data or process-related work in the application using input devices and software.
What are the Microsoft Office Suits?
Microsoft Office Suite includes Word, Excel, PowerPoint, Access, Publisher, OneNote and Outlook, and it is supported by Windows, Macintosh and Linux computers.
What are the Tabs of Microsoft Word Applications?
Tabs of Microsoft Word are Home, Insert, Design, Layout, References, Mailings, Review, and View.
What is Document Area in Microsoft Word?
The white space area in which you can type, edit, and store the data is called the document area.
Updated: 11/06/2021 by

Sometimes called Winword, MS Word, or Word, Microsoft Word is a word processor published by Microsoft. It is one of the office productivity applications included in the Microsoft Office suite. Originally developed by Charles Simonyi and Richard Brodie, it was first released in 1983.
Microsoft Word is available for Microsoft Windows, Apple macOS, Android, and Apple iOS. It can also run on the Linux operating system using WINE.
What is Microsoft Word used for?
Microsoft Word lets you create professional-quality documents, reports, letters, and résumés. Unlike a plain text editor, Microsoft Word has features including spell check, grammar check, text and font formatting, HTML support, image support, advanced page layout, and more.
What does the Microsoft Word editor look like?
Below is an overview of a Microsoft Word 2010 document.
Where do you find or start Microsoft Word?
If you have Microsoft Word or the entire Microsoft Office package installed on Microsoft Windows, you can access Microsoft Word in your Start menu.
Keep in mind that new computers do not include Microsoft Word. It must be purchased and installed before running it on your computer. If you do not want (or cannot afford) to purchase Microsoft Word, you can use a limited version for free at the Microsoft Office website.
If Microsoft Word is installed on your computer, but you can’t find it in your Start menu, use the following steps to launch Microsoft Word manually.
- Open My Computer or File Explorer.
- Click or select the C: drive. If Microsoft Office is installed on a drive other than the C: drive, select that drive instead.
- Find and open the Program Files (x86) or Program Files folder.
- Open the Microsoft Office folder.
- In the Microsoft Office folder, open the root folder. Then open the OfficeXX folder, where XX is the version of Microsoft Office (e.g., Office16 for Microsoft Office 2016) installed on your computer.
Tip
If there is no root folder, look for and open the folder with Office in the folder name.
- Find and double-click the file named WINWORD.EXE to start the Microsoft Word program.
How to open Microsoft Word without using a mouse
- Press the Windows key.
- Type Word and select the Microsoft Word entry in the search results.
- If Microsoft Word does not open after selecting it in the search results, press Enter to launch it.
What are the uses of Microsoft Word?
Microsoft Word is a word processor, and, like other word processors, it’s capable of helping users create a variety of different types of documents. For example, users can create a résumé, business contract, instruction document, or a letter to another person. We’ve included a list of the top uses of a word processor on our word processor page.
How many lines are there on a page in Microsoft Word?
By default, there are 29 lines on one page in Microsoft Word.
What type of files can Microsoft Word create and use?
Early versions of Microsoft Word primarily created and used the .doc file extension, while newer versions of Word create and use the .docx file extension.
More recent versions of Microsoft Word support the creation and opening of these types of files:
- .doc, .docm, .docx
- .dot, .dotm, .dotx
- .htm, .html
- .mht, .mhtml
- .odt
- .rtf
- .txt
- .wps
- .xps
- .xml
Example of a Microsoft Word .doc file
We created a Microsoft Word document that you can download and open in most word processor programs, including Microsoft Word. Click the link below to download the example Word document and experiment more with a word processing document.
- Download example.doc
Why use Word instead of a plain-text editor?
Microsoft Word offers many features not found in a traditional text editor or a plain-text file. Some advantages include changing the formatting (e.g., center), editing the font type, size, and color, inserting pictures, and more.
Tip
The features above are also available in a rich-text editor, such as WordPad, which is included with Microsoft Windows.
Why use Word instead of a WordPad?
A rich-text editor, like WordPad, offers many of the same basic features as Microsoft Word. Where Microsoft Word differs is the ability to do more advanced features. The advanced features include mail merges, spellchecker, styles, tables, headers & footers, WordArt, columns, margins, and more.
What are the different versions of Microsoft Word?
Microsoft Word has had several versions throughout its history. The different releases with release dates are listed below.
Windows versions

- Word 2019, released in 2018
- Office 365 and Word 2016, released in 2016
- Word 2013, released in 2013
- Word 2010, released in 2010
- Word 2007, released in 2006
- Word 2003, released in 2003
- Word 2002, released in 2001
- Word 2000, released in 1999
- Word 98, released in 1998
- Word 97, released in 1997
- Word 95, released in 1995
- Word 6.0, released in 1993
- Word 2.0, released in 1991
- Word 1.1, released in 1990
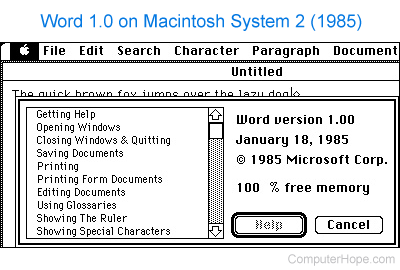
- Word 1.0, originally invented for MS-DOS and Xenix in 1983 by Charles Simonyi and Richard Brodie, working for Bill Gates and Paul Allen. Word was released in the Windows OS in 1989
Mac versions
- Word 2019, released in 2018
- Word 2016, released in 2015
- Word 2011, released in 2010
- Word 2008, released in 2008
- Word 2004, released in 2004
- Word v. X, released in 2001
- Word 2001, released in 2000
- Word 98, released in 1998
- Word 6, released in 1993
- Word 5.1, released in 1992
- Word 5, released in 1991
- Word 4, released in 1989
- Word 3, released in 1987
- Word 1, released in 1985
Desktop publishing, Editor, Google Docs, Office, Office 365, Office Online, Software terms, WordPad, Word processor, Word processor terms
When you create a new document in Microsoft Word, it looks decent right off the bat. But sometimes you want to make your page look much better than the default.
Use Microsoft Word’s page layout design tools to make easy-to-read documents that reflect positively on you and your business—even if you’re new to Word.


You can make page layout designs in Microsoft Word from scratch. Or, skip the grunt work by using Microsoft Word templates.
Envato Elements and GraphicRiver are both great sources of print templates for Word. Each template is made by professional designers. Elements makes a compelling offer. Download unlimited templates, fonts, photos, and other creative assets for one fixed subscription price.
But, if you only need the occasional template for MS Word and prefer to pay for each single use, then look to GraphicRiver.
How to Make Awesome Page Layout Designs in Microsoft Word (Video)
If you create or modify documents in Word, you may want to change the standard Microsoft Word layout. There are a number of changes you can make.
Watch this quick screencast to find out what you need to know about Word page layout options:
To learn more about changing page layouts in Microsoft Word, study the complete written tutorial below:
Why Learn About Page Layouts In Word?
Page layout settings in Word determine how your document looks when you print it out. It includes the page orientation, margins, and columns, for example.
It’s important to pay attention to the page layout of your document for several reasons:
- It ensures consistency. This gives your readers a good experience while consuming your document.
- A good page layout makes your document more readable. When your document is aesthetically pleasing and has a consistent look, your audience is more likely to read, comprehend, and remember your content.
- A well-designed document reflects well on you. It reinforces your credibility and authority in your field.
Microsoft Word has robust page settings that allow you to control your page layout design. Everything is designed to be as simple and intuitive as possible. Yet, doing page layout in Word can be daunting if you’re new to the software.
This article breaks things down for you. So, you can follow along, step-by-step, and take control of how your document looks.
Types of Documents You Can Create in MS Word
You can create all kinds of printed documents in Microsoft Word.
Make business documents like:
- resumes
- cover letters
- business letters
- reports
- proposals
- invoices
- certificates
- forms
MS Word is also very handy for creating marketing documents. Create everything from:
- flyers
- brochures
- advertising inserts
- and more
For education or training use Word to prepare:
- handouts
- workbooks
- manuals
- certificates
You can also produce postcards, invitations, newsletters, and signs. If you can print it, then you can whip it up in Word.
In this tutorial, you’ll learn how to use Microsoft Word’s page layout tools to produce the print materials you need.
How to Work With Templates to Quickly Change Your Design
The quickest way to change or apply a page layout is by using a print template for Word. For the examples below, we’ll be using the SEO Proposal template from Envato Elements.


When looking for a print template for Word, it’s a good idea to choose one that uses paragraph and character styles. The styles feature will allow you to quickly format text even in a long document.
Below are some roundups of Microsoft Word templates you can choose from:
Now that you’ve chosen a template with a good page layout in Word, it’s time to learn how to use it.
1. Download the Template
Download the template of your choice to your computer’s hard drive. Unzip the file, then copy the template. This way, you’ve got the original template file intact, if you want to revert to it.


2. Customize the Template With Your Own Content
Replace the text with your own information.


If you want to change the text formatting, change the settings for fonts and paragraphs.
To add your own image, click on an image placeholder. The Format Picture dialog box opens. Under Fill, select Picture or texture fill. Under Picture source, click Insert….


Find and select the image you want to use. Click Insert.


Now, the image is inserted.


To replace an existing logo on the template, click on the logo, then click on the Picture Format tab.


Click the Change Picture button on the ribbon. Find and select the logo file, then click Insert.
![]()
![]()
![]()
If necessary, click-and-drag one of the handles of the logo to resize it.
Next, I’d like to change the color of the rectangle on the cover page. To do that, select the shape, then click the Shape Format tab.


The Shape Format ribbon is displayed. Click on the drop-down arrow beside the Shape Fill button. Select from the color options shown or click More Fill Colors… to specify the color you want to apply.


This is what the customized proposal cover looks like now:


Repeat these steps to customize the other pages of the template.
As you can see, when you start with a template for Word most of the design and page formatting decisions are already made for you by the template creator.
But, if you prefer to start your document from scratch, follow the steps below to change the default page format settings.
Type or paste your text into the document. Apply text and paragraph formatting to modify settings for fonts, spacing, alignment, and more. Then, you can move on to the page layout.
3. How to Set the Microsoft Word Page Orientation as Portrait or Landscape
To set the Microsoft Word page orientation of your document, go to File > Page Setup….


The Page Setup dialog opens. Click on the button for either Word portrait or landscape layout orientation.


4. How to Set the Print Size of the Paper
From the Microsoft Word Page Setup dialog, you can also change the paper size when you print the document. Click on the Paper Size field to show the different paper size choices available.


Select the size you wish to use. You can also click Manage Custom Sizes… to specify your own size.


5. How to Split Your Text into Multiple Columns
Sometimes you may want to divide your text into columns. This can make the document more readable and adds variety to an otherwise monotonous layout. Columns are popular in magazines, newsletters, and similar types of materials.
Arrange the Entire Document into Columns
To change the MS Word layout to columns, follow these steps:
1. Go to Layout > Columns.


The Columns dialog box opens.


2. Select one of the Presets or manually set the:
- number of columns
- width and spacing
- apply to the whole document or from that point forward
3. When you’re happy with the settings, click OK.
Apply Columns to a Part of the Document
You can also apply columns to only a specific part of the document.
1. Select the text you wish to display in columns.


2. Go to Layout > Columns.
3. In the Columns dialog box, choose the settings you want to apply.
Notice that you now have the option to apply the column settings to Selected text. Click OK.


Now, only the selected text has been broken into two columns. The rest remains in one column.


6. How to Add Page and Section Breaks
Sections in Microsoft Word enable you to apply different layouts to different parts of your document. This is useful for making creative layouts, especially to long documents.
Insert a Page Break in Word
A page break separates text, so that anything after the break is moved to a succeeding page. It’s useful for dividing up a document into chapters and sections.
To insert a page break, place the cursor at the point where you want the break to be, then go to Insert > Break > Page Break.


In our sample document, the title page is now on a separate page from the rest of the text.


Insert a Section Break in Word
If you wish to apply varying formatting on different parts of the document, then you’ll want to break it into sections. This includes varying the columns, headers and footers, pagination, borders, and other settings.
To create a section break, place the cursor where you would like the section break to be. Go to Insert > Break > Section Break.


Select the type of section break you want to insert:
- Section Break (Next Page) creates a section break and moves the next section into a new page.
- Section Break (Continuous) keeps the two sections on the same page while allowing you to apply different formatting settings for each.
- Section Break (Odd Page) starts a new section on the next odd-numbered page.
- Section Break (Even Page) starts a new section on the next even-numbered page.
Take Control of Your Page Layouts with Microsoft Word
Use Microsoft Word’s page layout tools to give your documents a consistent, readable, and professional look. You don’t have to be an expert in Word to take better control of your document’s page layouts. With Microsoft Word’s page layout tools, you can make any document look the way you want it to.
You don’t have to start from scratch, either. You can have professional designers make most of the design and layout decisions for you by using print templates for MS Word. If you want unlimited downloads of templates as well as photos, fonts, icons, and other creative assets—all for one small, fixed fee—then Envato Elements is the best source for you.
For one-off Word templates and other desktop publishing tools, look to GraphicRiver. Here, you can access everything you need to create impressive print materials on a pay-per-use basis.
And when you use a template, the skills you learned in this post will help you customize and adapt it to your needs.
Editorial Note: Video added by Alexis (Lexi) Rodrigo.