
You can save a file to a folder on your hard disk drive, a network location, the cloud, a DVD, the desktop, or a flash drive. While you must identify the destination, if it is different than the default folder, the saving process is the same regardless of what destination you choose. By default, Microsoft 365 programs save files in the default working folder.
Additionally you can save a file in a different file format, such as RTF, CSV, or PDF.
Saving a file to OneDrive or SharePoint allows you to access it on any device and enables features such as AutoSave and Version History, which can help prevent data loss if your file closes unexpectedly.
To save your file:
-
Press CTRL+S or select File > Save.
Tip: You can also select Save
 on the Quick Access Toolbar.
 -
You must enter a name for the file if you are saving it for the first time.
 on the Quick Access Toolbar.
Tip: Save your file to a cloud location, such as OneDrive or SharePoint, to be able to access it anywhere, collaborate with others in real-time, and access Version History.
By default, if you’re signed in, files are saved to your OneDrive. If you want to save the current file somewhere else, click the Location drop-down to see additional recently-used locations. If the location you want isn’t there, you can open the full Save As window by selecting More save options.
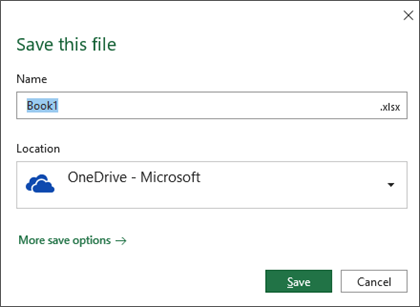
Tip: If you save your file to OneDrive or SharePoint, AutoSave will be enabled by default, so you don’t have to remember to save as you go.
If you’d like to change the default location for these saves to one of your other recently-used folders, select the Location drop-down, right-click the folder location you want to set as the default and select Set as Default Location.
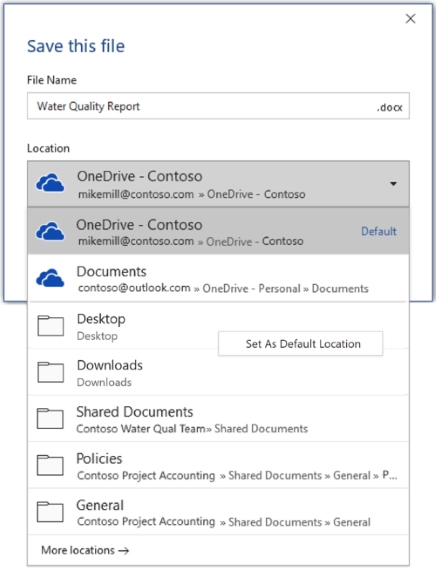
If you want to save to a location other than your recently-used folders, select More locations. If you haven’t received this update yet, your Office applications will continue to use the File menu for saving.
Tips:
-
You can also press F12 or select File > Save As to open the File menu.
-
If you’re used to using keyboard shortcuts when closing your document, such as ALT+F4, you can quickly choose to «Don’t Save» the file by using the keyboard accelerator key for that button (ALT+N).
Save a copy as a new file (Save As)
Tip: If you’re going to create a new file based on an existing file, but only want your changes saved in the new file, it’s a good idea to Save a Copy before you’ve made any changes. That way your original file will remain unchanged and all your edits will be in the new copy. You can also right-click the original file and select Open a copy.
-
Press F12 or click File > Save a Copy
-
By default Office will save the copy in the same location as the original. If you’re happy with the existing location go on to step 3. If you want to save the new copy in a different location choose it at this point.
Location
Description
Sites –
[Your Company Name]
SharePoint or Office 365 Groups document libraries
OneDrive –
[Your Company Name]
OneDrive for Business
OneDrive – Personal
OneDrive for consumers via your Microsoft account
This PC
Your local device, including any connected hard drives or flash drives
Browse
Opens the File Explorer so you can navigate to any location on your computer.
-
Give your new copy a name and click Save.
Your original file will be closed and you’ll now be working in the new copy you just created.
Tip: If you find yourself creating new files based on existing files often, you may want to use templates to make the process easier and safer. See Create a template for more information.
Save as a different format
You might want to save your file in another format so that you, or somebody else, can open the file in a different program or older version. For example, you might want to save your Word document as a Rich Text File (RTF) or your Excel workbook as a Comma-Separated Values (CSV) file.
Important: If you save an Office file in a format other than the Open XML format (such as .DOCX, .XLSX, or .PPTX) some connected experiences and modern features like AutoSave or Accessibility Checker won’t work on that file.
-
Click the File tab.
-
Click Save As.
-
Choose a file location, such as OneDrive or This PC to store your file.
-
In the File name box, enter a new name for the file.
-
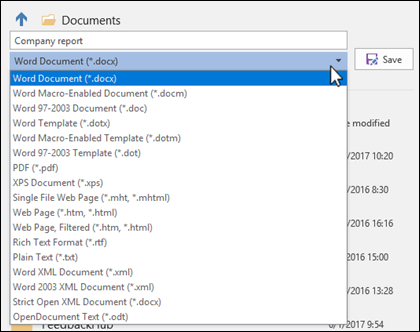
In the Save as type list, click the file format that you want to save the file in. For example, click Rich Text Format (.rtf), Word 97-2003 (.doc), Web Page (.htm or .html), or Comma Delimited (.csv).
For more information about how to save files in PDF (.pdf) or XPS (.xps) formats, see Save or convert to PDF or XPS.
-
Click Save.
Back up and recover your files
How you back up and recover your files depends on where and when you saved it. To learn more about a feature, including which versions of Office support it, select the name of the feature in the table below.
Saved to OneDrive
Saved to your device
If AutoRecover is turned on and your file closes unexpectedly, Document Recovery opens the next time you open the Office app. You can also recover an earlier version of an Office file.
Important: Even if AutoRecover is turned on, you should save the file frequently while you’re working on it to avoid losing data because of an unexpected power failure or other problem.
You can save a copy as a new file, or in a different format, or to a different location in Office 2016.
Save a copy as a new file (Save As)
Tip: If you’re going to create a new file, based on an existing file, but only want your changes saved in the new file it’s a good idea to do the Save a Copy process first thing; before you’ve made any changes. That way your original file will remain unchanged and all your edits will be in the new copy.
-
Press F12 or click File > Save a Copy
-
By default Office will save the copy in the same location as the original. If you want to save the new copy in a different location choose it at this point. If you’re happy with the existing location go on to step 3.
-
Give your new copy a name and click Save.
Your original file will be closed and you’ll now be working in the new copy you just created.
Tip: If you find yourself creating new files based on existing files often, you may want to use templates to make the process easier and safer. See Create a template for more information.
Choose a different location to save your file
During the Save, or Save a Copy, process described above you can choose a different location to save your file.
-
Select the cloud, web site, or device location where you want to save the file.
Location
Description
Sites –
[Your Company Name]
SharePoint or Office 365 Groups document libraries
OneDrive –
[Your Company Name]
OneDrive for Business
OneDrive – Personal
OneDrive for consumers via your Microsoft account
This PC
Your local device, including any connected hard drives or flash drives
Browse
Opens the File Explorer so you can navigate to any location on your computer.
-
Select a folder from the Recent Folders list, or click Browse if you don’t see the location you want listed there.
-
Confirm the filename you want to use and click Save.
Save as a different, or older, format
You might want to save your file in another format so that you, or somebody else, can open the file in a different program or older version. For example, you might want to save your Word 2016 document as a Rich Text File (RTF) or your Excel workbook as a Comma-Separated Values (CSV) file.
-
Click the File tab.
-
Click Save As.
-
Choose a file location, such as OneDrive or This PC to store your file.
-
In the File name box, enter a new name for the file.
-
In the Save as type list, click the file format that you want to save the file in. For example, click Rich Text Format (.rtf), Word 97-2003 (.doc), Web Page (.htm or .html), or Comma Delimited (.csv).
Note: For more information about how to save files in PDF (.pdf) or XPS (.xps) formats, see Save or convert to PDF or XPS.
-
Click Save.
Save as a copy, or to a different location in Office 2013.
-
Select the cloud, web site, or device location where you want to save the file.
Location
Description
Sites –
[Your Company Name]
SharePoint Server 2013 or earlier document libraries
OneDrive –
[Your Company Name]
OneDrive for work or school
OneDrive – Personal
OneDrive for consumers via your Microsoft account
Other web locations
Any other websites you have file storage access to.
Computer
Your local device
-
Select a folder from the Recent Folders list, or click Browse if you don’t see the location you want listed there.
-
Confirm the filename you want to use and click Save.
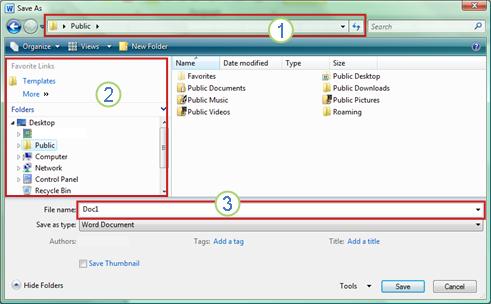
When you use the Save As dialog box, you can also save the file to a new location by using the Navigation pane.
-
To choose a folder or type the path to a folder, use the Address Bar.
-
To quickly see locations you use often, use the Navigation pane.
-
To see more file types, click the arrow.
You can also use the Save As dialog box to rename a file or change the location of where you save the file by clicking a different folder.
You might want to save your file in another format so that you, or somebody else, can open the file in a different program or older version. For example, you might want to save your Word document as a Rich Text File (RTF) or your Excel workbook as a Comma-Separated Values (CSV) file.
-
Click the File tab.
-
Click Save As.
-
Choose a file location, such as OneDrive or This PC to store your file.
-
In the File name box, enter a new name for the file.
-
In the Save as type list, click the file format that you want to save the file in. For example, click Rich Text Format (.rtf), Web Page (.htm or .html), or Comma Delimited (.csv).
Note: For more information about how to save files in PDF (.pdf) or XPS (.xps) formats, see Save or convert to PDF or XPS.
-
Click Save.
If you are using Office 2010, you can save files in an earlier version of Microsoft 365 by selecting the version in the Save as type list in the Save As dialog box. For example, you can save your Word 2010 document (.docx) as a 97-2003 document (.doc).
Notes:
-
Office 2010 continues the use of the XML-based file formats, such as .docx, .xlsx, and .pptx, introduced in the 2007 Office release. Therefore, files created in Microsoft Word 2010, Microsoft Excel 2010, and Microsoft PowerPoint 2010 can be opened in the 2007 Office release programs without special add-ins or loss of functionality. For more information, see Open XML Formats and file name extensions.
-
For more information about compatibility between files from different releases, see Use the Compatibility Checker.
For information about saving Microsoft Access 2010 .ACCDB files into the older .MDB format see Convert an .accdb database to an earlier file format.
-
Click the File tab.
-
Click Save As.
-
In the File name box, enter a new name for the file.
-
Click Save.
When you use the Save As dialog box, you can also save the file to a new location by using the Navigation pane.
-
To choose a folder or type the path to a folder, use the Address Bar.
-
To quickly see locations you use often, use the Navigation pane.
-
To see more file types, click the arrow.
You can also use the Save As dialog box to rename a file or change the location of where you save the file by clicking a different folder.
You might want to save your file in another format so that you, or somebody else, can open the file in a different program or older version. For example, you might want to save your Word document as a Rich Text File (RTF) or your Excel workbook as a Comma-Separated Values (CSV) file.
-
Click the File tab.
-
Click Save As.
-
Choose a file location, such as OneDrive or This PC to store your file.
-
In the File name box, enter a new name for the file.
-
In the Save as type list, click the file format that you want to save the file in. For example, click Rich Text Format (.rtf), Web Page (.htm or .html), or Comma Delimited (.csv).
Note: For more information about how to save files in PDF (.pdf) or XPS (.xps) formats, see Save or convert to PDF or XPS.
-
Click Save.
If you are using Office 2010, you can save files in an earlier version of Microsoft 365 by selecting the version in the Save as type list in the Save As dialog box. For example, you can save your Word 2010 document (.docx) as a 97-2003 document (.doc).
Notes:
-
Office 2010 continues the use of the XML-based file formats, such as .docx, .xlsx, and .pptx, introduced in the 2007 Office release. Therefore, files created in Microsoft Word 2010, Microsoft Excel 2010, and Microsoft PowerPoint 2010 can be opened in the 2007 Office release programs without special add-ins or loss of functionality. For more information, see Open XML Formats and file name extensions.
-
For more information about compatibility between files from different releases, see Use the Compatibility Checker.
For information about saving Microsoft Access 2010 .ACCDB files into the older .MDB format see Convert an .accdb database to an earlier file format.
We’re listening
This article was updated January 29, 2020 as a result of your comments. If you found it helpful, and especially if you didn’t, please use the feedback controls below to let us know how we can make it better.
See Also
-
What is AutoSave?
-
Rename a file
-
Save or convert to PDF
-
Store, share, and sync your files
-
What happens when you sign out of Office
Excel for iPad Word for iPad PowerPoint for iPad Excel for iPhone Word for iPhone PowerPoint for iPhone More…Less
The Save As feature in Word, Excel, and PowerPoint has been replaced by Save a Copy. To save a copy of a file, do the following:
-
Tap File > Save a Copy.
-
Choose where you want to save the file.
-
Enter a file name and then tap Save a Copy.
Important: The Office apps automatically save as you work. To avoid overwriting your original file, save a copy before you start making changes.
Save a new file
To save a newly created file, do the following:
-
Tap File > Name.
-
In the list of locations on the left side of the screen, choose the cloud service of your choice.
-
Enter a file name and tap Save.

Need more help?
Want more options?
Explore subscription benefits, browse training courses, learn how to secure your device, and more.
Communities help you ask and answer questions, give feedback, and hear from experts with rich knowledge.
![]()
Download Article
![]()
Download Article
Whether you’re creating a brand-new document in Microsoft Word or saving changes to an existing document, saving your files in Word is pretty simple. In this article, we’ll talk you through the basics of saving Word documents in Windows or Mac, including how to use keyboard shortcuts to save, how to turn on AutoSave, and how to save your docs in different file formats.
Things You Should Know
- Click the «File» menu and select «Save As» to save a new document.
- To quickly save changes to an existing document, click the disk icon on the toolbar, or press Control + S on a PC or Command + S on a Mac.
- If you’re using Office 365, enable AutoSave to automatically save your changes to the cloud every few seconds.
-
This function lets you name your file and choose its location. Once you’ve created a new Word document, open the File menu and select Save As. A window will pop up prompting you to name the file and choose a location on your computer or a linked cloud account where the file will be stored. Choose the file type (e.g., .docx, .pdf, or .xml) from the drop-down menu at the bottom of the window. Then, select Save.[1]
- You can also use the keyboard shortcut F12 (in Windows) or ↑+⌘ Command+s (on a Mac) to open the Save As window.
- If you’re saving a document for the first time, using the Save command will prompt the Save As window to open.
- If the document is saved locally, you can use Save As to save a copy of an existing document with a new name, format, or location. However, for documents that are saved to OneDrive or another cloud service, you may need to use Save a Copy instead, depending on your version of Word.

Advertisement
-
Use this method to save changes to an existing document. With your document open, click the File menu in the toolbar at the top of the screen. Then, click Save. Any recent changes to your file will be saved.[2]

-
This option lets you save your changes with a single click. The Quick Access Tool Bar is located at the very top of your document window on the right side. Locate the Save button, which looks like an old-fashioned square floppy disk, and click on it to save your document.[3]

Advertisement
-
These keyboard shortcuts instantly save recent changes. You can also use the keyboard Save command to launch the Save As window if you’re saving a new document for the first time. On a Windows PC, use Control+s. If you’re using a Mac, hit ⌘ Command+s.[4]

-
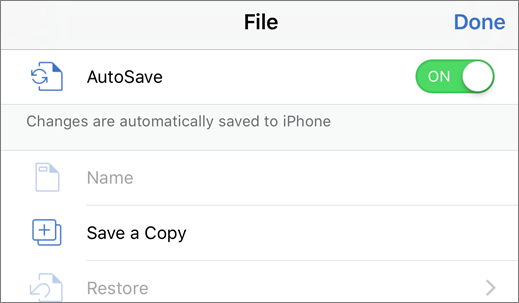
AutoSave is only available for documents saved to the cloud. The AutoSave feature in the Office 365 version of Word prevents you from having to save manually. However, in order to use it, you must save your files to a OneDrive, Box, or SharePoint account. To use AutoSave:[5]
- Click the toggle switch next to AutoSave in the Quick Access Toolbar at the top right corner of your document window.
- A window will pop up prompting you to upload your file to a cloud location. You can also rename it, if you like. Select your preferred location using the dropdown Place menu.
- Click Upload to use the default location or select Choose Location if you pick a different option in the Place menu.

Advertisement
-
Most Word documents save automatically as .docx files. However, you can choose to save your document as a different format, such as .pdf, .doc (for compatibility with older versions of Word), or .txt.[6]
To do this:- For documents that are saved locally on your computer, open the File menu and select Save As. In the File Format dropdown menu near the bottom of the Save As window, select your desired format.
- If your document has AutoSave enabled, you’ll need to use the Save a Copy command instead, which is also located in the File menu. Select the type of file you want to create in the drop-down File Format menu at the bottom of the window.
- Click Save to confirm your choice.
- With some formats, such as .pdf, you will be prompted to Export the file rather than Save it after you select the format.

-
This option creates a separate copy of your document. This is a good option if you want to make changes to your document while also preserving the original version. To make a copy of your Word doc, open the File menu and select Save a Copy…. If you’re saving the copy in the same location as the original, give it a new name. Click Save at the bottom of the Save a Copy window when you’re done.

Advertisement
-
If you don’t like Word’s default Save options, you can change them. On a Windows PC, open the File menu, then select Options, then Save.[7]
If you’re using a Mac, open the main Word menu, then click Preferences… and select Save. From there, you can customize options such as:- The default format for your saved Word files
- How frequently Word saves AutoRecover information
- Where AutoRecover files are stored
- The default location for saved documents (e.g., a local folder on your computer or a location in the cloud)

Add New Question
-
Question
What is the process of creating a file in a folder?

Once the folder is created, go into it and right-click on a blank area, then select New -> Microsoft Word Document.
-
Question
Do I save documents as a Word doc, or Word 97 — 2003?
This depends on what the reader(s) are using. Word 97 — 2003 format is more universal, but may strip some advanced features from your document. If you save it in Word format, those using earlier versions can still view/edit the document using the free MS Office Compatibility Pack from Microsoft. If you’re just creating the document for your own personal use, save as Word.
-
Question
How do I see a saved document?
On any modern version of Windows, you would a view a saved document by navigating to its save location. For example, if you saved it in the default «My Documents» folder, you would open a file explorer window and locate that folder, where you would then find your document. Alternatively, recent versions of Microsoft Word show a list of recent documents when you open the program. Finally, you can click File, then Open on most versions of Microsoft Word, then navigate to the correct file location.
Ask a Question
200 characters left
Include your email address to get a message when this question is answered.
Submit
Advertisement
Video
Thanks for submitting a tip for review!
-
Failing to save your document before you close Microsoft Word will potentially delete the document or any changes you made to an existing one.
Advertisement
About This Article
Thanks to all authors for creating a page that has been read 324,086 times.
Is this article up to date?


You use Microsoft Word for your various word-processing needs. It’s simple and easy-to-use, and it simply gets the job done in most cases. But what if someone else requests a file in a different format, such as PDF? What if you need the info in your Word doc to appear in plain text, without any font or paragraph styles?
Microsoft Word 2016 for Windows has a basic feature that lets you save documents in several different, but common, file formats. Here’s how to use it.
See on Microsoft Store (opens in new tab)
How to save a Microsoft Word doc as a PDF
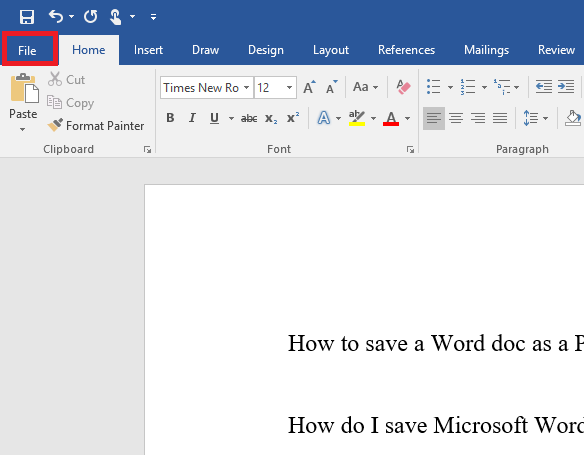
- Click the File tab in the top-left corner of your Word screen.
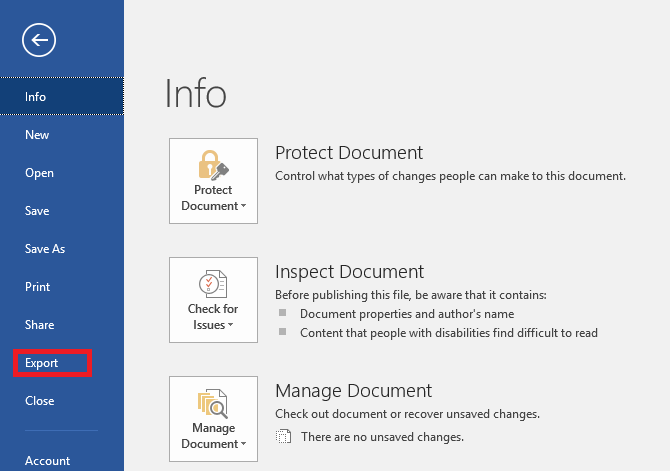
- Click Export in the blue vertical menu that runs along the left side of your screen.
- With the Create XPS/PDF Document option selected, click the corresponding box on the right side of your screen. (It looks like a document icon wearing a seatbelt.)
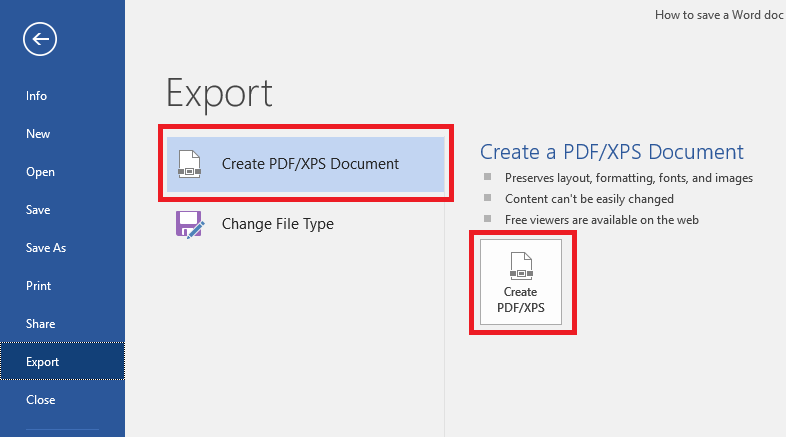
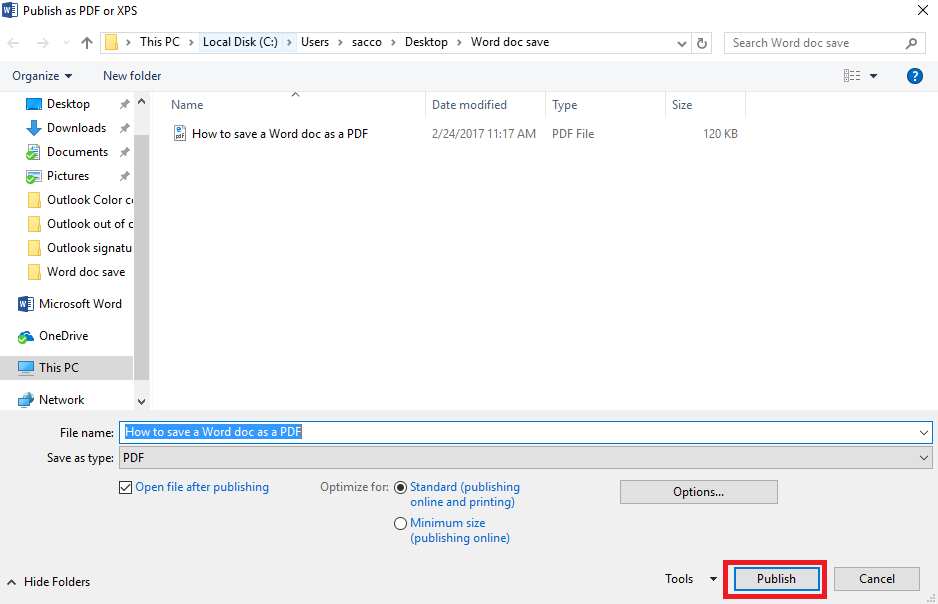
- A new box labeled Publish as PDF or XPS appears, and you should use it to navigate to the location on your PC where you want to save the new PDF.
- Click Publish to create and save your PDF.
- You may see a How do you want to open this file? pop-up box. By default, Windows will use the Edge browser but you can choose from other compatible browser apps installed on your PC, as well.
- If you want to continue using the same app to open PDFs in the future, check the Always use this app to open .pdf files option.
If the file format you want isn’t available in Microsoft’s default option, you can also dig a bit deeper for additional file format options.
How to save a Microsoft Word doc in different file formats
- Follow Steps No. 1 and No. 2 above.
- Highlight the Change File Type option on the left side of the screen.
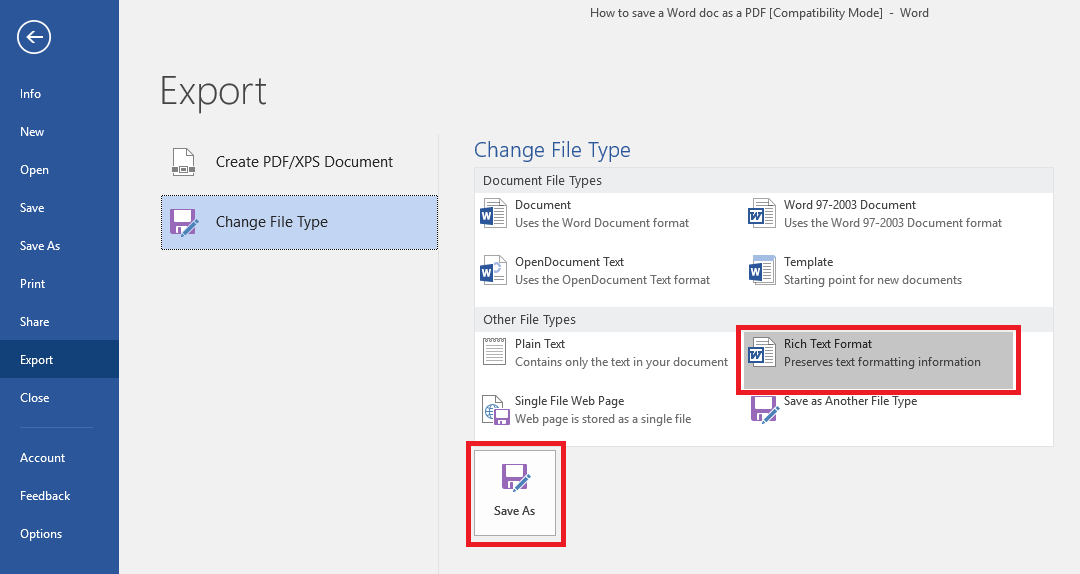
- You’ll see a number of different present options for new file formats, including OpenDocument Text, Word 97-2003 Document, Plain Text and Rich Text Format.
- If you want to use one of the default options, choose and click it accordingly and then hit the Save As box at the bottom of the screen.
- Next, navigate to the location on your PC where you want to save the new file and click Save.

- If you want to save your Word doc in a format that’s not available in Word’s preset defaults, complete Steps No. 1 and No. 2 above, and then choose Save as Another File Type
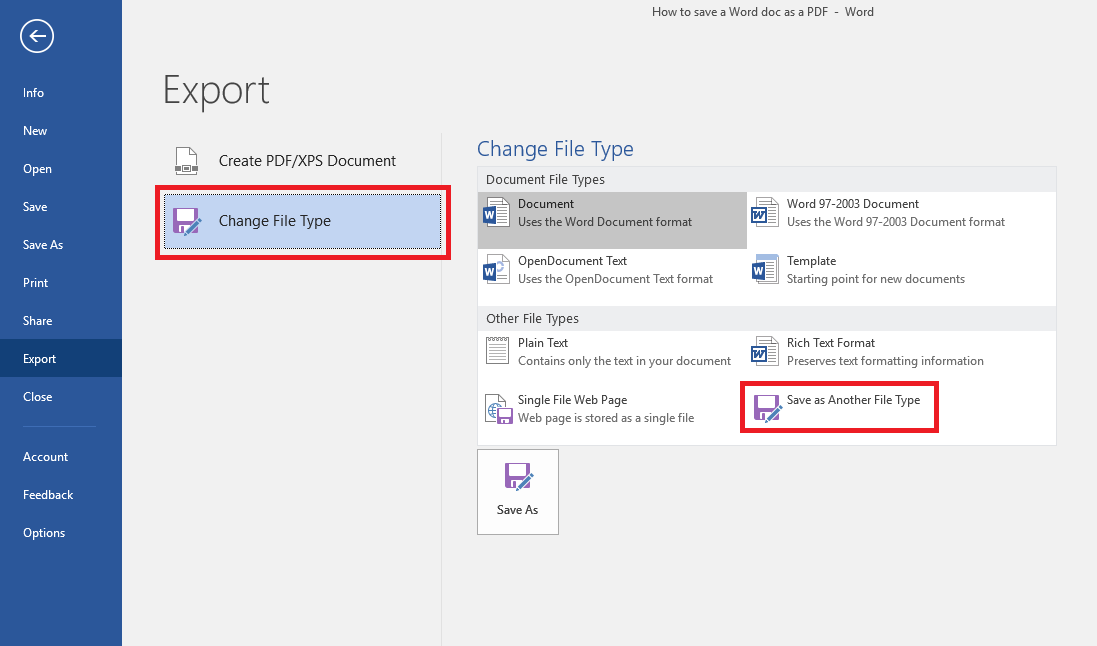
- Click the Save As box at the bottom of the screen.
- In the next box, navigate to the location on your PC where you want to save the new file.
- Open the drop-down menu next to Save as type to see a few additional options, such as Word XML Document, Strict Open XML document, and Web Page, Filtered.
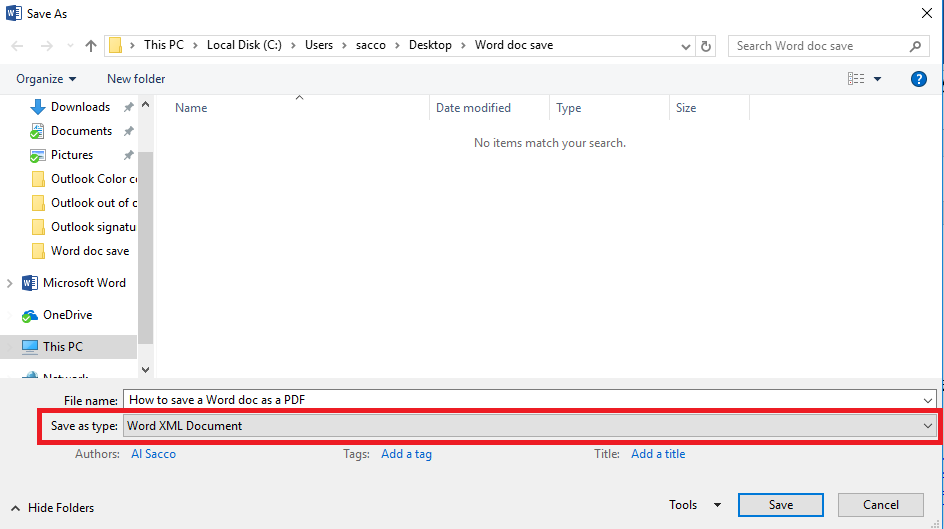
- Choose the format you want and click Save.
Word 2016 for Windows lets you easily convert your documents into more than a dozen different formats, using the process detailed here.
For more Word help and how-to articles, read:
- 13 easy-to-remember Microsoft Word keyboard shortcuts
- How to skip the Start screen in Microsoft Word 2016 for Windows
- How to change font defaults in Microsoft Word 2016 for Windows
- How to master Zoom settings in Word 2016 for Windows
All the latest news, reviews, and guides for Windows and Xbox diehards.
Al Sacco is content director of Future PLC’s Mobile Technology Vertical, which includes AndroidCentral.com, iMore.com and WindowsCentral.com. He is a veteran reporter, writer, reviewer and editor who has professionally covered and evaluated IT and mobile technology, and countless associated gadgets and accessories, for more than a decade. You can keep up with Al on Twitter and Instagram.
By default, Word saves all documents in the newest format (*.docx), but you can change the default format to
.doc or anything else.
To do this, follow the next steps:
1. On the File tab, click the Options button:

2. In the Word Options dialog box, on the Save tab, choose
the format you prefer in the list Save files in this format:

3. Click OK.
See also this tip in French:
Comment enregistrer des documents au format .doc.
Please, disable AdBlock and reload the page to continue
Today, 30% of our visitors use Ad-Block to block ads.We understand your pain with ads, but without ads, we won’t be able to provide you with free content soon. If you need our content for work or study, please support our efforts and disable AdBlock for our site. As you will see, we have a lot of helpful information to share.