
Word for Microsoft 365 Outlook for Microsoft 365 Word 2021 Outlook 2021 Word 2019 Outlook 2019 Word 2016 Outlook 2016 Word 2013 Outlook 2013 Word 2010 Outlook 2010 Word 2007 Outlook 2007 More…Less
You can add horizontal lines, sometimes called horizontal rules, to a document or email message to help separate sections of text and add visual appeal.
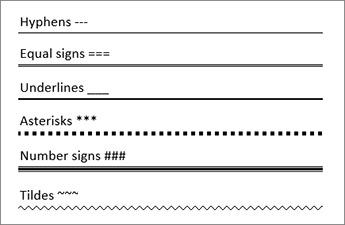
By default, Word and Outlook have a three-character shortcuts that inserts a full-width horizontal rule in your document or message. The appearance of that rule—thinner, thicker, double-line, dotted, wavy—depends on which shortcut you use, as illustrated in the image below.
If this automatic line feature doesn’t suit you, you can turn off this feature in Word or turn it off in Outlook.
If you want to draw a line for illustration purposes, see Draw a line in Word or Outlook instead.
Insert a horizontal line by typing a few characters
The fastest way to add a horizontal line or rule is to use the AutoFormat feature. When you type certain characters three times in their own paragraph and then press Enter, those characters instantly become a full-width horizontal line.
-
Place the cursor where you want to insert the horizontal line.
-
Type three of the characters illustrated below, and then press Enter.

The line is inserted for the full width of the page. When inserted into a column, the line is inserted to match the width of the column. To add text above the line, put your cursor where you want the text and begin typing.
Format the horizontal line after you create it
The shortcut described above creates an empty paragraph with a bottom border. You can change the look of that border line by using the Borders options:
-
In Word, on the Home tab of the ribbon, select the down arrow next to
Borders.In Outlook, on the Format Text tab of the ribbon, select the down arrow next to
Borders. -
At the bottom of the menu, select Borders and Shading.
-
In the dialog, you can change the line’s style (solid, dotted, wavy, double, and so on), color, or width as you see fit.
-
When you’re done formatting the line, select OK. Then, on the ribbon, select the
Borders button to apply your changes.
 Borders.
 Borders button to apply your changes.
 Word: Turn off the automatic line feature
To prevent Word or Outlook from automatically inserting a horizontal line when you type the three shortcut characters, do the following:
-
On the ribbon, select File > Options.
-
In the dialog box, select Proofing > AutoCorrect Options > AutoFormat As You Type.
-
Clear the Border Lines option.
-
Select OK.
Outlook: Turn off the automatic line feature
-
On the ribbon, select File > Options.
-
In the dialog box, select the Mail tab, then select Editor Options.
-
On the Proofing tab, select AutoCorrect Options > AutoFormat As You Type.
-
Under Apply as you type, clear the Border Lines option.
-
Select OK.
Want to draw a line?
See Draw a line in Word or Outlook.
See Also
Add a border to some text
Draw shapes
Need more help?
Want more options?
Explore subscription benefits, browse training courses, learn how to secure your device, and more.
Communities help you ask and answer questions, give feedback, and hear from experts with rich knowledge.
![]()
Download Article
A user-friendly guide to making different types of lines in Microsoft Word
![]()
Download Article
- Using Shapes to Draw a Line
- Using Borders to Add a Line
- Using Keyboard Shortcuts
- Using the Mobile App
- Q&A
- Tips
|
|
|
|
|
Do you want to create a horizontal line in your resumé or other Microsoft Word document? If you want to customize the color and format of the line, you can use the Shapes tool. If you need to make a quick, basic line, you can use the keyboard shortcut. While you can use the keyboard shortcut on Windows and Mac, you cannot use it on the mobile app. This wikiHow will show you how to insert different lines in Microsoft Word on your Windows, Mac, iPhone, or Android device.
Things You Should Know
- On desktop, go to the Insert tab. Click Shapes, then select a line. Click and drag across the document to create a line.
- To customize the line, double-click it. Click Shape Outline to change the color.
- On mobile, click the three dots. Tap Home and select Insert. Tap Shapes to select a line. Tap and drag across the document to create a line.
-
1
Open Microsoft Word on your Windows or Mac computer. Click or double-click the Word app icon, which resembles a white «W» on a dark-blue background.
- If you want to draw a line in an existing Word document, double-click the Word document to open it and skip the next step.
- You’ll need a subscription to use Office 365.
-
2
Click Blank document. It’s in the upper-left side of the page.
Advertisement
-
3
Click the Insert tab. This tab is in the blue ribbon at the top of the Word window, between Home and Draw.
-
4
Click Shapes. It’s in the Insert toolbar, next to the icon of an overlapping circle and square.
- A drop-down menu will appear.
-
5
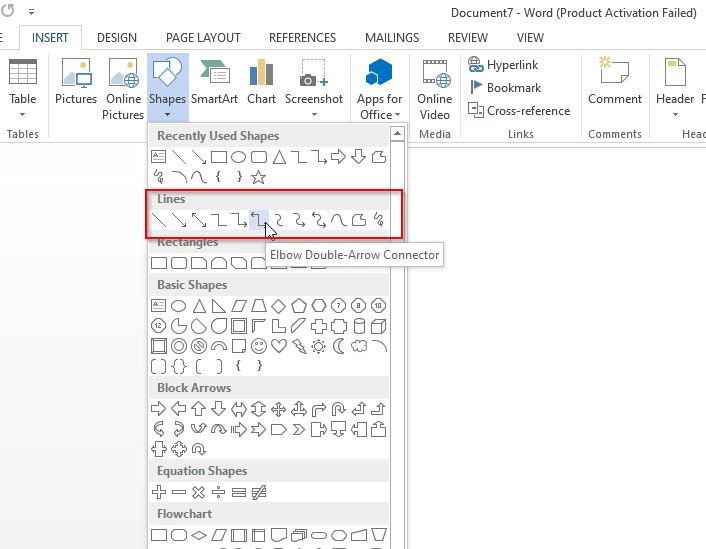
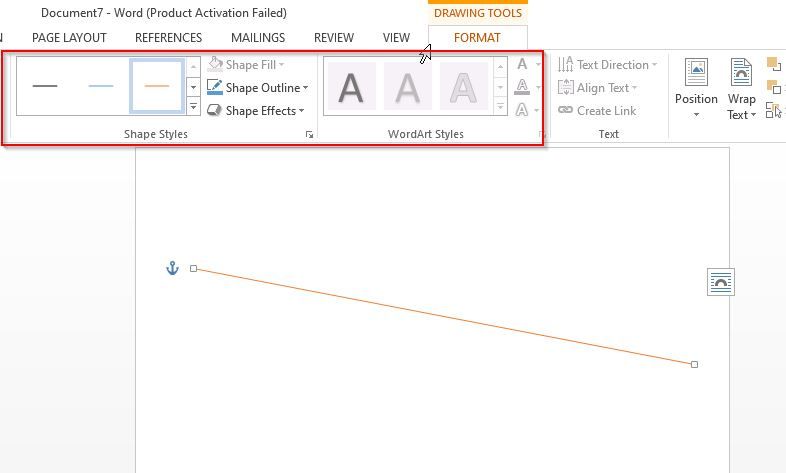
Select a line shape. In the «Lines» heading, click one of the line templates. You can choose a line, line arrow, double line arrow, and more.
-
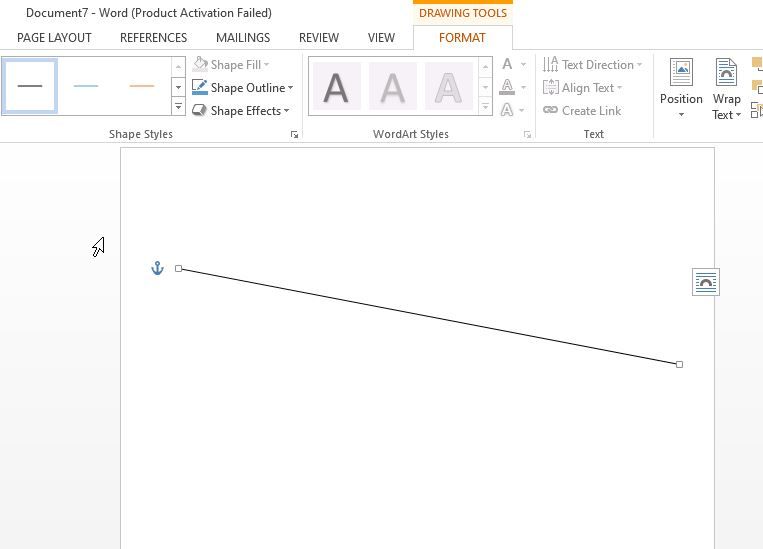
6
Draw your line. Click and drag across the document to create your line.
- If you need to adjust the line’s length and orientation, click the left or right circle. Drag it left or right to adjust the length, or drag it up and down to adjust the orientation.
- To move the line, double-click and drag it to the desired position.


Advertisement
-
1
Open Microsoft Word on your Windows or Mac computer. Click or double-click the Word app icon, which resembles a white «W» on a dark-blue background.
- If you want to draw a line in an existing Word document, double-click the Word document to open it and skip the next step.
-
2
Click Blank document. It’s in the upper-left side of the page.
-
3
Click the Home tab. This tab is in the blue ribbon at the top of the Word window, between File and Insert.
- You may already be on this tab by default.
-
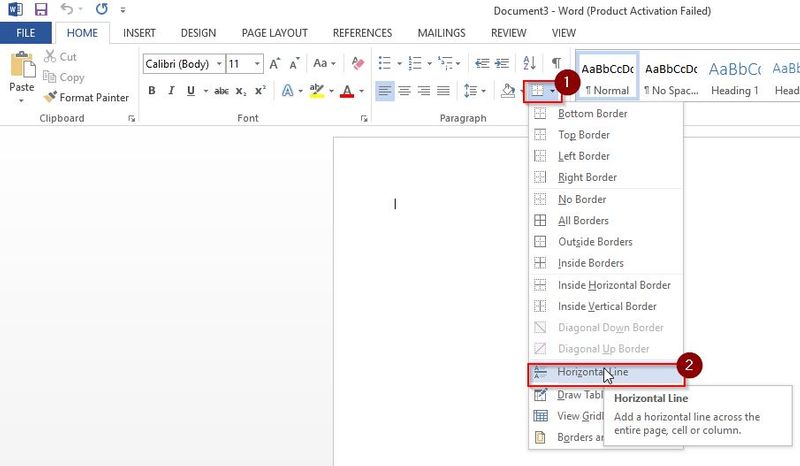
4
Click the «Borders» arrow. This is next to the icon of the dotted square with a solid bottom line.
- A drop-down menu will open.
-
5
Click Horizontal Line. This will be towards the bottom, above Draw Table.
- A horizontal line will be added.
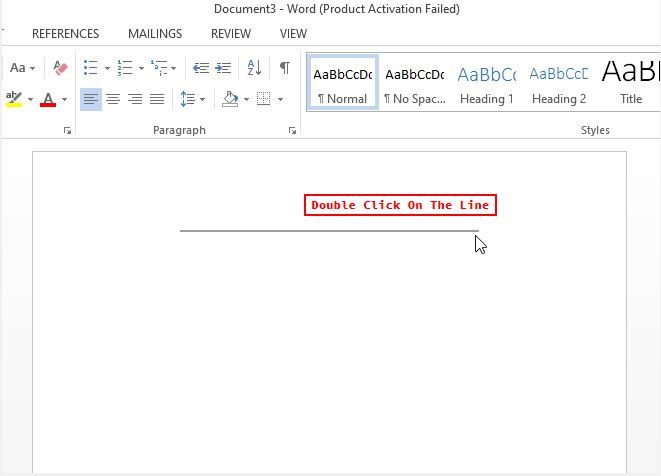
-
6
Format your line. Double-click the line; a dialogue box will appear.
- To change the line thickness, use the up and down arrow below Height. The higher the number, the thicker the line will be.
- To change the color, click the color box underneath Color. Select your desired color.
- Click OK to save and apply your changes.
- To move the line, double-click and drag it to the desired position.


Advertisement
-
1
Open Microsoft Word on your Windows or Mac computer. Click or double-click the Word app icon, which resembles a white «W» on a dark-blue background.[1]
- If you want to draw a line in an existing Word document, double-click the Word document to open it and skip the next step.
-
2
Click Blank document. It’s in the upper-left side of the page.
-
3
Place your cursor where you want your line to appear. You’ll need to be on a blank line, as this won’t work if there is text before or after your cursor on the same line.
- You’ll be creating a horizontal line that spans from one edge of your page to the other. The line will stop at your set margins.
- If you want to make the line span the whole page, you’ll need to change your document margins.
-
4
Type three dashes in a row. Use your dash key on the number row at the top of your keyboard, or on the numeric pad.
-
5
Press ↵ Enter to convert the dashes into a line. AutoCorrect will automatically create a solid line that will situate itself directly beneath the previous line of text.
- Note that the line does not occupy the space of a line of text, but instead exists between lines of text.
- If you do not have AutoCorrect enabled, do so by clicking File → Options → Proofing → AutoCorrect Options…. This will open a new window.
- Make sure the Border Lines box is checked. This can be found underneath Apply as you type.
- If you want to turn off AutoCorrect, uncheck the boxes.
-
6
Use different characters for different line styles. There are a variety of different lines that you can create by using characters other than the dash:[2]
- Thin line: Three hyphens (-).
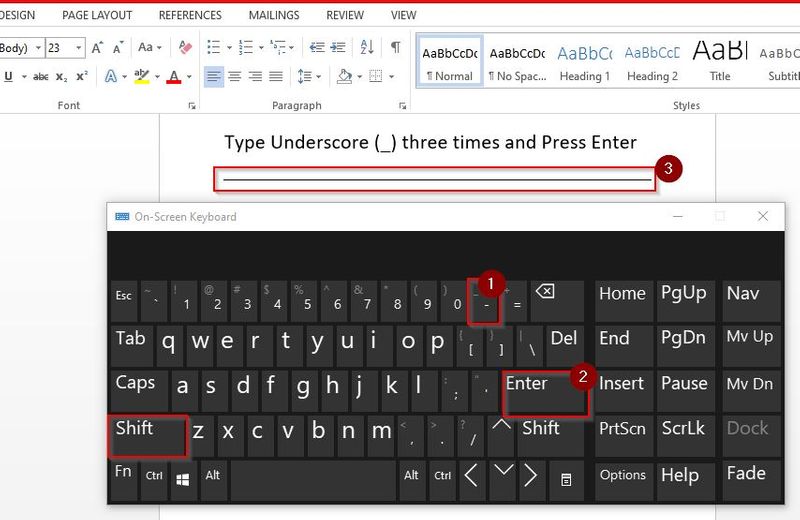
- Thick line: Three underscores (_).
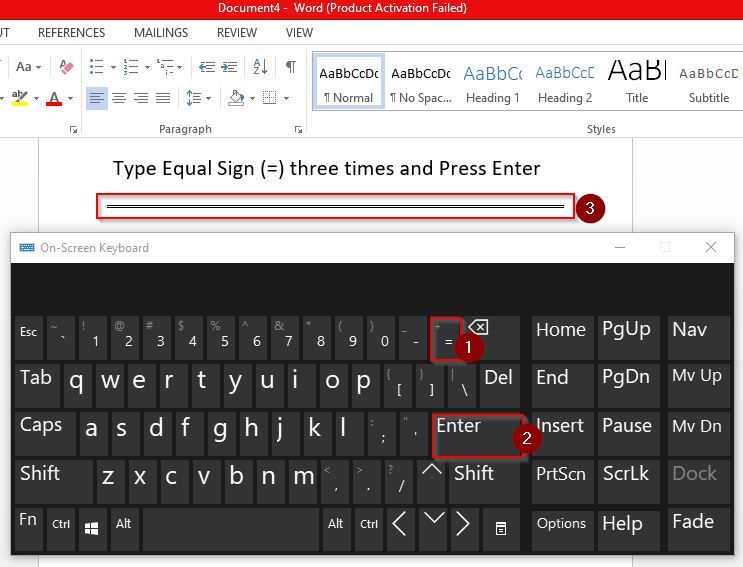
- Double line: Three equal signs (=).
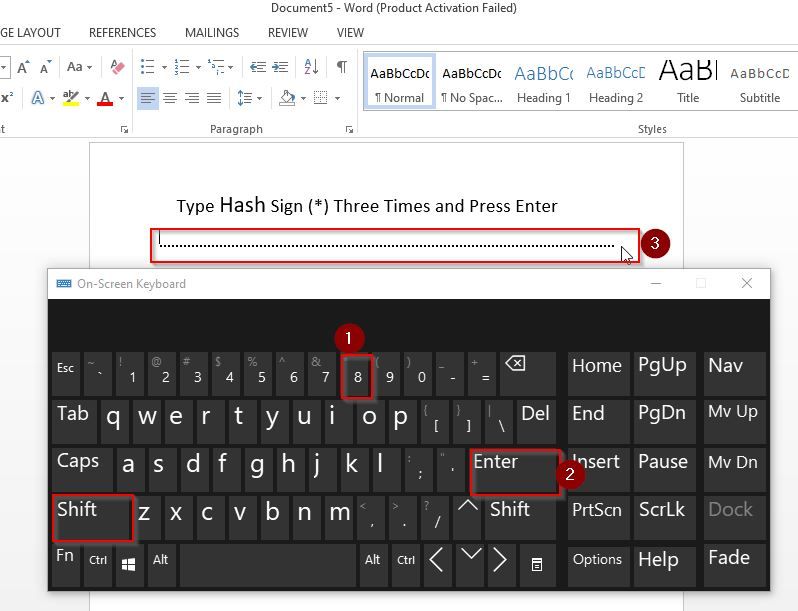
- Dotted line: Three asterisk (*).
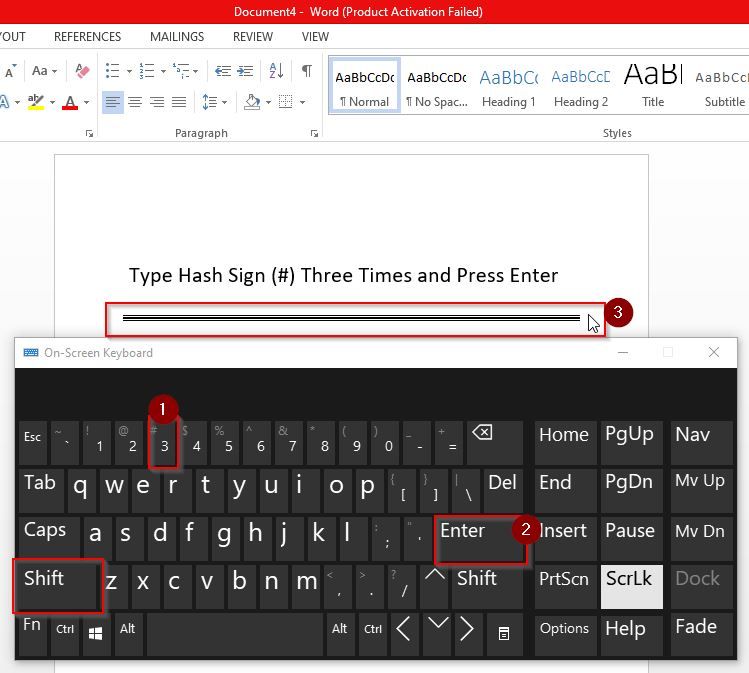
- Triple line: Three pound signs (#).
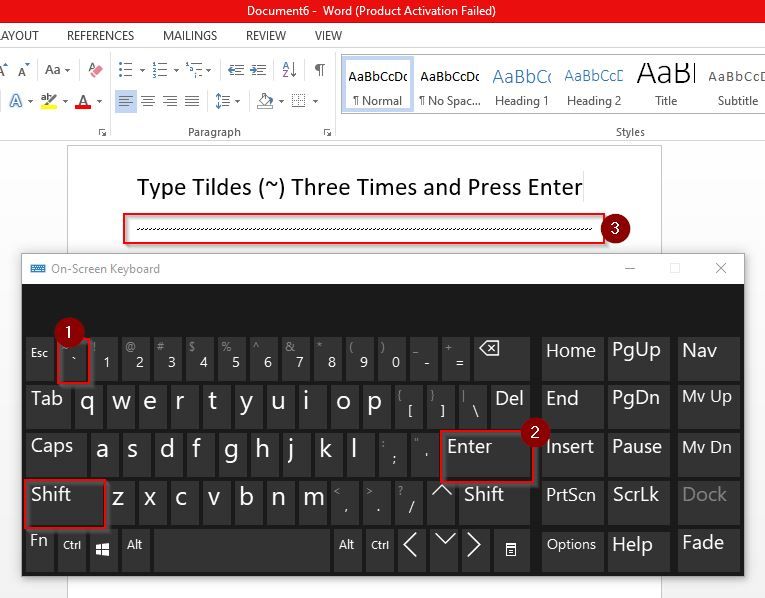
- Squiggly line: Three tildes (~).
-
7
Move the line by entering text above it. You can prompt the line to move down by typing text above it and then pressing Enter.
- Deleting text above the line will prompt it to move upward.


Advertisement
-
1
Open a document in the Microsoft Word app. This looks like a blue notebook next to a W.
- Microsoft Word is available for iOS in the App Store and for Android in the Google Play Store.
- Tap Blank document to open a new document or tap a file to open an existing document.
-
2
Tap ••• . This can be found above the keyboard, to the right.
- If you don’t see your keyboard, tap the document to bring it up.
- A new menu will open.
-
3
Tap Home. This will be to the left of the formatting window.
- A drop-down menu will open.
-
4
Tap Insert. You’ll see a list of all objects you can insert.
-
5
Tap Shapes. This is next to the icon of an overlapping circle and square.
-
6
Select a line shape. In the «Lines» heading, tap one of the line templates. You can choose a line, line arrow, double line arrow, and more.
-
7
Draw your line. Tap and drag across the document to create your line.
- Use two fingers to pinch and zoom out to view the entire document.
- If you need to adjust the line’s length and orientation, tap the left or right circle. Drag it left or right to adjust the length, or drag it up and down to adjust the orientation.
- To move the line, tap and drag it to the desired position.


Advertisement
Add New Question
-
Question
How do I view all available symbols in Microsoft Word?

Click «Insert» and then click «Symbols» and you should be shown a box with all of the symbols in it.
-
Question
How do I add a line on the first page, and no lines on the second?
Click «Insert» and then click «Symbols» and you should be shown a box with all of the symbols in it.
-
Question
How do I change the color of the line?
In the paragraph section, open the drop-down menu on the «Borders» button. At the very bottom is a «Borders and Shading» option. In that option, change the color of the bottom border to your specified color. Click the «Borders» button.
See more answers
Ask a Question
200 characters left
Include your email address to get a message when this question is answered.
Submit
Advertisement
-
Looking for money-saving deals on Microsoft Office products? Check out our coupon site for tons of coupons and promo codes on your next subscription.
Thanks for submitting a tip for review!
Advertisement
About This Article
Article SummaryX
1. Click Insert.
2. Click Shapes.
3. Select a line template.
4. Click and drag across your Microsoft Word document to draw the line.
Did this summary help you?
Thanks to all authors for creating a page that has been read 2,043,531 times.
Is this article up to date?
Если вы хотя бы иногда пользуетесь текстовым редактором MS Word, наверняка знаете о том, что в этой программе можно не только набирать текст, но и выполнять ряд других задач. О многих возможностях этого офисного продукта мы уже писали, при необходимости, вы можете ознакомиться с этим материалом. В этой же статье мы расскажем о том, как в Ворде нарисовать линию или полоску.
Уроки:
Как создать диаграмму в Word
Как сделать таблицу
Как создать схему
Как добавить шрифт
Создаем обычную линию
1. Откройте документ, в котором необходимо нарисовать линию, или создайте новый файл и откройте его.
2. Перейдите ко вкладке “Вставка”, где в группе “Иллюстрации” нажмите кнопку “Фигуры” и выберите подходящую линию из списка.
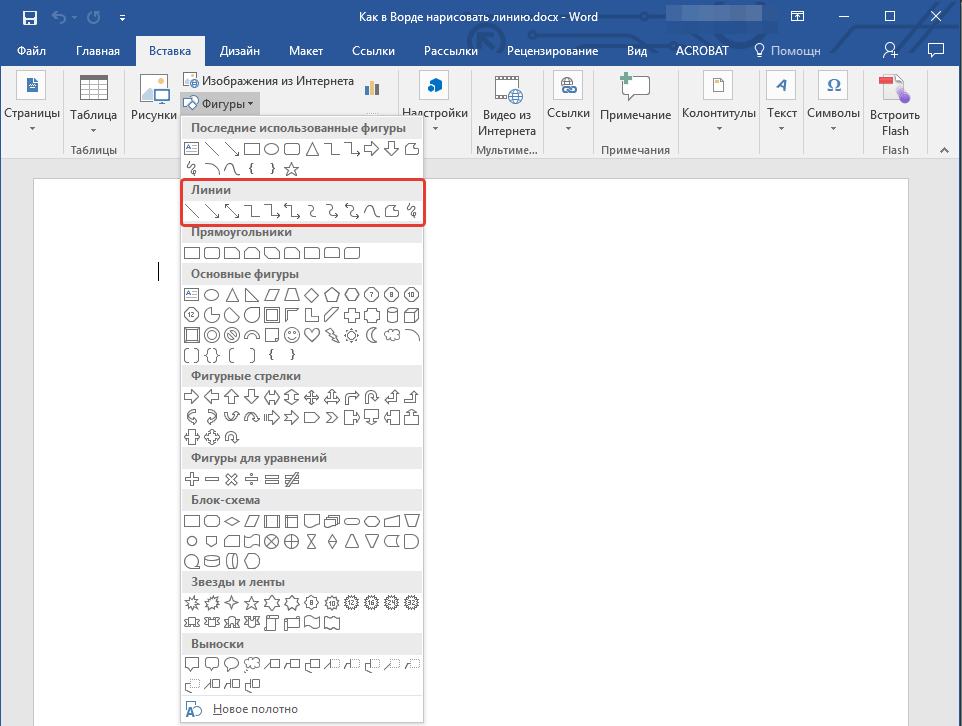
Примечание: В нашем примере используется Ворд 2016, в предыдущих версиях программы во вкладке “Вставка” есть отдельная группа “Фигуры”.
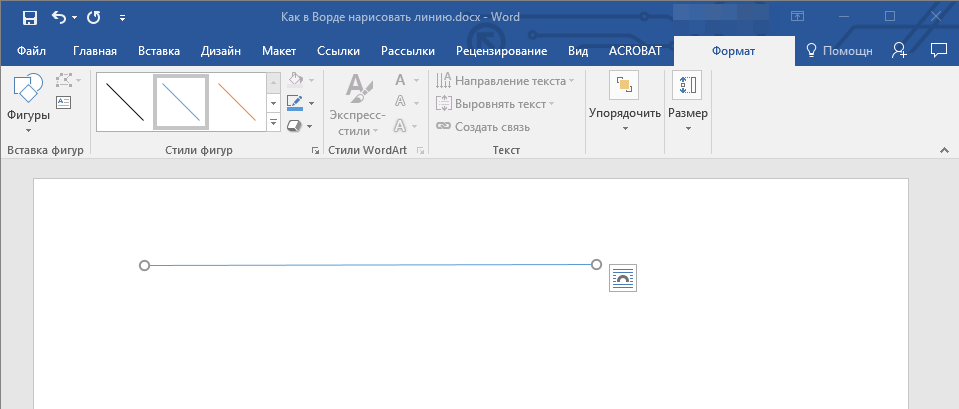
3. Нарисуйте линию, нажав левую кнопку мышки в ее начале и отпустив в конце.
4. Линия заданной вами длины и направления будет нарисована. После этого в документе MS Word появится режим работы с фигурами, о возможностях которого читайте ниже.
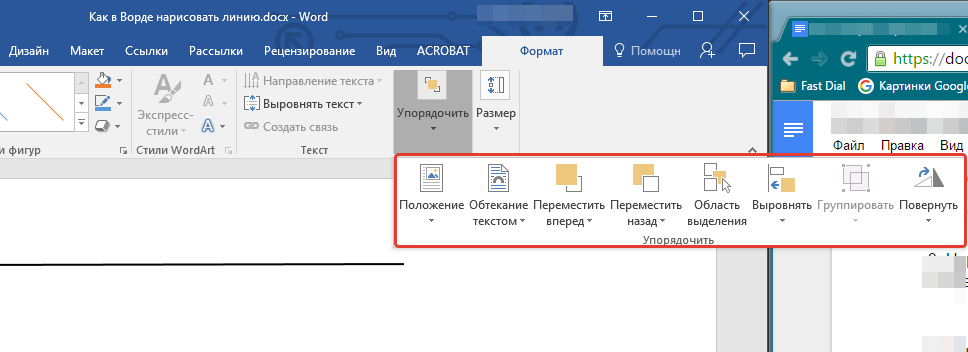
Рекомендации по созданию и изменению линий
После того, как вы нарисуете линию, в Ворде появится вкладка “Формат”, в которой вы сможете изменить и отредактировать добавленную фигуру.
Чтобы изменить внешний вид лини, разверните меню пункта “Стили фигур” и выберите тот, который вам нравится.
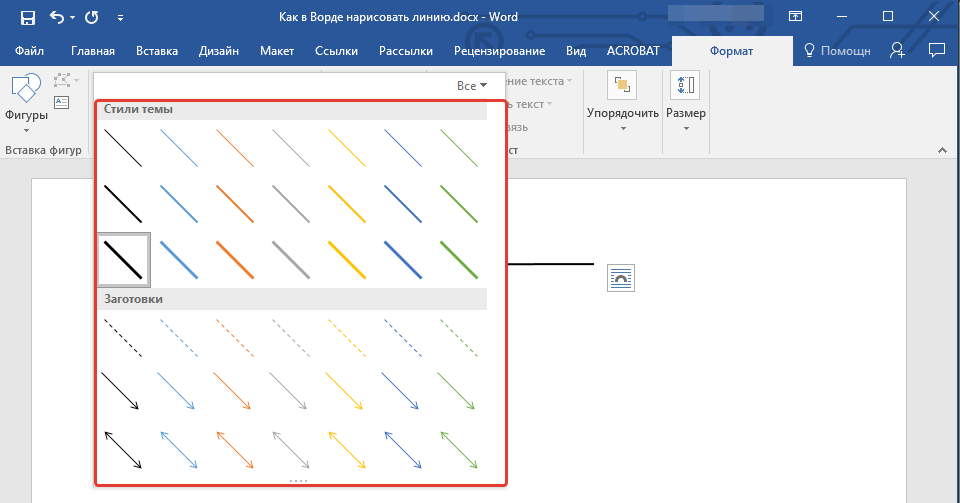

Чтобы сделать пунктирную линию в Word, разверните меню кнопки “Стили фигур”, предварительно кликнув на фигуру, и выберите необходимый тип линии (“Штрих”) в разделе “Заготовки”.
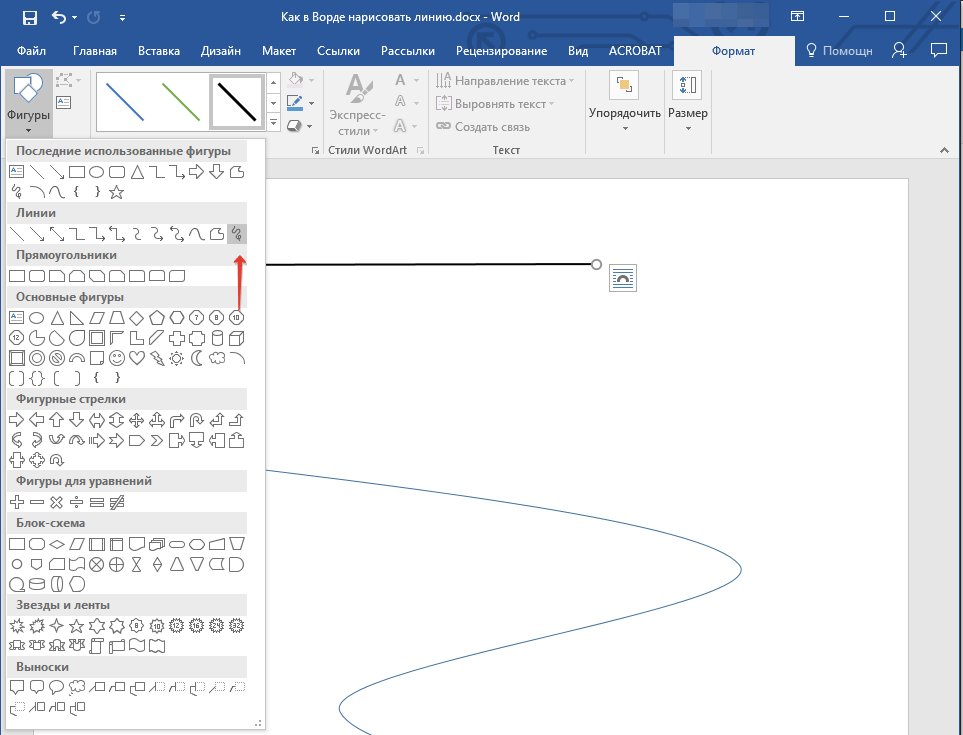
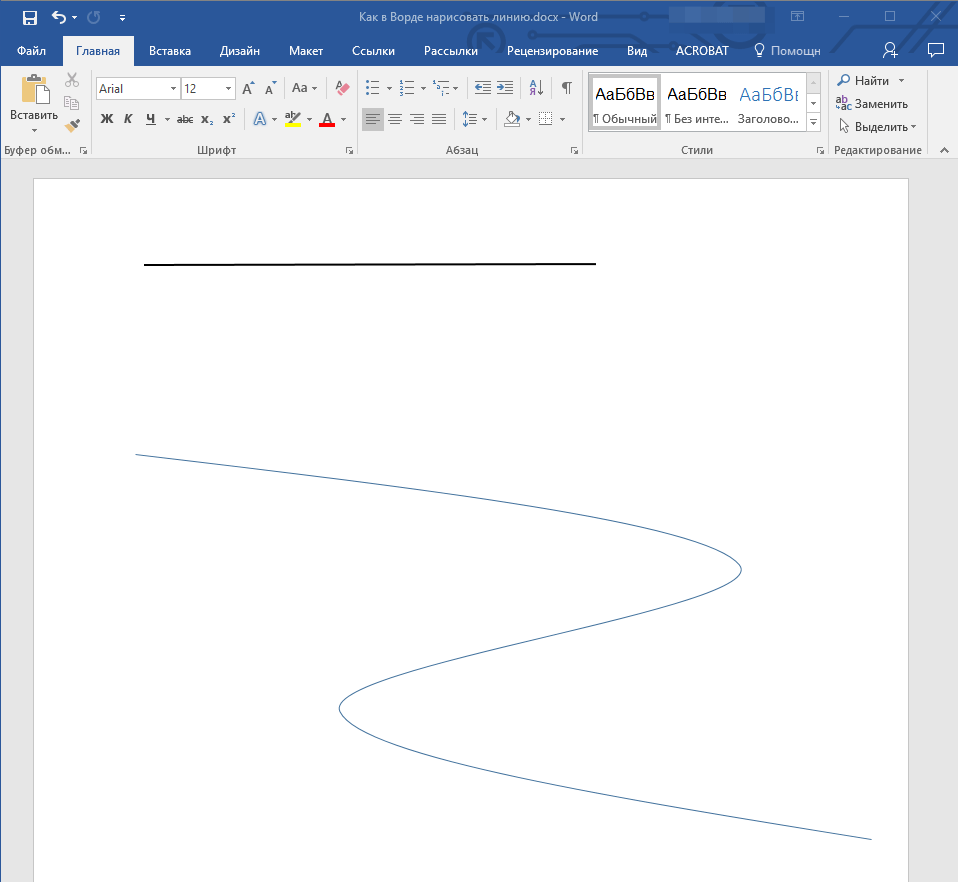
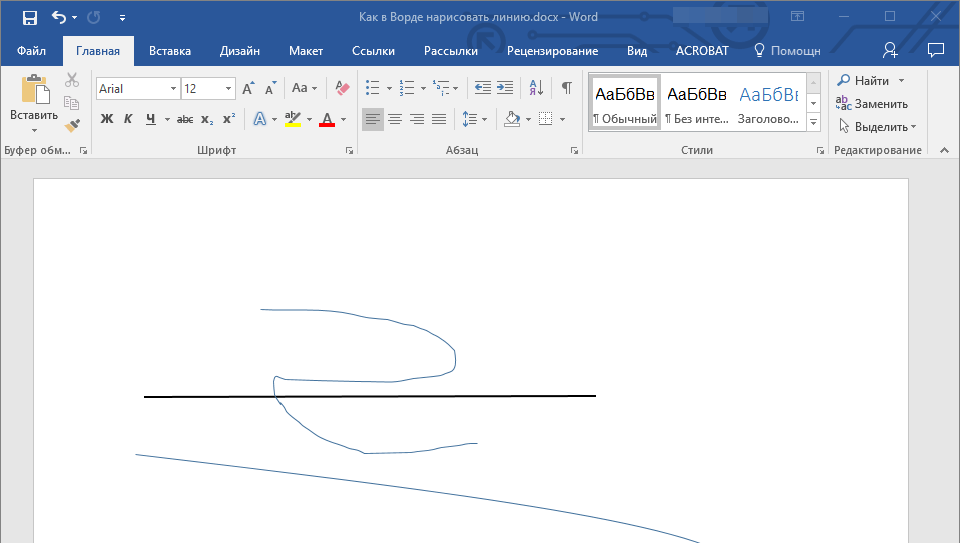
Чтобы нарисовать не прямую, а кривую линию, выберите соответствующий тип линии в разделе “Фигуры”. Кликните один раз левой кнопкой мышки и потяните ее, чтобы задать один изгиб, кликните второй раз для следующего, повторите это действие для каждого из изгибов, а затем дважды кликните левой кнопкой мышки, чтобы выйти из режима рисования линии.
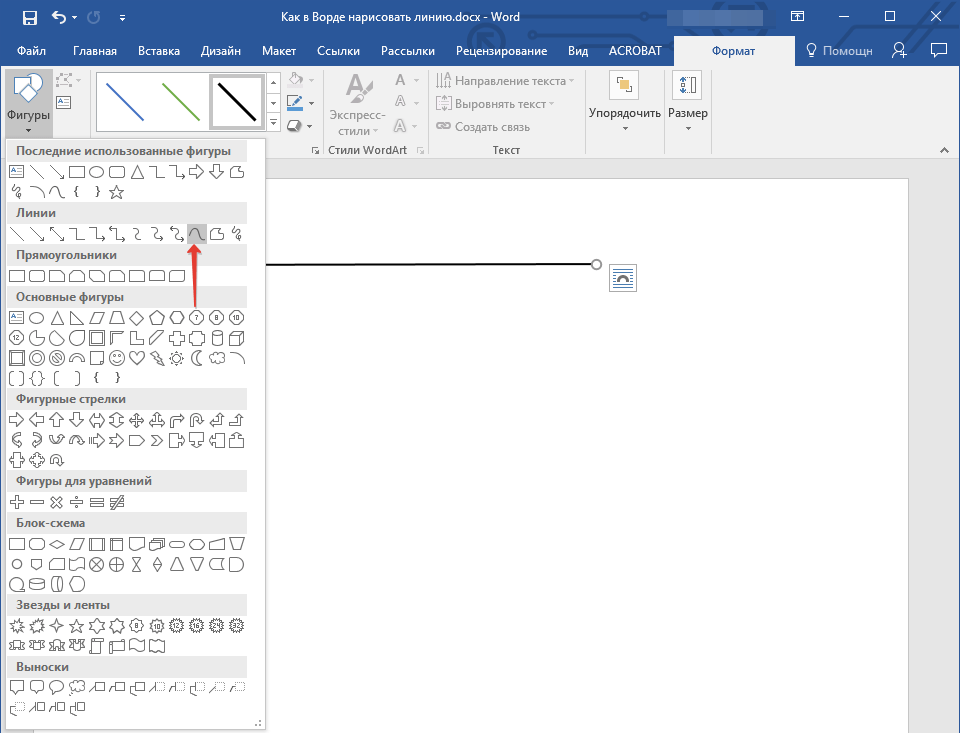
Чтобы нарисовать линию свободной формы, в разделе “Фигуры” выберите “Полилиния: рисованная кривая”.
Чтобы изменить размер поля нарисованной линии, выделите ее и нажмите на кнопку “Размер”. Задайте необходимые параметры ширины и высоты поля.
-
Совет: Изменить размер области, которую занимает линия можно и с помощью мышки. Кликните по одному из кружков, обрамляющих ее, и потяните в нужную строну. Если это необходимо, повторите действие и с другой стороны фигуры.
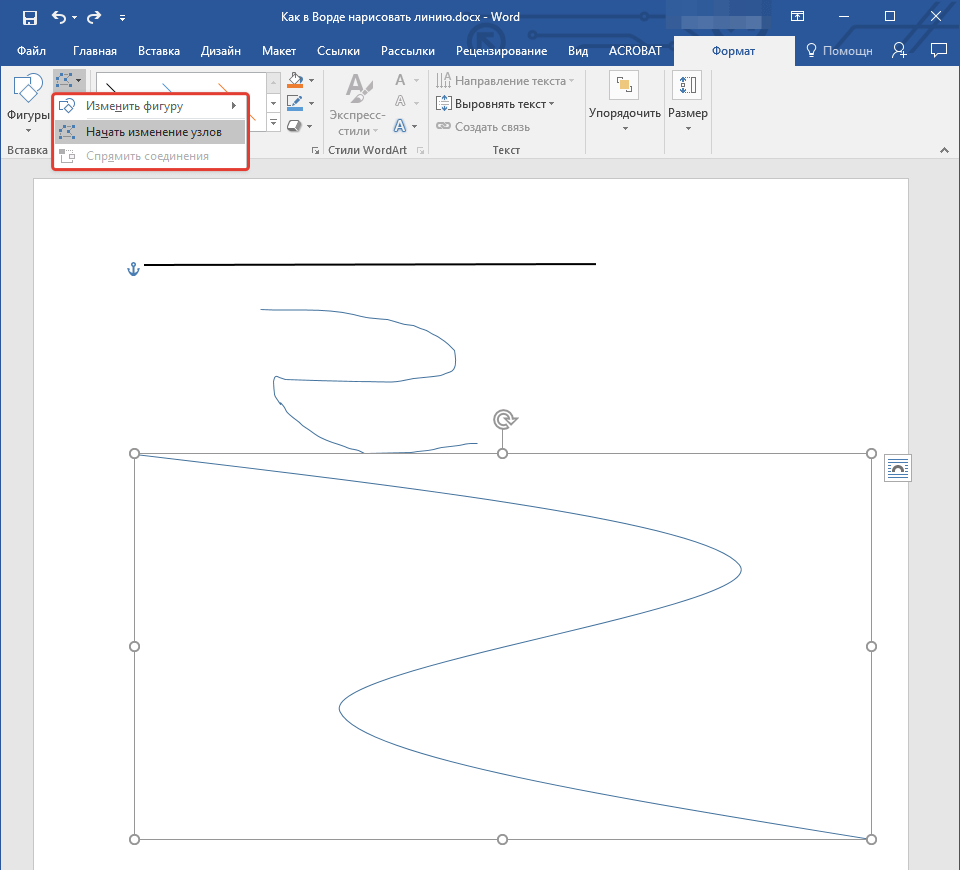
Для фигур с узлами (например, кривая линия) доступен инструмент их изменения.
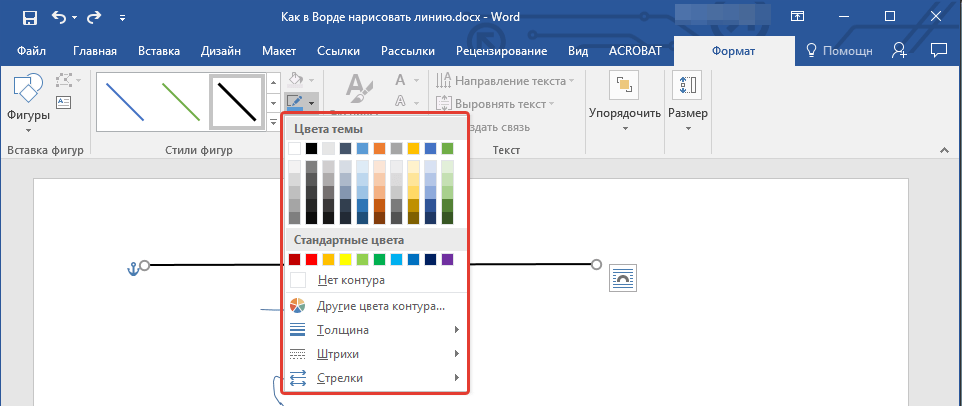
Чтобы изменить цвет фигуры, нажмите на кнопку “Контур фигуры”, расположенную в группе “Стили”, и выберите подходящий цвет.
Чтобы переместить линию, просто кликните по ней, чтобы отобразилась область фигуры, и переместите ее в желаемое место документа.
На этом все, из этой статьи вы узнали, как нарисовать (провести) линию в Ворде. Теперь вы знаете немного больше о возможностях этой программы. Желаем вам успехов в ее дальнейшем освоении.
Еще статьи по данной теме:
Помогла ли Вам статья?
465
465 people found this article helpful
Use these three methods to quickly insert a line in your document
Updated on December 4, 2020
What to Know
- AutoFormat: Type the three characters for the desired line style > Enter.
- Horizontal Line tool: In Home tab, select Borders drop-down menu > Horizontal Line.
- Shapes menu: Go to Insert > Shapes. In Lines group, select and drag a line shape across the page.
This article covers three ways to insert horizontal lines in Word for Microsoft 365, Word 2019, Word 2016, Word 2013, and Word 2010.
Use AutoFormat to Insert a Line in Word
You can quickly insert a line into a Word document with the AutoFormat feature. To create a line, place the cursor in the location that you’d like to insert it, type the three characters for the desired line style, then press Enter.
To create the different types of lines, press the associated keys on the keyboard:
- Plain single line: Three hyphens (—)
- Plain double line: Three equal signs (===)
- Broken or dotted line: Three asterisks (***)
- Bold single line: Three underline symbols (___)
- Wavy line: Three tildes (~~~)
- Triple line with a thick center: Three number signs (###)
Here’s what each of these line types looks like in Word:
Use the Horizontal Line Tool to Insert a Line in Word
To insert a line into a Word document using the built-in Horizontal Line tool:
-
Place the cursor where you want to insert a line.
-
Go to the Home tab.
By default, the Home tab is selected when you open a new or existing Word document.
-
In the Paragraph group, select the Borders drop-down arrow and choose Horizontal Line.
-
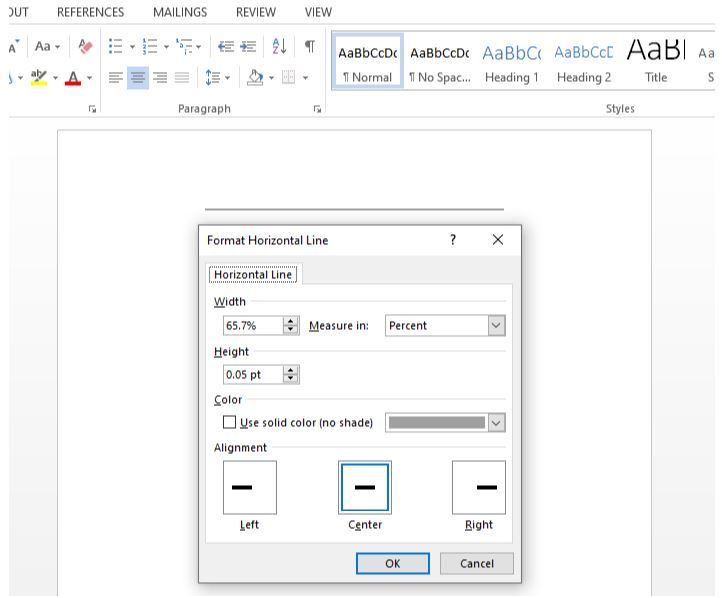
To change the look of the line, double-click the line in the document.
-
In the Format Horizontal Line dialog box, modify the width, height, color, and alignment of the line.
Use the Shapes Menu to Insert a Line in Word
A third way to add a line to a Word document is to draw it on the page. The Shapes menu contains several line options, including lines with arrow points on one or both ends. After you draw the line, customize the color and appearance.
-
Place the cursor in the spot where you want to insert a line.
-
Go to the Insert tab.
-
In the Illustrations group, select the Shapes drop-down arrow.
-
In the Lines group, choose a line shape.
-
In the Word document, drag across the location where you want the line to appear.
-
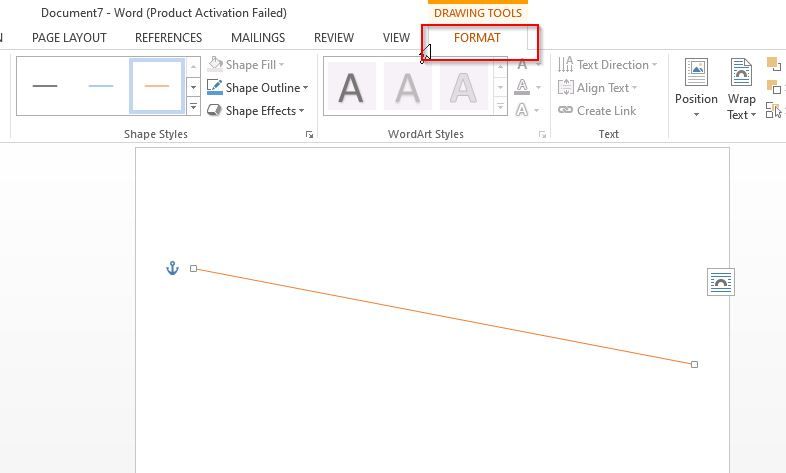
To change the look of the line, select the line to enable the Shape Format tab. (Some versions of Word call this Format.)
-
Go to the Shape Format tab and change the color, use a different line style, or apply effects.
FAQ
-
How do I change line spacing in Word?
To fix spacing in Word, highlight the text whose spacing you want to change and select the Home tab. Next to Paragraph, select the down arrow to expand the options. In the Spacing section, set the amount of space before and after line breaks or choose a preset line-spacing option.
-
How do I add a signature line in Word?
To insert a signature line in Word, go to the Insert tab and select Signature Line. Selecting few or no options leaves a blank line, and a signature line will appear in the document.
-
How do I add line numbers in Word?
To add line numbers in Word, go to Layout > Page Setup > Line Numbers and choose Continuous, Restart Each Page or Restart Each Section > Line Numbering Options.
Thanks for letting us know!
Get the Latest Tech News Delivered Every Day
Subscribe
Горизонтальная линия в Ворде — элемент дизайна, который служит для оформления текста или разделения документа на части. Добавление этого элемента в документ улучшает восприятие и удобство при чтении содержимого файла Word.
Вставка линий в Word помогает отформатировать документ, придать ему необходимый вид. Горизонтальная линия Word может сделать текст более легким для чтения, наличие линий делает документ более привлекательным.
Содержание:
- Как вставить горизонтальную линию в Ворде с помощью клавиатуры (1 способ)
- Как провести горизонтальную линию в Ворде с помощью добавления границы (2 способ)
- Как нарисовать горизонтальную линию в Ворде с помощью «Фигуры» (3 способ)
- Как в Ворде прочертить горизонтальную линию с помощью таблицы (4 способ)
- Как добавить горизонтальную линию в Ворде подчеркиванием (5 способ)
- Выводы статьи
- Как добавить горизонтальную линию в Word (видео)
Применение этого элемента дизайна в Microsoft Word поможет вашей работе выглядеть четко и профессионально как для личного, так и для корпоративного использования.
Из этого руководства вы узнаете, как сделать горизонтальную линию в Ворде, с помощью различных инструментов в текстовом редакторе Microsoft Word. Мы предложим вам три классических метода решения задачи и два нестандартных варианта. Инструкции этой статьи подходят для версий программы Microsoft Word: Word для Microsoft 365, Word 2021, Word 2019, Word 2016, Word 2013, Word 2010 и Word 2007.
Как вставить горизонтальную линию в Ворде с помощью клавиатуры (1 способ)
В этом методе мы используем функцию автоформата, чтобы разместить линию между строками текста, а не непосредственно в текстовой строке. Функция автоформата работает, когда до или после того места, где вы хотите поместить линию, нет текста.
Пройдите несколько шагов, чтобы вставить горизонтальную линию Word с помощью сочетаний клавиш клавиатуры:
- Откройте документ Word, а затем щелкните курсором мыши по тому месту документа, куда необходимо вставить горизонтальную линию.
- Введите три или более символов подряд для нужного стиля линии.
- Нажмите на клавишу «Enter» на клавиатуре.
Это действие превращает набранные символы в сплошную линию, которая доходит до края страницы под последней строкой текста.
Вы можете создавать различные стили для линий, вводя три или более определенных последовательных символа в строке. Ознакомьтесь со списком символов, которые вы можете ввести для создания линий, оформленных в разных стилях:
- Дефисы (—) образуют обычную простую линию.
- Знаки равенства (===) создают простую двойную линию.
- Звездочки (***) образуют пунктирную строку.
- Подчеркивание (___) создает одну жирную строку.
- Тильды (~~~) создают волнистую линию.
- Цифровые знаки с решеткой (###) образуют тройную линию с толстым центром.

Как провести горизонтальную линию в Ворде с помощью добавления границы (2 способ)
Сейчас мы расскажем, как добавить горизонтальную линию в Word без использования параметров автоформата или автозамены. Мы используем встроенный инструмент «Границы» из настроек оформления абзаца, расположенный на ленте приложения.
Выполните следующие действия:
- В окне открытого документа Word поместите курсор в то место документа, куда вы хотите вставить линию.
- Во вкладке «Главная» войдите в группу «Абзац», а затем щелкните по стрелке около кнопки «Границы».
- В раскрывающемся меню выберите пункт «Горизонтальная линия».

- Это действие помещает линию в указанное место на странице документа MS Word.

- Дважды щелкните левой кнопкой мыши по линии, чтобы отредактировать внешний вид этого элемента оформления документа.
- Откроется диалоговое окно «Формат горизонтальной линии», в котором можно изменить ширину, высоту, цвет и выравнивание линии.

- Нажмите на кнопку «ОК», чтобы применить эти настройки для оформления вида созданной горизонтальной линии.
Как нарисовать горизонтальную линию в Ворде с помощью «Фигуры» (3 способ)
Сейчас вы узнаете о третьем методе, с помощью которого можно нарисовать линию на странице документа Word. Меню «Фигуры» содержит несколько параметров линий, в том числе линии со стрелками на одном или обоих концах.
После того, как вы нарисуете линию, настройте цвет и внешний вид этого элемента. Линию можно нарисовать не по ширине листа, а произвольной длины.
Вам нужно пройти шаги, которые помогут вам вставить линию с помощью функции «Фигуры»:
- Откройте документ Word, перейдите во вкладку «Вставка».
- В группе «Иллюстрации» щелкните по значку «Фигуры».
- В открывшемся меню выберите форму линии в опции «Линии».

- Нарисуйте линию в любом месте документа, используя выбранный шаблон линии.
Чтобы нарисовать строго горизонтальную линию, сразу после выбора вида фигуры, нажмите и удерживайте клавишу «Shift», а затем проведите линию в нужном месте на странице документа.
- Во вкладке «Формат фигуры» (в некоторых версиях Word — Формат) измените внешний вид линии, цвет, примените другие эффекты.

Как в Ворде прочертить горизонтальную линию с помощью таблицы (4 способ)
Это не самый удобный нестандартный способ вставки линии в документ Word, но им также можно воспользоваться.
Выполните следующее:
- На странице документа Word установите в нужном месте указатель мыши.
- Откройте вкладку «Вставка».
- Щелкните по кнопке «Таблица» в группе «Таблица».
- В выпадающем меню выберите одну ячейку из предложенного макета таблицы.

- Во вкладке «Конструктор таблиц» щелкните по стрелке значка «Границы» в группе «Обрамление».
- В открывшемся меню поочередно снимите выделение с пунктов «Левая граница», «Правая граница», а также с одного из двух пунктов: «Верхняя граница» или «Нижняя граница», в зависимости от того, верхнюю или нижнюю линию вы хотите оставить на странице.

Рассмотрим еще один необычный способ создания горизонтальной линии в документе Word. Это не совсем правильный метод, но и этим вариантом можно воспользоваться, если вам будет удобно.
Проделайте следующие действия:
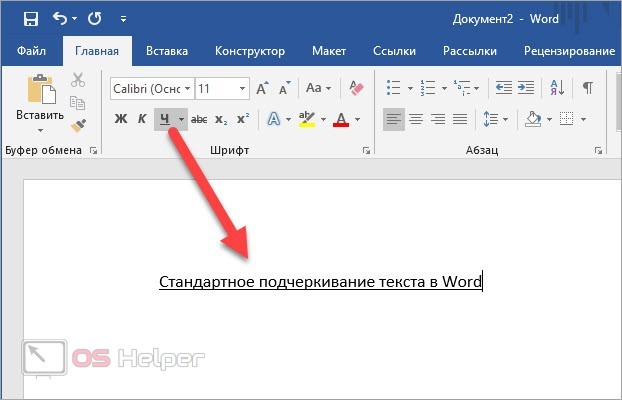
- Установите курсор мыши в нужном месте на открытой странице документа Word.
- В группе «Шрифт» нажмите на значок «Подчеркнутый».

Если вы хотите изменить обычный прямой вид подчеркивания по умолчанию, нажмите на стрелку у кнопки «Подчеркнутый», и выберите другой подходящий вариант.

- Нажимайте на клавишу «Space» (Пробел) до того места, где по вашему мнению должна заканчиваться горизонтальная линия.
- В самом конце напечатайте точку.
- В результате у нас появилась горизонтальная линия в документе Word.

- Выделите точку, а затем измените цвет точки на белый, который соответствует фону страницы Word, для скрытия этого символа.
Если необходимо измените цвет линии, сделайте следующее:
- Выделите линию на странице документа Microsoft Word.
- Войдите в группу «Шрифт».
- В опции «Цвета темы» выберите подходящий цвет из предложенных или воспользуйтесь палитрой с другими цветами.

Выводы статьи
Во время редактирования документа некоторые пользователи не знают, как начертить горизонтальную линию в Ворде. Этот элемент оформления придает документу привлекательность и удобство. Вы можете добавить горизонтальную линию в Word несколькими способами: при помощи клавиатуры, из настроек границ оформления абзаца, нарисовать с помощью функции фигуры, создать линию из таблицы или использовать метод подчеркивания.
Как добавить горизонтальную линию в Word (видео)
Похожие публикации:
- Как сделать вертикальный текст в Word — 5 способов
- Как написать дробь в Ворде
- Голосовой набор текста в Word — 3 способа
- Как перевернуть текст в Word — 5 способов
- Как сделать нумерацию страниц в Word
Как нарисовать линию в Word
Не редко при оформлении текстовых документов возникает необходимость нарисовать линию, например, для того чтобы отделить одну часть текста от другой. В текстовом редакторе Microsoft Word существует сразу несколько возможностей для решения такой задачи.
В этой статье мы рассмотрим три наиболее простых способа нарисовать линию в Word. Материал будет актуален для всех современных версий Word. Включая Word 2007, 2010, 2013 и 2016.
Способ № 1. Вставка знака тире или подчеркивания.
Пожалуй, самый простой способ нарисовать линию в Ворде это воспользоваться знаком тире или знаком подчеркивание. Подряд вставив большое количество таких знаков, вы получите горизонтальную линию. Например, для того чтобы нарисовать линию с помощью знака тире, просто зажмите клавишу CTRL и не отпуская ее нажмите клавишу «минус» на дополнительном блоке клавиатуры. Дальше удерживайте эту комбинацию клавиш, пока не получите линию нужной вам длины.

Аналогичным способом можно нарисовать линию с помощью знака подчеркивание. Для этого нужно зажать клавишу SHIFT и клавишу со знаком подчеркивания. Дальше нужно удерживать эти клавиши пока не будет нарисована линия нужной вам длины.

Данный способ создания линий удобен тем, что такую линию легко нарисовать и легко удалить. Если линия окажется не нужна, то ее можно удалить точно также, как и любой другой текст.
Способ № 2. Вставка готовой линии.
Другой способ нарисовать линию в Ворде, это воспользоваться кнопкой для создания границ. Данная кнопка находится на вкладке «Главная» и она позволяет быстро нарисовать линию в любом месте текста. Все, что нужно сделать, это установить курсор в том месте, где должна быть линия, нажать на кнопку и выбрать «Горизонтальная линия». В результате в выбранном месте страницы будет нарисована горизонтальная линия.

Преимуществом данного способа является то, что нарисованную таким образом линию можно изменить. Линию можно сделать более толстой, тонкой, длинной или короткой. Для этого линию нужно выделить мышкой, после чего ее размер можно регулировать, перемещая ее углы. Для того чтобы удалить такую линию ее нужно просто выделить и нажать на клавишу Delete.
Способ № 3. Вставка фигуры.
На вкладке «Вставка» есть кнопка «Фигуры», с помощью которой в документ можно вставлять различные фигуры. Среди прочего здесь есть фигура в виде линии. Для того чтобы вставить ее в документ нажмите на кнопку «Фигуры», выберите линию и нарисуйте в документе линию нужной вам длины.

Плюсом данного способа является то, что такую линию можно размещать под любым углом. Для того чтобы удалить такую линию нужно просто выделить ее мышкой и нажать клавишу Delete.
Посмотрите также:
- Как перевернуть страницу в Word
- Как построить график в Excel
- Как сделать альбомную страницу в Word
- Как сделать вертикальный текст в Word
- Как закрепить область в Экселе
Автор
Александр Степушин
Создатель сайта comp-security.net, автор более 2000 статей о ремонте компьютеров, работе с программами, настройке операционных систем.
Остались вопросы?
Задайте вопрос в комментариях под статьей или на странице
«Задать вопрос»
и вы обязательно получите ответ.
Insert Lines in Microsoft Word Documents
by Avantix Learning Team | Updated October 9, 2021
Applies to: Microsoft® Word® 2010, 2013, 2016, 2019 and 365 (Windows)
You can insert a line in Word using the Ribbon or by using keyboard shortcuts. It’s best to avoid drawing lines and instead insert border lines in Microsoft Word (normally paragraph borders) so the line or lines will move as you edit the document.
In this article, we’ll focus on inserting lines using borders attached to paragraphs. In Microsoft Word, anything with a hard return after it is a paragraph. If you use border lines, you can customize the type of border, line thickness and color. You can also include paragraph border lines in styles so they will appear throughout your document. If you draw lines using Insert Shapes, you’ll have to worry about the line being inline or floating.
You can insert a line in Word in 3 ways using borders:
- Use the Borders command on the Home tab in the Ribbon
- Select and apply different types of lines using the Borders and Shading dialog box
- Insert different types of lines using keyboard shortcuts (which add lines using AutoCorrect)
Recommended article: How to Keep Text Together in Microsoft Word
Do you want to learn more about Microsoft Word? Check out our virtual classroom or live classroom Word courses >
Inserting a line using the Borders button
To insert a line in Word above and / or below a paragraph using the Borders button:
- Select the paragraph(s) to which you want to add a line.
- Click the Home tab in the Ribbon.
- Click Borders in the Paragraph group. A drop-down menu appears.
- Select the line you want to use.
Below is the Borders command in the Ribbon in Word:
![]()
Removing lines using the Borders command
To remove a border line or lines from one or more paragraphs:
- Select the paragraph(s) with the border lines you want to remove.
- Click the Home tab in the Ribbon and then click Borders. A drop-down menu appears.
- Choose No Border from the drop-down menu.
Inserting a line using the Borders and Shading dialog box
You can apply a line or custom border lines to one or more paragraphs using the Borders and Shading dialog box.
To insert a line in Word above and / or below a paragraph using the Borders and Shading dialog box:
- Select the paragraph(s) to which you want to add a line.
- Click the Home tab in the Ribbon.
- Click Borders in the Paragraph group. A drop-down menu appears.
- Select Borders and Shading. A dialog box appears.
- Select a border style, color and width.
- Click between the guides in the sample area on the right (above or below the sample).
- Click Options (if required), enter any offset amounts to control the distance between the line and the paragraph and click OK.
- In Apply to, ensure Paragraph is selected.
- Click OK.
Below is the Borders and Shading dialog box where you can add a line or lines to paragraphs:

Removing lines using the Borders and Shading dialog box
To remove lines from one or more paragraphs using the Borders and Shading dialog box:
- Select the paragraph(s) with the lines you want to remove.
- Click the Home tab in the Ribbon and click Borders. A drop-down menu appears.
- Select Borders and Shading. A dialog box appears.
- Click None in the Setting area.
- In Apply to, ensure Paragraph is selected.
- Click OK.
Inserting a line using keyboard shortcuts
You can also insert a horizontal line using keyboard shortcuts (which insert border lines as AutoCorrect entries).
Type the following characters and then press Enter or Return to insert lines:
- To insert a plain single line, type three hyphens (—).
- To insert a plain double line, type three equal signs (===).
- To insert a dotted line, type three asterisks (***).
- To insert a bold single line, type three underlines (___).
- To insert a wavy line, type three tildes (~~~).
- To insert a triple line, type three number signs or hash tags (###).
To remove these lines, select the paragraph with the line, click the Borders button on the Home tab and select No Border.
Subscribe to get more articles like this one
Did you find this article helpful? If you would like to receive new articles, join our email list.
More resources
How to Double Space in Word (4 Ways)
14 Shortcuts to Quickly Select Text in Microsoft Word
4 Ways to Insert or Type the Pound Symbol in Word (£)
How to Create a Hanging Indent or First Line Indent in Microsoft Word
How to Insert an Em or En Dash in Microsoft Word (4 Ways with Shortcuts)
Related courses
Microsoft Word: Intermediate / Advanced
Microsoft Excel: Intermediate / Advanced
Microsoft PowerPoint: Intermediate / Advanced
Microsoft Word: Long Documents Master Class
Microsoft Word: Styles, Templates and Tables of Contents
Microsoft Word: Designing Dynamic Word Documents Using Fields
VIEW MORE COURSES >
Our instructor-led courses are delivered in virtual classroom format or at our downtown Toronto location at 18 King Street East, Suite 1400, Toronto, Ontario, Canada (some in-person classroom courses may also be delivered at an alternate downtown Toronto location). Contact us at info@avantixlearning.ca if you’d like to arrange custom instructor-led virtual classroom or onsite training on a date that’s convenient for you.
Copyright 2023 Avantix® Learning
Microsoft, the Microsoft logo, Microsoft Office and related Microsoft applications and logos are registered trademarks of Microsoft Corporation in Canada, US and other countries. All other trademarks are the property of the registered owners.
Avantix Learning |18 King Street East, Suite 1400, Toronto, Ontario, Canada M5C 1C4 | Contact us at info@avantixlearning.ca
If you want to add a horizontal line inside a Word document, you can do it by using the formatting tools. But inserting a vertical line is a little trickier. You have to insert the line as a shape. Word lets you tweak the line’s color, shape, style, angle, thickness and alignment. You can also add visual effects such as 3-D styles, outlines and shadows.
In this tutorial, you will learn the different ways to draw a line inside a Word document.
Method 1: Using Shapes Menu
The very basic method to draw a line inside a Word document is to draw it. You can do this by using the Shapes menu. This menu has several options such as lines with arrow points on one or both the ends. You can also customize the appearance and color of the line after drawing it.
Please follow the steps below:
- Open Ms Word, Double-click a Word document that you want to edit, or double-click the Word App Icon and click Blank document to open a new document.
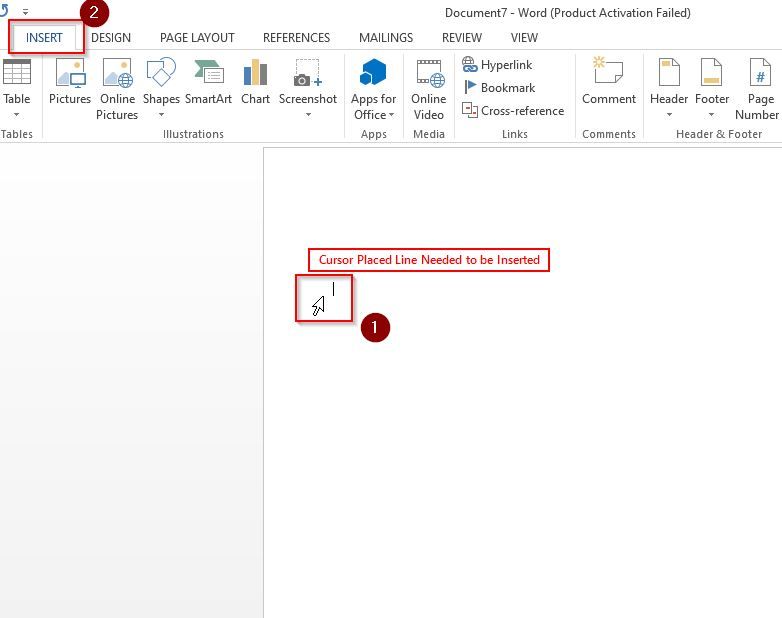
- Now place the cursor where you want to insert a line and click Insert
- Click on Shapes drop-down arrow available in In the Illustrations group.
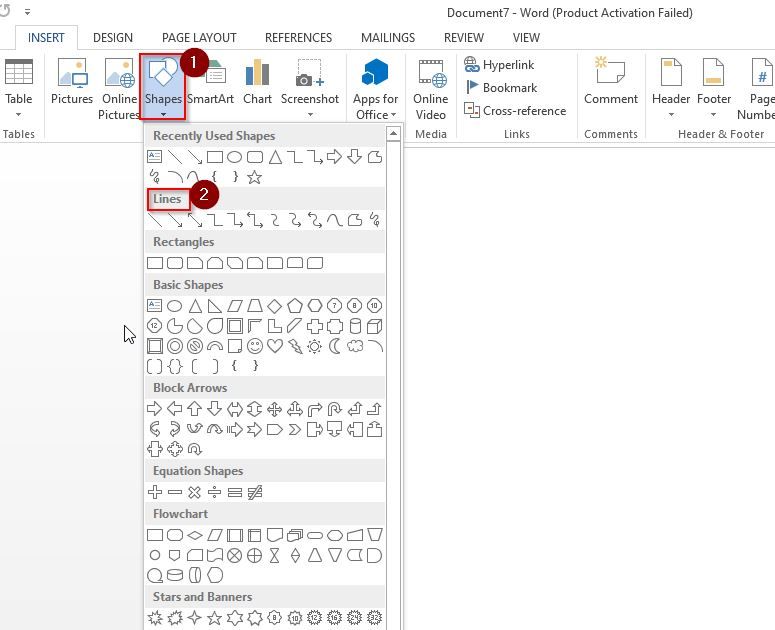
- Next,choose the shape of the line from the line group
- Inside the document, click on the shape and drag across the area where you wish the line to be placed.
Creating Vertical Line
- Put your cursor where you want the line to begin. Then, drag it to the area where you want the line to end.
Note: If you press the Shift key and drag the mouse while drawing the line, you can easily get an absolute horizontal or vertical orientation.
Change Style of Line
- You can change the style of the line, for that select the line and then click Format tab (Shape Format for some versions).
- In this Format tab you change the color, style or apply effects to the line.
Method 2: Using the Horizontal Line Tool
Another easy way to insert a line in the Word document is by using the Horizontal Line Tool present already. Let us see how you can use it.
Please follow the steps below in order to insert a line Horizontal Line Tool:
- Place the cursor in the word document where you want to draw a line and click Home Tab
Note: When you open a New Word document or an existing one, the Home tab is selected by default.
- Now go to Paragraph group and click on the Border drop-down and select Horizontal Line.
- A Horizontal Line will be inserted to your word document.
Change Style of the Line
In order to change the style (look) of the horizontal line, double click on the line
A Format Horizontal Line dialog box will appear where you can change the width, height, color and alignment of the line.
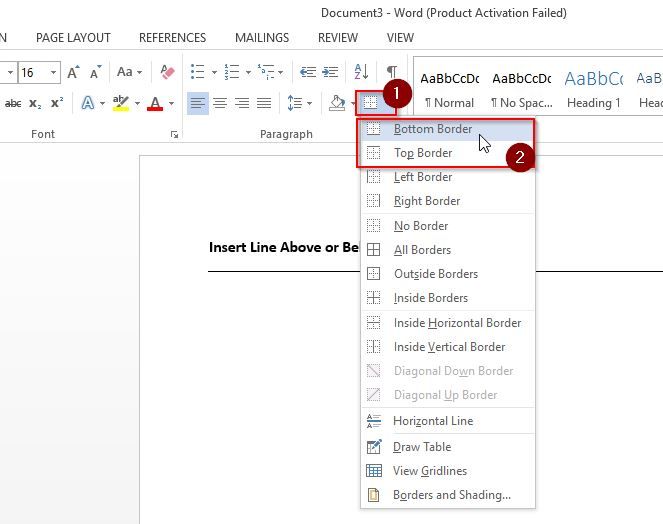
Method 3: Insert Line Above or Below Heading
Lines are commonly used in Word to decorate a heading or a subheading. It decorates the text and makes it eye-cathy, and also helps to divide the document into sections.
Please follow the steps below
- First place the cursor on the heading (where you want to add line) and click on Home Tab.
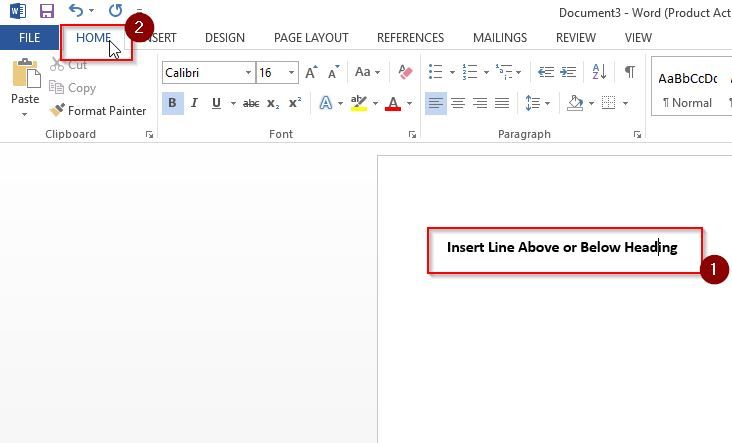
- Now go to Paragraph group and click on the Border drop-down and select Bottom Border to add line below Heading or Top Border to add line above Heading.
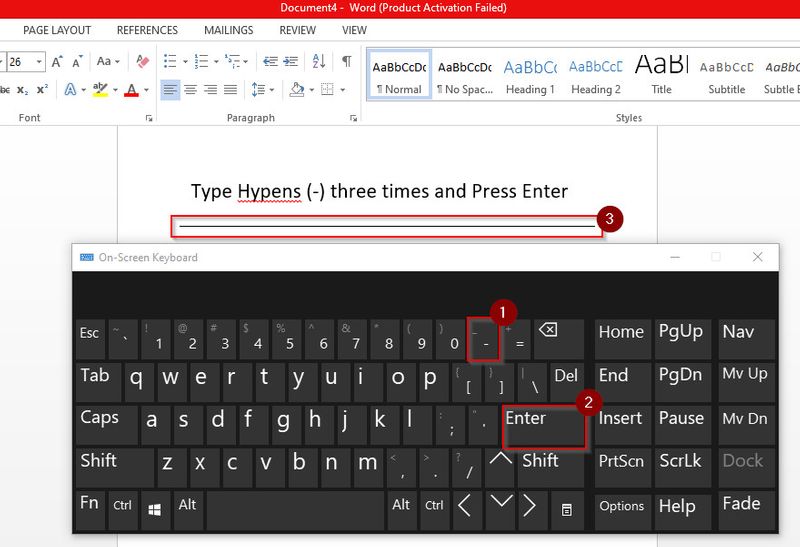
Method 4: Create Lines Using Keyboard
Another easy way to create a line in Word is to press the hyphen key 3 times and hit the Enter key. This will automatically create a straight line. You can also replace the hyphen key with an underscore or the equals symbol. This will give you thicker lines and doubles lines respectively. Hash signs can be used to drawing triple lines with thick centers.
You can use the Asterisk symbol to create a dotted line or use tildes to draw some wavy lines.
Using Hyphens (—)
- Just type three hyphens and press Enter on your Keyboard.
Using Underscore (___)
- Just type three underscore and press Enter on your Keyboard for thicker line.
Note: Press Shift + Hyphen to type Underscore
Using EqualTo Sign (===)
- Just type three EqualTo sign and press Enter on your Keyboard for double line.
Using Hash Sign (###)
- Just type three hash signs and press Enter to create triple line with a thick center
Using Asterisk Sign (***)
- Just type three asterisk Sign and press Enter to create a broken or dotted line.
Using Tildes (~)
- Just type three tildes and press Enter to create a wavy line
Conclusion
All of the methods described above are simple and easy to insert your desired lines in a Word document. Modification of the styles, colors and alignments is also easy with Word’s in-built line formatting tools. So, go ahead and play around with these methods a bit until you find the one that suits you the best.
На чтение 4 мин Просмотров 41.3к. Опубликовано 20.08.2019
![]() Microsoft Word является самым функциональным и вариативным текстовым редактором. Одну и ту же задачу можно решить разными способами за счет большого набора инструментов. Сегодня мы поговорим о том, как в Ворде сделать линию, на которой можно писать текст. Инструкция подходит для версий Word 2003-2016. Отличия заключаются лишь в незначительных изменениях интерфейса и меню.
Microsoft Word является самым функциональным и вариативным текстовым редактором. Одну и ту же задачу можно решить разными способами за счет большого набора инструментов. Сегодня мы поговорим о том, как в Ворде сделать линию, на которой можно писать текст. Инструкция подходит для версий Word 2003-2016. Отличия заключаются лишь в незначительных изменениях интерфейса и меню.
Содержание
- Подчеркивание строки
- Применение подчеркивания к знакам табуляции
- Нижняя граница таблицы
- Инструмент «Фигуры»
- Видеоинструкция
- Заключение
Подчеркивание строки
Начнем с самого очевидного варианта – это обычное подчеркивание текста. Вы можете сделать линию под словами как во время ввода текста, так и добавить ее к готовому документу. В первом случае нужно просто нажать на соответствующий знак на панели инструментов и начать ввод букв:
Во втором случае сначала выделите весь текст, а затем примените подчеркивание к нему. Есть еще один вариант применения данной функции. Он используется при составлении документов, обращений, заявлений и так далее. Например, вам нужно сделать шаблон для дальнейшего заполнения разными данными:
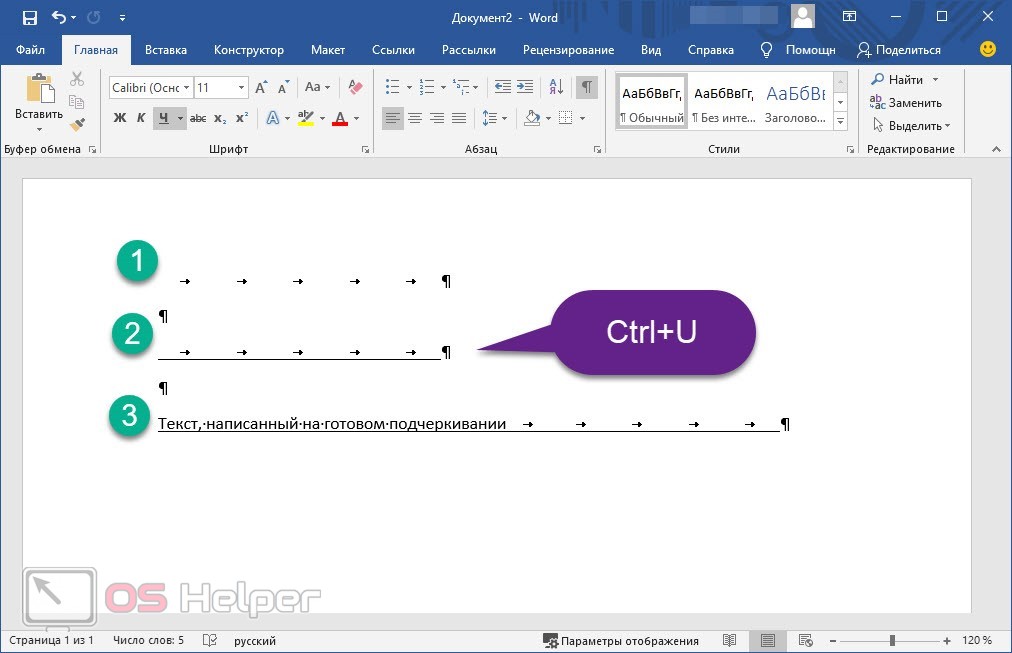
- Поставьте курсор для печати после названия строки, где должна начинаться линия.
- Включите функцию подчеркивания, как в предыдущем способе.
- Нажмите клавишу [knopka]Tab[/knopka] несколько раз, пока не получите строку нужной длины.
- Поставьте курсор в начало строки и наберите текст. Также вы можете не заполнять строки в Word, а оставить их пустыми, если в дальнейшем данные будут вписывать от руки на бумаге.

Обратите внимание на то, что при вводе слов подчеркивание может смещаться в сторону. Вам нужно удалить лишние куски с помощью клавиши [knopka]Delete[/knopka].
Клавишей [knopka]Tab[/knopka] вы создаете сразу большие отрезки. Чтобы увеличить линию на несколько пробелов, поставьте курсор в конце строки и воспользуйтесь комбинацией [knopka]Ctrl[/knopka]+[knopka]Shift[/knopka]+[knopka]Пробел[/knopka].
Применение подчеркивания к знакам табуляции
Сделать строку для написания текста сверху можно и через отображение всех знаков. Для этого сначала нажмите на соответствующий инструмент на верхней панели. В структуре документа появятся дополнительные символы. С помощью [knopka]Tab[/knopka] сделайте несколько отступов слева. Вместо пустоты вы увидите знак табуляции – стрелка, направленная вправо. Выделите эти знаки и примените к ним подчеркивание кнопок на панели инструментов.
Мнение эксперта
Василий
Руководитель проекта, эксперт по модерированию комментариев.
Задать вопрос
Также подчеркивание можно добавить с помощью комбинации клавиш [knopka]Ctrl[/knopka]+[knopka]U[/knopka].
Нижняя граница таблицы
Один из самых распространенных способов – это создание и редактирование таблицы. Обычно применяется в том случае, когда необходимо сделать несколько параллельных линий с одинаковыми интервалами. Ненужные границы просто обесцвечиваются, в результате чего остаются аккуратные линии, на которых можно писать текст. Разберем процедуру подробнее:
- Во вкладке «Вставка» откройте меню «Таблицы».
- Выберите нужное количество строк и столбцов. Если элементов много, вы можете ввести значение вручную через «Вставить таблицу».
- Выделите всю таблицу и откройте окно с параметрами «Границы и заливка».
- С помощью схемы уберите лишние грани таблицы. Оставьте только отмеченные на скриншоте.
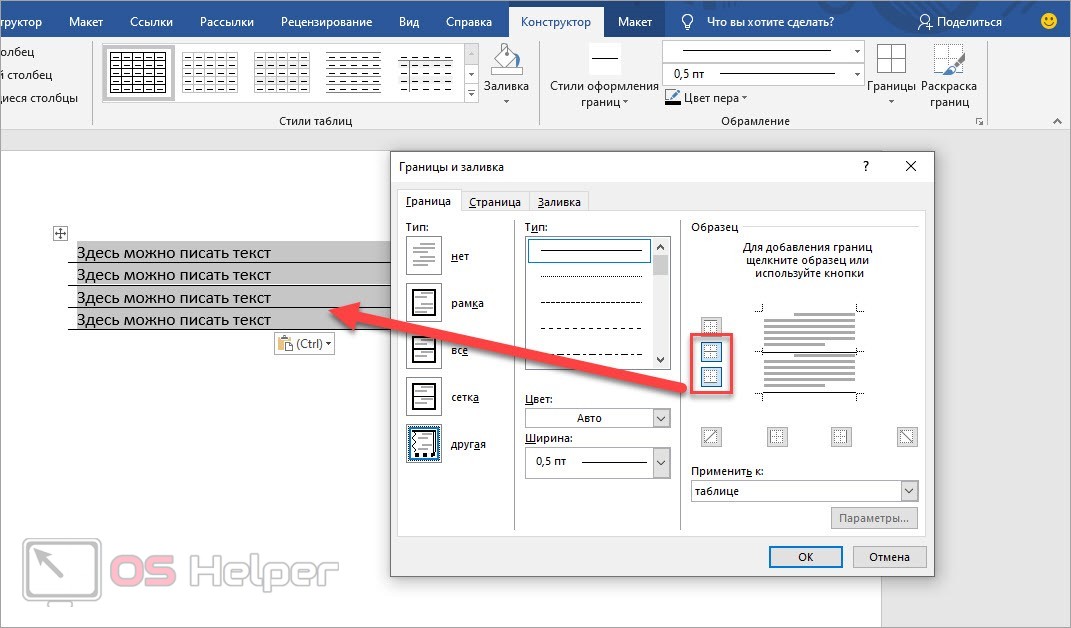
Инструмент «Фигуры»
Еще один простой метод позволяет вручную провести линию там, где она нужна. Инструментом «Фигуры» можно добавить подчеркивание как для уже напечатанного текста, так и создать шаблон для дальнейшего заполнения. Воспользоваться им можно так:
- Перейдите во вкладку «Вставка».
- В разделе «Фигуры» выберите прямую линию.
- Поставьте курсор в начало строки и зажмите ЛКМ. Проведите линию в сторону. Чтобы она была прямая, выполняйте операцию с нажатой клавишей [knopka]Shift[/knopka].

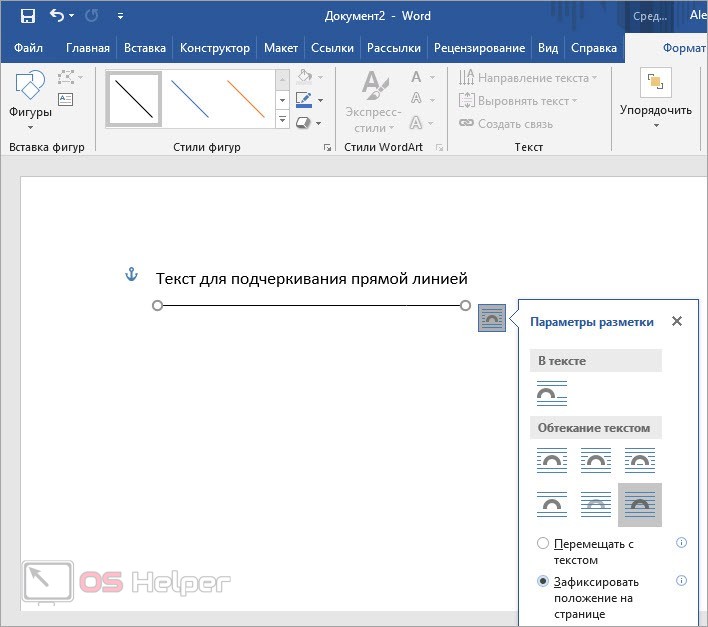
Чтобы линия оставалась статичной, через параметры зафиксируйте ее положение на листе. Также вы можете выбрать и другие модели поведения элемента, которые будут применяться при наборе текста.
Чтобы поменять цвет, выделите линию и откройте вкладку «Формат». Переключитесь к одному из готовых стилей фигур. В большинстве ситуаций подойдет черный цвет.
Видеоинструкция
Наглядное пошаговое руководство по всем способам создания линий в Word вы найдете в представленном ролике.
Заключение
Как видите, редактор предлагает множество вариантов подчеркивания и создания линий для дальнейшего заполнения печатным текстом или от руки. Задавайте свои вопросы в комментариях, если возникнут какие-либо трудности при работе с Word!
Using lines in a Microsoft Word document is crucial in organizing the document. A horizontal or vertical line can divide a document in Microsoft Word and direct the text’s flow. To transform a plain line into something more eye-catching, insert a line in Word and format it differently. It is that easy. But if you are unfamiliar with all the options, this article will guide you on how to create lines in Microsoft Office Word.
There are six ways in which you can insert vertical and horizontal lines in a Word document:
- Create a Line Using Shapes in Word
- Use the Border Option to Create Vertical and Horizontal Lines
- Create Horizontal Lines From the Ribbon
- Use a Bar Tab to Insert a Vertical Line
- Insert a Graphic for Creative Lines in Word
- Add a Vertical Line and Separate Text Into Columns
1] Create a Line Using Shapes in Word
The Shapes menu in a Word document offers numerous line options. The ability to draw these line shapes at various angles makes a significant difference. The color and appearance of the line can then be changed after it has been drawn, allowing you to add horizontal or vertical lines even in the middle of a Word document. Here is how you add a line through the Shapes menu:
- Place the cursor in the desired location to add a line.
- Navigate to the Insert tab of the Word document and click on the Shapes menu in the Illustrations group.
- Locate the Lines group and choose the line you desire to insert in the Word document.

- A plus sign will appear on the document page, and you can click and drag the cursor and create vertical or horizontal lines in the document.
- To change how the line looks, keep it selected and go to the Format tab on the Ribbon.
- You can also change the color, choose a different line style, or add effects by navigating to the Shape Styles group in the Format tab.

- For more options to change the appearance of the line you created, select the line, right-click on it, and choose the Format Shape option from the context menu.

2] Use the Border Option to Create Vertical and Horizontal Lines
You can also insert a top or bottom border that resembles a horizontal line in the document using the Borders option in the Paragraph group in the Word document. This is how you do it:
- Click on the area of the paragraph where you want the line to appear.
- Navigate to the Home tab, Paragraph group. Next, click on the Borders button.
- The default Bottom border will appear. It means the line will appear right below the selected text on the page. If you have not selected any text, the line will appear below the paragraph in the document.

- You can access a range of options by clicking the tiny dropdown arrow on the Borders button for options such as a vertical border.

- Click on the Borders and Shading option from the Borders drop-down menu to modify the border’s style, color, and width.


3] Create Horizontal Lines From the Ribbon
Here is a quick way to add a horizontal line to your document from the ribbon:
- Put the cursor where you wish the line to appear.
- Click on the Home tab and click on the little arrow next to the Borders button in the Paragraph group.
- Click on the Horizontal line option from the Borders drop-down menu.

- By double-clicking the horizontal line, you can change how it looks. You can change the line’s width, height, color, and alignment using the Format Horizontal Line pop-up window.

- To adjust the length or width of a line, double-click the line to select it, and then drag any of the resizing points.

- You can delete the horizontal line by selecting it and pressing the Delete button on your keyboard.
4] Use a Bar Tab to Insert a Vertical Line
In Word, tab stops are used to align paragraphs and lines. On the other hand, the bar tab does not create a tab. Instead, a vertical line is inserted, dividing your paragraph into columns. Here is how you use a bar tab to insert a vertical line:
- Choose the paragraph where the vertical line should be inserted.
- Click on the Home tab. To access the Paragraph group’s settings, click on the little arrow next to the Paragraph group. In the Paragraph pop-up window, click on the Tabs button at the bottom of the pop-up window.

- Enter the position of the vertical line you want to place in the Tab stop position box. To determine what value to enter, use the ruler at the top of the screen. For example, here, I have used the value -0.2 so that it would show up just before the first paragraph.
- In the Alignment section, click on the Bar radio button, click Set, and then OK.

5] Insert a Graphic for Creative Lines in Word
In this method, you can create horizontal and vertical lines using images. To avoid having a stretched or compressed image seem backward on paper or the screen, use them carefully and avoid overusing them in your documents.
A graphic can serve as both a horizontal and vertical straight line. Here is how:
- Go to the Insert tab and click on the Picture button from the Illustrations group.
- Choose the line graphic you wish to insert from your PC.
- You can use the anchor points surrounding the image to compress and stretch the images to resemble a straight line. You can flip the graphic for a vertical line using the rotation handle.
- These graphic lines can be used as separators or as a part of your document’s header or footer. You can also format the graphic using the Picture Border, Picture Effects, and Picture Layout options on the Picture Tools- Format toolbar.

6] Add a Vertical Line and Separate Text Into Columns
Column-based text arrangement is a basic design pattern. For instance, you can paste a vertical line between text blocks to divide them into different columns. Here is how you add a vertical line and separate text into columns:
- Select the paragraph you wish to separate into columns.
- Click on the Layout tab and the Column option in the Page Setup group. Choose the number of columns you wish to insert from the drop-down menu.

- The chosen columns are added to the selected text. Next, click on any of the columns, navigate to Layout > Columns, and click on the More Columns option from the drop-down menu.

- In the Columns dialog box, click on the checkbox next to the Line between the box and click OK. A vertical line is inserted to separate the text into columns.

Remember that the Columns pop-up window allows you to adjust the number of columns and the distance between them.
Conclusion
Horizontal lines are easier to see and are the more commonly used lines in a Word document. But, strategically placing vertical lines in your material can improve its aesthetic appeal. Lines are more than just adornment; when used subtly, they can draw your attention to the essential part of a page. Next time, when you finish creating a formal report using Microsoft Word, consider lines and use the strategies mentioned in the article.