
На чтение 3 мин Опубликовано 19.10.2015
По умолчанию в Word отключено автоматическое создание резервных копий документов, но эту функцию не сложно включить. Правда есть одна маленькая неприятность, файлы резервных копий имеют расширение .wbk. Как же открыть такой файл, если нужно получить доступ к его содержимому?
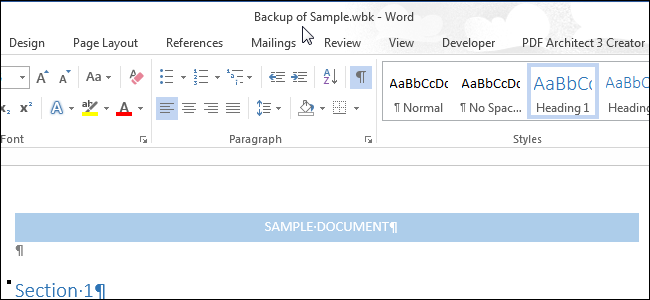
Файл резервной копии Word открывается предельно просто. Когда Вы запускаете Word, не открывая документ, в левой части окна отображается список недавно открытых документов, а в правой части – шаблоны, которые Вы можете использовать для создания документов.

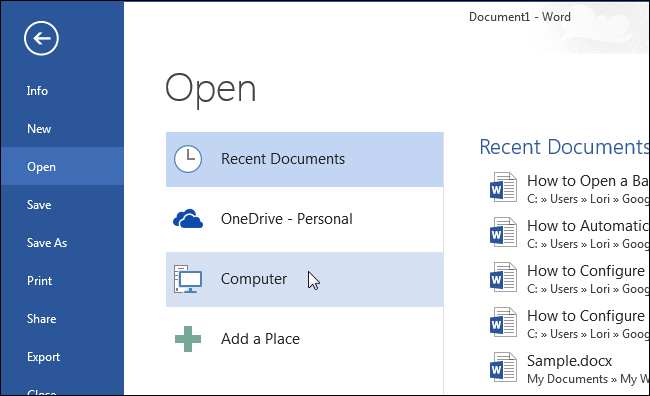
Под списком Последние (Recent) нажмите Открыть другие документы (Open Other Documents).
Замечание: Если в данный момент у Вас открыт пустой или созданный ранее документ, нажмите Ctrl+O или кликните Файл > Открыть (File > Open).

В окне Открыть (Open) выберите место, где хранится нужный файл резервной копии, например, Компьютер (Computer).
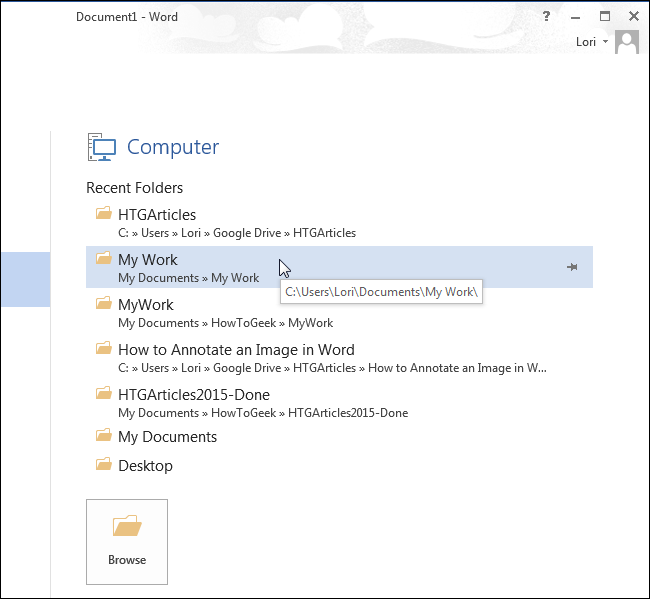
Если папка, содержащая файл резервной копии, есть в списке Последние папки (Recent Folders), то кликните по ней. Если нет – нажмите кнопку Обзор (Browse).
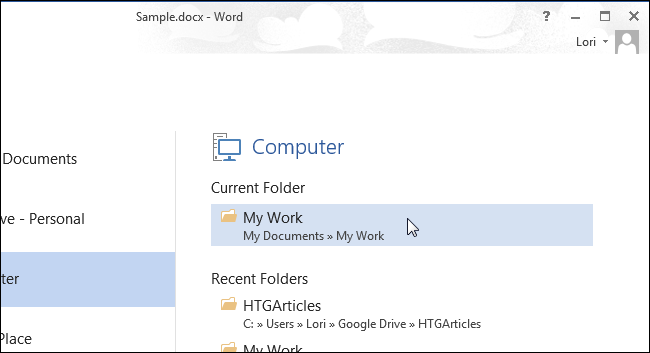
Замечание: Если в данный момент у Вас открыт какой-либо документ, то над списком Последние папки (Recent Folders) будет указана текущая папка. Кликните по ней, если файл резервной копии сохранён в той же папке, что и открытый в данный момент документ.
Откроется диалоговое окно Открытие документа (Open). Перейдите к папке, в которой хранится файл резервной копии. Обратите внимание, что Вы видите только файл оригинала, но не файл резервной копии. Дело в том, что по умолчанию Word показывает только документы Word, а файл резервной копии имеет расширение .wbk.
Примечание: По всей видимости, расширение .wbk произошло от словосочетания Word Backup.
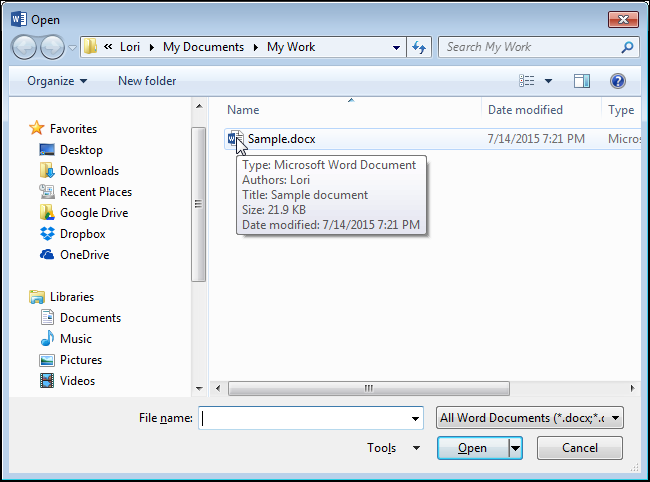
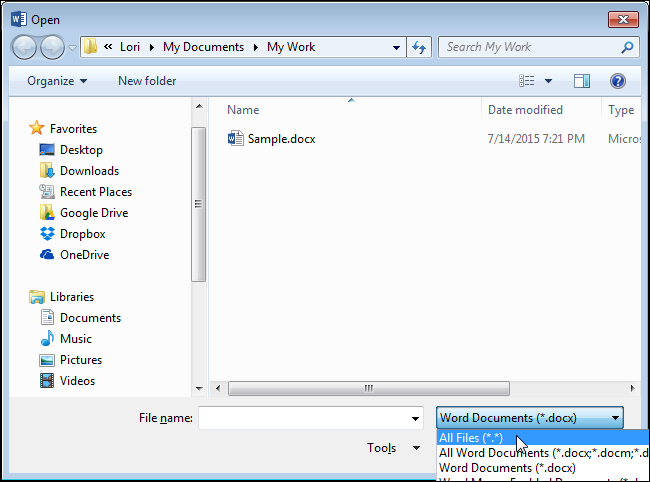
Чтобы сделать видимыми все файлы в папке, в выпадающем списке справа от поля Имя файла (File name) выберите Все файлы (All Files).
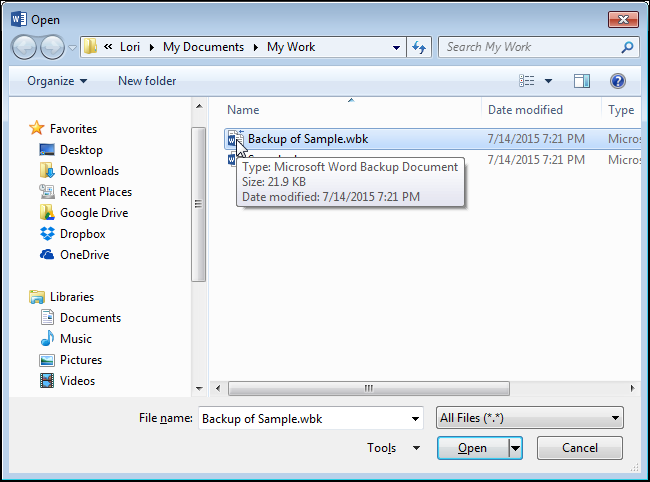
Теперь файл резервной копии (.wbk) должен стать видимым. Выберите нужный файл и нажмите Открыть (Open).
Файл .wbk откроется в Microsoft Word, и Вы сможете делать в нём любые изменения так же, как в обычных документах Word. Откройте вкладку Файл (File) и нажмите Сохранить как (Save as), чтобы сохранить документ в формате .docx. Тип файла .docx будет автоматически выбран для сохранения документа и расширение .docx заменит расширение .wbk в имени файла. При желании, Вы можете изменить имя файла, прежде чем сохранить его. Кроме этого, Вы можете сохранить документ в более старом формате Word.
Оцените качество статьи. Нам важно ваше мнение:

By default, Word 2013 does not automatically save backup copies of your documents, but you can easily enable this feature. However, these backup files use the “.wbk” extension. So, how do you open these backup files if you need to access them?
Opening Word backup files is easy. When you open Word without opening a document, the “Recent” list of documents displays on the left and templates you can use as a basis for documents displays on the right.

At the bottom of the “Recent” list, click the “Open Other Documents” link.
NOTE: If you currently have a blank or existing document open in Word, press “Ctrl +O” (that’s a capital letter “O”, not a zero) to access the “Open” screen or click the “File” tab and then click “Open” in the list of items on the left side of the backstage screen.
On the “Open” screen, click the place, such as “OneDrive” or “Computer”, where your backup file is located.
If the folder containing the backup file is available in the “Recent Folders” list, click on it. If not, click the “Browse” button at the bottom of the list.
NOTE: If you are currently have a blank or existing document open from the same place you selected, a “Current Folders” list displays above “Recent Folders”. You can click the “Current Folder” if your backup file is in the same directory as your currently open document.
The “Open” dialog box displays. Navigate to the folder containing the backup file you want to open, if necessary. Notice that you only see the original document and not the backup file. The backup file uses the extension “.wbk” and, by default, Word shows only Word documents.
To show all available documents, select “All Files (*.*)” from the drop-down list to the right of the “File name” edit box.
Now you should see the “Microsoft Word Backup Document”, or “.wbk” file. Select the file and click “Open”.
The “.wbk” file opens in Word and you can make any changes you want to it, just like you do in regular Word documents. Click the “File” tab and then “Save As” to save the backup document as a “.docx” file. The “.docx” file type is automatically selected in the drop-down list and the “.docx” extension automatically replaces the “.wbk” extension. Change the “File name” as desired before saving the file.
You can also save the document in the older Word format.
READ NEXT
- › How to Adjust and Change Discord Fonts
- › The New NVIDIA GeForce RTX 4070 Is Like an RTX 3080 for $599
- › HoloLens Now Has Windows 11 and Incredible 3D Ink Features
- › BLUETTI Slashed Hundreds off Its Best Power Stations for Easter Sale
- › This New Google TV Streaming Device Costs Just $20
- › Google Chrome Is Getting Faster
How-To Geek is where you turn when you want experts to explain technology. Since we launched in 2006, our articles have been read billions of times. Want to know more?
Пользователи Microsoft Office знают, как неприятно бывает потерять несохраненные документы. Это означает потерю многих часов или даже дней работы, если в неподходящее время случаются перебои в подаче электричества, или компьютер зависнет по каким-то другим причинам. В статье мы расскажем, как защитить себя от подобных неприятностей и активировать в Office функции автосохранения.
Данная функция доступна в Office 365 и более ранних версиях. В этой статье используется Microsoft Office 2016. Пакет приложений Office поддерживает возможность создания резервных копий документов, которые хранятся вместе с оригинальным файлом для восстановления в будущем.
Давайте посмотрим, как можно восстановить и копировать несохраненные документы в Office на Windows 10.
Как восстановить потерянные файлы в Office (Windows 10)
- Запустите приложение Microsoft Word.
- Создайте новый документ.
- Нажмите «Файл» в верхнем левом углу.
- Откройте вкладку «Сведения».
- Нажмите «Управление документом» и выберите «Восстановить несохранённые документы».
- Выберите последний несохранённый документ в формате .ASD из списка и нажмите «Открыть».
- Загрузится последняя версия файла, которую Word сохранил перед непреднамеренным закрытием. Нужно помнить, что там могут быть не все внесенные вами изменения. Последние строки или параграфы могут отсутствовать, в зависимости от того, сколько текста вы внесли с момента последнего сохранения. Выберите в меню Файл > Сохранить как для сохранения документа.
- Наберите название файла и нажмите «Сохранить».
- Файл Word сохранён на вашем компьютере, и вы можете работать с ним как обычно.
Другой способ для автоматического восстановления файлов MS Office в Windows 10
- Нажмите «Открыть» на вкладке «Файлы» в приложении Word.
- Выберите команду «Восстановить несохранённые документы» внизу в середине экрана.
- Выберите файл формата ASD и нажмите «Открыть» для просмотра файла. Дальше можно выполнять описанные выше инструкции, начиная с сохранения файла в формате файла Word.
Как свести к минимуму потери данных и создавать резервные копии
- После открытия документа Word или любого другого приложения пакета Office прокрутите вниз и нажмите на меню «Параметры» в нижнем левом углу основного экрана.
- Переключитесь на вкладку «Сохранение».
- Нужно убедиться, что проставлены две галочки: «Автосохранение каждые XX мин» и «Сохранять последнюю автоматически восстановленную версию при закрытии без сохранения».
- Переключитесь на вкладку «Дополнительно» и прокрутите вниз. Поставьте галочку в поле «Всегда создавать резервную копию». Будет создаваться резервная копия файлов Word в формате WBK в тех случаях, когда файл повреждён, или данные утеряны. Эти файлы будут сохраняться в том же месте, что и оригинальный файл. Они будут называться «Резервная копия (название файла).wbk».В резервной копии может не быть последних изменений в файле, как и в случае с автоматическим восстановлением.
Чтобы свести к минимуму потерю данных, вместо XX поставьте 1 минуту, тогда как по умолчанию стоит значение 10 минут. Файл будет автоматически сохраняться каждую минуту, и вы потеряете минимум данных.
Также можно получить доступ к автосохранённым файлам, скопировав путь из меню местоположения файла AutoRecover. Нажмите OK для внесения изменений.
Теперь откройте проводник и вставьте скопированный путь в адресную строку и нажмите ввод.
Нажмите правой кнопкой мыши на автоматически восстановленный файл .ASD, который вы хотите открыть. Выберите команду «Открыть с помощью Microsoft Office Word».
Пожалуйста, оцените статью.
Many Microsoft Office users find that there are some WBK files on their computers. What is a WBK file, and how to open WBK files? Well, this post from MiniTool Partition Wizard will tell you what a WBK file is and how to use WBK files to recover Word documents on Windows 10.
What Is a WBK File?
Usually, if you have enabled the Always create backup copy feature in Word, you can see a WBK file when you save a document. So, what is a WBK file? It is a backup copy of a Word document such as a .docx or .doc file. Word documents saved with the WBK extension are also known as word backup files.
What is a WBK file used for? Generally speaking, if you deleted a Word document by mistake, you could use WBK files to restore your files. Please note that you should make sure that the Always create backup copy feature is enabled in Word, and here is how to check whether this feature is turned on:
Tip: By default, the Always create backup copy option is turned off in Word.
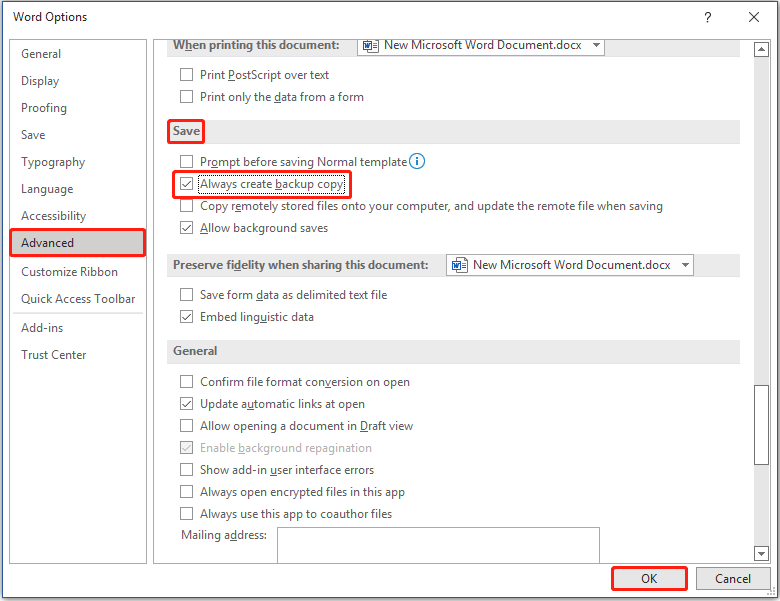
Step 1: Open a Word document and choose File > Options > Advanced.
Step 2: In Word Options, scroll down to find the Save section. Then, check if the Always create backup copy feature is checked. If this option is turned off, you can tick it and click OK.
With WBK files, you can recover deleted or corrupted Word documents.
How to Open WBK Files and Recover Documents in Word?
Just as I mentioned above, if your Word documents are lost or deleted, you can find and open WBK files to recover your documents. How to open WBK files and recover documents in Word? Here is the full guide to do that:
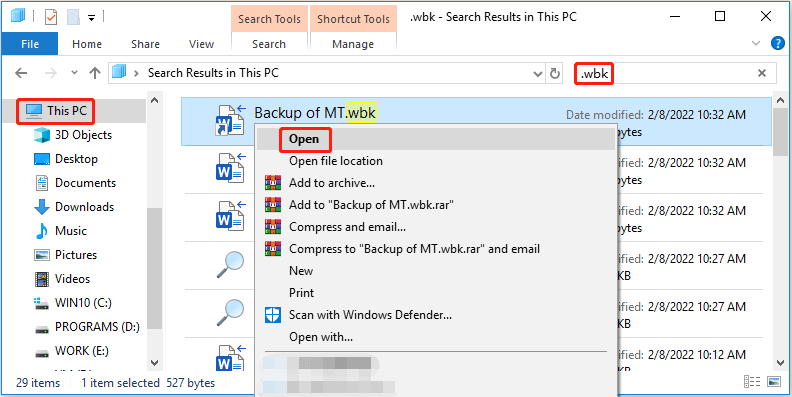
Step 1: Press the Win + E keys on the keyboard to open File Explorer on the computer.
Step 2: Click This PC and type .wbk in the search box of File Explorer. Then, the computer will search all the files with the WBK extension.
Step 3: In the list of results, right-click a WBK file and choose Open from the context menu to open the file in Microsoft Word. (There may be several WBK files. You need to open them one by one to check your content.)
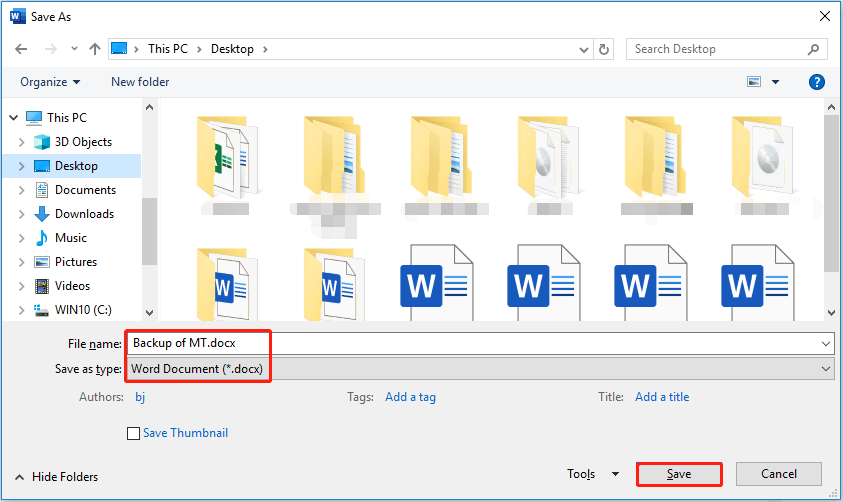
Step 4: Once you open a WBK file, choose File > Save As. Then, choose a location to save and recover your lost or deleted document.
In addition, if you disable the Always create backup copy feature in Word but enable the AutoRecover feature, you can open File Explorer to find .asd files to recover unsaved documents. How to do that? This post “How to Open ASD File? Here Are 3 Applicable Methods” can help you recover unsaved documents.
What is a WBK file? How to use WBK files to recover your Word documents. Here is the answer!Click to Tweet
How to Recover Documents with Professional Software?
However, if you don’t have any WBK files on your computer to recover deleted Word documents, the most effective way is to use professional data recovery software. In this case, you can search for reliable software in your browser, but here I recommend MiniTool Partition Wizard for you.
MiniTool Partition Wizard is a reliable and professional program with the Data Recovery feature. This feature can help you recover lost or deleted documents in simple steps. In addition, MiniTool Partition Wizard can also help you copy/wipe disk, format/extend partition, convert MBR to GPT without data loss, and so on.
Note: Don’t perform any operations on the partition/hard disk where your Word documents are lost or accidentally deleted. In addition, this software allows recovering documents lost due to system updates, hard drive failures, operating system corruption, and virus attacks.
So, how to recover deleted Word documents? With the help of MiniTool Partition Wizard, you can recover your lost or deleted documents in simple steps. How to do that? Please download the MiniTool Partition Wizard program, launch it to access its interface, and follow the on-screen instructions to install it on your computer.
Free Download
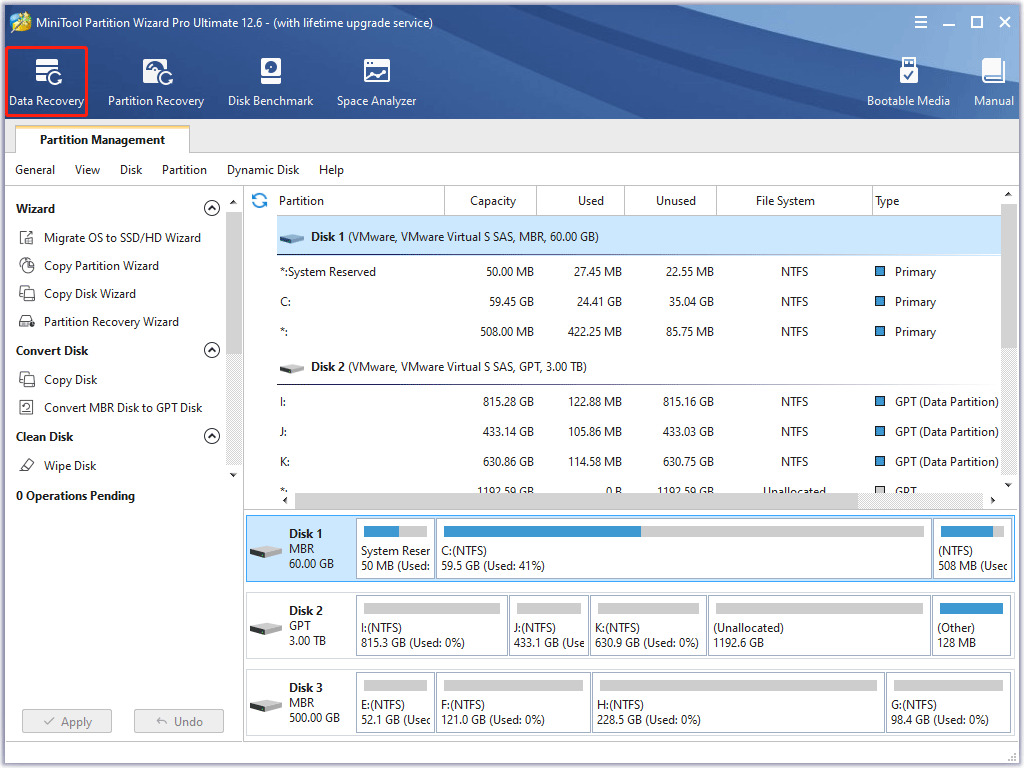
Step 1: Launch MiniTool Partition Wizard to its main interface, and click Data Recovery on the top toolbar.
Note: You can also right-click the specific partition or disk and choose Data Recovery from the context menu to get the scanning interface directly if you know the specific location of the lost or deleted documents.
Step 2: Once you are in the Data Recovery interface, you can see all detected storages devices on the computer. Then, click the Scan Settings icon in the upper left corner.
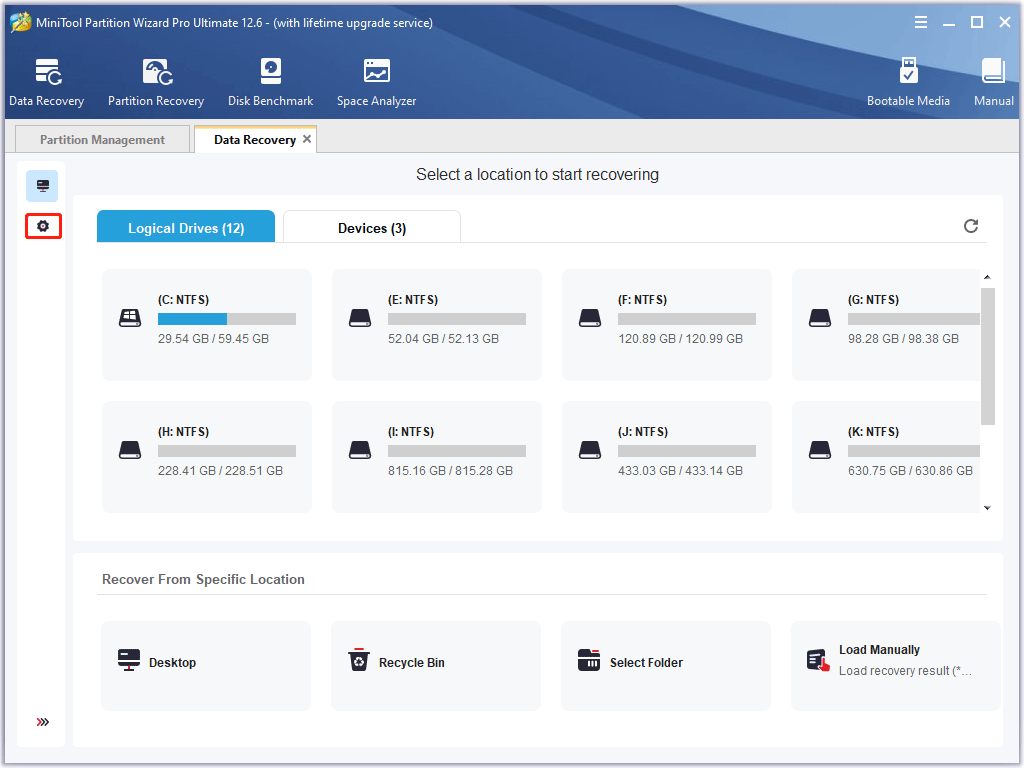
Note: If you just want to recover some specific files (such as documents), you can click the Scan Settings icon. To do this, you can save some scanning time. Certainly, if you want to scan and recover all the lost or deleted data, just ignore Step 2 and Step 3.
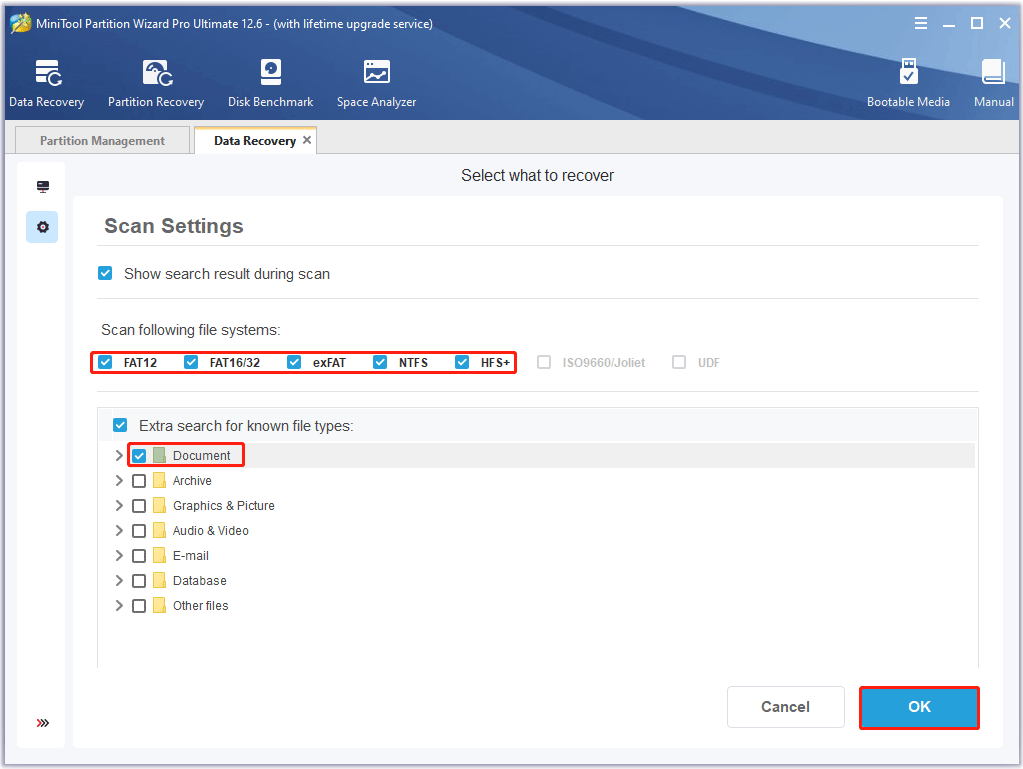
Step 3: In Scan Settings, choose the file system, and only check Document. Then, click OK. To do this, you can save some scanning time. (If you don’t know what the file system of your drive is, you can also choose all.)
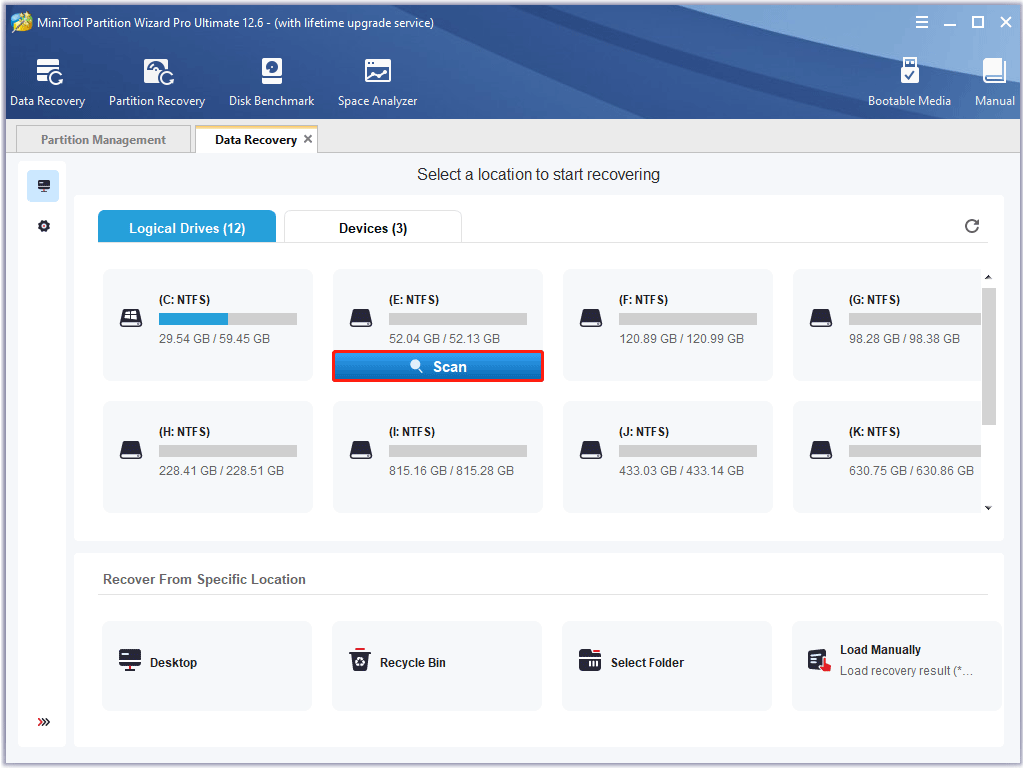
Step 4: Choose the drive where your Word documents are lost or deleted. Then, click Scan and give it a few minutes to scan. (Here I take drive E: as an example)
Step 5: Once the scan is complete, you can preview the files. Then, tick the file that you want to recover, and click the Save button.
Tip: MiniTool Partition Wizard allows you to preview files smaller than 100MB. Besides, I strongly recommend you save the recovered files on another drive. Otherwise, the lost/deleted documents may be overwritten.
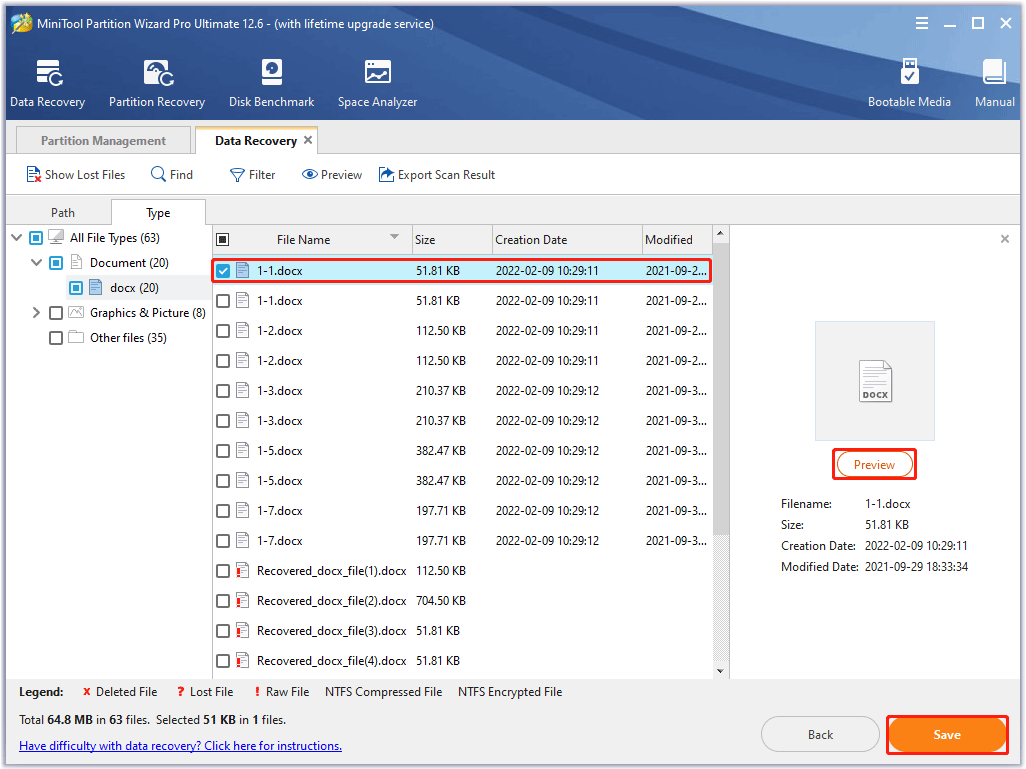
In addition, Data Recovery provides you the following options so that you can quickly find the lost or deleted Word documents.
- Type: All the found files will be displayed by file type. Just unfold the file type and select some items of this type to recover.
- Show Lost Files: Users just need to click the Show Lost Files button to make the software display only the lost files.
- Find: This option allows users to enter a specific file name to quickly find the desired file. Match Case requires users to pay attention to the capital and small letter of the file name. Match Word requires the user to enter the complete file name, including the file extension.
- Filter: This option allows users to search for files by Filename/Extension, Size, Creation or Modification Date. Besides, users can choose to show deleted, lost, or normal files as needed.
I deleted some important Word documents by mistake, and I don’t have any backup files of my documents. Luckily, I found a perfect application MiniTool Partition Wizard to recover my documents with its Data Recovery function.Click to Tweet
To protect your documents from being lost or accidentally deleted, you should back up your files regularly. So, when your files are lost or deleted, you can recover them with previous versions.
How to Back up Your Files on Windows 10?
If you want to back up your files on Windows 10, you should turn on the File History feature on your computer. How to do that? Here is the full guide:
Windows 10 vs Windows 11 File History: What’s the Difference?
Step 1: Click the Start button at the lower-left corner of your screen, and then click the Settings icon to open Windows Settings.
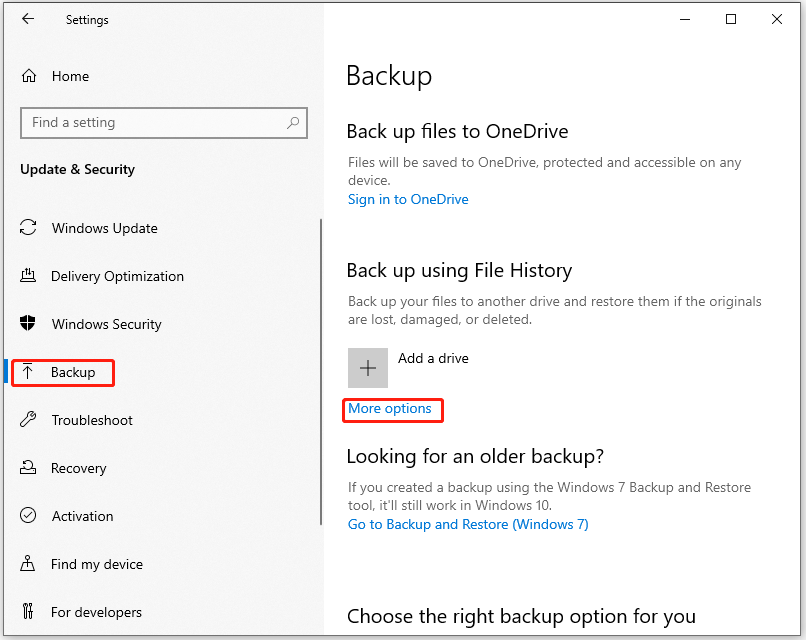
Step 2: In Settings, choose Update & Security. Then, choose Backup in the left pane and click More options. In the next window, click See advanced settings.
Step 3: In the File History window, click Select drive in the left pane. Then, choose a drive from the list to store your backup. (You can also click Add network location to back up your files on another computer on the same network.)
Tip: Your computer will not allow you to save your backup on the system drive. Besides, I recommend you save your backup files on your USB flash drive or external hard drive.

Step 4: After choosing the drive where you want to back up your files, click OK and the File History feature will be turned on. Then, it will automatically save a copy of your file to the specified location.
After that, even if you lose your Word documents or other important files, you can restore them.
How to Restore Files with File History in Windows 10 – 3 Steps
How to Recover Word Documents from Previous Versions
In addition to using .wbk files or using MiniTool Partition Wizard to recover Word documents, you can also recover your files from previous versions. But this method will only work if you enable previous versions on Windows 10. Follow the steps below to recover your Word documents:
Step 1: Right-click the folder where you want to recover Word documents and then choose Restore previous versions.
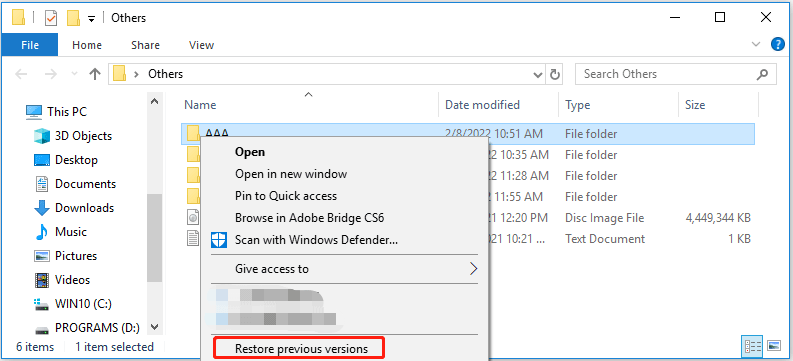
Step 2: Under the Previous Versions tab, choose a previous version from the list. Then click the Restore button.
After that, your folder will be restored and a pop-up window will show you the location of your folder. Then, you can open the folder and see documents that have been restored with a previous version.
Bottom Line
After reading this post, you know what a WBK file is and how to open WBK files to recover Word documents. In addition, if you do not enable the Always create backup copy or AutoRecover feature in Word, you can also use the Data Recovery function of MiniTool Partition Wizard to recover deleted Word documents.
If you have any questions about how to recover deleted Word documents, please leave them in the comment zone and we will try our best to answer them. If you need any help when using MiniTool Partition Wizard software, you can contact us via [email protected].