
Подборка по базе: Документ Microsoft Word (2).docx, Документ Microsoft Word.docx, Документ Microsoft Word.docx, Презентация Microsoft PowerPoint.pptx, Презентация Microsoft PowerPoint.pptx, Документ Microsoft Word (3).docx, Документ Microsoft Word (5).docx, Документ Microsoft Office Word (2).docx, Документ Microsoft Word (2).docx, Документ Microsoft Word (2).docx
Practical class
«Microsoft Word as a word processor. Inserting pictures, creation graphical objects»
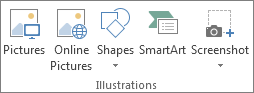
Objectives: to develop skills as using graphical objects, such as OLE technologies.Creation pictures in Word.These are the basic types of graphics that you can use to enhance your Word documents: drawing objects, SmartArt, charts, pictures, and clip art. Drawings refer to a drawing object or a group of drawing objects. Drawing objects include shapes, diagrams, flowcharts, curves, lines, and WordArt. These objects are part of your Word document. You can change and enhance these objects with colors, patterns, borders, and other effects. (Insert tab (Вкладка Вставка)Illustrations group (Группа элементов Иллюстрации) Shapes objects (Объект Фигуры)).Group selected shapes. Select several shapes at a time by pressing CTRL on your keyboard and clicking each shape you want to include in the group. On the Format tab (ВкладкаФормат) in the Arrange group (Группа элементов Упорядочить),click Group (Группировать) so that all of the shapes will be treated like a single object. To cancel the group select your object and click Group (Группировать)Ungroup (Разгруппировать)or use context menu.
Pictures can be inserted (or copied):
- from other applications (for example.,Paint, MsDrawing,Paintbrush and et.)
- Drawing object in current document (using Shapes objects).
- Using Clipart or Online pictures.
After you have inserted a picture or drawing object into a Word document, you can use a variety of tools to position the item relative to the page and text.
Picture position in text.
- Select your picture, then open the Format tab (Вкладка Формат).
- Click on Wrapping Text (Обтекание текстом). Click the wrapping position that you want to apply.
OLE technology. The main differences between linked objects and embedded objects are where the data is stored and how you update the data after you place it in the Word file.
You place either a link to the object or a copy of the object in the document. You can insert objects this way from any program that supports the technology of linking and embedding objects (object linking and embedding, or OLE).
For example, a monthly status report may contain information that is separately maintained in an Excel worksheet. If you link the report to the worksheet, the data in the report can be updated whenever the source file is updated. If you embed the worksheet in the report, your report contains a static copy of the data.
1. Embedded object
2. Linked object
3. Source file
Linked objects.When an object is linked, information can be updated if the source file is modified. Linked data is stored in the source file. The Word file, or destination file, stores only the location of the source file, and it displays a representation of the linked data. Use linked objects if file size is a consideration.
Linking is also useful when you want to include information that is maintained independently, such as data collected by a different department, and when you need to keep that information up-to-date in a Word document.
Embedded objects.When you embed an Excel object, information in the Word file doesn’t change if you modify the source Excel file. Embedded objects become part of the Word file and, after they are inserted, they are no longer part of the source file.
Because the information is totally contained in one Word document, embedding is useful when you do not want the information to reflect changes in the source file, or when you do not want the document recipients to be concerned with updating the linked information.
Two ways to use OLE technologies: Open Insert (Вкладка Вставка), then on the Text group(Группа элементов Текст)
- Click on Object (Объект)
- Click on Text from file (Текст из файла)
The first method can be used for embedding (linking) a document fragment or an entire document, the second one is used only for an entire document.
Exercise 1. Create scheme (see on the picture), group all graphical objects.
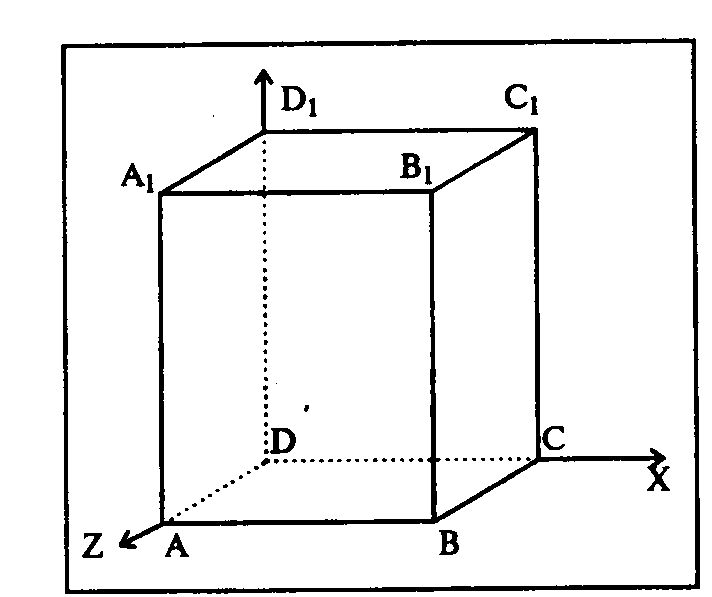
- draw the rectangle ABB1A1;
- make a line, for example, A1D1;
- copy A1D1 and insert three times ВС, B1C1 and AD;
- make lines CC1, DD1, DC and D1C1;
- select lines and click on Format tab (Формат Вкладка)Shape Styles group (Группа элементов Стили фигур)Shape outline (Контур фигуры), choosing Dashes (Штрихи)Type of dashes (Тип штриха)
 – dotted-dashes (штрих пунктирный);
 - finish drawing reference axes, choosing the instrument Line with arrow (Линия со стрелкой). For selecting AutoShape style, click the right button of the mouse over the object and select Format AutoShape (Формат автофигуры) in the right click menu.
- For placing the letter in the place required click onInsert tabText groupText box (Надпись) .
- Clicking the button Line color (Цвет линии) in Format tab (Вкладка формат)Shape Styles group (Группа элементов Стили фигур)Shape outline(Контур фигуры)(the frame should be selected), select in the given pallet No line (Нет Линии),similarly the following Fill color (Цветзаливки) — No fill (Нет заливки), your frame becomes transparent. Now the text can be placed in it (we need only one letter –top labelling).
 – dotted-dashes (штрих пунктирный);
 .
. in Format tab (Вкладка формат)Shape Styles group (Группа элементов Стили фигур)Shape outline(Контур фигуры)(the frame should be selected), select in the given pallet No line (Нет Линии),similarly the following Fill color (Цветзаливки)
 — No fill (Нет заливки), your frame becomes transparent. Now the text can be placed in it (we need only one letter –top labelling).
9. Select your frame, copy it and paste 10 times. Sub index is established with the Home tab (Вкладка главная) Font group (Группа элементов Шрифт) Subscript Subscriptоr press CTRL+= (Нижний индекс). ![]()
10. Modify the drawing into the single graphics object. For this purpose activating on Home tab (Вкладка главная) Editing group (Редактирование) Select (Выбор) Select objects(Выборобъектов) button stretch the punctuated frame around the whole drawing (select the drawing) and click Format tab (Вкладкаформат) Arrange group (Группа элементов упорядочить) select Group (Группировать).
Exercise 2: Embedded object creating (drawing)
- Create a new document С:My documentsYour FolderIntegration.doc
- Open Paint program, create a picture and save as Picture.bmp
- Copy the picture into the clipboard (select the picture and choose the command COPY).
- Paste an embedded object into the document in its full image. For this purpose:
- Change to Microsoft Word (Integration.doc).
- Set the cursor into the place of embedded object to be placed and type any title;
- Run the command Home tab (Вкладка главная) click the arrow under Paste (Вставить), click Paste Special (Специальная вставка) for pasting the embedded object ;
- Set the option Paste (Вставить);
- Select Рисунок format, in the dialogue box select the flag Display as icon (В виде значка) and click ОК;
- Edit the embedded object:
- To see the drawing click 2 times with the mouse over the icon;
- Modify the drawing;
- Return to Integration.doc document
- Right Click over the icon. In the appeared menu select Объект упаковщика для оболочки ObjectConvert (Преобразовать).Unselect Display as icon (В виде значка) check boxОК.
- Compare the initial drawing with the modified.
- Switch to the window of Picture.bmp drawing and compare its content with the result after modifying the object in Integration.doc document.
Exercise 3: Linking object creating (text document)
- Create the document Letter.txt in Notepad (Блокнот) and type the following text:
- Switch to Integration.doc;
- Set the cursor in the place of linking object (text) pasting and type any content
- Paste the linking object using the command Insert tab (Вкладка Вставка) Group text (Группа элементов текст) Object (Объект)From file (Создание из файла) Select (Обзор)Select (Выделите) Letter.txt select display as icon (в виде значка); link to file (связь с файлом) check box.
- Edit the source object and save the changings.
- Close Integration document.
- Reopen Integration document.
- Compare the state of Integration document with the document Letter.txt.
Advancement questions:
- What tool can be used for drawing the graphic objects in Word text processor?
- What approaches is the work with graphics based on in Word text processor?
- What is OLE –technologies?
- What is the difference between linked objects and embedded objects?
- What does Group objects mean?


Word for Microsoft 365 Word 2021 Word 2019 Word 2016 Word 2013 Word 2010 Word 2007 More…Less
These are the basic types of graphics that you can use to enhance your Word documents: drawing objects, SmartArt, charts, pictures, and clip art. Drawings refer to a drawing object or a group of drawing objects.
Drawing objects include shapes, diagrams, flowcharts, curves, lines, and WordArt. These objects are part of your Word document. You can change and enhance these objects with colors, patterns, borders, and other effects.
Note: It is no longer necessary to insert a drawing canvas to work with drawing objects in Word. However, you may still use a drawing canvas as an organizational aid when working with several drawing objects, or if you want to add connectors between shapes. To insert a drawing canvas, on the Insert tab, click Shapes, and then click New Drawing Canvas.
What do you want to do?
-
Add a drawing to a document
-
Delete all or part of a drawing
Add a drawing to a document
-
Click in your document where you want to create the drawing.
-
On the Insert tab, in the Illustrations group, click Shapes.
-
You can do any of the following on the Format tab, which appears after you insert a drawing shape:
-
Insert a shape. On the Format tab, in the Insert Shapes group, click a shape, and then click somewhere in the document.
-
Change a shape. Click the shape you want to change. On the Format tab, in the Insert Shapes group, click Edit Shape, point to Change Shape, and then choose a different shape.
-
Add text to a shape. Click the shape you where you want text, and then type.
-
Group selected shapes. Select several shapes at a time by pressing CTRL on your keyboard and clicking each shape you want to include in the group. On the Format tab in the Arrange group, click Group so that all of the shapes will be treated like a single object.
-
Draw in the document. On the Format tab, in the Insert Shapes group, expand the shapes options by clicking the arrow. Under Lines click Freeform or Scribble.
Tip: To stop drawing with the Freeform or Scribble lines, double-click.
-
Adjust the size of the shapes. Select the shape or shapes you want to resize. On the Format tab, in the Size group, click the arrows or type new dimensions in the Height and Width boxes.
-
Apply a style to a shape. In the Shape Styles group, rest your pointer over a style to see what your shape will look like when you apply that style. Click the style to apply it. Or, click Shape Fill or Shape Outline and select the options that you want.
Note: If you want to apply a color and gradient that aren’t available in the Shape Styles group, select the color first, and then apply the gradient.
-
Add flow charts with connectors. Before you create a flow chart, add a drawing canvas by clicking the Insert tab, clicking Shapes in the Illustrations group, and then clicking New Drawing Canvas. On the Format tab, in the Insert Shapes group, click a Flow chart shape. Under Lines, choose a connector line such as the Curved Arrow Connector.
-
Use shadow and three-dimensional (3-D) effects to add interest to the shapes in your drawing. On the Format tab, in the Shape Styles group, click Shape Effects, and choose an effect.
-
Align the objects on the canvas. To align the objects, press and hold CTRL while you select the objects that you want to align. On the Format tab, in the Arrange group, click Align to choose from an assortment of alignment commands.
-

Delete all or part of a drawing
-
Select the drawing object that you want to delete.
-
Press DELETE.
See also
Add shapes
Draw a curve or circle shape
Insert pictures
Crop a picture
Add clip art to your file
What do you want to do?
-
Add a drawing to a document
-
Delete all or part of a drawing
Add a drawing to a document
-
Click in your document where you want to create the drawing.
-
On the Insert tab, in the Illustrations group, click Shapes.
-
When you find the shape you want to insert, double-click to insert it automatically, or click and drag to draw it in your document.
You can do any of the following on the Format tab, which appears after you insert a drawing shape:
-
Insert a shape. On the Format tab, in the Insert Shapes group, click a shape, and then click somewhere in the document.
-
Change a shape. Click the shape you want to change. On the Format tab, in the Shape Styles group, click Change Shape, and then choose a different shape.
-
Add text to a shape. Right-click the shape, click Add Text, and then type.
-
Group selected shapes. Select several shapes at a time by pressing CTRL on your keyboard and clicking each shape you want to include in the group. On the Format tab in the Arrange group, click Group so that all of the shapes will be treated like a single object.
-
Draw in the document. On the Format tab, in the Insert Shapes group, expand the shapes options by clicking the arrow. Under Lines click Freeform or Scribble.
-
Adjust the size of the shapes. Select the shape or shapes you want to resize. On the Format tab, in the Size group, click the arrows or type new dimensions in the Shape Height and Shape Width boxes.
-
Apply a style to a shape. In the Shape Styles group, rest your pointer over a style to see what your shape will look like when you apply that style. Click the style to apply it. Or, click Shape Fill or Shape Outline and select the options that you want.
Note: If you want to apply a color and gradient that aren’t available in the Shape Styles group, select the color first, and then apply the gradient.
-
Add flow charts with connectors. Before you create a flow chart, add a drawing canvas by clicking the Insert tab, clicking Shapes in the Illustrations group, and then clicking New Drawing Canvas. On the Format tab, in the Insert Shapes group, click a Flow chart shape. Under Lines, choose a connector line such as the Curved Arrow Connector.
-
Use shadow and three-dimensional (3-D) effects to add interest to the shapes in your drawing. On the Format tab, choose an option in either the Shadow Effects or the 3-D Effects group.
-
Align the objects on the canvas. To align the objects, press and hold CTRL while you select the objects that you want to align. On the Format tab, in the Arrange group, click Align to choose from an assortment of alignment commands.
-

Delete all or part of a drawing
-
Select the drawing object that you want to delete.
-
Press DELETE.
See also
Draw a curve or circle shape
Insert pictures
Crop a picture
Add clip art to your file
Need more help?
Insert an object (picture, image, chart, drawn object) to a specified location in a document.
To insert an object like an image or a chart to a specific location in a document, first of all bring the text pointer to that location by clicking at that location once. Now click on ‘Insert’ from the main menu bar. This gives us a drop-down menu. In this drop-down, we have a number of options.
To insert an image, click on ‘Image’ from the drop-down. This will open the ‘Insert Image’ dialog box. Go to the location of the required image from this dialog and select the image and then click on ‘Open’. This will insert the image to the specified location in the document.
Similarly, to insert a chart, click on ‘Object’ and from the resulting menu, click on ‘Chart’. This will insert a chart to the document. In the same way, we can insert some predefined shapes to the document by clicking on ‘Shapes’ from the drop-down and then choosing the required shape from the resulting menu.
Select an object.
To select an image, just click once on the image and the image will get surrounded by eight different green coloured small squares. This is how we select an image.
To select a chart, double-click on the chart. The chart will get surrounded by a thick grey coloured border. This is how we select a chart.
Copy, move an object within a document, between open documents.
To copy an object within a document or between open documents, first of all select the object. Then right-click on the object and from the resulting menu click on ‘Copy’. Now go to the location where you want to copy this object to and right-click once and from the resulting menu click on ‘Paste’. This will copy the object to the new location which can be in the same document or a different one.
To move an image within a document or between open documents, first of all select the image. Then right-click on the image and from the resulting menu click on ‘Cut’. Now go to the location where you want to move this image to and right-click once and from the resulting menu click on ‘Paste’. This will move the image to the new location which can be in the same document or a different one.
To move a chart, first of all select the chart. Now place the mouse pointer anywhere on the grey border of the chart other than the eight square pointers which are darker than the rest of the border. Simply click and drag the mouse pointer to the location where you want to place the chart and the chart will be moved to the new location.
Resize, delete an object.
To resize an object, click once on the object so that the object gets surrounded by eight small green squares on its border. Now Place the mouse pointer on any of these squares and click and drag in order to increase or decrease the size of the object.
To delete an object, click once on the object so that the object gets surrounded by eight small green squares on its border. Then press the ‘delete’ button from the keyboard and this will delete the object from the document.

Татьяна Шкляр
Эксперт по предмету «Информатика»
Задать вопрос автору статьи
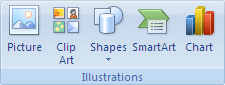
Инструменты для работы с графическими объектами располагаются в группе Иллюстрации вкладки Вставка.
Рисунок 1. Группа Иллюстрации
Вставка рисунков
Инструмент Рисунок позволяет вставить существующий рисунок, сохраненный на компьютере или съемном носителе. При нажатии на кнопку Рисунок откроется окно выбора файла, после чего рисунок будет вставлен в документ.
При выделении изображения на ленте появится дополнительная вкладка Формат инструмента Работа с рисунками.

Рисунок 2. Вкладка Формат
![]()
Сделаем домашку
с вашим ребенком за 380 ₽
Уделите время себе, а мы сделаем всю домашку с вашим ребенком в режиме online
Бесплатное пробное занятие
*количество мест ограничено
Чтобы документ с рисунком не занимал слишком много памяти, можно воспользоваться инструментом Сжатие группы Изменение.
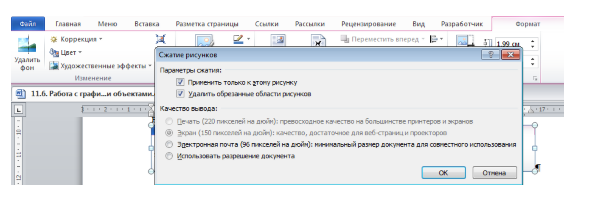
Рисунок 3. Диалоговое окно Сжатие рисунков
Для более широких настроек рисунка можно использовать пункт Формат рисунка контекстного меню рисунка.
Коллекция Clip Art
В коллекции ClipArt хранится подборка картинок текстового редактора.
Для вставки клипа используется инструмент Клип.
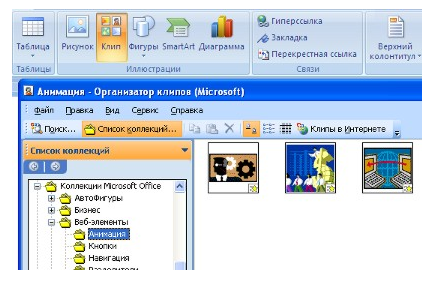
Рисунок 4. Организатор клипов
«Работа с графическими объектами в текстовом процессоре MS Word» 👇
Открывшееся окно похоже на окно Проводника: слева располагается каталог клипов, справа – область просмотра выбранного раздела.
Создание графического примитива
Инструмент Фигуры используется для добавления графических примитивов. Необходимо выбранный примитив методом протягивания разместить на странице. Для сохранения правильных пропорций фигур при рисовании нужно удерживать клавишу Shift.
При выделенной фигуре на ленте появляется дополнительная вкладка Формат инструмента Средства рисования.

Рисунок 5. Вкладка Формат
Для редактирования графического примитива используются синие угловые маркеры, которые позволяют изменять размеры фигуры; зеленый кружок, который позволяет выполнять поворот фигуры, и желтый маркер, позволяющий редактировать форму объекта.
Форматирование графического объекта
Окно группы Стили фигур содержит широкие параметры форматирования автофигуры.
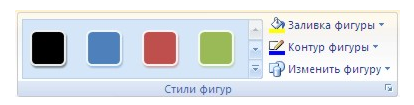
Рисунок 6. Группа Стили фигур
Диалоговое окно Формат автофигуры содержит практически все возможные настройки, которые можно применить к автофигуре, а на вкладке Формат располагаются наиболее распространенные параметры.
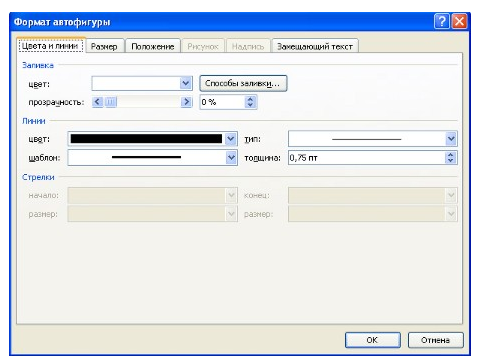
Рисунок 7. Диалоговое окно Формат автофигуры
С помощью группы Стили фигур можно изменить заливку и контур фигуры, а также изменить фигуру. Если же необходимо использовать собственный стиль, то его можно сохранить для дальнейшего использования.
Инструмент Эффекты тени позволяет настроить параметры тени фигуры.
Инструмент Объем служит для применения трехмерных эффектов к фигуре. При этом можно изменять следующие параметры: Цвет объемной фигуры, Глубина, Направление, Освещение, Поверхность.
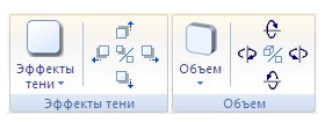
Рисунок 8. Группы Эффекты тени и Объем
Инструменты группы Упорядочить используются для настройки параметров размещения фигуры в тексте документа.
Инструмент Положение позволяет задавать расположение графического объекта на странице.
Обтекание текстом устанавливается одноименным инструментом.
Порядок размещения нескольких фигур относительно друг друга настраивается с помощью кнопок На передний план и На задний план.
Инструмент Выровнять используется для выравнивания объекта относительно границ страницы.
Инструмент Повернуть дает возможность вращать фигуру.
В группе Размер можно задать точный размер фигуры.
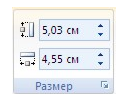
Рисунок 9. Группа Размер
Группировка фигур
Для одновременного выполнения одинаковых действий над объектами их удобно сгруппировать.
Группировку можно выполнить с помощью команды Выделить вкладки Главная, предварительно выделив объекты для группировки.
Для одновременного выделения нескольких объектов нужно при их выборе удерживать нажатой клавишу Shift, после чего в группе Упорядочить выбрать команду Группировать.
Работа с надписями
Надпись также является графическим примитивом, который может содержать в себе текст.
Подобные элементы можно связывать между собой.
Для связывания блоков в группе Текст выполнить команду Создать связь.
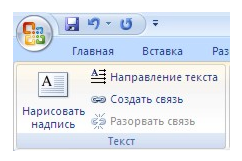
Рисунок 10. Группа Текст
Объекты SmartArt
Объекты SmartArt используются для быстрого создания различных красочных схем.
Для вставки объекта SmartArt используется кнопка SmartArt группы Иллюстрации вкладки Вставка. После ее нажатия откроется окно Выбор рисунка.
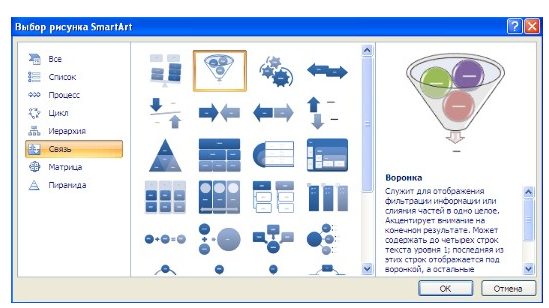
Рисунок 11. Окно Выбор рисунка SmartArt
После вставки объекта в документ на ленте появятся вкладки Конструктор и Формат инструмента Работа с рисунками SmartArt.
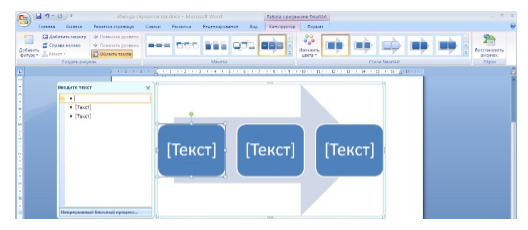
Рисунок 12.
Левая панель предназначена для заполнения текстовых полей.
Редактирование объектов, добавление или удаление, изменение формата объектов можно выполнить также с помощью контекстного меню.
Объекты WordArt
Красиво оформленный текст WordArt можно вставить с помощью инструмента WordArt группы Текст вкладки Вставка.
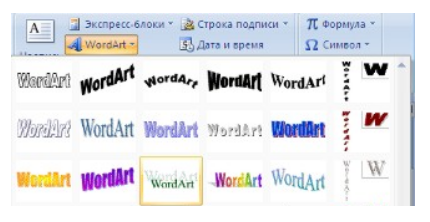
Рисунок 13.
Находи статьи и создавай свой список литературы по ГОСТу
Поиск по теме

Word allows you to do much more than simply insert or place graphics. For our fourth lesson in this series, we will focus on the graphic design functions in Word such as pictures, SmartArt, screenshots, and other items that can be found on the “Insert” tab.
These functions really breathe life into your drab black and white text documents. With a simple picture or chart, you can turn your term paper from meh to yeah! Luckily, there’s a whole range of ways you can add images to better illustrate (no pun intended) your point.
We’ll wrap the lesson by changing gears a bit and discussing how to use more than one language in Word 2013.
Images and Multimedia
You don’t have to think of Word as simply a word processing program. It has requisite tools for doing some pretty nifty page layout. While it’s not a feature-complete or robust as a professional page layout program such as Adobe InDesign. You can still get very professional looking results if you know what’s in your toolbox and how to use it.

Pictures and Online Pictures
Both “Pictures” and “Online Pictures” accomplish the same goal. The only difference is that “Pictures” means you can insert pictures locally, while “Online Pictures” allows you to insert images from an internet-based source such as clip art from Office.com, Bing, or OneDrive (formerly SkyDrive).
You can also insert pictures from your Facebook profile or Flickr although you could always just save the pictures you want to insert to your computer and then insert them from there if you don’t want to connect Office to these profiles.
Picture Tools
As always, when you want to edit a picture or any element place in a Word document, you can click on it and the appropriate tab will appear on the Ribbon.
With pictures, that tab is “Picture Tools.” Here we see you can make all kinds of corrections to the picture on-the-fly. For example, you can correct brightness and contrast, the color, add a border.
Where you position and how you wrap text will also play a large role in formatting your documents.
Here we see those controls. In our documents, we don’t worry so much about word wrapping or positioning because Word isn’t the final step toward publishing online. However, if you’re going to produce something WYSIWYG (What You See is What You Get), such as for a PDF or print publication, then these things will definitely matter.
Also, there are a couple ways you make changes to your pictures inline, such as resizing, rotating, and moving them. In the following image, you see these controls, many of which you will likely be familiar with.
When you click on an image in your document, you get a box on each corner, which will let you resize a picture. At the top, in the middle, is a circular arrow, grab this to freely rotate your picture. To move the image, hover the mouse over the image until the pointer is the four arrows, you can then click and drag the image anywhere you like.
Finally, if you click on the little “Layout Options” button, you can change your text wrapping without going to the Ribbon.
Clicking on “See more…” at the bottom of the “Layout Options” opens the full-blown “Layout” dialog.
Note, the size tab both on the Ribbon the “Layout” dialog allows you to specifically resize, rotate, and scale your pictures, rather than relying wholly on winging it:
We’d like to spend the whole day talking about formatting images in Word, but as you can see, there’s a ton of options at your disposal. Let’s move on now to other objects you can insert into your documents, starting with “Shapes.”
Shapes
Microsoft Word 2013 comes with an array of built-in shapes, which you can use to create callouts, boxes, stars, and other shapes.
When you choose a shape, you simply draw it on a blank space on the page. It doesn’t matter if you get it perfect or just the way you want it because you can adjust it to your heart’s content once it is placed in your document.
Note in the screenshot, the previously mentioned little “handles” you can use to resize and rotate your shapes.
At the bottom of the “Shapes” menu, there’s an option to create a “new drawing canvas.” This will open, what is essentially a text box for shapes. With this drawing canvas, you can create drawings using these shapes allowing you to create things like diagrams and flowcharts.
SmartArt and WordArt
SmartArt and WordArt tend to have some overlap, particularly if you create something using WordArt and then customize any of the text within it. Of course, you can use one or the other and never the twain shall meet, but we’re going to talk about them in the same section because one often leads to the other.
Think of SmartArt as premade drawing canvases that you can insert into your document and then customize as you like. Simply pick an arrangement, such as a list, process, or cycle.
As you can see, we created a graphic based on a “Continuous Block Process.” When we click on the text boxes, we can edit what is inside. There are also the usual grab handles needed to resize the image, and the “Layout Options” allowing you to wrap text to your preference.
If you use SmartArt, note that the Ribbon changes to reflect this. The “SmartArt Tools” features two tabs: “Design” and “Format.” Let’s cover each one and its features.
The right half of the “Format” tab allows you to pick from a number of “SmartArt Styles” and you can also “Change Colors.”
If you look at our previous example, you can see we applied an embossed, shiny effect and changed the colors of our text boxes and arrow.
On the left half of the “Design” tab, you can “Create Graphic” so you can add shapes, bullets, text, and move things around.
The “Layouts” section lets you change how your graphic looks on the fly. Simply hover over any of the built-in options to see how it would look utilizing a different layout. Changes to the layout are not applied unless you first click on a style.
The right side of the “Format” tab is used for affecting changes to text. These include “WordArt Styles” and other effects suchs as fill and outline. Beyond that, you can arrange multiple layers by sending them forward and backward.
The “Layout” dialog pops out if you select the little arrow in the bottom-right corner of the “size” section or you can choose more options from any of the drop-down menus including “Position”, “Align”, and “Rotate.”
On the left side of the “Format” tab you can select any of your shapes and change them to another, and also make them larger or smaller.
If you click on “Shape Styles” you will be able to choose from a selection of pre-defined shapes and colors.
Shift right just slightly and you will find controls to alter the fill. Choose from various “Theme Colors” or select your own. You an also use pictures, gradients, and textures for even more fill options.
If you want to refine the outline around your shape(s), you can choose any color, weight, or dashes.
Finally, “Shape Effects” has quite a few options for enhancing your shapes, many of which will give them a cool 3D effect that you can adjust by clicking 3D Options at the bottom of the of the menu.
Format Text Effects
Let’s take a closer look at this because it contains a pretty sizable amount of features. We’ll cover the basics so that you’re more aware of them. The pane titled, “Format Text Effects,” slides out from the right edge.
As with any other panes in Word 2013, it can be detached, which you can then stick out of the way to save screen area, or keep it nearby so it is handy. Regardless, this dialog box will allow you to quickly work with text, so you don’t have to repeatedly keep going to the ribbon to change things. Note also that the dialog is split into functions, “Text Fill and Outline” and “Text Effects.” “Text Fill and Outline” is simple enough to figure out, and is used to enhance how text appears.
Say, for instance, we want to write How-To Geek School and enhance it so that it is size 48 pt., blue with a black 1 pt. outline. We simply select the text we want, increase to the size to 48, then in the “Format Text Effects” dialog, we can change the color (we can also do this in the “Font” section of the “Home” tab. Then under “Text Outline” we choose “Solid line” and choose block and 1 pt. for the outline width.
That looks pretty good, but we really want it to pop, let’s add some more text effects, such as a shadow, a reflection, and we’ll add a bit of a 3d bezel to round the lettering out.
The result is a bit more striking and while it’s not likely to make it into any final designs, it does give you an idea of what you can do with WordArt.
Chart
Who doesn’t like charts? Charts are a great way to visually display data sets and Word 2013 comes jam packed with a large assortment of Charts to choose from, including columns, pie, bar charts and much, much more. Check out the screenshot for an idea of just how many options there are:
When you choose a style, you’ll get a spreadsheet, which will allow you to enter the data points on your x and y axes. As you enter data, the chart will change.
Manipulating and formatting charts is easy. Whenever you click on a chart in your document, you’ll get the “Chart Tools,” which, as you might have guessed, is the Ribbon tab devoted solely to charts.
Using the “Design” tab, if you don’t like the colors or style of your chart, you can instantly apply changes to it without having to generate a new one.
If you decide you don’t think the layout works for this particular type of data, change it using “Quick Layout” or add another element such as another axis, chart title, gridlines, and more.
On the right side of the “Design” tab you will find essential tools for altering your data and you can also go back and completely change the type of chart you’re using.
So, if you think a pie chart would work better, you can change to that. Note however, some data points, such as “breakfast,” “lunch,” and “dinner” aren’t represented on this chart.
The “Chart Tools” also give you a “Format” tab so you can dress things up a bit by adding shapes and then being able to change the style, fill, and outline.
Turning to the right side of the “Format” tab, you are given options for adding and changing WordArt, arranging elements, and adjusting the size of your chart (which you can also do with the grab handles).
It’s easy also to affect changes inline too. When you click on a chart in your document, formatting controls appear along the upper-right corner. From top-to-bottom, you get “Layout options” so you can set your text wrapping. You can change chart elements with the plus (+) symbol, so if you want to change chart titles, add gridlines, and stuff like that.
The paintbrush icon is for setting a style and color them, and finally, the sieve icon is for “Chart Filters,” so you can edit data points and names on your chart.
Screenshot
The “Screenshot” feature will allow you to take a screen clip, which is automatically pasted in you document.
When you use the screenshot function, it will let you choose between any currently open windows, or you can select “Screen Clipping,” which will minimize Word allowing you to take a selection or full shot of your desktop. So for example, if you want to simply insert a shot of your desktop and its icons, you would first need to minimize everything you have open.
There’s a myriad of ways you can take and add screenshots, so we’re not going to dwell on it. Just note this feature, if you’re unfamiliar with adding screenshots, and you want an easy way to do it in Word.
Online Video
You can insert “Online Video” such as Bing, YouTube, or video embed code into your document.
When you embed a video, it will appear as if it is a regular picture, complete with grab handles and text wrap controls.
Further, you can adjust how the emedded video thumbnail appears (as a picture) using the “Picture Tools” so you can make adjustments to the color, add a border, correct the contrast and brightness, and more.
So you see, we simply applied a “picture style” and add a purple border. This is only a fraction of the stuff you can do, so if you to add some really nice looking effects and create a nice looking document that really pops, you should take your time to familiarize yourself with everything.
On the other hand, if you don’t like your changes and you want to go back to the default, simply click “Reset Picture” and it will revert to normal.
Other Text Features
Here are few more text features that you might want to be aware of though you will probably rarely use them.
Text Box
Text boxes are like their own little islands in Word. What we mean is, when you add a “Text Box” to your documents, it is immune to changes you make to the rest of the document. It is like a document within a document.
This is useful if you want to present something “as is” in your work, be able to make overarching changes to the document’s formatting, but have something you’ve pasted remain unchanged.
For the most part, text boxes are something of a bane to an editor’s existence because they don’t play nice with styles (Lesson 5). You may find them extremely convenient and that’s perfectly fine, but if you want something that conforms to your document’s style and formatting, but still place it in a box or have a border around it, then we recommend simply adding a border, which we covered in Lesson 2 – Shading and Borders.
Drop Cap
Drop caps are simply that one letter at the beginning of a chapter or book that is larger than the rest:
You can either make your drop cap “Dropped” (the text below it shifts underneath it) or “In Margin.” Check out the “Drop Cap” options for more power over how your drop caps behave.
Using More than One Language
If you want to produce content in a language other than the one that comes with Word by default, you will likely need to purchase it. Open the Word “Options” and click on “Language.”
Pick the language you want to add from the dropdown list and then click the “Add” button. When you add a language, you will need to enable it, which means that you will have to turn it on in the “Control Panel.”
From here, you can write in the language, but Word won’t display in it, in other words, menus and help systems will still appear in the default language. To get the full multilingual experience, you may need to purchase a language pack from Microsoft.
To see what languages are available for purchase, and how much, click on “Not installed” and you will be whisked to the Microsoft Office website.
If you want to add proofing tools, such as spellcheck, grammar check, and/or screen tooltips, then you may be able to simply download them for free.
While it’s doubtful you’ll be using Word in full multilingual mode, it’s nice to know how you can affect those changes. Moreover, most languages are freely available to use system-wide so actually creating a document in another language is well within your reach, for free.
Coming up Next…
So that concludes this section. We know it’s been a lot to absorb but you’ll see that after a while, this stuff is a cinch!
Once you get the hang of one skill, the rest is pretty similar and comes easier. By now you should have more than enough knowledge to create awesome documents with lists, tables, pictures, video, and anything you need to create a true multimedia publication!
Don’t forget though, if you’ve missed anything in this series you can always go back and read our introduction in Lesson 1, all that stuff on paragraphs and lists in Lesson 2, and all-important tables and other formatting options in Lesson 3.
In our final lesson, Lesson 5, we will cover styles, templates, and themes. It doesn’t sound like much, but they can be a fantastic way to not only save tons of time and create consistently formatted documents, but quickly apply themes that will instantly affect the entire appearance of your documents, as well as create templates that you can later use over and over again!
READ NEXT
- › The New NVIDIA GeForce RTX 4070 Is Like an RTX 3080 for $599
- › HoloLens Now Has Windows 11 and Incredible 3D Ink Features
- › This New Google TV Streaming Device Costs Just $20
- › BLUETTI Slashed Hundreds off Its Best Power Stations for Easter Sale
- › How to Adjust and Change Discord Fonts
- › Google Chrome Is Getting Faster
![]()
Download Article
Step-by-step guide to inserting pictures in Word
![]()
Download Article
- Windows
- Mac
- Web App
- Video
- Q&A
- Tips
|
|
|
|
|
Whether you’re working on a hefty research project or a friendly holiday greeting card, adding images to your Word document can really add value to your project. Whether you want to insert a picture from your computer or find one online, it’s easy to add photos in Word. This wikiHow teaches you how to insert an image into a Microsoft Word document using Windows, a Mac, and the free web version of Word.
Things You Should Know
- Use the Insert tab on Windows, Mac, and the web app to add a picture.
- Select Pictures > This Device to use an image on your computer.
- Click the image to resize and reformat it.
-
1
Click the place in your document where you want to insert the picture. Word’s insertion cursor, a vertical blinking bar, will appear at this point. When you insert the image, its bottom-left corner will be at this point.
- This method works for all modern versions of Word beginning with Word 2016. You can also use it as a guide for earlier versions of Windows, although there will be fewer tools and features.
- Changing the background is done through a different method, using the Design tab.
-
2
Click the Insert tab. It’s near the top of Word between «Home» and «Draw» (or «Home» and «Design» in some versions).
Advertisement
-
3
Click the Pictures tool. It’s in the «Illustrations» section of the toolbar running along the top of Word. Some location options will appear. If you’re using Word 2019 or later, a menu will expand. If you’re using Word 2016 or earlier, your file browser will appear.
-
4
Select the type of image you want to insert. You can choose an image on your computer, a stock image from Microsoft, or an image from the internet.
- Word 2019 or later:
- Click This Device if the picture is on your computer.
- Click Stock Images to select a free stock image from Microsoft’s collection.
- Click Online Pictures to use Bing’s image search to find photos on the web.
- If the photo is on your OneDrive, select Online Pictures and click OneDrive at the bottom-left corner.
- Word 2016:
- If the picture is on your computer, simply navigate to it in the file browser.
- If you want to search for a photo online or insert one from Facebook, Flickr, or your OneDrive, close the file browser and click the Online Pictures icon next to the «Pictures» in the toolbar. You can then select an image from Bing image search, Flickr, or Facebook.
- If the picture is on your OneDrive, click Online Pictures instead of Pictures and click Browse next to «OneDrive.»
- Word 2019 or later:
-
5
Select the image you want to insert. When you find the picture, click it once to select it.
- If you’re selecting from stock images or online images, you can click multiple pictures to add more than one.
- If you’re choosing files from your computer and want to add more than one picture, hold the Ctrl button down as you click each image.
-
6
Click Insert. It’ll be near the bottom-right corner of the window no matter where you’ve selected your image(s). You’re done! Continue to the next steps for formatting information, or print the document when you’re ready.
-
7
Resize the picture. If you want to change the picture’s size, click it once to select it, and then drag any of the corner circles in or out.[1]
- You can also specify the size if you want. Double-click the picture to open the Picture Format tab at the top, and then set your desired measurements next to «Height» and «Width.»
-
8
Use the curved arrow at the top of the picture to rotate it. It’s above the dot at the top-center part of the picture. To rotate, place the mouse cursor over the curved arrow, and then click and drag the cursor left or right until you’re satisfied.
-
9
Double-click the picture to access more editing tools. This opens the «Picture Format» (2019 and later) or «Format» (2016) tab at the top of Word. On this tab, you can:
- In the «Arrange» panel in the top-right area, click Wrap Text to choose how to situate the picture in blocks of text. You can also set alignment preferences here. Wrapping the text is a good way to get your document formatted exactly the way you want.
- To crop the picture, click the Crop tool in the «Size» panel at the top-right corner.
- The «Adjust» panel near the top-left corner has additional tools for background removal, color effects, and corrections.
- To add a border or effect around the picture, select one of the «Picture Styles» at the center of the Format bar, or choose any of the other options in the section to have more control over the style.


Advertisement
-
1
Click the place in your document where you’d like to insert a picture. This places the cursor at that location.
-
2
Click the Insert tab. It’s at the top of Word between the «Home» and «Design» or «Home» and «Draw» tabs.
-
3
Click the Pictures icon. It’s on the toolbar that runs along the top of Word. Look for an icon of a green mountain with a yellow sun between «Tables» and «Shapes.»
-
4
Click Photo Browser or Picture from File. If you want to browse images in your Mac’s Photos app, use Photo Browser. To select an image file using Finder, choose Picture from File.
-
5
Insert the picture into the document. If you’re using the Photo Browser option, simply drag the photo into your document. If you’re using Picture from File, select the image and click Insert.
-
6
Resize the picture. If you want to increase or reduce the picture’s size, click the image to select it, and then do one of the following:
- To maintain the picture’s proportions so it doesn’t stretch or warp, hold down the Shift key as you drag any of the sizing handles (the circles) inward or outward.[2]
- To keep the image’s center in place as you resize, hold down the Option key as you drag the handles.
- You can also specify a size. Double-click the Picture to open the Picture Format tab, then enter your desired measurements next to «Height» and «Width.»
- To maintain the picture’s proportions so it doesn’t stretch or warp, hold down the Shift key as you drag any of the sizing handles (the circles) inward or outward.[2]
-
7
Drag the curved arrow at the top of the picture to rotate it. It’s above the dot at the top-center edge of the picture. Just place the mouse cursor over the curved arrow, and then click and drag it left or right until it’s correct.
-
8
Double-click the picture to access more editing tools. This opens the «Picture Format» tab at the top of Word, which has a bunch of editing features, including the ability to remove the background and add styles.
- Click Corrections near the top-left corner to correct lighting and color problems.
- Click Artistic Effects to play around with filters, and Transparency to make the picture more see-through.
- To crop the picture, click the Crop tool next to the height and width controls.
- Click Wrap Text to choose how to situate the picture in blocks of text, and use Align and Position to ensure correct placement.
- Click Quick Styles to choose pre-styled borders, shadows, and other options.


Advertisement
-
1
Click the place in your document where you’d like to insert a picture. This places the cursor at that location.
- If it’s your first time using Office Online on the web, go to https://www.office.com, sign in with your Microsoft account, and select Word to get started.
-
2
Click Insert. This opens the Insert tab.
-
3
Click Pictures. This opens a drop down options menu.
-
4
Select a picture type. There are four options to choose from:
- This Device — choose a picture on your computer
- OneDrive — choose an image from your OneDrive
- Stock Images — insert a stock image or sticker
- Bing Pictures — search Bing for an image
-
5
Select an image. If you choose the This Device option, you’ll be prompted to select an image from your computer. Click it to select it.
-
6
Click Open. This is in the bottom right corner of the image selection window. This will confirm your selected image and insert it into the document.
-
7
Resize the picture. If you want to change the picture’s size, click it once to select it, and then drag any of the corner circles in or out.
- You can also specify the size if you want. Double-click the picture to open the Picture tab at the top, and then set your desired measurements next to «Height» and «Width.»
-
8
Use the curved arrow at the top of the picture to rotate it. It’s above the dot at the top-center part of the picture. To rotate, place the mouse cursor over the curved arrow, and then click and drag the cursor left or right until you’re satisfied.
-
9
Double-click the picture to access more editing tools. This opens the «Picture» tab at the top of the Word web app. On this tab, you can:
- In the «Arrange» panel in the top-right area, click Wrap Text to choose how to situate the picture in blocks of text. You can also set alignment preferences here.
- To crop the picture, click the Crop tool in the «Image Size» panel at the top-right corner.
- To add a border or effect around the picture, select one of the «Picture Styles» at the center of the bar, or choose any of the other options in the section to have more control over the style.


Advertisement
Add New Question
-
Question
How do I take screenshots?

On a Mac, shift command 3 to screenshot the whole screen. If you want to take a screenshot of a certain area on the screen, press shift command 4. On a Windows PC, press control and print screen at the same time, then you can paste the image into Paint or Microsoft Word.
-
Question
When I insert several photos on an age in a Word document, the photos often won’t stay in place. How do I stop the photos from bumping each other around?
You can right-click the image, hold the cursor over the «Wrap Text» menu option, and select an option from the list that is NOT «In Line with Text» (usually selected by default), such as «Tight» or «Behind/In Front of Text.» Then you should be able to move the image freely around the page.
-
Question
How do I format images in a Word document?
Try double-tapping the photo. A photo format menu should come up on the right side.
See more answers
Ask a Question
200 characters left
Include your email address to get a message when this question is answered.
Submit
Advertisement
Video
-
Adding photos to your Word document increases its size.
-
Other photo modification features available in newer versions of Microsoft Word include the ability to add borders, cutout styles, shadows, beveled edges, glows, and drop shadows.
-
When you crop a picture, the actual cropped part of the picture is hidden, not removed; unless you check the «Delete Cropped Areas of Pictures» box in the «Compression Settings» dialog box. Any compressed pictures with their cropped areas deleted cannot be restored to their original appearance.
Show More Tips
Thanks for submitting a tip for review!
Advertisement
About This Article
Article SummaryX
1. Click the place you want to insert the image.
2. Click the Insert tab.
3. Click Pictures.
4. Choose a location.
5. Select the image and click Insert.
6. Double-click the picture to open editing and format tools.
Did this summary help you?
Thanks to all authors for creating a page that has been read 650,440 times.
Is this article up to date?
Updated: 07/06/2021 by

Sometimes abbreviated as WP, a word processor is a software program capable of creating, storing, and printing typed documents. Today, the word processor is one of the most frequently used software programs on a computer, with Microsoft Word being a popular choice.
Word processors can create multiple types of files, including text files (.txt), rich text files (.rtf), HTML files (.htm & .html), and Word files (.doc & .docx). Some word processors can also be used to create XML files (.xml).
Overview of Word
In a word processor, you are presented with a blank white sheet as shown below. The text is added to the document area and after it has been inserted formatted or adjusted to your preference. Below is an example of a blank Microsoft Word window with areas of the window highlighted.
Features of a word processor
Unlike a basic plaintext editor, a word processor offers several additional features that can give your document or other text a more professional appearance. Below is a listing of popular features of a word processor.
Note
Some more advanced text editors can perform some of these functions.
- Text formatting — Changing the font, font size, font color, bold, italicizing, underline, etc.
- Copying, cutting, and pasting — Once text is entered into a document, it can be copied or cut and pasted in the current document or another document.
- Multimedia — Insert clip art, charts, images, pictures, and video into a document.
- Spelling and Grammar — Checks for spelling and grammar errors in a document.
- Adjust the layout — Capable of modifying the margins, size, and layout of a document.
- Find — Word processors give you the ability to quickly find any word or text in any size of the document.
- Search and Replace — You can use the Search and Replace feature to replace any text throughout a document.
- Indentation and lists — Set and format tabs, bullet lists, and number lists.
- Insert tables — Add tables to a document.
- Word wrap — Word processors can detect the edges of a page or container and automatically wrap the text using word wrap.
- Header and footer — Being able to adjust and change text in the header and footer of a document.
- Thesaurus — Look up alternatives to a word without leaving the program.
- Multiple windows — While working on a document, you can have additional windows with other documents for comparison or move text between documents.
- AutoCorrect — Automatically correct common errors (e.g., typing «teh» and having it autocorrected to «the»).
- Mailers and labels — Create mailers or print labels.
- Import data — Import and format data from CSV, database, or another source.
- Headers and footers — The headers and footers of a document can be customized to contain page numbers, dates, footnotes, or text for all pages or specific pages of the document.
- Merge — Word processors allow data from other documents and files to be automatically merged into a new document. For example, you can mail merge names into a letter.
- Macros — Setup macros to perform common tasks.
- Collaboration — More modern word processors help multiple people work on the same document at the same time.
Examples and top uses of a word processor
A word processor is one of the most used computer programs because of its versatility in creating a document. Below is a list of the top examples of how you could use a word processor.
- Book — Write a book.
- Document — Any text document that requires formatting.
- Help documentation — Support documentation for a product or service.
- Journal — Keep a digital version of your daily, weekly, or monthly journal.
- Letter — Write a letter to one or more people. Mail merge could also be used to automatically fill in the name, address, and other fields of the letter.
- Marketing plan — An overview of a plan to help market a new product or service.
- Memo — Create a memo for employees.
- Report — A status report or book report.
- Résumé — Create or maintain your résumé.
Examples of word processor programs
Although Microsoft Word is popular, there are other word processor programs. Below is a list of some popular word processors in alphabetical order.
- Abiword.
- Apple iWork — Pages.
- Apple TextEdit — Apple macOS included word processor.
- Corel WordPerfect.
- Dropbox Paper (online and free).
- Google Docs (online and free).
- LibreOffice -> Writer (free).
- Microsoft Office -> Microsoft Word.
- Microsoft WordPad.
- Microsoft Works (discontinued).
- SoftMaker FreeOffice -> TextMaker (free).
- OpenOffice -> Writer (free).
- SSuite -> WordGraph (free).
- Sun StarOffice (discontinued).
- Textilus (iPad and iPhone).
- Kingsoft WPS Office -> Writer (free).
Word processor advantages over a typewriter
See our typewriter page for a listing of advantages a computer with a word processor has over a typewriter.
Computer acronyms, Doc, Microsoft Word, Software terms, Untitled, Word processing, Word processor terms, WordStar, Write
© 2023 Prezi Inc.
Terms & Privacy Policy
- Definition of a Word Processor
- What is a word processor?
- Purpose of Word Processing.
- Basic Word Processing Features and Concepts
- Using a Word Processing Package — Microsoft Word
- Starting Microsoft Word
- Microsoft Word Screen Layout
- Editing a Document
- Editing a Document
- Block Operations
- Find and Replace
- Proofreading
- Formatting a Document
- Text Formatting
- Paragraph Formatting
- Formatting Pages
- Creating and Editing Tables
- Creating Tables
- Formatting and Editing a Table
- Table Conversions
- Mail Merge Document
- To Create the Main Document
- Inserting Graphics
- Working with Graphics
- Editing and Formatting Pictures
- Printing a Document
- Printing in Microsoft Word
Definition of a Word Processor
What is a Word Processor?
- A word processor is an application software that enables a person to create, save, edit, format and print text documents. Word processing is the act of using a word processor.
Examples of word processors
- Examples of word processors include, Microsoft Word, Corel WordPerfect, WordStar, Lotus WordPro and many others.
Purpose of Word Processing.
— A Word processor is a tool that can be used to prepare & produce documents. It can be used in:
- Writing Letters (i.e., Business & general mail).
- Writing Memos.
- Writing Books.
- Writing Articles, Research letters such as Reports/thesis and Term papers.
- Writing Essays and Projects.
- Writing Curriculum vitae and Resumes.
- Writing weekly Newsletters on sports, entertainment, etc.
- Writing Lease agreements and other legal documents
A word processor has a number of advantages over the type writer that include:
- A document can be stored in the computer for future reference in computer files that do not occupy physical space like the one on paper. This creates a paperless document-processing environment.
- Typing using a word processor is easier and more efficient because some actions are automated. For example, word-wrap feature automatically takes the cursor to the beginning of the next line once you reach the end of the current. Another automatic features common in most word processors is automatic insertion of a new page after reaching the end of the current page.
- Most word processors have special editing tools such as spelling and grammar checkers and thesaurus that help the user to easily Correct grammar and spelling mistakes. A thesaurus helps to find a word or phrase with similar meanings.
- With insert and type over modes available in most word processors, one can easily insert or replace a word or a phrase without affecting the structure and neatness of the document.
- Word processors have superior document formatting features. Formatting refers to the art of making the document more attractive and appealing to the eye. Such features include, underlining, boldfacing, italicization, applying different colors etc.
- While a typewriter may require that we retype the entire document when we want many copies, with a word processor, printing lets you produce as many copies per session as needed.
- Using the cut, copy and paste commands, you can incorporate other text without having to retype it.
Basic Word Processing Features and Concepts
- They allow the user to create a file, save it and open it again and again for reuse, editing or formatting.
- They have almost similar document windows with the following Features:
- Most are designed to look like a piece of paper with a few
- Most of the screen is blank before typing of text.
- There is a cursor, which blinks at the position where you can Begin entering text.
- There is a status bar or line that provides the user with current status information such as saving operation, the name of the file in use, the current page, the current imaginary horizontal-line and column cursor position.
- Word wrap: The feature that automatically moves a word or cursor to the beginning of the next line if it does not fit at the end of the current line.
- Scrolling: This is the vertical movement of text document on the screen. We can scroll through a text document using the up or do n arrow keys, page up and page down keys and also using, a mouse in windows based word processors.
- Help: Sometimes we get lost, confused or need more information on how to use an application. Help contains instruction, tips, pointers, explanations and guidance. You can get help by either pressing F1 on the keyboard or clicking Help from the menu.
- Editing Modes: Word processors have two editing modes, insert and type over mode. In insert mode, every character typed between words, lines or characters is placed at the cursor position. This pushes all the text in front of the cursor away without deleting it.
— However in type over mode every character typed deletes what was there before and replaces it with new text at the cursor position.
- Nearly all word processors have a spelling checker, thesaurus (Dictionary of synonyms) and grammar checker.
- They provide for the use of headers and footers, indexing, footnotes and references, typefaces (fonts) and character set.
- Most word processors have ability to create and import tables, text and graphics from other programs.
— Mostly, word processors are used for writing letters, reports, projects, books, essays, memos curriculum vitae etc.
Factors to consider when choosing a word processor The choice of a word processor depend on:
- The type of operating system. For example, most microcomputers are currently running on Windows based operating system such as Microsoft Windows. This means that you should consider acquiring a graphical user interface based Word Processor,
- Its user-friendliness, i.e. ease of use.
- Its formatting and editing features. They should be good and varied.
Using a Word Processing Package — Microsoft Word.
- Microsoft Word is one of the components of Microsoft Office. Microsoft Office is integrated software with a number of interrelated programs. The programs include Microsoft Word, a spreadsheet called Microsoft Excel, and a database management system called Microsoft Access, communication software called Microsoft Outlook, and a presentation package called Microsoft PowerPoint among others.
- Although there are several versions of Microsoft Word, the most common are Word 97, Word 2000, Word XP and Word 2003, Word 2007, Word 2010, Word 2013, Word 2016, Word 2019. These versions of Microsoft Word are found in Microsoft Office 97, 2000, XP and 2003, 2007, 2010, 2013, 2016, 2019 suites respectively.
Starting Microsoft Word
- There are a number of ways you can start Microsoft Word. However the Simplest is by using programs start menu.Starting Microsoft Word from the start menu
- Click the start button.
- Click All Programs option from the menu.
- Search for Microsoft Office from the sub menu and click it.
- Search for Microsoft Word 2013 from the submenu and click it.
- This will launch Microsoft Word 2013 application
- A Microsoft Word icon may also be available on your desktop for quick access. Double click on the icon to start the application
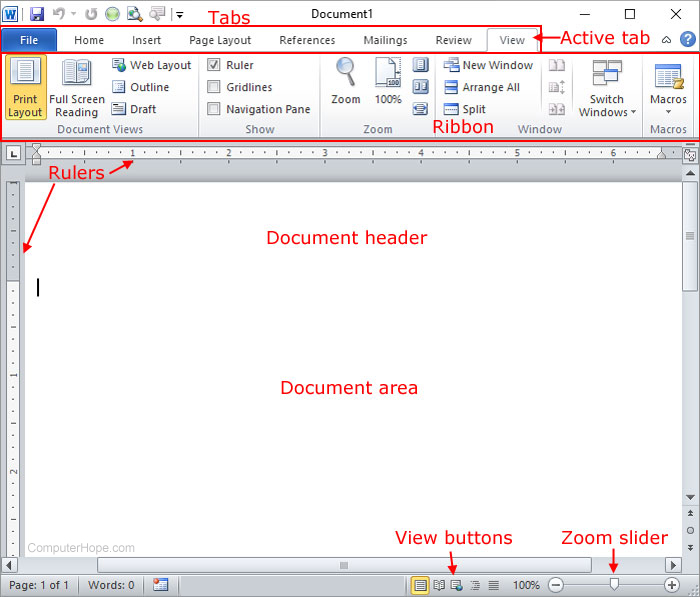
Microsoft Word Screen Layout
Parts of A Window
The File tab replaces the Office button from Word 2007. You can click it to check Backstage view, which is the place to come when you need to open or save files, create new documents, print a document, and do other file-related operations.
Title bar
- A title bar is mostly a blue strip at the top of the window that displays the title of the currently running application or task. However it is possible to change the color of the title bar using the display properties.
- The title bar also enables the user to move the window around the desktop. This is possible by pointing to it then dragging using the mouse.
- On the right of the title bar are three tiny buttons called minimize, restore/maximize and the close buttons.
- The minimize button reduces a window to become a button on the taskbar. The restore/maximize button stretches the window to cover the entire desktop or restore it to its original size respectively.
- The close button is used to close and exit a window.
- At the left hand side of the title bar is a quick access toolbar which provides you with access to commands you frequntly use. By default Save, Undo, and Redo appear on the quick access toolbar. You can use Save to save your file, Undo to rollback an action you have taken, and Redo to reapply an action you have rolled back.
Quick Access Toolbar
- This you will find just above the File tab and its purpose is to provide a convenient resting place for the Word most frequently used commands. You can customize this toolbar based on your comfort
Ribbon
- Ribbon contains commands organized in three components:
- Tabs: They appear across the top of the Ribbon and contain groups of related commands. Home, Insert, Page Layout are example of ribbon tabs.
- Groups: They organize related commands; each group name appears below the group on the Ribbon. For example group of commands related to fonts or or group of commands related to alignment etc.
- Commands: Commands appear within each group as mentioned above
Tabs
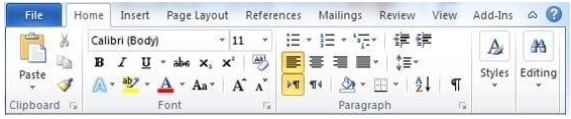
- The Home tab gives you access to some of the most commonly used commands for working with Word 2013, including copying and pasting, formatting, aligning paragraphs, and choosing document styles. The Home tab is selected by default whenever you open Word

- The Insert tab allows you to insert pictures, charts, tables, shapes, cover pages, and more to your document, which can help you communicate information visually and add style to your document

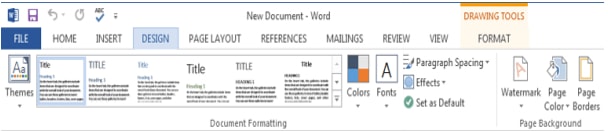
- The Design tab gives you access to a variety of design tools, including document formatting, effects, and page borders, which can give your document a polished look

- The Page Layout tab allows you to change the print formatting of your document, including margin width, page orientation, page breaks, and more. These commands will be especially helpful when preparing to print a document

- The References tab allows you add annotations to your document, such as footnotes and citations. From here, you can also add a table of contents, captions, and a bibliography. These commands are especially helpful when composing academic papers

- You can use the Mail Merge feature in the Mailings tab to quickly compose letters, address envelopes, and create labels. This is especially useful when you need to send a letter to many different recipients

- You can use the Review tab to access Word’s powerful editing features, including adding comments and tracking changes. These features make it easy to share and collaborate on documents.

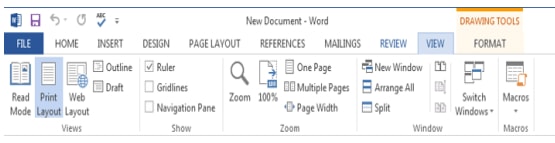
- The View tab allows you to switch between different views for your document and split the screen to view two parts of your document at once. These commands will also be helpful when preparing to print a document.

- Contextual tabs will appear on the Ribbon when working with certain items, such as tables and pictures. These tabs contain special command groups that can help you format these items as needed

- Certain programs, such as Adobe Acrobat Reader, may install additional tabs to the Ribbon. These tabs are called Add-ins


Help
- The Help Icon can be used to get word related help anytime you like. This provides nice tutorial on various subjects related to word
Zoom Control:
- Zoom control lets you zoom in for a closer look at your text. The zoom control consists of a slider that you can slide left or right to zoom in or out, . and + buttons you can click to increase or decrease the zoom factor.
View Buttons
- The group of buttons located to the left of the Zoom control, near the bottom of the screen, lets you switch among Word’s various document views.
- Print Layout view: This displays pages exactly as they will appear when printed.
- Web Layout view: This shows how a document appears when viewed by a Web browser, such as Internet Explorer.
- Read Mode view: to hide the writing tools and menus and to leave more room for the pages themselves. Read Mode automatically fits the page layout to your device, using columns and larger font sizes, both of which you can adjust.
Rulers
- Word has two rulers — a horizontal ruler and a vertical ruler. The horizontal ruler appears just beneath the Ribbon and is used to set margins and tab stops. The vertical ruler appears on the left edge of the Word window and is used to gauge the vertical position of elements on the page.
- If the ruler is not visible on the screen, then display it using the following procedure.
- Click the View menu option.
- On the drop down menu that appears, click Ruler. A check mark or tick will appear next to it showing that the ruler is displayed on the screen.
Work area/Document Area
- This is the working area where you can enter text or graphical objects. All windows based application programs provide the user with a unique working area suited to that particular application. The flashing vertical bar is called the insertion point and it represents the location where text will appear when you type.
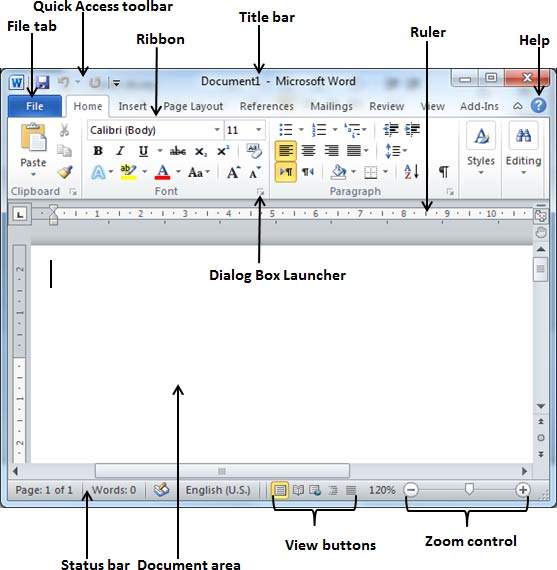
Status bar
- This is an interactive strip at the bottom of the screen that acts as a communication link between the user and the program. It displays interactive activities like saving, opening, background printing, cursor position etc.
Scroll bars/button and scroll arrows
- Scroll bars or buttons are horizontal and vertical bars on the borders of a window that the user drags to scroll upward, downwards, to the right or left of a document. Scroll arrows are arrows at the end of the scroll bars that the user clicks instead of dragging the scroll button. Using scroll bars or arrows is equivalent to using the arrow keys on the keyboard
Dialog Box Launcher:
- This appears as very small arrow in the lower-right corner of many groups on the Ribbon. Clicking this button opens a dialog box or task pane that provides more options about the group
Backstage View
- The Backstage view has been introduced in Word 2013 and acts as the central place for managing your documents. The backstage view helps in creating new documents, saving and opening documents, printing and sharing documents, and so on.
- Getting to the Backstage View is easy: Just click the File tab, located in the upper-left corner of the Word Ribbon.
- It is simple to exit from Backstage View. Either click on back arrow on the top leftor press Esc button on the keyboard to go back in word working mode
Running the Program
Creating a document
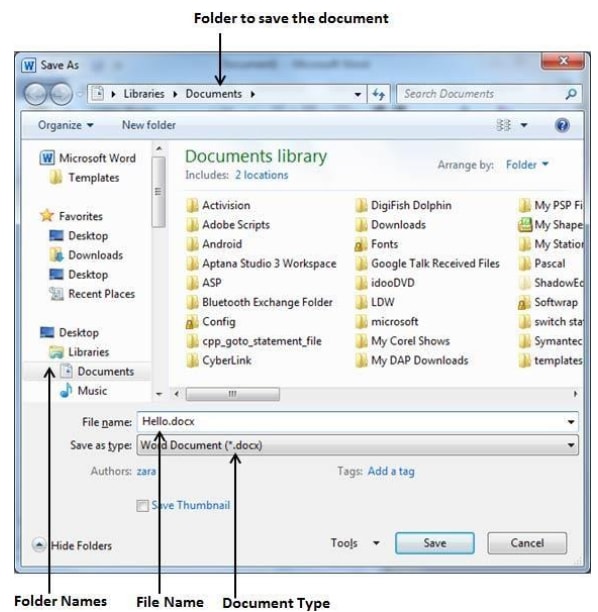
Saving a new document
- Click the File tab and select Save or Save As option. The difference between Save and Save As is that although both give the save as dialog box when saving for the first time, Save allows the user to save document without the opportunity to change the file name or the location. The figure below shows a Save As dialog box.
- In the file name box, type a unique name for the document
- Select a the location or drive you want to save in, by clicking the down arrow on the right of save in list box,
- To save the file in a different format or type such as PDF, Word 97-2003 document etc., click the down arrow on the right of Save as type list box and choose a file type.
- Click the save button. The file will automatically be saved as a Microsoft Word document.
Saving New Changes:
- There may be a situation when you open an existing document and edit it partially or completely, or even you would like to save the changes in between editing of the document. If you want to save this document with the same name then you can use either of the following simple options:
- Just press Ctrl + S keys to save the changes.
- Optionally you can click on the floppy icon available at the top left corner and just above the File tab. This option will also save the changes.
- You can also use third method to save the changes, which is Save option available just above the Save As option as shown in the above screen capture.
- If your document is new and it was never saved so far, then with either of the three options, word would display you a dialogue box to let you select a folder, and enter document name as explained in case of saving new document
Opening an existing document
- There may be a situation when you open an existing document and edit it partially or completely. If you want to open an existing document then follw the following simple options:
- Click the File tab and select Open option. Alternatively press Ctrl + O key combination on the keyboard.

- The Open dialog box shown appears.

- Select a drive or folder where the file is saved.
- In the file name box, type or select the name of the document you want to open.
- Click the open button
- Click the File tab and select Open option. Alternatively press Ctrl + O key combination on the keyboard.
— To open a document created in another program, click the file format you want in the files of type box, and then double click the document name in the folder list. You can also use wildcards in the file name box for example, type *. Document to find Microsoft Word files.
Protecting a document with a password
- A password is a combination of characters that prevents other users from opening and changing a document without permission. If a document is protected by a password, only the person who knows the password can open the document or edit it.
To save a document with a password
- Create or open the document you want to protect
- Click the file tab and choose Save As.
- Click the down arrow on the Tools button in the save as dialog box
- Click General options.
- Type in a password in the password to open. This prompts the user to enter password when opening a document.
- Type in a password in the password to modify. This prevents the user from making changes to a document unless the user enters the correct password.
- Finally click OK.
Closing a document
- Closing a document means unloading the current active document from memory so that the user can create or open another without necessarily exiting from Word.
To close a document:
- Click the File tab and select Close option
- This will close the document and if you had other documents open, Word displays the last document you used
NB: You can close a document by pressing Alt + F4 keys or by clicking the close button on the top right of the title bar. If you have not saved the open document, Microsoft Word prompts you to save the document first.
Editing a Document
- Editing refers to making necessary changes to an existing document. Apart from manual editing using delete, insert and overtype/overwrite commands, Microsoft Word provides the user with inbuilt tools such as the spelling and grammar checker, thesaurus, undo and re-do, find and replace etc.
Block Operations
Selecting (highlighting) a block of text
- The purpose of selecting text is to enable the user perform a number of editing or formatting operations on the selected block of text. Microsoft Word presents the user with a number of ways for selecting a block of text. You can either select a block of text using the mouse or keyboard.
Selecting with a mouse
- To select a word, place the insertion pointer on the word then, double Click it.
- To select a sentence, positions the mouse pointer at the left margin until it changes to a right arrow, and then click once.
- To select a paragraph, place the pointer at the beginning or end of the paragraph. Notice that the pointer changes to I-beam. Now drag the I-beam over the text to be selected and release the mouse button at the end of the text you wish to work on.
Selecting with the keyboard
- To select one word, move the insertion pointer to the beginning or End of the word then press Shift+Ctrl+Right or left arrow.
- To select one line, press Shift+Up or Shift+Down arrow key. Alternatively, move the insertion point to the end or beginning of The line then press Shift+Home or end keys respectively.
- To select an entire page; press Shift+Page Down or Shift+Page Up.
- To select the entire document, press Ctrl+A or place the cursor at the beginning of the document then press Shift+Ctrl+End.
Deleting text
- To delete a character or a word from the right to the left, place the insertion pointer on the right of the word then press the backspace key.
- To delete a character to the right of the cursor position, place the Insertion pointer on the left of the word then press the Delete key.
To delete a block of text
- Highlight the text to be deleted.
- Press the Delete key.
Restoring deleted text
- To restore text that has just been deleted in the current word processing session: click the Undo buttonon the quick access toolbar or press CTRL + Y on the keyboard
Copying and moving text and objects
- Copying means creating a duplicate of text or an object while moving means changing the position of text or an object in a document. In Microsoft Word, you can copy or move a block of text.
- To use copy and paste or cut and paste operations, word makes use of a temporary memory which is called clipboard. When you copy or cut a text then temporarily it stayed in clipboard. When you copy or cut a text then temporarily it stayed in clipboard and in second step you can paste this content at desired location.
To copy a block of text:
- Highlight the text,
- At second step, you have various options available to copy the selected text in clipboard. Just use any one of them which you like most:
- Using Mouse Right Click: If right click on the selected text, it will display copy option, just click this option to copy the selected content in clipboard.
- Using Ribbon Copy Button: After selecting a text, you can use copy button available at the ribbon to copy the selected content in clipboard.
- Using Ctrl + C Keys: After selecting a text, just press Ctrl + C keys to copy the selected content in clipboard

- Finally click at the place where you want to copy selected text and use either of these two simple options:
- Using Ribbon Paste Button: Just click paste button available at the ribbon to paste the copied content at the desired location.
- Using Ctrl + V Keys: This is simplest way of pasting the content. Just press Ctrl + V keys to paste the content at the new location
To move text and objects
- Highlight the text,
- At second step, you have various options available to cut the selected text and put it in clipboard. Just use any one of them which you like most:
- Using Mouse Right Click: If right click on the selected text, it will display cut option, just click this option to cut the selected content and keep it in clipboard.
- Using Ribbon Cut Button: After selecting a text, you can use cut button available at the ribbon to cut the selected content and keep it in clipboard.
- Using Ctrl + X Keys: After selecting a text, just press Ctrl + x keys to cut the selected content and keep it in clipboard
- Finally click at the place where you want to move the selected text and use either of these two simple options:
- Using Ribbon Paste Button: Just click paste button available at the ribbon to paste the content at the new location.
- Using Ctrl + V Keys: This is simplest way of pasting the content. Just press Ctrl + v keys to paste the content at the new location.
Typing modes
- There are two typing modes in a word processor that assist the user in typing or editing text documents. These are:
- Insert mode.
- Overtype/typeover mode.
Insert mode
- This is the default mode in most word processors. In this case when text is inserted between words or characters it pushes the existing text away without replacing it.
Typeover mode.
- In this case, when text is typed between existing words or characters, the new text automatically replaces the existing text by deleting it. To switch between typeover and insert mode, simply press the insert key on the keyboard or double click the OVR label on the status bar.
Find and Replace
- When you need to search for a word or phrase in a large document, use the Find command. In case you wish to replace a word or phrase, use the Replace option.
Find
- Click the Find option in the Editing group on the Home tab or press Ctrl + F to launch the Navigation pane shown in step 2
- Enter a word which you want to search in the search box, as soon as you finish typing, Word searches for the text you entered and displays the results in the navigation pane and highlight the word in the document as well as follows:

- You can click clear button (X) to clear the search and results and perform another search.
- Finally if you are done with searching operation, you can click close button (X) to close the Navigation Pane.
NB: You can use the keyboard shortcut Ctrl+F to find.
Some search options:
— You can specify search options by clicking the option button to display them. They include:
- Match case: This identifies only text that matches in case with that in the find what box e.g. it will not find the word DEEN if you typed deen and selected the match case option.
- Whole Word: Searches for a word or phrase that is whole. If it is part of another word it will not be found, e.g. the word ever will not be found in words like however, whenever etc. during the search.
- Use wildcards: Wildcards are special symbols such as * and ? That are used to represent a set of words with certain characters in common e.g. names like Jeff, Joe, Jane can be represented using a wildcard as J* which means all names starting with J.
- Like: Searches for words, which are similar in pronunciation e.g., fare and fair.
Replace command
- Click the Replace option in the Editing group on the Home tab or press Ctrl + H to launch the Find and Replace dialog box shown in step 2 appears
- Type a word which you want to search and a word which would like to replace with in the Find and Replace dialog box as follows:

- Click Replace button available on Find and Replace dialog box and you will see first occurrence of the searched word would be replaced with the replace with word. Clicking again on Replace button would replace next occurrence of the searched word. If you will click Replace All button then it would replace all the found words in one go. You can also use Find Next button just to search the next occurence and later you can use Replace button to replace the found word.
- You can use More >> button available on the dialog box to use more options and to make your search more specific like case sensitive search or searching for whole word only etc.
- Finally if you are done with finding and replacing operation, you can click Close (X) or Cancel button of the dialog box to close the box.

Proofreading
- Proofreading refers to checking whether the document has typographical or grammar errors. Microsoft Word has tools for proofreading e.g. spelling and grammar checker, Thesaurus, Autocomplete and Autocorrect.
Spelling and grammar checker
- The spelling and grammar checker is an inbuilt tool that helps the user to correct spelling errors and incorrect grammar structures. However, the checker can only recognise errors of those words whose correct spelling is in its dictionaries. A correctly spelt word used wrongly cannot be detected hence the document should be proofread just before and after printing.
- Word is intelligent enough to identify misspelled or misused, as well as grammar errors and underlines them as follows.
- A red underline beneath spelling errors.
- A green underline beneath grammar errors.
- A blue line under correctly spelled but misused words.
- To check the accuracy of spelling and grammar:
- Click the Review tab and then click Spelling & Grammar button
- A Spelling and Grammar dialog box will appear and will display wrong spellings or grammar and correct suggestions as shown below:

- Either choose one of the following buttons:
- Change to correct only the highlighted incorrect word.
- Change all to correct all the occurrences of the misspelled word.
- Ignore to retain the highlighted and continue. For example, although a word like jembe may not be in the custom dictionary, in the Kenyan context, the word is acceptable therefore if highlighted, click Ignore.
- Ignore all to retain all the occurrences of the same word or phrase in the document from another language e.g. a Kiswahili
- Click Add to add the word into the custom dictionary. In case you want to undo the changes made, click on the Undo button at the lower bottom of the spelling and grammar dialog box.
- NB: You can close the spelling and grammar dialog box even if the process is not complete by choosing Close.
- If you will click a right mouse button over a misspelled word then it would show you correct suggestions and above mentioned options to fix the spelling or grammar mistake
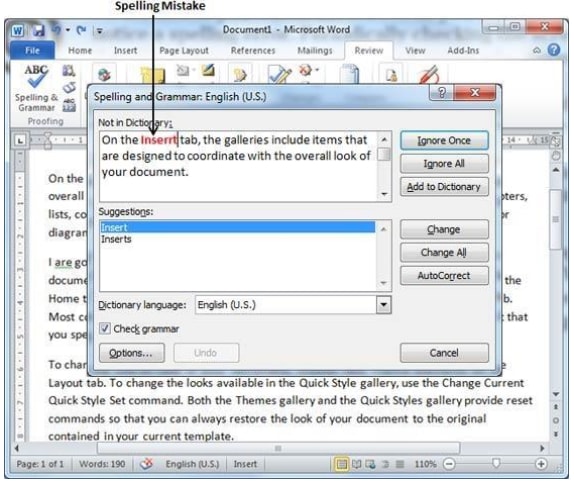
Using the thesaurus
- This is an editing tool that helps the user find words or phrases with similar meaning (synonyms) or opposite meaning (antonyms) to the one selected.
To use the Thesaurus:
- Select a word or a phrase.
- Click the Review tab and then click Thesaurus
- Word displays words with similar or opposite meanings.
- On the drop down arrow against each word, click insert to replace the selected word with the new word.
NB: You can also find the synonyms and antonyms by right clicking on the selected word and choosing synonyms on the menu that appears.
Autocomplete
- The auto complete feature displays a complete word when the user types the first few characters of the word.
- This enables the user to type faster by simply accepting the suggested word if indeed he/she intend to type it.
- To accept the suggestion, simply press the Enter key, and continue typing other word or phrases.
- The figure shows an auto text that automatically completes Thursday text entries

Autocorrect
- The auto correct feature automatically detects wrongly spelled or capitalised words and replaces them with the correct word. However, the settings of auto correct are user defined e.g. if a person keeps on typing the word certain as certain, set the auto correct feature to replace the later with the former.
To turn auto correct on/off
- Click the File tab in the top left.
- Click Options on the left.
- In the new window that opens, click Proofing, on the left.
- Click AutoCorrect Options, near the top of the right panel of that window. A new window will open.
- To turn on the spelling checker corrections, select the Replace text as you type check box, and then select the Automatically use suggestions from the spelling checker check box.
- To turn off the spelling checker corrections, click Automatically use suggestions from the spelling checker check Box at the bottom of the dialog box
- Click OK to close the dialog box.
Undo and redo
- Undo: It reverses the last command that was issued in Order to revert back to the previous state. To undo, click the undo button on the quick access toolbar or use CTRL+Z shortcut on the keyoard.
- Redo: It does the last undone action. To redo, click the redo button on the quick access toolbar or use CTRL + Y shortcut on the keyboard.
Formatting a Document
- Formatting refers to applying various styles or features to enhance the document’s appearance. You can format text, a paragraph or a page.
Text Formatting
- Text formatting refers to features such as changing fonts (type, style and size of characters), changing text color, underlining, bolding Italicising etc. You can use either the formatting tools bar or the Format menu to underline, bold, etc.
To format existing text using the format menu
- Highlight the text to be formatted
- Right click on the highlighted text and choose font. A dialog box with all Text formatting features is displayed
- To change font type and size, where necessary scroll down the Font list box then click the font required, for example Verdana font style would appears as Verdana. To increase the font size, where necessary, scroll down the Size list box and select the required size e.g. 12 points (pt). A point is 1/72 of an inch in height. 72 points i.e. 72/72 is equivalent to 1 inch For example «Verdana» is in Times New Roman 16 points and «Verdana» is in Verdana 16 points.
- Bolding text: Bolding makes the selected text appear darker than the rest of the text. To bold text:
- Activate the font dialog box.
- From the font dialog box, select Bold.
- Underline text: Underlining refers to placing a line at the base or bottom of a word or a phrase. To underline:
- Activate the font dialog box.
- Click the down arrow at the right of Underline style and select. The underline style required e.g. single, double, dashed etc.
- Italicising text: To italicise is to make the text slant forward.
- To italicise activate the font dialog box.
- Click Italic.
- Changing the font color: In most cases, the font default color is black. However you can change the font color for example to red, green, blue etc. To change the font color,
- Activate the font dialog box
- Click the down arrow at the right of font color list box and select the color of your choice.
Using formatting toolbar
- The formatting toolbar lets the user easily format text by clicking the required format button. To format some text, highlight it first then click the home tab. Select a command on the toolbar.
- For example to bold text, highlight it then click then bolding command (B) on the formatting toolbar.
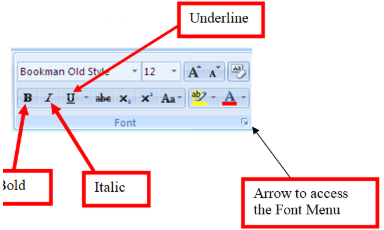
Paragraph Formatting
Text alignment
- Text alignment refers to how text is lined up on the page relative to the left, right or center of the page. There are four ways in which text can be aligned namely left aligned, centered, right aligned and justified.
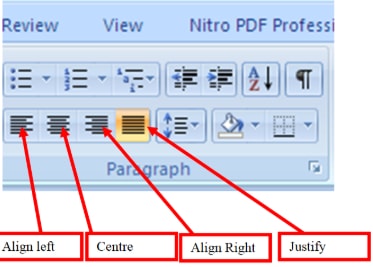
Left alignment
- Lines of text are lined up evenly along the left margin but unevenly at The right margin.
- This is the default alignment.
To align left,
- Highlight your text.
- Simply click the left alignment button. Alternatively click format, Paragraph. And select left from the alignment list box as shown in Figure 1.20.
- Click OK. To apply the choice.
Right alignment
- This is opposite of left alignment. Lines of text are lined up evenly along the right margin but unevenly at the left margin.
To align right,
- Highlight your text
- Simply click the right alignment button. Alternatively click Format, Paragraph. select Right from alignment list box, then click OK..
Center alignment
- The lines of text are centered unevenly between the left and right margins.
To center text,
- Highlight your text,
- Simply click the Center, button. Alternatively click format, paragraph, select centered from alignment list box, then click OK.
Justification
- Lines of text are arranged evenly along the left and right margin.
To justify text,
- Highlight your text
- Simply click the Justify alignment button. Alternatively click Format, paragraph, select Justify from Alignment list box, then click OK.
Change case
- When typing a text, there are a number of cases the user may intend to apply in order to create contrast within the text. These are:
- Sentence case: All the first characters in a sentence are in uppercase (Capitalised).
- Lowercase: All characters appear in lowercase.
- Uppercase: All characters appear in uppercase.
- Title case: All the first characters of each word in a sentence appear in uppercase.
- Toggle case: It changes upper cases to lowercases and vice versa.
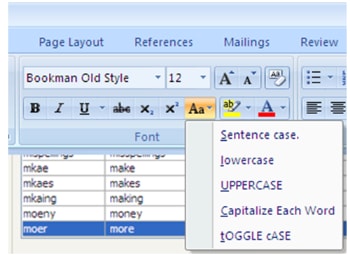
To change case in an existing text;
- Highlight the text.
- Click the Change Case button
- From drop down list, select the case type to be applied.
- Click OK.
Drop caps
- There are times when you wish to attract the reader’s attention by making the first character in a sentence large, taking more space in the next line. Such kind of a character is said to be «dropped». an example is shown in the snip below
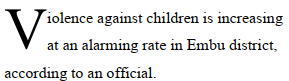
To apply drop cap;
- Highlight the first character in the sentence
- From the Insert Tab, click Drop Cap. A drop down menu appears. Select Drop cap options to open the drop cap dialog box
- Select font in case you wish to apply a certain font to the drop capped
- Specify the number of lines to drop.
- Click OK
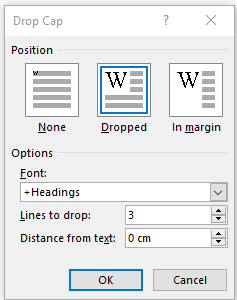
Drop cap dialog box
Indenting paragraphs
- Indentation refers to moving the text away from the margin. You can indent the first sentence in a paragraph (first line), the whole paragraph (full indent) or the rest of the text except the first line (hanging indentations).
First line indent
- Select the paragraph to be indented
- Click the Paragraph Dialog Box Launcher available on Home tab. Paragraph properties dialog box appears
- Click the down arrow in the list box under Special and select First Line.
- Specify by how far the paragraph is to be indented from the margin In the by text box
- Click OK to apply the indent and close the dialog box. The paragraph will be indented
NB: You can also indent the first line by positioning the cursor at the beginning of the paragraph then press the Tab key.
Hanging Indent
- Select the paragraph to be indented
- Click the Paragraph Dialog Box Launcher available on Home tab. Paragraph properties dialog box appears
- Click the down arrow in the list box under Special and select Hanging.
- Specify by how far the paragraph is to be indented from the margin In the by text box
- Click OK to apply the indent and close the dialog box. The paragraph will be indented
Full indent
- Select the paragraph to be indented or position the cursor anywhere in the paragraph
- From the home tab, click the Increase or Decrease indent Button or simply press CTRL+M to increase indent and CTRL+SHIFT+M to decrease indent.
Setting tabs
- Tabs are used to indent the first line of a paragraph or create columnar data. By default the tab stop is set at 0.5 of an inch.
To change the default setting:
- Click the Paragraph Dialog Box Launcher available on Home tab. Paragraph properties dialog box appears
- On the paragraph dialog box click Tabs
- Enter a new value for tab stop in the Tab stop Position box.
- Choose the type of tab either left, center or right.
- If need be specify the Tab leader option
- Click the Set button then OK.
Setting tabs using the ruler
- The easiest way to set tabs is by using the ruler. On the left corner of the horizontal ruler is a tab alignment button that lets the user select the type of tab. The figure below illustrates the tab alignment button while table 1.1 gives an explanation of each alignment button.


To set the tab using the ruler;
- Click on the tab button to choose the required tab type. Notice that the tab type keeps on changing as you click the tab button.
- Set the tab stop by clicking where you want it to be on the ruler.
- Drag the tab stop
| Button | Name | Purpose |
| Left tab | Text is left aligned | |
| |
Center tab | Text is centered |
| Bar tab | Inserts a vertical line at Tab stop and align text to The right of the line |
|
 |
Decimal tab | Text is aligned at decimal Character |
| |
Right tab | Text is right aligned |
Table 1.1 Examples of tabs
Line and character spacing
- Line spacing refers to the vertical distance between lines of text. The default line spacing is single spacing. This type of spacing accommodates the characters in a text leaving a small extra space between lines. Character spacing on the other hand refers to the space between the characters in the text.
To change line spacing:
- Highlight the text,
- Click the Paragraph Dialog Box Launcher available on Home tab. Paragraph properties dialog box appears
- Click the down arrow from the Line Spacing list box and select the Type of spacing required e.g. double, 1.5, at least etc.
- Click OK to effect the changes.
To change character spacing:
- Highlight the text
- Click the Font Dialog Box Launcher available on Home tab. Font properties dialog box appears
- Click the Advanced button
- Under character spacing, adjust the spacing as required
- Click OK.
Bullets and numbering
- Bullets and numbers are used to mark steps in a procedure or items in a list.
To apply bullets and numbers in a list:
- Select the list.
- Click the Bullet Button triangle to display a list of bullets you want to assign to the list. You can select any of the bullet style available by simply clicking over it.
- If you are willing to create a list with numbers then click the Numbering Button triangle instead of bullet button to display a list of numbers you want to assign to the list. You can select any of the numbering style available by simply clicking over it.
To create numbered list as you type.
- Type 1, fullstop (.) and then either press the SPACEBAR or press TAB key, and then type the rest of what you want in the first item of the numbered list.
- When you are done with typing, press Enter to add the item in the list automatically and go to add next item in the list.
- Repeat Step 2 for each list item.
To create bulleted list as you type.
- Type *, and then either press the SPACEBAR or press TAB key, and then type the rest of what you want in the first item of the bulleted list.
- When you are done with typing, press Enter to add the item in the list automatically and go to add next item in the list.
- Repeat Step 2 for each list item
Section breaks
- A break is used to identify where a section, a column or a page ends and the beginning of next. This allows the user to apply more than one paragraph or page format in the same document especially when it comes to page layout, size, different margins etc.
To insert a section break
- Position the text cursor in the document where the break is to be inserted.
- Click the breaks button from the page Layout Tab.
- From the Drop down list, select the type of section break to insert e.g. page break.
Formatting Pages
Inserting page breaks
- A page break identifies the end of one page and the beginning of the next.
- Word automatically inserts a new page after the current one is full. However, there may be a need to start a new page even if the current one is not full.
To insert page breaks
- Position the pointer where the break is to be inserted.
- From the Insert Tab, click on the page break button.
Alternatively
- Click the breaks button from the page Layout Tab.
- From the Drop down list, select page break.
Creating columns
To, create columns on existing text:
- Highlight the text
- From Page Layout Tab, click Columns.
- From the drop down list, select the number of columns.
- If you need more than three columns, select more columns which will launch the Column dialog box. You can then type the number of columns you need in the Number of columns text box
- In the Width and spacing boxes, specify the column widths and space between columns
- Click OK
Page setup
- Page setup options let the user specify the size of the margins, paper size, paper source and layout.
Setting margins
- Margins are blank spaces around the edges of the page. Only text and objects inside the margins are printable.
To set up margins:
- From Page Layout Tab, click Margins Button.
- From the drop down list, select the margins you want.
- You can customize your margin by selecting the custom margin option which will launch the page setup dialog box
- Enter the values for the left, right, top and bottom margins in the respective boxes.
- Click OK.
Setting the paper size
- By default, the paper size may be either Letter or A4. An A4 paper has dimensions 210 mm x 297 mm
To specify a different paper size
- From Page Layout Tab, click the Size Button.
- From the drop down list, select the paper size you want.
- You can customize your paper size by selecting the more paper sizes option which will launch the page setup dialog box
- Enter the dimensions in the height and width boxes.
- Click OK.
Specifying page orientation
- The term page orientation refers to the positioning of the page in relation to the text.
- The two available orientations are:
- Portrait: text and graphics are printed with the longest side vertically upright. For example, on an A4 piece of paper, the 210 mm edges are at the bottom and top.
- Landscape: With landscape, text and graphical objects are placed with the longest side of the page placed horizontally and the lines of text printed parallel. For example, to create a timetable on an A4 page, the 297 mm side should be horizontal.
To select the orientation:
- From Page Layout Tab, click the Orientation Button.
- From the drop down list, select the orientation you want.
Page layout
- This option lets the user specify how text will be placed on the page from the margins. By default, text starts from the top margin.
To change the layout
- From the Page Layout tab choose Page setup dialog box launcher. The page setup dialog box Appears.
- Click on the Layout tab.
- From the Vertical alignment tab, select the alignment required then click OK.
Inserting headers and footers
- Headers, footers and page numbers make it easy to locate information. Headers are few words placed at the top of every page while footers appear at the bottom.
To insert headers and footers:
- From the Insert Tab, click on the Header or Footer button
- From the drop down list, select the type of header you wish to insert.
- The contextual tab appears for you to customise your header or footer
- Edit the header to your preference and click close header and footer from the contextual tab
Inserting page numbers
— To give your document page numbers
- From the Insert menu, click Page number button.
- From the drop down list select the position you wish to insert the page numbers
- You can also choose the format page numbers option to change the number format, i.e. 1,2,3,…, A,B, C etc. or select the page number to start from from using the start at box
Creating and Editing Tables
Creating Tables
- A table is a feature in Microsoft Word made up of rows and columns that is used to organise and enhance display of information.
Creating a new table
- You can create a table either by using the Insert Table command from tables menu, or by using Draw Table tool that resembles a pencil to create more complex tables.
To create a table using the insert table command;
- From the Insert Tab, click on the Table button.
- From the drop down list, select the insert Table option
- In the Insert table dialog box displayed, specify the number of rows and columns.
- Click OK. The table will be displayed on the screen and you can start entering data in it.
NB: You can insert a table by clicking the table button on the insert tab, then drag to select the number of rows and columns.
To create a table using the drawing tool:
- From the Insert Tab, Click on the tables button, then click the Draw table button from the drop down list. The mouse pointer changes to a pencil symbol
- Drag the pointer to draw the outline of the table
- Fill in the table with rows and columns by dragging the pointer as you would draw using an ordinary pencil.
Formatting and Editing a Table
Inserting rows and columns
— To insert a row:
- Click a row where you want to add an additional row and then click Layout tab
- Now use Row & Column group of buttons to add any row below or above to the selected row. If you click Insert Below button, it will add a row just below the selected row
- If you click Insert Above button, it will add a row just above the selected row.
OR
- Place the cursor where you want to insert a row
- Right click, point Insert then click Row above or Row below.
— To insert a column:
- Click a column where you want to add an additional column and then click Layout tab
- Now use Row & Column group of buttons to add any column left or right to the selected column. If you click Insert Left button, it will add a column just left to the selected column.
- If you click Insert Right button, it will add a column just right to the selected column.
OR
- Place the cursor where you want to insert a column
- Right click, point Insert then click Column to left then Column to the Right.
Adjusting the column width:
- Position the mouse pointer on the row or column boundary until the mouse pointer changes to an arrowed cross.
- Drag the boundary to the required size.
Deleting rows, column or cells
- Select the rows, columns or cells to be deleted.
- Click Layout tab
- Under the Delete Button, select either delete, cells, columns or rowsto delete the selected cell, column or row respectively
Merging cells in a table
— This refers to combining more than one cell in a table.
To merge cells:
- Select cells to be merged
- Right click and then click Merge cells.
Splitting cells in a table
— This refers to subdividing a cell or cells into more cells.
To split cells:
- Select cells to be split
- Right click then click Split cells. A dialog box appears that lets you specify the number of rows and columns that the selected cells will be split.
Formatting table borders and shading
- Word provides the user with automatic formatting feature that lets you choose border styles and shading.
To format a table:
- Select the table. To select a table, click over the table anywhere which will make Cross Icon visible at the top-left corner of the table. Just click this cross icon to select the table.
- From Layout Tab, click Properties Button.
- From the dialog box that appears select borders and shading
- Select your preffered borders and shading
- Click Ok to apply the effects.
OR
- Select the table.
- From Design Tab, click either borders or shading button
- Select your preferred borders or shading from the respective drop down lists.
Table Conversions
- With convert feature in Microsoft Word, you can convert a table to lines of text and vice versa.
To convert a table to text
- Select the entire table or row and columns you want to convert to text.
- From contextual Layout tab, click on the Convert to text button. A dialog box is displayed that requires you to specify how the text will be separated after conversion
- In the separate text with box enter or select the character to be used as a separator.
- Click ok
To convert text to table:
- Select the text that you want to convert to a table.
- From the insert menu, click on the table button.
- From the drop down list select Convert text to table. A dialog box is displayed that requires you to specify the number of rows and of columns
- From Separate text at, specify whether the table will be defined by paragraphs, commas, Tabs or other characters.
- Click OK.
Performing arithmetic calculations in a table
- It is possible to perform mathematical calculations such as sum, product and count, if a table has numerical figures.
To perform calculations:
- Click the cell in which you want the result to be placed.
- From the Contextual layout tab, click Formula. A formula dialog box is displayed.
- If Ms-Word proposes a formula that you do not want to use, delete it from the Formula box, making sure that you don’t delete the equal sign
- In the Paste function box, click a function. A Function is a mathematical formula that accomplishes calculations in a table. E.g., to add numbers, click SUM
- To refer to the contents of a cell in the formula, type the cell references in the parentheses. Use a Comma to separate references to individual cells, or a Colon to separate the first & the last cells in a selected range.
Examples;- To add the numbers in cells A1, A3 & C2, type: =SUM(a1, a3,c2)
- To find the average of values in cells A1, A2, B1, B2, C1 & C2, type: =Average(a1:c2)
- In the Number format box, enter a format for the numbers, e.g., to display the numbers as a decimal percentage, click 0.00%.
- Click the OK button..
Sorting
- In Microsoft Word you can sort a list of text, numbers and dates in ascending or descending order.
To sort a list or table:
- Highlight the text list or table you want to sort.
- From the Contextual Layout Tab, click Sort.
- Select the type of data to be used when sorting i.e. Text, Number or Date.
- Click either Ascending or decending
- Click OK.
Mail Merge Document
- Mail merge is the process of generating personalised letters or documents by combining a main document, e.g. a letter, with an existing data source such as the address book.
- Therefore in mail merge, the three files created are:
- The primary file (main document)
- The secondary file (Data source)
- Merged file
To Create the Main Document,
- Open an existing Word document, or create a new one.
- From the Mailings tab, click the Start Mail Merge command and select Step by Step Mail Merge Wizard from the drop-down menu.
The Mail Merge pane appears and will guide you through the six main steps to complete a merge. The following example demonstrates how to create a form letter and merge the letter with a recipient list.- Choose the type of document you want to create. In our example, we’ll select Letters. Then click Next: Starting document to move to Step 2
- Select Use the current document, then click Next: Select recipients to move to Step 3.
- Now you’ll need an address list so Word can automatically place each address into the document. The list can be in an existing file, such as an Excel workbook, or you can type a new address list from within the Mail Merge Wizard.
— From the Mail Merge task pane, select Use an existing list, then click Browse… to select the file.
— Locate your file and click Open.
— If the address list is in an Excel workbook, select the worksheet that contains the list and click OK.
— In the Mail Merge Recipients dialog box, you can check or uncheck each box to control which recipients are included in the merge. By default, all recipients should be selected. When you’re done, click OK.
— From the Mail Merge task pane, click Next: Write your letter to move to Step 4. If you don’t have an existing address list, you can click the Type a new list button and click Create. You can then type your address list. - Now you’re ready to write your letter. When it’s printed, each copy of the letter will basically be the same; only the recipient data (such as the name and address) will be different. You’ll need to add placeholders for the recipient data so Mail Merge knows exactly where to add the data. To insert recipient data
— Place the insertion point in the document where you want the information to appear.
— Choose one of the four placeholder options: Address block, Greeting line, Electronic postage, or More items.
— Depending on your selection, a dialog box may appear with various options. Select the desired options and click OK.
— A placeholder will appear in your document (for example, «AddressBlock»).
— Repeat these steps each time you need to enter information from your data record. In our example, we’ll add a Greeting line.
— When you’re done, click Next: Preview your letters to move to Step 5.
NB: For some letters, you’ll only need to add an Address block and Greeting line. Sometimes, however, you may want to place recipient data within the body of the letter to personalize it even further - Preview the letters to make sure the information from the recipient list appears correctly in the letter. You can use the left and right scroll arrows to view each document.
— Click Next: Complete the merge to move to Step 6. - — Click Print… to print the letters
— A dialog box will appear. Click All, then click OK.
— The Print dialog box will appear. Adjust the print settings if needed, then click OK. The letters will be printed.
Inserting Graphics
Working with Graphics
- The term graphics refers to non-text images generated by a compute! This includes photographs, drawings and graphs. Graphics present information in a form that is easy to understand.
- You can insert a graphical object from Microsoft Clip Gallery, a scanner or by using drawing tools available in Microsoft Word.
Inserting an image from a scanner
- The computer must be connected to a scanner to complete this procedure. A scanner is a data capture device that transforms a hand copy or real graphical object into digital form.
To scan an object:
- Position the insertion pointer where you want your picture to appear,
- From the insert tab, point to Picture and then click from scanner or Camera.
- To scan, follow the instructions that come with your scanner.
- When the image appears on the screen you can edit and format it as required the same way you would with a clipart.
Inserting a picture from another file
- Position the insertion pointer where you want your picture placed,
- From the insert tab, point to Picture, then click «From file
- Locate the file that contain the image you want to insert eg from your floppy disk, from a compact disk etc.
- Select the object you want to insert
- Then click the Insert button.
- When the image appears on the screen you can edit and format it as required the same way you would with a clipart.
Editing and Formatting Pictures
To format or edit a picture:
- Microsoft Word provides the user with a picture editing toolbar that lets you adjust the brightness, contrast, change it to black and white or grayscale and crop the image.
- Cropping refers to hiding the unwanted details so that they do not come out when printing.
- To display the picture toolbar, click on View menu, point to toolbars then select Picture.
- The picture toolbar has buttons that enable a person to format a picture to format a picture, click it to select it then use the commands on the picture toolbar.
Drawing an object using MS Word drawing tools
- Microsoft Word provides the user with basic drawing tools such as polygons, lines, a circle, stars and banners, call outs and many others. If the drawings toolbar is not displayed, click on View menu, toolbars then click on Drawing. The toolbar will be displayed which a button has labeled Auto shapes, an arrow, a line, square and a circle
To draw a line, a circle an arrow or a rectangle:
- Click on the appropriate shape button. The pointer changes to a plus sign.
- Place the pointer where you want to draw that shape and drag to the required size.
To draw an object using the Auto shapes:
- Click the Auto shapes button. A menu is displayed showing categories of shapes you can choose from
- Point to the category required then select the type of object you wish to draw
- Place the pointer where you want to draw that shape and drag to the required size.
Editing and formatting a drawn object
- You can resize, move, fill color and change the drawing outline.
To resize or move a drawing.
- Click anywhere inside it. The place holders appear.
- To move it, hold down the mouse button and drag.
- To resize it, place the pointer at one of the place holders and drag.
To fill the object with color and fill effects:
- Click the object. The place holders appear.
- Click the down arrow of fill color button, the one that looks like a bucket pouring ink.
- Select the color you want applied. To fill the drawing with texture, gradient or pattern, click the Effects button. From the resulting dialog box, select the appropriate fill effect.
Printing a Document
Printing in Microsoft Word
- Because the main purpose of any word processor is to prepare documents for printing, this cannot be accomplished without a printer. The choice of a printer depends on the quality of hardcopy desired. Before you print, it is very important that you preview you document to confirm that no details are outside the printable area and that the document layout is okay.
To print:
- Click the File tab and then Print option which will display a preview of the document in the right column. You can scroll up or scroll down your document to walk through the document using given Scrollbar. Middle column gives various options to be set before your send your document to the printer.
- You can set various other printing options available. Select from among the following options, depending on your preferences
- Once you are done with your setting, click on Print button which will send your document to the printer for final printing.