
Table of Contents
- Introduction
- Building the Sample
You can download the source code from this link Source
Code Link
Introduction

The main purpose of this article is to explain how to create simple Excel and Microsoft Word Add-Ins using Visual
Studio Tools for Office (VSTO).
VSTO is available as an add-in tool with Microsoft Visual Studio. Using Visual Studio we can develop our own custom controls for Office tools like Excel, Word and and so on.In
our demo program We have used Visual Studio 2010 and Office 2007.
Building the Sample
This article explains a few basic things to create our own Custom Add-Ins for Excel and Word as follows.
1. Excel Add-Ins
- Add text to any Excel selected active Excel cell.
- Add an image to Excel from our Custom Control.
- Load data from a database and display the search result data in Excel.
2. Word Add-Ins

- Export Word to PDF.
- Add Image to Word Document.
- Add Table to Word document.
Description
Creating Excel Add-Ins
To create our own Custom Control Add-Ins for Excel.
Step 1
Create a new project and select Office 2007 Excel Add-In as in the following Image. Select your Project Folder and enter your Project Name.

Step 2
Now we can see that the Excel ThisAddIn.Cs file has been created in our project folder and we can find two default methods in this class as in the following image. “ThisAddIn_Startup”
In this event we can display our own custom Control Add-Ins to Excel. We can see the details in the code part.

Step 3
Add a new UserControl to your project to create your own Custom Excel Control Add-In.
Right-click your project->Click Add New Item->Add User Control and Name the control as you wish. Add all your Controls and design your user control depending on your requirement.

In our example,We are performing 3 types of actions in User Controls.
- Add Text: In this button click event I will insert the text from the Text box to the Active Selected Excel Cell. Using “Globals.ThisAddIn.Application.ActiveCell”
we can get the current active Excel cell. We store the result in an Excel range and now using the range, value and color we can set our own text and colors to the active Excel Cell.
private void btnAddText_Click(object sender, EventArgs e)
{
Excel.Range objRange = Globals.ThisAddIn.Application.ActiveCell;
objRange.Interior.Color = Color.Pink; //Active Cell back Color
objRange.Borders.Color = Color.Red;// Active Cell border Color
objRange.Borders.LineStyle = Excel.XlLineStyle.xlContinuous;
objRange.Value = txtActiveCellText.Text; //Active Cell Text Add
objRange.Columns.AutoFit();
}
2. Add Image: using
the Open File Dialog we can select our own image that needs to be added to the Excel file. Using the Excel.Shape we can add our selected image to the Excel file.
private void btnAddImage_Click(object sender, EventArgs e)
{
OpenFileDialog dlg = new OpenFileDialog();
dlg.FileName = "*";
dlg.DefaultExt = "bmp";
dlg.ValidateNames = true;
dlg.Filter = "Bitmap Image (.bmp)|*.bmp|Gif Image (.gif)|*.gif|JPEG Image (.jpeg)|*.jpeg|Png Image (.png)|*.png";
if (dlg.ShowDialog() == System.Windows.Forms.DialogResult.OK)
{
Bitmap dImg = new Bitmap(dlg.FileName);
Excel.Shape IamgeAdd = Globals.ThisAddIn.Application.ActiveSheet.Shapes.AddPicture(dlg.FileName,
Microsoft.Office.Core.MsoTriState.msoFalse, Microsoft.Office.Core.MsoTriState.msoCTrue,
20, 30, dImg.Width, dImg.Height);
}
System.Windows.Forms.Clipboard.Clear();
}
Search and bind Db Data to Excel: Now
we can create our own Custom Search control to be used in Excel to search our data from the database and bind the result to the Excel file.
Creating the table
-- Create Table ItemMaster in your SQL Server - This table will be used for search and bind result to excel.
CREATE
TABLE
[dbo].[ItemMasters](
[Item_Code] [varchar](20)
NOT NULL,
[Item_Name] [varchar](100)
NOT NULL)
-- insert sample data to Item Master table
INSERT
INTO
[ItemMasters] ([Item_Code],[Item_Name])
VALUES
('Item001','Coke')
INSERT
INTO
[ItemMasters] ([Item_Code],[Item_Name])
VALUES
('Item002','Coffee')
INSERT
INTO
[ItemMasters] ([Item_Code],[Item_Name])
VALUES
('Item003','Chiken Burger')
INSERT
INTO
[ItemMasters] ([Item_Code],[Item_Name])
VALUES
('Item004','Potato Fry')
In the button search click event we search for the data from the database and bind the result to an Excel cell using “Globals.ThisAddIn.Application.ActiveSheet.Cells”.
This will add the result to the active Excel sheet.
private
void
btnSearch_Click(object
sender, EventArgs e)
{
try
{
System.Data.DataTable dt =
new
System.Data.DataTable();
String ConnectionString =
"Data Source=YOURDATASOURCE;Initial Catalog=YOURDATABASENAME;User id = UID;password=password";
SqlConnection con =
new
SqlConnection(ConnectionString);
String Query =
" Select Item_Code,Item_Name FROM ItemMasters Where Item_Name LIKE '"
+ txtItemName.Text.Trim() + "%'";
SqlCommand cmd =
new
SqlCommand(Query, con);
cmd.CommandType = System.Data.CommandType.Text;
System.Data.SqlClient.SqlDataAdapter sda =
new
System.Data.SqlClient.SqlDataAdapter(cmd);
sda.Fill(dt);
if
(dt.Rows.Count <= 0)
{
return;
}
Globals.ThisAddIn.Application.ActiveSheet.Cells.ClearContents();
Globals.ThisAddIn.Application.ActiveSheet.Cells[1, 1].Value2 =
"Item Code";
Globals.ThisAddIn.Application.ActiveSheet.Cells[1, 2].Value2 =
"Item Name";
for
(int
i = 0; i <= dt.Rows.Count - 1; i++)
{
Globals.ThisAddIn.Application.ActiveSheet.Cells[i + 2, 1].Value2 = dt.Rows[i][0].ToString();
Globals.ThisAddIn.Application.ActiveSheet.Cells[i + 2, 2].Value2 = dt.Rows[i][1].ToString();
}
}
catch
(Exception ex)
{
}
}
Step 4
Now we have created our own User Control to be added to our Excel Add-Ins. To add this user control to our Excel Add-In as we have already seen that the Excel Addin class “ThisAddIn.Cs” has start and stop events. Using
the Office “CustomTaskpane” we can add our user control to Excel as an Add-In as in the following.
private
Microsoft.Office.Tools.CustomTaskPane customPane;
private
void
ThisAddIn_Startup(object
sender, System.EventArgs e)
{
ShowShanuControl();
}
public
void
ShowShanuControl()
{
var txtObject =
new
ShanuExcelADDIn();
customPane =
this.CustomTaskPanes.Add(txtObject,
"Enter Text");
customPane.Width = txtObject.Width;
customPane.Visible =
true;
}
Step 5
Run your program and now we can see our user control has been added in the Excel File as an Add-In.
Next we will see how to create Add-Ins for Word Documents using a Ribbon Control.
Creating Word Add-Ins:
In my example I have used Visual Studio 2010 and Office 2007.
The following describes how to create our own Custom Control Add-Ins for Word.
Step 1
Create a new project and select Office 2007 Word AddIn as in the following Image. Select your Project Folder and enter your Project Name.

Step 2
Add a new Ribbon Control to your project to create your own Word Control Add-In.
Right-click your project then click Add New Item -> Add Ribbon Control and name the control as you wish.

Add all your controls and design your user control depending on your requirements. By default in our Ribbon Control we can see a “RibbonGroup”. We can add all our controls to the Ribbon Group. Here
in my example I have changed the Group Label Text to “SHANU Add-In”. I have added three Ribbon Button Controls to the group. We can add an image to the Ribbon Button Controls and set the properties of the Button Control Size as “RibbobControlSizeLarge”.

Here I have added three Button Controls for export the Word as a PDF, add an image to Word and add a table to the Word file.
Step 3
Export to PDF File Button Click.
Using the “Globals.ThisAddIn.Application.ActiveDocument.ExportAsFixedFormat” we can save the Word document to the PDF file. I have used the Save file dialog to save the PDF file into our selected path.
private
void
btnPDF_Click(object
sender, RibbonControlEventArgs e)
{
SaveFileDialog dlg =
new
SaveFileDialog();
dlg.FileName =
"*";
dlg.DefaultExt =
"pdf";
dlg.ValidateNames =
true;
if
(dlg.ShowDialog() == System.Windows.Forms.DialogResult.OK)
{
Globals.ThisAddIn.Application.ActiveDocument.ExportAsFixedFormat(dlg.FileName, word.WdExportFormat.wdExportFormatPDF, OpenAfterExport:
true);
}
}
Step 4
Here we will add an image to Word. Using the Open File Dialog we can select our own image to be added to the Word file. Using the “Globals.ThisAddIn.Application.ActiveDocument.Shapes.AddPicture” method we can add our
selected image to the Word file.
private
void
btnImage_Click(object
sender, RibbonControlEventArgs e)
{
OpenFileDialog dlg =
new
OpenFileDialog();
dlg.FileName =
"*";
dlg.DefaultExt =
"bmp";
dlg.ValidateNames =
true;
dlg.Filter =
"Bitmap Image (.bmp)|*.bmp|Gif Image (.gif)|*.gif|JPEG Image (.jpeg)|*.jpeg|Png Image (.png)|*.png";
if
(dlg.ShowDialog() == System.Windows.Forms.DialogResult.OK)
{
Globals.ThisAddIn.Application.ActiveDocument.Shapes.AddPicture(dlg.FileName);
}
}
Step 5
Here we will add a table to Word. Using the “Globals.ThisAddIn.Application.ActiveDocument.Tables” method we can add a table to the Word file. In my example I have created a table with 4 columns and 3 rows.
private
void
button1_Click(object
sender, RibbonControlEventArgs e)
{
Globals.ThisAddIn.Application.ActiveDocument.Tables.Add(Globals.ThisAddIn.Application.ActiveDocument.Range(0, 0), 3, 4);
.ThisAddIn.Application.ActiveDocument.Tables[1].Range.Shading.BackgroundPatternColor = Microsoft.Office.Interop.Word.WdColor.wdColorSeaGreen;
Globals.ThisAddIn.Application.ActiveDocument.Tables[1].Range.Font.Size = 12;
Globals.ThisAddIn.Application.ActiveDocument.Tables[1].Rows.Borders.Enable = 1;
}
Step 6
Run your program and now you will see your own Ribbon Control has been added to the Word file as an Add-In.

You can download the source code from this link Source
Code Link
18 Sep How to Create an Excel VSTO Add-in
Posted at 01:39h
in Excel VSTO
0 Comments
Howdee! For many years now, being an Excel expert has been almost synonymous with being an expert in writing VBA code. While VBA is a wonderful tool, in 2017 it is a bit dated in my opinion. So, today I want to introduce a new topic, the Excel VSTO add-in. This might be new to some of you, some of you might know what it means, and some may have even experimented with it before. VSTO stands for Visual Studio Tools for Office and is a means to use Microsoft’s Visual Studio IDE (Integrated Development Environment) to create and build your own Excel (and other Microsoft Office applications) add-ins. This has actually been around for several years now, but has yet to be widely adopted. I think this is a mistake by the Excel community.
Why use Visual Studio Tools for Office?
Building your applications using VSTO makes sense for a few reasons. First, Visual Studio is a much more advanced development environment than the VBA editor. Intellisense is much more robust which allows for faster coding and easier debugging. The advanced environment can be intimidating when you’re used to the more simple VBA development interface (it definitely was for me), but it is surprisingly easy to pick up.
Second, you can code in Visual Basic, C#, Python, and even JavaScript (although the base language must be C# or Visual Basic). These languages have significantly more recent support, both by Microsoft and the community at large, than does VBA. Developers are constantly building more libraries that you can use and, with C# in particular, the more popular ones are rarely deprecated. Parsing JSON for example, there are a couple of libraries in VBA to do this, but the support for them is often slow or nonexistent. The Newtonsoft JSON library from NuGet, on the other hand, is incredibly robust (and supports serialization along with parsing) and is actively supported.
Third, the ability to make modern looking interfaces with Winforms and WPF (Windows Presentation Foundation) makes your Excel applications look significantly more attractive than using VBA. Referencing a bit of reason number two here, there are dozens of libraries that extend the functionality of user interfaces and make it easier and faster to build beautiful Excel add-ins. I’ve used a couple of different libraries both professionally and personally and these really make the process fast, easy, and intuitive.
Finally, VSTO offers the ability to extend your Excel applications to the web. You can do this a couple of different ways. You can use task panes to bring the web into your desktop Excel applications, or you can use javascript and create add-ins that run in Excel online. That means you can easily make your add-in cross-platform by utilizing Excel online!
Creating your first Excel VSTO Add-in
Today, I want to just cover the basics of building an Excel VSTO application and I’ll get into some more detailed implementations in later posts. To start you’ll need to download Visual Studio. Any version 2010 or later will work, but I’ll be working with the 2017 community edition (the free version). You can download this here if you need to.
In the install options, I would recommend at least the following three items to get started: Universal Windows Platform development, .Net Desktop development, & Office/Sharepoint development.

With these three you should have plenty to get started developing your Excel add-ins. Once Visual Studio installs and you open it, you’ll see a start screen with a lot of different links on it. This is just the default start screen and you can pick up previous projects from here in the future. To get started with a new project, select “File” in the top left and then “New” and, finally, “Project”.
In the window that opens, select the language you wish to use (I’ll be using C# today). As I mentioned earlier, you must choose either Visual Basic or C# to start your app with, but you can use other languages later if desired. Next, select the Office/SharePoint section. In the center window, you’ll see several options underneath this language for the project template. You can create Web Add-in’s that can be used in Microsoft Online, a VSTO Add-in, or a VSTO template/workbook. Today we will go over the Excel VSTO Add-in, so let’s select that. Don’t forget to name it something useful at the bottom of the window.

Once you click OK, the project will take a minute to build as Visual Studio will go ahead and start the project for you including the code you’ll need to initialize the add-in. This will be contained in the “ThisAddin” file. It contains two methods that handle the startup and shutdown of the add-in so anything you need to do during those times should go inside those methods.
For today’s example, let’s build a simple add-in that will simply read out the address of our current cell and the contents it contains. This will give you a good grasp of how to begin interacting with the Excel object model from a VSTO project. One question you might have asked yourself already, is how can the user control when the code runs? A common approach with VBA code is to assign a macro to a button or some other object within the workbook.
Since we can’t do that in this example, the easiest way to let a user control running the code is to tie it to a ribbon control. To do that, right-click on the project name in the solution explorer. Select “Add” and “New Item”. A new window will pop up. The default selection should be “Ribbon (Visual Designer)” and that just happens to be the one we need. You can rename this ribbon also if you desire and then click “Add” in the bottom right.
Visual Studio will install the Ribbon to the project and open the designer file. If the “Toolbox” is not open on the left side of your screen, open it now by clicking on “View” in the top left and selecting “Toolbox”. Alternatively, you could press Ctrl+alt+X on the keyboard to do this. If you’re clicked on the ribbon designer, you should see “Office Ribbon Controls” as the first option in the toolbox. Inside this group, there is an option for button. Click and drag the button the ribbon interface and it should snap to “group 1” as a new button with the label “button1”.
As with VBA, we can rename these so they display something a little more appropriate by using the “Properties” window. This should appear in the bottom right of your Visual Studio window. Click on the group or button and change the names to something that makes sense to you. Below is a screen grab with the elements we just talked about called out (click to enlarge):

Now, we have our button in place, let’s get to writing some code! From the ribbon designer, you can double click the button to create an event handler just like you would in a VBA user form. The first thing we need to do is create a reference to the active cell so we can return some data about it. To do this, I’m actually going to jump over to the “ThisAddIn” file and enter some code there to demonstrate how to reference code between files in Visual Studio. Switch to the file and add the following code in the ThisAddIn class (if you’re using C#):
[cc lang=”csharp”]
public Excel.Range GetActiveCell()
{
return (Excel.Range)Application.ActiveCell;
}
[/cc]
Next, back in the method we created by double-clicking our button in the Ribbon class, let’s add the following code:
[cc lang=”csharp”]
private void ReadCellDataBtn_Click(object sender, RibbonControlEventArgs e)
{
Range thisCell = Globals.ThisAddIn.GetActiveCell();
MessageBox
.Show(“This cell’s address is: ” + thisCell.Address + ” — And it’s value is: ” + thisCell.Value);
}
[/cc]
If you just enter the code as I displayed above, you’ll get errors. You’ll need to make sure you add the proper using statements to the top of the Ribbon1 class. Those are using Microsoft.Office.Interop.Excel; and using System.Windows;
Once this is done – we can test the Excel VSTO add-in by pressing F5 on our keyboard or clicking “Start” at the top of Visual Studio. This will open an instance of Excel for us to test with. We can type some information into a blank spreadsheet and quickly test if our code works. Please note that you’ll need to add the “Add-ins” ribbon to Excel if you haven’t done so already. This is done by clicking “File”, then “Options”, and finally “Customize Ribbon”. As you can see below, this example is returning the value of our active cell to a message box.

This is all I wanted to cover in this article since, if you’re new to Excel VSTO Add-ins, your head might be hurting right now. Don’t worry, mine was as well when I first started playing with them. My best recommendation for becoming familiar with this approach is to pick a project you’ve done in VBA (the simpler the better) and try to replicate it as an Excel VSTO add-in. That was my first step and I had a lot of mistakes on the way. However, I think this should be the future of working with Microsoft Excel applications for reasons stated at the beginning of this article. Let me know your thoughts below in the comments.
Also, the example file will be available for download as usual if you’re a free member to my site. However, with this type of add-in I am going to zip the Visual Studio project file up and have it available for download. So, if you want to test it out you will need to download Visual Studio before you’re able to. Feel free to drop a question in the comments if you have an issue doing this.
Cheers,
R
Разработать расширение VSTO для Excel
Excel должен быть эффективным инструментом, который мы обычно используем в нашей повседневной работе. Если вы хотите расширить больше бизнес-функций Excel, вы можете разработать расширения VSTO для Excel в среде разработки VS. Интерфейс Excel, после добавления вкладок и элементов управления в функциональную область Office, выполняет некоторые необходимые нам бизнес-функции:

Новая надстройка Excel VSTO
-
Создайте новое приложение расширения Excel в VS. Если вы не найдете эту опцию, перейдите к установщику VS в красном поле и выберите вариант разработки Office (версия VS, которую я использую — 2015 и 2017)

-
ThisAddIn.cs является основной точкой входа в программу расширения VSTO, которая предоставляет нам множество событий обратного вызова для использования
-
Щелкните правой кнопкой мыши в решении нового проекта, чтобы создать функциональную область для проекта Excel, эта функциональная область является пользовательским интерфейсом внешней программы Excel VSTO.


- Очень просто, проект завершен
Основные пространства имен и абстрактные типы
Узнайте о двух часто используемых библиотеках
При разработке VSTO часто используются две библиотеки:
using Microsoft.Office.Interop.Excel;
using Microsoft.Office.Tools.Excel;
из их:
- Пространство имен Interop.Excel
- Интерфейс COM, предоставляемый Microsoft для доступа к Excel, наиболее широко используется: он может использоваться для непосредственного чтения и записи содержимого в версии Excel для Windows, например:
- Получить все листы в Excel
- Получить Изменить ячейки в Excel
- Добавить страницу листа
- и многое другое
- Интерфейс COM, предоставляемый Microsoft для доступа к Excel, наиболее широко используется: он может использоваться для непосредственного чтения и записи содержимого в версии Excel для Windows, например:
- Tools.Excel namespace
- Это библиотека классов для расширения поддержки объектной модели Office Excel, с помощью которой вы можете комбинировать другие компоненты .NET с Excel для достижения некоторых функций, таких как:
- Используйте интерфейс ListObject, чтобы связать экземпляр DataTable с таблицей листов Excel.
- Используйте интерфейс Chart для добавления диаграммы в лист Excel
- Это библиотека классов для расширения поддержки объектной модели Office Excel, с помощью которой вы можете комбинировать другие компоненты .NET с Excel для достижения некоторых функций, таких как:
Понимать абстрактные типы в разработке Excel
-
1、Application
В программе VSTO интерфейс приложения представляет все приложение Excel
-
2、WorkSheet
Объект WorkSheet является членом набора объектов WorkSheets и является абстракцией страницы листа в Excel.
-
3、Range
Объект Range — это абстракция каждой ячейки в Excel или выделенной области, содержащей один или несколько блоков ячеек (эта область может быть непрерывной или прерывистой) )
Вышеупомянутые три элемента — три наиболее часто используемых абстрактных интерфейса для Excel в VSTO
Основная операция
В проекте Excel, в файле ThisAddIn и других файлах проекта,Способ чтения и записи элементов Excel отличается:
- В файле ThisAddIn.cs получить доступ к элементам в Excel и получить прямой доступ к нему с помощью приложения
using Excel = Microsoft.Office.Interop.Excel;

Excel.Worksheet activeWorksheet = ((Excel.Worksheet)Application.ActiveSheet);
Excel.Range firstRow = activeWorksheet.get_Range("A1");
- Однако в файлах не-ThisAddIn .cs, таких как событие кнопки новой ленты, если вы хотите получить доступ к элементу Excel, вы должны добавить Globals.ThisAddIn впереди, чтобы получить к нему обычный доступ.
- При нормальных обстоятельствах бизнес-операции вообще не будут выполняться в основной программе, поэтому все основные примеры операций в будущем будут приведены в соответствии с методом доступа неосновной программы:
using Microsoft.Office.Tools.Ribbon;
using Microsoft.Office.Interop.Excel;
using ExcelTools = Microsoft.Office.Tools;

// Операции на уровне листа:
Worksheet wst = ((Worksheet)Globals.ThisAddIn.Application.ActiveSheet);                     // Получить текущую выбранную страницу листа;
Worksheet wst2 = ((Worksheet)Globals.ThisAddIn.Application.Worksheets[«Оценка ситуации»]);         // Получить страницу листа на основе имени;

// Новый лист
Worksheet new_wst;
new_wst = (Worksheet)Globals.ThisAddIn.Application.Worksheets.Add();
new_wst.Name = «Новая листовая страница»;

int rowsCount = wst.UsedRange.Rows.Count;                                                   // Получить использованные строки
int colsCount = wst.UsedRange.Columns.Count;                                                // Получить использованные столбцы

var content = wst2.Range["A1"].Value;                                                       // Получить содержимое ячейки в таблице
((Range)wst.Range["A8"]).Value = "111";                                                     // Записать данные ячейки

((Range)wst2.Rows[2, Type.Missing]).Delete(XlDeleteShiftDirection.xlShiftToLeft);           // удаляем строку
((Range)wst2.Cells[1, 2]).EntireColumn.Delete(0);                                           // удаляем столбец

// Вынимаем все столбцы этой таблицы
// Если вы не используете UsedRange, вы получите все столбцы, которые Excel содержит пустыми
List<string> all_column = new List<string>();
foreach (Range all_col in wst2.UsedRange.Columns)
{
    all_column.Add(all_col.Value2[1, 1]);
}

// Получить все имена таблиц текущей таблицы Excel;
List<string> m_AllSheets = new List<string>();
foreach (var sheetlist in Globals.ThisAddIn.Application.Worksheets)
{
    m_AllSheets.Add(((Worksheet)sheetlist).Name);
}
Расширенные элементы управления Excel
Microsoft предоставляет несколько полезных расширенных элементов управления для Excel, которые могут помочь Excel выполнить более расширенные функции, такие как:
- Добавить таблицу на лист и связать источник данных
- Добавить диаграмму на лист и связать источник данных
- Подождите, как показано ниже:

1. Используйте ObjectList, чтобы расширить элемент управления на таблицу Excel и связать источник данных
Все операции, описанные выше, являются операциями над каждым отдельным элементом в Excel, но если есть одинисточник данныхНеобходимо связать с рабочим листом в Excel, это роль ListObject. Элемент управления ListObject поддерживает простое и сложное связывание данных, самое простое, например: например, связывание источника данных DataTable в памяти
Вариант использования 1: привязка DataTable к ObjectList
Добавление ListObject в WorkSheet of Excel с использованием программирования VSTO аналогично добавлению таблицы в Excel. Операция в Excel заключается в следующем:

Используя разработку кода в VSTO, эффект тот же:
using Microsoft.Office.Tools.Ribbon;
using Microsoft.Office.Interop.Excel;
using ExcelTools = Microsoft.Office.Tools;


string connectionString = «Вот строка для подключения к базе данных»;

// Добавить ListObject to WorkSheet;
ExcelTools.Excel.Worksheet worksheet = Globals.Factory.GetVstoObject(wst);
ExcelTools.Excel.ListObject list1;
Range cell = worksheet.Range["$A$1:$Z$9999"];
list1 = worksheet.Controls.AddListObject(cell, "list1");
list1.AutoSetDataBoundColumnHeaders = true;

// Запрос через OleDB;
using (OleDbConnection con = new OleDbConnection(connectionString))
{
    var dataTable = new System.Data.DataTable();
    string query = SQL_Generator.GenerateSQLByTemplate(column);
    con.Open();
    OleDbDataAdapter adapter = new OleDbDataAdapter(query, con);

    adapter.Fill(dataTable);
    ds.Tables.Add(dataTable);
    con.Close();

    list1.SetDataBinding(dataTable, null, sheetnames);
}
Пример 2. Использование расширенного элемента управления Chart для добавления диаграммы в Excel

using Microsoft.Office.Tools.Ribbon;
using Microsoft.Office.Interop.Excel;
using ExcelTools = Microsoft.Office.Tools;


ExcelTools.Excel.Worksheet worksheet = Globals.Factory.GetVstoObject(
    Globals.ThisAddIn.Application.ActiveWorkbook.ActiveSheet);


Range cells = worksheet.Range["A5", "D8"];
ExcelTools.Excel.Chart chart = worksheet.Controls.AddChart(cells, "employees");
chart.ChartType = XlChartType.xl3DPie;
chart.SetSourceData(cells);
Microsoft Office is heavily used in most organizations, and Microsoft has provided several ways to extend and customize Office applications. In this article, Darko Martinovic demonstrates how to use C# to create several automation solutions, including custom add-ins.
Office components such as Excel or Word, have a powerful GUI, with many options to automate everyday tasks. In addition, there are a lot of excellent Add-Ins such as Power BI. With such functionality and the ability to use VBA, you may ask yourself why we need Office extensions.
Of course, there are many situations in which you might like to extend Office functionality. For example, to create a routine that:
- exports data from SQL Server into Excel with custom formatting
- imports data from Excel into the dataset
- automatizes Pivot Table creation in Excel
- customizes writing documents in Word
- customizes writing e-mail messages in Outlook
- more…
Microsoft provides a mechanism to accomplish all of these tasks. Office developer tools in Visual Studio let you create .NET Framework applications that extend Office. These applications are also named Office solutions. This article talks about how to develop and distribute such solutions.
In order to start developing you have to set up the environment.
Configure a Computer for Developing Office Solutions
The Office Developer Tools are installed by default as part of Visual Studio.
NOTE: In order to follow examples in the article, you can use any edition, including Visual Studio 2017 Community Edition.
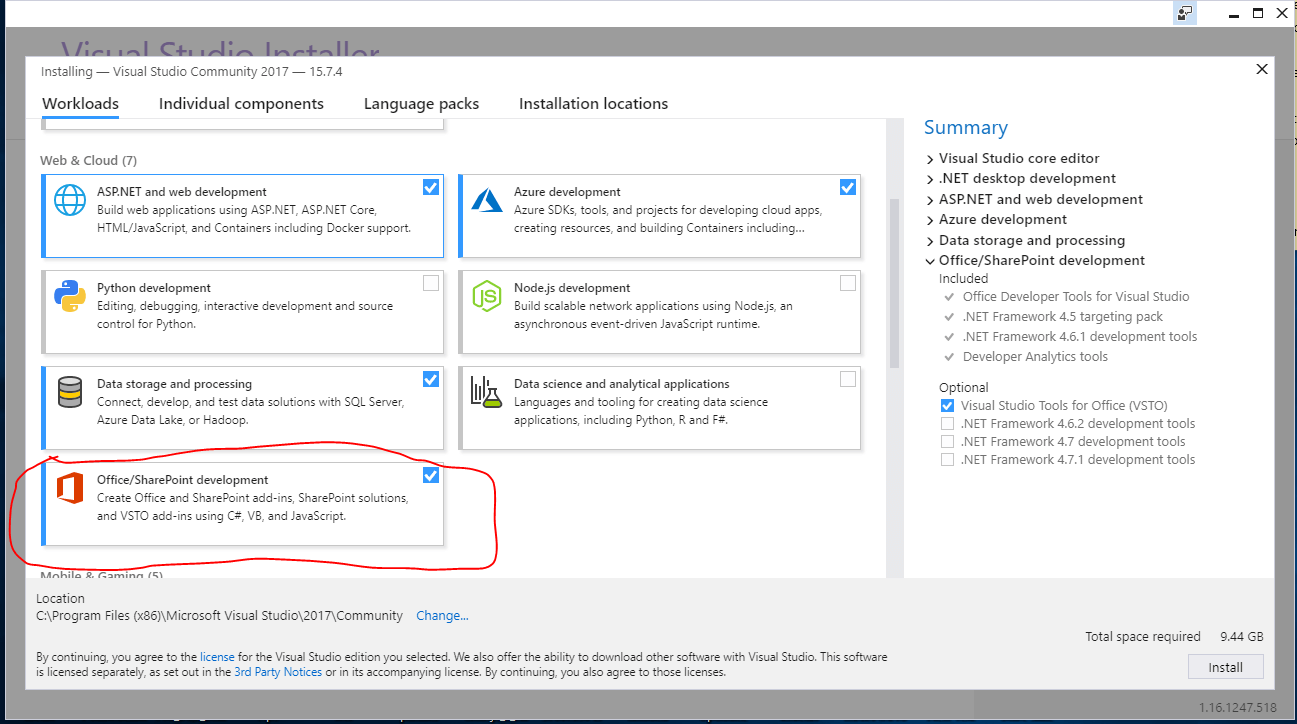
If you customize the Visual Studio installation by selecting which features to install, make sure that Microsoft Office Developer Tools is selected during setup. Alternatively, you can start Visual Studio Installer and select the Office/SharePoint development workload, as shown in the image below.
In addition, you have to Install a version of Office that is supported by the Office developer tools in Visual Studio. Examples in the article are tested with Office 2013/2016. Make sure that you also install the PIAs (Primary Interop Assemblies) for the version of Office that you install. The PIAs are installed with Office by default. If you modify the Office setup, make sure that the .NET Programmability Support feature is selected for the applications you want to target.
To check the installation, start Visual Studio, create a new project and be sure that Office templates are present as shown in the image below.
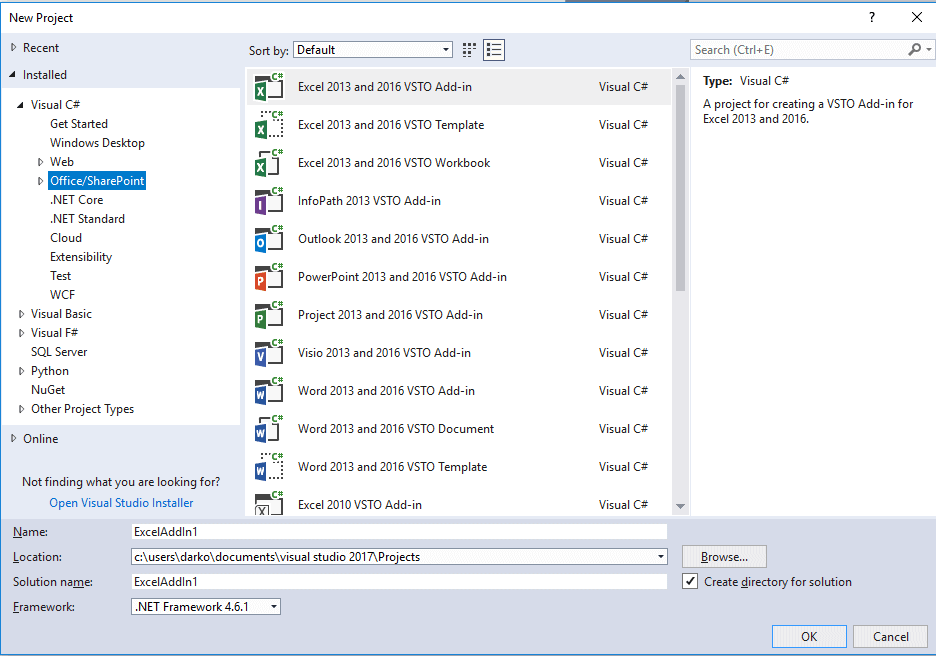
Choose an Office project type
Office projects are divided into Office and COM Add-ins. The first one usually is marked as ‘new development’, uses WEB templates and JavaScript, requires Office 2016, and targets mainly Office 365. In my opinion, both are worth exploring. This article covers the second one, which is usually divided based on the template you choose. There are Document-level customizations and VSTO Add-ins. VSTO Add-ins are associated with the application itself and Document-level customizations, as the name implies, are associated with a particular document.
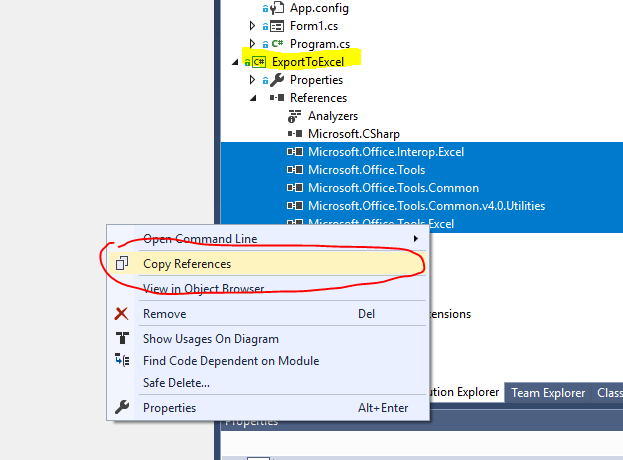
Besides that, there is the possibility to include the Office object model in your application by referencing PIA assemblies. The PIA enables the managed code in your solution to interact with the Office application’s COM-based object model. That would be the first example in which we will browsing source code in a Console application. If you would like to create your own startup project, choose C# console application from the list of available templates. After that you can use Visual Studio productivity tool Power Commands to copy references as shown in the image below and paste them in your project.
NOTE: You can add references by choosing Add Reference command from References context menu.
Exporting Data into Excel
Download this solution and then open it in Visual Studio. Make sure that ExportToExcel is selected as the startup project. The purpose of the first demo is to introduce the Excel object model by accomplishing one common task, exporting data from SQL Server tables into Excel. In order to follow the demo, you have to change the application configuration file app.config. In the file enter your instance name where you have restored the AdventureWorks2016 database.
The most important objects in Excel are:
- Application
- Workbook
- Worksheet
- Range
Microsoft documentation states: “The Application object represents the Excel application. The Application object exposes a great deal of information about the running application, the options applied to that instance, and the current user objects open within the instance.”
NOTE: The source code is located in the ExportToExcel.cs file inside the ExportToExcel project. There is no need to copy the code from the article.
In order to instantiate an application object, you have to include the Microsoft.Office.Interop.Excel namespace. An application object is created by using the following code snippet.
|
var excelApp = new Application { Visible = false, DisplayAlerts = false, DisplayClipboardWindow = false, DisplayFullScreen = false, ScreenUpdating = false, WindowState = XlWindowState.xlNormal }; |
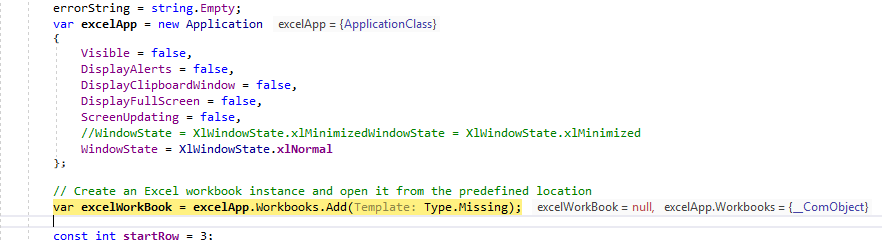
If you add a breakpoint on a line after an application object is created (see the image below) and press F5 to start debugging the project, you will notice that nothing changes. The application is started as hidden because the Visible property is set to false.
In order to prove that the Excel application has started, start Task Manager, and find the Excel application on the list, as shown in the image below.

The Workbook object represents a single workbook within the Excel application. The following snippet is used to create the object:
|
// Create an Excel workbook instance var workbooks = excelApp.Workbooks; var excelWorkBook = workbooks.Add(Template: Type.Missing); |
The Worksheet object is a member of the Worksheets collection. Many of the properties, methods, and events of the Worksheet are identical or similar to members provided by the Application or Workbook objects. Excel provides a Sheets collection as a property of a Workbook object. Each member of the Sheets collection is either a Worksheet or a Chart object. The following snippet is used to create the Worksheet.
|
var wst = excelWorkBook.Worksheets; Worksheet excelWorkSheet = null; // Add a new worksheet to workbook with the Data table name excelWorkSheet = (Worksheet)wst.Add(); |
A range object represents a cell, a row, a column, or any kind of selection that contains at least one cell. In order to create Range object, you have to use a snippet like this one
|
var newRng = excelWorkSheet.Range[excelWorkSheet.Cells[startRow + 1, i], excelWorkSheet.Cells[endIndex, i]]; |
The purpose of the first example is to take T-SQL query results as an object of type DataSet and transform that object into an Excel workbook. The T-SQL query, as well as the connection string, are found in the application configuration file app.config. The example uses two tables of the AdventureWorks2016 database, both located in the schema Sales: The SalesOrderHeader table which contains 31K rows and SalesOrderDetail which contains 121K rows. On my machine, the Excel file is created in 25 sec. In order to shorten the example, I reduced number of records in both tables to 1000 by applying SELECT TOP in the app.config file.
Generating an object of the DataSet type is quite a common thing, and I will skip describing this part. In the project, the source code to accomplish that task is located in DataAccess.cs.
After getting an object of the DataSet type, Excel Workbook creation is invoked. This is accomplished in the Export method that is part of static class ExportToExcel. The workbook Is exported to C:TMPFirstTest.xlsx. The workbook looks similar to that shown in the image below.
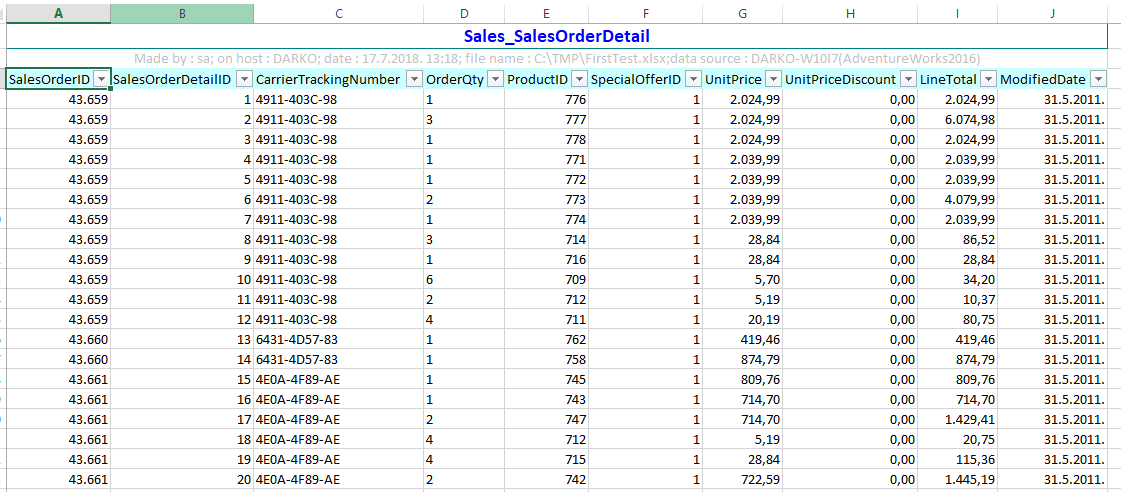
Every table that is part of the DataSet collection becomes an Excel sheet. The first and the second rows contain some information about the data. The third row contains the column names as well as something called ‘auto-filter’ which I will explain in detail later in the article.
When working with the object of type Range, you may find yourself confused by the Range property names that sound very similar, like Value, Value2, and Text.
Besides that, there is a big difference in performance. Text and Value are much slower than Value2. Value2 represents the cells underlying value, unlike Text which gives you the string representation of the cell. Value differs from Value2 when the cell is formatted as date or currency.
In the Export method, there is a parameter named pasteRange used to test performance. Its default value is true which means that the two-dimensional object based on a DataTable is set as the value of the Excel sheet range.
|
1 2 3 4 5 6 7 8 9 10 11 12 13 14 15 16 17 |
if (pasteRange == false) { // slow! do not use like this for (var j = 0; j <= table.Rows.Count — 1; j++) { for (var k = 0; k <= table.Columns.Count — 1; k++) { excelWorkSheet.Cells[j + startRow + 1, k + 1] = table.Rows[j][k]; } } } else { // using Value2 excelWorkSheet.Range[excelWorkSheet.Cells[startRow + 1, 1], excelWorkSheet.Cells[endIndex, table.Columns.Count]].Value2 = General.Convert(table); } |
You can change the method call by setting pasteRange to false as shown in the snippet below.
|
Excel.ExportToExcel.Export(pasteRange: false, ds: dataSet, mFileName: fileName, title: name, errorString: out var error2); |
When the value false is passed, it iterates through all columns and rows, setting the values by each cell. It’s is slow and should not be used.
Before setting the range’s property Value2, some formatting is made. This is accomplished by processing the Columns collection of the DataTable object and setting the property to NumberFormat.
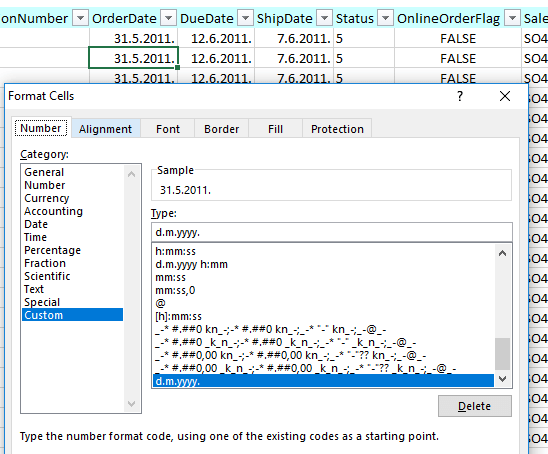
DateTime columns are formatted as shown in the snippet below
|
newRng.NumberFormat = Thread.CurrentThread.CurrentCulture.DateTimeFormat.ShortDatePattern; |
So, it depends on the CurrentCulture, and on my machine looks similar to the image below:
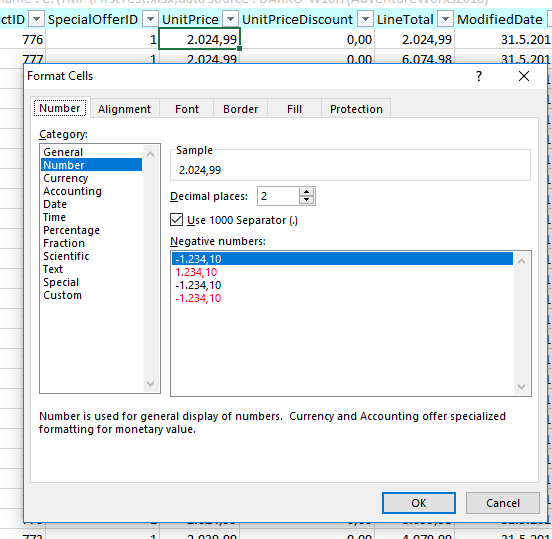
You can also format numbers. For columns that are System.Decimal type, formatting is accomplished like the snippet below.
|
newRng.NumberFormat = «#» + Thread.CurrentThread.CurrentCulture.NumberFormat.NumberGroupSeparator + «##0» + Thread.CurrentThread.CurrentCulture.NumberFormat.NumberDecimalSeparator + «00»; |
On my machine, it looks similar to the image shown below:
One feature that I love when working with Excel is to put columns into the auto-filter mode. That means that all discrete values for one particular column are bound to the combo box that represents the column name.
This is accomplished by referencing the row in which the column names are and by calling the AutoFilter method as shown in the snippet below.
|
// apply auto filter var firstRow = (Range)excelWorkSheet.Rows[<strong>startRow</strong>]; firstRow.AutoFilter(fRow, Criteria1: Type.Missing, Operator: XlAutoFilterOperator.<strong>xlAnd</strong>, Criteria2: Type.Missing, VisibleDropDown: true); |
Finally, to conclude the first example, a sentence about disposing of objects. The proper way to dispose objects is to call Marchal.RelaseComObject. This method is used to explicitly control the lifetime of a COM object used from managed code. You should use this method to free the underlying COM object that holds references to resources in a timely manner or when objects must be freed in a specific order.
COM disposing is a very huge and painful topic and one article is not enough to cover it. Talking about COM disposal is out of scope of the article.
Close the console application if still running and remove the first two rows in the Excel workbook created in the example. This is preparation for the second example.
Importing Data from Excel
The source code for this example is located in the ImportFromExcel project. Set up this project as the Startup Project. This example opens the Excel file generated in the first example, but it can be a different Excel file as well. After opening the file, the code tries to determine how many sheets are in the workbook and the name of every sheet.
This example needs a driver installed, microsoft.ace.oledb.12.0. The driver could be downloaded from the link.
After that, by using the OLEDB provider, every sheet is queried and, as a result, an object of type DataSet is formed. When you have a DataSet object, it is easy to update the database or do whatever else you need to do.
The source code that creates an object of type DataSet is displayed in the snippet below.
|
1 2 3 4 5 6 7 8 9 10 11 12 13 14 15 16 17 |
using (var myConnection = new OleDbConnection($@»Provider=Microsoft.Ace.OLEDB.12.0;Data Source={fileToRead};Extended Properties=’Excel 12.0 Xml;HDR = YES;'»)) { using (var dtSet = new DataSet()) { foreach (var s in dic) { Console.WriteLine($» Processing {s} table»); var myCommand = new OleDbDataAdapter($@»select * from {s};», myConnection); myCommand.TableMappings.Add(«Table», s); myCommand.Fill(dtSet); } foreach (DataTable t in dtSet.Tables) { Console.WriteLine($» Table {t.TableName} has {t.Rows.Count} records»); } } } |
It is important that the sheet name is put in parenthesis and that dollar sign is appended at the end. For example, you could query the first sheet by issuing select * from [Sales_SalesOrderDetail$];. As a result, the console window displays the number of records for each table.
Now, is time to make a real Add-in for Excel and that is the third example.
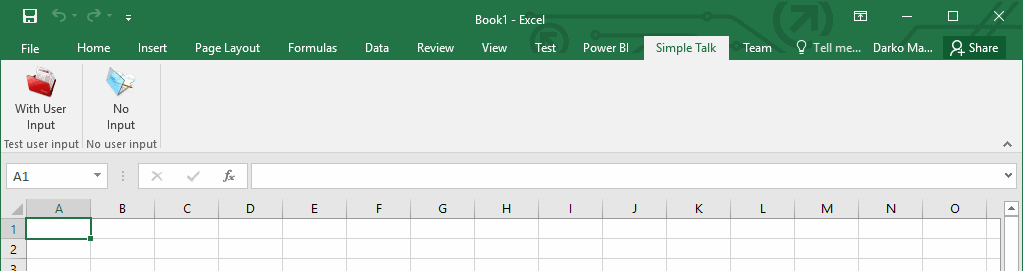
Creating an Excel VSTO Add-In
The third example extends Excel functionality by adding a custom tab with two buttons on the Excel Ribbon, as shown in the image below.
Set SimpleTalkExcelAddIn as the Startup project in the solution. This project has the type of Excel VSTO Add-In. When you create such a project for the first time, a class named ThisAddIn is created and two events are raised. Usually, the generated code looks similar to what is shown in the image below.
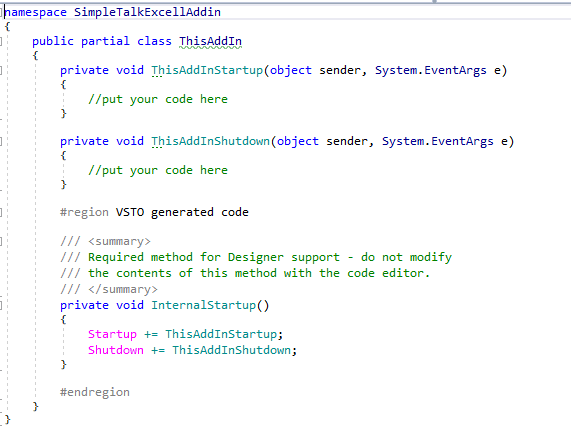
The Startup event is raised after the VSTO Add-in is loaded and all the initialization code in the assembly has been run. The event is handled by the ThisAddInStartup method in the generated code file named ThisAddin.cs. The code in the ThisAddInStartup event handler is the first user code to run unless your VSTO Add-in overrides the RequestComAddInAutomationService method. In this case, the ThisAddInStartup event handler is called after RequestComAddInAutomationService.
Similar to the Startup event, there is a ShutDown event. The event is raised when the application domain that your code is loaded in is about to be unloaded. Usually, it means when you close the Excel application.
Accessing the application, workbook and worksheet objects is accomplished slightly different from earlier examples, as shown in the code below.
|
Excel.Worksheet oSheet; Excel.Workbook oBook; Excel.Application oApp; oApp = Globals.ThisAddIn.Application; oBook = Globals.ThisAddIn.Application.ActiveWorkbook; oSheet = Globals.ThisAddIn.Application.ActiveSheet; |
You can interact with the Excel application by adding two types of Ribbon as shown in the image below.

In the example, the Ribbon of type Visual Designer is already added and named UsingRibbon. In design mode, the Ribbon looks similar to the image below.
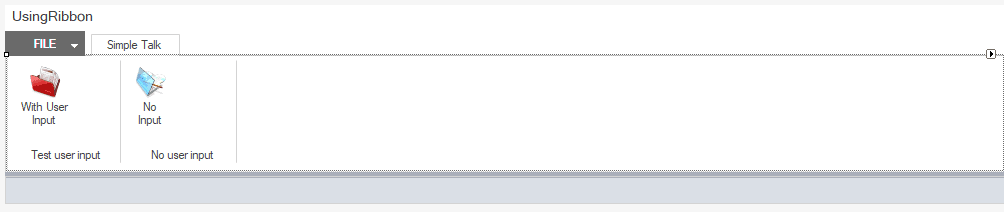
The ribbon control has its own set of properties and events. The control looks similar to any tabbed control and exposes a tabs collection.
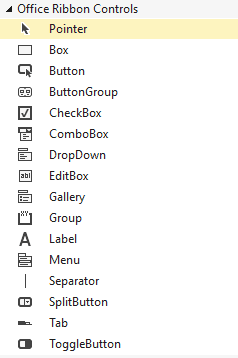
When working with Excel VSTO Add-in’s, on the Visual Studio Toolbar there is a special tab in Visual Studio Toolbox. You can access the toolbox, called Office Ribbon Controls, through the View->Toolbox menu. It’s shown in the image below.
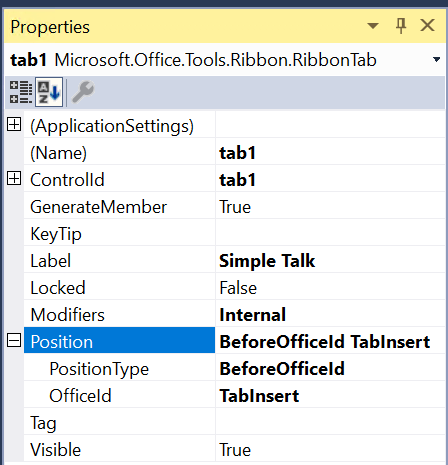
In the example, a few controls are already added. Ribbon Tab is a part of Ribbon Control collection. In this example it’s labeled as Simple Talk. After the Label property, the most commonly used property is Position. The property is the type of RibbonPosition which is an interface that holds a string called OfficeId and an enumerator with three possible values:
- Default
- BeforeOfficeId
- AfterOfficeId
If you choose something other than Default, you have to specify the OfficeId as a string value. Usually, this ID is formed from the word ‘Tab’ plus the ‘Label’ shown on Excel main ribbon. For example, if you would like to position the tab before the ‘Insert’ tab, put ‘TabInsert’ as the OfficeId property. Here is an example from this ribbon.
The Group control is a classic container that could hold another control. It also exposes the Position property. In this example, every group control has a button on it. The Button control responds to only one event – the click event. The most important code in this example is in buttons event handlers.
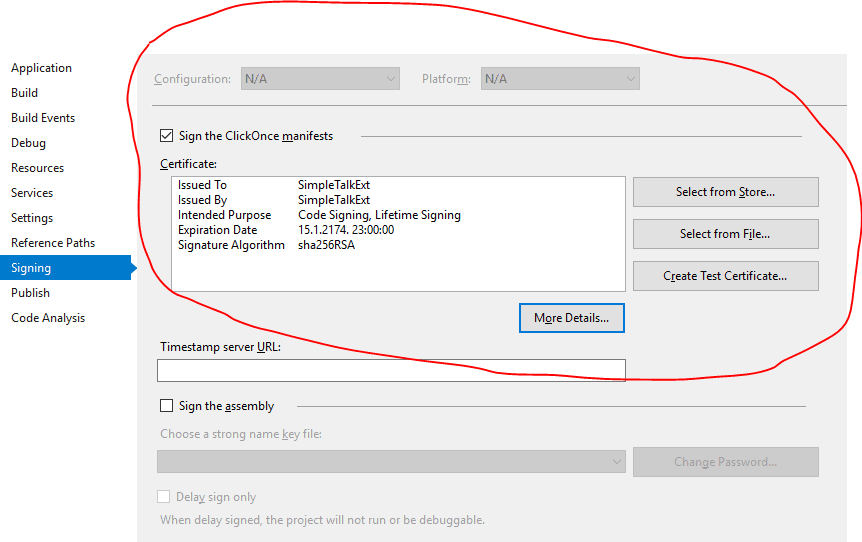
However, before writing anything about what the handler does, I have to make a digression. If you create a brand new Excel VSTO Add-In using Visual Studio template, your first build will fail. Visual Studio will report to you that you have to sign the ClickOnce manifest.
In the example, signing is already accomplished and in the next few sentences, I will explain how.
The project is signed by using the Personal Information Exchange (.pfx) file, although it’s possible to select a certificate from the Store. In order to create a .pfx file, first, you have to create a certificate. This is accomplished by using the Windows SDK utility MakeCert.exe as shown in the snippet below.
|
MakeCert /n «CN=SimpleTalkExt» /r /h 0 /eku «1.3.6.1.5.5.7.3.3,1.3.6.1.4.1.311.10.3.13» /e «01/16/2174» /sv SimpleTalkExt.pvk SimpleTalkExt.cer /a sha256 |
After that, another Windows SDK tool named Pvk2Pfx is used. Pvk2Pfx (Pvk2Pfx.exe) is a command-line tool that copies public key and private key information contained in .spc, .cer, and .pvk files to a Personal Information Exchange file. The file is created by issuing following command
|
pvk2pfx —pvk SimpleTalkExt.pvk —spc SimpleTalkExt.cer —pfx SimpleTalkExt.pfx –f |
After the file is created, on the project property Signing tab, choose Select from File and select the newly created pfx file. Your build will work correctly. So, time to go back to the main topic.
NOTE: Just like the previous examples, you can see this add-in in action by running the project. Be sure to modify the App.Config file first.
The event handlers for both buttons in the example produce the same result. The result is an Excel workbook. The workbook contains three sheets. The first one a contains data that represents the result of the T-SQL query, the second one is a Pivot table based on data in the first sheet. And the last sheet contains a chart that represents Pivot on the second sheet.
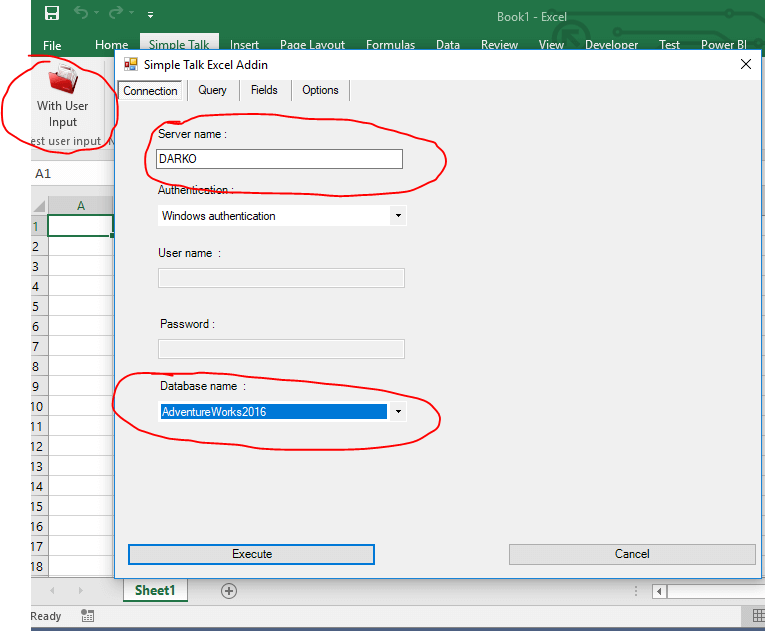
The difference between these two handlers is that the first one shows a form in which the user can specify a connection to SQL Server, T-SQL query, some Pivot options. The form looks similar to that shown in the image below. On the first tab named Connection, you have to specify the instance name and select a database from the list box. This example uses the AdventureWorks2016 database.
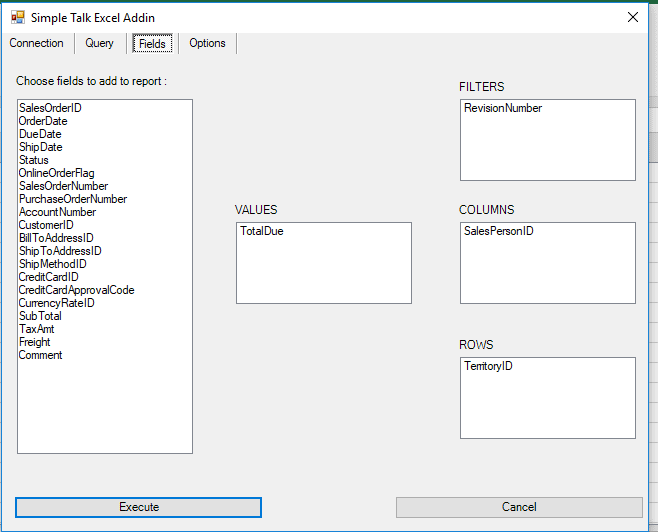
On the second tab named Query, you have to specify a T-SQL statement. This example, queries the Sales.SalesHeader table. On the third tab named Fields, you have to specify some Pivot options, like Columns, Rows, Values and so on, as shown in the image below.
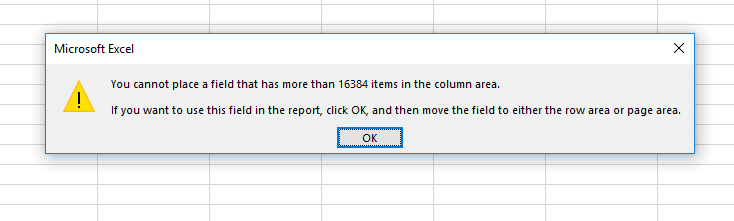
Several values are already added to the list boxes, as you see in the image above. Using drag & drop, it is possible to move fields between list boxes similar to Excel. Every table or every query result is not suitable to be pivoted. Furthermore, there is a restriction on the Columns list box. For example, when you try to put SalesOrderID in the Columns list box in Excel, you will receive an Excel message like the one shown in the image below.
Finally, on the Options tab, there are possibilities to define Chart Types, Table Styles and Pivot styles as shown in the image below.
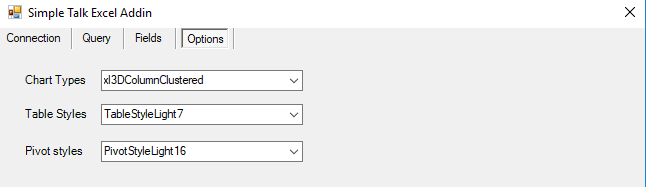
The chart type is an enumerator named xlChartType defined in Microsoft.Office.Core. During loading of the custom user form, the enumerator is set as a data source of the form’s combo box labeled Chart Types, so the user can initially set up the type of chart to see.
NOTE:In Excel it’s possible to change the chart type as well, but the purpose of this example is to show the Excel object model.
Excel exposes 21 ‘Light’ styles, 28 ‘Medium’ styles, and 11 ‘Dark’ styles by default, and you can define your own styles for the table and pivot. When the user has filled everything on the form, and clicks Execute in the current Excel workbook, three sheets are added.
In the first one, the result of the T-SQL query, is displayed very similarly to in the first example, as shown in the image below.
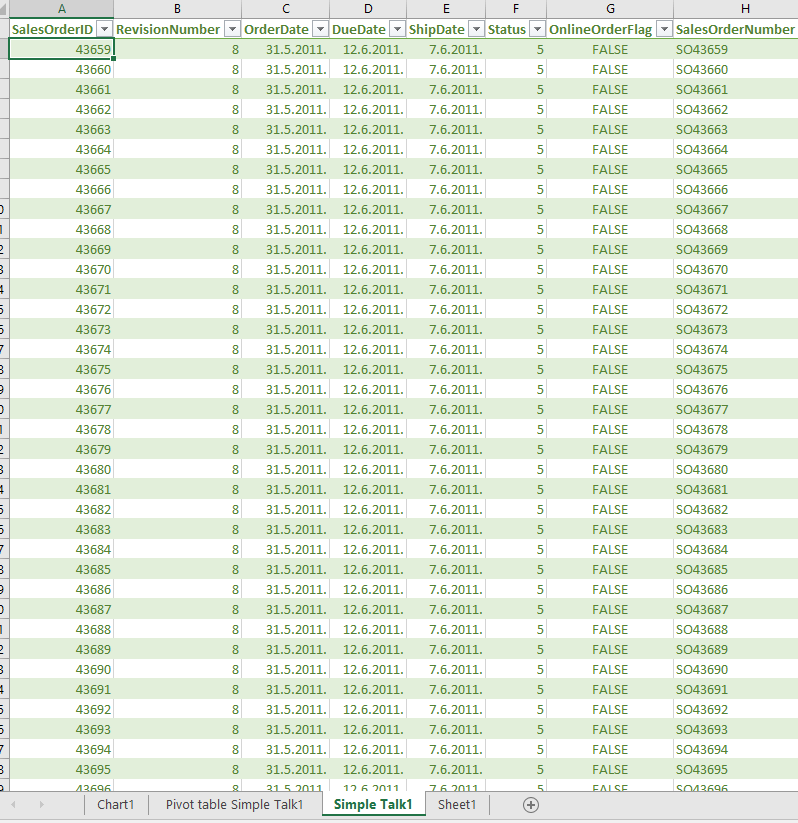
The only difference is that the result is formatted as a table rather than range. This is accomplished by calling function FormatAsTable that is implemented in the project’s General.cs class. The function is implemented as shown in the snippet below.
|
public static void FormatAsTable( Excel.Range sourceRange, string tableName, string tableStyleName, bool isSelected ) { sourceRange.Worksheet.ListObjects.Add(SourceType: Excel.XlListObjectSourceType.xlSrcRange,Source: sourceRange, LinkSource: Type.Missing, XlListObjectHasHeaders: Excel.XlYesNoGuess.xlYes,Destination: Type.Missing).Name = tableName; if (isSelected) sourceRange.Select(); sourceRange.Worksheet.ListObjects[tableName].TableStyle = tableStyleName; } |
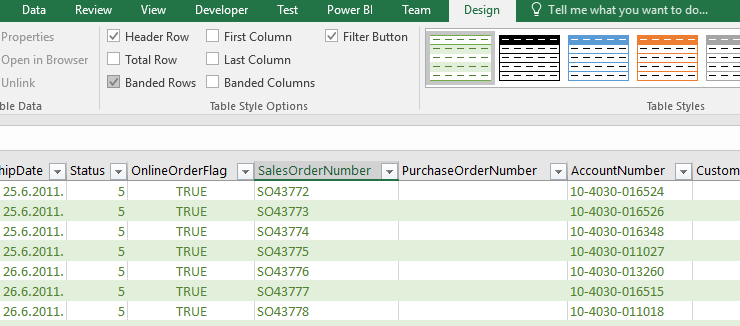
The benefits of formatting ‘as table’ are that column names are frozen in the first row with applied auto-filtering, and there are extra functionalities such as adding Total row by clicking on checkbox, as shown in the image below.
The second sheet contains a pivot table with a slicer object.
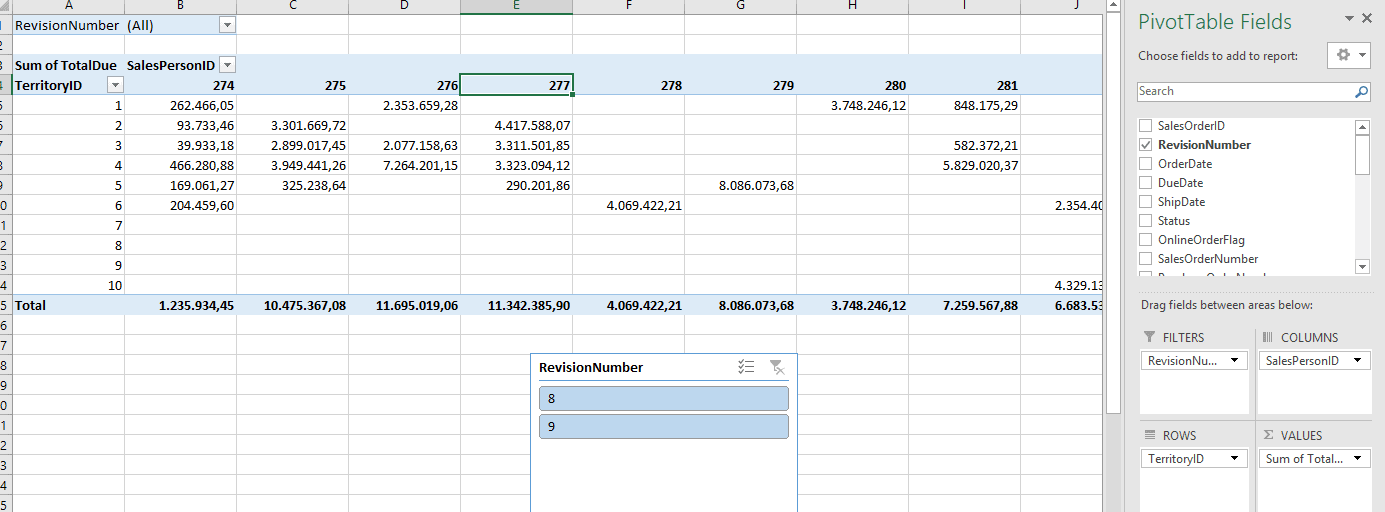
You can manipulate fields, applied a filter, and so on. One cool thing is a slicer object, introduced with Excel 2010, which makes it easy to apply a filter.
The pivot table is added by calling the AddPivot function defined in the General.cs static class. The signature of the function looks similar to that shown in the image below.
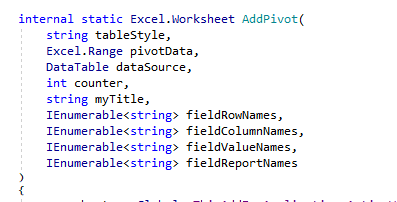
The AddPivot function uses the PivotTableWizard function which is part of the _Worksheet interface defined in the Microsoft.Office.Interop.Excel namespace. The function call is accomplished as in the snippet below.
|
//Add a PivotTable to the worksheet. pivotWorkSheet.PivotTableWizard( SourceType: Excel.XlPivotTableSourceType.xlDatabase, SourceData: pivotData, TableDestination: pivotWorkSheet.Cells[1, 1], // first cell of the pivot table TableName: pivotTableName ); |
Finally, on the third tab, there is a pivot-chart, which is basically the pivot table represented as a chart.
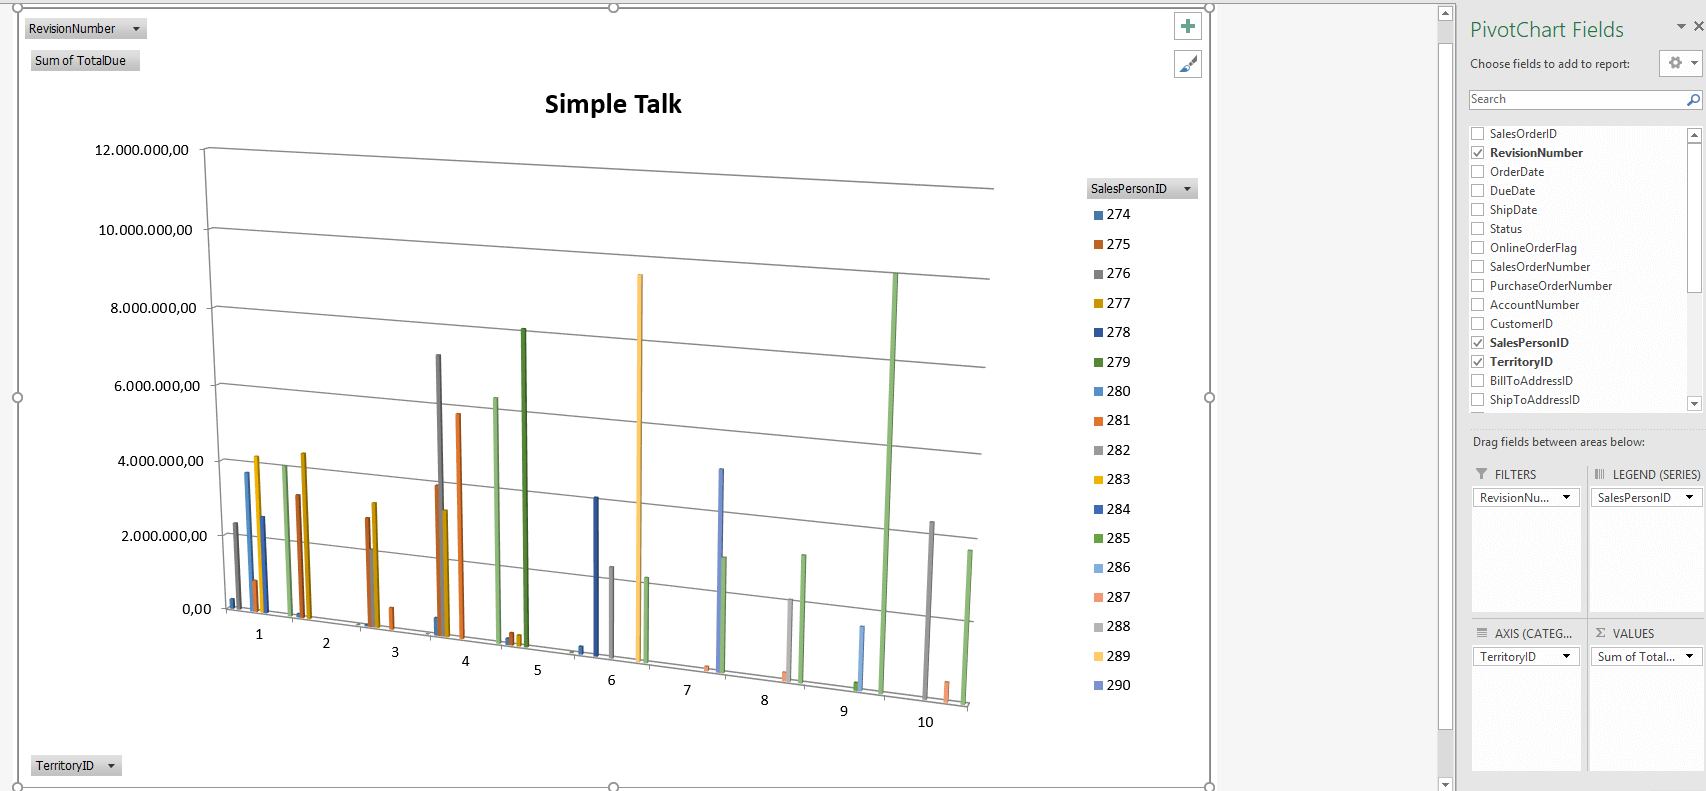
The pivot-chart is added to the workbook by using a wrapper method AddChart defined in the static class General. The most important part of this method is calling the ChartWizard method, which is part of the Chart interface defined in Microsoft.Office.Interop.Excel namespace.
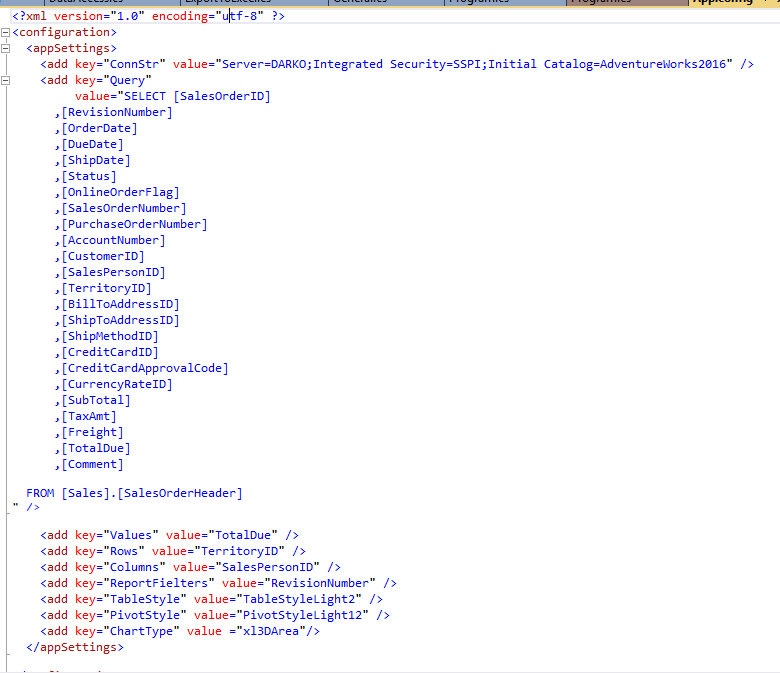
In the introduction of the section I mentioned that there are two buttons on the ribbon form. Both do the same thing. The difference is that information needed to accomplish the task in the second event handler is read from the application configuration file app.config shown in the image below.
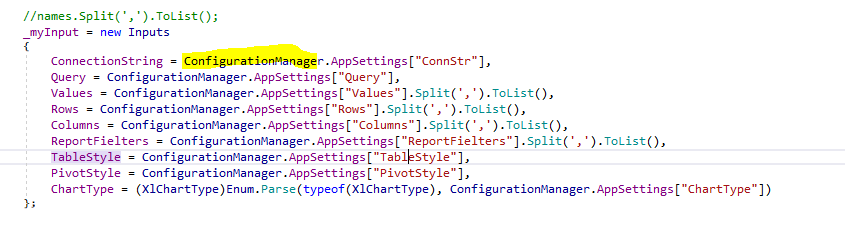
Reading from app.config is quite common, and it is accomplished by using ConfigurationManager defined in System.Configuration as shown in the image below.
Changing the values in app.config before and after publishing the result is a little bit different. In order to explain how to achieve this, I have to explain how to publish the result of the project VSTO.
Publishing the project result could be accomplished by using ClickOnce or by creating a Setup project. On the project properties, there is a tab named Publish as shown in the image below.
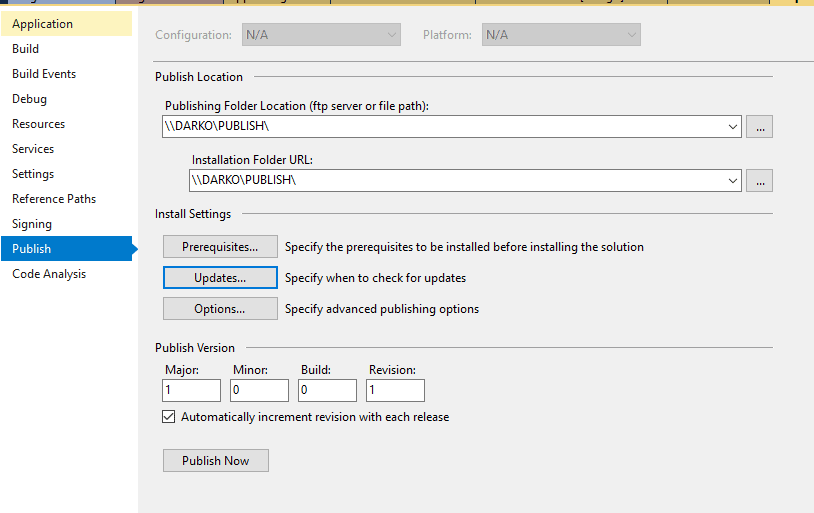
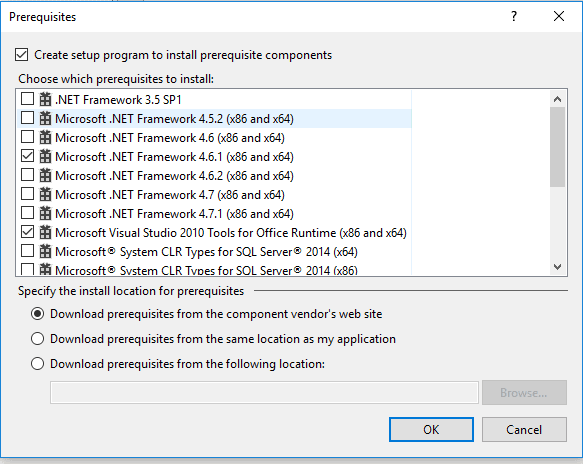
In addition to specifying the publish and installation folders, you can also specify Prerequisites, Updates, and Options.
When you click on the Prerequisites button, you see a set of options similar to the image below.
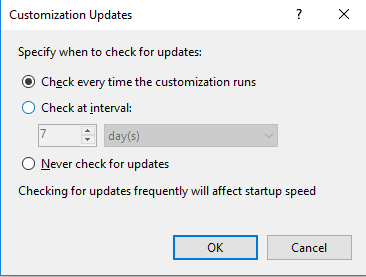
When you click on the Update button, you can see a set of options for updates as shown in the image below.
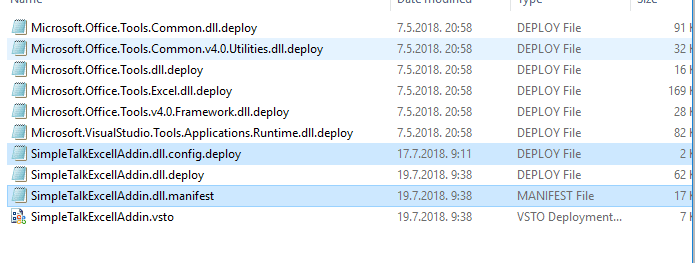
Depending on the options you choose, and after choosing the Publish command from the project context menu, your publishing/installation folder will look to that shown in the image below.
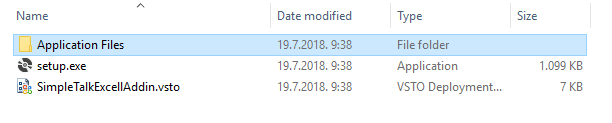
When you browse Application Files, you will notice that the files are separated by the version number. One common thing that you will need to do is to change configuration values, e.g. to change the connection string. This could be done, but after that, you should update the manifest file. On the image below configuration file and manifest file are highlighted.
When you explore the manifest file by using Visual Studio, you will notice that the file is basically an XML file. Part of that file is a description of the configuration file, as shown in the image below.
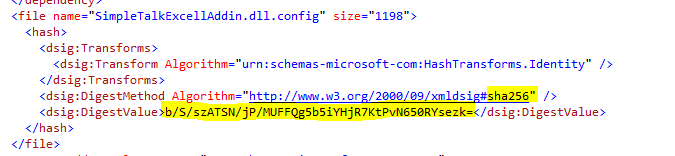
The result files are protected by hashing. In order to change some values in the configuration file, you have to determine a new hash value. This might be accomplished by using ComputeHashGUI that is part of the article solution. If you set the project as a startup, you will see a simple GUI as shown in the image below.
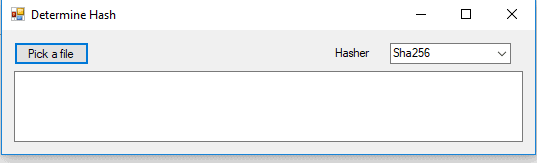
Usage is easy, first, you have to pick a file and that will be the configuration file. After that, the hash value is calculated by using the hash algorithm selected in the combo box. That hash value is then pasted in the manifest file. And there are a just a few more steps.
First, you have to copy the pfx file to the installation folder as well as the Windows SDK utility called mage.exe. Then you have to sign the manifest file located in the last installation folder by executing
|
d:publishmage —sign d:publishApplication FilesSimpleTalkExcellAddin_1_0_0_0SimpleTalkExcellAddin.dll.manifest —certfile «d:publishSimpleTalkExt.pfx» |
After that, you have to update the application VSTO file by executing the following command
|
mage —update SimpleTalkExcellAddin.vsto —appmanifest «d:publishApplication FilesSimpleTalkExcellAddin_1_0_0_0SimpleTalkExcellAddin.dll.manifest» —certfile «D:PUBLISHSimpleTalkExt.pfx» |
As a final step, you have to copy the VSTO file to the last installation folder, in this example SimpleTalExcelAddin_1_0_0_0. Of course, all these steps could be automated, but it is out of the scope of the article.
In the solution, there are two other projects. One to define a Word add-in by using the XML Ribbon control, and the other by using Outlook Add-in.
Set TestWordAddIn as the Startup project in Visual Studio. That is the next example.
Working with Word Add-ins
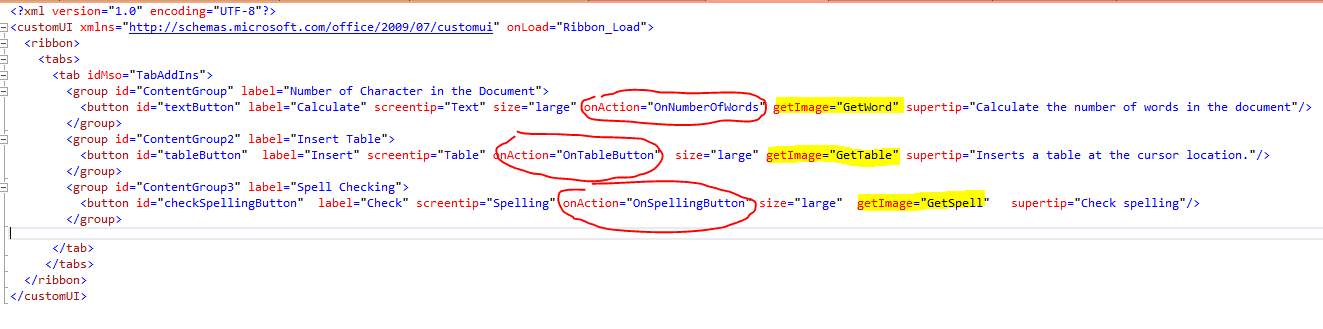
Unlike the previous example in which a Ribbon Designer Control is used, in this section, I will take another approach by utilizing Ribbon XML. So, what is the difference? The Ribbon Designer does not incorporate all facets provided by the OfficeFluentUI model. For example, the Ribbon Designer provides no way to re-purpose built-in commands or work with the BackStage. These things can only be done using Ribbon XML.
When you add a Ribbon (XML) item to a VSTO project from the Add New Item dialog box, Visual Studio automatically adds
- A Ribbon XML file. This file is used to defined UI elements
- A Ribbon code file. This file contains the Ribbon class.
In the solution, these two files are named as MyRibbon.xml and MyRibbon.cs.
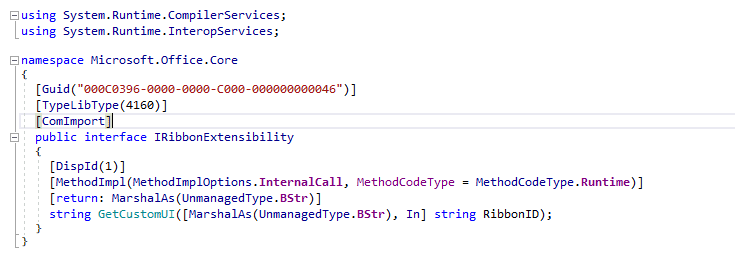
If you open the MyRibbon.cs file, you will notice that, unlike the previous example in which a Ribbon Designer Control is used, here the class implements an interface called IRibbonExtensibility. The interface is defined as shown in the image below. The interface contains only one method named GetCustomUI. (NOTE : The image is NOT from the project code, it is generated(displayed) with a help of R#-Resharper).
The interface implementation is in the code file and looks similar shown in the following snippet
|
#region IRibbonExtensibility Members public string GetCustomUI(string ribbonId) { return GetResourceText(«TestWordAddIn.MyRibbon.xml»); #endregion |
The content of the XML file, returned by GetCustomUI, is used to construct a GUI representation of the ribbon control. You can respond to user actions, such as clicking a button on the ribbon, by creating callback methods. Callback methods resemble events in Windows Forms controls, but they are identified by an attribute in the XML of the UI element and displayed surrounded with red in the image below. You might define an image for a button, as shown highlighted in yellow.
Before exploring the Word Add-in’s functionality, take a look at the Word object model. Similar to Excel, at the top of the object hierarchy, is the Application object. It represents a current instance of Word.
Next in the hierarchy is the Document object, which is basically the most frequently used object. Application objects have a collection named Documents of currently open or created documents.
The Selection object represents the area that is currently selected. When you perform an operation in the Word user interface, such as bolding text, you select, or highlight the text and then apply the formatting.
The Range object represents a contiguous area in a document and is defined by a starting character position and an ending character position. It is not visible, unlike Selection, which is always visible.
Now it is time to start exploring the Add-in functionality. By pressing F5, Word will launch. On the Add-ins tab, there are three buttons, as shown in the image below.
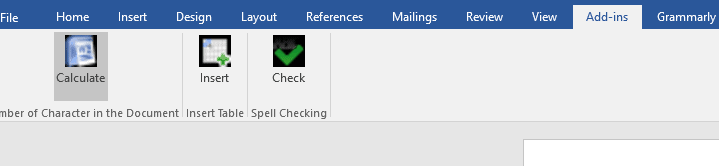
The first button, labeled with Calculate, calculates the number of characters (including hidden) in the current document.
The second button, with the Insert label, inserts a table at the current cursor position. This is accomplished by adding a new table in the ActivDocument.Tables collection, as shown in the snippet below.
|
var <strong>missing</strong> = Type.Missing; var currentRange = Globals.ThisAddIn.Application.Selection.Range; var newTable = Globals.ThisAddIn.Application.ActiveDocument.Tables.Add(Range: currentRange, NumRows: 3, NumColumns: 4, DefaultTableBehavior: ref <strong>missing</strong>, AutoFitBehavior: ref <strong>missing</strong>); |
The third button performs spell checking and reports the result by showing a MessageBox dialog. Most of the things that I write about Excel VSTO could be applied to Word VSTO or Outlook VSTO as well.
Now it is time to review the last example. In order to do that set OutLookAddIn as the startup project.
Working with Outlook Add-ins
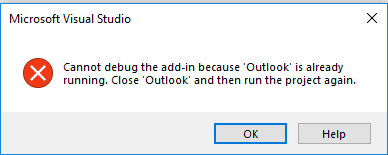
Most things we are talking about Office VSTO could be applied to Outlook VSTO’s as well. It means that signing the project, then working with ThisAddIn class is almost the same as with Excel or Word VSTO’s.
However, unlike Word or Excel VSTO’s, Outlook VSTO does not raise a ShutDown event. When you create a new Outlook VSTO project, the generated code tells you exactly that.

There is another difference, unlike Excel or Word VSTO’s which allows you to have running instances when you try to debug an OutLook VSTO by running the Outlook client, you receive a message like shown in the image below
At the top of Outlook’s object model hierarchy is the Application object. It represents the Outlook application. The application object has two collection properties, Explorers, and Inspectors. Part of the Explorers collection is the object of type Explorer.
The Explorer object represents a window that displays the contents of a folder that contains items such as e-mail messages, tasks, or appointments. The Inspector object represents a window that displays a single item such as an e-mail message, task, or appointment.
In this example, the Inspector object is used. In the VSTO StartUp event-handler, the following snippet is added in order to respond to the creation of the new e-mail message.
|
private void ThisAddInStartup(object sender, System.EventArgs e) { _inspectors = Application.Inspectors; _inspectors.NewInspector += InspectorsNewInspector; } |
When you create a new task, meeting, contact or e-mail or view existing once, the event is fired. In the event, handler following code is added.
|
Private void InspectorsNewInspector(Outlook.Inspector inspector) { If (!(inspector.CurrentItem is Outlook.MailItem mailItem)) return; if (mailItem.EntryID != null) return; mailItem.Subject = @»Mail subject added by using Outlook add-in»; mailItem.Body = @»Mail body added by using Outlook add-in»; } |
If the item is a newly created e-mail, then a text is added to e-mail subject and e-mail body.
Finally few words about cleaning up the environment. By choosing File->Options from the main menu, and choosing Add-ins from tabbed menu, you can get the form like shown in the image below.
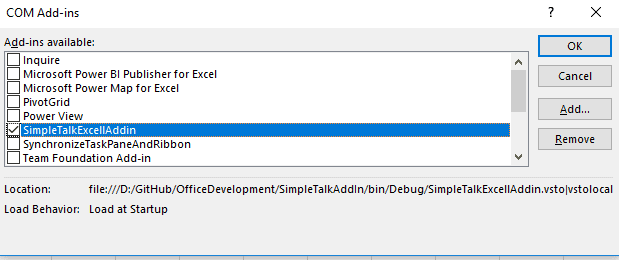
If you would like to disable an Add-in, just uncheck checkbox that is with Add-ins name. If you would like to remove the Add-in, choose Remove button.
Summary
Browsing Microsoft documentation about Office solutions is a tedious task. There are no pictures and a lot of mistakes. My aim was in writing this article is to provide a set of practical examples that could be easy to follow. The Office solution is a huge topic. In the article, I cover a small part, but I hope quite enough to encourage readers to start exploring the topic.
The solution source code can be found on GitHub here.
Microsoft has opened wide Office development to Visual Studio .NET developers by creating the Microsoft Visual Studio Tools for the Microsoft Office System. These tools work with Microsoft Office 2003 Professional Edition.
In its previous versions, Microsoft has spent considerable time making Office available for integration with other Windows-based applications. The ability to integrate with Office began with DDE, went on to OLE 1.0, then to automation, and finally added Visual Basic for Applications. The Visual Studio Tools for Office combine the vision of its predecessors with the functionality of the future in Office 2003.
Office is a staple in most corporations, and .NET developers can easily take advantage of its power and omnipresence. The Visual Studio Tools for Office provide the ability to use .NET code with Office 2003 applications. With it, you can create code using Microsoft Visual Basic .NET (VB.NET) or C# (or other .NET languages) and integrate that code into your own Office 2003 tools.
The first step to using the Visual Studio Tools for Office is to install it; it should be available by the time of this printing.
A cool .NET feature allows you to import a library and access its properties and classes via an alias.
The installer adds a new section called Microsoft Office System Projects to the Visual Studio .NET New Project dialog box. These new project types are divided by language (C# or VB.NET) and by Office 2003 application (only Microsoft Excel 2003 and Microsoft Word 2003 at this time). Figure 1 shows the New Project dialog box with the Visual Basic projects type selected.
Creating Your First Project
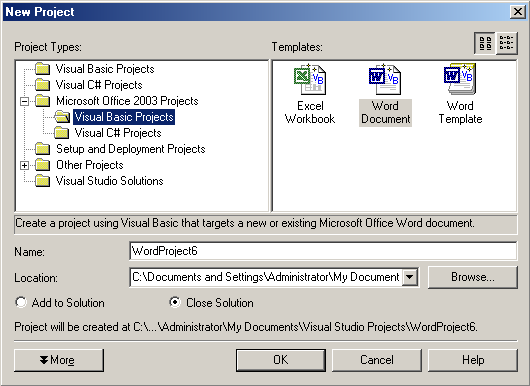
Figure 1. The Visual Studio .NET New Project dialog box shows the Office 2003 projects highlighted.
Now that you’ve installed Visual Studio Tools for Office and selected a language, you can create a new project for the type of document with which you want to integrate. Upon selecting the document type, a wizard prompts you to choose options to create a new document or attach code to an existing document (Figure 2).
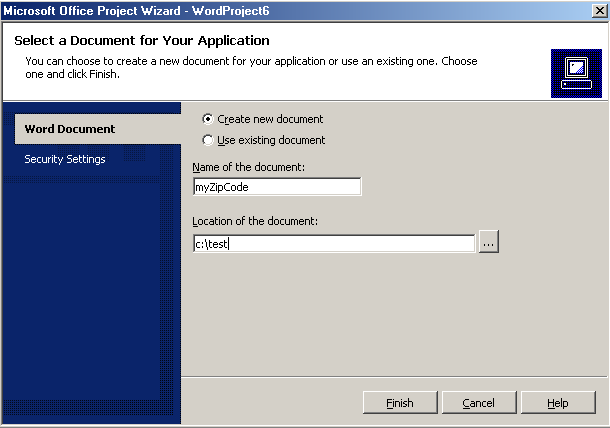
Figure 2. Choose the Create New Document option in the Microsoft Office Project Wizard.
Once you have selected the appropriate behavior, the wizard creates a new Visual Studio Tools for Office project. This project includes code suitable for the type of project you selected. This article discusses a Word 2003 application.
Examining the Code
Once the wizard has run, you can examine the project it created. The first item to examine is the references added by the wizard. The wizard creates a project with all the standard .NET references (System, System.Data, System.XML, etc.) and it also adds references to Microsoft.Office.Core, Microsoft.Office.Interop.Word and Microsoft.VBE.Interop.Forms. These references are assemblies used to communicate with Office 2003 and are installed when you perform a complete installation of Office 2003. If you haven’t installed them from your Office 2003 CDs, the Visual Studio Tools for Office will do that for you.
The next item to examine is the class created by the wizard. The class created by the wizard is partially defined in Table 1.
One item to note is that the routine is defined as a Sub and not a function.
Other items to note are the properties ThisDocument and ThisApplication (ThisDocument is known as ThisWorkbook in Excel 2003 projects). These variables are references to the current document and application. These two variables are cast as their proper Office data types in the _Startup() subroutine created by the wizard.
Friend WithEvents ThisDocument As Word.Document
Friend WithEvents ThisApplication As Word.Application
One last thing to note is how your project links to the workbook or document defined in the wizard.Figure 3 shows the Project Properties dialog box and how the Visual Studio .NET project is linked to Word 2003 and the specified document.Figure 4 shows the Properties dialog box from Word 2003 and how the document is linked to a .NET assembly. In Figure 4, you can see how easy it would be to replace the auto-generated _AssemblyLocaltion0 and _AssemblyName0 properties with your own assemblies.
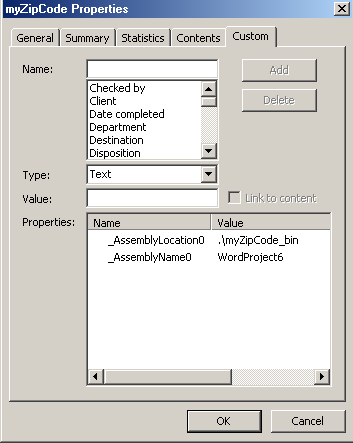
Figure 3. The Properties dialog box from Microsoft Word shows the .NET assembly links specified.
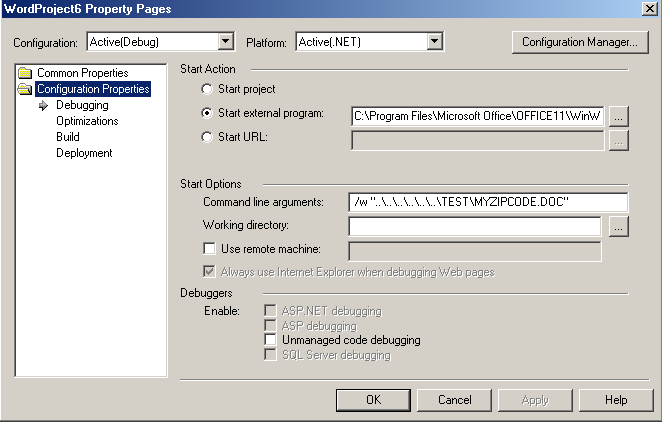
Figure 4. The Visual Studio Properties Page shows Word 2003 links specified for an Office 2003 assembly.
As you can see, the interface is pretty simple for interacting with Office 2003 applications from Visual Studio .NET. Now let’s go to work and make this thing do something.
Hello World
No article on using a new technology would be complete without a new-fangled Hello World example. To create your new Hello World functionality, add the following code to the Document_Open() subroutine and press F5:
ThisDocument.Range.Text = "HELLO WORLD"
From this code, you can see that you are adding text to the Range object of the Word 2003 document. Not too difficult, is it?
Moving On
The next step is to create an application that deals with more complex code and issues than Hello World.
One of the great things about Visual Studio .NET is its ability to create and consume Web services. It would be nice to take advantage of this in your Word 2003 applications as well. That’s what this next set of code will do.
The interface is pretty simple for interacting with Word and Excel 2003 applications from Visual Studio .NET.
First, let’s create a simple Web service with a WebMethod called GetZipInfo(). The WebMethod returns the city and state for a passed-in Zip Code.
Next, you’ll add some data entry controls to your Word 2003 document. These data entry controls are:
- A button named cmdGetZip and captioned “Get Zip Info”
- A textbox named txtZipCode
- A textbox named txtResult
You can add these controls to your Word 2003 document via the Control Toolbox in Word 2003. Your Word 2003 document should look like the document in Figure 5.
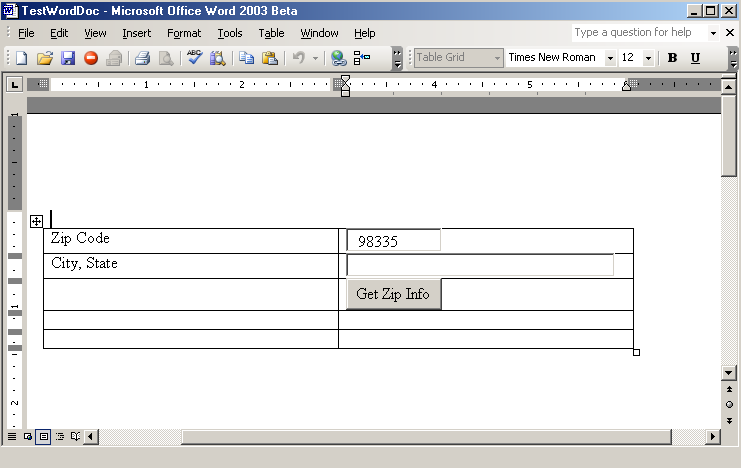
Figure 5. . This is a Word 2003 document with custom controls added.
Now that you have created your Word 2003 document with the proper controls, you can create your Web service, adding code to the interface with controls and adding code to call the Web service.
Creating the Web Service
The first step is to create a Web service called ZipService with a WebMethod called GetZipInfo. To create a Web service, open the New Project dialog box in Visual Studio .NET. Select Create New ASP.NET Web Service and call it ZipService. Add the following code to your Web service:
<WebMethod()> _
Public Function GetZipInfo(ByVal cZip As String) As String
    If cZip = "98335" Then
        Return "Gig Harbor, WA"
    ElseIf cZip = "90210" Then
        Return "Beverly Hills, CA"
    Else
        Return "???"
    End If
End Function
Build the Web service by pressing F5. You can now return to your .NET/Office 2003 code.
Interfacing with Controls
The next step is to add code to interface with the controls you added to your Word 2003 document. This is a multi-step process:
Referencing and Importing the Microsoft Forms Library
The first step to integrating with the Microsoft Forms 2.0 library is to add a reference to that library. To do this, right click on the References section of the Solutions Explorer and then choose References from the shortcut menu. Now select the COM tab, select the first Microsoft Forms 2.0 reference from the dialog box, and press the Select and OK buttons. You can now use this library in your applications.
One of the great things about Visual Studio .NET is its ability to create and consume Web services.
The next step is to add an Imports statement to the top of your class. The following code adds the Forms library to your class:
Imports myForms = Microsoft.Vbe.Interop.Forms
As you can see, this library is imported and aliased to the name myForms. This is a cool .NET feature that allows you to import a library and access its properties and classes via an alias.
Adding Reference Properties to Your Controls
The next step is to add Reference properties to the controls on your Word 2003 document. The following code adds reference properties for each control:
Friend WithEvents myButton As myForms.CommandButton
Friend WithEvents myZip As myForms.TextBox
Friend WithEvents myResult As myForms.TextBox
One item to note is the inclusion of the WithEvents option. These controls send events to your .NET code, which requires use of the WithEvents option.
Casting Your Controls
After adding the reference variables to your code, you need to cast these controls as the proper object types. The following code uses the FindControl() (which can be found in the code created by the Office Project Wizard) and the Ctype() function to cast the reference properties as the proper object types:
myButton = CType(FindControl("cmdGetZip"), myForms.CommandButton)
myZip = CType(FindControl("txtZipCode"), myForms.TextBox)
myResult = CType(FindControl("txtResult"), myForms.TextBox)
The Ctype() function is used to cast an object from one type to another. The FindControl() call returns a handle to the object you wish to cast.
Creating the Event Sink
The final step in this process is to add code to your class to trap the Click event sent from the button on your Word 2003 document. To do this, add the following code to your class:
Dim cZip As String = myZip.Text
Dim oWS As New wsZipService.Service1
Dim cResult As String = oWS.GetZipInfo(cZip)
myResult.Text = cResult
From this code, you can see the Handles statement. This control handles the Click() event of the myButton object.
The rest of the code simply instantiates the Web service, sends the proper Zip Code to the Word 2003 document, and returns the information to the Results text box.
Running Your Example
Now you can run your example using one of two methods. You can press F5 and run the example directly from Visual Studio .NET or from Word 2003. Running your application from the F5 option is how you debug these applications.Figure 6 shows the code above running in debug mode.
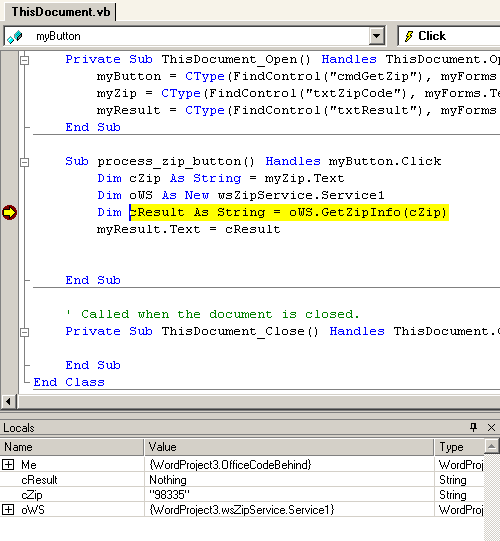
Figure 6. A Visual Studio Tools for Office application has been loaded in the Visual Studio .NET debugger.
The other mechanism for running this code is to simply open the document in Word 2003. Word 2003 takes care of loading the assembly and calling the code in it.
Conclusion
As you can see, integrating Visual Studio .NET and Office 2003 is pretty simple. You can use the user-friendliness of Office 2003 along with the power of Visual Studio .NET in your applications without having to resort to VBA code. That’s pretty cool.
Thanks go out to Ken Getz for helping with the research for this article.
Table 1: Definition of the class created by the Visual Studio Tools for Office Wizard.
| Property/Method | Description |
|---|---|
| ThisDocument | Handle to the current document |
| ThisApplication | Handle to the current application |
| ThisDocument_Open | Subroutine called when the document opens |
| ThisDocument_Close | Subroutine called when the document is closed |
| `FindControl()` | Function that searches the current document for a handle to a control. Used for accessing controls added to a document |
| `Range()` | Returns a `range` object that can be manipulated in workbooks and documents. In Excel, a range can be defined as a cell or range of cells. |
| `Other` functions and properties | There are literally hundreds of others. For the purposes of this article, the ones defined above are the ones most commonly used when integrating with Office. |