
Давайте научимся быстро и просто создавать и записывать файлы Excel с помощью visual studio c#. Наше самое простое приложение Windows Forms будет брать из текстбокса текст и заносить его в первую ячейку. Статья написана специально для Сергея =).
Начать необходимо с подключения библиотеки Microsoft.Office.Interop.Excel. Выглядеть это должно так:

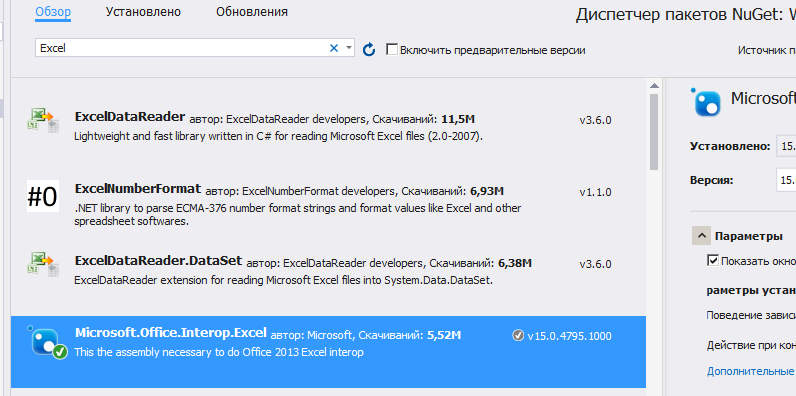
Если у вас при открытии обозревателя решений – Ссылки – правая кнопка – Добавить ссылку – Сборки – в списке нет Microsoft.Office.Interop.Excel, то добавьте её через Nuget. Проект – управление пакетами NuGet – в строке поиска Excel:
Теперь создайте новый проект Windows Forms и на форму закиньте текстбокс и кнопку. На кнопки кликните два раза, откроется исходный код. В самом верху допишите следующее:
using Excel = Microsoft.Office.Interop.Excel;
А в методе button1_Click замените так:
private void button1_Click(object sender, EventArgs e)
        {
            string fileName = "D:\temp\test.xls";

            try
            {
                var excel = new Excel.Application();

                var workBooks = excel.Workbooks;
                var workBook = workBooks.Add();
                var workSheet = (Excel.Worksheet)excel.ActiveSheet;

                workSheet.Cells[1, "A"] = textBox1.Text;

                workBook.SaveAs(fileName);
                workBook.Close();
            }
            catch (Exception ex) {
                MessageBox.Show("Ошибка: "+ ex.ToString());
            }

            MessageBox.Show("Файл "+ Path.GetFileName (fileName) + " записан успешно!");

        }
Вот, собственно говоря и все. Текст из текстбокса запишется в ячейку A1. Обратите внимание, что папка temp на диске уже должна существовать.
Дополнение. Прочитать первую ячейку
Это тоже просто:
 string fileName = "D:\temp\test.xls";

Excel.Application xlApp = new Excel.Application();
Excel.Workbook xlWorkbook = xlApp.Workbooks.Open(fileName, 0, true, 5, "", "", true, Excel.XlPlatform.xlWindows, "t", false, false, 0, true, 1, 0);
Excel._Worksheet xlWorksheet = (Excel._Worksheet)xlWorkbook.Sheets[1];
Excel.Range xlRange = xlWorksheet.UsedRange;

string temp = (string)(xlRange.Cells[1, 1] as Excel.Range).Value2;// 1 1 - адрес 1-й ячейки
MessageBox.Show(temp);

Автор этого материала — я — Пахолков Юрий. Я оказываю услуги по написанию программ на языках Java, C++, C# (а также консультирую по ним) и созданию сайтов. Работаю с сайтами на CMS OpenCart, WordPress, ModX и самописными. Кроме этого, работаю напрямую с JavaScript, PHP, CSS, HTML — то есть могу доработать ваш сайт или помочь с веб-программированием. Пишите сюда.
![]() заметки, си шарп, excel
заметки, си шарп, excel
| title | description | ms.date | ms.topic | dev_langs | helpviewer_keywords | author | ms.author | manager | ms.technology | ms.workload | |||||||||||||||||
|---|---|---|---|---|---|---|---|---|---|---|---|---|---|---|---|---|---|---|---|---|---|---|---|---|---|---|---|
|
Excel solutions |
Learn you can use project templates to automate Excel, extend Excel features, and customize the Excel user interface (UI) |
08/14/2019 |
conceptual |
|
|
John-Hart |
johnhart |
jmartens |
office-development |
office |
Excel solutions
[!INCLUDE Visual Studio]
Visual Studio provides project templates you can use to create document-level customizations and VSTO Add-ins for Microsoft Office Excel. You can use these solutions to automate Excel, extend Excel features, and customize the Excel user interface (UI). For more information about the differences between document-level customizations and VSTO Add-ins, see Office solutions development overview (VSTO).
[!INCLUDEappliesto_xlalldocapp]
[!includeAdd-ins note]
This topic provides the following information:
-
Automate Excel.
-
Develop document-level customizations for Excel.
-
Develop VSTO Add-ins for Excel.
-
Customize the user interface of Excel.
Automate Excel
The Excel object model exposes many types that you can use to automate Excel. For example, you can programmatically create charts, format worksheets, and set the values of ranges and cells. For more information, see Excel object model overview.
When developing Excel solutions in Visual Studio, you can also use host items and host controls in your solutions. These are objects that extend certain commonly used objects in the Excel object model, such as the xref:Microsoft.Office.Interop.Excel.Worksheet and xref:Microsoft.Office.Interop.Excel.Range objects. The extended objects behave like the Excel objects they are based on, but they add additional events and data binding capabilities to the objects. For more information, see Automate Excel by using extended objects.
Develop document-level customizations for Excel
A document-level customization for Microsoft Office Excel consists of an assembly that is associated with a specific workbook. The assembly typically extends the workbook by customizing the UI and by automating Excel. Unlike a VSTO Add-in, which is associated with Excel itself, functionality that you implement in a customization is available only when the associated workbook is open in Excel.
To create a document-level customization project for Excel, use the Excel workbook or Excel template project templates in the New Project dialog box of Visual Studio. For more information, see How to: Create Office projects in Visual Studio.
For more information about how document-level customizations work, see Architecture of document-level customizations.
Excel customization programming model
When you create a document-level project for Excel, Visual Studio generates several classes that are the foundation of your solution: ThisWorkbook, Sheet1, Sheet2, and Sheet3. These classes represent the workbook and worksheets that are associated with your solution, and they provide a starting point for writing your code.
For more information about these generated classes and other features you can use in a document-level project, see Program document-level customizations.
Develop VSTO Add-ins for Excel
A VSTO Add-in for Microsoft Office Excel consists of an assembly that is loaded by Excel. The assembly typically extends Excel by customizing the UI and by automating Excel. Unlike a document-level customization, which is associated with a specific workbook, functionality that you implement in a VSTO Add-in is not restricted to any single workbook.
To create a VSTO Add-in project for Excel, use the Excel workbook or Excel template project templates in the New Project dialog box of Visual Studio. For more information, see How to: Create Office projects in Visual Studio.
For general information about how VSTO Add-ins work, see Architecture of VSTO Add-ins.
Excel Add-in programming model
When you create an Excel VSTO Add-in project, Visual Studio generates a class, called ThisAddIn, which is the foundation of your solution. This class provides a starting point for writing your code, and it also exposes the object model of Excel to your VSTO Add-in.
For more information about the ThisAddIn class and other Visual Studio features you can use in a VSTO Add-in, see Program VSTO Add-Ins.
Customize the user interface of Excel
There are several different ways to customize the user interface of Excel. Some options are available to all project types, and other options are available only to VSTO Add-ins or document-level customizations.
Options for all project types
The following table lists customization options that are available to both document-level customizations and VSTO Add-ins.
| Task | For more information |
|---|---|
| Customize the Ribbon. | Ribbon overview |
| Add Windows Forms controls or extended Excel controls to a worksheet in the customized workbook for a document-level customization, or in any open workbook for a VSTO Add-in. | How to: Add Windows forms controls to Office documents
How to: Add Chart controls to worksheets How to: Add ListObject controls to worksheets How to: Add NamedRange controls to worksheets |
Options for document-level customizations
The following table lists customization options that are available only to document-level customizations.
| Task | For more information |
|---|---|
| Add an actions pane to the workbook. | Actions pane overview
How to: Add an actions pane to Word documents or Excel workbooks |
| Add extended range controls that are mapped to XML nodes to a worksheet. | How to: Add XMLMappedRange controls to worksheets |
Options for VSTO Add-ins
The following table lists customization options that are available only to VSTO Add-ins.
| Task | For more information |
|---|---|
| Create a custom task pane. | Custom task panes |
Related topics
| Title | Description |
|---|---|
| Excel object model overview | Provides an overview of the main types provided by the Excel object model. |
| Automate Excel by using extended objects | Provides information about extended objects (provided by the [!INCLUDEvsto_runtime]) that you can use in Excel solutions. |
| Globalization and localization of Excel solutions | Contains information about special considerations for Excel solutions that will be run on computers that have non-English settings for Windows. |
| Windows Forms controls on Office documents overview | Describes how you can add Windows Forms controls to Excel worksheets. |
| Walkthrough: Create your first document-level customization for Excel | Demonstrates how to create a basic document-level customization for Excel. |
| Walkthrough: Create your first VSTO Add-in for Excel | Demonstrates how to create a basic VSTO Add-in for Excel. |
| Walkthrough: Add controls to a worksheet at run time in VSTO Add-in project | Demonstrates how to add a Windows Forms button, a xref:Microsoft.Office.Tools.Excel.NamedRange, and a xref:Microsoft.Office.Tools.Excel.ListObject to a worksheet at run time by using a VSTO Add-in. |
| Understand co-authoring and Add-ins | Describes adjustments you might need to make to your solutions to accommodate coauthoring. |
| Excel 2010 in Office development | Provides links to articles and reference documentation about developing Excel solutions. These are not specific to Office development using Visual Studio. |
Microsoft Office is heavily used in most organizations, and Microsoft has provided several ways to extend and customize Office applications. In this article, Darko Martinovic demonstrates how to use C# to create several automation solutions, including custom add-ins.
Office components such as Excel or Word, have a powerful GUI, with many options to automate everyday tasks. In addition, there are a lot of excellent Add-Ins such as Power BI. With such functionality and the ability to use VBA, you may ask yourself why we need Office extensions.
Of course, there are many situations in which you might like to extend Office functionality. For example, to create a routine that:
- exports data from SQL Server into Excel with custom formatting
- imports data from Excel into the dataset
- automatizes Pivot Table creation in Excel
- customizes writing documents in Word
- customizes writing e-mail messages in Outlook
- more…
Microsoft provides a mechanism to accomplish all of these tasks. Office developer tools in Visual Studio let you create .NET Framework applications that extend Office. These applications are also named Office solutions. This article talks about how to develop and distribute such solutions.
In order to start developing you have to set up the environment.
Configure a Computer for Developing Office Solutions
The Office Developer Tools are installed by default as part of Visual Studio.
NOTE: In order to follow examples in the article, you can use any edition, including Visual Studio 2017 Community Edition.
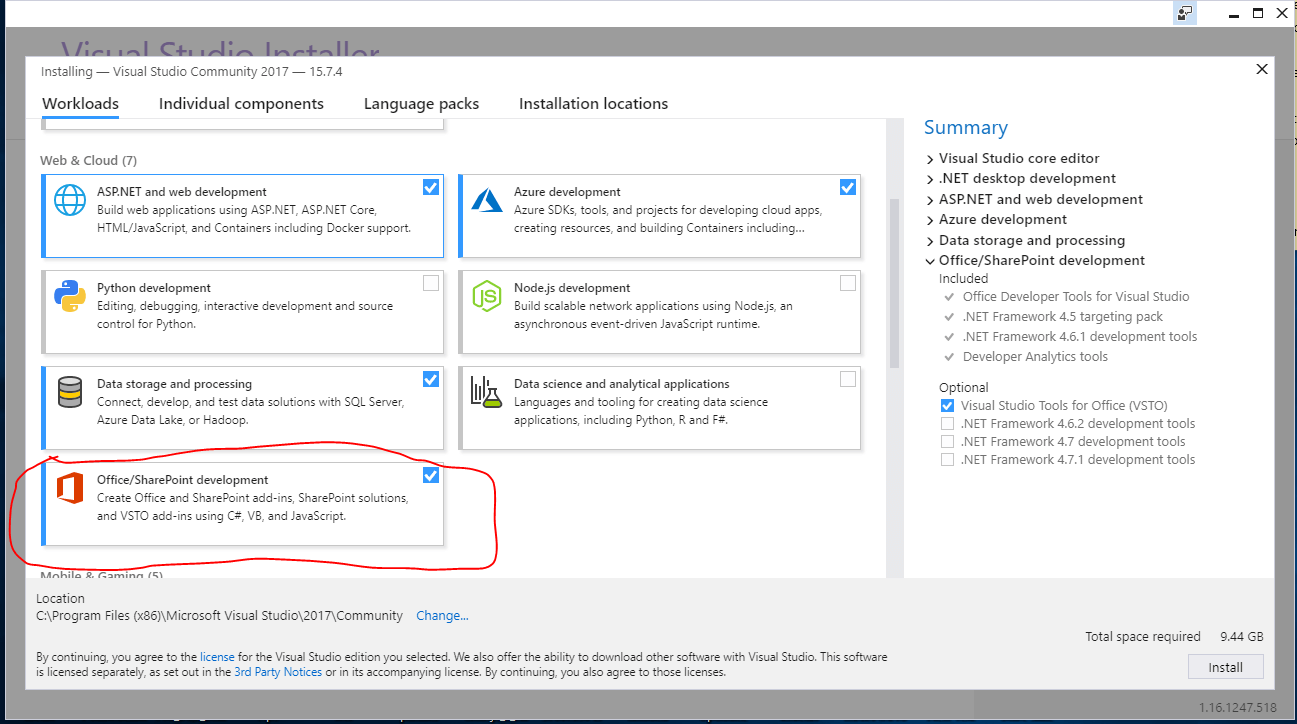
If you customize the Visual Studio installation by selecting which features to install, make sure that Microsoft Office Developer Tools is selected during setup. Alternatively, you can start Visual Studio Installer and select the Office/SharePoint development workload, as shown in the image below.
In addition, you have to Install a version of Office that is supported by the Office developer tools in Visual Studio. Examples in the article are tested with Office 2013/2016. Make sure that you also install the PIAs (Primary Interop Assemblies) for the version of Office that you install. The PIAs are installed with Office by default. If you modify the Office setup, make sure that the .NET Programmability Support feature is selected for the applications you want to target.
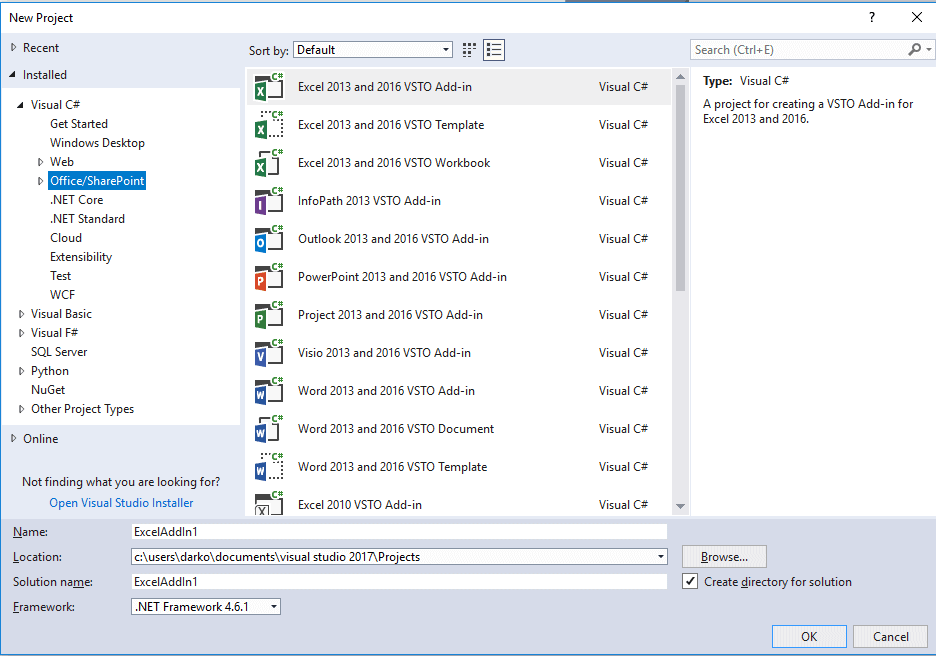
To check the installation, start Visual Studio, create a new project and be sure that Office templates are present as shown in the image below.
Choose an Office project type
Office projects are divided into Office and COM Add-ins. The first one usually is marked as ‘new development’, uses WEB templates and JavaScript, requires Office 2016, and targets mainly Office 365. In my opinion, both are worth exploring. This article covers the second one, which is usually divided based on the template you choose. There are Document-level customizations and VSTO Add-ins. VSTO Add-ins are associated with the application itself and Document-level customizations, as the name implies, are associated with a particular document.
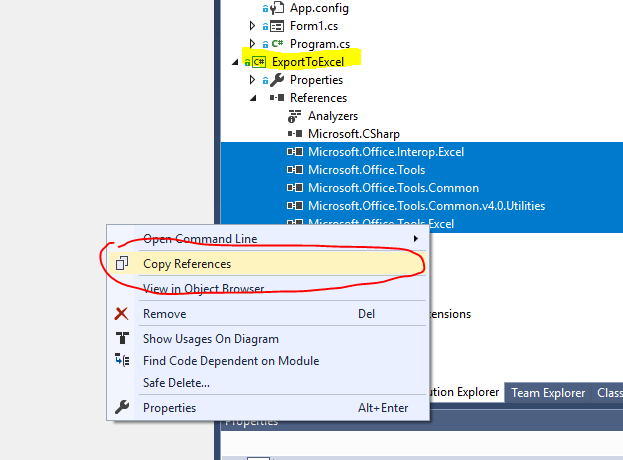
Besides that, there is the possibility to include the Office object model in your application by referencing PIA assemblies. The PIA enables the managed code in your solution to interact with the Office application’s COM-based object model. That would be the first example in which we will browsing source code in a Console application. If you would like to create your own startup project, choose C# console application from the list of available templates. After that you can use Visual Studio productivity tool Power Commands to copy references as shown in the image below and paste them in your project.
NOTE: You can add references by choosing Add Reference command from References context menu.
Exporting Data into Excel
Download this solution and then open it in Visual Studio. Make sure that ExportToExcel is selected as the startup project. The purpose of the first demo is to introduce the Excel object model by accomplishing one common task, exporting data from SQL Server tables into Excel. In order to follow the demo, you have to change the application configuration file app.config. In the file enter your instance name where you have restored the AdventureWorks2016 database.
The most important objects in Excel are:
- Application
- Workbook
- Worksheet
- Range
Microsoft documentation states: “The Application object represents the Excel application. The Application object exposes a great deal of information about the running application, the options applied to that instance, and the current user objects open within the instance.”
NOTE: The source code is located in the ExportToExcel.cs file inside the ExportToExcel project. There is no need to copy the code from the article.
In order to instantiate an application object, you have to include the Microsoft.Office.Interop.Excel namespace. An application object is created by using the following code snippet.
|
var excelApp = new Application { Visible = false, DisplayAlerts = false, DisplayClipboardWindow = false, DisplayFullScreen = false, ScreenUpdating = false, WindowState = XlWindowState.xlNormal }; |
If you add a breakpoint on a line after an application object is created (see the image below) and press F5 to start debugging the project, you will notice that nothing changes. The application is started as hidden because the Visible property is set to false.
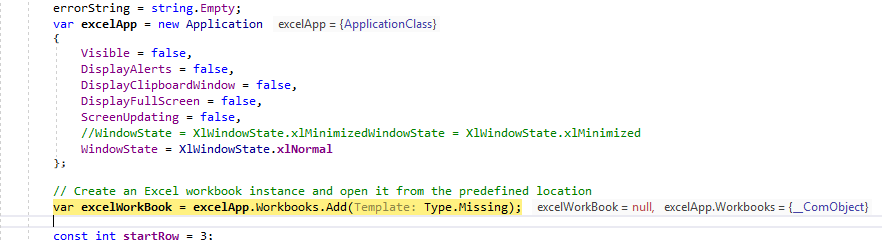
In order to prove that the Excel application has started, start Task Manager, and find the Excel application on the list, as shown in the image below.

The Workbook object represents a single workbook within the Excel application. The following snippet is used to create the object:
|
// Create an Excel workbook instance var workbooks = excelApp.Workbooks; var excelWorkBook = workbooks.Add(Template: Type.Missing); |
The Worksheet object is a member of the Worksheets collection. Many of the properties, methods, and events of the Worksheet are identical or similar to members provided by the Application or Workbook objects. Excel provides a Sheets collection as a property of a Workbook object. Each member of the Sheets collection is either a Worksheet or a Chart object. The following snippet is used to create the Worksheet.
|
var wst = excelWorkBook.Worksheets; Worksheet excelWorkSheet = null; // Add a new worksheet to workbook with the Data table name excelWorkSheet = (Worksheet)wst.Add(); |
A range object represents a cell, a row, a column, or any kind of selection that contains at least one cell. In order to create Range object, you have to use a snippet like this one
|
var newRng = excelWorkSheet.Range[excelWorkSheet.Cells[startRow + 1, i], excelWorkSheet.Cells[endIndex, i]]; |
The purpose of the first example is to take T-SQL query results as an object of type DataSet and transform that object into an Excel workbook. The T-SQL query, as well as the connection string, are found in the application configuration file app.config. The example uses two tables of the AdventureWorks2016 database, both located in the schema Sales: The SalesOrderHeader table which contains 31K rows and SalesOrderDetail which contains 121K rows. On my machine, the Excel file is created in 25 sec. In order to shorten the example, I reduced number of records in both tables to 1000 by applying SELECT TOP in the app.config file.
Generating an object of the DataSet type is quite a common thing, and I will skip describing this part. In the project, the source code to accomplish that task is located in DataAccess.cs.
After getting an object of the DataSet type, Excel Workbook creation is invoked. This is accomplished in the Export method that is part of static class ExportToExcel. The workbook Is exported to C:TMPFirstTest.xlsx. The workbook looks similar to that shown in the image below.
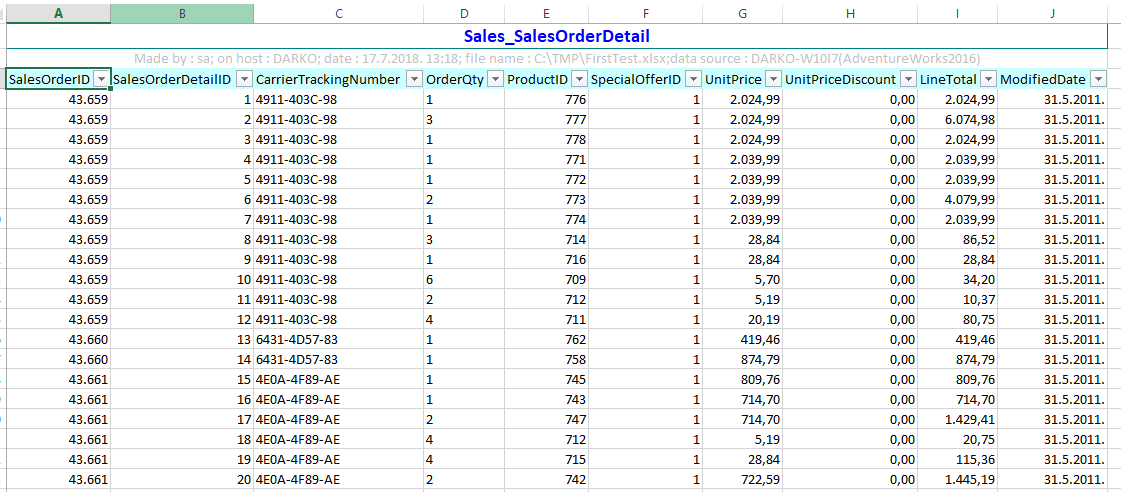
Every table that is part of the DataSet collection becomes an Excel sheet. The first and the second rows contain some information about the data. The third row contains the column names as well as something called ‘auto-filter’ which I will explain in detail later in the article.
When working with the object of type Range, you may find yourself confused by the Range property names that sound very similar, like Value, Value2, and Text.
Besides that, there is a big difference in performance. Text and Value are much slower than Value2. Value2 represents the cells underlying value, unlike Text which gives you the string representation of the cell. Value differs from Value2 when the cell is formatted as date or currency.
In the Export method, there is a parameter named pasteRange used to test performance. Its default value is true which means that the two-dimensional object based on a DataTable is set as the value of the Excel sheet range.
|
1 2 3 4 5 6 7 8 9 10 11 12 13 14 15 16 17 |
if (pasteRange == false) { // slow! do not use like this for (var j = 0; j <= table.Rows.Count — 1; j++) { for (var k = 0; k <= table.Columns.Count — 1; k++) { excelWorkSheet.Cells[j + startRow + 1, k + 1] = table.Rows[j][k]; } } } else { // using Value2 excelWorkSheet.Range[excelWorkSheet.Cells[startRow + 1, 1], excelWorkSheet.Cells[endIndex, table.Columns.Count]].Value2 = General.Convert(table); } |
You can change the method call by setting pasteRange to false as shown in the snippet below.
|
Excel.ExportToExcel.Export(pasteRange: false, ds: dataSet, mFileName: fileName, title: name, errorString: out var error2); |
When the value false is passed, it iterates through all columns and rows, setting the values by each cell. It’s is slow and should not be used.
Before setting the range’s property Value2, some formatting is made. This is accomplished by processing the Columns collection of the DataTable object and setting the property to NumberFormat.
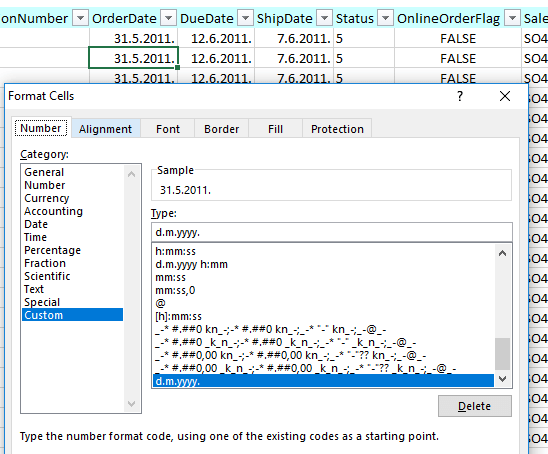
DateTime columns are formatted as shown in the snippet below
|
newRng.NumberFormat = Thread.CurrentThread.CurrentCulture.DateTimeFormat.ShortDatePattern; |
So, it depends on the CurrentCulture, and on my machine looks similar to the image below:
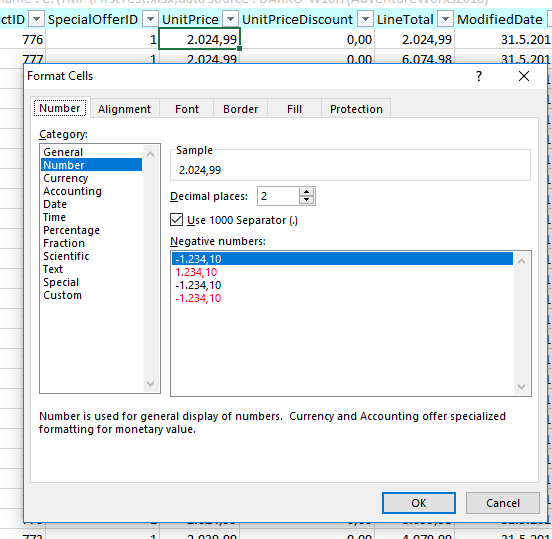
You can also format numbers. For columns that are System.Decimal type, formatting is accomplished like the snippet below.
|
newRng.NumberFormat = «#» + Thread.CurrentThread.CurrentCulture.NumberFormat.NumberGroupSeparator + «##0» + Thread.CurrentThread.CurrentCulture.NumberFormat.NumberDecimalSeparator + «00»; |
On my machine, it looks similar to the image shown below:
One feature that I love when working with Excel is to put columns into the auto-filter mode. That means that all discrete values for one particular column are bound to the combo box that represents the column name.
This is accomplished by referencing the row in which the column names are and by calling the AutoFilter method as shown in the snippet below.
|
// apply auto filter var firstRow = (Range)excelWorkSheet.Rows[<strong>startRow</strong>]; firstRow.AutoFilter(fRow, Criteria1: Type.Missing, Operator: XlAutoFilterOperator.<strong>xlAnd</strong>, Criteria2: Type.Missing, VisibleDropDown: true); |
Finally, to conclude the first example, a sentence about disposing of objects. The proper way to dispose objects is to call Marchal.RelaseComObject. This method is used to explicitly control the lifetime of a COM object used from managed code. You should use this method to free the underlying COM object that holds references to resources in a timely manner or when objects must be freed in a specific order.
COM disposing is a very huge and painful topic and one article is not enough to cover it. Talking about COM disposal is out of scope of the article.
Close the console application if still running and remove the first two rows in the Excel workbook created in the example. This is preparation for the second example.
Importing Data from Excel
The source code for this example is located in the ImportFromExcel project. Set up this project as the Startup Project. This example opens the Excel file generated in the first example, but it can be a different Excel file as well. After opening the file, the code tries to determine how many sheets are in the workbook and the name of every sheet.
This example needs a driver installed, microsoft.ace.oledb.12.0. The driver could be downloaded from the link.
After that, by using the OLEDB provider, every sheet is queried and, as a result, an object of type DataSet is formed. When you have a DataSet object, it is easy to update the database or do whatever else you need to do.
The source code that creates an object of type DataSet is displayed in the snippet below.
|
1 2 3 4 5 6 7 8 9 10 11 12 13 14 15 16 17 |
using (var myConnection = new OleDbConnection($@»Provider=Microsoft.Ace.OLEDB.12.0;Data Source={fileToRead};Extended Properties=’Excel 12.0 Xml;HDR = YES;'»)) { using (var dtSet = new DataSet()) { foreach (var s in dic) { Console.WriteLine($» Processing {s} table»); var myCommand = new OleDbDataAdapter($@»select * from {s};», myConnection); myCommand.TableMappings.Add(«Table», s); myCommand.Fill(dtSet); } foreach (DataTable t in dtSet.Tables) { Console.WriteLine($» Table {t.TableName} has {t.Rows.Count} records»); } } } |
It is important that the sheet name is put in parenthesis and that dollar sign is appended at the end. For example, you could query the first sheet by issuing select * from [Sales_SalesOrderDetail$];. As a result, the console window displays the number of records for each table.
Now, is time to make a real Add-in for Excel and that is the third example.
Creating an Excel VSTO Add-In
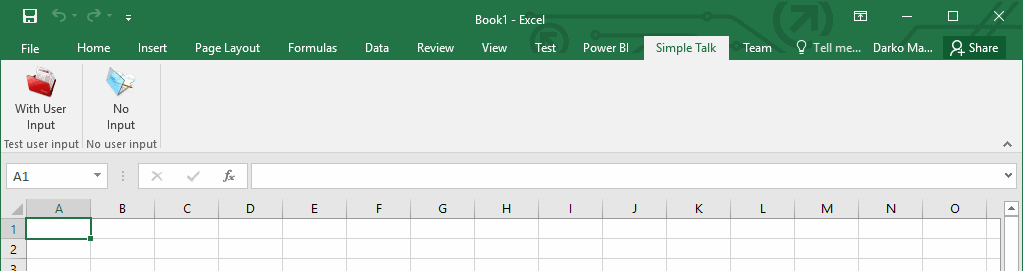
The third example extends Excel functionality by adding a custom tab with two buttons on the Excel Ribbon, as shown in the image below.
Set SimpleTalkExcelAddIn as the Startup project in the solution. This project has the type of Excel VSTO Add-In. When you create such a project for the first time, a class named ThisAddIn is created and two events are raised. Usually, the generated code looks similar to what is shown in the image below.
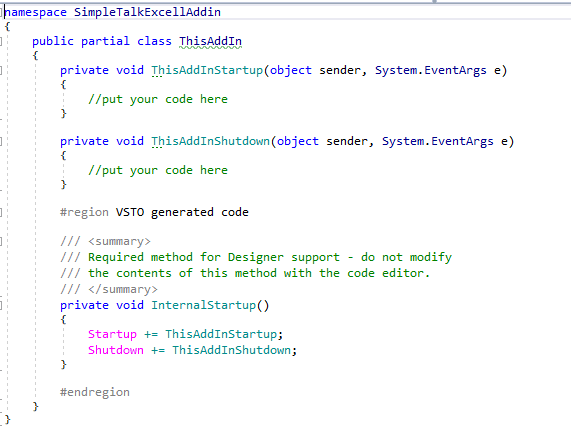
The Startup event is raised after the VSTO Add-in is loaded and all the initialization code in the assembly has been run. The event is handled by the ThisAddInStartup method in the generated code file named ThisAddin.cs. The code in the ThisAddInStartup event handler is the first user code to run unless your VSTO Add-in overrides the RequestComAddInAutomationService method. In this case, the ThisAddInStartup event handler is called after RequestComAddInAutomationService.
Similar to the Startup event, there is a ShutDown event. The event is raised when the application domain that your code is loaded in is about to be unloaded. Usually, it means when you close the Excel application.
Accessing the application, workbook and worksheet objects is accomplished slightly different from earlier examples, as shown in the code below.
|
Excel.Worksheet oSheet; Excel.Workbook oBook; Excel.Application oApp; oApp = Globals.ThisAddIn.Application; oBook = Globals.ThisAddIn.Application.ActiveWorkbook; oSheet = Globals.ThisAddIn.Application.ActiveSheet; |
You can interact with the Excel application by adding two types of Ribbon as shown in the image below.

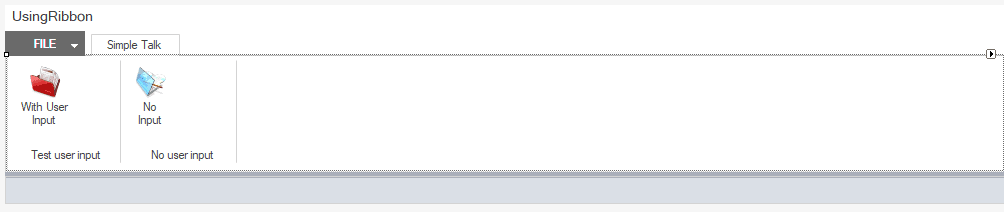
In the example, the Ribbon of type Visual Designer is already added and named UsingRibbon. In design mode, the Ribbon looks similar to the image below.
The ribbon control has its own set of properties and events. The control looks similar to any tabbed control and exposes a tabs collection.
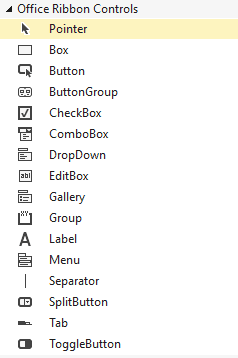
When working with Excel VSTO Add-in’s, on the Visual Studio Toolbar there is a special tab in Visual Studio Toolbox. You can access the toolbox, called Office Ribbon Controls, through the View->Toolbox menu. It’s shown in the image below.
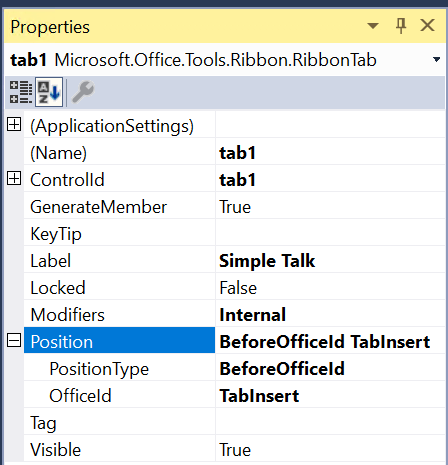
In the example, a few controls are already added. Ribbon Tab is a part of Ribbon Control collection. In this example it’s labeled as Simple Talk. After the Label property, the most commonly used property is Position. The property is the type of RibbonPosition which is an interface that holds a string called OfficeId and an enumerator with three possible values:
- Default
- BeforeOfficeId
- AfterOfficeId
If you choose something other than Default, you have to specify the OfficeId as a string value. Usually, this ID is formed from the word ‘Tab’ plus the ‘Label’ shown on Excel main ribbon. For example, if you would like to position the tab before the ‘Insert’ tab, put ‘TabInsert’ as the OfficeId property. Here is an example from this ribbon.
The Group control is a classic container that could hold another control. It also exposes the Position property. In this example, every group control has a button on it. The Button control responds to only one event – the click event. The most important code in this example is in buttons event handlers.
However, before writing anything about what the handler does, I have to make a digression. If you create a brand new Excel VSTO Add-In using Visual Studio template, your first build will fail. Visual Studio will report to you that you have to sign the ClickOnce manifest.
In the example, signing is already accomplished and in the next few sentences, I will explain how.
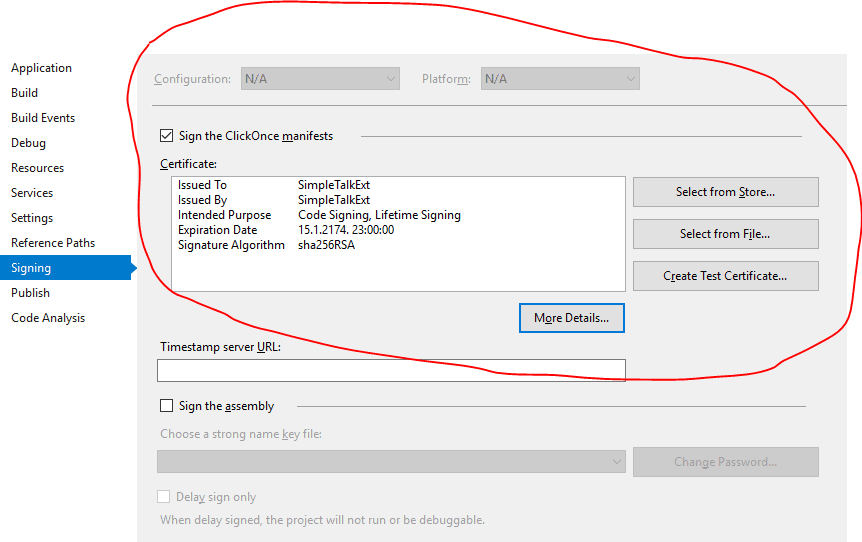
The project is signed by using the Personal Information Exchange (.pfx) file, although it’s possible to select a certificate from the Store. In order to create a .pfx file, first, you have to create a certificate. This is accomplished by using the Windows SDK utility MakeCert.exe as shown in the snippet below.
|
MakeCert /n «CN=SimpleTalkExt» /r /h 0 /eku «1.3.6.1.5.5.7.3.3,1.3.6.1.4.1.311.10.3.13» /e «01/16/2174» /sv SimpleTalkExt.pvk SimpleTalkExt.cer /a sha256 |
After that, another Windows SDK tool named Pvk2Pfx is used. Pvk2Pfx (Pvk2Pfx.exe) is a command-line tool that copies public key and private key information contained in .spc, .cer, and .pvk files to a Personal Information Exchange file. The file is created by issuing following command
|
pvk2pfx —pvk SimpleTalkExt.pvk —spc SimpleTalkExt.cer —pfx SimpleTalkExt.pfx –f |
After the file is created, on the project property Signing tab, choose Select from File and select the newly created pfx file. Your build will work correctly. So, time to go back to the main topic.
NOTE: Just like the previous examples, you can see this add-in in action by running the project. Be sure to modify the App.Config file first.
The event handlers for both buttons in the example produce the same result. The result is an Excel workbook. The workbook contains three sheets. The first one a contains data that represents the result of the T-SQL query, the second one is a Pivot table based on data in the first sheet. And the last sheet contains a chart that represents Pivot on the second sheet.
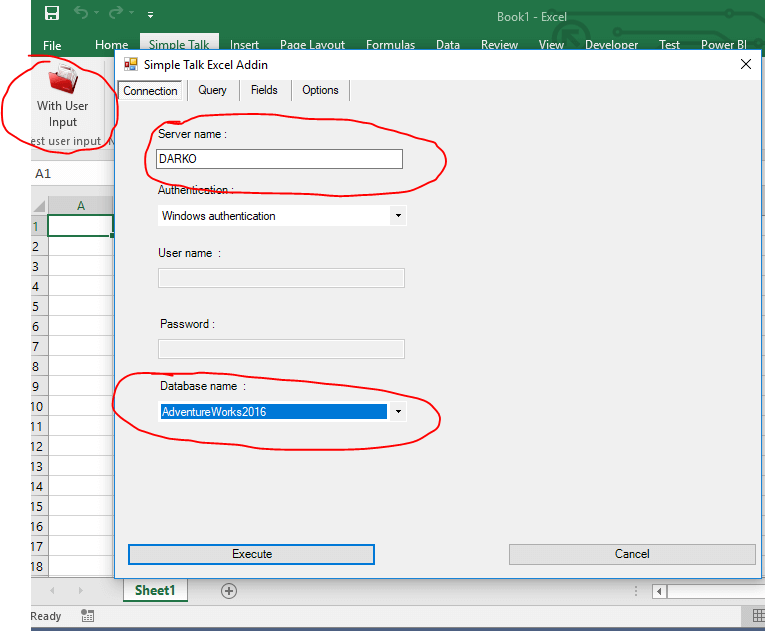
The difference between these two handlers is that the first one shows a form in which the user can specify a connection to SQL Server, T-SQL query, some Pivot options. The form looks similar to that shown in the image below. On the first tab named Connection, you have to specify the instance name and select a database from the list box. This example uses the AdventureWorks2016 database.
On the second tab named Query, you have to specify a T-SQL statement. This example, queries the Sales.SalesHeader table. On the third tab named Fields, you have to specify some Pivot options, like Columns, Rows, Values and so on, as shown in the image below.
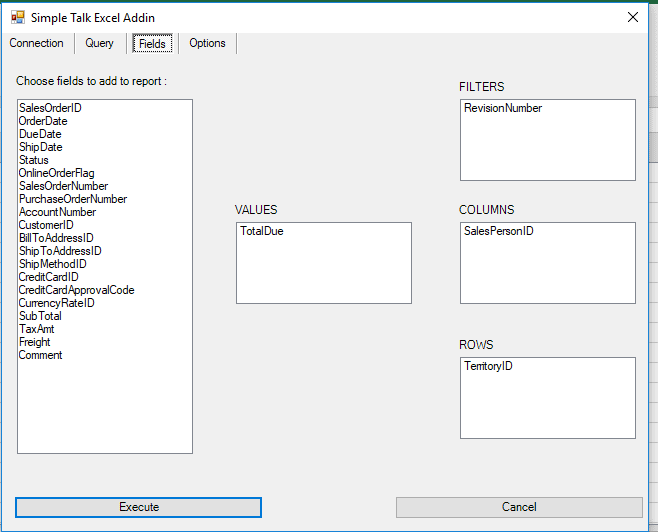
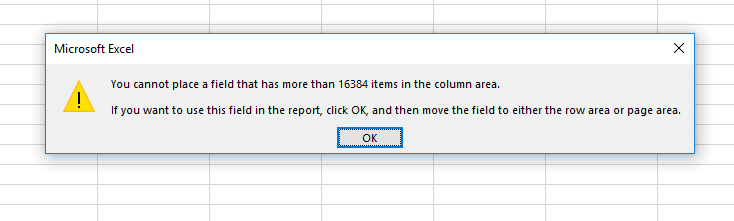
Several values are already added to the list boxes, as you see in the image above. Using drag & drop, it is possible to move fields between list boxes similar to Excel. Every table or every query result is not suitable to be pivoted. Furthermore, there is a restriction on the Columns list box. For example, when you try to put SalesOrderID in the Columns list box in Excel, you will receive an Excel message like the one shown in the image below.
Finally, on the Options tab, there are possibilities to define Chart Types, Table Styles and Pivot styles as shown in the image below.
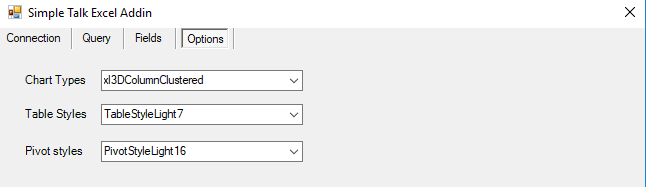
The chart type is an enumerator named xlChartType defined in Microsoft.Office.Core. During loading of the custom user form, the enumerator is set as a data source of the form’s combo box labeled Chart Types, so the user can initially set up the type of chart to see.
NOTE:In Excel it’s possible to change the chart type as well, but the purpose of this example is to show the Excel object model.
Excel exposes 21 ‘Light’ styles, 28 ‘Medium’ styles, and 11 ‘Dark’ styles by default, and you can define your own styles for the table and pivot. When the user has filled everything on the form, and clicks Execute in the current Excel workbook, three sheets are added.
In the first one, the result of the T-SQL query, is displayed very similarly to in the first example, as shown in the image below.
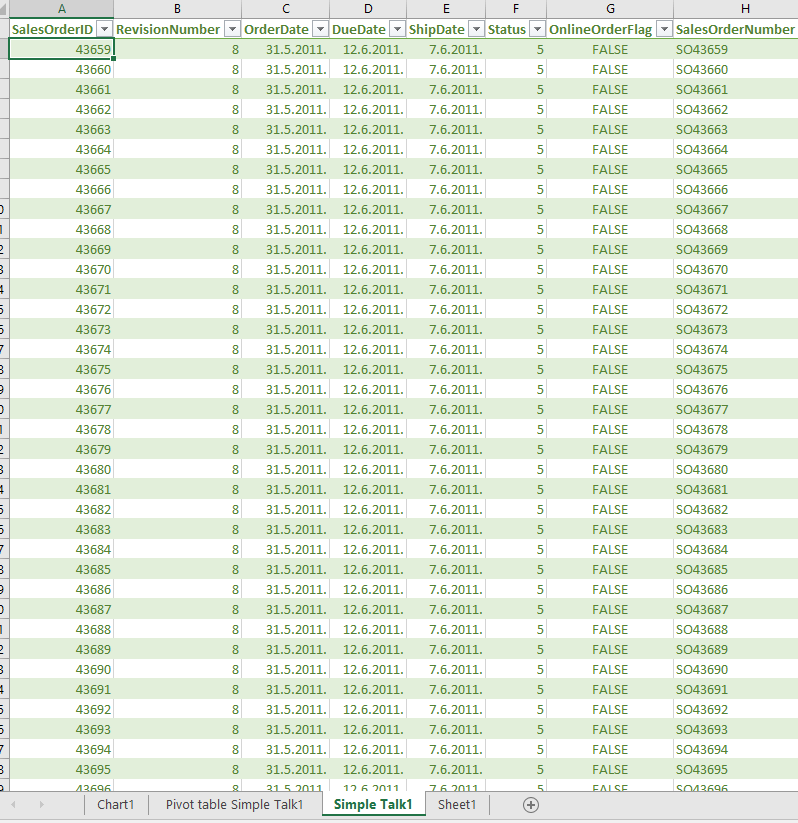
The only difference is that the result is formatted as a table rather than range. This is accomplished by calling function FormatAsTable that is implemented in the project’s General.cs class. The function is implemented as shown in the snippet below.
|
public static void FormatAsTable( Excel.Range sourceRange, string tableName, string tableStyleName, bool isSelected ) { sourceRange.Worksheet.ListObjects.Add(SourceType: Excel.XlListObjectSourceType.xlSrcRange,Source: sourceRange, LinkSource: Type.Missing, XlListObjectHasHeaders: Excel.XlYesNoGuess.xlYes,Destination: Type.Missing).Name = tableName; if (isSelected) sourceRange.Select(); sourceRange.Worksheet.ListObjects[tableName].TableStyle = tableStyleName; } |
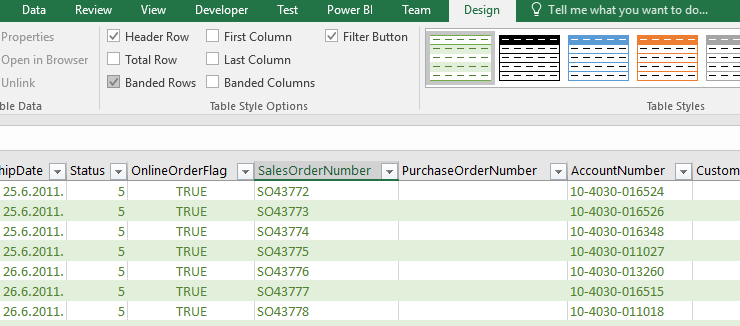
The benefits of formatting ‘as table’ are that column names are frozen in the first row with applied auto-filtering, and there are extra functionalities such as adding Total row by clicking on checkbox, as shown in the image below.
The second sheet contains a pivot table with a slicer object.
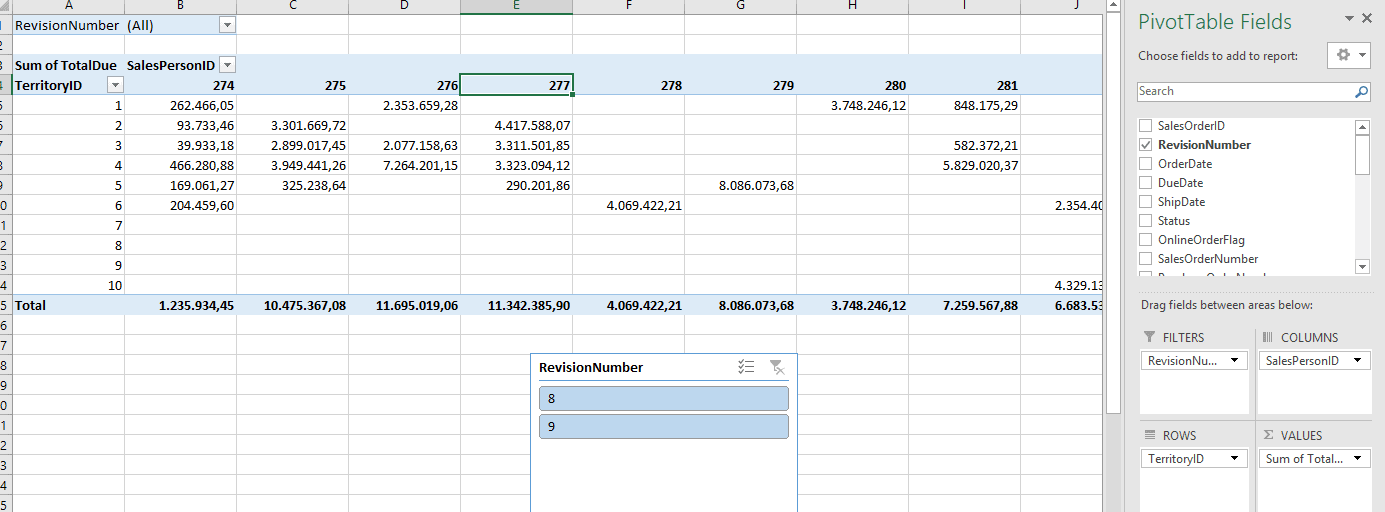
You can manipulate fields, applied a filter, and so on. One cool thing is a slicer object, introduced with Excel 2010, which makes it easy to apply a filter.
The pivot table is added by calling the AddPivot function defined in the General.cs static class. The signature of the function looks similar to that shown in the image below.
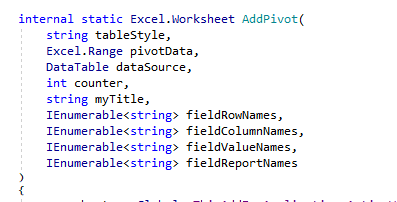
The AddPivot function uses the PivotTableWizard function which is part of the _Worksheet interface defined in the Microsoft.Office.Interop.Excel namespace. The function call is accomplished as in the snippet below.
|
//Add a PivotTable to the worksheet. pivotWorkSheet.PivotTableWizard( SourceType: Excel.XlPivotTableSourceType.xlDatabase, SourceData: pivotData, TableDestination: pivotWorkSheet.Cells[1, 1], // first cell of the pivot table TableName: pivotTableName ); |
Finally, on the third tab, there is a pivot-chart, which is basically the pivot table represented as a chart.
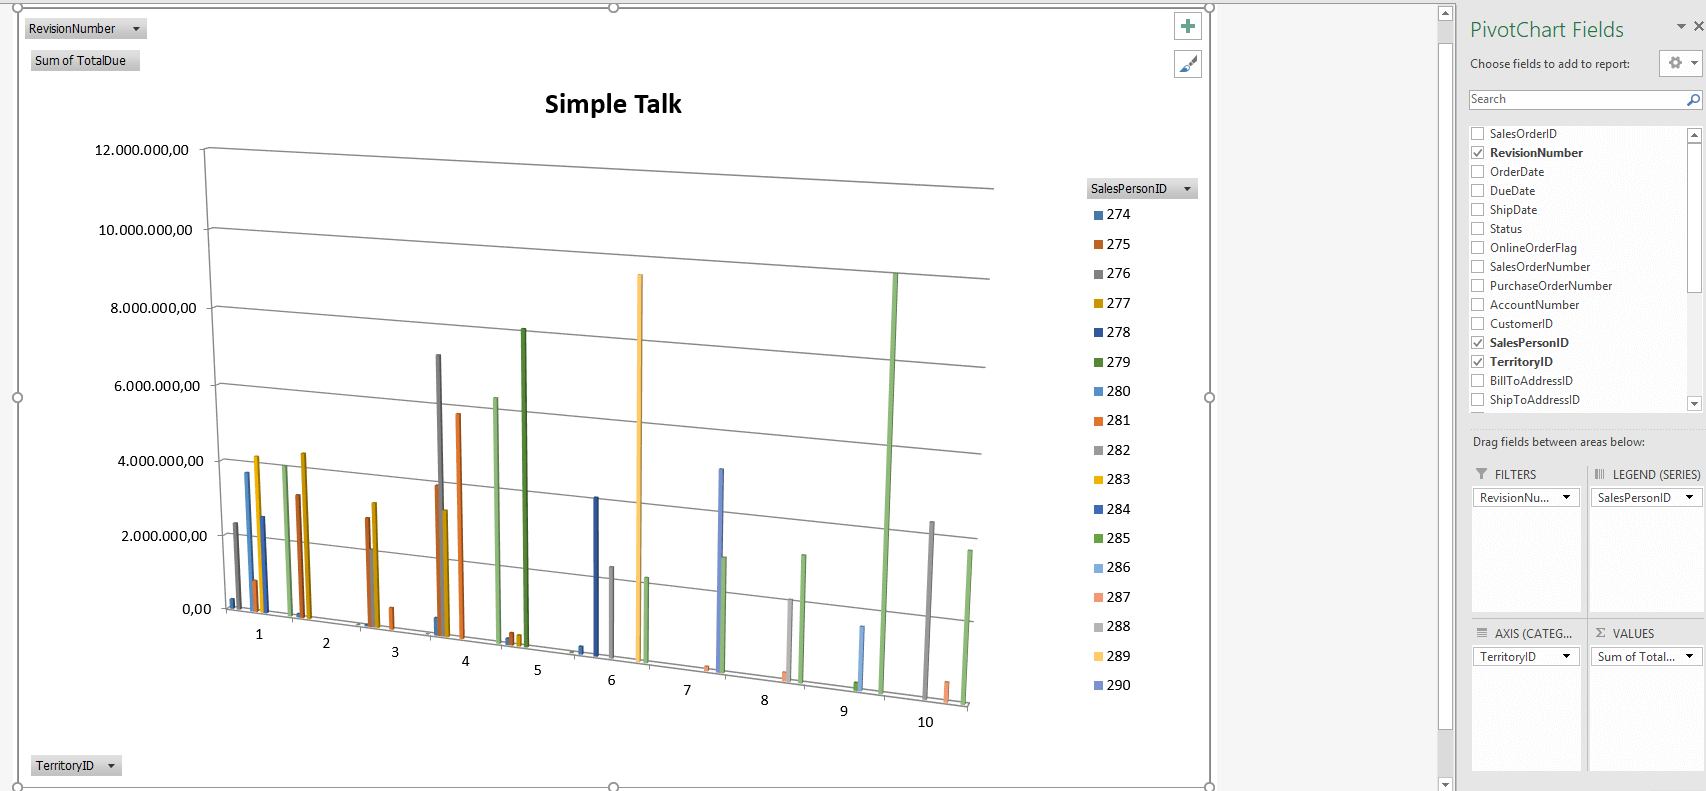
The pivot-chart is added to the workbook by using a wrapper method AddChart defined in the static class General. The most important part of this method is calling the ChartWizard method, which is part of the Chart interface defined in Microsoft.Office.Interop.Excel namespace.
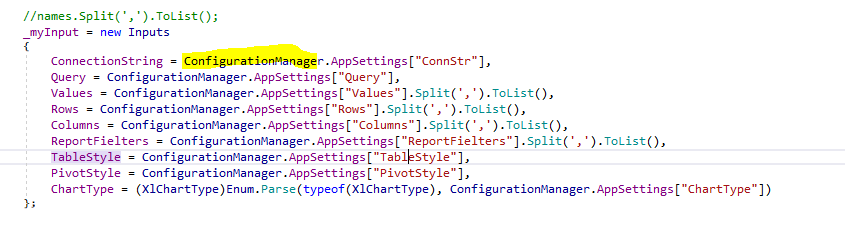
In the introduction of the section I mentioned that there are two buttons on the ribbon form. Both do the same thing. The difference is that information needed to accomplish the task in the second event handler is read from the application configuration file app.config shown in the image below.
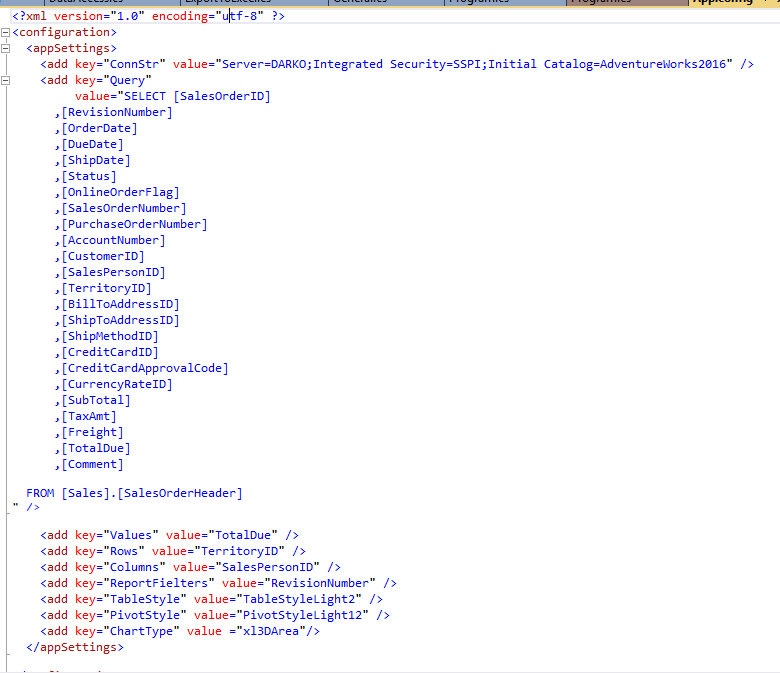
Reading from app.config is quite common, and it is accomplished by using ConfigurationManager defined in System.Configuration as shown in the image below.
Changing the values in app.config before and after publishing the result is a little bit different. In order to explain how to achieve this, I have to explain how to publish the result of the project VSTO.
Publishing the project result could be accomplished by using ClickOnce or by creating a Setup project. On the project properties, there is a tab named Publish as shown in the image below.
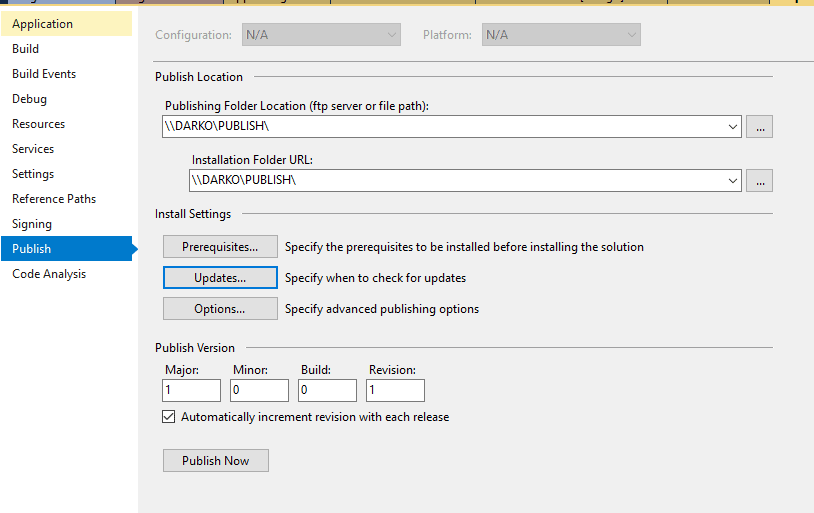
In addition to specifying the publish and installation folders, you can also specify Prerequisites, Updates, and Options.
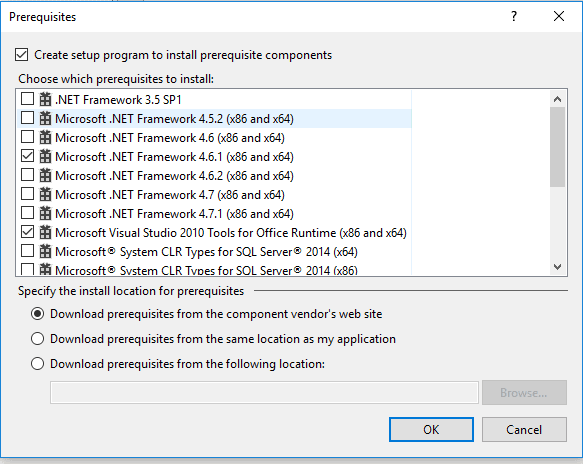
When you click on the Prerequisites button, you see a set of options similar to the image below.
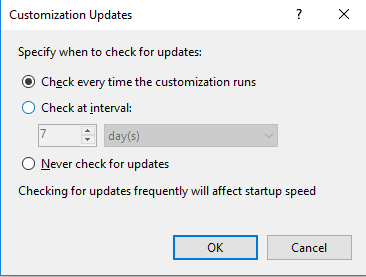
When you click on the Update button, you can see a set of options for updates as shown in the image below.
Depending on the options you choose, and after choosing the Publish command from the project context menu, your publishing/installation folder will look to that shown in the image below.
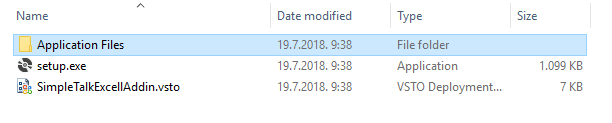
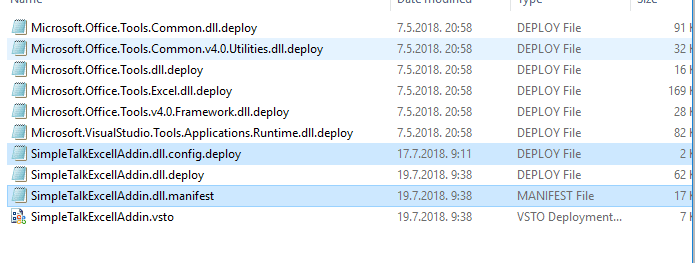
When you browse Application Files, you will notice that the files are separated by the version number. One common thing that you will need to do is to change configuration values, e.g. to change the connection string. This could be done, but after that, you should update the manifest file. On the image below configuration file and manifest file are highlighted.
When you explore the manifest file by using Visual Studio, you will notice that the file is basically an XML file. Part of that file is a description of the configuration file, as shown in the image below.
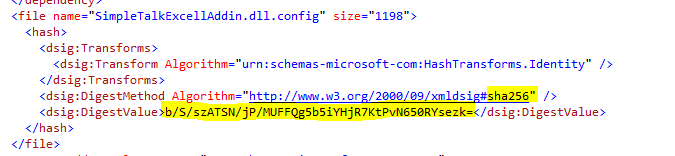
The result files are protected by hashing. In order to change some values in the configuration file, you have to determine a new hash value. This might be accomplished by using ComputeHashGUI that is part of the article solution. If you set the project as a startup, you will see a simple GUI as shown in the image below.
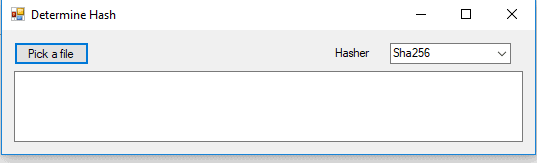
Usage is easy, first, you have to pick a file and that will be the configuration file. After that, the hash value is calculated by using the hash algorithm selected in the combo box. That hash value is then pasted in the manifest file. And there are a just a few more steps.
First, you have to copy the pfx file to the installation folder as well as the Windows SDK utility called mage.exe. Then you have to sign the manifest file located in the last installation folder by executing
|
d:publishmage —sign d:publishApplication FilesSimpleTalkExcellAddin_1_0_0_0SimpleTalkExcellAddin.dll.manifest —certfile «d:publishSimpleTalkExt.pfx» |
After that, you have to update the application VSTO file by executing the following command
|
mage —update SimpleTalkExcellAddin.vsto —appmanifest «d:publishApplication FilesSimpleTalkExcellAddin_1_0_0_0SimpleTalkExcellAddin.dll.manifest» —certfile «D:PUBLISHSimpleTalkExt.pfx» |
As a final step, you have to copy the VSTO file to the last installation folder, in this example SimpleTalExcelAddin_1_0_0_0. Of course, all these steps could be automated, but it is out of the scope of the article.
In the solution, there are two other projects. One to define a Word add-in by using the XML Ribbon control, and the other by using Outlook Add-in.
Set TestWordAddIn as the Startup project in Visual Studio. That is the next example.
Working with Word Add-ins
Unlike the previous example in which a Ribbon Designer Control is used, in this section, I will take another approach by utilizing Ribbon XML. So, what is the difference? The Ribbon Designer does not incorporate all facets provided by the OfficeFluentUI model. For example, the Ribbon Designer provides no way to re-purpose built-in commands or work with the BackStage. These things can only be done using Ribbon XML.
When you add a Ribbon (XML) item to a VSTO project from the Add New Item dialog box, Visual Studio automatically adds
- A Ribbon XML file. This file is used to defined UI elements
- A Ribbon code file. This file contains the Ribbon class.
In the solution, these two files are named as MyRibbon.xml and MyRibbon.cs.
If you open the MyRibbon.cs file, you will notice that, unlike the previous example in which a Ribbon Designer Control is used, here the class implements an interface called IRibbonExtensibility. The interface is defined as shown in the image below. The interface contains only one method named GetCustomUI. (NOTE : The image is NOT from the project code, it is generated(displayed) with a help of R#-Resharper).
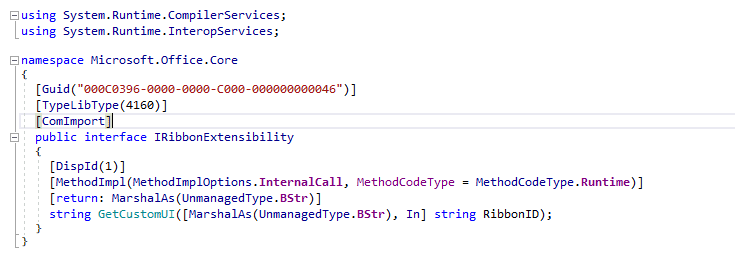
The interface implementation is in the code file and looks similar shown in the following snippet
|
#region IRibbonExtensibility Members public string GetCustomUI(string ribbonId) { return GetResourceText(«TestWordAddIn.MyRibbon.xml»); #endregion |
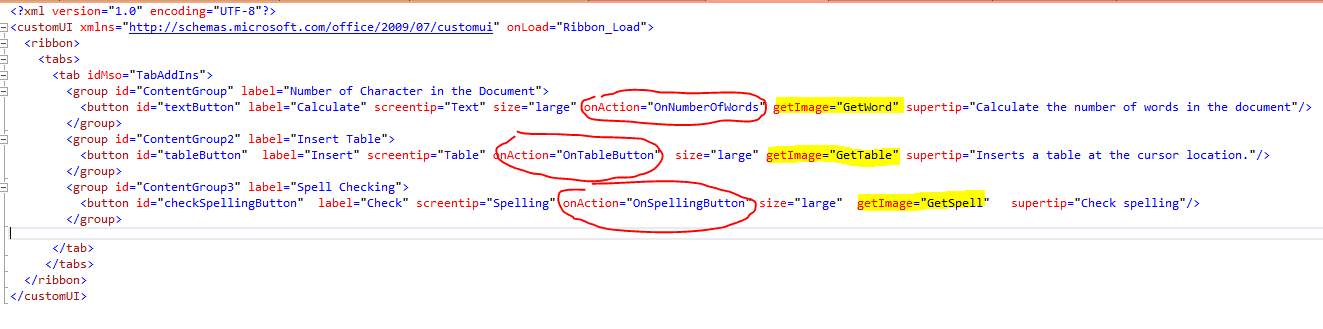
The content of the XML file, returned by GetCustomUI, is used to construct a GUI representation of the ribbon control. You can respond to user actions, such as clicking a button on the ribbon, by creating callback methods. Callback methods resemble events in Windows Forms controls, but they are identified by an attribute in the XML of the UI element and displayed surrounded with red in the image below. You might define an image for a button, as shown highlighted in yellow.
Before exploring the Word Add-in’s functionality, take a look at the Word object model. Similar to Excel, at the top of the object hierarchy, is the Application object. It represents a current instance of Word.
Next in the hierarchy is the Document object, which is basically the most frequently used object. Application objects have a collection named Documents of currently open or created documents.
The Selection object represents the area that is currently selected. When you perform an operation in the Word user interface, such as bolding text, you select, or highlight the text and then apply the formatting.
The Range object represents a contiguous area in a document and is defined by a starting character position and an ending character position. It is not visible, unlike Selection, which is always visible.
Now it is time to start exploring the Add-in functionality. By pressing F5, Word will launch. On the Add-ins tab, there are three buttons, as shown in the image below.
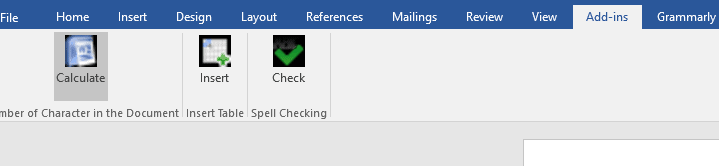
The first button, labeled with Calculate, calculates the number of characters (including hidden) in the current document.
The second button, with the Insert label, inserts a table at the current cursor position. This is accomplished by adding a new table in the ActivDocument.Tables collection, as shown in the snippet below.
|
var <strong>missing</strong> = Type.Missing; var currentRange = Globals.ThisAddIn.Application.Selection.Range; var newTable = Globals.ThisAddIn.Application.ActiveDocument.Tables.Add(Range: currentRange, NumRows: 3, NumColumns: 4, DefaultTableBehavior: ref <strong>missing</strong>, AutoFitBehavior: ref <strong>missing</strong>); |
The third button performs spell checking and reports the result by showing a MessageBox dialog. Most of the things that I write about Excel VSTO could be applied to Word VSTO or Outlook VSTO as well.
Now it is time to review the last example. In order to do that set OutLookAddIn as the startup project.
Working with Outlook Add-ins
Most things we are talking about Office VSTO could be applied to Outlook VSTO’s as well. It means that signing the project, then working with ThisAddIn class is almost the same as with Excel or Word VSTO’s.
However, unlike Word or Excel VSTO’s, Outlook VSTO does not raise a ShutDown event. When you create a new Outlook VSTO project, the generated code tells you exactly that.

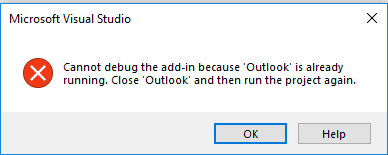
There is another difference, unlike Excel or Word VSTO’s which allows you to have running instances when you try to debug an OutLook VSTO by running the Outlook client, you receive a message like shown in the image below
At the top of Outlook’s object model hierarchy is the Application object. It represents the Outlook application. The application object has two collection properties, Explorers, and Inspectors. Part of the Explorers collection is the object of type Explorer.
The Explorer object represents a window that displays the contents of a folder that contains items such as e-mail messages, tasks, or appointments. The Inspector object represents a window that displays a single item such as an e-mail message, task, or appointment.
In this example, the Inspector object is used. In the VSTO StartUp event-handler, the following snippet is added in order to respond to the creation of the new e-mail message.
|
private void ThisAddInStartup(object sender, System.EventArgs e) { _inspectors = Application.Inspectors; _inspectors.NewInspector += InspectorsNewInspector; } |
When you create a new task, meeting, contact or e-mail or view existing once, the event is fired. In the event, handler following code is added.
|
Private void InspectorsNewInspector(Outlook.Inspector inspector) { If (!(inspector.CurrentItem is Outlook.MailItem mailItem)) return; if (mailItem.EntryID != null) return; mailItem.Subject = @»Mail subject added by using Outlook add-in»; mailItem.Body = @»Mail body added by using Outlook add-in»; } |
If the item is a newly created e-mail, then a text is added to e-mail subject and e-mail body.
Finally few words about cleaning up the environment. By choosing File->Options from the main menu, and choosing Add-ins from tabbed menu, you can get the form like shown in the image below.
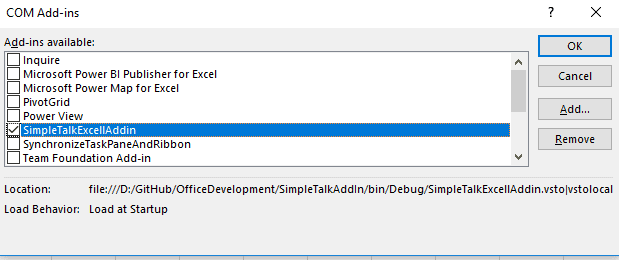
If you would like to disable an Add-in, just uncheck checkbox that is with Add-ins name. If you would like to remove the Add-in, choose Remove button.
Summary
Browsing Microsoft documentation about Office solutions is a tedious task. There are no pictures and a lot of mistakes. My aim was in writing this article is to provide a set of practical examples that could be easy to follow. The Office solution is a huge topic. In the article, I cover a small part, but I hope quite enough to encourage readers to start exploring the topic.
The solution source code can be found on GitHub here.

- Remove From My Forums
-
Вопрос
-
Hi,
I’m using Visual Studio 2017 Community edition with Windows 10 and I can’t seem to create a reference to Microsoft.Office.Interop.Excel which I need in order to be able to use C# to create a spreadsheet from a SQL statement that will then open up in Excel.
Is this not available in the community edition or is there something else I am supposed to use?Thanks.
-
Изменено
JunkBondster
8 июня 2017 г. 14:16
-
Изменено
Все ответы
-
Hi,
I’m using Visual Studio 2017 Community edition with Windows 10 and I can’t seem to create a reference to Microsoft.Office.Interop.Excel which I need in order to be able to use C# to create a spreadsheet that will open up in Excel. Is this not available
in the community edition or is there something else I am supposed to use?Thanks.
-
Объединено
Wendy ZangMicrosoft contingent staff
9 июня 2017 г. 2:39
deplicate
-
Объединено
-
https://social.msdn.microsoft.com/Forums/office/en-US/home?category=officedev
You should post to the above forum.
-
Hello,
You should be able to «add reference», select «Assemblies», press the «Browse» button, traverse to a path along this line (most likely close to your machine but slightly different)
C:Program Files (x86)Microsoft Visual Studio 14.0Visual Studio Tools for OfficePIAOffice15
Then you should see to select

Please remember to mark the replies as answers if they help and unmark them if they provide no help, this will help others who are looking for solutions to the same or similar problem. Contact via my Twitter (Karen Payne) or Facebook (Karen Payne) via
my MSDN profile but will not answer coding question on either.
VB Forums — moderator

-
Предложено в качестве ответа
Chenchen Li
9 июня 2017 г. 2:00
-
Предложено в качестве ответа
-
I dont have office tools under Visual Studio. I have Libra Excel How do I get dll for that
-
Изменено
Seema716
25 апреля 2019 г. 19:53
-
Изменено
-
Had the same question, finally figured it out.
1. Go to the Visual Studio Installer
2. In the Installer, click the Modify Button:
3. Go to the Individual Components tab and click: Visual Studio Tools for Office (VSTO)
4. Click Modify and let it install.
5. Open your Visual Studio project, go to Assemblies, in the search box type in office, and choose: Microsoft.Office.Interop.Excel.
6. On top of the module, add: Imports Microsoft.Office.Interop.Excel
-
Предложено в качестве ответа
BIManish
13 ноября 2019 г. 9:18
-
Предложено в качестве ответа
-
Hi Manish,
I did the steps you mentioned, it worked for me.
Thank you
Neelima

Table of Contents
- Introduction
- Building the Sample
You can download the source code from this link Source
Code Link
Introduction

The main purpose of this article is to explain how to create simple Excel and Microsoft Word Add-Ins using Visual
Studio Tools for Office (VSTO).
VSTO is available as an add-in tool with Microsoft Visual Studio. Using Visual Studio we can develop our own custom controls for Office tools like Excel, Word and and so on.In
our demo program We have used Visual Studio 2010 and Office 2007.
Building the Sample
This article explains a few basic things to create our own Custom Add-Ins for Excel and Word as follows.
1. Excel Add-Ins
- Add text to any Excel selected active Excel cell.
- Add an image to Excel from our Custom Control.
- Load data from a database and display the search result data in Excel.
2. Word Add-Ins

- Export Word to PDF.
- Add Image to Word Document.
- Add Table to Word document.
Description
Creating Excel Add-Ins
To create our own Custom Control Add-Ins for Excel.
Step 1
Create a new project and select Office 2007 Excel Add-In as in the following Image. Select your Project Folder and enter your Project Name.

Step 2
Now we can see that the Excel ThisAddIn.Cs file has been created in our project folder and we can find two default methods in this class as in the following image. “ThisAddIn_Startup”
In this event we can display our own custom Control Add-Ins to Excel. We can see the details in the code part.

Step 3
Add a new UserControl to your project to create your own Custom Excel Control Add-In.
Right-click your project->Click Add New Item->Add User Control and Name the control as you wish. Add all your Controls and design your user control depending on your requirement.

In our example,We are performing 3 types of actions in User Controls.
- Add Text: In this button click event I will insert the text from the Text box to the Active Selected Excel Cell. Using “Globals.ThisAddIn.Application.ActiveCell”
we can get the current active Excel cell. We store the result in an Excel range and now using the range, value and color we can set our own text and colors to the active Excel Cell.
private void btnAddText_Click(object sender, EventArgs e)
{
Excel.Range objRange = Globals.ThisAddIn.Application.ActiveCell;
objRange.Interior.Color = Color.Pink; //Active Cell back Color
objRange.Borders.Color = Color.Red;// Active Cell border Color
objRange.Borders.LineStyle = Excel.XlLineStyle.xlContinuous;
objRange.Value = txtActiveCellText.Text; //Active Cell Text Add
objRange.Columns.AutoFit();
}
2. Add Image: using
the Open File Dialog we can select our own image that needs to be added to the Excel file. Using the Excel.Shape we can add our selected image to the Excel file.
private void btnAddImage_Click(object sender, EventArgs e)
{
OpenFileDialog dlg = new OpenFileDialog();
dlg.FileName = "*";
dlg.DefaultExt = "bmp";
dlg.ValidateNames = true;
dlg.Filter = "Bitmap Image (.bmp)|*.bmp|Gif Image (.gif)|*.gif|JPEG Image (.jpeg)|*.jpeg|Png Image (.png)|*.png";
if (dlg.ShowDialog() == System.Windows.Forms.DialogResult.OK)
{
Bitmap dImg = new Bitmap(dlg.FileName);
Excel.Shape IamgeAdd = Globals.ThisAddIn.Application.ActiveSheet.Shapes.AddPicture(dlg.FileName,
Microsoft.Office.Core.MsoTriState.msoFalse, Microsoft.Office.Core.MsoTriState.msoCTrue,
20, 30, dImg.Width, dImg.Height);
}
System.Windows.Forms.Clipboard.Clear();
}
Search and bind Db Data to Excel: Now
we can create our own Custom Search control to be used in Excel to search our data from the database and bind the result to the Excel file.
Creating the table
-- Create Table ItemMaster in your SQL Server - This table will be used for search and bind result to excel.
CREATE
TABLE
[dbo].[ItemMasters](
[Item_Code] [varchar](20)
NOT NULL,
[Item_Name] [varchar](100)
NOT NULL)
-- insert sample data to Item Master table
INSERT
INTO
[ItemMasters] ([Item_Code],[Item_Name])
VALUES
('Item001','Coke')
INSERT
INTO
[ItemMasters] ([Item_Code],[Item_Name])
VALUES
('Item002','Coffee')
INSERT
INTO
[ItemMasters] ([Item_Code],[Item_Name])
VALUES
('Item003','Chiken Burger')
INSERT
INTO
[ItemMasters] ([Item_Code],[Item_Name])
VALUES
('Item004','Potato Fry')
In the button search click event we search for the data from the database and bind the result to an Excel cell using “Globals.ThisAddIn.Application.ActiveSheet.Cells”.
This will add the result to the active Excel sheet.
private
void
btnSearch_Click(object
sender, EventArgs e)
{
try
{
System.Data.DataTable dt =
new
System.Data.DataTable();
String ConnectionString =
"Data Source=YOURDATASOURCE;Initial Catalog=YOURDATABASENAME;User id = UID;password=password";
SqlConnection con =
new
SqlConnection(ConnectionString);
String Query =
" Select Item_Code,Item_Name FROM ItemMasters Where Item_Name LIKE '"
+ txtItemName.Text.Trim() + "%'";
SqlCommand cmd =
new
SqlCommand(Query, con);
cmd.CommandType = System.Data.CommandType.Text;
System.Data.SqlClient.SqlDataAdapter sda =
new
System.Data.SqlClient.SqlDataAdapter(cmd);
sda.Fill(dt);
if
(dt.Rows.Count <= 0)
{
return;
}
Globals.ThisAddIn.Application.ActiveSheet.Cells.ClearContents();
Globals.ThisAddIn.Application.ActiveSheet.Cells[1, 1].Value2 =
"Item Code";
Globals.ThisAddIn.Application.ActiveSheet.Cells[1, 2].Value2 =
"Item Name";
for
(int
i = 0; i <= dt.Rows.Count - 1; i++)
{
Globals.ThisAddIn.Application.ActiveSheet.Cells[i + 2, 1].Value2 = dt.Rows[i][0].ToString();
Globals.ThisAddIn.Application.ActiveSheet.Cells[i + 2, 2].Value2 = dt.Rows[i][1].ToString();
}
}
catch
(Exception ex)
{
}
}
Step 4
Now we have created our own User Control to be added to our Excel Add-Ins. To add this user control to our Excel Add-In as we have already seen that the Excel Addin class “ThisAddIn.Cs” has start and stop events. Using
the Office “CustomTaskpane” we can add our user control to Excel as an Add-In as in the following.
private
Microsoft.Office.Tools.CustomTaskPane customPane;
private
void
ThisAddIn_Startup(object
sender, System.EventArgs e)
{
ShowShanuControl();
}
public
void
ShowShanuControl()
{
var txtObject =
new
ShanuExcelADDIn();
customPane =
this.CustomTaskPanes.Add(txtObject,
"Enter Text");
customPane.Width = txtObject.Width;
customPane.Visible =
true;
}
Step 5
Run your program and now we can see our user control has been added in the Excel File as an Add-In.
Next we will see how to create Add-Ins for Word Documents using a Ribbon Control.
Creating Word Add-Ins:
In my example I have used Visual Studio 2010 and Office 2007.
The following describes how to create our own Custom Control Add-Ins for Word.
Step 1
Create a new project and select Office 2007 Word AddIn as in the following Image. Select your Project Folder and enter your Project Name.

Step 2
Add a new Ribbon Control to your project to create your own Word Control Add-In.
Right-click your project then click Add New Item -> Add Ribbon Control and name the control as you wish.

Add all your controls and design your user control depending on your requirements. By default in our Ribbon Control we can see a “RibbonGroup”. We can add all our controls to the Ribbon Group. Here
in my example I have changed the Group Label Text to “SHANU Add-In”. I have added three Ribbon Button Controls to the group. We can add an image to the Ribbon Button Controls and set the properties of the Button Control Size as “RibbobControlSizeLarge”.

Here I have added three Button Controls for export the Word as a PDF, add an image to Word and add a table to the Word file.
Step 3
Export to PDF File Button Click.
Using the “Globals.ThisAddIn.Application.ActiveDocument.ExportAsFixedFormat” we can save the Word document to the PDF file. I have used the Save file dialog to save the PDF file into our selected path.
private
void
btnPDF_Click(object
sender, RibbonControlEventArgs e)
{
SaveFileDialog dlg =
new
SaveFileDialog();
dlg.FileName =
"*";
dlg.DefaultExt =
"pdf";
dlg.ValidateNames =
true;
if
(dlg.ShowDialog() == System.Windows.Forms.DialogResult.OK)
{
Globals.ThisAddIn.Application.ActiveDocument.ExportAsFixedFormat(dlg.FileName, word.WdExportFormat.wdExportFormatPDF, OpenAfterExport:
true);
}
}
Step 4
Here we will add an image to Word. Using the Open File Dialog we can select our own image to be added to the Word file. Using the “Globals.ThisAddIn.Application.ActiveDocument.Shapes.AddPicture” method we can add our
selected image to the Word file.
private
void
btnImage_Click(object
sender, RibbonControlEventArgs e)
{
OpenFileDialog dlg =
new
OpenFileDialog();
dlg.FileName =
"*";
dlg.DefaultExt =
"bmp";
dlg.ValidateNames =
true;
dlg.Filter =
"Bitmap Image (.bmp)|*.bmp|Gif Image (.gif)|*.gif|JPEG Image (.jpeg)|*.jpeg|Png Image (.png)|*.png";
if
(dlg.ShowDialog() == System.Windows.Forms.DialogResult.OK)
{
Globals.ThisAddIn.Application.ActiveDocument.Shapes.AddPicture(dlg.FileName);
}
}
Step 5
Here we will add a table to Word. Using the “Globals.ThisAddIn.Application.ActiveDocument.Tables” method we can add a table to the Word file. In my example I have created a table with 4 columns and 3 rows.
private
void
button1_Click(object
sender, RibbonControlEventArgs e)
{
Globals.ThisAddIn.Application.ActiveDocument.Tables.Add(Globals.ThisAddIn.Application.ActiveDocument.Range(0, 0), 3, 4);
.ThisAddIn.Application.ActiveDocument.Tables[1].Range.Shading.BackgroundPatternColor = Microsoft.Office.Interop.Word.WdColor.wdColorSeaGreen;
Globals.ThisAddIn.Application.ActiveDocument.Tables[1].Range.Font.Size = 12;
Globals.ThisAddIn.Application.ActiveDocument.Tables[1].Rows.Borders.Enable = 1;
}
Step 6
Run your program and now you will see your own Ribbon Control has been added to the Word file as an Add-In.

You can download the source code from this link Source
Code Link
Оставляю заметку по работе с Excel с помощью C#.
Привожу фрагменты кода, которые искал когда-то сам для работы с Excel документами.
Наработки очень пригодились в работе для формирования отчетности.
Прежде всего нужно подключить библиотеку Microsoft.Office.Interop.Excel.

Далее создаем псевдоним для работы с Excel:
using Excel = Microsoft.Office.Interop.Excel;
//Объявляем приложение
Excel.Application ex = new Microsoft.Office.Interop.Excel.Application();

//Отобразить Excel
ex.Visible = true;

//Количество листов в рабочей книге
ex.SheetsInNewWorkbook = 2;

//Добавить рабочую книгу
Excel.Workbook workBook = ex.Workbooks.Add(Type.Missing);

//Отключить отображение окон с сообщениями
ex.DisplayAlerts = false;

//Получаем первый лист документа (счет начинается с 1)
Excel.Worksheet sheet = (Excel.Worksheet)ex.Worksheets.get_Item(1);

//Название листа (вкладки снизу)
sheet.Name = "Отчет за 13.12.2017";

//Пример заполнения ячеек
for (int i = 1; i <= 9; i++)
{
  for (int j = 1; j < 9; j++)
  sheet.Cells[i, j] = String.Format("Boom {0} {1}", i, j);
}

//Захватываем диапазон ячеек
Excel.Range range1 = sheet.get_Range(sheet.Cells[1, 1], sheet.Cells[9, 9]);

//Шрифт для диапазона
range1.Cells.Font.Name = "Tahoma";
//Размер шрифта для диапазона
range1.Cells.Font.Size = 10;

//Захватываем другой диапазон ячеек
Excel.Range range2 = sheet.get_Range(sheet.Cells[1, 1], sheet.Cells[9, 2]);
range2.Cells.Font.Name = "Times New Roman";

//Задаем цвет этого диапазона. Необходимо подключить System.Drawing
range2.Cells.Font.Color = ColorTranslator.ToOle(Color.Green);
//Фоновый цвет
range2.Interior.Color = ColorTranslator.ToOle(Color.FromArgb(0xFF, 0xFF, 0xCC));
Расстановка рамок.
Расставляем рамки со всех сторон:
range2.Borders.get_Item(Excel.XlBordersIndex.xlEdgeBottom).LineStyle = Excel.XlLineStyle.xlContinuous;
range2.Borders.get_Item(Excel.XlBordersIndex.xlEdgeRight).LineStyle = Excel.XlLineStyle.xlContinuous;
range2.Borders.get_Item(Excel.XlBordersIndex.xlInsideHorizontal).LineStyle = Excel.XlLineStyle.xlContinuous;
range2.Borders.get_Item(Excel.XlBordersIndex.xlInsideVertical).LineStyle = Excel.XlLineStyle.xlContinuous;
range2.Borders.get_Item(Excel.XlBordersIndex.xlEdgeTop).LineStyle = Excel.XlLineStyle.xlContinuous;
Цвет рамки можно установить так:
range2.Borders.Color = ColorTranslator.ToOle(Color.Red);
Выравнивания в диапазоне задаются так:
rangeDate.VerticalAlignment = Excel.XlVAlign.xlVAlignCenter;
rangeDate.HorizontalAlignment = Excel.XlHAlign.xlHAlignLeft;
Формулы
Определим задачу: получить сумму диапазона ячеек A4:A10.
Для начала снова получим диапазон ячеек:
Excel.Range formulaRange = sheet.get_Range(sheet.Cells[4, 1], sheet.Cells[9, 1]);
Далее получим диапазон вида A4:A10 по адресу ячейки ( [4,1]; [9;1] ) описанному выше:
string adder = formulaRange.get_Address(1, 1, Excel.XlReferenceStyle.xlA1, Type.Missing, Type.Missing);
Теперь в переменной adder у нас хранится строковое значение диапазона ( [4,1]; [9;1] ), то есть A4:A10.
Вычисляем формулу:
//Одна ячейка как диапазон
Excel.Range r = sheet.Cells[10, 1] as Excel.Range;
//Оформления
r.Font.Name = "Times New Roman";
r.Font.Bold = true;
r.Font.Color = ColorTranslator.ToOle(Color.Blue);
//Задаем формулу суммы
r.Formula = String.Format("=СУММ({0}", adder);
Выделение ячейки или диапазона ячеек
Так же можно выделить ячейку или диапазон, как если бы мы выделили их мышкой:
sheet.get_Range("J3", "J8").Activate();
//или
sheet.get_Range("J3", "J8").Select();
//Можно вписать одну и ту же ячейку, тогда будет выделена одна ячейка.
sheet.get_Range("J3", "J3").Activate();
sheet.get_Range("J3", "J3").Select();
Авто ширина и авто высота
Чтобы настроить авто ширину и высоту для диапазона, используем такие команды:
range.EntireColumn.AutoFit();
range.EntireRow.AutoFit();
Получаем значения из ячеек
Чтобы получить значение из ячейки, используем такой код:
//Получение одной ячейки как ранга
Excel.Range forYach = sheet.Cells[ob + 1, 1] as Excel.Range;
//Получаем значение из ячейки и преобразуем в строку
string yach = forYach.Value2.ToString();
Добавляем лист в рабочую книгу
Чтобы добавить лист и дать ему заголовок, используем следующее:
var sh = workBook.Sheets;
Excel.Worksheet sheetPivot = (Excel.Worksheet)sh.Add(Type.Missing, sh[1], Type.Missing, Type.Missing);
sheetPivot.Name = "Сводная таблица";
Добавление разрыва страницы
//Ячейка, с которой будет разрыв
Excel.Range razr = sheet.Cells[n, m] as Excel.Range;
//Добавить горизонтальный разрыв (sheet - текущий лист)
sheet.HPageBreaks.Add(razr);
//VPageBreaks - Добавить вертикальный разрыв
Сохраняем документ
ex.Application.ActiveWorkbook.SaveAs("doc.xlsx", Type.Missing,
  Type.Missing, Type.Missing, Type.Missing, Type.Missing, Excel.XlSaveAsAccessMode.xlNoChange,
  Type.Missing, Type.Missing, Type.Missing, Type.Missing, Type.Missing);
Как открыть существующий документ Excel
ex.Workbooks.Open(@"C:UsersMyuserDocumentsExcel.xlsx",
  Type.Missing, Type.Missing, Type.Missing, Type.Missing,
  Type.Missing, Type.Missing, Type.Missing, Type.Missing,
  Type.Missing, Type.Missing, Type.Missing, Type.Missing,
  Type.Missing, Type.Missing);
Комментарии
При работе с Excel с помощью C# большую помощь может оказать редактор Visual Basic, встроенный в Excel.
Для этого в настройках ленты надо добавить пункт «Разработчик». Далее начинаем запись макроса, производим действия и останавливаем запись.
Далее заходим в редактор Visual Basic и смотрим код, который туда записался:

Например:
Sub Макрос1()
'
' Макрос1 Макрос
'

'
    Range("E88").Select
    ActiveSheet.ListObjects.Add(xlSrcRange, Range("$A$1:$F$118"), , xlYes).Name = _
        "Таблица1"
    Range("A1:F118").Select
    ActiveSheet.ListObjects("Таблица1").TableStyle = "TableStyleLight9"
    Range("E18").Select
    ActiveWindow.SmallScroll Down:=84
End Sub
В данном макросе записаны все действия, которые мы выполнили во время его записи. Эти методы и свойства можно использовать в C# коде.
Данный метод так же может оказать помощь в формировании относительных формул, например, выполнить сложение чисел, находящиеся слева от текущей ячейки на 4 столбца, и т.п. Пример:
//Складываем значения предыдущих 12 ячеек слева
rang.Formula = "=СУММ(RC[-12]:RC[-1])";
Так же во время работы может возникнуть ошибка: метод завершен неверно. Это может означать, что не выбран лист, с которым идет работа.
Чтобы выбрать лист, выполните sheetData.Select(Type.Missing); где sheetData это нужный лист.
Просмотрено:
81 944