
Projects require constant control and monitoring by a project manager. However, there are cases that happen quite often when a third party, say, a stakeholder needs to check your chart; or you need to showcase your plan and include it in your presentation; or you simply need a quick access to a printable version of your plan or use data in another tool or application, etc. In this situation, your handler is the export feature.
Let’s go further in our Microsoft Project tutorial and figure out how to export Microsoft Project data.
- How to export Microsoft Project to Word.
- How to Export Microsoft Project to Notepad.
- How to export Microsoft Project to Excel.
How to export data from Microsoft Project
There are several ways to export data from Microsoft Project. We can export to Microsoft Word, Notepad, and Excel.
Note: if you need to create a Gantt chart in MS Project, read our detailed guide.
How to export Microsoft Project to Word
Here we need to do a few simple actions which are copy and paste. In this case, we can only export data from columns, not a Gantt chart itself. For this, choose the data you need to export and simply click Copy.
After that, go to your Word document and do a paste. In Microsoft Word, your data from Microsoft Project will have the same style and indentation of the table.
Note that you have three options to paste data:
- Keeping source formatting – it will look like in the Microsoft project.
- Merging formatting – the table will get the Word style.
- Keeping text only – you will paste only text and it will look like data in Notepad. We will review it a little bit later.
Also, you can choose “Paste special”. In the window, you will get the alternative ways to export data. Among all these alternative ways, there is one pretty interesting. It is called “Paste link”. If you choose it, all the changes that you will do in the original project in MS Project will be automatically reflected in your Word document. In other words, the “Paste link” feature creates a dynamic link to source data.
Note: if you need to create a Gantt chart in Word, read our detailed guide.
How to Export Microsoft Project to Notepad
Do the same actions as in the case with Word. Select required project data in Microsoft Project, copy it, go to Notepad, and paste it. But in this case, all your data will have no structure, formatting, and other styling features.
How to export Microsoft Project to Excel
Now we will figure out how to export Microsoft Project to Excel. For this, follow the steps.
- File → Export → Save Project as File → Microsoft Workbook → Save As → name your file and choose Save. After that, you will see the Export Wizard where you will need to choose required options.
Note: if you need to create a Gantt chart in Excel, read our detailed guide.
How to export Microsoft Project to GanttPRO
Would you like to manage your projects in MS Project alternatives? Your choice may be GanttPRO online Gantt chart creator. This is a nice Gantt chart tool with an intuitive interface where it is so easy to work with projects.
To export your MS Project file to GanttPRO online MPP viewer, do these quick steps:
- Go to All projects → Create new project → Import → Drag & drop your mpp file or select from your PC to upload. That’s it!
From it, you can already export the project to pdf, png, excel formats.
Choose a format and orientation, use filters and zoom, and enable columns you want to include in your downloadable project.
Be sure you export what you need. GanttPRO shows your project before you click the Export button.
This advanced export is the perfect way to download your project with lots of options.
For an easier start, watch this video.
GanttPRO offers a 14-day free trial for you to try all the features of the Gantt chart software.
Any questions about GanttPRO? Email at [email protected] or ask in the Live Chat. You can also book a GanttPRO demo.
GanttPRO project management tool
Plan and manage your projects easily with Gantt charts.
Sign up for free
Convert Microsoft-Project to Word online
Loading…
Processing Please Wait…
Copy Text
![]()
Copy Link
![]()
![]()
Processing Please Wait…
File has been sent to
![]()
Your feedback is important to us, please rate this app.
★
★
★
★
★
Thanks for rating our app!
Microsoft-Project to Word conversion
Conholdate Microsoft-Project to Word Conversion is cross platform and cross browser conversion app that allow you to convert Microsoft-Project to Word in any modern browser (Chrome, Safari, Firefox, Opera, Tor, etc) and on any OS (Windows, Unix and MacOS) despite your PC specifications. Converted Microsoft-Project to Word will maintain original document structure, content and styles. Microsoft-Project to Word Convertor app is built on top of high quality document conversion engine which provides outstanding conversion results and performance, our goal is to offer secure and best conversion experience to our users. Conholdate.Conversion app offers an OCR feature that allows you to parse image files and export data into Excel documents, for example convert PNG to Excel.
How to Convert Microsoft-Project to Word
- Click inside drop area or drag & drop your file.
- Wait until Microsoft-Project to Word file is uploaded.
- Select output format from dropdown menu.
- Click on Convert button to start Microsoft-Project to Word conversion.
- Download or share resulted file.
![]()
FAQ
Q: How to convert Microsoft-Project to Word file?
A: Upload you file by drag and drop it to the upload zone with label «Click or drop your files here» or click on it to select file using file explorer. After that select destination format in which you want to convert your file and click Convert button.
Q: Can I extract tables from images (PNG) and export them to Excel files?
A: Yes you can. Conholdate Image to Excel conversion will parse image files using OCR feature and extract text and tables data. Extracted data can be saved into various formats, such as Excel, OpenOffice and more.
Q: How many files can be converted at a time?
A: You can convert 1 file at a time.
Q: What is the maximum allowed file size?
A: Maximum allowed file size to upload and convert is 20 Mb.
Q: What are the ways to get my conversion results?
A: At the end of the conversion process, you will get a download link. You can download the results immediately or send the link to your email.
Q: How multi page document is converted to image?
A: Each page of such a document will be saved as a separate image. After conversion process is finished you will get a package of such images.
More Apps
More conversion Apps
Select language
The Export Wizard and Import Wizard help you transfer project data between Microsoft Project and other programs. The following is a list of formats you export to or import from.
-
Microsoft Excel (as a workbook or PivotTable report)
-
text-only (tab delimited)
-
comma-separated values (CSV)
-
Extensible Markup Language (XML)
By defining or editing the export or import maps of these wizards, you can easily transfer data to and from the task, resource, or assignment fields that you want.
What do you want to do?
-
Export project information
-
Import project information
Export project information
-
Choose File > Save As.
-
Choose Browse. (Not applicable in Project 2010.)
-
In the Save As type box, select the file format that you want to export data to.
-
In the File name box, type a name for the exported file.
-
Choose Save.
-
Follow the instructions in the Export Wizard to export the data that you want into the proper fields of the destination file.
-
When the wizard prompts you to create a new map or use an existing one, do one of the following:
-
Choose New map to create a new export map from scratch.
-
Choose Use existing map to use a default map or a map that you previously defined and saved.
-
-
On the Task Mapping, Resource Mapping, or Assignment Mapping page of the Export Wizard, verify or edit the mapping assumptions of Project, or create a new map:
-
To export specific project information, type or select the field that you want in the From column, and then press ENTER.
-
To add all task, resource, or assignment fields in your project to the export map, choose Add All.
-
To add all task or resource fields of a specific table to the export map, choose Base on Table. Select the table you want to use, and then select OK.
-
To remove all task, resource, or assignment fields from an export map, choose Clear All.
-
To insert a new field above another field, select a field in the From column, and then choose Insert Row.
-
To insert a new field above another field, select a field in the From column, and then choose Insert Row.
-
To delete a field, select it in the From column, and then choose Delete Row. To change the name of the field in the destination file, select the field in the To column, and then type a new name.
-
-
To export certain tasks or resources only, select the filter that you want in the Export filter box.
-
If you want to change the order of the fields in the destination file, select a field in the To column, and then use the Move buttons to move the field to the position that you want.
-
On the last page of the Export Wizard, choose Finish to export your data.
Notes:
-
You can export only an entire project to XML format. Project maps the data automatically, without the Export Wizard. Also, to minimize the file size, fields that contain null values are not included in the exported XML file.
-
On the Task Mapping, Resource Mapping, or Assignment Mapping page of the Export Wizard, under Preview, you can review the layout of the export map.
-
You can save a new or edited export map if you want to use it again. On the last page of the Export Wizard, choose Save Map, and then type a name in the Map name box. The new map will be added to the list of predefined maps.
-
You can use an existing export map from another project if the map is available in the global file. By using the Organizer, you can copy an export map from a project file to the global file.
-
When you create an export map to save data to either CSV file format or TXT file format and you set the text delimiter, the delimiter, not the file extension, controls the file type. For example, if you save to a file named Myproject.csv but you specified a tab delimiter in the map, the CSV file will have tabs instead of commas, even though the file extension indicates commas.
Import project information
You can import information into Project by using any entered field from another product’s file format, such as Microsoft Office Excel, Microsoft Office Access, Extensible Markup Language (XML), comma-separated values (CSV), or tab delimited text format.
-
Choose File > Open > Browse.
(In Project 2010, choose File > Open.)
-
In the Files of type box, select the file type that you want to import data from.
-
Navigate to the folder that contains the file you want to import, and then select the file in the file list.
-
Choose Open.
-
Follow the instructions in the Import Wizard to import the data that you want into the proper Project fields.
-
On the Task Mapping, Resource Mapping, or Assignment Mapping page of the Import Wizard, verify or edit the mapping assumptions of Project:
-
To import the data from a field in the source file to a different Project field, select the field in the To column, select a new field, and then press ENTER.
-
To change the name of a field in the destination file, select the field in the To column, and then type a new name.
-
To delete a field, select it in the From column, and then choose Delete Row.
-
To insert a new field above another field, select a field in the From column, and then choose Insert Row.
-
To remove all task, resource, or assignment fields from an import map, choose Clear All.
-
To add all task, resource, or assignment fields of the destination file to the import map, choose Add All.
Tip: On the Task Mapping, Resource Mapping, or Assignment Mapping page of the Import Wizard, under Preview, you can preview the layout of the import map.
-
-
To change the order of the fields in the destination file, select a field in the To column, and then use the Move buttons to move the field to the position that you want.
-
On the last page of the Import Wizard, choose Finish to import your data.
Tip: You can save a new or edited import map if you want to use it again. On the last page of the Import Wizard, choose Save Map, and then type a name in the Map name box. The new map will be added to the list of predefined maps.
Notes:
-
You can use an existing import map from another project if the map is available in the global file. By using the Organizer, you can copy an import map from a project file to the global file.
-
When you create an import map to incorporate data from either CSV file format or TXT file format and you set the text delimiter, the delimiter, not the file extension, controls the file type. For example, if you import a file named Myproject.csv but you specified a tab delimiter in the map, the CSV file will have tabs instead of commas, even though the file extension indicates commas.
-
Although you can enter values in some calculated fields, Project may recalculate these values, either automatically or when you specify.
-
Project can import only XML data that can be validated against its data interchange schema.
-
If you are using Microsoft Project Professional, and you want to import information from another file format into an enterprise project that requires you to enter specific information for tasks, you won’t be able to save the project until you enter all required information.
-
If you are using Microsoft Project Professional, remember that resource cost fields cannot be updated in an enterprise project. You can import resource cost information only in nonenterprise projects or for nonenterprise resources in a project.
Вы также можете конвертировать MPP во многие другие форматы файлов. Пожалуйста, смотрите полный список ниже.
MPP TO XPS Конвертер (Спецификация документа Open XML)
MPP TO TEX Конвертер (Исходный документ LaTeX)
MPP TO SVG Конвертер (Файл масштабируемой векторной графики)
MPP TO PDF Конвертер (Портативный документ)
MPP TO XLS Конвертер (Формат двоичного файла Microsoft Excel)
MPP TO XLSX Конвертер (Электронная таблица Microsoft Excel Open XML)
MPP TO XLSM Конвертер (Электронная таблица Microsoft Excel с поддержкой макросов)
MPP TO XLSB Конвертер (Двоичный файл электронной таблицы Microsoft Excel)
MPP TO ODS Конвертер (Открыть электронную таблицу документов)
MPP TO XLTX Конвертер (Открытый XML-шаблон Microsoft Excel)
MPP TO XLT Конвертер (Шаблон Microsoft Excel)
MPP TO XLTM Конвертер (Шаблон Microsoft Excel с поддержкой макросов)
MPP TO TSV Конвертер (Файл значений, разделенных табуляцией)
MPP TO XLAM Конвертер (Надстройка Microsoft Excel с поддержкой макросов)
MPP TO CSV Конвертер (Файл значений, разделенных запятыми)
MPP TO FODS Конвертер (Плоская XML-таблица OpenDocument)
MPP TO SXC Конвертер (Электронная таблица StarOffice Calc)
MPP TO HTM Конвертер (Файл языка гипертекстовой разметки)
MPP TO HTML Конвертер (Язык гипертекстовой разметки)
MPP TO MHTML Конвертер (MIME-инкапсуляция совокупного HTML)
MPP TO MHT Конвертер (MIME-инкапсуляция совокупного HTML)
MPP TO MPP Конвертер (Файл проекта Microsoft)
MPP TO MPX Конвертер (Файл обмена Microsoft Project)
Преобразовать MPP TO XER (Файл проекта Primavera P6)
Преобразовать MPP TO PPT (Презентация PowerPoint)
Преобразовать MPP TO PPS (Слайд-шоу Microsoft PowerPoint)
Преобразовать MPP TO PPTX (Презентация PowerPoint Open XML)
Преобразовать MPP TO PPSX (Слайд-шоу PowerPoint Open XML)
Преобразовать MPP TO ODP (Формат файла презентации OpenDocument)
Преобразовать MPP TO OTP (Шаблон графика происхождения)
Преобразовать MPP TO POTX (Открытый XML-шаблон Microsoft PowerPoint)
Преобразовать MPP TO POT (Шаблон PowerPoint)
Преобразовать MPP TO POTM (Шаблон Microsoft PowerPoint)
Преобразовать MPP TO PPTM (Презентация Microsoft PowerPoint)
Преобразовать MPP TO PPSM (Слайд-шоу Microsoft PowerPoint)
Преобразовать MPP TO FODP (Плоская XML-презентация OpenDocument)
Преобразовать MPP TO EPUB (Формат файла цифровой электронной книги)
Преобразовать MPP TO MOBI (Электронная книга Mobipocket)
Преобразовать MPP TO AZW3 (Kindle eBook format)
Преобразовать MPP TO TIFF (Формат файла изображения с тегами)
Преобразовать MPP TO TIF (Формат файла изображения с тегами)
Преобразовать MPP TO JPG (Файл изображения Объединенной группы экспертов по фотографии)
Преобразовать MPP TO JPEG (Изображение в формате JPEG)
Преобразовать MPP TO PNG (Портативная сетевая графика)
Преобразовать MPP TO GIF (Графический файл формата обмена)
Преобразовать MPP TO BMP (Формат растрового файла)
MPP TO ICO Преобразование (Файл значка Майкрософт)
MPP TO PSD Преобразование (Документ Adobe Photoshop)
MPP TO WMF Преобразование (Метафайл Windows)
MPP TO EMF Преобразование (Расширенный формат метафайла)
MPP TO DCM Преобразование (DICOM-изображение)
MPP TO DICOM Преобразование (Цифровая визуализация и коммуникации в медицине)
MPP TO WEBP Преобразование (Формат файла растрового веб-изображения)
MPP TO JP2 Преобразование (Основной файл изображения JPEG 2000)
MPP TO EMZ Преобразование (Расширенный сжатый метафайл Windows)
MPP TO WMZ Преобразование (Метафайл Windows сжат)
MPP TO SVGZ Преобразование (Сжатый файл масштабируемой векторной графики)
MPP TO TGA Преобразование (Тарга Графика)
MPP TO PSB Преобразование (Файл изображения Adobe Photoshop)
MPP TO DOCM Преобразование (Документ Microsoft Word с поддержкой макросов)
MPP TO DOCX Преобразование (Документ Microsoft Word с открытым XML)
MPP TO DOT Преобразование (Шаблон документа Microsoft Word)
MPP TO DOTM Преобразование (Шаблон Microsoft Word с поддержкой макросов)
MPP TO DOTX Преобразование (Шаблон документа Word Open XML)
MPP TO RTF Преобразование (Расширенный текстовый формат файла)
MPP TO ODT Преобразование (Открыть текст документа)
MPP TO OTT Преобразование (Открыть шаблон документа)
MPP TO TXT Преобразование (Формат обычного текстового файла)
MPP TO MD Преобразование (Уценка)
Although you can’t export Project data directly into Word, you can use the Windows Copy and Paste commands to incorporate Project text or table data into a Word file. For example, you can copy the columns in any table to a Word document. Start in Project, and follow these steps to send Project data to Word:
1. Open the file that contains the information that you want to incorporate into a Word document.
2. Select the information. You can copy text information from the Notes tab of either the Task Information dialog box or the Resource Information dialog box. In addition, as shown in Figure 26-10, you can copy table columns.
3. Click the Copy button on the Standard toolbar.
|
il Microsoft Project -331U.inp[i ■a.l EMe Edit fiew Insert Format |
loo te Project |
Collaborate ^Window Help |
* s xl |
||||||||
|
: ! J A i. J ¿3- A / |
1 & — — ^ 1 No Group |
— 71 |
Li Detail form */ Z |
||||||||
|
* * |
+ — Show I Arial |
i a PI |
S = All Tasks |
— ft ! |
JàJ |
||||||
|
S I Conference |
|||||||||||
|
Task Name |
Fixe« cost |
Fixed Cost Acciuai |
Totai Cost |
Baseline |
variance |
At |
JlTi 01 , ‘G3 |
Jun 00 . |
|||
|
S |
‘ S : M TW |
T F S* |
S W «» |
||||||||
|
1 |
— Conference |
$0.00 |
Prorated |
$7,217,50 |
$0.00 |
$? ,2t 7.50 |
|||||
|
2 |
— Preplanning |
$0.00 |
Prorated |
$020.00 |
io.oo |
$020.00 |
w w |
||||
|
3 |
— Initial planning |
$0,00 |
Prorated |
$920.00 |
$0,00 |
$920.10 |
|||||
|
Determine budgei |
$0 00 |
Prorated |
$720.00 |
$0.00 |
$720.00 |
I |
nrei |
Bah Woack |
|||
|
6 |
Ihviletion list Send out invitalio |
$0.00 50 00 |
Prorated Prorated |
$200.00 $0.00 |
30.00 $0.00 |
$200.00 $0.00 |
i E |
hvi Im nTo in m |
|||
|
$350.00 |
HHW»™ |
ru Tancnblatt |
|||||||||
|
% |
9 |
ste |
$250 00 |
Prorated |
$1,050.00 |
$0.00 |
$1 IJ5IJ.IJIJ |
■n |
Mfl |
mm |
|
|
-C |
10 |
Keynoie speaker |
$0.00 |
Prorated |
$1,137.50 |
$0.00 |
$1,137.50 |
til SobWooi |
|||
|
1 |
11 |
— Hire |
$0,00 |
Prorated |
$2,020.00 |
$0.00 |
$2.020.00 |
* |
— |
— |
|
|
•j |
12 |
Caterer |
$0 00 |
Prorated |
3SOO.OO |
$0.00 |
3000,00 |
Ml |
|||
|
13 |
Bartenders |
$0.00 |
Prorated |
$430.00 |
30.00 |
$480.00 |
m . |
||||
|
14 |
Security |
$0.00 |
Prorated |
$1,100.00 |
30.00 |
$1,100.00 |
[77777 |
mM E |
|||
|
15 |
Photographers |
$0 00 |
Prorated |
$220.00 |
$0.00 |
$220.00 |
i |
F Deena T |
|||
|
16 |
Cteanup Crew |
$000 |
Prorated |
$320.00 |
$000 |
$320.00 |
;’ ‘;’; ‘;!: Intern, Jt |
||||
|
17 |
~ Flan Entertainment |
$0.00 |
Prorated |
$240.00 |
$0.00 |
$240.00 |
|||||
|
18 |
Baseball Game |
$0.00 |
Prorated |
$160,00 |
90 00 |
$160,00 |
EBen Feck |
||||
|
19 |
Qaera |
$0.00 |
Prorated |
$80.00 |
30.00 |
$80.00 |
^ Film Peck |
||||
|
20 |
— Public Relations |
$0.00 |
Prorated |
$600.00 |
$0.00 |
$800.00 |
|||||
|
<T I |
|||||||||||
|
Ready |
F5 |
NUN |
Figure 26-10: Select information to copy to Word.
Figure 26-10: Select information to copy to Word.
4. Open or switch to Word.
5. Position the insertion point where you want the Project information to begin.
6. Click Paste. The Project information appears in Word.
As shown in Figure 26-11, table information appears in Word as tab-separated columns. Using Word’s Convert Text to Table feature (select the data, and choose TableOConvertOText to Table), you can convert the information into a Word table.
|
H] Document — Microsoft Word |
QSg |
|||
|
File Edit View h>ser1 Format Tools Ta Ijle |
Window Help |
— X |
||
|
D^iaa’^a^»^ a ^ *r — |
‘ — (a) CS TOT Prandy NetCIeanup |
em ir . v? : |
||
|
é |
Normal — Book Anttqua ^ 12 — B / U |
m m m u js — |
s= iE i= IS □ |
— *-jl£. |
|
— |
» ■ |
… 3 … , |
. . 4 . . |
fi |
|
— |
[Conference-* $7,217.501f |
— |
||
|
— |
Preplanning-*! 92 0. OO^f |
|||
|
Initial planning — $920 0Of |
||||
|
Determine budget- $720.00f |
||||
|
Invitation lisfc$200.00^ |
||||
|
» |
Send cutinvitations$0.00Tl |
G |
||
|
— |
3 Q :} 4 |
|||
|
Page 1 Sec 1 1/1 At 1″ Ln 1 Col 1 |
REC TP< E » ‘ S |
English (LS.S (S |
Figure 26-11: Project table information as it appears when you copy it to Word.
If you save a Project file as an HTML file, Project uses the Export Wizard to help you save the table portion of the file in a nice format that you can open in Word and then save as a Word .doc file. See «Saving Project files as Web pages» later in this chapter for information on using the Export Wizard to create an HTML file.
Continue reading here: Exporting to other project management software
Was this article helpful?
On the whole Microsoft Office is quite good at importing objects from one program to another. It is common to copy and paste a table from Excel into your Word report, or add a flow chart using Visio, Microsoft has pretty much taken the pain out of producing rich documents. Why then is it such a challenge to import a Gantt chart from Microsoft Project into Microsoft Word? It is a fairly common scenario, but without an official solution provided by Microsoft, what’s the best way to do it? Here are several ways I have tried and how useful I found each.
Print or Publish to PDF
One method is to produce a PDF file of the Gantt chart and the Word document. The two PDF files can then be merged, inserting the Gantt chart pages where required. Microsoft Office 2007 and 2010 both allow you to produce PDF files under the ‘save as’ menu, but PDF printers are available freely on the internet for older versions. However, merging of PDF files often requires editors that are not free, such as Adobe Acrobat. There are free alternatives available, such as PDF SAM, but these are more complicated to use. Even if you have the software required there is still the problem that you can only insert the Gantt chart after the document has been published to PDF. This means that any alterations required to the document or Gantt chart will result in having to start the process over. In addition, merging PDF files often breaks any links within the document, such as the contents page. This method is okay if you don’t need to edit the document and don’t require links, but it is straightforward to have the Gantt chart on a larger landscape page.
Insert as Screenshot
Another way would be to take a screenshot of the Gantt chart open in Microsoft Project and paste it into the Microsoft Word document. To capture a screenshot simply press the ‘Prt Sc’ (print screen) button on your keyboard and then paste it straight into Word. Tip: If you hold the ‘Alt’ key down when you press ‘Prt Sc’ it will only capture the selected window, hiding your task bar, which is particularly useful if you have more than one monitor. After pasting the screenshot into Word you can crop the image down to suit. This method allows you to continue editing the document before publishing, but be careful when resizing the screenshot as the text will be unreadable if too small or distorted.
Insert as Table and Image
Finally, the method I have found most effective. This is done in two parts: first highlighting all the rows of the task table in Microsoft Project, and then copying them into Microsoft Word. Word should automatically convert the text into a table – if not, then look for the ‘Paste as Table’ option. Then, on the next page, you can paste a screenshot of just the Gantt chart without the task table. This will allow you to show the Gantt chart at a larger scale, making it clearer. If you are using Microsoft Word 2010 there is a ‘Screenshot’ tool on the ‘Insert’ ribbon that is very useful; you can either select any open window to capture or select ‘Screen Clipping’ to drag your cursor over the area of your screen you want to capture, removing the need to crop the screenshot afterwards. You will probably want the Gantt chart to be landscape – before changing the orientation, put a section break before and after so that only that page becomes landscape. This method ensures the task table is clearly visible and can be formatted to suit the rest of your document and also allows for a larger Gantt chart.
MS Project Tutorial: Learn how export the calendar view
Exporting the calendar view from Microsoft Project to Microsoft Word is a simple task that is useful to communicate key timelines, activities and milestones. The process creates a GIF file that can be included in any Office document.
Export Calendar Using MS Project 2010
To export the calendar view, follow these simple steps:
1. Switch to the Calendar View in Microsoft Project using View – Calendar
2. Select Task – Copy Picture

Copy Picture
3. Select either the “For screen” radio butto or the “To GIF image file:” radio button
4. Click Ok
5. Open Microsoft Word and if you selected For Screen, just Select Edit – Paste and the Calendar image will appear.
Export Calendar Using MS Project 2007
To export the calendar view, follow these simple steps:
1. Switch to the Calendar View in Microsoft Project 2007 (View – Calendar)
2. Select Report – Copy Picture
3. Select either the “For screen” radio butto or the “To GIF image file:” radio button
4. Click Ok
5. Open Microsoft Word and if you selected For Screen, just Select Edit – Paste and the Calendar image will appear.
The Final Result
Below is the final exported image of the calendar view.

Export Calendar From MS Project
You can also save the Copy Picture output to a file for future reference. Copy the image to the buffer just makes it easier.
Calendar View or Timeline?
If you are using MS Project 2010, my recommendation is to use the Timeline view rather than the calendar view. However, it helps to create a calendar view if you want to represent key milestones and tasks in a calendar format that your stakeholders can easily visualize. MS Project 2007 users will need to upgrade to MS Project 2010 to take advantage of the timeline view feature. Otherwise, this export calendar view option is a suitable solution.
For more tutorials on how to use Microsoft Project, check out our list of Microsoft Project tutorials.
Note: the following feature is only available in version 1.3 or higher
In the Menu bar, click on File → Export → Export to MS Word → Export planning.
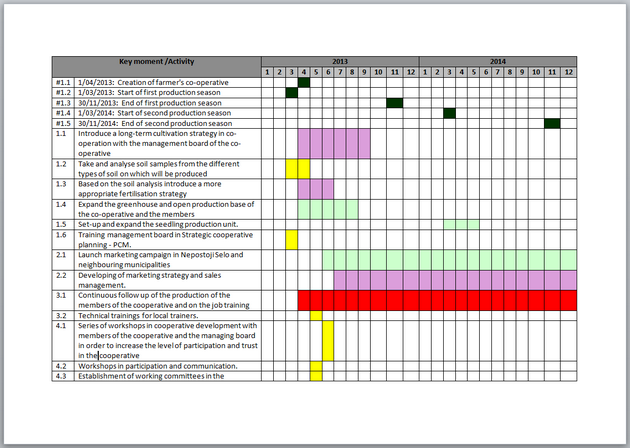
The table presents the planning per year and month only (not per week or day).
‹ Exporting the table of resources to a MS Word document
up
Exporting the list of partners to a MS Word document ›
- Printer-friendly version
- Français
Add new comment
Your name
Subject
Comment *
More information about text formats
Text format
Filtered HTML
- Web page addresses and e-mail addresses turn into links automatically.
- Allowed HTML tags: <a> <em> <strong> <cite> <blockquote> <code> <ul> <ol> <li> <dl> <dt> <dd> <img>
- Lines and paragraphs break automatically.
Plain text
- No HTML tags allowed.
- Web page addresses and e-mail addresses turn into links automatically.
- Lines and paragraphs break automatically.
CAPTCHA
This question is for testing whether or not you are a human visitor and to prevent automated spam submissions.
Math question *
1 + 5 =
Solve this simple math problem and enter the result. E.g. for 1+3, enter 4.
Leave this field blank