
Импорт данных Excel в Project
Классический клиент Project Online Project профессиональный 2021 Project стандартный 2021 Project профессиональный 2019 Project стандартный 2019 Project профессиональный 2016 Project стандартный 2016 Project профессиональный 2013 Project стандартный 2013 Project 2010 Project стандартный 2010 Еще…Меньше
Если вы начали работу над проектом в Excel, но затем вам потребовались инструменты для управления более сложными расписаниями, общим доступом к ресурсам и отслеживанием, возможно, пора перенести данные в Project. Это можно сделать с помощью мастера импорта проекта. Просто выполните действия по импорту данных в новый или уже существующий проект, и мастер автоматически разместит их в соответствующие поля в Project.
-
В Project выберите команды Файл > Создать.
-
На странице Создать выберите команду Добавить из книги Excel.

-
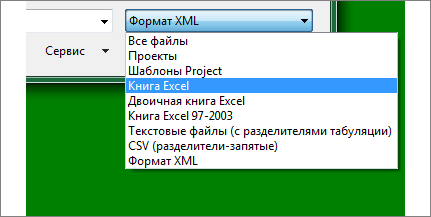
В поле Открыть щелкните стрелку рядом с элементом Формат XML и выберите пункт Книга Excel или Книга Excel 97-2003 (если данные проект сохранены в формате более ранней версии приложения).
-
Найдите и выберите книгу, которую вы хотите импортировать, и нажмите кнопку Открыть.
-
В окне мастера импорта нажмите кнопку Далее, чтобы начать импорт, а затем следуйте указаниям, чтобы завершить операцию импорта.
-
Действие 2. Создайте схему с нуля или выберите готовую схему, соответствующую имеющимся у вас данным, и нажмите кнопку Далее.
-
Действие 3. Импортируйте данные в новый или открытый проект и нажмите кнопку Далее.
-
Действие 4. Выберите тип сведений, которые вы импортируете, чтобы мастер мог правильно разместить данные из Excel в Project, и нажмите кнопку Далее.
-
Действие 5. Проверьте сопоставленные поля, внесите при необходимости изменения и нажмите кнопку Далее.
-
Последнее действие. Щелкните Сохранить схему, если вы хотите использовать ее повторно, и нажмите кнопку Готово.
-

Дополнительные сведения об импорте и экспорте данных проекта
-
Если вы часто начинаете создавать проекты в Excel, воспользуйтесь одним из имеющихся в приложении шаблонов проекта. Они разработаны с использованием соответствующих полей, что упрощает сопоставление данных при последующем экспорте проекта из Excel в Project. В Excel выберите команды Файл > Создать, а затем выберите нужный шаблон проекта, например, Список задач Microsoft Project.
-
Вы также можете экспортировать данные из Project в Excel для анализа данных и создания визуальных отчетов.
Нужна дополнительная помощь?
 MS Excel is a generic tool that can be used in many situations. In terms of project management, it is an average tool for preparing project schedules, at best. It is generally believed that MS Project is a much better solution than Excel could ever be for project scheduling. This is because Excel has some inherent disadvantages for creating and maintaining project schedules.
Here is a quote from senior MPUG author, Keith Wilson, “Using Excel to manage project information doesn’t make sense, since Project is set up to increase productivity and effectiveness.” (Read his full article here.) I, too, believe that Excel is a cumbersome tool and has serious limitations in creating and maintaining schedules. However, there are times where it becomes necessary to use Excel in conjunction with MSP.
Let’s back up for a moment. MSP is an expensive tool and its licenses are costly. To save costs, many organizations buy licenses only for the project managers who are responsible for preparing and maintaining project schedules. This keeps costs under control, but leaves team members without a way to track a project’s progress and schedule, which can be detrimental for project delivery.
In such situations, it becomes necessary to use a generic tool like MS Excel along with MSP to maintain project schedules. In this scenario, the project manager can start by preparing a high level project schedule, and then ask team members to fill in their respective tasks. The team members can use Excel to create parts of the project schedule and share updated Excel sheets with the project manager.
The project manager can then use import functionality of MSP to integrate and merge the Excel data. This allows the project managers to concentrate on the overall schedule without wasting any time on mundane lower level activities. As you can see, importing data from Excel into MSP can be useful. Let’s look at the steps involved.
Steps to Import Project Data from Excel to MS Project
You can look at an article written by Ellen Lehnert to understand the basics of import functions. This article would be useful if you are looking to do a one-time import of Excel data in a new Project file. However, in most cases, PMs would need more than a one-time import as project scheduling and tracking is a complex task. You need a constant integration of MS Project and Excel data by importing and merging Excel data periodically into your Project file.
Let’s look at the steps to importing Excel data into an existing MSP file.
1. Open MS Project.
2. Click on File > Open.
3. Choose ‘Excel Workbook’ from the dropdown menu, instead of the default option. Refer to Figure I below.
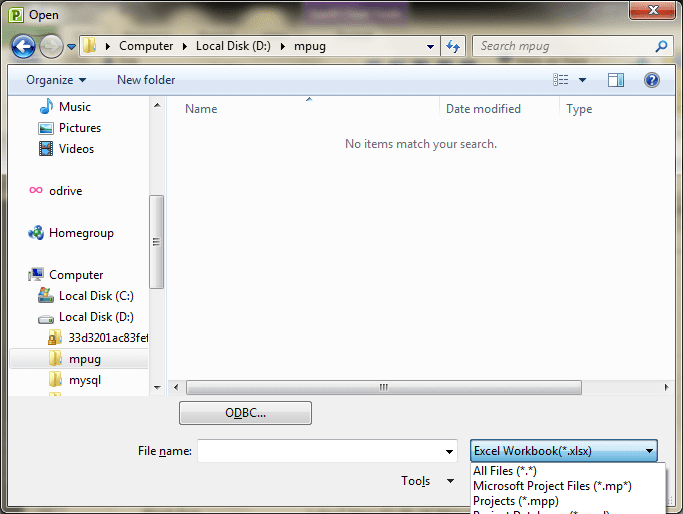
Figure I
4. After select the Excel file, MSP will start an Import Wizard. Click on the ‘Next’ button to continue and follow the Wizard to import the Excel file. Refer to Figure II below.
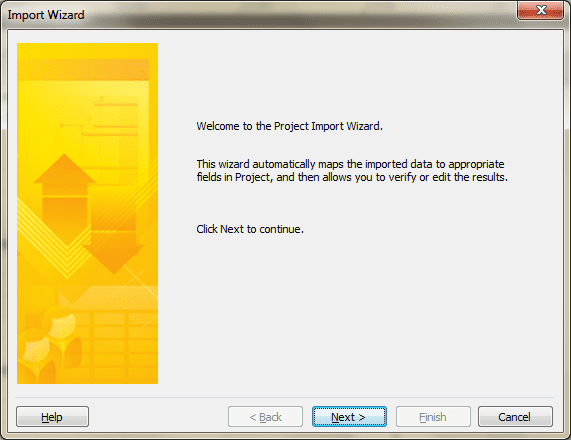
Figure II
5. Select ‘New map’ and click ‘Next.’ This feature links the Excel columns to MSP. Refer to Figure III below.

Figure III
6. On the next screen, you can do one of the three things as shown in Figure IV. Here, we will merge data into an existing project. This way you can integrate team members’ data into your MSP file and will not need to re-enter the data.
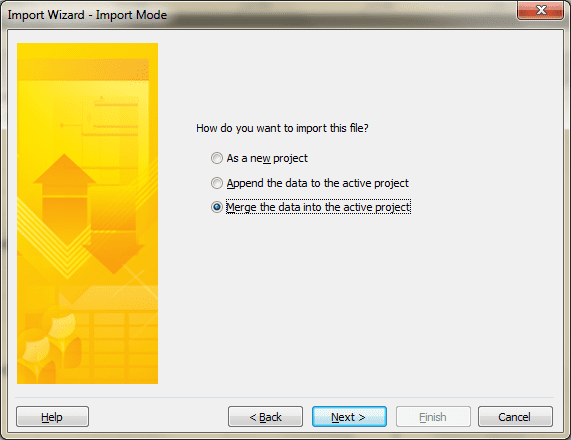
Figure IV
7. Then, you can choose to import one of three types of data, Tasks, Resources, or Assignments. Refer to Figure V below.

Figure V
You will find an example in the section for importing Tasks from Excel to MSP.
8. On the next screen, map your Excel columns to appropriate MSP columns. Refer to Figure VI below.
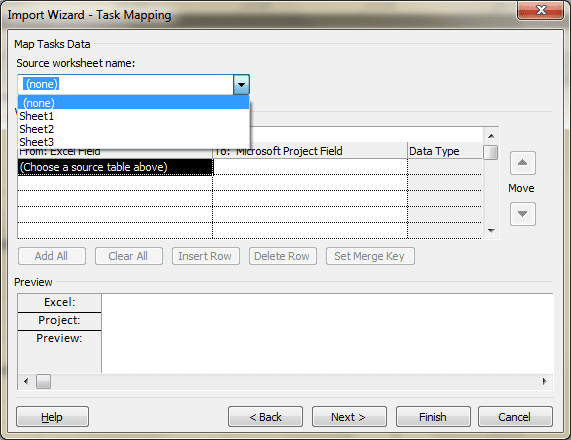
Figure VI
This is the last step for importing the data. Simply, click on the ‘Next’ button and MSP will do its magic.
An Illustration for Importing Tasks
Let’s assume that you are a project manager, and you want to create a high level WBS giving liberty to you team members to define the lower level tasks. You have a high level project schedule defined in MSP. Refer to Figure VII.
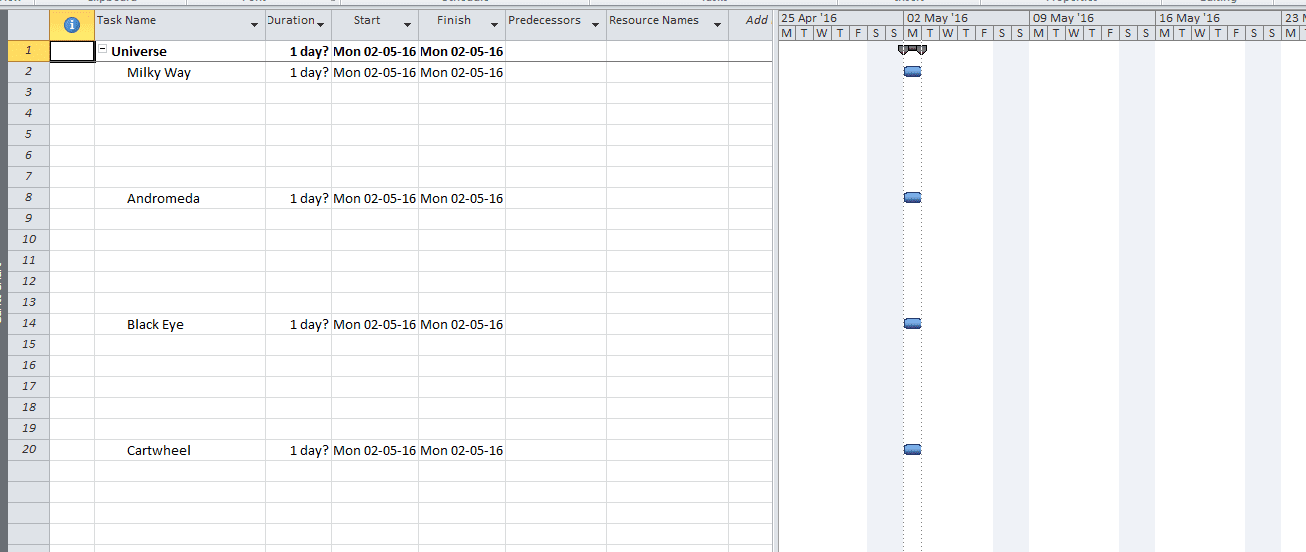
Figure VII
You can export this schedule as an Excel file and provide it to your team members. You can also ask them to create lower level tasks in Excel and share their respective sheets to you.
Refer to Figure VIII below. This may be what the Excel sheet created by your team member looks like.
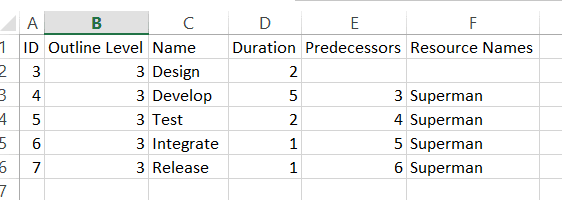
Figure VIII
Now follow the steps in the previous section. Project will automatically import the data into the correct columns and rows and your project schedule will begin to take shape. Refer to Figure X for updated MSP Gantt chart.
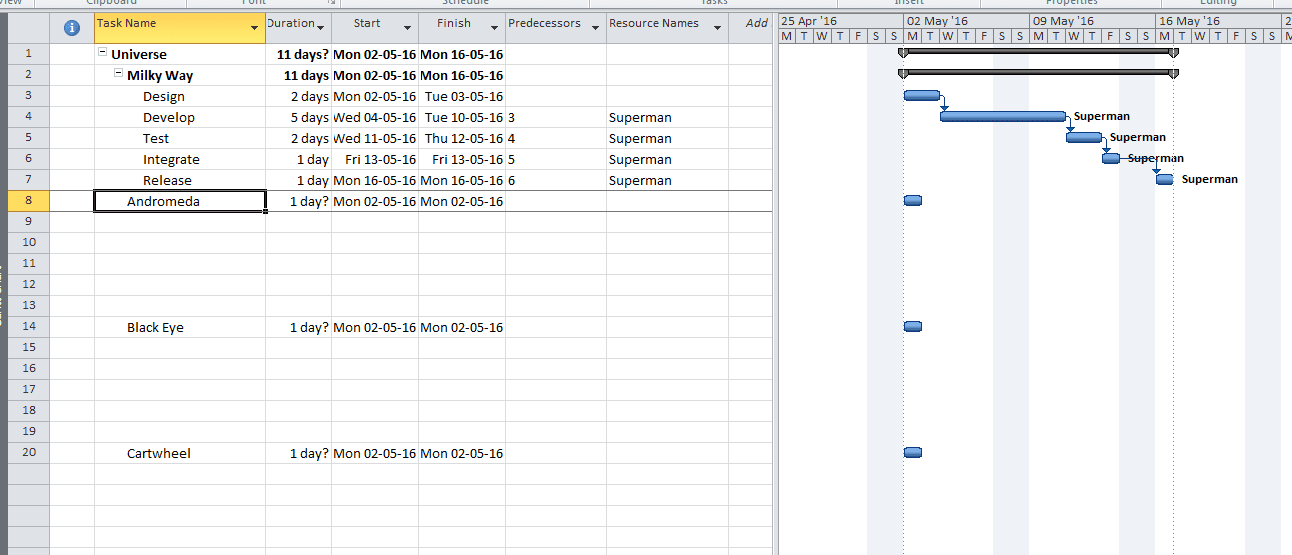
Figure IX
A Few Important Points to Note
You will have to ensure that names of Excel columns are the same as MSP Gantt Chart column names. Otherwise, you will need to map the columns yourself.
The number in Excel’s ID column should be synchronized with MSP to ensure that tasks are imported in the correct rows. If this is the case, imported data will come in the correct order.
The Project Start Date from MSP is automatically populated base on the Start Date of the first task. All the other successor dates (Start and Finish) are automatically calculated.
MSP outlines all imported tasks and summary task data is automatically calculated. In fact, MSP does a little more than just importing the tasks. It will also add a new related resource for you. Refer to Figure XI to see an example of a newly added resource.

Figure X
Conclusion
The importing of date to MS Project is a great tool for project managers. It not only saves on cost, but also saves a lot of time. In addition to merging your team members’ data, you can use the method I’ve described here to exchange information with your clients and vendors.
In this article, I have given an example of importing tasks from Excel, but, as stated, you can also import resources and assignments. Play around with importing other fields that are needed in your project.
What has been your experience with using MSP and Excel together? In what situations have you found this combination of tools useful?
I would love to hear your thoughts in the comments below.
Next Webinar
Webinar Recap: Beyond Macros Revisited: Automating Microsoft Project for Non-Techies Part 2
Microsoft Project Tutorial: Learn how to import an Excel into Microsoft Project
If you’ve worked with external vendors for any length of time, I’m sure you’ve noticed the variety of formats vendors use for a project schedule. In some cases, it is a formal MS Project schedule. In other cases, it is a set of dates described in an email or it is developed in every non-MS Project user’s favorite tool – Excel or a spreadsheet variant.
The following is a brief tutorial on how to import an Excel spreadsheet project schedule into Microsoft Project.
For the past four years, I’ve worked for companies that outsource the majority of their IT work to external vendors using fixed-price contracts. One challenge in jointly delivering a project with an external vendor is obtaining the vendor project schedule in a format that can be integrated with Microsoft Project.
The obvious solution is to have the vendor provide its Microsoft Project schedule; the reality is some vendors are reluctant to hand over their detailed schedule because it contains cost data, notes, custom macros, and other private data. If you’ve worked with outsourcing vendors, then you’re familiar with some vendors who don’t consistently use Microsoft Project as a scheduling tool.
In my case, I typically receive an Excel file with tasks and start and finish dates. Ironically, my vendor extracts this information from his Microsoft Project schedule and provides an Excel file that I can scroll through to find key milestones and due dates. Faced with the poor usability in scanning hundreds of tasks using Excel, I developed an import map that will properly import the Excel sheet that builds the task hierarchy in Microsoft Project.
When you export data from Microsoft Project into Excel, the data file doesn’t maintain the hierarchy. Creating the hierarchy in Excel usually involves grouping and indenting in Excel or using a custom macro to build the hierarchy. When you import an Excel file into Microsoft Project, it also lacks any of the indenting (Figure 1) and summary tasks that make Microsoft Project a valuable roll-up tool.

Figure 1 – Schedule in Excel
Build the Excel to Project import map
My solution was to develop an import map that includes the key fields in the table below
| Field Name | Description |
| ID | The Task ID for the Microsoft Project task |
| Outline Level | Determines the Outline Level in a project’s hierarchy. An Outline Level of 1 is at the highest level in the hierarchy, and an Outline Level of 5 has four summary level tasks above it. |
| Name | Task Name |
| Start | Forecasted Start date |
| Finish | Forecasted Finish date |
| % Complete | Task completion percentage |
| Baseline Start | Original Baseline Start date |
| Baseline Finish | Original Baseline Finish date |
| Actual Start | Actual task Start date |
| Actual Finish | Actual task Finish date |
| Predecessors | Identifies the Task ID of a predecessor task |
| Resource Name | Assigned Resource |
To build this map in Microsoft Project:
- Open a sample Microsoft Project schedule. (It helps if you have a completed project schedule so the final export will have meaningful data.)
- Go to File | Save As.
- Select the Microsoft Excel Workbook (*.xls) as the Save as Type and click Save.
- Click Next and leave Selected Data as the option.
- Click New Map.
- Select the Tasks checkbox (Figure 2).

Figure 2 – Task Mapping
- Click the Microsoft Office Project field and select the fields in table above.
- Click the Next button.
- Click Save Map and Save It as Excel MPP Map.
- Click the Finish button.

The Excel extract will now contain the key fields needed to build the project hierarchy.
In this case, I had to build the export map for the vendor so they could simply export their Microsoft Project data into a format that I could use to import the file. Once the vendor had this map in their Microsoft Project file, the vendor could easily save an Excel file using this extract. It ensured the vendor’s confidential data was kept confidential, while the critical data that I needed to understand milestones and start and finish dates for key tasks could be imported into my Microsoft Project schedule.
Import Excel Into Microsoft Project Wizard
Once the vendor provided a file using this format, their schedule could easily be imported into Microsoft Project by following these steps:
- Start Microsoft Project with a blank project schedule.
- In Microsoft Project, go to File | Open.
- Change the Files of Type combo box to Microsoft Excel (*.xls).
- Select the extract file and click Open.
- Click the Next button.
- Select Use Existing Map.
- Select the Excel MPP map.
- Select Append the Data to the Active Project (Figure 3).

Figure 3 – Import Wizard
- Click the Next button.
- Click the Next button.
- Click the Finish button.

The end result is a properly formatted Microsoft Project file that contains the vendor’s project schedule. Once the schedules are converted, I insert them as subprojects in the master project schedule.
Before I came up with this solution, I would import the schedule as a new project; I ran into calculation issues because the % Complete field is a calculated field and didn’t consistently convert.
Applying imports to other project schedules
You can apply these same map concepts to other schedules that lack the Outline Level, but you’ll need to build the Outline Level manually. Depending on the level of granularity required, you might just want the vendor’s key tasks and milestones instead of the entire project schedule. The main benefit is that once you have the vendor and your project activities defined in one integrated view, you can easily identify late tasks and analyze the critical path.
In fixed-price outsourcing projects, you may outsource the work to another supplier and establish penalties for failing to meet milestones. From a financial viewpoint, it makes sense because a fixed-price contract puts all the risk on the vendor; however, effective project managers collaborate with all their team members (vendors, customers, and internal team members) to deliver their projects. A key to being a successful PM is tracking to an integrated project schedule so the team can collectively understand progress.
If the vendor can’t provide all their schedule data, this Excel MPP map will help integrate the data you need.
For more tutorials on how to use Microsoft Project, check out our list of Microsoft Project tutorials.
It would be awesome if everyone worked with the same project software. But we live in the real world where we have various choices (not a bad thing) but at the same time, as a project manager, this can become frustrating when you are trying to integrate different subprojects into Microsoft Project and the file comes in the form of Excel.
Firstly, if the file was exported from Microsoft Project into an Excel file, it will be simple to integrate with your project. If it was one of those suppliers that still insist on good-old Excel (yes we all have them), then you may need to do a little bit more work.
Important Note – When you import your project file from Excel, remember the ‘Task Name’ column is simply called ‘Name’ – So don’t scroll down to T when looking for the Task column and panic when it is not there – It is there, it is simply called ‘Name’!
One more tip – If you do find yourself having to import an excel file into Microsoft Project, always first ask the sender whether they exported it directly from Microsoft Project, and if not, can they? Better yet, can they send you the MS project file? Generally, this wouldn’t be an issue within your organisation but it will most likely relate to getting schedules from external contractors. The important point is to ask; all they can say is no, then you move on.
For the examples below, I have simply used an existing MS Project template.
First Example – Importing an Excel file as a New Project that was exported from MS Project
If you have been supplied with an Excel file that was exported from MS Project, then you simply need to import the file.
- Click on File
- Click on New
- Click on New from Excel Workbook

Figure 1: Click on File to Access the Import Wizard

Figure 2: Accessing the Excel File Import Wizard in Microsoft Project
- Open the selected file (You may need to select All Files from the dropdown next to File name: )
- The Project Import Wizard will open
- Click Next
- Keep new Map selected
- Click Next

Figure 3: Select the Microsoft Excel Project File

Figure 4: Microsoft Project Import Wizard

Figure 5: Import Wizard – Map Selection
- Keep the import mode as As a new project
- Click Next
For the next command window, you will select the type of data that you would like to import. There are three selections available. In the example, I will only import the task data, therefore I only select tasks in the next step.
- Select Tasks
- Ensure Import includes headers is selected

Figure 6: Microsoft Project Import Wizard – Import Mode Selection

Figure 7: Selecting the Data Type to Import in Microsoft Project’s Import Wizard
The task mapping setting open after selecting the data type. As this imported file was exported from Microsoft Project, the source worksheet is automatically selected. If you import from a new Excel spreadsheet, you will need to select the tab that contains the data.
- Next, verify the data and delete data that you may not want.
- Click Finish

Figure 8: Successfully Imported Project from an Excel File
- Finishing it off, I apply some formatting to the summary tasks and add the outline numbers to give the project schedule a more professional look. It is also easier to follow.

Figure 9: Microsoft Project Import Wizard – Task Mapping Settings

Figure 10: Formatting the Project Schedule for Better Reading
Second Example – Importing an Excel file into an existing project
Assuming we have a project schedule up to the point below in Figure 11, we now want to add another summary task from an Excel file (exported from MS project). We can again use the Import Wizard to speed up the process.
Note – This example is different to adding a subproject.

Figure 11: MS Project Schedule Example 2
- Follow steps 1 to 8 in example 1 above.
- Select Append the data to the active project

Figure 12: Import Mode Selected as Append the data to the active Project in the Microsoft Project Import Wizard
- Select Tasks as the data types to import
- Ensure Import includes headers is selected

Figure 13: Selecting Tasks as the Data Types to Import into Microsoft Project
- Check the task data and ensure it has imported correctly
- Click Finish
- Go out of the File settings

Figure 14: Import Wizard – Task Mapping Data from an Excel File in Microsoft Project
Notice below that the tasks have been imported into the schedule. The Foundation summary tasks is added as a subtask under Site Work.
Simply outdent the Foundation task and then format it the same as the other summary tasks. See Figure 16 below for the final result.

Figure 15: The Tasks have been Imported in MS Project

Figure 16: The Tasks have been Imported and Formatted
Third Example – Importing a Plain Excel file not exported from MS Project
For example 3, let’s assume you get a plain old Excel file from someone who likes to work in the slow lane. See the example Excel file below.
Note – If you are aware of a better method, please let me know. Personally, I would not import a plain Excel file, especially if there are a lot of tasks because of the manual reformatting that is required.

Figure 17: Excel Project Task File
To import this file into Project, simply follow the steps in the examples above. When you get to the Task mapping settings, the source file will not be pre-selected.
- Under Source worksheet name, select the tab that contains the data. In this case it is Sheet 1
- Under To: Microsoft Project Field, select the field required for the tasks and the finish date. In this example, the task header and finish header are named differently and therefore the Import Wizard does not automatically detect them.
- Select Name for the task name column
- Select Finish for the finish date column
- In this example, two errors appear. Click Yes to both, noting what the errors are referring to as this is important to check after the import is completed. These errors occur because the tasks did not have predecessor data.
- Check the predecessors as you will notice row 13 of the excel spreadsheet did not import correctly.
- After importing the tasks, create the summary tasks and format the schedule as required.

Figure 18: Importing an Excel file into Microsoft Project

Figure 19: Checking and Selecting the Data to Import from the Excel file in MS Project

Figure 20: Selecting the Source Worksheet Name in the Task Mapping Settings in Microsoft Project

Figure 21: Verifying and Editing Data to Map into Microsoft Project

Figure 22: Error 1 after Importing the File

Figure 23: Error 2 After Importing the File

Figure 24: The Excel File Tasks have been Imported and Now Require Formatting

Figure 25: Correcting the Predecessor in the Microsoft Project Schedule

Figure 26: Final Format of the MS Project Schedule – Example 3
As always, refer to the MS Project project help for further clarity.
Learn how to import Microsoft Excel XLS and XLSX Data File into Microsoft Project. Many folks use Microsoft Excel as a tool used for organizing project data. Microsoft Project has several features that support importing this Excel project data into a Project schedule file.
Manual entry of project data into Microsoft Project from Microsoft Excel can be cumbersome. Importing the project data directly from Microsoft Excel is a much more efficient way. And, of course, Microsoft Project has several data types that support importing Microsoft Excel spreadsheet data.
Here we look at how to import Microsoft Excel XLS and XLSX files into Microsoft Project 2013.
In Figure 1 we have our demonstration project data.
 Figure 1
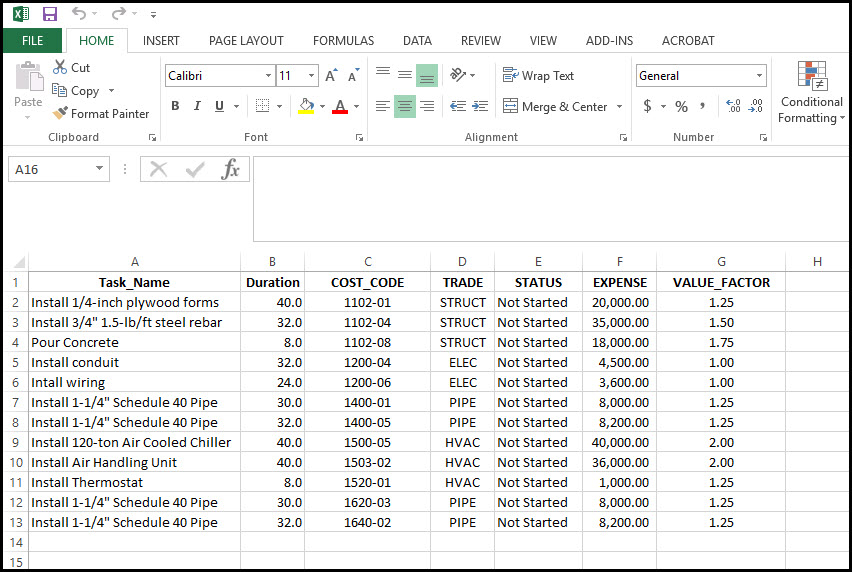 Figure 1
This data is simply of list of project tasks and associated task information. The Microsoft Project import wizard defaults to importing Sheet1. All our project data is contained in Sheet1. For proper importing the Excel datasheet names, column headers, must be one word, or two words separated by the underline special character.
We want to create some custom fields, select the project tab, properties ribbon group, and custom fields, Figure 2.
 Figure 2
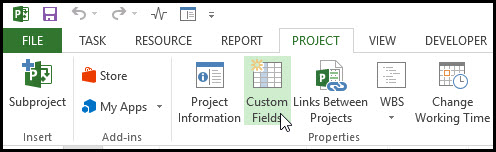 Figure 2
In Figure 3 we define our first data type.
 Figure 3
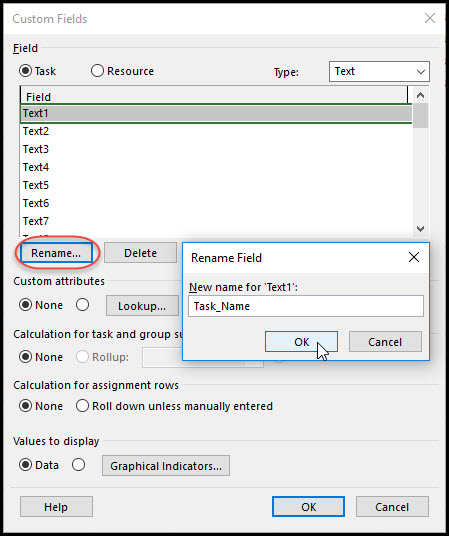 Figure 3
This is a unique task code that we plan to read in as text. In Figure 3 we choose the Text1 data field and select rename. We rename our Text1 data field Task_Name, Figure 3. We also add another data type in Text2 named Cost_Code. We continue and add a third data type. This data type we plan to make a list of skill trades. After renaming Text3 Trade, select lookup, Figure 4.
Figure 4
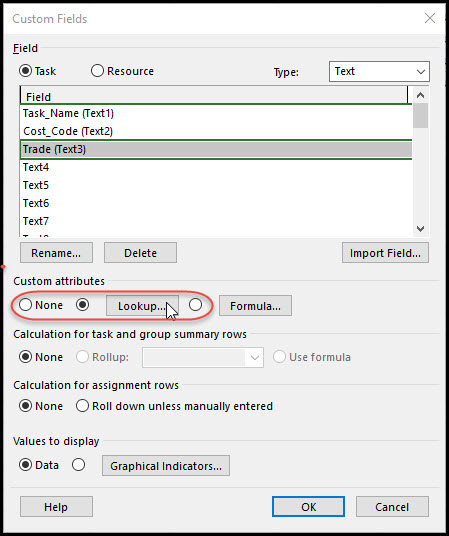 Figure 4
Select insert to add a new value. A list of our schedule trades is displayed in Figure 5.
 Figure 5
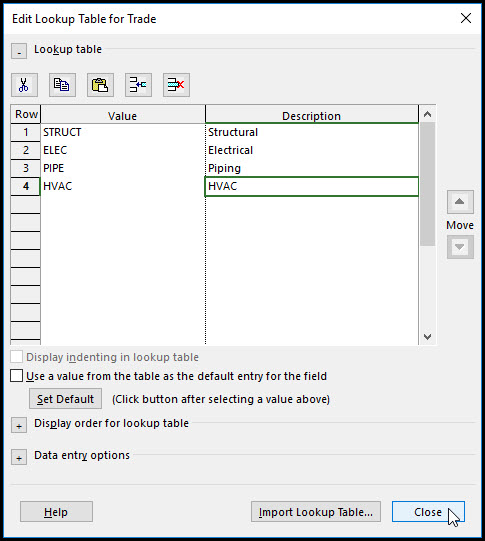 Figure 5
Great! We have competed the definition of our text fields.
Continue in the custom field dialog and select cost from the type drop down menu, Figure 6.
Figure 6
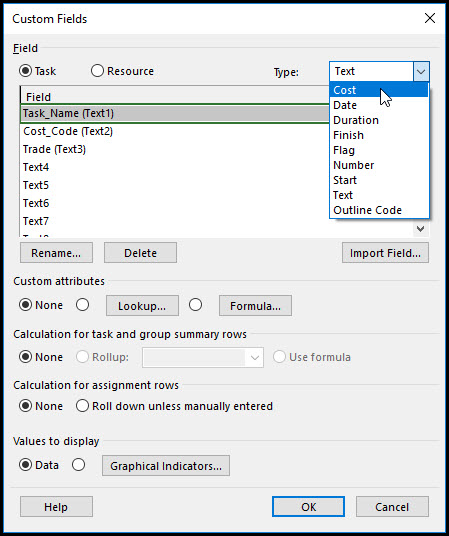 Figure 6
Rename Cost1 Expense, Figure 7.
Figure 7
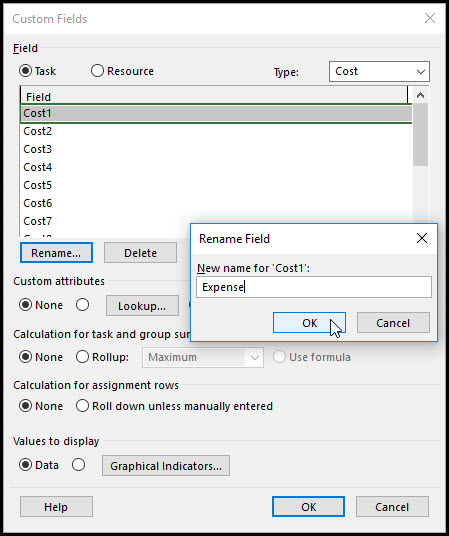 Figure 7
Proceed and select number from the type drop down menu, Figure 8.
Figure 8
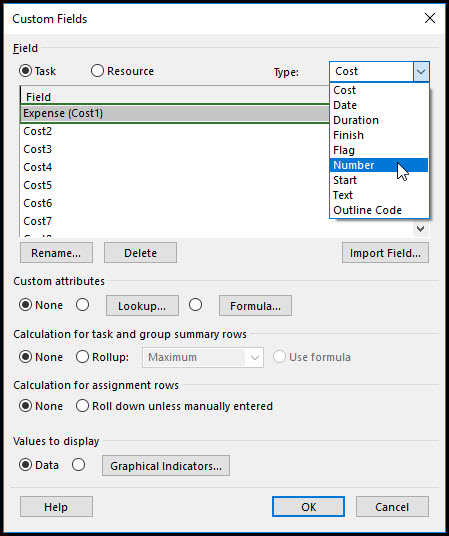 Figure 8
Finally, we rename Number1, Value_Factor, Figure 9.
Figure 9
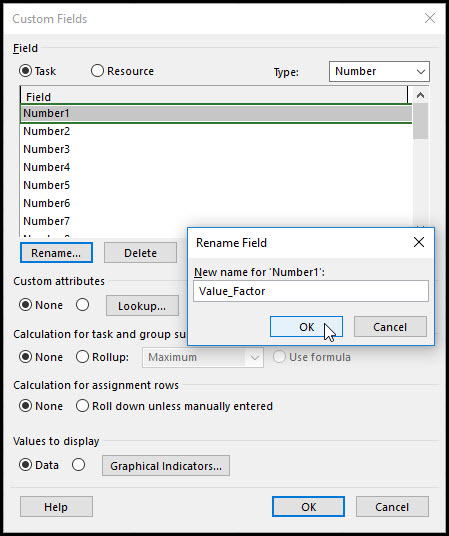 Figure 9
Now with all our data types defined we set up the schedule columns, as per Figure 10.
 Figure 10
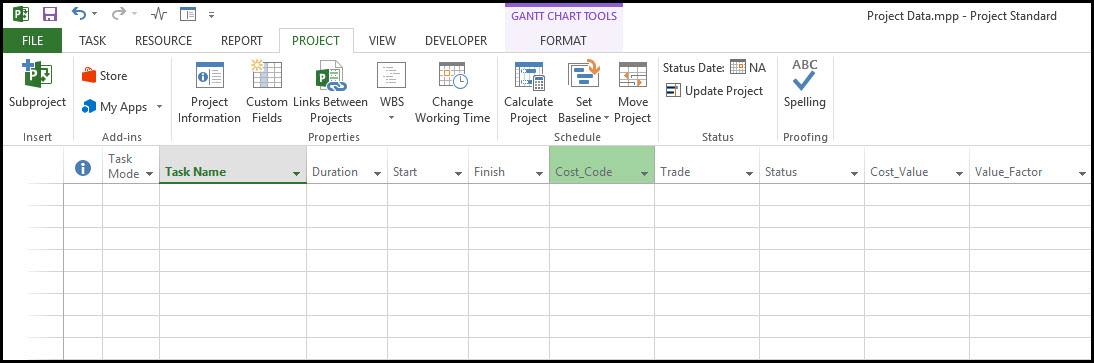 Figure 10
We are now ready to import our project data spreadsheet.
Select File and Open, Figure 11.
 Figure 11
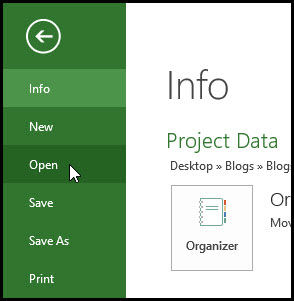 Figure 11
In the File system we find and open the file ‘project data.xlsx’. We could have also imported from an xls file, Figure 12.
 Figure 12
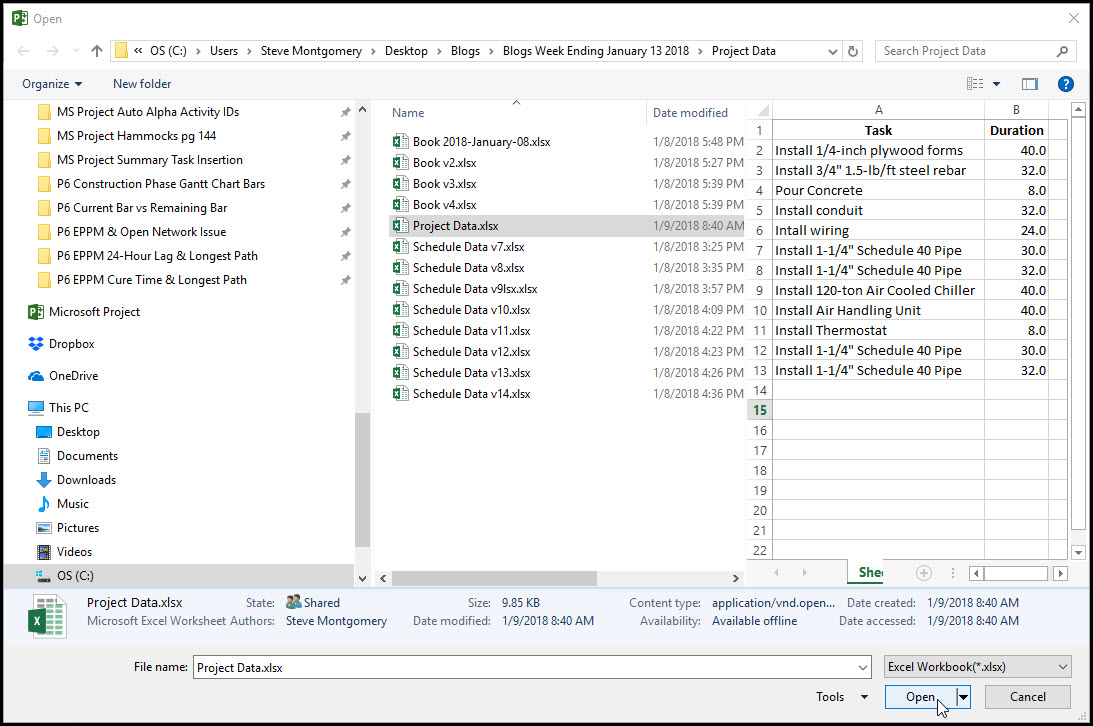 Figure 12
When we select the xlsx file type the import wizard – map dialog pops up on the screen, Figure 13.
 Figure 13
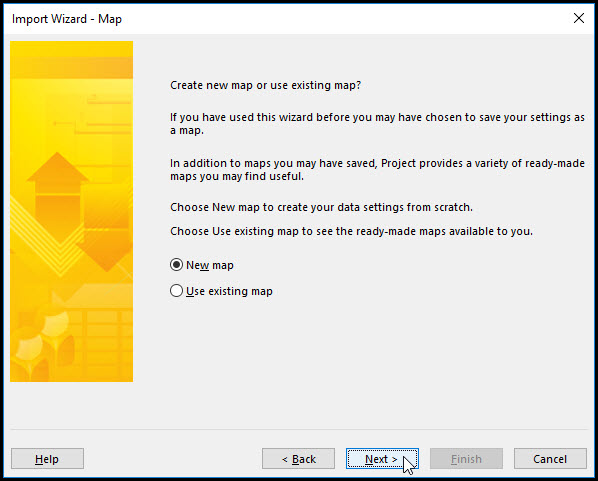 Figure 13
Toggle new map and select next. Map refers to the direct mapping between Excel data and Microsoft Project data. In the next screen select ‘append the data to the active project’ and click next, Figure 14.
Figure 14
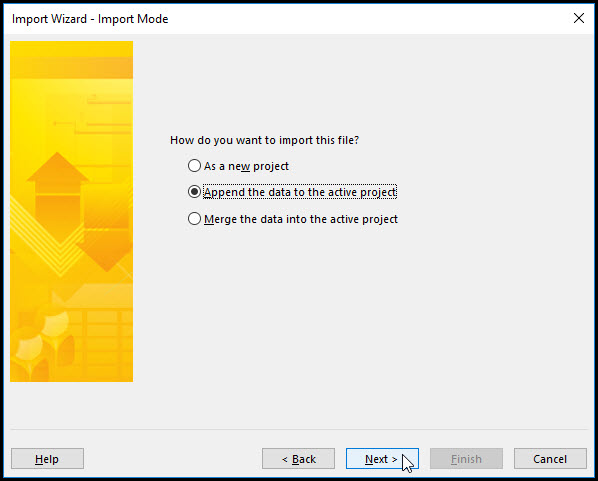 Figure 14
In Figure 15, we select the task information to import along with the column headers.
Figure 15
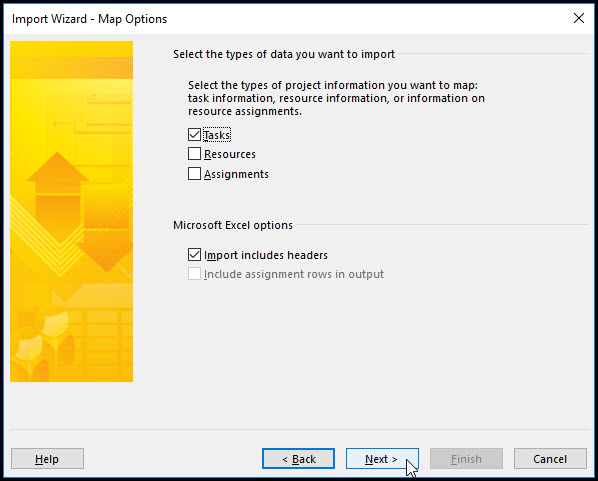 Figure 15
Click next. Change the source work sheet name to Sheet1, Figure 16.
Figure 16
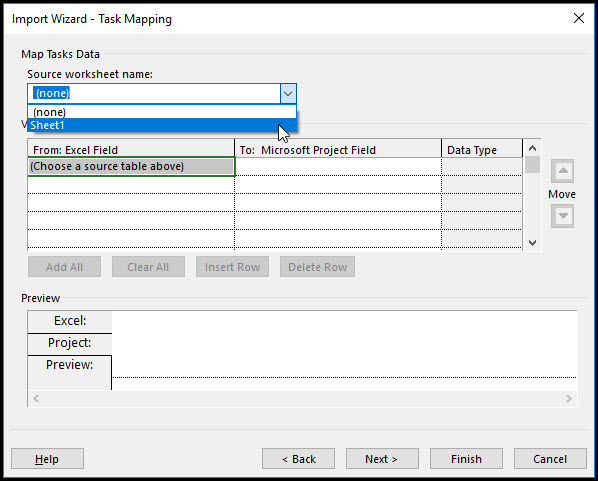 Figure 16
In Figure 17 we see our mapping, everything looks good.
Figure 17
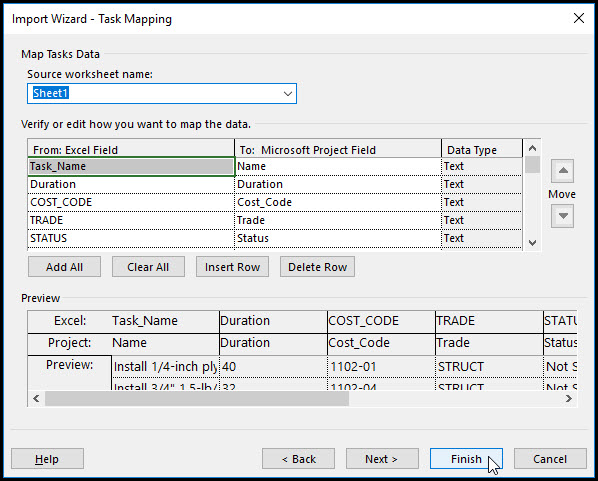 Figure 17
When we finally select Finish, and the project data imports as per Figure 18.
 Figure 18
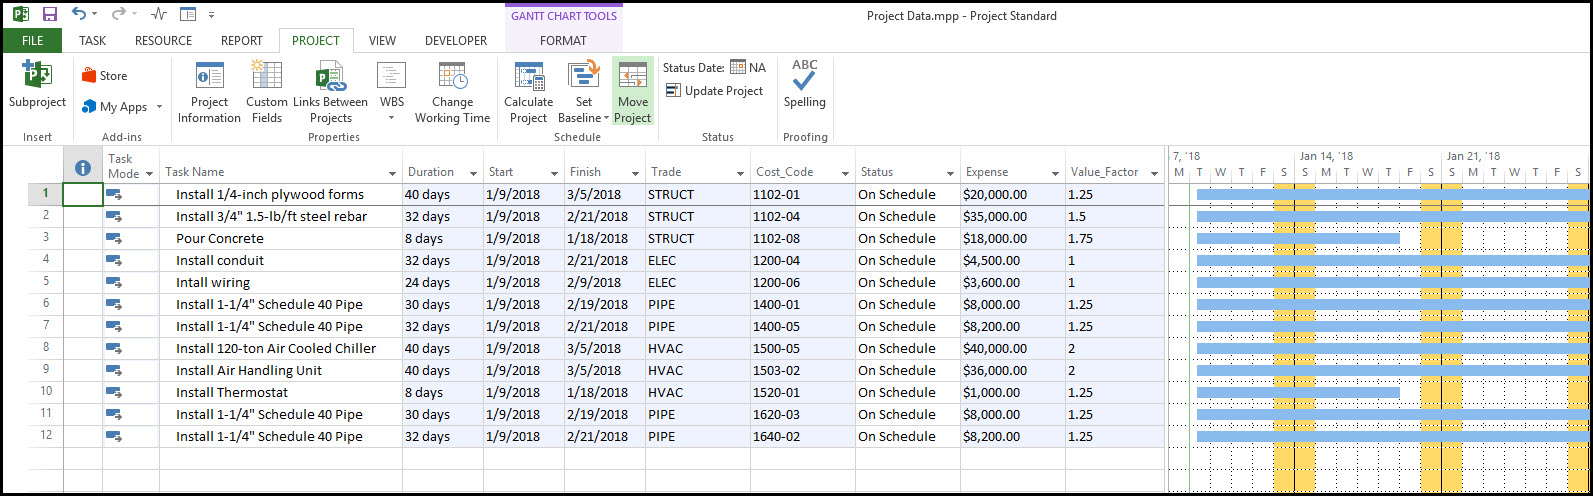 Figure 18
Summary
It is possible to import an Excel XLS or XLSX files directly into Microsoft Project 2013. Microsoft Project supports several data types including: text, text including lookup attributes, costs, and numbers. Make sure the Excel spreadsheet column headings have no spaces.
The import procedure is to open a Microsoft Project file. Set up the customized fields and then column headings. Import the project data by appending to the open project. If fields were not properly mapped, the import wizard provides the option to edit how you want to map the data. So, you can import Microsoft Excel XLS and XLSX data files into Microsoft Project.
Ниже приведенная информация является справочным материалом. Подробнее о данном материале и его практическом применении вы можете узнать, просмотрев видео.
Содержание:
- Импорт данных в MS Project Pro с MS Excel
Импорт данных в MS Project Pro с MS Excel
MS Project Pro позволяет импортировать данные с MS Excel. Вы можете импортировать данные как экспортированные с MS Project Pro так и отдельно созданные файлы.
Вы можете импортировать данные различным образом:
- Создать отдельный план график проекта.
- Добавить дополнительные задачи и ресурсы в план-график
- Обновить данные уже внесенных задач и ресурсов.

Для интеграции данных необходимо:
1. Перейти в пункт меню «Файл» нажать на кнопку «Добавить из книги Excel«.
2. Выберите тип файла «Книга Excel» и расположение файла с данными.
3. Выберите схему импорта данные. Вы можете создать новую схему или использовать уже существующую. Схема это модель какие данные MS Excel передаются в какие поля MS Project Pro.
4. Определите куда направлять данные. В новый файл проекта, дополнить открытый файл и обновить строки задач открытого проекта.

5. Укажите какой тип данных импортируется. Данные задач, ресурсов или данные назначений.
6. Установите есть ли заголовки данных в MS Excel.
7. Установите название страницы в MS Excel.
8. Выберите поля MS Project Pro в которые будут передаваться с MS Excel.
9. Если обновляете данные открытого проекта укажите поле ключ по которому будут сопоставляться данные.
