
User-991993823 posted
I just figure out the issue and its working now….Here is the code
private void button3_Click(object sender, System.EventArgs e)
{
Word.DocumentClass wd = new Word.DocumentClass();
wd.Activate();
//ADD TEXT
//wd.Content.Text=»<table></table>»;
//END ADD TEXT
Object start = Type.Missing;
Object end = Type.Missing;
Word.Range rng = wd.Range(ref start,
ref end);
Object defaultTableBehavior = Type.Missing;
Object autoFitBehavior = Type.Missing;
object missing = System.Type.Missing;
//ADD TABLE
Word.Table tbl = wd.Tables.Add
(rng,1, 5, ref missing,
ref missing);
//END ADD TABLE
//SET HEADER
SetHeadings(tbl.Cell(1, 1), «Permit Type»);
SetHeadings(tbl.Cell(1, 2), «Completeness Determination»);
SetHeadings(tbl.Cell(1, 3), «Draft Permit»);
SetHeadings(tbl.Cell(1, 4), «Final Decision»);
SetHeadings(tbl.Cell(1, 5), «Other Target»);
//END SET HEADER
//ADD ROW
for(int i=0;i<fds.Rows.Count;i++)
{
Word.Row newRow = wd.Tables[1].Rows.Add(ref missing);
newRow.Range.Font.Bold = 0;
newRow.Range.ParagraphFormat.Alignment =
Word.WdParagraphAlignment.wdAlignParagraphLeft;
newRow.Cells[1].Range.Text = fds.Rows[i][0].ToString();
newRow.Cells[2].Range.Text = fds.Rows[i][1].ToString();
newRow.Cells[3].Range.Text = fds.Rows[i][2].ToString();
newRow.Cells[4].Range.Text = fds.Rows[i][3].ToString();;
newRow.Cells[5].Range.Text = fds.Rows[i][4].ToString();
}
//END ROW
}
//ADD HEADER
static void SetHeadings(Word.Cell tblCell,
string text)
{
tblCell.Range.Text = text;
tblCell.Range.Font.Bold = 1;
tblCell.Range.ParagraphFormat.Alignment =
Word.WdParagraphAlignment.wdAlignParagraphCenter;
}
//ADD HEADER
-
Marked as answer by
Thursday, October 7, 2021 12:00 AM
The C# programming language includes capabilities that make working with Microsoft Office API objects easier. With the advent of named and optional arguments, introduction of the dynamic type in .NET, and the ability to pass arguments to the reference parameters in COM methods, C# 4.0 quickly became the language of choice for working with COM and Interop objects.
This article talks about office interop objects in C# and how you can use them to interact with Microsoft Word and Microsoft Excel. Code examples are also provided to illustrate the concepts covered.
Prerequisites for working with Interop Objects
Visual Studio 2019 or Visual Studio 2022 must be installed on your computer to work with the code samples demonstrated in this C# tutorial. In this example, we will be using Visual Studio 2022. If you don’t have it installed in your computer, you can download it from here.
As of this writing, Visual Studio 2022 RC 2 has been released. You should also have Microsoft Office Excel 2007 or Microsoft Office Word 2007 (or their later versions) installed on your computer.
Read: Code Refactoring Tips for C#.
How to Create a New Console Application in Visual Studio
In this section we will examine how we can create a new console application project in Visual Studio 2022. Assuming Visual Studio 2022 is installed on your system, adhere to the steps given below to create a new Console Application project:
- Start the Visual Studio 2022 IDE.
- Click on “Create new project.”
- In the “Create new project” page, select C# in the language drop down list, Windows from the Platforms list and Console from the “Project types” list.
- Select Console App (.NET Framework) from the project templates displayed.
- Click Next.
- In the “Configure your new project” screen, specify the project’s name and the location where you would want the project to be created.
- Before you move on to the next screen, you can optionally select the “Place solution and project in the same directory” checkbox.
- Click Next.
- In the Additional Information screen, specify the Framework version you would like to use. We will use .NET Framework 4.8 in this example.
- Click Create to complete the process.
This will create a new .NET Framework Console application project in Visual Studio 2022. We will use this project in the sections that follow.
Install NuGet Packages
Install the following libraries from NuGet using the NuGet Package Manager or from the NuGet Package Manager Console:
Microsoft.Office.Interop.Word
Microsoft.Office.Interop.Excel
Read: Working with C# Math Operators.
How to Program Office Interop Objects in C#
In this section we will examine how to work with Office Interop objects and use them to connect to Microsoft Word and Excel and read/write data.
You must add the following using directives in your program for working with Word and Excel respectively when using Office interop objects:
using Microsoft.Office.Interop.Excel;
using Microsoft.Office.Interop.Word;
Working with Excel Interop Objects in C#
To begin, create a new Excel document named Test.xslx as a sample Excel file present in the root directory of the D:> drive. We will use this file in the following example.
You should create an instance of the Application class pertaining to the Microsoft.Office.Interop.Excel library for communicating with Excel. To do this, write the following C# code:
Application excelApplication = new Application();
The next step is to create an instance of the Workbook class to access a Workbook in Excel. You can create an instance of Workbook using the following code:
Workbook excelWorkBook = excel.Workbooks.Open(@"D:Test.xslx");
To read the name of the workbook, you can use the Name property of the workbook instance as shown in the code snippet given below:
string workbookName = excelWorkBook.Name;
The following code listing illustrates how you can display the value of the first cell of the first worksheet of the Excel document:
int worksheetcount = excelWorkBook.Worksheets.Count;
if (worksheetcount > 0) {
  Worksheet worksheet = (Worksheet) excelWorkBook.Worksheets[1];
  string worksheetName = worksheet.Name;
  var data = ((Range) worksheet.Cells[row, column]).Value;
  Console.WriteLine(data);
} else {
  Console.WriteLine("No worksheets available");
}
Here’s the complete code listing for your reference:
using Microsoft.Office.Interop.Excel;
using Microsoft.Office.Interop.Word;
using System;
using System.Runtime.InteropServices;

namespace OfficeInteropDemoApp
{
    class Program
    {
        static void Main(string[] args)
        {
            string filename = @"D:Test.xlsx";
            DisplayExcelCellValue(filename, 1, 1);
            Console.Read();
        }

        static void DisplayExcelCellValue(string filename,
        int row, int column)
        {
            Microsoft.Office.Interop.Excel.Application
            excelApplication = null;
            try
            {
                excelApplication = new
                Microsoft.Office.Interop.Excel.Application();
                Workbook excelWorkBook =
                excelApplication.Workbooks.Open(filename);
                string workbookName = excelWorkBook.Name;
                int worksheetcount = excelWorkBook.Worksheets.Count;

                if (worksheetcount > 0)
                {
                    Worksheet worksheet =
                   (Worksheet)excelWorkBook.Worksheets[1];
                    string firstworksheetname = worksheet.Name;
                    var data = ((Microsoft.Office.Interop.Excel.Range)
                    worksheet.Cells[row, column]).Value;
                    Console.WriteLine(data);
                }
                else
                {
                    Console.WriteLine("No worksheets available");
                }
            }
            catch (Exception ex)
            {
                Console.WriteLine(ex.Message);
            }
            finally
            {
                if (excelApplication != null)
                {
                    excelApplication.Quit();
                    Marshal.FinalReleaseComObject(excelApplication);
                }
            }
        }
    }
}
Refer to the code listing given above. Note, the finally block of the DisplayExcelCellValue method. The Quit method is called on the Excel application instance to stop the application. Finally, a call to Marshall.FinalReleaseComObject sets the reference counter of the Excel application instance to 0.
The following code listing illustrates how you can create a new Excel document using Office Interop in C#. Note how a new workbook has been created:
static void CreateExcelDocument()
{
	Microsoft.Office.Interop.Excel.Application excelApplication = null;

	try {
		excelApplication = new
            Microsoft.Office.Interop.Excel.Application();
		Workbook excelWorkBook = excelApplication.Workbooks.Add();
		Worksheet worksheet = (Worksheet) excelWorkBook.Worksheets[1];
		worksheet.Cells[1, 1] = "Product Id";
		worksheet.Cells[1, 2] = "Product Name";
		worksheet.Cells[2, 1] = "1";
		worksheet.Cells[2, 2] = "Lenovo Laptop";
		worksheet.Cells[3, 1] = "2";
		worksheet.Cells[3, 2] = "DELL Laptop";
		excelWorkBook.SaveAs(@"D:Test.xls");
	}
	catch(Exception ex) {
		Console.WriteLine(ex.Message);
	}
	finally {
		if (excelApplication != null) {
			excelApplication.Quit();
			Marshal.FinalReleaseComObject(excelApplication);
		}
	}
}
When you run this code, a new Excel document will be created at the path specified with the following content inside:
Read: Working with Strings in C#.
Working with Word Interop Objects in C#
To work with Microsoft Word, you would need to create an instance of Microsoft.Office.Interop.Word.Application. Like Excel, this instance would be used to communicate with a Word document.
Microsoft.Office.Interop.Word.Application wordApplication = new Microsoft.Office.Interop.Word.Application();
The next step is to create a document instance using the Documents property of the Microsoft.Office.Interop.Word.Application instance we just created, as shown in the C# code snippet given below:
wordApplication.Documents.Add();
Next, you can create a paragraph and add some text to it using the as shown in the code snippet shown below:
var paragraph = document.Paragraphs.Add();
paragraph.Range.Text = "This is a sample text to demonstrate how Interop works...";
Then you can save the Word document using this code:
wordApplication.ActiveDocument.SaveAs(@"D:Test.doc", WdSaveFormat.wdFormatDocument);
Here is the complete code listing showing how to work with Microsoft Word Interop Objects in C# for your reference:
using Microsoft.Office.Interop.Excel;
using Microsoft.Office.Interop.Word;
using System;
using System.Runtime.InteropServices;

namespace OfficeInteropDemoApp
{
    class Program
    {
        static void Main(string[] args)
        {
            string filename = @"D:Test.doc";
            CreateWordDocument(filename);
            Console.Read();
        }

        static void CreateWordDocument(string filename)
        {
            Microsoft.Office.Interop.Word.Application
            wordApplication = null;
            try
            {
                wordApplication = new
                Microsoft.Office.Interop.Word.Application();
                var document = wordApplication.Documents.Add();
                var paragraph = document.Paragraphs.Add();
                paragraph.Range.Text = "This is a sample text to
                demonstrate how Interop works...";
                wordApplication.ActiveDocument.SaveAs(filename,
                WdSaveFormat.wdFormatDocument);
                document.Close();

            }
            finally
            {
                if (wordApplication != null)
                {
                    wordApplication.Quit();
                    Marshal.FinalReleaseComObject(wordApplication);
                }
            }
        }
    }
}
To read a Word document and display each word of the document you can use the following C# code:
static void ReadWordDocument(string filename)
        {
            Microsoft.Office.Interop.Word.Application
            wordApplication = null;
            try
            {
                wordApplication = new
                Microsoft.Office.Interop.Word.Application();
                Document document =
                wordApplication.Documents.Open(filename);

                int count = document.Words.Count;
                for (int i = 1; i <= count; i++)
                {
                    string text = document.Words[i].Text;
                    Console.WriteLine(text);
                }
            }
            catch(Exception ex)
            {
                Console.Write(ex.Message);
            }
            finally
            {
                if (wordApplication != null)
                {
                    wordApplication.Quit();
                    Marshal.FinalReleaseComObject(wordApplication);
                }
            }
        }
Note how the Words property of the Word application instance has been used to retrieve the words contained in the document.
C# Interop Objects Tutorial
In this article we have examined how we can access Microsoft Office Interop objects using C#. Since there is still no support for working with Interop objects in .NET Core, we have created a .NET Framework Console Application in this example.


- Introduction
- Office developers’ pain
- The basics
- Examples
- How to create Word document
- Insert a new paragraph to Word
- Insert header to Word
- Change the orientation of a page in Word
- Insert hyperlink to Word
- Insert a picture to Word
- Insert a table to Word
- Table coloring
- Insert page break to Word
- Insert a footer/header to Word
- Conclusion
With the .NET5 release further development of some projects was questionable due to the complexity of porting. One can abandon small outdated libraries or find a replacement. But it’s hard to throw away Microsoft.Office.Interop.Word.dll. Microsoft doesn’t plan to add compatibility with .NET Core/5+, so in this article we focus on creating Word files with Open XML SDK.

Introduction
Office Open XML aka OpenXML or OOXML, is an XML-based format for office documents. It includes text files, spreadsheets, presentations, as well as diagrams, shapes, and other graphic material. In June 2014 Microsoft released Open XML SDK source code on GitHub to work with this format.
This library has impressive advantages:
- compatible with .NET 5+,
- does not require Microsoft Office installation,
- high-speed operation,
- open source code.
The disadvantages include:
- complex API,
- scant documentation.
The disadvantages definitely complement each other. Actually, it was the reason to create this article.
But the open source code was the big plus. If we had COM libraries’ open source code, the developer community would help with porting to .NET Core/5+. Besides attracting third-party developers, open source code allows everyone to find and fix errors and vulnerabilities. Or at least to report them. The quality of open libraries is crucial for all projects that can use them. For example, we conducted a small audit of the Open XML SDK code when we first got acquainted with this library.
Office developers’ pain
Third-party developers created a lot of software for Office products. These are plugins for Word, Excel, Outlook. Many companies implemented themselves convenient plugins and report generators in Word format. On July 3, 2021 a terrible thing happened — Microsoft closed all the tickets on .NET 5+ in VSTO / COM support with a comment from its representatives:
…The VSTO/COM Add-Ins platform is very important to Microsoft, and we plan to continue to support it in Office with .NET Framework 4.8 as the last major version…VSTO/COM Add-Ins cannot be created with .NET Core and .NET 5+. This is because .NET Core/.NET 5+ cannot work together with .NET Framework in the same process and may lead to add-in load failures. Microsoft will not be updating VSTO or the COM Add-in platform to use .NET Core or .NET 5+…
According to their information, .NET 5+ support is not expected. Here’s one of the discussions that hasn’t stopped after the announcement: «Please port Visual Studio Tools For Office (VSTO) to .NET 5/7, to enable VSTO add-in development in C# in .Net 5/7».
The plugin developers were offered to switch to Office JavaScript API. This is a completely different language, where the API does not allow you to do even the smallest part of what it could do. However, one may switch to Open XML SDK (nuget) library to create documents from C# code.
The basics
Before we analyze examples, we should understand what these two libraries work with in general and what is the difference between their approaches.
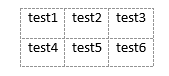
A Word file is a set of boxed xml documents. All elements are structured by tags.
For example, a paragraph inside a document will look as follows:
<w:p w:rsidR="007D2247" w:rsidRDefault="009A4B44"
         xmlns:w="http://schemas.openxmlformats.org/wordprocessingml/2006/main">
  <w:r>
    <w:t>test</w:t>
  </w:r>
  <w:bookmarkStart w:name="_GoBack" w:id="0" />
  <w:bookmarkEnd w:id="0" />
</w:p>
The Interop.Word assembly provides higher abstraction level than this structure and often works with a part of the document — Range. However, Open XML SDK follows the path of reflecting the document’s inner structure in the code itself. <w:p> paragraphs, <w:t> sections of text and everything else become objects in code. If you don’t create the body of the document, the paragraph and other mandatory «parents», then there will be no place to insert text.

The screenshot shows the inner structure of the main file for a Word document — document.xml. The file contains the content of the document itself.
The screenshot was taken in the Open XML SDK 2.5 Productivity Tool which is necessary for working with Open XML. By the time of writing this article, Microsoft removed the utility from its website. And a link to DocxToSource was added to the Open-XML-SDK repository, which should be a replacement for the outdated Productivity Tool. However, this replacement is still a prototype, so for now it’s better to find the good old Productivity Tool. The old utility allows you to view the structure of the document, get acquainted with the autogenerated code.

It also allows you to compare two different documents — both code for their creation and inner structure.

Examples
In the entire article, we use this alias for Interop.Word for the sake of readability:
using MicrosoftWord = Microsoft.Office.Interop.Word;Also, we will call the Open XML SDK simply Open XML.
How to create Word document
Interop.Word:
MicrosoftWord.Application wordApp = new MicrosoftWord.Application();
MicrosoftWord.Document wordDoc = wordApp.Documents.Add();
MicrosoftWord.Range docRange = wordDoc.Range();
.... // here we work with the document, if necessary
wordDoc.SaveAs2(pathToDocFile);
wordApp.Quit();
Everything is quite simple here, but there are also some pitfalls. When working with Interop we interact not just with some object in memory, but with a COM object. That’s why we have to terminate all the processes after the program finishes working. This problem has been raised more than once on Stack Overflow (1,2) and people proposed various solutions to it.
There is a solution with Marshal Class, which is a part of InteropServices.
finally
{
  if (Marshal.IsComObject(wordDoc))
    try
    {
      Marshal.FinalReleaseComObject(wordDoc);
    }
    catch { throw; }

  if (Marshal.IsComObject(wordApp))
    try
    {
      Marshal.FinalReleaseComObject(wordApp);
    }
    catch { throw; }
}
However, in this case we may miss some processes.
A more reliable option with a GC call:
GC.Collect();
GC.WaitForPendingFinalizers();
These methods should be called after all work with COM objects is finished.
If we don’t stop the processes, we can cause this situation when debugging:

But even if the code fragment contained termination of processes after it finishes work, some of them would remain running after manual interruption or crash. There is no such drawback when we work with a document via Open XML.
Open XML:
using (WordprocessingDocument doc =
         WordprocessingDocument.Create(pathToDocFile,
                                       WordprocessingDocumentType.Document,
                                       true))
{
  MainDocumentPart mainPart = doc.AddMainDocumentPart();
  mainPart.Document = new Document();
  Body body = mainPart.Document.AppendChild(new Body());
  SectionProperties props = new SectionProperties();
  body.AppendChild(props);
}
Pay attention to the addition of SectionProperties, we will need them later.
Insert a new paragraph to Word
Interop.Word
public static void InsertWordText(MicrosoftWord.Document doc,
                                      string text)
{
  MicrosoftWord.Paragraph paragraph = doc.Paragraphs.Add(Missing.Value);
  paragraph.Range.Text = text;
  paragraph.Range.InsertParagraphAfter();
}
We can also make text bold or italic with the Font parameter:
paragraph.Range.Font.Bold = 1;
paragraph.Range.Font.Italic = 1;
We can change the font size with:
paragraph.Range.Font.Size = 14;Text alignment is performed via ParagraphFormat.Alignment:
paragraph.Range.ParagraphFormat.Alignment = MicrosoftWord.WdParagraphAlignment
                                                        .wdAlignParagraphCenter;
Open XML:
public static void AddText(WordprocessingDocument doc, string text)
{
  MainDocumentPart mainPart = doc.MainDocumentPart;
  Body body = mainPart.Document.Body;
  Paragraph paragraph = body.AppendChild(new Paragraph());

  Run run = paragraph.AppendChild(new Run());
  run.AppendChild(new Text(text));
  run.PrependChild(new RunProperties());
}
With Open XML we can make text bold or italic this way:
run.RunProperties.AddChild(new Bold());
run.RunProperties.AddChild(new Italic());
Changing the font size is a bit unintuitive, but it corresponds with the general logic of working with Open XML:
run.RunProperties.AddChild(new FontSize(){ Val = "14"});Text alignment:
paragraph.ParagraphProperties.AddChild(new Justification()
                                       {
                                         Val = JustificationValues.Center
                                       });
Don’t forget to add properties to the paragraph:
paragraph.AppendChild(new ParagraphProperties());Insert header to Word
Let’s assume that we need to insert a header in the document. In the case of Interop.Word we only need a small addition to text insertion to get a header:
Interop.Word:
public static void InsertWordHeading1(MicrosoftWord.Document doc,
                                      string headingText)
{
  MicrosoftWord.Paragraph paragraph = doc.Paragraphs.Add(Missing.Value);
  paragraph.Range.Text = headingText;
  paragraph.Range.set_Style("Heading 1");
  paragraph.Range.InsertParagraphAfter();
}
In this case, first we set the Range for writing the new text and assign it the Heading 1 style.
Open XML:
public static void InsertWordHeading1(WordprocessingDocument doc,
                                      string headingText)
{
  MainDocumentPart mainPart = doc.MainDocumentPart;
  Paragraph para = mainPart.Document.Body.AppendChild(new Paragraph());
  Run run = para.AppendChild(new Run());
  run.AppendChild(new Text(headingText));
  para.ParagraphProperties = new ParagraphProperties(
                               new ParagraphStyleId() { Val = "Heading1" });
}
Here everything seems similar. We add a paragraph and in the case of Open XML we set the necessary hierarchy of objects.
However, in the case of Open XML, adding a style turns out to be insidious. Interop.Word works with a real complete document as if you ran Word and clicked create. But Open XML only works with what was created. And if you add text to a document which was created via Open XML and not via Interop.Word, it will lack styles, for example. Accordingly, there is no Heading1 style in this document. We need to add it first.
It is more convenient to add the needed style when we create the document. There are two options: to port ready-made styles from the Word document or add them manually.
In the first case, we have to apply the needed style in the document from which the style will be taken. The porting itself requires a lot of code. Fortunately, the manual on this topic is available in the documentation.
Productivity Tool for Open XML will help us with the second option. To get the code needed to add the desired style, we create a blank Word document, apply the desired style to it and then «feed» it to the utility. Next, we use the Reflect Code button on /word/styles.xml in the document structure and get the implementation of the GeneratePartContent method. In this method we are looking for the implementation of the desired style and everything connected to it. This includes StyleParagraphProperties, StyleRunProperties, etc.
For Heading1 style the generated code looks like this:
Style style2 = new Style() { Type = StyleValues.Paragraph,
                             StyleId = "Heading1" };
StyleName styleName2 = new StyleName(){ Val = "heading 1" };
....
style2.Append(styleRunProperties1);
To add the ported style to the generated document, we need to create a set of Styles and add the style. Next, we need to add StyleDefinitionsPart to the document and assign the style group. It looks like this:
var styles = new Styles();
styles.Append(style2);
wordDocument.MainDocumentPart.AddNewPart<StyleDefinitionsPart>();
wordDocument.MainDocumentPart.StyleDefinitionsPart.Styles = styles;
Here, we decided to use the template document option. In the future, when we need a style, we’ll just use it in the template document and work with it in code. It is easier than digging into ProductivityTool every time and copying lots of code with the declaration of the style we need.
Change the orientation of a page in Word
For our report we needed a landscape page layout.
Interop.Word:
MicrosoftWord.Document wordDoc = wordApp.Documents.Add();
MicrosoftWord.Range docRange = wordDoc.Range();
docRange.PageSetup.Orientation = MicrosoftWord.WdOrientation
                                              .wdOrientLandscape;
We get the desired Range from the document and set the landscape orientation.
Open XML:
var sectionProperties = mainPart.Document
                                .Body
                                .GetFirstChild<SectionProperties>();
sectionProperties.AddChild(new PageSize()
{
  Width = (UInt32Value)15840U,
  Height = (UInt32Value)12240U,
  Orient = PageOrientationValues.Landscape
});
With Open XML, in this case everything is not as abstract as we wanted. If we initialize only the Orient field in PageSize, nothing changes. We must also change Width and Height.
Additionally, the landscape orientation usually has different margins, so if you have requirements for them, you can fix it this way:
sectionProperties.AddChild(new PageMargin()
{
  Top = 720,
  Right = Convert.ToUInt32(1440.0),
  Bottom = 360,
  Left = Convert.ToUInt32(1440.0),
  Header = (UInt32Value)450U,
  Footer = (UInt32Value)720U,
  Gutter = (UInt32Value)0U
});
Insert hyperlink to Word
Interop.Word:
public static void AddHyperlinkedText(MicrosoftWord.Document doc,
                                      string text,
                                      string url)
{
  MicrosoftWord.Range wrdRng = doc.Bookmarks
                                  .get_Item("\endofdoc")
                                  .Range;
  doc.Hyperlinks.Add(wrdRng, url, TextToDisplay: text);
}
Everything is simple here: we get the desired Range and add a hyperlink. The Add method has many parameters, and we can create a more complex link.
Open XML:
public static void AddHyperlinkedText(WordprocessingDocument doc,
                                      string text,
                                      string url)
{
  MainDocumentPart mainPart = doc.MainDocumentPart;
  Body body = mainPart.Document.Body;
  Paragraph paragraph = body.AppendChild(new Paragraph());

  var rel = mainPart.AddHyperlinkRelationship(new Uri(url), true);

  Hyperlink hyperlink = new Hyperlink(new Run(
                                    new RunProperties(
                                      new RunStyle
                                      {
                                        Val = "Hyperlink",
                                      },
                                      new Underline
                                      {
                                        Val = UnderlineValues.Single
                                      },
                                      new Color
                                      {
                                        ThemeColor = ThemeColorValues.Hyperlink
                                      }),
                                      new Text
                                      {
                                        Text = text
                                      }))
                    {
                      Id = rel.Id
                    };

  paragraph.AppendChild(hyperlink);
}
Significant differences: we must wrap a url into Uri and connect the url with the hyperlink via AddHyperlinkRelationship. First, we create the relationship between the link, wrapped in Uri class, and the document itself. After that, when creating an object of the Hyperlink class, we assign the rel.Id value to its Id field.
Insert a picture to Word
Interop.Word:
public static void InsertWordPicture(MicrosoftWord.Document doc,
                                     string picturePath)
{
  MicrosoftWord.Range wrdRng = doc.Bookmarks.get_Item("\endofdoc")
                                            .Range;
  wrdRng.InlineShapes.AddPicture(picturePath);
}
This example doesn’t look complicated, right? But it gets harder with Open XML.
Open XML:
To insert a picture, we need to comply with a complex hierarchy of objects with certain parameters. Good thing we have documentation on this case. Therefore, we skip the code needed to insert a picture in this article. Let’s analyze another moment that wasn’t mentioned in the documentation. You can notice that the size of the image was not passed anywhere in that code. Its size is set as follows:
new DW.Extent() { Cx = 990000L, Cy = 792000L }and here
new A.Extents() { Cx = 990000L, Cy = 792000L }If we use this code, it inserts a tiny image instead of a normal-sized one. The image’s real size doesn’t change in any way. But when displayed, it will be scaled to this size:

That’s because the scale of the displayed image here is tied to EMU (English Metric Units).
In order to pass the usual pixel dimensions to the image insertion method, we need the following transformation:
double englishMetricUnitsPerInch = 914400;
double pixelsPerInch = 96;
double englishMetricUnitsPerPixel = englishMetricUnitsPerInch / pixelsPerInch;

double emuWidth = width * englishMetricUnitsPerPixel;
double emuHeight = height * englishMetricUnitsPerPixel;
Here we get the number of EMUs per pixel, taking the PPI value as 96. Then we multiply the resulting value by the desired number of pixels for width and height. As a result, we get the desired width and height in EMU. And we pass them as Cx and Cy to Extent and Extents.
Cx = (Int64Value)emuWidth, Cy = (Int64Value)emuHeightInsert a table to Word
Interop.Word:
Table generation via Interop.Word is quite straightforward. Let’s analyze an example of how we can insert a table from a square matrix of strings.
public static void InsertWordTable(MicrosoftWord.Document doc,
                                   string[,] table)
{
  MicrosoftWord.Table oTable;
  MicrosoftWord.Range wrdRng = doc.Bookmarks
                                  .get_Item("\endofdoc")
                                  .Range;

  int rowCount = table.GetLength(0);
  int columnCount = table.GetLength(1);

  oTable = doc.Tables.Add(wrdRng,
                    rowCount,
                    columnCount,
                    DefaultTableBehavior: MicrosoftWord.WdDefaultTableBehavior
                                                       .wdWord9TableBehavior,
                    AutoFitBehavior: MicrosoftWord.WdAutoFitBehavior
                                                  .wdAutoFitWindow);

  for (int i = 0; i < rowCount; i++)
    for (int j = 0; j < columnCount; j++)
      oTable.Cell(i + 1, j + 1).Range.Text = table[i,j];
}
Parameters of the Add method — DefaultTableBehavior and AutoFitBehavior — are responsible for auto-fitting cell size to contents. They are assigned the values of the WdDefaultTableBehavior and WdAutoFitBehavior enumerators, respectively. The Add method itself creates a table in the document with the desired parameters.
The style to the table can be applied the following way:
oTable.set_Style("Grid Table 4 - Accent 1");Also, if you want a nice highlight of the first column, you can assign true to the oTable.ApplyStyleFirstColumn field.
oTable.Range.ParagraphFormat.SpaceAfter controls the spacing between paragraphs. For a compact table display you can use
oTable.Range.ParagraphFormat.SpaceAfter = 0;You can also assign text style to rows or columns:
oTable.Rows[1].Range.Font.Bold = 1;
oTable.Column[1].Range.Font.Italic = 1;
Using these features, you can get this table:
![]()
Open XML:
public static void InsertWordTable(WordprocessingDocument doc,
                                   string[,] table)
{
  DocumentFormat.OpenXml.Wordprocessing.Table dTable =
    new DocumentFormat.OpenXml.Wordprocessing.Table();

  TableProperties props = new TableProperties();

  dTable.AppendChild<TableProperties>(props);

  for (int i = 0; i < table.GetLength(0); i++)
  {
    var tr = new TableRow();

    for (int j = 0; j < table.GetLength(1); j++)
    {
      var tc = new TableCell();
      tc.Append(new Paragraph(new Run(new Text(table[i, j]))));

      tc.Append(new TableCellProperties());

      tr.Append(tc);
    }
    dTable.Append(tr);
  }
  doc.MainDocumentPart.Document.Body.Append(dTable);
}
When creating a table from scratch with Open XML, remember that no cells or rows exist when you start entering data. We must create them first, following the inner hierarchy.
Therefore, when traversing the matrix, we create TableRow for each element. Then for every new element in the line we create TableCell, where we add the new Paragraph, Run and Text with the corresponding matrix value. It’s also better to add TableCellProperties immediately. Otherwise later, when working with the table, you’ll get a System.NullReferenceException when trying to add a property to the cell.
If we don’t set any style or Borders in TableProperties, the table will look like this:
TableBorders form the table borders.
var borderValues = new EnumValue<BorderValues>(BorderValues.Single);
var tableBorders = new TableBorders(
                     new TopBorder { Val = borderValues, Size = 4 },
                     new BottomBorder {  Val = borderValues,  Size = 4 },
                     new LeftBorder { Val = borderValues, Size = 4 },
                     new RightBorder { Val = borderValues, Size = 4 },
                     new InsideHorizontalBorder { Val= borderValues, Size = 4 },
                     new InsideVerticalBorder { Val= borderValues, Size = 4 }));
The BorderValues enumeration here sets the border style.
We need to add TableBorders to TableProperties via
props.Append(tableBorders);If we set a style to the table, we may not set the table borders. But don’t forget to add the style to the document.
The style is set quite simply:
TableStyle tableStyle = new TableStyle()
                        {
                          Val = "GridTable4-Accent5"
                        };
It should be added to TableProperties the same way as the borders:
props.Append(tableStyle);In order to extend the table for the entire page width, use TableWidth set as follows:
var tableWidth = new TableWidth()
                 {
                   Width = "5000",
                   Type = TableWidthUnitValues.Pct
                 };
We didn’t take the 5000 value out of nowhere. We set the type of the width unit via TableWidthUnitValues.Pct–the width unit of 1/50 of the percent or 0,02%. As a result, 5000 Pct is 100% of the page width.
This parameter is added to TableProperties in a similar way:
props.Append(tableWidth);Note: TableProperties should be added to the table before the data itself. This way TableProperties will work correctly. You can add it after other objects, but it this case you should use
dTable.PrependChild<TableProperties>(props);Table coloring
To form our report, we needed to color the cells in some document tables.
Interop.Word:
oTable.Cell(i, j).Range.Shading.BackgroundPatternColor = MicrosoftWord.WdColor
                                                                    .wdColorRed;
where oTable is the previously made table, i and j are indexes of the desired cell.
The assigned value is the WdColor enumeration.
Open XML:
tc.Append(new TableCellProperties(
            new Shading { Fill = "FF0000" }));
where tc is TableCell that we work with. The Fill field is assigned a string with the Hex color value.
Insert page break to Word
In our case, the report is generated step-by-step. That’s why we had to insert the page break after the last added text.
Interop.Word:
public static void InsertWordBreak(MicrosoftWord.Document doc)
{
  MicrosoftWord.Range wrdRng = doc.Bookmarks.get_Item("\endofdoc")
                                            .Range;
  wrdRng.InsertBreak();
}
Open XML:
public static void InsertWordBreak(WordprocessingDocument doc)
{
  MainDocumentPart mainPart = doc.MainDocumentPart;
  mainPart.Document.Body.InsertAfter(new Paragraph(
                                       new Run(
                                         new Break()
                                         {
                                           Type = BreakValues.Page
                                         })),
                                     mainPart.Document.Body.LastChild);
}
The break type in changed via the BreakValues enumeration.
Insert a footer/header to Word
We also needed footers/headers in the document.
Interop.Word:
public static void InsertWordFooter(
  MicrosoftWord.Document doc,
  string headerText)
{
  MicrosoftWord.Range headerRange = doc.Sections
                                 .Last
                                 .Headers[MicrosoftWord.WdHeaderFooterIndex
                                                       .wdHeaderFooterPrimary]
                                 .Range;

  headerRange.Fields.Add(headerRange, MicrosoftWord.WdFieldType.wdFieldPage);
  headerRange.Text = headerText;
}
We can change the text parameters — size, font, color, etc — via headerRange.Font. As you might guess, headerRange.ParagraphFormat.Alignment sets the text alignment. This field takes the values of WdParagraphAlignment.
Open XML:
The problem here is that the footer/header itself is stored in a separate .xml file. That’s why we need to link footer/header to the document content via SectionProperties.
static void InsertWordHeader(HeaderPart part,
                             string headerText)
{
  MainDocumentPart mainPart = doc.MainDocumentPart;

  if (mainPart.HeaderParts.Any())
    return;

  HeaderPart headerPart = mainPart.AddNewPart<HeaderPart>();

  string headerPartId = mainPart.GetIdOfPart(headerPart);

  part.Header = new Header(
                  new Paragraph(
                    new ParagraphProperties(
                      new ParagraphStyleId() { Val = "Header" }),
                      new Run( new Text() { Text = headerText })));

  var sectionProperties = mainPart.Document
                                  .Body
                                  .GetFirstChild<SectionProperties>();
  sectionProperties.PrependChild<HeaderReference>(new HeaderReference()
                                                  {
                                                    Id = headerPartId
                                                  });
}
If you want the text to be overwritten with a new one when calling the header addition method, then instead of
if (mainPart.HeaderParts.Any())
  return;
you can use
mainDocumentPart.DeleteParts(mainDocumentPart.HeaderParts);For the footer, we need to pass mainDocumentPart.FooterParts.
Conclusion
We compiled all these methods for Open XML SDK into a class library for internal use. Creating Word documents became even more convenient than it was with Word Interop API.
Here one might ask a question: is there any ready-made libraries based on Open XML SDK for simplified work with the documents? The answer is definitely yes. But unfortunately, developers rapidly stop the maintenance of such libraries. Stories of creating such projects are the same. Developers start working with Word and realize the inconvenience of the existing infrastructure. They modify it and post some libraries on GitHub. Even if we’re lucky to find a fresh version of such a library, someone might have adapted it for certain project’s objectives. It will probably be inconvenient to use in your project. Plus, there’s a risk of being left with a library that is not maintained.
We can email you a selection of our best articles once a month

Большинству операций, выполняемых программным способом, есть эквиваленты в пользовательском интерфейсе (UI), доступные как команды в меню и на панелях инструментов. Также существует нижележащая архитектура, обеспечивающая поддержку команд, выбираемых из UI. Всякий раз, когда вы создаете новый документ Word, он базируется на каком-либо шаблоне; расширение файлов шаблонов «.dot», а файлы документов – «.doc». Шаблон Word может содержать текст, код, стили, панели инструментов, элементы автотекста, комбинации клавиш для быстрого доступа к командам. Новый документ связывается с шаблоном и получает полный доступ к его элементам. Если вы не указываете конкретный шаблон, новый документ создается на основе стандартного шаблона «Normal.dot», который устанавливается при установке Word).
Шаблон Normal.dot является глобальным, он доступен любому документу, который вы создаете. Вы могли бы при желании поместить весь свой код в Normal.dot и создавать все документы в своей среде на основе собственного шаблона Normal (Обычный). Но тогда его файл мог бы стать чрезмерно большим, поэтому более эффективное решение для многих разработчиков — создание собственных шаблонов для конкретных приложений. В документах, создаваемых на основе вашего шаблона, код из стандартного шаблона Normal по-прежнему будет доступен. При необходимости можно связывать документ с несколькими шаблонами в дополнение к шаблону Normal.
Для работы с приложением Microsoft Word в .NET, используется объект Application, который является предком всех остальных объектов. Получив на него ссылку, вы можете работать с его методами и свойствами. Этот объект предоставляет большой набор методов и свойств, позволяющих программным путем управлять Microsoft Word. Код инициализации нового объекта Application, представлен ниже.
Microsoft.Office.Interop.Word.Application winword =
  new Microsoft.Office.Interop.Word.Application();
Чтобы открыть существующий документ или создать новый, необходимо создать новый объект Document.
object missing = System.Reflection.Missing.Value;
Microsoft.Office.Interop.Word.Document document =
     winword.Documents.Add(ref missing, ref missing, ref missing, ref missing);
Выполняя какую-либо операцию в пользовательском интерфейсе Word (например, добавляя верхний колонтитул), вы выделяете соответствующую секцию, используя объект «Selection», определяющий текущую позицию «невидимого» курсора и применяете к ней новый параметр форматирования с использованием объекта «Range». Данный объект представляет область в документе и может включать в себя все что угодно — от пары символов, до таблиц, закладок и много другого. Вы не ограничены одним объектом «Range» — в одном документе можно определить сразу несколько таких объектов.
//Добавление верхнего колонтитула
foreach (Microsoft.Office.Interop.Word.Section section in document.Sections)
{
    Microsoft.Office.Interop.Word.Range headerRange =
    section.Headers[Microsoft.Office.Interop.Word.WdHeaderFooterIndex.wdHeaderFooterPrimary].Range;
    headerRange.Fields.Add(headerRange, Microsoft.Office.Interop.Word.WdFieldType.wdFieldPage);
    headerRange.ParagraphFormat.Alignment =
    Microsoft.Office.Interop.Word.WdParagraphAlignment.wdAlignParagraphCenter;
    headerRange.Font.ColorIndex = Microsoft.Office.Interop.Word.WdColorIndex.wdBlue;
    headerRange.Font.Size = 10;
    headerRange.Text = "Верхний колонтитул" + Environment.NewLine + "www.CSharpCoderR.com";
}

//Добавление нижнего колонтитула
foreach (Microsoft.Office.Interop.Word.Section wordSection in document.Sections)
{
    Microsoft.Office.Interop.Word.Range footerRange =
   wordSection.Footers[Microsoft.Office.Interop.Word.WdHeaderFooterIndex.wdHeaderFooterPrimary].Range;

    footerRange.Font.ColorIndex = Microsoft.Office.Interop.Word.WdColorIndex.wdDarkRed;
    footerRange.Font.Size = 10;
    footerRange.ParagraphFormat.Alignment =
    Microsoft.Office.Interop.Word.WdParagraphAlignment.wdAlignParagraphCenter;
    footerRange.Text = "Нижний колонтитул" + Environment.NewLine + "www.CSharpCoderR.com";
}
Чтобы добавить текст в документ, необходимо указать позицию для вставки и сам текст.
//Добавление текста в документ
document.Content.SetRange(0, 0);
document.Content.Text = "www.CSharpCoderR.com" + Environment.NewLine;
Так же вы можете применить к тексту определенный стиль.
//Добавление текста со стилем Заголовок 1
Microsoft.Office.Interop.Word.Paragraph para1 = document.Content.Paragraphs.Add(ref missing);
object styleHeading1 = "Заголовок 1";
para1.Range.set_Style(styleHeading1);
para1.Range.Text = "Исходники по языку программирования CSharp";
para1.Range.InsertParagraphAfter();
В классе Microsoft.Office.Interop.Word.Document, присутствует коллекция «Tables», которая позволяет добавить таблицу в документ с использованием метода Add.
//Создание таблицы 5х5
Table firstTable = document.Tables.Add(para1.Range, 5, 5, ref missing, ref missing);

firstTable.Borders.Enable = 1;
foreach (Row row in firstTable.Rows)
{
    foreach (Cell cell in row.Cells)
    {
        //Заголовок таблицы
        if (cell.RowIndex == 1)
        {
            cell.Range.Text = "Колонка " + cell.ColumnIndex.ToString();
            cell.Range.Font.Bold = 1;
            //Задаем шрифт и размер текста
            cell.Range.Font.Name = "verdana";
            cell.Range.Font.Size = 10;
            cell.Shading.BackgroundPatternColor = WdColor.wdColorGray25;
            //Выравнивание текста в заголовках столбцов по центру
            cell.VerticalAlignment =
                 WdCellVerticalAlignment.wdCellAlignVerticalCenter;
            cell.Range.ParagraphFormat.Alignment =
                 WdParagraphAlignment.wdAlignParagraphCenter;
        }
        //Значения ячеек
        else
        {
            cell.Range.Text = (cell.RowIndex - 2 + cell.ColumnIndex).ToString();
        }
    }
}
Для функционирования описанного выше кода, необходимо добавить к текущему проекту объектную библиотеку MS Word. Перейдите в меню «Проект» и выберете команду «Добавить ссылку» или в обозревателе решений, найдите пункт «Ссылки» и сделайте клик правой клавишей мыши по нему, из появившегося контекстного меню выберете соответствующий пункт.

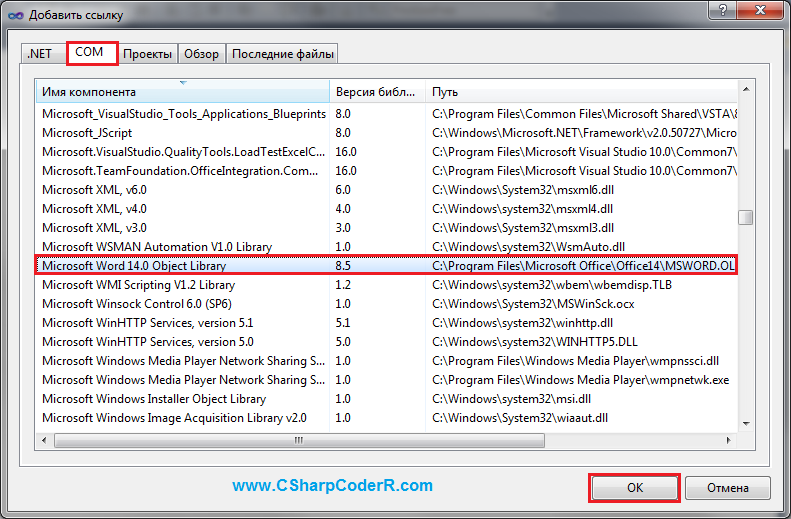
В открывшемся окне «Добавить ссылку», перейдите на вкладку «COM» и выберете «Microsoft Word 14.0 Object Library» из предложенного списка библиотек.
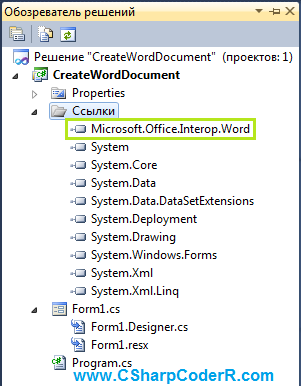
В обозревателе решений у вас появится ссылка на данную библиотеку.
Перейдите в конструктор главной формы и добавьте из панели элементов, командную кнопку «Button». Данный элемент необходим для запуска процесса создания документа и вызов MS Word для отображения.

Сделайте двойной клик левой клавишей мыши по элементу «Button» и вы перейдете в автоматически созданный метод события «button1_Click». Добавьте в него приведенный ниже код.
try
{
    Microsoft.Office.Interop.Word.Application winword =
        new Microsoft.Office.Interop.Word.Application();

    winword.Visible = false;

    //Заголовок документа
    winword.Documents.Application.Caption = "www.CSharpCoderR.com";

    object missing = System.Reflection.Missing.Value;

    //Создание нового документа
    Microsoft.Office.Interop.Word.Document document =
        winword.Documents.Add(ref missing, ref missing, ref missing, ref missing);

    //добавление новой страницы
    //winword.Selection.InsertNewPage();

    //Добавление верхнего колонтитула
    foreach (Microsoft.Office.Interop.Word.Section section in document.Sections)
    {
        Microsoft.Office.Interop.Word.Range headerRange = section.Headers[
        Microsoft.Office.Interop.Word.WdHeaderFooterIndex.wdHeaderFooterPrimary].Range;
        headerRange.Fields.Add(
       headerRange, Microsoft.Office.Interop.Word.WdFieldType.wdFieldPage);
        headerRange.ParagraphFormat.Alignment =
       Microsoft.Office.Interop.Word.WdParagraphAlignment.wdAlignParagraphCenter;
        headerRange.Font.ColorIndex =
       Microsoft.Office.Interop.Word.WdColorIndex.wdBlue;
        headerRange.Font.Size = 10;
        headerRange.Text = "Верхний колонтитул" + Environment.NewLine + "www.CSharpCoderR.com";
    }

    //Добавление нижнего колонтитула
    foreach (Microsoft.Office.Interop.Word.Section wordSection in document.Sections)
    {
        //
        Microsoft.Office.Interop.Word.Range footerRange =
wordSection.Footers[Microsoft.Office.Interop.Word.WdHeaderFooterIndex.wdHeaderFooterPrimary].Range;
        //Установка цвета текста
        footerRange.Font.ColorIndex = Microsoft.Office.Interop.Word.WdColorIndex.wdDarkRed;
        //Размер
        footerRange.Font.Size = 10;
        //Установка расположения по центру
        footerRange.ParagraphFormat.Alignment =
            Microsoft.Office.Interop.Word.WdParagraphAlignment.wdAlignParagraphCenter;
        //Установка текста для вывода в нижнем колонтитуле
        footerRange.Text = "Нижний колонтитул" + Environment.NewLine + "www.CSharpCoderR.com";
    }

    //Добавление текста в документ
    document.Content.SetRange(0, 0);
    document.Content.Text = "www.CSharpCoderR.com" + Environment.NewLine;

    //Добавление текста со стилем Заголовок 1
    Microsoft.Office.Interop.Word.Paragraph para1 = document.Content.Paragraphs.Add(ref missing);
    object styleHeading1 = "Заголовок 1";
    para1.Range.set_Style(styleHeading1);
    para1.Range.Text = "Исходники по языку программирования CSharp";
    para1.Range.InsertParagraphAfter();

    //Создание таблицы 5х5
    Table firstTable = document.Tables.Add(para1.Range, 5, 5, ref missing, ref missing);

    firstTable.Borders.Enable = 1;
    foreach (Row row in firstTable.Rows)
    {
        foreach (Cell cell in row.Cells)
        {
            //Заголовок таблицы
            if (cell.RowIndex == 1)
            {
                cell.Range.Text = "Колонка " + cell.ColumnIndex.ToString();
                cell.Range.Font.Bold = 1;
                //Задаем шрифт и размер текста
                cell.Range.Font.Name = "verdana";
                cell.Range.Font.Size = 10;
                cell.Shading.BackgroundPatternColor = WdColor.wdColorGray25;
                //Выравнивание текста в заголовках столбцов по центру
                cell.VerticalAlignment =
                WdCellVerticalAlignment.wdCellAlignVerticalCenter;
                cell.Range.ParagraphFormat.Alignment =
                WdParagraphAlignment.wdAlignParagraphCenter;
            }
            //Значения ячеек
            else
            {
                cell.Range.Text = (cell.RowIndex - 2 + cell.ColumnIndex).ToString();
            }
        }
    }
    winword.Visible = true;
}
catch (Exception ex)
{
    MessageBox.Show(ex.Message);
}
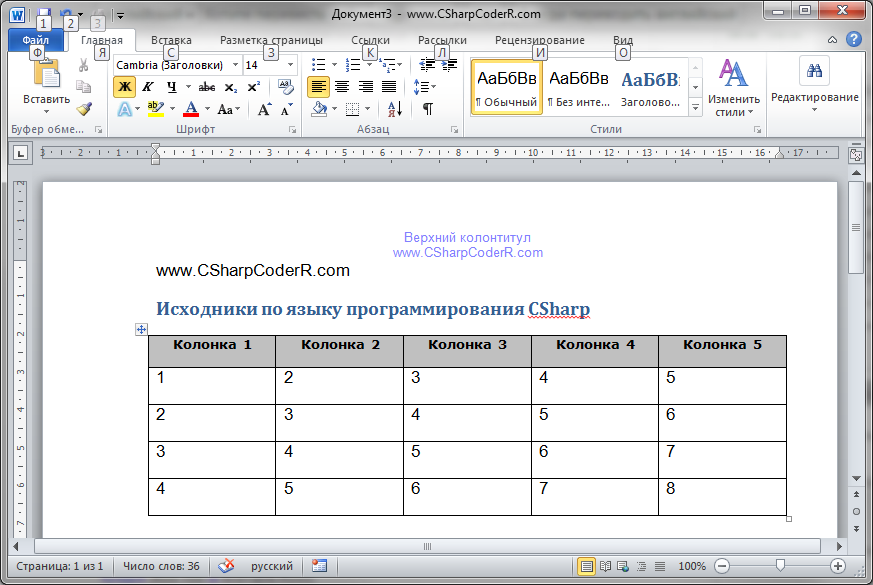
Запустите ваш проект, нажав на клавиатуре, клавишу «F5». Нажмите на единственную кнопку, расположенную на главной форме вашего проекта. У вас автоматически откроется документ Microsoft Word с заполненным верхним и нижним колонтитулом, обычным и с применением стиля текстом, а так же заполненной таблицей.
Для сохранения документа в определенной директории, добавьте приведенный ниже код, после строки «winword.Visible = true;».
//Сохранение документа
object filename = @"d:temp1.docx";
document.SaveAs(ref filename);
//Закрытие текущего документа
document.Close(ref missing, ref missing, ref missing);
document = null;
//Закрытие приложения Word
winword.Quit(ref missing, ref missing, ref missing);
winword = null;
При работе с приложением Word в памяти компьютера создается отдельный процесс, если его не закрыть или не вывести созданный документ на экран, то он будет работать до выключения компьютера. Так же при постоянной работе с такими документами, их процессы будут накапливаться незаметно для пользователя, что может привести к зависанию компьютера или другим последствиям.