
Содержание
- Объект Shapes (Excel)
- Замечания
- Пример
- Методы
- Свойства
- См. также
- Поддержка и обратная связь
- Working with shapes (drawing objects)
- Setting properties for a shape
- Applying a property or method to several shapes at the same time
- Creating a ShapeRange collection that contains all shapes on a sheet
- Applying a property or method to a ShapeRange collection
- Looping through a Shapes or ShapeRange collection
- Aligning, distributing, and grouping shapes in a ShapeRange
- See also
- Support and feedback
- Work with shapes using the Excel JavaScript API
- Create shapes
- Geometric shapes
- Images
- Lines
- Move and resize shapes
- Text in shapes
- Shape groups
- Export shapes as images
- Delete shapes
Объект Shapes (Excel)
Коллекция всех объектов Shape на указанном листе.
Замечания
Каждый объект Shape представляет объект на слое рисования, например автофигуру, свободную форму, объект OLE или рисунок.
Если вы хотите работать с подмножеством фигур в документе( например, для выполнения действий только с автофигурами в документе или только с выбранными фигурами), необходимо создать коллекцию ShapeRange , содержащую фигуры, с которыми вы хотите работать.
Пример
Используйте свойство Shapes объекта Worksheet , чтобы вернуть коллекцию Shapes . В следующем примере выбраны все фигуры в myDocument.
Если вы хотите выполнить что-то (например, удалить или задать свойство) для всех фигур на листе одновременно, выделите все фигуры, а затем используйте свойство ShapeRange в выделенном фрагменте, чтобы создать объект ShapeRange , содержащий все фигуры на листе, а затем применить соответствующее свойство или метод к объекту ShapeRange .
Используйте фигуры (индекс), где индекс — это имя или номер индекса фигуры, чтобы вернуть один объект Shape. В следующем примере заливка задает предустановленный оттенок для фигуры 1 в myDocument.
Используйте диапазон (индекс), где индекс — это имя или номер индекса фигуры или массив имен фигур или номеров индексов, чтобы вернуть коллекцию ShapeRange , представляющую подмножество коллекции Shapes . В следующем примере задается шаблон заливки для фигур один и три в myDocument.
Элемент ActiveX на листе имеет два имени: имя фигуры, содержащей элемент управления, которое отображается в поле Имя при просмотре листа, и кодового имени элемента управления, которое отображается в ячейке справа от (Имя) в окно свойств. При первом добавлении элемента управления на лист имя фигуры и код совпадают. Однако при изменении имени фигуры или кодового имени другое не будет автоматически изменено в соответствии с ней.
Имя кода элемента управления используется в именах его процедур событий. Однако при возврате элемента управления из коллекции Shapes или OLEObjects для листа необходимо использовать имя фигуры, а не код, чтобы ссылаться на элемент управления по имени. Например, предположим, что вы добавили флажок на лист и что имя фигуры по умолчанию и код по умолчанию — CheckBox1. Если изменить имя кода элемента управления, введя chkFinished рядом с (Name) в окно свойств, необходимо использовать chkFinished в именах процедур событий, но по-прежнему необходимо использовать CheckBox1 для возврата элемента управления из коллекции Shapes или OLEObject, как показано в следующем примере.
Методы
Свойства
См. также
Поддержка и обратная связь
Есть вопросы или отзывы, касающиеся Office VBA или этой статьи? Руководство по другим способам получения поддержки и отправки отзывов см. в статье Поддержка Office VBA и обратная связь.
Источник
Working with shapes (drawing objects)
Shapes, or drawing objects, are represented by three different objects:
| Object | Description |
|---|---|
| Shapes collection | Use to create shapes and to iterate through all the shapes on a given worksheet. |
| ShapeRange collection | Use to modify multiple shapes the same way you work with multiple shapes in the user interface. |
| Shape object | Use to format or modify a single shape. |
Setting properties for a shape
Many formatting properties of shapes are not set by properties that apply directly to the Shape or ShapeRange object. Instead, related shape attributes are grouped under secondary objects, such as the FillFormat object, which contains all the properties that relate to the shape’s fill, or the LinkFormat object, which contains all the properties that are unique to linked OLE objects.
To set properties for a shape, you must first return the object that represents the set of related shape attributes and then set properties of that returned object. For example, you use the Fill property to return the FillFormat object, and then you set the ForeColor property of the FillFormat object to set the fill foreground color for the specified shape, as shown in the following example.
Applying a property or method to several shapes at the same time
In the user interface, you can perform some operations with several shapes selected; for example, you can select several shapes and set all their individual fills at once. You can perform other operations with only a single shape selected; for example, you can edit the text in a shape only if a single shape is selected.
In Visual Basic, there are two ways to apply properties and methods to a set of shapes. These two ways allow you to perform any operation that you can perform on a single shape on a range of shapes, whether or not you can perform the same operation in the user interface.
If the operation works on multiple selected shapes in the user interface, you can perform the same operation in Visual Basic by constructing a ShapeRange collection that contains the shapes you want to work with, and applying the appropriate properties and methods directly to the ShapeRange collection.
If the operation does not work on multiple selected shapes in the user interface, you can still perform the operation in Visual Basic by looping through the Shapes collection or through a ShapeRange collection that contains the shapes you want to work with, and applying the appropriate properties and methods to the individual Shape objects in the collection.
Many properties and methods that apply to the Shape object and ShapeRange collection fail if applied to certain kinds of shapes. For example, the TextFrame property fails if applied to a shape that cannot contain text.
If you are not positive that each of the shapes in a ShapeRange collection can have a certain property or method applied to it, don’t apply the property or method to the ShapeRange collection. If you want to apply one of these properties or methods to a collection of shapes, you must loop through the collection and test each individual shape to make sure it is an appropriate type of shape before applying the property or method to it.
Creating a ShapeRange collection that contains all shapes on a sheet
You can create a ShapeRange object that contains all the Shape objects on a sheet by selecting the shapes and then using the ShapeRange property to return a ShapeRange object containing the selected shapes.
In Microsoft Excel, the Index argument is not optional for the Range property of the Shapes collection, so you cannot use this property without an argument to create a ShapeRange object containing all shapes in a Shapes collection.
Applying a property or method to a ShapeRange collection
If you can perform an operation on multiple selected shapes in the user interface at the same time, you can do the programmatic equivalent by constructing a ShapeRange collection and then applying the appropriate properties or methods to it. The following example constructs a shape range that contains the shapes named «Big Star» and «Little Star» on myDocument and applies a gradient fill to them.
The following are general guidelines for how properties and methods behave when they are applied to a ShapeRange collection.
Applying a method to the collection is equivalent to applying the method to each individual Shape object in that collection.
Setting the value of a property of the collection is equivalent to setting the value of the property of each individual shape in that range.
A property of the collection that returns a constant returns the value of the property for an individual shape in the collection if all shapes in the collection have the same value for that property. If not all shapes in the collection have the same value for the property, it returns the «mixed» constant.
A property of the collection that returns a simple data type (such as Long, Single, or String) returns the value of the property for an individual shape if all shapes in the collection have the same value for that property.
The value of some properties can be returned or set only if there is exactly one shape in the collection. If the collection contains more than one shape, a run-time error occurs. This is generally the case for returning or setting properties when the equivalent action in the user interface is possible only with a single shape (actions such as editing text in a shape or editing the points of a freeform).
The preceding guidelines also apply when you are setting properties of shapes that are grouped under secondary objects of the ShapeRange collection, such as the FillFormat object. If the secondary object represents operations that can be performed on multiple selected objects in the user interface, you’ll be able to return the object from a ShapeRange collection and set its properties.
For example, you can use the Fill property to return the FillFormat object that represents the fills of all the shapes in the ShapeRange collection. Setting the properties of this FillFormat object will set the same properties for all the individual shapes in the ShapeRange collection.
Looping through a Shapes or ShapeRange collection
Even if you cannot perform an operation on several shapes in the user interface at the same time by selecting them and then using a command, you can perform the equivalent action programmatically by looping through a Shapes or ShapeRange collection that contains the shapes you want to work with, applying the appropriate properties and methods to the individual Shape objects in the collection.
The following example loops through all the shapes on myDocument and changes the foreground color for each AutoShape shape.
The following example constructs a ShapeRange collection that contains all the currently selected shapes in the active window and sets the foreground color for each selected shape.
Aligning, distributing, and grouping shapes in a ShapeRange
Use the Align and Distribute methods to position a set of shapes relative to one another or relative to the document that contains them.
Use the Group method or the Regroup method to form a single grouped shape from a set of shapes.
See also
Support and feedback
Have questions or feedback about Office VBA or this documentation? Please see Office VBA support and feedback for guidance about the ways you can receive support and provide feedback.
Источник
Work with shapes using the Excel JavaScript API
Excel defines shapes as any object that sits on the drawing layer of Excel. That means anything outside of a cell is a shape. This article describes how to use geometric shapes, lines, and images in conjunction with the Shape and ShapeCollection APIs. Charts are covered in their own article, Work with charts using the Excel JavaScript API.
The following image shows shapes which form a thermometer. 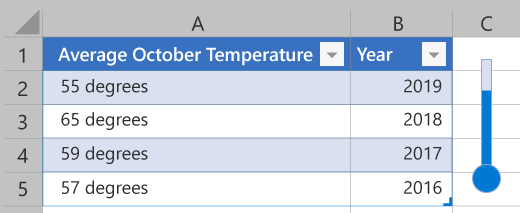
Create shapes
Shapes are created through and stored in a worksheet’s shape collection ( Worksheet.shapes ). ShapeCollection has several .add* methods for this purpose. All shapes have names and IDs generated for them when they are added to the collection. These are the name and id properties, respectively. name can be set by your add-in for easy retrieval with the ShapeCollection.getItem(name) method.
The following types of shapes are added using the associated method.
| Shape | Add Method | Signature |
|---|---|---|
| Geometric Shape | addGeometricShape | addGeometricShape(geometricShapeType: Excel.GeometricShapeType): Excel.Shape |
| Image (either JPEG or PNG) | addImage | addImage(base64ImageString: string): Excel.Shape |
| Line | addLine | addLine(startLeft: number, startTop: number, endLeft: number, endTop: number, connectorType?: Excel.ConnectorType): Excel.Shape |
| SVG | addSvg | addSvg(xml: string): Excel.Shape |
| Text Box | addTextBox | addTextBox(text?: string): Excel.Shape |
Geometric shapes
A geometric shape is created with ShapeCollection.addGeometricShape . That method takes a GeometricShapeType enum as an argument.
The following code sample creates a 150×150-pixel rectangle named «Square» that is positioned 100 pixels from the top and left sides of the worksheet.
Images
JPEG, PNG, and SVG images can be inserted into a worksheet as shapes. The ShapeCollection.addImage method takes a base64-encoded string as an argument. This is either a JPEG or PNG image in string form. ShapeCollection.addSvg also takes in a string, though this argument is XML that defines the graphic.
The following code sample shows an image file being loaded by a FileReader as a string. The string has the metadata «base64,» removed before the shape is created.
Lines
A line is created with ShapeCollection.addLine . That method needs the left and top margins of the line’s start and end points. It also takes a ConnectorType enum to specify how the line contorts between endpoints. The following code sample creates a straight line on the worksheet.
Lines can be connected to other Shape objects. The connectBeginShape and connectEndShape methods attach the beginning and ending of a line to shapes at the specified connection points. The locations of these points vary by shape, but the Shape.connectionSiteCount can be used to ensure your add-in does not connect to a point that’s out-of-bounds. A line is disconnected from any attached shapes using the disconnectBeginShape and disconnectEndShape methods.
The following code sample connects the «MyLine» line to two shapes named «LeftShape» and «RightShape».
Move and resize shapes
Shapes sit on top of the worksheet. Their placement is defined by the left and top property. These act as margins from worksheet’s respective edges, with [0, 0] being the upper-left corner. These can either be set directly or adjusted from their current position with the incrementLeft and incrementTop methods. How much a shape is rotated from the default position is also established in this manner, with the rotation property being the absolute amount and the incrementRotation method adjusting the existing rotation.
A shape’s depth relative to other shapes is defined by the zorderPosition property. This is set using the setZOrder method, which takes a ShapeZOrder. setZOrder adjusts the ordering of the current shape relative to the other shapes.
Your add-in has a couple options for changing the height and width of shapes. Setting either the height or width property changes the specified dimension without changing the other dimension. The scaleHeight and scaleWidth adjust the shape’s respective dimensions relative to either the current or original size (based on the value of the provided ShapeScaleType). An optional ShapeScaleFrom parameter specifies from where the shape scales (top-left corner, middle, or bottom-right corner). If the lockAspectRatio property is true , the scale methods maintain the shape’s current aspect ratio by also adjusting the other dimension.
Direct changes to the height and width properties only affect that property, regardless of the lockAspectRatio property’s value.
The following code sample shows a shape being scaled to 1.25 times its original size and rotated 30 degrees.
Text in shapes
Geometric Shapes can contain text. Shapes have a textFrame property of type TextFrame. The TextFrame object manages the text display options (such as margins and text overflow). TextFrame.textRange is a TextRange object with the text content and font settings.
The following code sample creates a geometric shape named «Wave» with the text «Shape Text». It also adjusts the shape and text colors, as well as sets the text’s horizontal alignment to the center.
The addTextBox method of ShapeCollection creates a GeometricShape of type Rectangle with a white background and black text. This is the same as what is created by Excel’s Text Box button on the Insert tab. addTextBox takes a string argument to set the text of the TextRange .
The following code sample shows the creation of a text box with the text «Hello!».
Shape groups
Shapes can be grouped together. This allows a user to treat them as a single entity for positioning, sizing, and other related tasks. A ShapeGroup is a type of Shape , so your add-in treats the group as a single shape.
The following code sample shows three shapes being grouped together. The subsequent code sample shows that shape group being moved to the right 50 pixels.
Individual shapes within the group are referenced through the ShapeGroup.shapes property, which is of type GroupShapeCollection. They are no longer accessible through the worksheet’s shape collection after being grouped. As an example, if your worksheet had three shapes and they were all grouped together, the worksheet’s shapes.getCount method would return a count of 1.
Export shapes as images
Any Shape object can be converted to an image. Shape.getAsImage returns base64-encoded string. The image’s format is specified as a PictureFormat enum passed to getAsImage .
Delete shapes
Shapes are removed from the worksheet with the Shape object’s delete method. No other metadata is needed.
The following code sample deletes all the shapes from MyWorksheet.
Источник
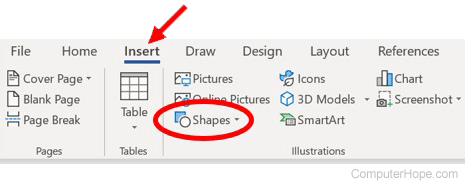
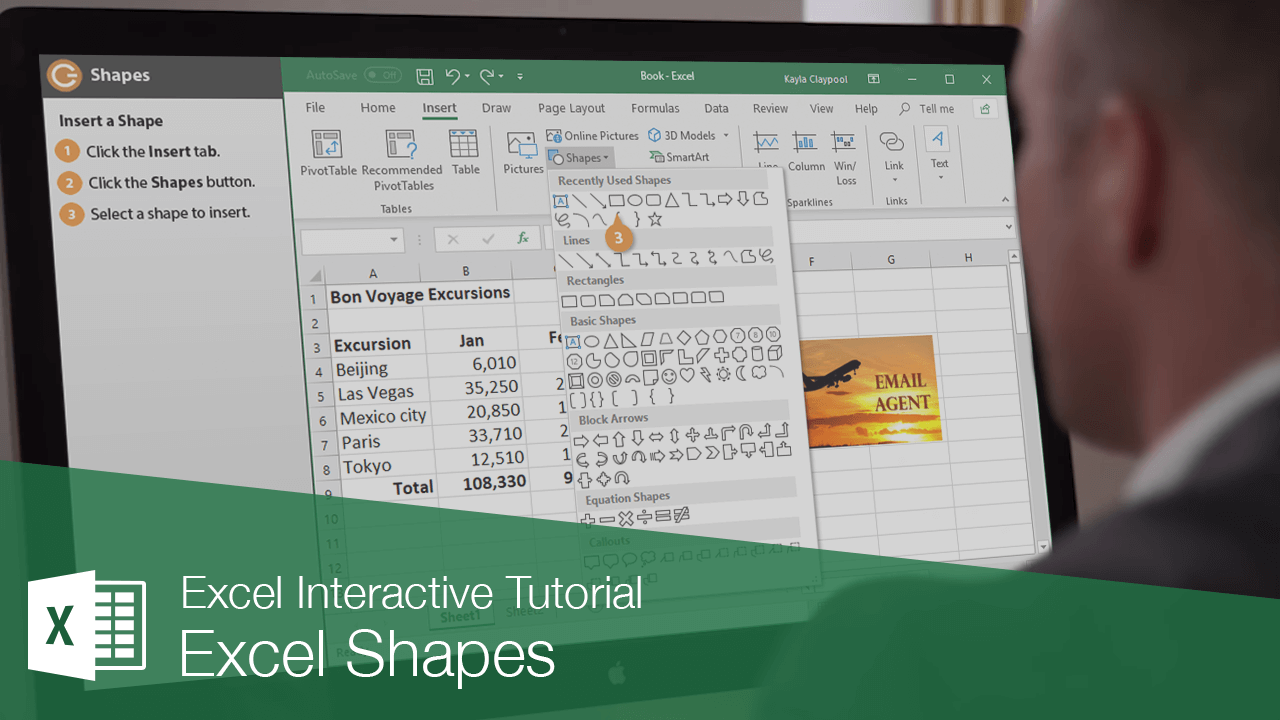
You can easily add a wide variety of shapes to your Microsoft Excel worksheets, including squares, circles, stars, arrows, smiley faces, lines, equation shapes, and callouts. To insert a shape into a worksheet, follow these four easy steps.
This feature works the same in all modern versions of Microsoft Excel: 2010, 2013, and 2016.
- From the Insert tab, in the Illustrations group, click Shapes.

- Select a shape by clicking on it.
- Your cursor will change to a plus sign.
- Click in your worksheet where you want to place the shape, drag your mouse until the shape is the size you want it to be, and then release your mouse.


Updated: 03/05/2023 by
When creating a document in Microsoft Word, or a spreadsheet in Microsoft Excel, users can add many types of shapes to highlight important items. Bringing attention to those items helps readers to better understand the content of the document or spreadsheet. After a shape is added, it can be modified by changing features, such as size, color, and fill.
To add and edit a shape in Microsoft Word and Microsoft Excel, select a link below for help.
Add shapes in Microsoft Word
Select the version of Microsoft Word you’re using below and follow the steps to learn how to add a shape in a document.
- Microsoft Word Online.
- Microsoft Word desktop application.
Microsoft Word Online
- In Microsoft Word Online, click the Insert tab at the top of the window.
- On the Insert tab, in the Illustrations group, click the Drawings option.
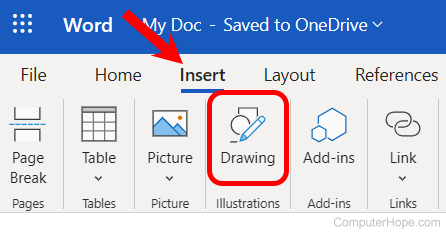
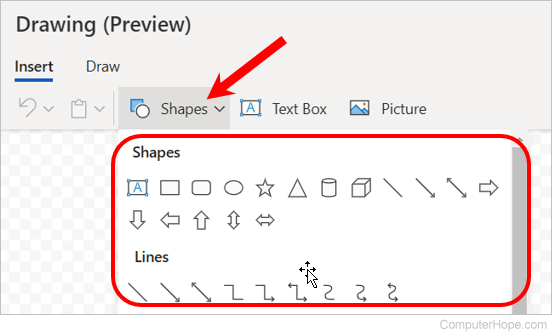
- In the Drawings (Preview) window, click the Shapes option, and select the type of shape you want to add or draw from the drop-down menu that appears.
- After selecting the desired type of shape, draw the shape in the Drawing window, then click the Save and Close button to add the shape in your Word Online document.
Microsoft Word desktop application
- In Microsoft Word, click the Insert tab at the top of the program window.
- On the Insert tab, in the Illustrations group, click the Shapes option.
- Select the type of shape you want to add or draw from the drop-down menu that appears.
Add shapes in Microsoft Excel
The following steps help you add a shape to a spreadsheet in Microsoft Excel Online or the desktop application.
- In Microsoft Excel, click the Insert tab at the top of the program window.
- On the Insert tab, click the Illustrations option, then click the Shapes option.
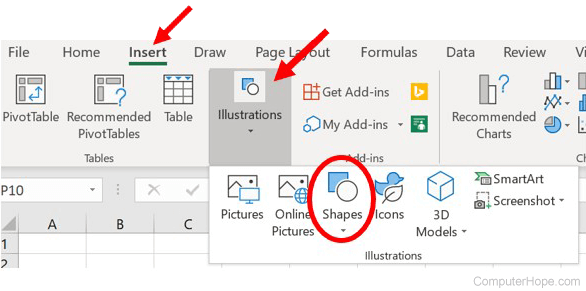
- Select the type of shape you want to add or draw from the drop-down menu that appears.
Edit shapes in Microsoft Word and Excel
- Click the shape to select it.
- Right-click the shape and select Format Shape in the pop-up menu.
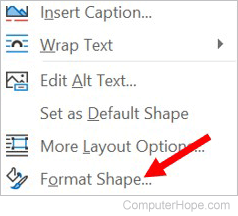
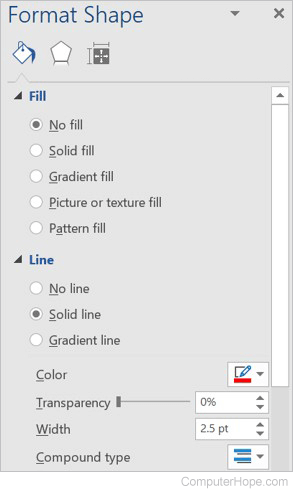
- The Format Shape section opens on the right side of the program window. You can change the shape’s fill, select the type and fill color (or no fill at all), and the size, color, and shape’s lines. You can also add shadow, glow, reflection, and other effects.
Работа с фигурами в VBA Excel: создание фигур методом Shapes.AddShape, типы фигур (MsoAutoShapeType), обращение к фигурам и изменение их свойств. Примеры.
Объекты для работы с фигурами
Фигуры в VBA Excel представлены тремя объектами:
| Объект | Описание |
|---|---|
| Shapes | Коллекция всех фигур на рабочем листе. Используется для создания новых фигур, для обращения к одной фигуре по имени и для перебора фигур циклом. |
| ShapeRange | Коллекция нескольких фигур, аргументом которой является массив имен выбранных объектов. Используется для редактирования сразу всех фигур, входящих в эту коллекцию. |
| Shape | Объект, представляющий одну фигуру. Используется для редактирования одной этой фигуры. |
Фигуры в VBA Excel создаются методом Shapes.AddShape.
Синтаксис метода AddShape
|
Shapes.AddShape (Type, Left, Top, Width, Height) |
Shapes — выражение, возвращающее коллекцию фигур на рабочем листе, например: ActiveSheet.Shapes.
Параметры метода AddShape
| Параметр | Описание |
|---|---|
| Type | Константа из коллекции MsoAutoShapeType, определяющая тип создаваемой фигуры. |
| Left | Расстояние от левой границы фигуры до левой границы табличной части рабочего листа в пунктах.. Тип данных — Single. |
| Top | Расстояние от верхней границы фигуры до верхней границы табличной части рабочего листа в пунктах.. Тип данных — Single. |
| Width | Ширина фигуры по внешним границам в пунктах. |
| Height | Высота фигуры по внешним границам в пунктах. |
Все параметры метода Shapes.AddShape являются обязательными.
Константы MsoAutoShapeType
Константы коллекции MsoAutoShapeType, определяющие основные типы создаваемых фигур:
| Константа | Значение | Тип фигуры |
|---|---|---|
| msoShapeRectangle | 1 | Прямоугольник |
| msoShapeParallelogram | 2 | Параллелограмм |
| msoShapeTrapezoid | 3 | Трапеция |
| msoShapeDiamond | 4 | Ромб |
| msoShapeRoundedRectangle | 5 | Прямоугольник: скругленные углы |
| msoShapeOctagon | 6 | Восьмиугольник (октаэдр) |
| msoShapeIsoscelesTriangle | 7 | Равнобедренный треугольник |
| msoShapeRightTriangle | 8 | Прямоугольный треугольник |
| msoShapeOval | 9 | Овал |
| msoShapeHexagon | 10 | Шестиугольник (гексаэдр) |
| msoShapeCross | 11 | Крест |
| msoShapeRegularPentagon | 12 | Пятиугольник (пентаэдр) |
| msoShapeCan | 13 | Цилиндр |
| msoShapeCube | 14 | Куб |
| msoShapeDonut | 18 | Круг: прозрачная заливка (кольцо) |
| msoShapeLightningBolt | 22 | Молния |
| msoShapeSun | 23 | Солнце |
| msoShapeMoon | 24 | Месяц (луна) |
| msoShape5pointStar | 92 | Звезда: 5 точек (пятиконечная) |
| msoShapeCloud | 179 | Облако |
Все доступные константы из коллекции MsoAutoShapeType смотрите на сайте разработчиков.
Создание объекта ShapeRange
Создание коллекции ShapeRange из выбранных фигур:
|
Dim myShapeRange As ShapeRange Set myShapeRange = ActiveSheet.Shapes.Range(Array(«Пятиугольник 140», «Солнце 141», «Облако 144»)) |
Объектная переменная myShapeRange не обязательна, можно обратиться непосредственно к возвращенной коллекции, например, присвоив всем ее элементам синий цвет:
|
ActiveSheet.Shapes.Range(Array(«Пятиугольник 140», «Солнце 141», «Облако 144»)).Fill.ForeColor.RGB = vbBlue |
Примеры работы с фигурами
Пример 1
Создание пяти разных фигур из кода VBA Excel методом Shapes.AddShape:
|
Sub Primer1() With ActiveSheet.Shapes ‘При создании фигуры без присвоения ее переменной скобки не нужны .AddShape msoShapeCube, 30, 40, 72, 72 .AddShape msoShapeIsoscelesTriangle, 130, 40, 72, 72 .AddShape msoShapeSun, 230, 40, 72, 72 .AddShape msoShapeLightningBolt, 330, 40, 72, 72 ‘Чтобы выбрать фигуру, параметры необходимо заключить в скобки .AddShape(msoShapeCloud, 430, 40, 72, 72).Select End With End Sub |
Результат работы кода:

Пример 2
Работа с одной фигурой:
|
Sub Primer2() Dim myShape As Shape ‘Создаем фигуру «Месяц» и присваивает ссылку на нее переменной myShape Set myShape = ActiveSheet.Shapes.AddShape(msoShapeMoon, 50, 50, 80, 80) With myShape ‘Меняем высоту и ширину фигуры .Height = 150 .Width = 100 ‘Меняем цвет фигуры .Fill.ForeColor.RGB = vbYellow ‘Поворачиваем фигуру влево на 40 градусов .Rotation = —40 End With End Sub |
Пример 3
Редактирование одновременно нескольких фигур с помощью коллекции ShapeRange:
|
Sub Primer3() With ActiveSheet.Shapes.Range(Array(«Овал 1», «Овал 2», «Овал 3»)) ‘Меняем цвет всех фигур из коллекции ShapeRange .Fill.ForeColor.RGB = vbBlue ‘Задаем высоту и ширину овалов .Height = 150 .Width = 50 ‘Поворачиваем фигуры вправо на 45 градусов .Rotation = 45 End With End Sub |
Пример 4
Редактирование одновременно всех фигур на рабочем листе с помощью коллекции ShapeRange:
|
1 2 3 4 5 6 7 8 9 10 11 12 13 14 15 16 17 18 19 |
Sub Primer4() Dim myShapeRange As ShapeRange, i As Integer, _ myShape As Shape, myArray() As String ‘Задаем массиву размерность от 1 до количества фигур на листе ReDim myArray(1 To ActiveSheet.Shapes.Count) ‘Проходим циклом по всем фигурам коллекции и записываем их имена в массив For Each myShape In ActiveSheet.Shapes i = i + 1 myArray(i) = myShape.Name Next ‘Создаем коллекцию ShapeRange и присваиваем ссылку на нее переменной myShapeRange Set myShapeRange = ActiveSheet.Shapes.Range(myArray) With myShapeRange ‘Изменяем цвет всех фигур на рабочем листе .Fill.ForeColor.RGB = RGB(100, 150, 200) ‘Поворачиваем все фигуры вокруг вертикальной оси .Flip msoFlipVertical End With End Sub |
Пример 5
Добавление надписи (текста) на фигуру:
|
Sub Primer5() Dim myShape As Shape Set myShape = ActiveSheet.Shapes.AddShape(msoShapeCloud, 50, 30, 300, 300) With myShape.TextFrame2 ‘Добавление текста на фигуру .TextRange.Characters.Text = «Объект TextFrame представляет текстовую рамку в объекте Shape. Содержит текст в текстовом кадре, а также свойства и методы, которые контролируют выравнивание и закрепление текстового кадра.» ‘Задаем курсивное начертание .TextRange.Characters.Font.Italic = True ‘Указываем размер шрифта .TextRange.Characters.Font.Size = 13 ‘Отступ левой границы текстового поля от левой внутренней границы фигуры .MarginLeft = 30 ‘Отступ верхней границы текстового поля от верхней внутренней границы фигуры .MarginTop = 20 End With End Sub |
Результат работы кода:

Изменить цвет текста, например на черный, можно двумя способами:
|
‘С помощью константы MsoThemeColorIndex myShape.TextFrame2.TextRange.Characters.Font.Fill.ForeColor.ObjectThemeColor = msoThemeColorDark1 ‘С помощью цветовой модели RGB myShape.TextFrame2.TextRange.Characters.Font.Fill.ForeColor.RGB = RGB(0, 0, 0) |
С константами из коллекции MsoThemeColorIndex вы можете ознакомиться на сайте разработчиков.
Пример 6
Удаление фигур с рабочего листа из кода VBA Excel с помощью метода Delete.
Удаление одной фигуры:
|
ActiveSheet.Shapes(«Ромб 5»).Delete |
Удаление нескольких фигур:
|
ActiveSheet.Shapes.Range(Array(«Овал 1», «Овал 2», «Овал 3»)).Delete |
Удаление всех фигур с рабочего листа с помощью цикла:
|
Sub Primer6() Dim myShape As Shape For Each myShape In ActiveSheet.Shapes myShape.Delete Next End Sub |
В 7 примере рассмотрено удаление всех фигур без цикла.
Пример 7
Выделение всех фигур на рабочем листе:
|
ActiveSheet.Shapes.SelectAll |
Выбор всех фигур и удаление выбранного (всех фигур):
|
Sub Primer7() ActiveSheet.Shapes.SelectAll Selection.Delete End Sub |
Продолжение темы в статье VBA Excel. Копирование, перемещение и поворот фигур.
You can add shapes to your spreadsheet to spark a little visual interest. By using the Shapes menu, you can choose from dozens of different types of shapes.
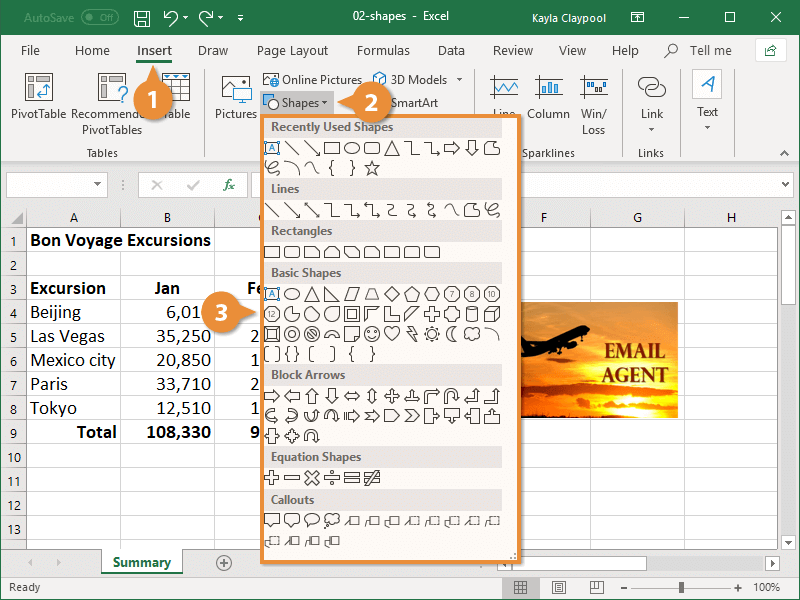
Insert a Shape
- Click the Insert tab.
- Click the Shapes button.
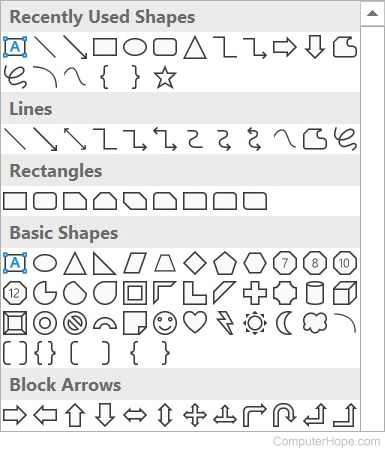
The Shapes menu displays all the types of shapes available, organized into groups.
- Select a shape to insert.

Now the cursor changes to a cross hair and is ready to draw on the sheet.
- Insert the shape in one of two ways:
- Click anywhere on the page to insert the shape there.
- Click and drag anywhere on the page to place the shape while also controlling its size.
Some shapes have prominent features that can be adjusted; these shapes will have a yellow adjustment handle.
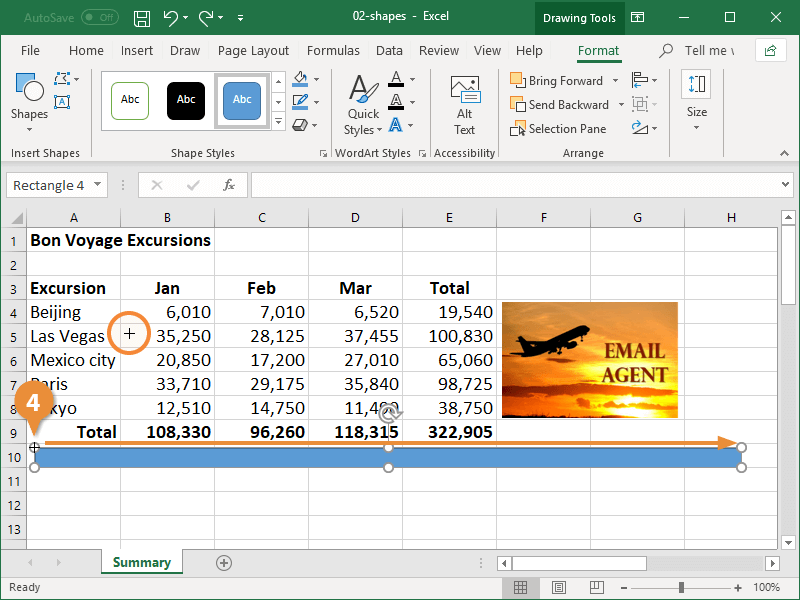
Format a Shape
Once you’ve added a shape, you can use the Format tab to change its style, fill, outline color, and effects.
- Select a shape.
When you select a shape, the Format tab in the Drawing Tools ribbon group becomes available. Double-click a shape to automatically switch to the Format tab.
- Use the Shape Style options on the Format tab to change the style, fill color, outline, or shape effects.
- Select a style from the Shape Styles gallery, or click the gallery’s More button to see all available styles.
- Select a shape fill color, weight, or dash pattern.
- Select a shape outline color to change the color of the selected shape. You can also fill it with a gradient, picture, or texture pattern.
- Apply various shape effects such as shadow, reflection, glow, bevel, and 3D rotation.
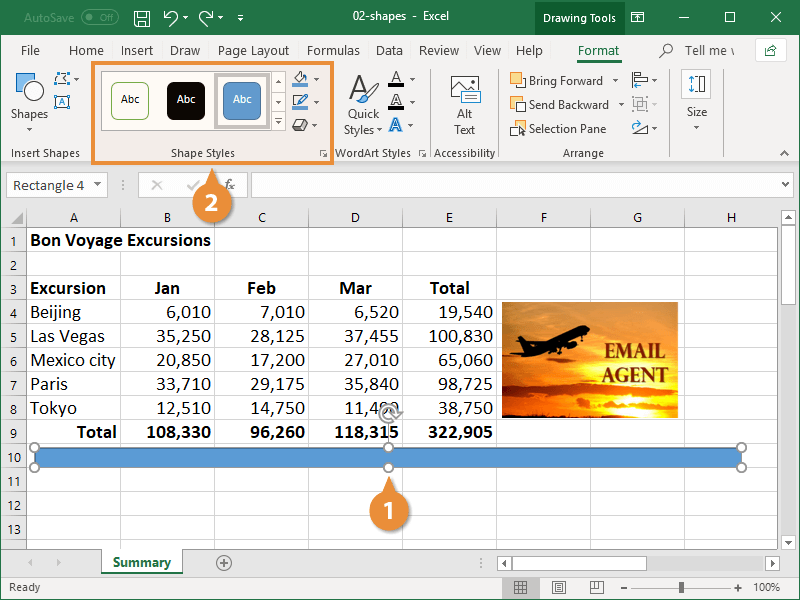
You can first apply a style from the gallery, and then adjust the fill, outline, and effects to customize it.

FREE Quick Reference
Click to Download
Free to distribute with our compliments; we hope you will consider our paid training.