

Almost everyone, at some point in time, have managed or attempted to manage a project using Microsoft Excel. Since its release in 1987, this spreadsheet program is being used by millions of users today around the world for various purposes. It is an excellent software for spreadsheet creation, calculation, and data visualization.
Some of the reasons why people use Excel for project management is because Office is a popular application and is widely used by companies, institutions, and many other organizations. Therefore, people are familiar with it. And since it is flexible, managers try to make it work for project management, at the same time trying to save on spending for additional software.
Disadvantages of using Excel
Here are some of the disadvantages of using Excel as a project management tool:
1. Excel is not designed for project collaboration.
Excel may be flexible enough to allow a single user to manage a simple project, but most business cases are far from simple and solitary. The projects that companies initiate, plan, execute and deliver usually involve teams of multiple members, sometimes even involve multiple teams across the enterprise. Excel simply does not have the tools or features to automatically handle the coordination and updating of the status of different tasks being performed by multiple people.
2. Excel is limited as a data repository
As teams start to work on projects one after the other, and sometimes more than one simultaneously, the amount of project data can grow very fast. Since Excel as a standalone program can only hold certain types of data and information, teams will have to use other applications or solutions to manage their other project documentation. It can be difficult and confusing to find and update these documents separate from the other project information inside the spreadsheet.
3. Excel lacks the needed transparency in project management
Most of the time, the project manager will be in charge to update the Excel project spreadsheet regarding the completion of tasks, the progress of the project, the actual hours spent by each team member, and other important information. This can be time-consuming for the project manager. It can also be stressful for the team members who are constantly being asked for updates. And this process is prone to error. Furthermore, by the time the project manager consolidates the data, it is probably outdated and does not reflect the true status of the project.
4. Excel is not an ideal project reporting tool
Although Excel has data visualization tools, not everyone in the team would know how to use it. If there is a capable person, the rest may have to rely on him or her, and this can be burdensome for just one person. When senior management needs a presentation of the project, this would require extra effort to create additional views. And different persons need different views to analyze the project, which will require additional tabs in the spreadsheet until it is stretched to its limits.
5. Excel lacks essential project management capabilities
Creating a project schedule in Excel can be a lot of work simply because you will have to enter every bit of data. If you need to update a schedule, you will have to manually change everything, too. Furthermore, a Gantt chart is not automatically created in Excel, but Gantt charts are essential for project planning and scheduling. Another important feature is creating dependencies. This will have to be done manually to make sure tasks are done in the right sequence and order.
The Microsoft Project Solution
All these disadvantages in using Excel as a project management tool can be disregarded by switching to Microsoft Project. As a cloud-based solution, project team members can update the status of their tasks, share documents, and communicate with one another just using their web browser or mobile app.
Team members can easily submit timesheets, and project managers do not have to spend extra time asking for updates, collecting data, and updating documents for reporting purposes. The cloud-based solution includes the platform to capture and update in real-time information for payroll, billing, invoicing, and other purposes.
Microsoft Project includes built-in tools to plan projects, such as Gantt charts and other customizable templates. This helps in starting the project quickly instead of building from scratch. Furthermore, it has the reporting tools that can easily show the health of the project without having to ask a specialist to create the needed views. And all these information are visible for all members with the right access and privilege.
Benefits of using Microsoft Project
Like many other cloud-based project management software, Project Online is a more suitable application than Excel for managing projects. Aside from having a collaboration-ready tool, Project Online has features designed to support project management best practices that help ensure project success:
- Portfolio Management – provides a portfolio view of projects
- Project Management – manage projects from waterfall to agile
- Resource Management – provides advanced resource planning tools
- Roadmapping – build ready-to-present roadmaps with high-level view of projects and programs
- Project Collaboration – collaborate with integrated tools such as Planner, Teams, Skype, SharePoint, and others
- Strong Reporting – track and report on project performance with out-of-the-box reports and Power BI solutions, and
- 24/7 Accessibility – work from anywhere using a web browser, desktop, and mobile devices.
Transitioning from Excel to Microsoft Project requires an investment in time, money, and resources. However, it is a good investment that can make a strong impact in the long run. Project information will be more transparent, processes can be more efficient, and people will be more effective with their time. All these productivities can mean more successful projects and also a happier project team.
Trending Project Management Software
If you’re interested in learning more about top-rated project management software, project-management.com actively recommends the following:
1
Prommpt

Visit website
Prommpt is a project management platform which at its core enables true collaboration between all project members and stake holders, whether in-house or external. Available as Web-App and iPad App Prommpt.com suits any project environment.
Learn more about Prommpt
How often have you seen a manager struggle to use Microsoft Office Excel to manage project information such as scheduling project dates or recording task assignments? Often, it’s a matter of sticking with what they know — and every manager in the world seems to know Excel. In this article, I’ll supply you with the arguments you need to help them understand when it’s time to shift to using Microsoft Project instead.
When it comes to managing project information such as scope (phases, tasks, milestones and deliverables), timelines (schedules and deadlines) and resources (assignments, effort, availability and costs), Project provides better built-in capabilities than Excel. Once the user is over the hump of learning Project, using Excel to manage project information doesn’t make sense since Project is set up to increase productivity and effectiveness.
Key challenges in using Excel in project management work include:
- Project and summary level data calculation is largely done manually.
- Creating and maintaining phases, tasks and milestones is more difficult.
- Creating and maintaining project timelines and deadlines isn’t dynamic or easy.
- Assigning resources and costs to tasks isn’t automated nor project-specific.
- There are no automatic updates for scope, time or resource assignments.
- There are no specific tools to manage change effectively.
- It’s difficult to see the ripple effect of delays.
- There’s no feature that calculates the impact of resource availability.
- There are no pre-defined project-specific reports for different stakeholders.
Building a Project Schedule
Project enables managers to not only create a schedule but to see a project through the lifecycle of planning, tracking and reporting. Also, if a user has a plan in Excel, importing it to Project is simplified by using the Project step-by-step guides to map Excel columns to project columns. It’s then possible to convert the task list from Excel into phases, tasks and milestones which defines the project scope known as the work breakdown structure (WBS). Project has the tools the user needs to quickly set-up and maintain the WBS. The next step is to establish a timeline by defining task durations and dependencies or links. Completing the schedule involves identifying and allocating resources. Once complete, the task relationships can be represented in the form of graphs or reports. Information can then be easily shared. Project allows the user to:
- Quickly set up project phases, tasks and milestones.
- Define task durations and relationships.
- Clearly identify and allocate resources and coordinate workload.
- Quickly access and share relevant project information.
- Effortlessly create custom reports to keep the project team informed and aligned.

With Project it’s also possible to:
- Import existing data from Excel or Outlook.
- Initiate a plan using the built-in project templates.
- Collapse or expand plans to show the necessary level of detail.
- Click and drag to change task duration.
- Keep notes on important task information.
- Do “what if” analysis with multiple undo’s.
- Focus on tasks that are driving project completion and critical path.
- Determine the factors that are affecting task dates and easily trace the sourcef of issues.
In addition to importing Excel files, Project offers users two options to create or start a new project. First, project schedules can be created from templates. In addition to Project’s built-in templates and those available at Office Online, custom templates can be built. Using templates saves time and ensures consistency and standardization across an organization.

The second approach is to build a plan from scratch using the powerful planning tools Project has to offer. Building dynamic and effective plans in Project involves these five steps:
- Enter WBS (phases, tasks and milestones) into task name column.
- Outline (indent/outdent) tasks to reflect the WBS hierarchy (major, minor and task pieces).
- Estimate duration (or work-for-work based schedules).
- Set dependencies or task links to establish the flow of activities.
- Assign resources (and costs if applicable).
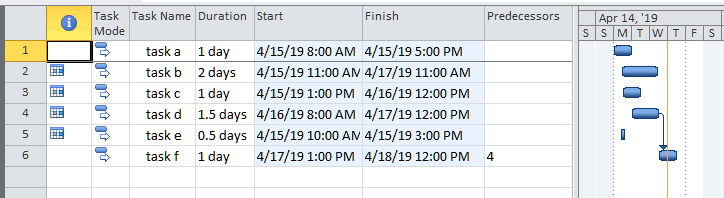
Unlike in Excel, any task with zero duration in Project appears as a milestone automatically. A milestone is a reference point marking a major event in a project, used to monitor the project’s progress. By default, milestones appear as diamonds on the Gantt chart, as shown in Figure 2 above, at the end of each phase (summary task). There are many different models and methods for estimating duration, but none is entirely accurate. In Excel, it would be necessary to build formulas to see a project’s total duration or the total duration per phase or major pieces. Using Project, a user can establish a base calendar and estimate each task by entering its duration in the task column. In turn, Project will total the project and phase duration without having to build in formulas.
In Project it’s possible to easily create task dependencies, which are also referred to as activity relationships or task connections. Types of dependencies, as shown in Figure 3, include sequential (finish to start), concurrent and overlapping. Once the task relationships are established in conjunction with duration estimates, Project automatically calculates your schedule. Furthermore it establishes a dynamic schedule that can be recalculated automatically as you modify your plan.

One extraordinary new tool in Project is “Show Change Highlighting,” which will highlight the impact of making a change throughout the entire plan so you can decide whether to keep or undo the change. It will also calculate the critical path, which can be easily viewed through filters, highlights, groups or formatting. In Excel this would involve many separate and complicated calculations to determine the overall schedule of a critical path.
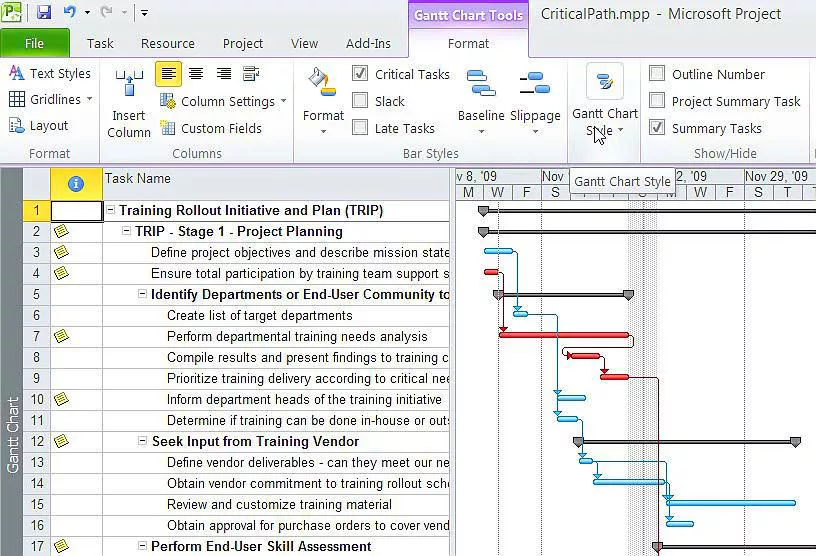
What is a critical path? It’s the set of tasks that affects the overall end date. In any single-project network, one sequence of tasks fixes the duration of the project. Any slippage or failure to begin a task on time that is on the critical path will cause the project to finish later than planned. The critical path is illustrated in Figure 4 below using the red highlights and the red Gantt bars.
Project allows users to manage cost and resources by defining local project resources and the respective related information in a separate view or window. In turn, the Project Resource Assignment Tool is used to add resources to tasks, including multiple resources to a single task or multiple resources to multiple tasks. This is a cumbersome process in Excel involving creating and linking worksheets.
Communicating from the Project Schedule
Project has capabilities and features beyond those available in Excel. Those features can be used to present project data to different stakeholders according to their requirements. It’s easy to keep stakeholders informed using these Project capabilities:
- Using appropriate views to keep different stakeholders informed.
- Controlling the information to present with predefined tables.
- Focusing on the specific information using filters.
- Grouping information for effective communication and decision making.
- Highlighting cells to convey a different meaning.
- Analyzing and reporting project data in professional reports and charts.
Using Excel, it would take numerous steps to generate the views that are a click away in Project. There are many built-in views in Project and it’s possible to create custom views as well. Some of the views include:
Gantt Chart. Shows activity/task start and end dates as well as expected durations. The Gantt chart is the default display and principle report format in Project.
The Network View. Shows the task boxes. Where nested, they indicate the hierarchy of tasks to clarify dependencies between tasks.
The Calendar View. Displays project tasks in a calendar format. A task bar representing a task spans the days or weeks on which the task is scheduled.
Project also includes many built-in resource views. The resource usage view shows the tasks and their timing per resource. The resource histograms show resource utilization data. It would be possible but laborious to create these views in Excel.
The Visual Reports feature leverages charts and diagrams by using Excel and Microsoft Office Visio Professional to produce charts, graphs and diagrams based on Project data. A user can define custom report templates or choose from a list of customizable, ready-to-use report templates. Reports can be shared with other Project users. Tables and filters can be applied to further control the data that is communicated to different stakeholders. Filters provide an easy way to zero in and focus on a set of tasks for more effective communication. Instead of filtering tasks or in conjunction with filtering tasks, grouping tasks makes it easy to reorganize information to enhance your ability to analyze or communicate information. Project has a set of predefined views, tables, filters, groups and reports specifically designed for project managers to become more productive immediately without having to spend extra time formatting or customizing — which is exactly what a user would need to do using Excel.
Tracking and Analyzing the Project Schedule
Project can also be used to track and analyze progress of projects. Within Project, once an optimized schedule has been approved, it’s possible to save a copy of the original plan by setting a baseline. In Excel, this would require manually populating additional baseline columns. With Project, once the baseline is set, the project constraints are managed by comparing the evolving plan with the saved baseline. Managers can then track progress, identify problems and take corrective action using the built-in tools already in Project.
For example, a project manager can easily update a task using the Update Tasks dialog box. The results can then be analyzed in the tracking Gantt view which is already customized for tracking purposes. This view shows both baseline Gantt bars in gray and the current plan bars in red for critical path task and in blue for non-critical. These tools are presented in Project so new users can take advantage of them quickly and easily while providing advanced users the ability to go deeper when necessary. In comparison to Excel, no such tools exist to manage project information in this way, and it would be quite laborious to customize and format it with no guarantee of success.
Gaining a Work Edge
Understanding when to shift to Microsoft Office Project and using the right tool gives those put in charge of managing a project a distinct advantage. Managing project information such as scope (phases, tasks and milestones), time (schedules, deadlines and critical path), resources (assignments, effort, costs) and the need to communicate that information effectively are all indicators of when to use Project. This advantage continues throughout a project life cycle as Project makes it easy not just to plan, but to communicate, track and analyze project data. Project is the best tool to help manage projects because it’s specifically designed for this purpose with tools that offer immediate gains in productivity.
Импорт данных Excel в Project
Классический клиент Project Online Project профессиональный 2021 Project стандартный 2021 Project профессиональный 2019 Project стандартный 2019 Project профессиональный 2016 Project стандартный 2016 Project профессиональный 2013 Project стандартный 2013 Project 2010 Project стандартный 2010 Еще…Меньше
Если вы начали работу над проектом в Excel, но затем вам потребовались инструменты для управления более сложными расписаниями, общим доступом к ресурсам и отслеживанием, возможно, пора перенести данные в Project. Это можно сделать с помощью мастера импорта проекта. Просто выполните действия по импорту данных в новый или уже существующий проект, и мастер автоматически разместит их в соответствующие поля в Project.
-
В Project выберите команды Файл > Создать.
-
На странице Создать выберите команду Добавить из книги Excel.

-
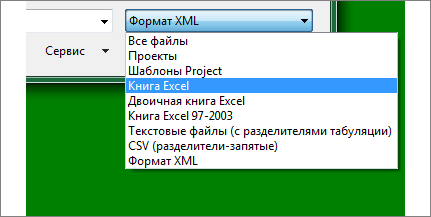
В поле Открыть щелкните стрелку рядом с элементом Формат XML и выберите пункт Книга Excel или Книга Excel 97-2003 (если данные проект сохранены в формате более ранней версии приложения).
-
Найдите и выберите книгу, которую вы хотите импортировать, и нажмите кнопку Открыть.
-
В окне мастера импорта нажмите кнопку Далее, чтобы начать импорт, а затем следуйте указаниям, чтобы завершить операцию импорта.
-
Действие 2. Создайте схему с нуля или выберите готовую схему, соответствующую имеющимся у вас данным, и нажмите кнопку Далее.
-
Действие 3. Импортируйте данные в новый или открытый проект и нажмите кнопку Далее.
-
Действие 4. Выберите тип сведений, которые вы импортируете, чтобы мастер мог правильно разместить данные из Excel в Project, и нажмите кнопку Далее.
-
Действие 5. Проверьте сопоставленные поля, внесите при необходимости изменения и нажмите кнопку Далее.
-
Последнее действие. Щелкните Сохранить схему, если вы хотите использовать ее повторно, и нажмите кнопку Готово.
-
Дополнительные сведения об импорте и экспорте данных проекта
-
Если вы часто начинаете создавать проекты в Excel, воспользуйтесь одним из имеющихся в приложении шаблонов проекта. Они разработаны с использованием соответствующих полей, что упрощает сопоставление данных при последующем экспорте проекта из Excel в Project. В Excel выберите команды Файл > Создать, а затем выберите нужный шаблон проекта, например, Список задач Microsoft Project.
-
Вы также можете экспортировать данные из Project в Excel для анализа данных и создания визуальных отчетов.
Нужна дополнительная помощь?
Список курсов/Материалы темы «Управление интеграцией»
Видео материала «Установка связей между MS Excel и MS Project Pro»
Ниже приведенная информация является справочным материалом. Подробнее о данном материале и его практическом применении вы можете узнать, просмотрев видео.
Содержание:
- Использование фиксированных таблиц в MS Power BI
Использование фиксированных таблиц в MS Power BI
В MS Project Pro Вы можете обновлять данные на основании справочников что храниться в файле MS Excel. Для этого необходимо:
- Создайте файл MS Excel, где будет храниться справочная информация.
- Выделите ячейку значения, которой должен быть передан в MS Project Pro.
- Открываем проект в MS Project Pro и становимся на ячейку в которую хотим передать данные.
- Нажимаем контекстное меню и выбираем пункт «Специальная вставка«.
- В открывшемся окне «Специальная вставка» устанавливаем пункт «Связать:» и выбираем пункт «Текстовые данные«.
- Нажимаем кнопку «Ок«.

При изменении данных в таблице MS Excel будут меняться связанные поля в плане-графике MS Project Pro. При установке значений полей справочника учитывайте тип поля который будет передаваться в план-график MS Project Pro.
Есть ряд особенности работы со ссылками:
- При редактировании значений в поле со связью в MS Project Pro связь будет удалена.
- При перепланировании связанных полей в плане-графике значения будут меняться. В результате значения в плане-графике и в справочнике будут отличатся.
- При открытии плана-графика со связями MS Project Pro предлагается запрос на обновление связей.
- Файл справочника в MS Excel необходимо разместить на дисках со свободным доступом пользователя плана-графика в MS Project Pro.

Вас могут заинтересовать следующие материалы
 |
Календарь проекта в MS Project Pro | |
|---|---|---|
| Установка и настройка календарей проектов и календарей системы. | ||
|
01.11.2022 |
15768 |


| |
Корпоративные календари в MS Project Online | |
|---|---|---|
| Установка и настройка календарей проектов и календарей системы | ||
|
20.05.2020 |
1749 |
| |
Дополнительные параметры сервера MS Project Online | |
|---|---|---|
| Описание особенностей настройки системы управления проектами MS Project Online | ||
|
20.05.2020 |
1295 |
Связь с другими программами
При
работе с планом проекта может оказаться,
что средств программы Microsoft
Project
вам недостаточно. Например, вам потребуется
произвести вычисления с данными проекта
и построить различные графики. С другой
стороны, может возникнуть
ситуация, когда у заказчика или участника
проекта отсутствует Microsoft
Project.
В
этой главе вы узнаете о связи Microsoft
Project
с другими программами. Обмениваясь
данными с программой Microsoft
Excel
[Майкрософт Эксел], вы можете выполнить
сложные расчеты с данными проекта,
создать разнообразные диаграммы, а
также включить электронную таблицу в
план проекта.
Если
ваш план проекта получился достаточно
большим, может оказаться удобней
работать с данными проекта, используя
базу данных программы Microsoft
Access
[Майкрософт Эксес]. Эту программу также
удобно использовать для пополнения
существующей базы данных информацией
из проекта и, наоборот, для включения
базы данных в план.
Импортировав
план проекта в программу Microsoft
Outlook
[Майкрософт Аутлук], можно
создать механизм напоминания сотрудникам
о необходимости выполнения
определенной работы в заданное время.
Если вы создали в Microsoft
Outlook
список
людей, его можно включить в проект как
дополнительные ресурсы.
Если
экспортировать план проекта в Web-формат
и разместить его на сайте, то с
планом сразу могут познакомиться другие
участники и заказчик, что существенно
повысит эффективность совместной работы
над проектом.
Если
вы экспортируете диаграмму из плана
проекта в изображение, то потом в
графическом редакторе будет возможность
внести изменения или просмотреть
рисунок.
Интеграция с программой Microsoft Excel
При
создании проекта может оказаться, что
у некоторых участников проекта установлена
только программа Microsoft
Excel.
В этом случае следует воспользоваться
возможностью интеграции программ
Microsoft
Project
и Microsoft
Excel.
Кроме того, Microsoft
Excel
полезно использовать для выполнения
сложных расчетов
с данными проекта, создания разнообразных
диаграмм. В этом разделе вы рассмотрите
интеграцию с программой Microsoft
Office
Excel
2003, т.е. узнаем, как
копировать электронную таблицу в план
проекта, перемещать диаграмму Ганта
в документ Microsoft
Excel,
импортировать и экспортировать план
проекта.
Сначала
скопируем ячейки электронной таблицы
в план проекта.
-
Нажмите
кнопку Пуск
(Start)
на Панели
задач (Taskbar)
операционной системы
Windows.
На экране появится основное меню. -
Выберите
команду Все
программы ♦ Microsoft
Office
♦ Microsoft
Office
Excel
2003 (All
Programs
♦ Microsoft
Office
♦ Microsoft
Office
Excel
2003) из основного
меню. На экране появится рабочее окно
программы Microsoft
Excel
(Рис.
7.1).

Рис.
7.1. Рабочее окно программы Microsoft
Excel
-
Нажмите
комбинацию клавиш Alt+F1.
чтобы закрыть Область
задач (Task
Рапе)
в правой части рабочего окна программы
Microsoft
Excel
(Рис. 7.2). -
В
ячейку А1 введите слово Microsoft.
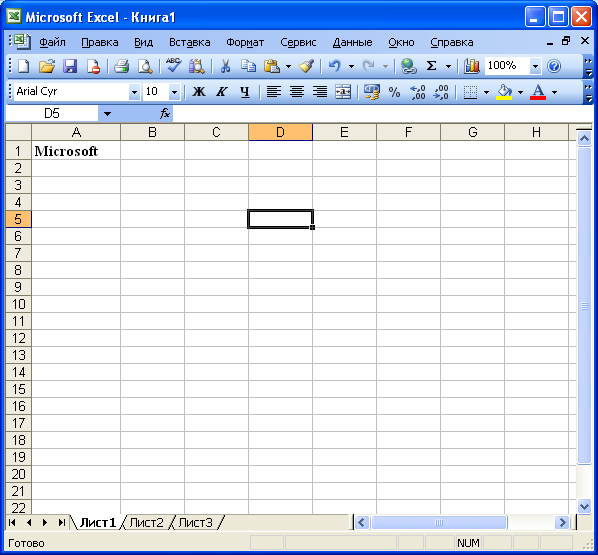
Рис.
7.2. Область задач (Task
Pane)
скрыта
-
В
ячейку А2 введите слово Project
(Рис. 7.3).

Рис.
7.3. Заполненные ячейки
-
Установите
указатель мыши на ячейку А1. -
Нажмите
и удерживайте левую кнопку мыши. -
Не
отпуская левую кнопку мыши, переместите
мышь к ячейке А2. -
Отпустите
левую кнопку мыши. Диапазон ячеек А1
:А2 будет выделен. -
Нажмите
кнопку копировать
на панели инструментов Стандартная
(Standard).
Выделенный
диапазон ячеек будет скопирован в буфер
обмена. -
Щелкните
мышью на кнопке с программой Microsoft
Project
на Панели
задач (Taskbar)
для перехода к данной программе. -
Нажмите
кнопку создания нового документа на
панели инструментов Стандартная
(Standard),
чтобы открыть
новый документ. -
Щелкните
мышью на первой ячейке столбца Название
задачи (Task
Name). -
Нажмите
кнопку вставить
на панели инструментов Стандартная
(Standard).
В окне программы
Microsoft
Project
появится список задач (Рис. 7.4).
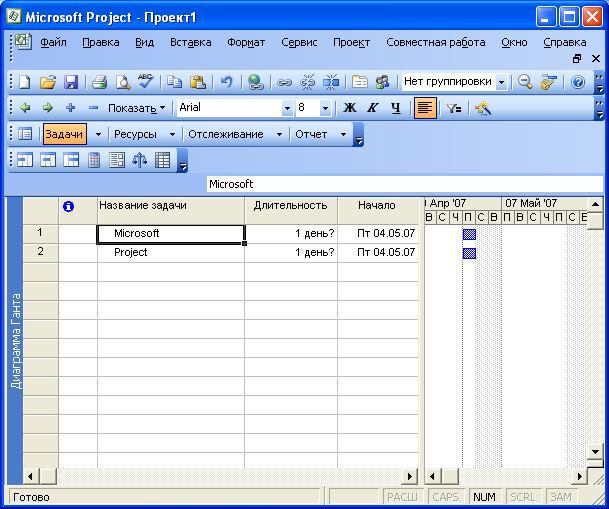
Рис.
7.4. Вставленные данные из электронной
таблицы
Иными
словами, программа Microsoft
Project
интерпретировала вставленные из
электронной
таблицы данные как список задач.
-
Выберите
команду меню Файл
♦ Закрыть (File
♦ Close).
На экране появится диалог
с вопросом о сохранении документа (Рис.
7.5).
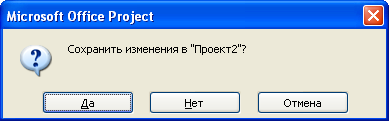
Рис.
7.5. Диалог с вопросом о сохранении
документа
-
Нажмите
кнопку Нет
(No),
чтобы закрыть диалог и не сохранять
документ.
Теперь
скопируем диаграмму Ганта в программу
Microsoft
Excel.
-
Выберите
команду меню Вид
♦ Диаграмма Ганта (View
♦ Gantt
Chart)
для перехода
к диаграмме Ганта в нашем плане проекта. -
Перетащите
мышью полоску, разделяющую список задач
и диаграмму Ганта, в крайнее левое
положение, чтобы весь экран занимала
диаграмма (Рис. 7.6).

Рис.
7.6. Диаграмма Ганта
-
Выберите
команду меню Правка
♦ Копировать рисунок (Edit
♦
Сору
Picture).
На экране появится диалог Копирование
рисунка (Copy
Picture)
(Рис.
7.7).
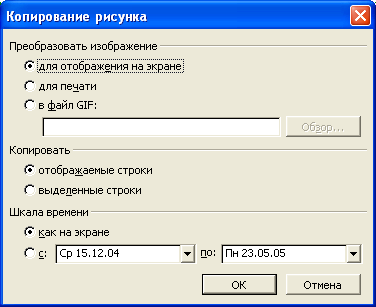
Рис.
7.7. Диалог Копирование
рисунка (Copy
Picture)
-
Если
в группе элементов управления
Преобразовать
изображение (Render
image)
не установлен переключатель для
отображения на экране (For
screen),
то установите его, чтобы скопировать
рисунок в буфер обмена. -
Убедитесь,
что в группе Копировать
(Сору)
установлен переключатель отображаемые
строки (Rows
on
screen)
для копирования всего содержимого
рабочего
окна программы. -
Если
в группе Шкала
времени (Timescale)
не установлен переключатель как
на
экране (As
shown
on
screen),
то установите его, чтобы при копировании
сохранить
шкалу времени неизменной. -
Нажмите
кнопку ОК, чтобы закрыть диалог
Копирование
рисунка (Сору
Picture).
Диаграмма Ганта будет скопирована в
буфер обмена. -
С
помощью мыши верните полоску, разделяющую
список задач и диаграмму Ганта,
в прежнее центральное положение. -
Щелкните
мышью на кнопке с программой Microsoft
Excel
на Панели
задач (Taskbar)
для перехода к данной программе. -
Щелкните
мышью на ячейке A3. -
Выберите
команду меню Правка
♦ Вставить (Edit
♦ Insert).
В электронную таблицу
будет вставлена диаграмма Ганта (Рис.
7.8).
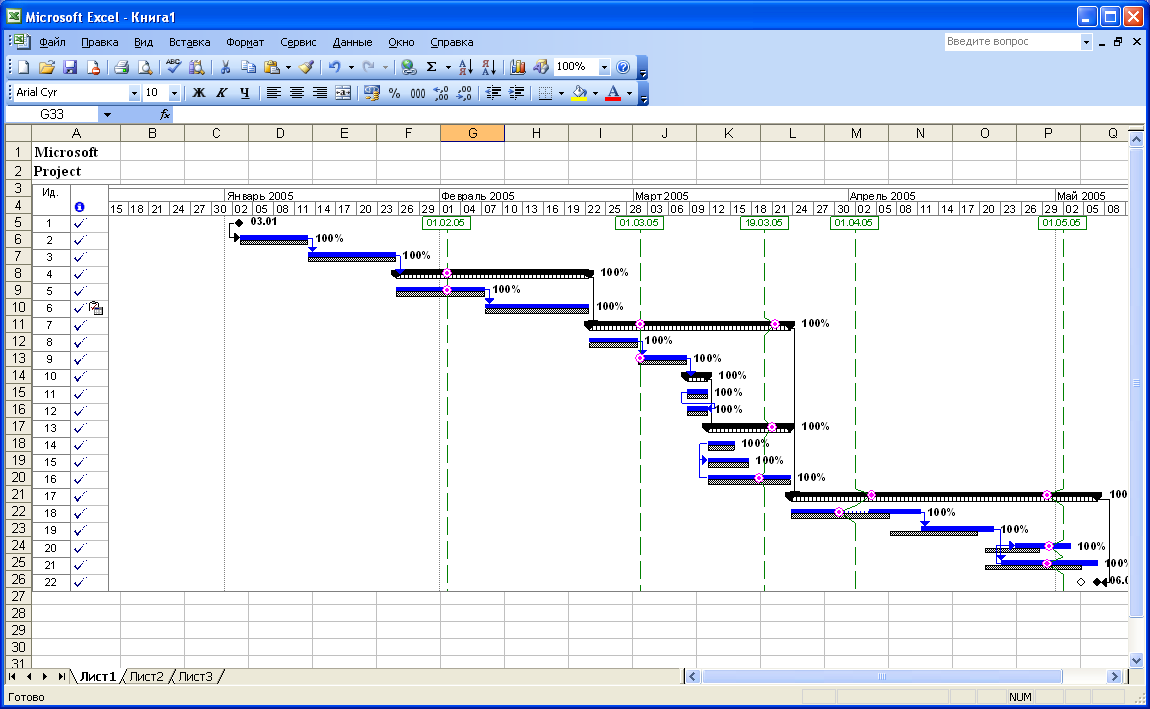
Рис.
7.8.
Диаграмма
Ганта в Excel
Сейчас
импортируем план проекта из Microsoft
Excel
в Microsoft
Project.
-
Нажмите
кнопку создания нового документа на
панели инструментов Стандартная
(Standard),
чтобы открыть новый документ в Microsoft
Excel. -
Если
в рабочем окне программы Microsoft
Excel
отсутствует панель Область
задач
(Task
Pane),
то выберите команду меню Вид
♦ Панели инструментов ♦ Область
задач (View
♦ Toolbars
♦ Task
Pane).
В правой части рабочего окна программы
Microsoft
Excel
появится панель Область
задач (Task
Pane)
(Рис. 7.1). -
Из
открывающегося списка в верхней части
Области
задач (Task
Pane)
выберите
Создание
книги (New
Workbook).
Вид панели Область
задач (Task
Pane)
изменится (Рис. 7.9).
Рис.
7.9. Панель Создание
книги (New
Workbook)
-
В
разделе Шаблоны
(Templates)
на панели Создание
книги (New
Workbook)
щелкните
мышью на ссылке На
моем компьютере (On
my
computer),
чтобы открыть
диалог Шаблоны
(Templates). -
Выберите
вкладку Решения
(Spreadsheet
Solutions) (Рис.
7.10).
Р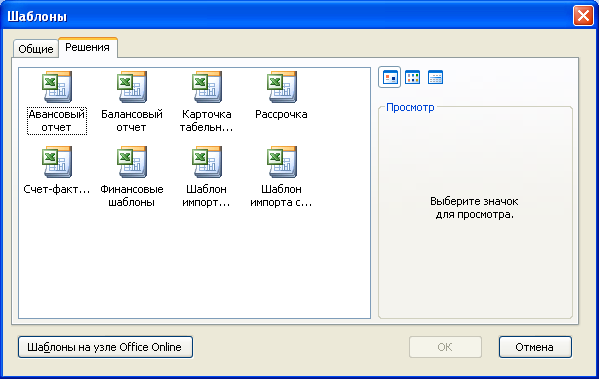 ис.
ис.
7.10. Вкладка
Решения
(Spreadsheet
Solutions) диалога
Шаблоны
(Templates)
-
Щелкните
мышью на значке с надписью Шаблон
импорта
списка
задач
Microsoft
Project (Microsoft
Project Task List Import Template). -
Нажмите
кнопку OK,
чтобы закрыть диалог Шаблоны
(Templates). -
В
окне программы Microsoft
Excel
выберите лист Таблица_задач
(TaskJTable)
(Рис. 7.11).
Р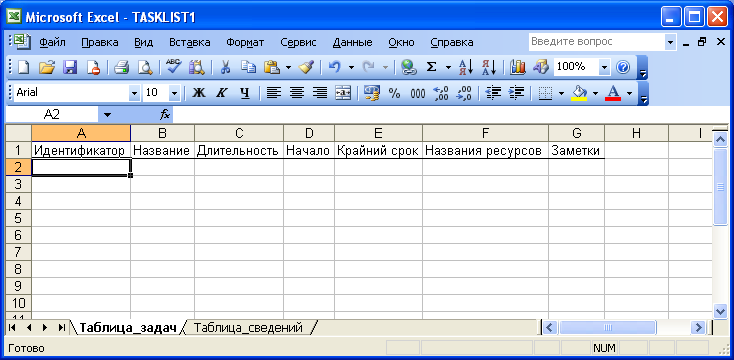 ис.
ис.
7.11. Шаблон для списка задач
Обратите
внимание, что названия столбцов шаблона
практически совпадают с названиями
полей списка задач Microsoft
Project.
-
В
ячейку А2 введите номер задачи 1.
-
В
ячейку В2 введите название работы
Обустройство
двора. -
В
ячейку С2 введите длительность задачи
5
дней (5
days). -
Выберите
команду меню Файл
♦ Сохранить как (File
♦ Save
As).
На экране появится
диалог Сохранение
документа (Save
As)
(Рис. 7.12).
Рис.
7.12. Диалог Сохранение
документа
(Save
As)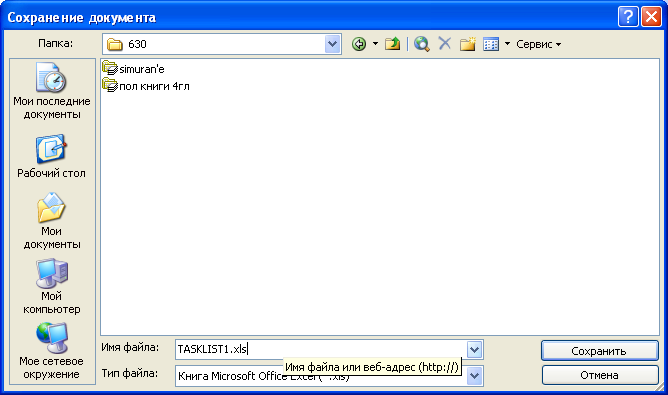
-
В
открывающемся списке Папка
(Save
in)
выберите диск для документа. -
В
списке файлов и каталогов выберите
папку, в которой будет сохранен документ. -
Убедитесь,
что в открывающемся списке Тип
файла (Save
as
type)
выбрана строка
Книга
Microsoft
Office
Excel
(Microsoft
Office
Excel
Workbook)
для сохранения
документа в виде электронной таблицы. -
В
поле ввода Имя
файла (File
name)
введите имя создаваемого файла
Импорт-таблица.
Расширение
.xls
будет
присвоено имени файла автоматически. -
Нажмите
кнопку Сохранить
(Save),
чтобы закрыть диалог Сохранение
документа
(Save
As).
Документ будет сохранен на диске. -
Щелкните
мышью на кнопке с программой Microsoft
Project
на Панели
задач (Taskbar)
для перехода к данной программе. -
Нажмите
кнопку Открыть на панели инструментов
Стандартная
(Standard).
На экране
появится диалог Открытие
документа (Open)
(Рис. 7.13).
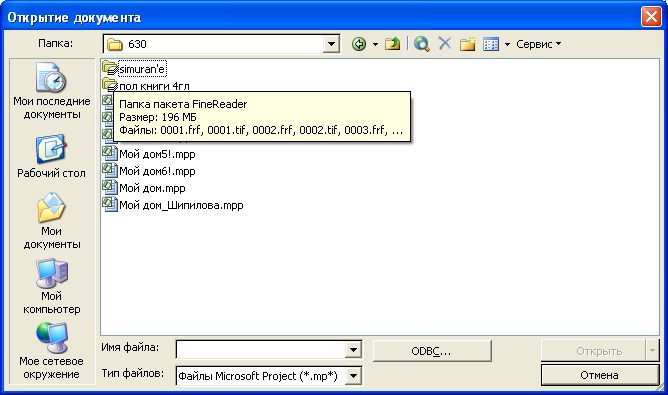
Рис.
7.13. Диалог Открытие
документа (Open)
-
В
открывающемся списке Папка
(Look
in)
выберите диск, на котором хранится
документ Импорт-таблица. -
В
списке файлов и каталогов выберите
папку с документом. -
В
открывающемся списке Тип
файла (File
of
type)
выберите строку Книги
Microsoft
Excel
(Microsoft
Excel
Workbooks)
для загрузки электронной таблицы. -
Щелкните
мышью на имени файла Импорт-таблица
в
списке каталогов. -
Нажмите
кнопку Открыть
(Open).
Диалог Открытие
документа (Open)
будет закрыт,
а на экране появится первый диалог
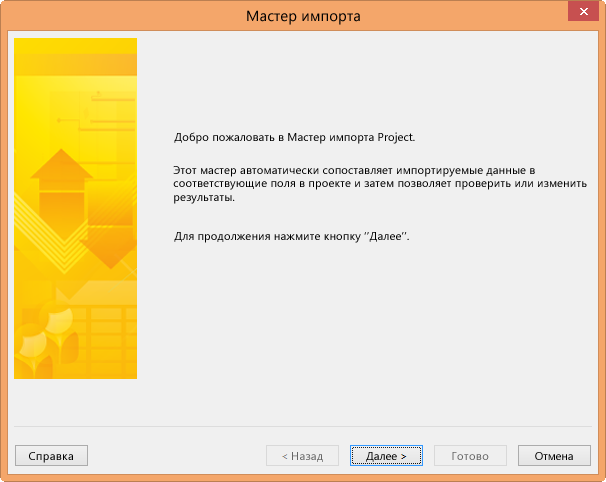
мастера импорта (Рис. 7.14).

Рис.
7.14. Первый диалог мастера импорта
-
Нажмите
кнопку Далее
(Next).
На экране появится второй диалог мастера
импорта
(Рис. 7.15). В английской версии программы
этому диалогу предшествует диалог
выбора формата данных.
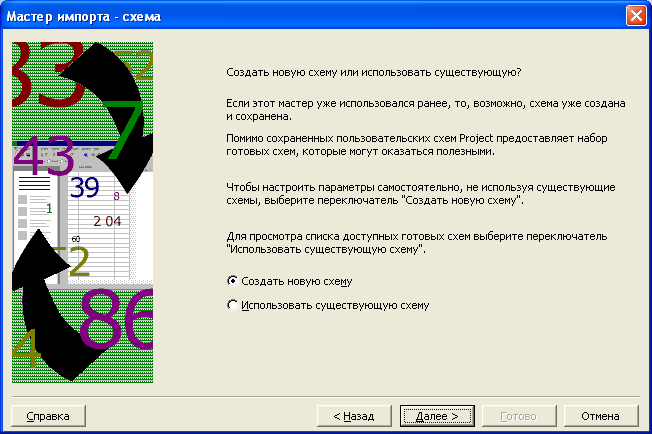
Рис.
7.15. Второй диалог мастера импорта
-
Установите
переключатель Создать
новую схему (New
map)
для создания новой
схемы импорта. -
Нажмите
кнопку Далее
(Next).
На экране появится третий диалог мастера
импорта
(Рис. 7.16).
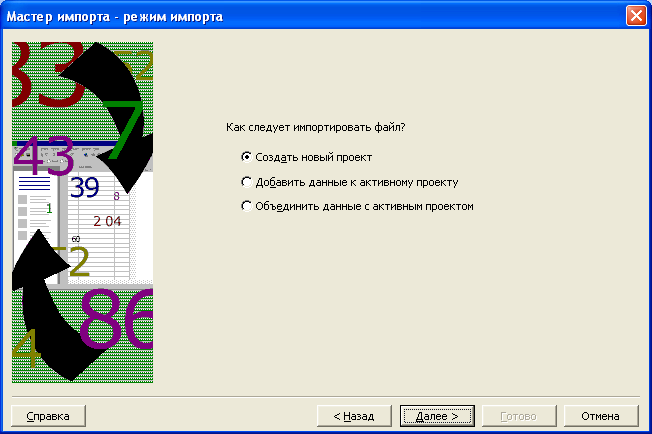
Рис.
7.16. Третий диалог мастера импорта
-
Если
не установлен переключатель Создать
новый проект (As
a
new
project),
то установите его, чтобы при импорте
документа был создан новый проект. -
Нажмите
кнопку Далее
(Next).
На экране появится четвертый диалог
мастера импорта (Рис. 7.17).
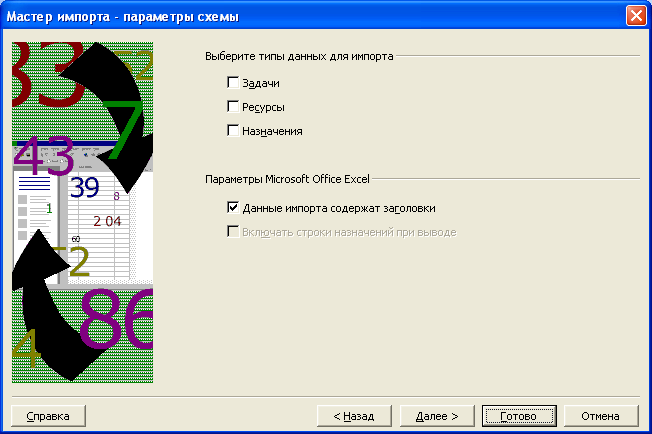
Рис.
7.17. Четвертый диалог мастера импорта
-
В
группе элементов управления Выберите
тип данных для импорта (Select
the
types
of
data
you
want
to
import)
установите флажок Задачи
(Tasks)
для импорта
задач. -
Нажмите
кнопку Далее
(Next).
На экране появится пятый диалог мастера
импорта (Рис. 7.18).

Рис.
7.18. Пятый диалог мастера импорта
В
столбцах Из:
поле Excel
(From:
Excel
Fields)
и В:
поле Microsoft
Project
(To:
Microsoft
Office
Project
Field)
центральной таблицы диалога отображаются
названия
полей программ Microsoft
Excel
и Microsoft
Project,
которые будут соответствовать
друг другу при импорте. Эти поля можно
изменить, но предлагаемый
по умолчанию вариант является приемлемым.
-
Нажмите
кнопку Далее
(Next).
На экране появится последний диалог
мастера импорта (Рис. 7.19).
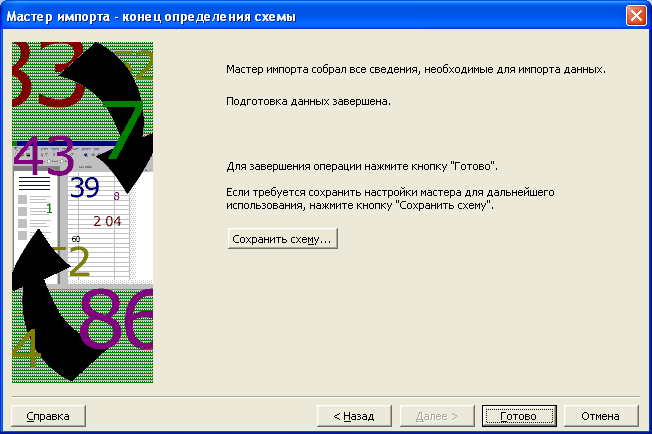
Рис.
7.19. Последний диалог мастера импорта
-
Нажмите
кнопку Готово
(Finish),
чтобы завершить работу мастера импорта.
В
окне программы Microsoft
Project
появится импортированный план проекта
(Рис. 7.20).

Рис.
7.20. Импортированный план проекта
-
Выберите
команду меню Файл
♦ Закрыть (File
♦ Close).
На экране появится диалог с предложением
сохранить документ (Рис. 7.21).
Рис.
7.21. Диалог с предложением сохранить
документ
-
Нажмите
кнопку Нет
(No),
чтобы отказаться от сохранения
импортированного документа на диске.
Диалог закроется, а в окне программы
снова появится план
проекта строительства дома.
Давайте
экспортируем план проекта из программы
Microsoft
Project
в Microsoft
Excel.
-
В
Microsoft
Project
выберите команду меню Файл
♦ Сохранить как (File
♦Save
As).
На экране появится диалог Сохранение
документа (Save
As)
(Рис.
7.22).

Рис.
7.22.
Диалог
Сохранение
документа (Save
As)
-
В
открывающемся списке Папка
(Save
in)
выберите диск для документа. -
В
списке файлов и каталогов выберите
папку, в которой будет сохранен документ. -
В
открывающемся списке Тип
файла (Save
as
type)
выберите строку Книга
Microsoft
Excel
(Microsoft
Excel
Workbook)
для экспорта документа в электронную
таблицу. -
В
поле ввода Имя
файла (File
name)
введите имя создаваемого файла
Экспорт-
таблица.
Расширение
.xls
будет
присвоено имени файла автоматически. -
Нажмите
кнопку Сохранить
(Save),
чтобы закрыть диалог Сохранение
документа
(Save
As).
На экране появится первый диалог мастера
экспорта (Рис. 7.23).
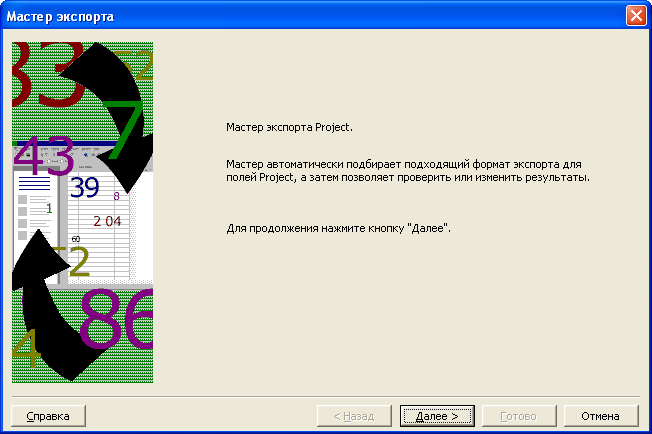
Рис.
7.23.Первый диалог мастера экспорта
-
Нажмите
кнопку Далее
(Next).
На экране появится второй диалог мастера
экспорта
(Рис. 7.24).

Рис.
7.24. Второй диалог мастера экспорта
-
Установите
переключатель Шаблон
проекта (Excel)
(Project
Excel
Template),
чтобы
использовать шаблон проекта программы
Microsoft
Excel
при экспорте. -
Нажмите
кнопку Готово
(Finish)
для завершения работы мастера экспорта. -
Щелкните
мышью на кнопке с программой Microsoft
Excel
на Панели
задач (Taskbar)
для перехода к данной программе. -
Нажмите
кнопку Открыть
на панели инструментов Стандартная
(Standard).
На
экране появится диалог Открытие
документа (Open)
(Рис. 7.25).
Рис.
7.25. Диалог Открытие
документа (Open)
-
В
открывающемся списке Папка
(Look
in)
выберите диск, на котором хранится
документ Экпорт-таблица. -
В
списке файлов и каталогов выберите
папку с документом. -
Щелкните
мышью на имени файла Экпорт-таблица
в
списке файлов и каталогов. -
Нажмите
кнопку Открыть
(Open).
Диалог Открытие
документа (Open)
будет закрыт,
а в окне программы Microsoft
Excel
на листе Таблица_задач
(Task_Table)
появится экспортированный из Microsoft
Project
список задач плана
проекта (Рис. 7.26).
Обратите
внимание, что формат представления
экспортированного плана проекта похож
на исходный вариант плана в Microsoft
Project.
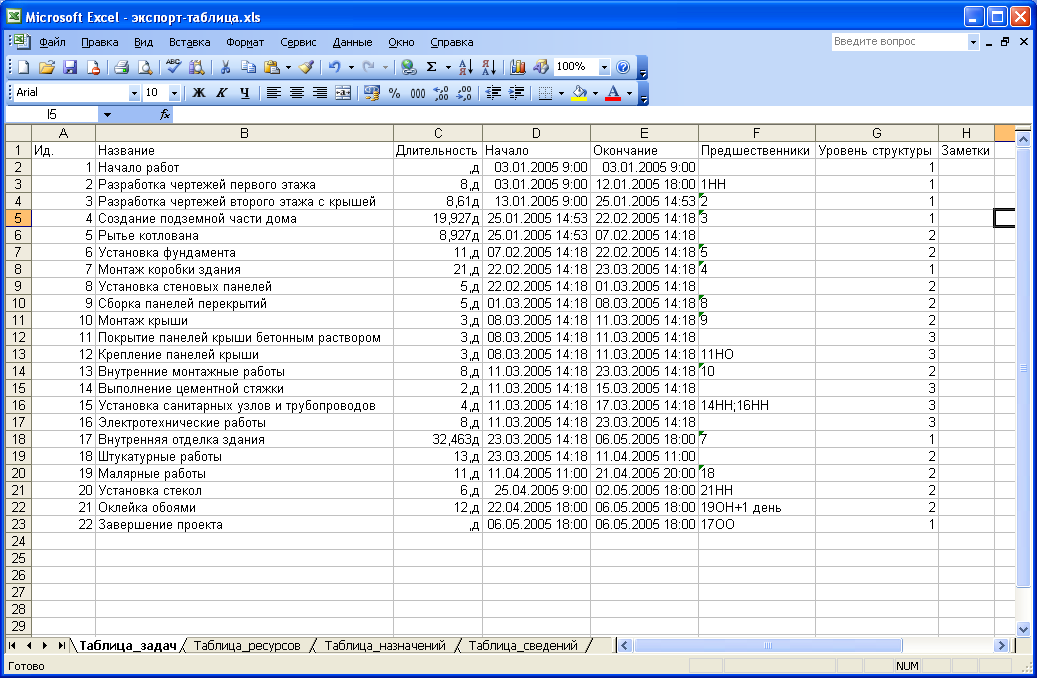
Рис.
7.26. Экспортированный в Microsoft
Excel
список задач
-
Щелкните
мышью на ярлыке листа Таблица_ресурсов
(Resource_Table).
В
окне программы появится экспортированный
из Microsoft
Project
список ресурсов
плана проекта (Рис. 7.27).

Рис.
7.27. Экспортированный в Microsoft
Excel
список ресурсов
-
В
Microsoft
Excel
выберите команду меню Файл
♦ Выход (File
♦ Exit).
На экране
появится диалог с предложением сохранить
документ (Рис. 7.28).
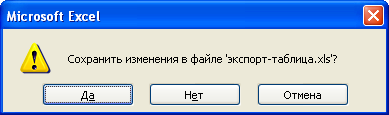
Рис.
7.28. Диалог с предложением сохранить
документ
-
Нажмите
кнопку Нет
(No),
чтобы отказаться от сохранения
экспортированного
документа на диске. Диалог закроется,
и работа программы Microsoft
Excel
будет завершена.
Следует
отметить, что вы можете экспортировать
в Microsoft
Excel
часть
созданного плана, а также использовать
импортированные из Excel
данные для добавления в существующий
план.
Соседние файлы в папке лабы Project
- #
- #
- #
- #
- #
- #
- #
- #
Imagine you’re having your dream house built and you’re very excited to see how far along the builders have come so you decide to check on the progress. You arrive onsite, two weeks into the project, and you see a bunch of people busily working. You ask the foreman how things are going he responds “great”, when you ask to see his blueprint he responds “I don’t have the blueprint…”
If your anything like me you would immediately think that this situation is crazy, this would never happen and every layman knows a blueprint or some type of drawings are imperative for success.
I believe that within the next 5 years it will be considered just as ludacris for a Project Manager to manage a project without using some sort of scheduling software.
In my five years of Project Management and scheduling experience I have come to realize a few things in this industry. There are a lot of seasoned Project Managers out there that are not using scheduling software and most of them are convinced that excel is the best tool to use. This blog aims to dispel this myth.
Project Planning an Schedule in Excel
Imagine this basic schedule below, this is similar to what I have seen people do within Microsoft Excel.
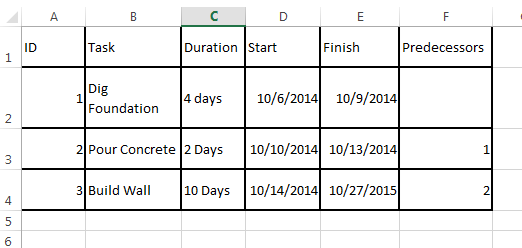
It looks great, however it took me a lot of work. I had to manually enter all durations and dates while double checking that not of these tasks were scheduled over a weekend or holiday. I made a few mistakes when creating the schedule; I calculated the ‘Dig Foundation’ to finish on 10/9 and that ‘Pour Concrete’ would start on 10/9. (it should has started on the next working day), I updated the finish date of ‘Pour Concrete’ to be 10/13, I then had to correct start date and finish date of ‘Build Wall’ as a result of this mistake. There were only 3 tasks in the schedule but it was very annoying and hard to accurate.
Updating the Schedule in Excel
It is now time to update the schedule; the ‘Dig Foundation’ task has been extended to 6 days due to unforeseen circumstances. I need to update the following: (marked below in red) the duration of ‘Dig Foundation’, the finish date of ‘Dig Foundation’, the start date and finish date of ‘Pour Concrete’ and ‘Build Wall’, that’s 6 updates which resulted from one small change in the project schedule. It took me a while to work out the dates for ‘Dig Foundation’ because when it changed from 4 days to 8 days (in terms of elapsed duration) the task was then scheduled over the weekend which is nonworking so I had to take that into account. furthermore; the ‘Pour Concrete’ task is no longer scheduled over the weekend so the dates need to be calculated again, this is another manual calculation that I needed to make.
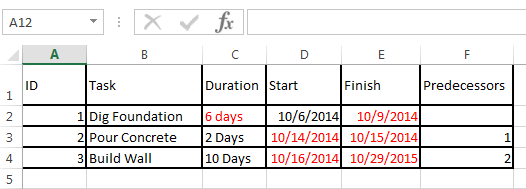
As you can see, this process is administrative nightmare even for this three line schedule. For this reason any educated Project Manager would not update this schedule, they simply wouldn’t have the time and this is why excel schedules are seldom updated.
Let’s now try the same thing in Microsoft Project
Planning in Microsoft Project
The first thing I did was set the project start date to be Monday of this week 10/6/14. I then typed in the task tames, input the duration of each task and added the predecessors.
Microsoft Project has calculated all the dates for me, as shown below.

Updating the Schedule in Microsoft Project
I’m going to use the same example as above so I need to update the ‘Dig Foundation’ task to 6 days.
I updated the duration for ‘Dig Foundation’ to be 6 days and Microsoft Project then calculates all of the dates. (No more manual calculations!)

If that wasn’t enough, you will notice above that Microsoft Project has highlighted all the dates that I had to change in blue. It has also generated a Gantt chart and will calculate the critical path for you. Those a just a few of the many benefits that scheduling with Microsoft Project gives you.
So what can be taken from this blog; if you use Excel to manage your project and something goes wrong you will have no idea what the residual effects of that change on the entire project are.
By using Microsoft project, when things change in your schedule you will be able to update your schedule and it will instantly display all affected dates. This will enable the project manager to make better informed decisions as to what corrective action to take and thus have a more effective and up to date project schedule.
Thanks for reading! Please check out our other blogs.
Feel free to reach out to me on LinkedIn or Twitter.
- Download demo project — 33 Kb
- Download source — 7 Kb
Introduction
Microsoft Project files contain much information that is needed for project reports, but
the Project application does not contain all data that is needed for projects reports, such as
an open item list, weekly summary, etc. Through .NET Interoperability, the data from the
Microsoft Project file can be exported to other formats and combined with other data to generated comprehensive
project reports. For this example I am concentrating on
demonstrating how to export the data from the Microsoft Project not how to use the data, thus I am
creating a simple Excel file that summarizes the project’s activities for the current week, displays the
tasks that are late, and displays the tasks that will be starting.
For a more detailed discussion on project reporting, refer to the discussion at the end of this article.
Background
This article uses the .NET Interop functionality and the Excel XML format. Though these technologies are
used, this article does not go into detail explaining these technologies as there are many other articles
that do that. This article focuses on exporting the Microsoft Project data.
Using the code
The MainForm class is the application and a good place to start a top down evaluation of the
code. The MainForm class does not contain any functon other that being a GUI. All the functionality
is contained in the Project class and the Task class.
The Task class contains the work breakdown structure id, the name, the start data, and the finish date
of the Microsoft Project task. The Microsoft Project task object contains tons more data, but for this example,
these pieces are all that we are interested in. The Task class was created for two reasons: (1) I wanted
to extract the data from the Microsoft Project file as fast as possible so that I can close it, thus I needed
to copy the data into my own class, and (2) per proper OO design, I wanted the task to be able to format its own
data for the Excel XML. The Task class is basically a data storage class—it does not manipulate
the data. The only item to note about the Task class is that for Excel XML, the DateTime
must be formatted as YYYY-MM-DDThh.mm.ss.mmmm and this is handled through the StartDateExcelFormat and
FinishDateExcelFormat properties.
The use of the Task class is very simple. The Project class just calls the constructor
passing the Microsoft Project task object, uses the StartData and FinishDate properties
to determine if the task is current, late, or future, and uses the ToXml method to generate the
Excel XML.
The Project class is the work horse class—this class is the key to the application, but again
it was designed for easy use in that the MainForm class, which only uses three Project
class methods: Load, Evaluate, and Save. The
Project class complies with good OO design by having the class manipulate its own data.
All the magic with the Microsoft Project data occurs in the Load method of Project:
MSProject.ApplicationClass app = null;
string retVal = "";
Initialize();

try {

    app = new MSProject.ApplicationClass();

    app.Visible = false;

    if(app.FileOpen(fileName, true, Type.Missing,
        Type.Missing, Type.Missing, Type.Missing,
        Type.Missing, Type.Missing, Type.Missing,
        Type.Missing, Type.Missing,
        MSProject.PjPoolOpen.pjPoolReadOnly, Type.Missing,
        Type.Missing, Type.Missing, Type.Missing)) {


        foreach(MSProject.Project proj in app.Projects) {

            foreach(MSProject.Task task in proj.Tasks) {


                if(task.OutlineChildren.Count == 0) {


                    tasks.Add(new PrjXlsRpt.Task(task));
                }
            }
        }
    } else {
        retVal = "The MS Project file " + fileName +
                 " could not be opened.";
    }
} catch (Exception ex) {
    retVal =  "Could not process the MS Project file " +
        fileName + "." + System.Environment.NewLine +
        ex.Message + System.Environment.NewLine +
        ex.StackTrace;
}


if(app != null) {
    app.Quit(MSProject.PjSaveType.pjDoNotSave);
}
return retVal;
As the example above demonstrates the steps are: (1) Open the Microsoft Project Application, (2) Open the
Microsoft Project File, (3) for the Project go through all the tasks and do what ever you want to them, and
(4) close the application. The only two items left to discuss are: Adding the Microsoft Project COM
components and Creating the Excel file.
Adding Microsoft Project COM Components
The Microsoft Project data is accessed using Microsoft Project COM components. Wrappers to these COM components need to be created.
Microsoft Visual Studio 2003 provides an easy method for including non-managed COM components into your managed code.
Microsoft Project must be loaded on your development system for you to follow these instructions. Microsoft Project 2003 and
Visual Studio 2003 are used in this example.
- From the main menu select Project > Add Reference.
- Go to the «COM» tab. Scroll down and select «Microsoft Project 11.0 Object Library»
- Click Select and click OK
When you go to Solution Explorer, you should see Microsoft.Office.Core, MSHTML, MSProject, System.XML,
VBIDE under the References folder. The next step is to add the using statement to your code.
For the using statement I use the assignment format because for library specific code I prefer to
use the namespace part of the class name so that I know where the class is located. By using the assignment
format of the using statement I can make the code more readable and still indicate the location of the
class.
using MSProject = Microsoft.Office.Interop.MSProject;
This is all that is required to add the Interop functionality to your project.
Creating the Excel File
The Excel report file could be created using the COM Interop like the Microsoft Project part of this example,
but whenever possible I try not to have my programs rely on the software installed on a user’s PC. I could also use the
Excel ODBC driver, but that means that I would have to have a properly formatted Excel file. To keep the implementation easy for me,
I used Excel XML to create the Excel file.
The easiest way of working with Excel XML is to create the file in Excel, save the file in XML, and extract the pieces
that you will use as strings in your program. If you do this frequently like I do, you will have a tool that will
convert the XML text into code. Having such a tool saves a lot of time, but if you do not have a tool, you
should be able to make one quick.
The Excel XML that is created in the application is done through text strings. I do not use the System.Xml
classes because that takes too long. These strings are located in the XmlPart1, XmlPart2,
XmlPart3, and XmlPart4 methods located in the XML region of the
Project class.
One important part to note is that for the <Table> element, remove the ss:ExpandedRowCount parameter.
The row count will grow based upon the number of tasks and we really do not need to keep track of this. If this
parameter is removed, the XML code is still functional.
Project Reports Discussion
I am a project manager and for my customers I need to submit weekly project status reports. These reports
change from customer to customer but normally contain schedule information, open item information,
budgetary information, and a summary of what was accomplished during the week. This information is
scattered across multiple systems/files with Microsoft Project being used to manage the schedule. Our customers
do not want to spend too much time evaluating the status of the project. They want these project reports to be
concise such that they can determine the status of the project in about 5 minutes. Submitting just the
Microsoft Project file is unacceptable because depending upon the size of the project, it can take more than
5 minutes to just review the schedule. Also, these Project Reports need to be in a format that can be
distributed to people who do not have Microsoft Project. So for us, there is a need to export the data from
Microsoft Project and use it else where.
The example in this article is basic—extremely basic, but it is not supposed to be an application in itself
but rather a demonstration on how to export the data from Microsoft Project and use it within your application.
Microsoft Project does provide methods for exporting data, but the goal here is not to have the user
complete many steps to get the data, but have the software perform this repetitive task. In my company
we suck in data from Microsoft Project, an Open Item database (Access), and a time card system (SQL Server) into an Access
database using a one click action. This database contains forms for authoring summary data and contains a
report to pull all the data together. The report is printed to a PDF file and emailed to our customer. This
application is trivial, but it saves our project managers about 30 minutes per report per project—a good cost
savings to our company.
I concentrated on discussing the use of Microsoft Project data for project reports, but it can be used
anywhere else in your organization. We also use Microsoft Project data to feed our estimating tools. What
ever you use the Microsoft Project data for, I hope that this article was a valuable starting point.
Good luck with your projects.
Michael Carey is the Head of Development for an Automation Integrator in Philadelphia, PA. Michael specializes in Batch Automation, Process History, and Factory to Enterprise Integration.