
You have several Excel workbooks and you want to merge them into one file? This could be a troublesome and long process. But there are 6 different methods of how to merge existing workbooks and worksheets into one file. Depending on the size and number of workbooks, at least one of these methods should be helpful for you. Let’s take a look at them.
Summary
If you want to merge just a small amount of files, go with methods 1 or method 2 below. For anything else, please take a look at the methods 4 to 6: Either use a VBA macro, conveniently use an Excel-add-in or use PowerQuery (PowerQuery only possible if the sheets to merge have exactly the same structure).
Method 1: Copy the cell ranges
The obvious method: Select the source cell range, copy and paste them into your main workbook. The disadvantage: This method is very troublesome if you have to deal with several worksheets or cell ranges. On the other hand: For just a few ranges it’s probably the fastest way.
Method 2: Manually copy worksheets

The next method is to copy or move one or several Excel sheets manually to another file. Therefore, open both Excel workbooks: The file containing the worksheets which you want to merge (the source workbook) and the new one, which should comprise all the worksheets from the separate files.
- Select the worksheets in your source workbooks which you want to copy. If there are several sheets within one file, hold the Ctrl key
 and click on each sheet tab. Alternatively, go to the first worksheet you want to copy, hold the Shift key
  and click on the last worksheet. That way, all worksheets in between will be selected as well.
 - Once all worksheets are selected, right click on any of the selected worksheets.
- Click on “Move or Copy”.
- Select the target workbook.
- Set the tick at “Create a copy”. That way, the original worksheets remain in the original workbook and a copy will be created.
- Confirm with OK.

One small tip at this point: You can just drag and drop worksheets from one to another Excel file. Even better: If you press and hold the Ctrl-Key when you drag and drop the worksheets, you create copies.
Do you want to boost your productivity in Excel?
Get the Professor Excel ribbon!

Add more than 120 great features to Excel!
Method 3: Use the INDIRECT formula
The next method comes with some disadvantages and is a little bit more complicated. It works, if your files are in a systematic file order and just want to import some certain values. You build your file and cell reference with the INDIRECT formula. That way, the original files remain and the INDIRECT formula only looks up the values within these files. If you delete the files, you’ll receive #REF! errors.
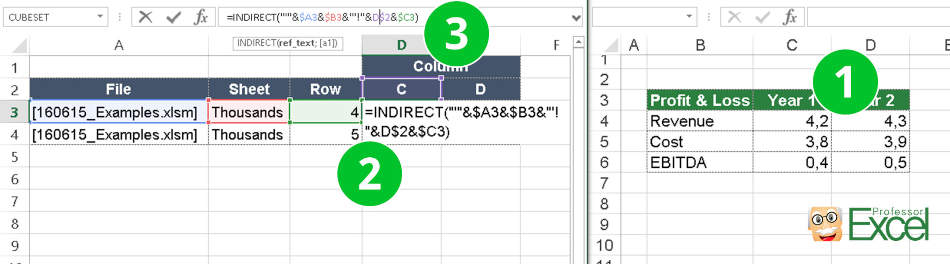
Let’s take a closer look at how to build the formula. The INDIRECT formula has only one argument: The link to another cell which can also be located within another workbook.
- Copy the first source cell.
- Paste it into your main file using paste special (Ctrl + Alt + v ). Instead of pasting it normally, click on “Link” in the bottom left corner of the Paste Special window. That way, you extract the complete path. In our case, we have the following link:
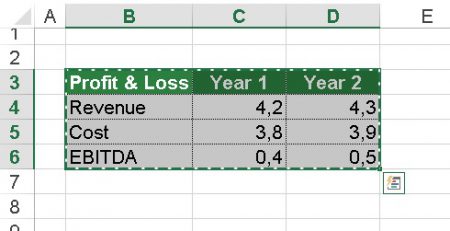
=[160615_Examples.xlsm]Thousands!$C$4 - Now we wrap the INDIRECT formula around this path. Furthermore, we separate it into file name, sheet name and cell reference. That way, we can later on just change one of these references, for instance for different versions of the same file. The complete formula looks like this (please also see the image above):
=INDIRECT(“‘”&$A3&$B3&”‘!”&D$2&$C3)
Important – please note: This function only works if the source workbooks are open.
Method 4: Merge files with a simple VBA macro
You are not afraid of using a simple VBA macro? Then let’s insert a new VBA module:
- Go to the Developer ribbon. If you can’t see the Developer ribbon, right click on any ribbon and then click on “Customize the Ribbon…”. On the right hand side, set the tick at “Developer”.
- Click on Visual Basic on the left side of the Developer ribbon.
- Right click on your workbook name and click on Insert –> Module.
- Copy and paste the following code into the new VBA module. Position the cursor within the code and click start (the green triangle) on the top. That’s it!
Sub mergeFiles()
    'Merges all files in a folder to a main file.

    'Define variables:
    Dim numberOfFilesChosen, i As Integer
    Dim tempFileDialog As fileDialog
    Dim mainWorkbook, sourceWorkbook As Workbook
    Dim tempWorkSheet As Worksheet

    Set mainWorkbook = Application.ActiveWorkbook
    Set tempFileDialog = Application.fileDialog(msoFileDialogFilePicker)

    'Allow the user to select multiple workbooks
    tempFileDialog.AllowMultiSelect = True

    numberOfFilesChosen = tempFileDialog.Show

    'Loop through all selected workbooks
    For i = 1 To tempFileDialog.SelectedItems.Count

        'Open each workbook
        Workbooks.Open tempFileDialog.SelectedItems(i)

        Set sourceWorkbook = ActiveWorkbook

        'Copy each worksheet to the end of the main workbook
        For Each tempWorkSheet In sourceWorkbook.Worksheets
            tempWorkSheet.Copy after:=mainWorkbook.Sheets(mainWorkbook.Worksheets.Count)
        Next tempWorkSheet

        'Close the source workbook
        sourceWorkbook.Close
    Next i

End Sub
Method 5: Automatically merge workbooks
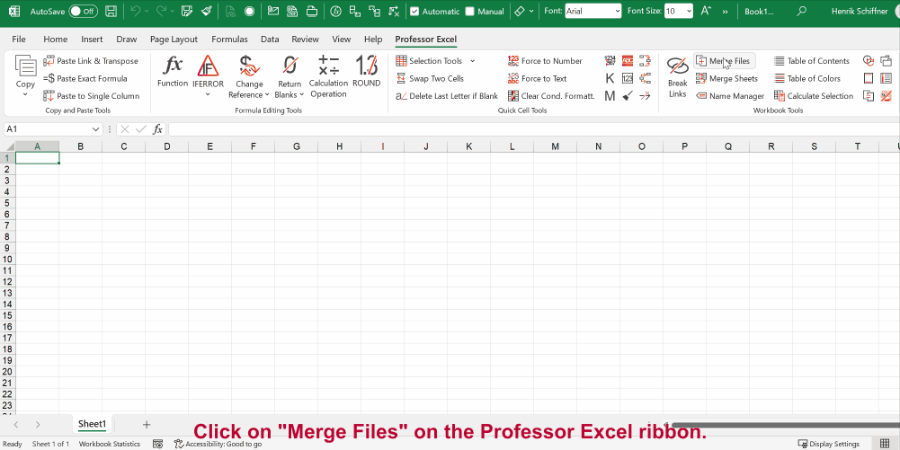
The fifth way is probably most convenient:
Click on “Merge Files” on the Professor Excel ribbon.
Now select all the files and worksheets you want to merge and start with “OK”.
This procedure works well also for many files at the same time and is self-explanatory. Even better: Besides XLSX files, you can also combine XLS, XLSB, XLSM, CSV, TXT and ODS files.
To do that you need a third party add-in, for example our popular “Professor Excel Tools” (click here to start the download).
Here is the whole process in detail:
Method 6: Use the Get & Transform tools (PowerQuery)
The current version of Excel 365 offers the “Get & Transform” tools to import data. These functions are very powerful and are supposed to replace the old “Text Import Wizard”. However, they have one useful feature: Import a complete folder of documents.
The requirements: The workbooks and worksheets you want to import have to be in the same format.
Please follow these steps for importing a complete folder of Excel files.
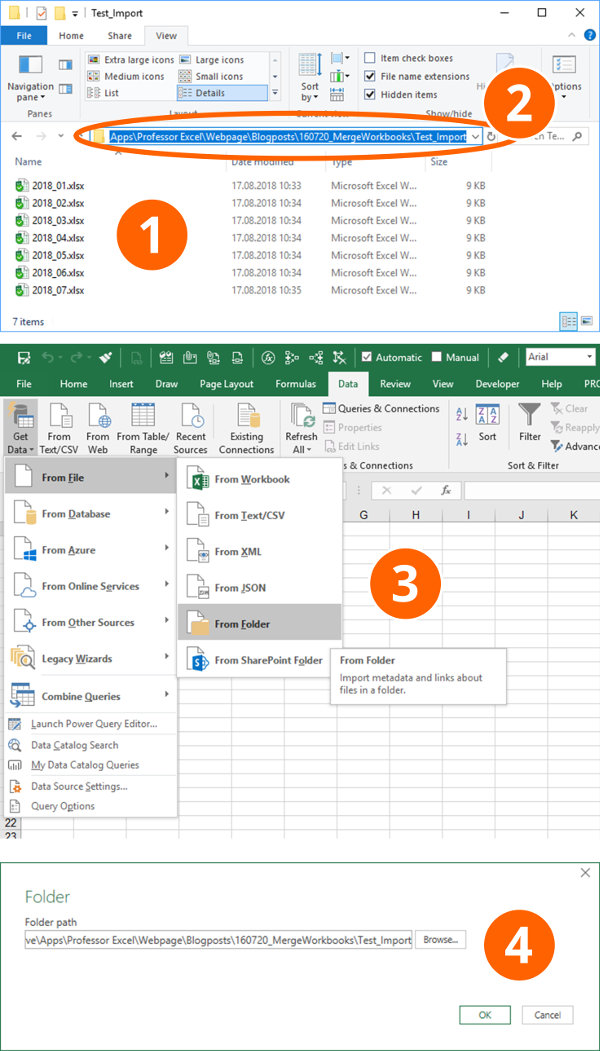
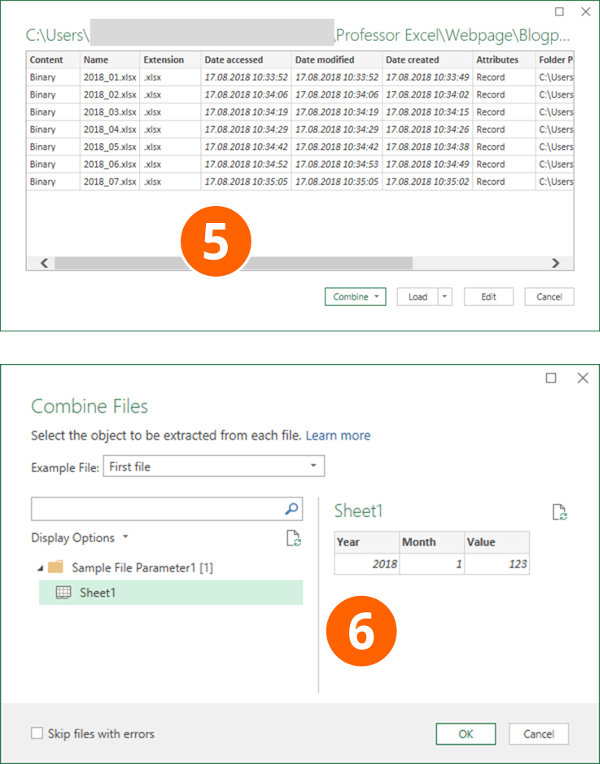
- Create a folder with all the documents you want to import.
- Usually it’s the fastest to just copy the folder path directly from the Windows Explorer. You still have the change to later-on select the folder, though.
- Within Excel, go to the Data ribbon and click on “Get Data”, “From File” and then on “From Folder”.
- Paste the previously copied path or select it via the “Browse” function. Continue with “OK”.
- If all files are shown in the following window, either click on “Combine” (and then on “Combine & Load To”) or on “Edit”. If you click on “Edit”, you can still filter the list and only import a selection of the files in the list. Recommendation: Put only the necessary files into your import folder from the beginning so that you don’t have to navigate through the complex “Edit” process.
- Next, Excel shows an example of the data based on the first file. If everything seems fine, click on OK. If your files have several sheets, just select the one you want to import, in this example “Sheet1”. Click on “OK”.
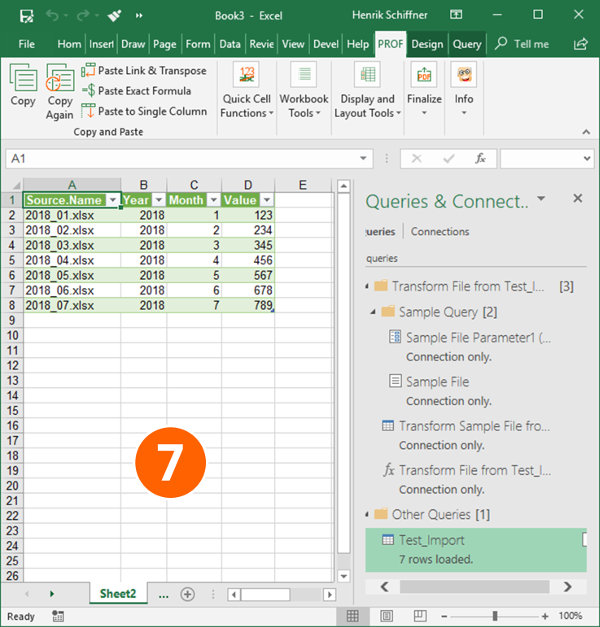
- That’s it, Excel now imports the data and inserts a new column containing the file name.
For more information about the Get & Transform tools please refer to this article.
Next step: Merge multiple worksheets to one combined sheet
After you have combined many Excel workbooks into one file, usually the next step is this: Merge all the imported sheets into one worksheet.
Because this is a whole different topic by itself, please refer to this article.
Image by MartinHolzer from Pixabay
You have several Excel files that make it harder for you to access data. You keep switching between different opened files, and this process takes a lot of your time. You are well aware that it is a lot easier to process data in a single file instead of switching between numerous sources. Then comes the question, how can I merge all these files into one comprehensive file? It is a troublesome and long process trying to combine different Excel files into one file when you factor in the number of worksheets found in one workbook. There are various ways of merging Excel files.
In this article, we discuss how to merge multiple Excel files into one file. Let’s get started.
Method 1: Combine multiple workbooks into one workbook with the Move or Copy function
1. If you want to merge all the existing files into a new Excel workbook, create the new Excel workbook and open it. But if you’re going to combine all of them into a current workbook, open that workbook.


2. Open all the Excel files you want to merge. You need to open all files to be able to combine them into one. Instead of doing it manually, select all the files and press the enter key on your keyboard. To select multiple files that are non-adjacent, hold the Ctrl key and click the files one by one. For adjacent files, hold the Shift key and click on the last file to select them all.

3. Maximize the first file you want to merge.
4. Right-click the worksheet you want to merge, then select Move or Copy.

5. On the pop-up window, click ‘Pick from Drop-down List.’ All the Excel files opened on your computer will be displayed here

6. Select the excel file you want to merge other files into in the ‘To book’ drop-down arrow.

7. To merge excel files, check the Create a copy checkbox.

8. In the Before Sheet section, select ‘move to end and click OK. It will create a copy of the worksheet in the destination file.

9. Repeat all the above steps for all the remaining files and save your file.
Method 2: Combine multiple workbooks into one with VBA
1. Open a new workbook that will act as a master workbook.

2. Press Alt + F11 to the VBA page

3. Click on the Insert tab. Next, select the Module tab.

4. Copy and paste the macro code below.
Sub GetSheets()
Path = "C:UsersdtDesktopdt kte"
Filename = Dir(Path & "*.xlsx")
Do While Filename <> ""
Workbooks.Open Filename:=Path & Filename, ReadOnly:=True
For Each Sheet In ActiveWorkbook.Sheets
Sheet.Copy After:=ThisWorkbook.Sheets(1)
Next Sheet
Workbooks(Filename).Close
Filename = Dir()
Loop
End Sub
Click here for more code.
5. After this, it is time to initiate the command by pressing F5 to run the excel macro code. Doing this will open a file and then copy the data. It will paste the same in your new workbook. Close the workbook.

Method 3: Merging Microsoft Excel files as CSV files.
1. Open the excel files.
2. Go to the Menu bar. Click File. Then Save As.
4. In the Save as type, there is a drop-down list. Select CSV from the list.

5. Do this for all the files you want to merge, and then place all the CSV files into one folder.

6. Open the command prompt then navigate to your folder. Type the following command to merge all CSV files in the folder into a new CSV file. Copy *.csv newfile.CSV

7. After creating the new file, open the new CSV file in Microsoft Excel.
8. Save it as an Excel file.

Method 4: Using Power Query
The Power Query method is the best way to merge data since you only need to store all the excel files in a single folder. You can then use that folder to load data from files into the Power Query Editor. It also allows you to transform data while combining.
However, for the Power Query editor to merge Excel files, you need to understand that all data should be structured in the same way. That means the number of columns and their order should be the same. Below are steps to follow when merging files with the Power Query application.
Power query allows to import, edit and consolidate the data. It can also be used to import and combine multiple excel files into one folder.
With the Same Name of Worksheets and Tables
1. Move all the files into the new folder that you want to combine.

2. In Excel go to the Data tab

3. Press Get Dat > From File > From Folder

4. Browse and select the folder path

5. Press Ok
6. If files are ready to combine press Combine & Load

7. If you want to manipulate the data, then press the Transform Data button. This will open the query editor where you can work on the data.

From here, select the table in which you have data in all the workbooks. A preview of this will appear at the side of the window.

8. Once you select the table, click OK to merge data from all the files into your Power Query editor. You will see a new column with the name of the workbooks from which data is extracted.

9. Right-click on the column header and select “Replace Values”.

10. Enter the text “.xlsx” in the Replace Values box and leave the “Replace With” box blank. The idea here is to remove the file extension from the name of the workbook.

11. Next, double-click on the header and select “Rename” to enter a name for the column.

12. At this point, your merged data is ready and you only need to load it into your new workbook. To perform this, go to the Home Tab and click on Close & Load. Now you will have your combined data from all tables or workbooks with the same name in a single workbook.

Note: You will not have the same table name in all the excel files all the time. At that point, you can use the worksheet name to combine data with the Power Query method. However, you should note two points when using the worksheet name to combine data with the power query method:
- Power Query is case-sensitive. So, you should have the same letter names of worksheets in all the workbooks.
- You should have the same name for the column headers, but the order of the columns does not matter. If column1 in the north.xlxs is column2 in the west.xlxs, Power Query will match it, but you need to have the same column names.
Therefore, when combining files using the power query, you can use the worksheet name instead of the table name. You only need to select the worksheet name, click on the Combine & Edit, and follow all the steps outlined above from step number 6.
When You Don’t Have the Same Name of Worksheets and Tables.
In some situations, you can lack the same name of worksheets and tables in the excel files. In this case, you must know how to combine data from these different worksheets and tables into one file, following these steps:
1. Open the “From Folder” dialog box to locate the folder where you have all the files and click OK.

2. After that, click on the “Edit” to edit the table.
3. Once the table and Power Query editor open, select the first two columns of the table and click on the Remove other Columns from the right-click menu.

4. From here, you need to add a custom column to fetch data from the worksheets of the workbooks. To do this, go to Add Column Tab and click on the Custom Column button. The step will automatically open the Custom Column in the dialog box.

5. In the dialog box enter the formula below and click OK.
=Excel.Workbook([Content])

6. You will have a new column in the table from which you need to extract data. Open the filter from that newly added custom column and click OK to expand all the data into the table.
7. You will see a newly expanded table with some new columns. Delete all columns from the new table except the third and the fourth column.

8. Now open the filter for the Custom Data column to expand it and click OK.

Once you click OK, you will get all the data from the files having been merged into a single table. Though, if you notice all the headings of the columns are in the data itself, you need to add the column headings as follows;
- Double-click on the header and add a name. You can also right-click and select Rename It.
- Exclude the headings you have in the data table. For this, open any column’s filter options and unselect the heading name which you have in the column data and click OK after that. After you click ok, your data is ready to load into the worksheet.
- Go to the Home Tab and click on Close and Load. This allows you to combine data from different workbooks that had different worksheets names.

At this point, you have already merged the data into one single file. You should then apply some formatting to avoid losing a single file of your data when updating it. To format a single file, you can use these steps:
- Go to Design Tab and open Properties.
- Untick the Adjust Column width and tick the Preserve Cell Formatting
Conclusion
The above tips help you to be organized and save time. Whether you decide to merge data in excel into a single file, or if you prefer to spread your work across multiple files, either of the methods above will help you. Excel offers immense features such as an in-built tracking feature that keeps track of any changes made in your files. So, losing your original data should not be a cause of dilemma.
Accessing data from multiple Excel files can be time-consuming and hard.
You often have to switch between multiple open windows, it’s messy and you feel like there’s data all over the place.
So, when you have to access data that is spread out over multiple Excel files, it makes sense to merge the sheets from all these files into one single Excel workbook.
This keeps your data organized and saves a lot of referencing time.
In this tutorial, we show you three ways to merge two Excel files:
- Using the Move or Copy feature
- Using VBA
- Using Get & Transform tools
Imagine you have two separate files:
- File1
- File2
These two files contain order-related information (for an imaginary company).
File1 has 2 tabs (named Apr-Jun 2021 and Jul-Sep 2021) and File2 has a single tab (named Jan-Mar 2021).
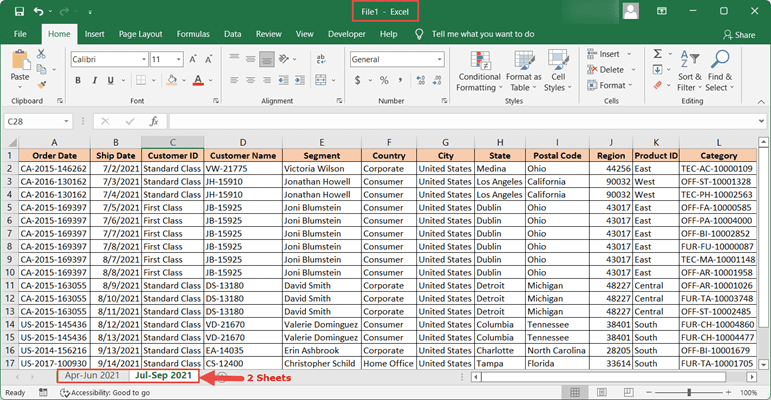
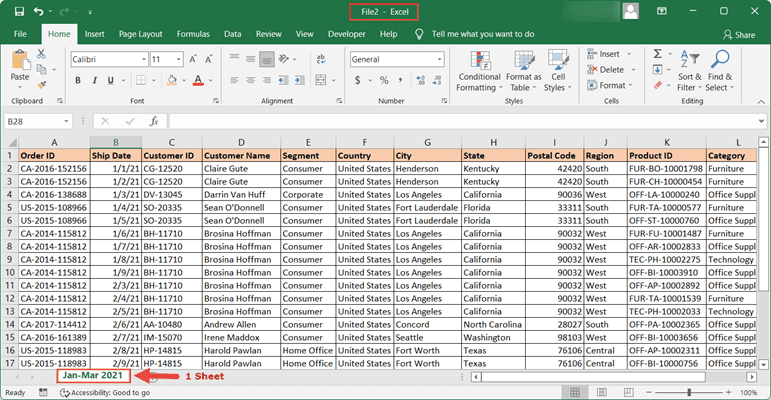
Let’s say you want to merge File1 and File2 by bringing both sheets of File1 into File2.
As mentioned before, there are 3 ways to do this. The method you choose will depend on your requirement and how your data is structured.
Let us look at each method one by one.
Using the Move or Copy Feature to Merge Two Excel Files
This is the simplest and the most commonly used method to merge two Excel Files.
This method is suited in situations where you have to merge two or more Excel files that have only a few sheets, and you need to do it only once in a while.
Below are the merge two Excel files manually:
- Select all the tabs that you want to move or copy from File1. Since we want to move all the sheets from File1, we simply select the first tab, hold down the shift key and select the last tab.
- Right-click on your selected tabs and click on ‘Move or Copy’ from the context menu that appears.
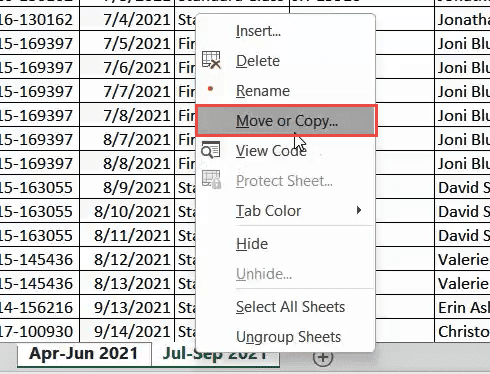
- This opens the ‘Move or Copy’ dialog box.
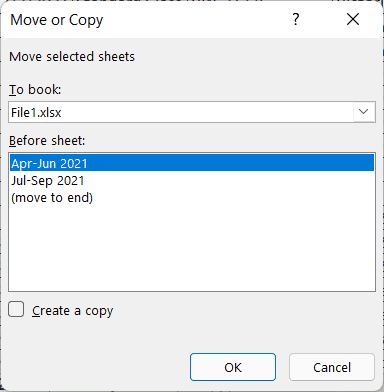
- Click on the dropdown under ‘To book:’.
- From here, you can select the file (or workbook) to which you want to move or copy the selected sheet(s). Since we want to transfer the sheet to File2, we can select the File2.xlsx option from this list.
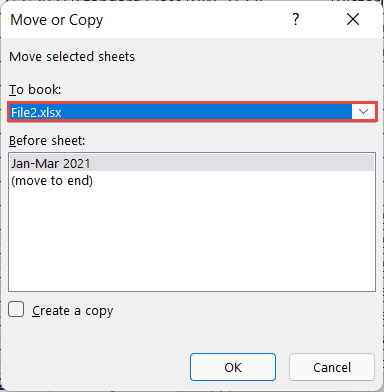
- You should now see the different move or copy options available in the list under ‘Before Sheet:’. Select where in File2 you want the sheet moved. Since Apr-Jun 2021 comes after Jan-Feb 2021, it makes sense to place it at the end (as the last sheet of File2). So select (move to end)
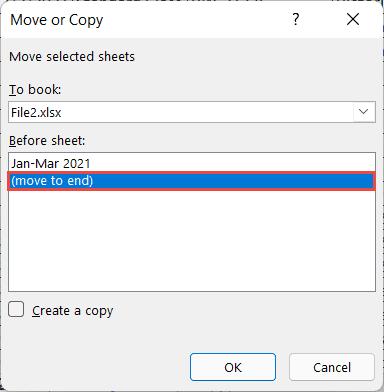
- If you want to retain a copy of the sheets in File1, then check the box next to ‘Create a copy’.
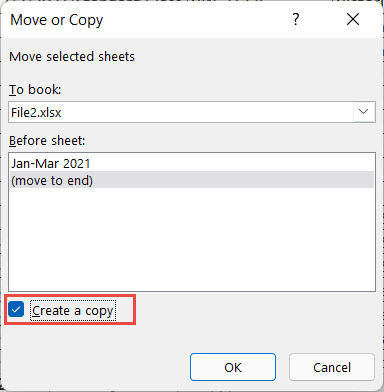
- Click OK.
All sheets of File1 should now get copied to File2, so that it now contains 3 sheets in all.

Note that for this method to work, you need to have both the files open (one from which you want to copy the sheets and the one where you want to copy these sheets).
Also, note that this method will create a copy of sheets in File1 and add these to File2. These sheets will still remain in File1.
As I mentioned, this method is fine if you want to do this once in a while with files that have less number of sheets. If you have more sheets, there is always a chance of human error. In such cases, you can use the VBA or the Power Query method covered next.
In case you have more than two Excel files that you want to merge, you can follow the same process, where you combine two Excel files, and then combine the third/fourth file with it.
Using VBA to Merge Two Excel Files
The second method to merge two Excel files uses the following VBA script:
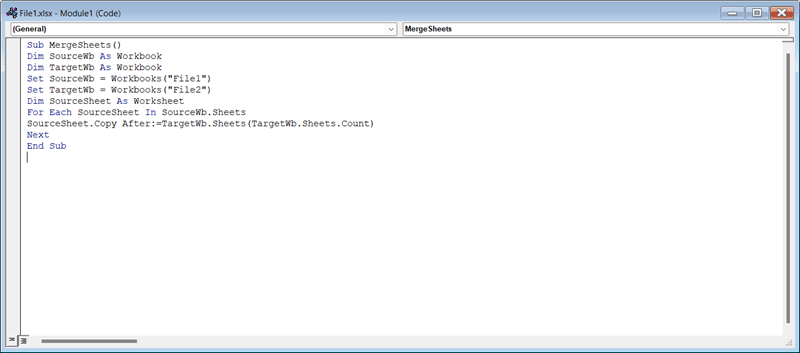
'Code by Steve Scott from https://spreadsheetplanet.com
Sub MergeSheets()
Dim SourceWb As Workbook
Dim TargetWb As Workbook
Set SourceWb = Workbooks("File1")
Set TargetWb = Workbooks("File2")
Dim SourceSheet As Worksheet
For Each SourceSheet In SourceWb.Sheets
SourceSheet.Copy After:=TargetWb.Sheets(TargetWb.Sheets.Count)
Next
End Sub
The above script simply takes two files, “File1” and “File2“, cycles through each sheet of File1 and appends a copy of it to File2.
All you need to do is replace the filenames “File1” and “File2” in the above code with your required source and target files.
For this code to work, your Excel files need to be open. In case you want the code to open a closed file, copy sheets from one file to another, and then close the files again, you can do that too (you will need to modify the code to do that).
Note: This script copies the “File1” sheets and pastes them into “File2”. This means the original sheets within “File1” remain as they were.
To run the above script, follow the steps below:
- Make sure both files that you want to merge are open.
- Navigate to Developer->Visual Basic.

- When the Visual Basic window opens, click Insert->Module.
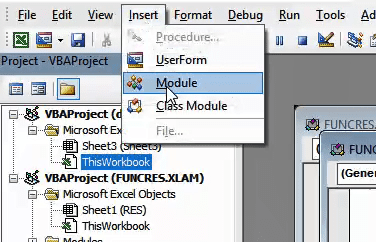
- Copy and paste the above code into the newly opened window.
- Edit the code according to your requirement. For example, change the filenames in lines 4 and 5, or make other changes if you need to.
- Run the code by clicking on the Run button, as shown below:

That’s it!
You should now find the sheets of File1 and File2 merged into File2, while retaining a copy of the original sheets in File1 too.
Note: If you cannot find the Developer menu option, navigate to File->Options->Customize Ribbon and check the Developer option. Click OK.
Using Get & Transform Tools (Power Query) to Merge Two Excel Files
If you’re using Excel 2016 or newer versions, you can also use the Get & Transform tool to merge two or more Excel files.
The Get & Transform tool is a Power Query feature that allows you to import data from multiple sources quickly and easily.
The great thing is that you can use it to make changes to your source data as required before importing it to the new workbook.
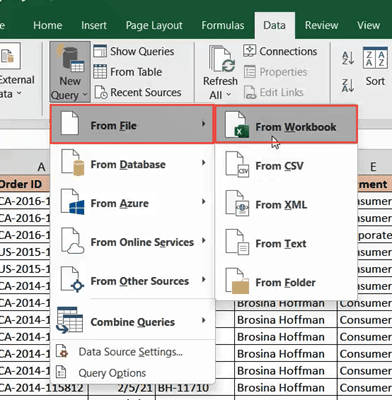
Here are the steps that you need to follow in order to merge two Excel Files using the Get & Transform tool:
- Open File2
- From the Data tab, select New Query (from the Get & Transform group).
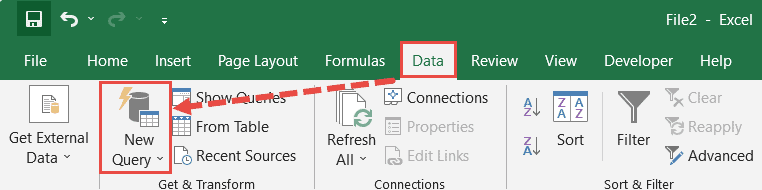
- Select From File -> From Workbook from the dropdown list that appears.
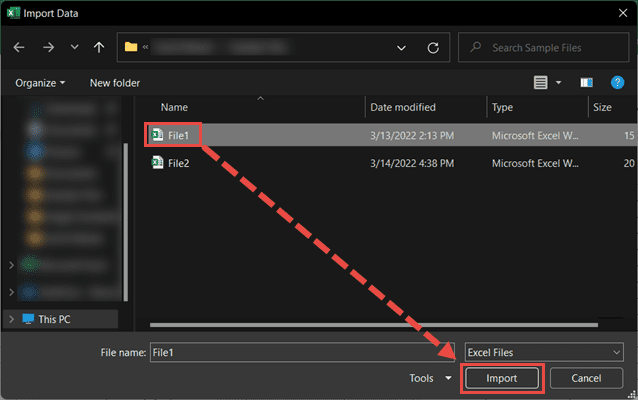
- This opens the Import Data window, from where you can select the workbook from which you want to import the sheets. Select File1 and click Import.
- This opens the Navigator window, where you can see a list of all the sheets and tables from File1.
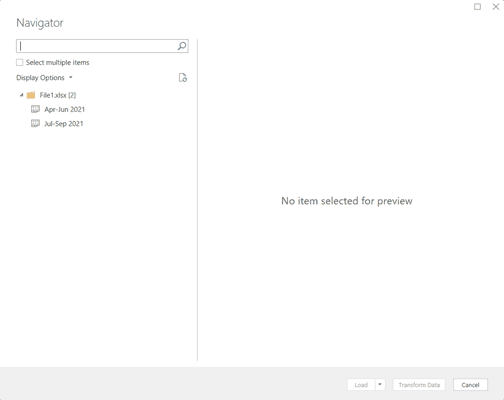
- Since we want to import more than one sheet, check the box next to ‘Select multiple items’.

- Check the boxes next to the sheets you want to import. In our case, we select both.
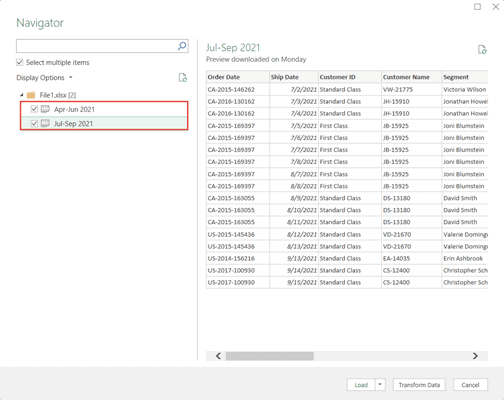
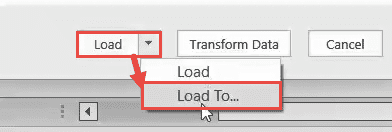
- Click on the dropdown arrow next to ‘Load’ at the bottom of the window.
- Select ‘Load to’.
- From the Load To window, check the radio button next to ‘Table’ and click ‘Load’.
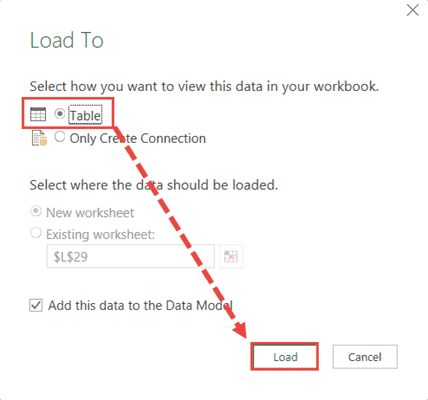
- Wait for the query to complete processing.
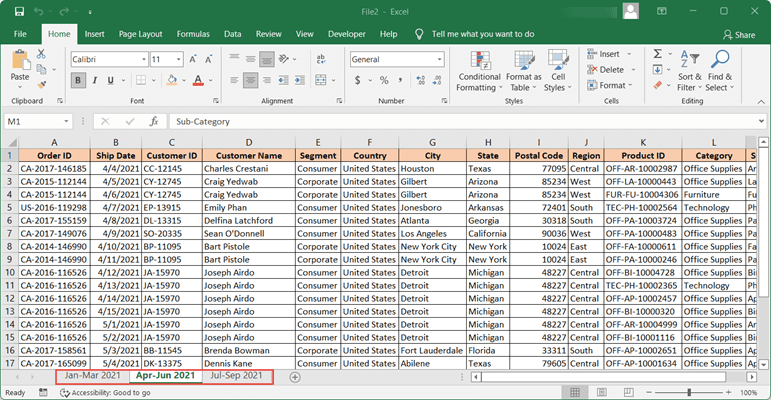
You should now see two new sheets in File2.
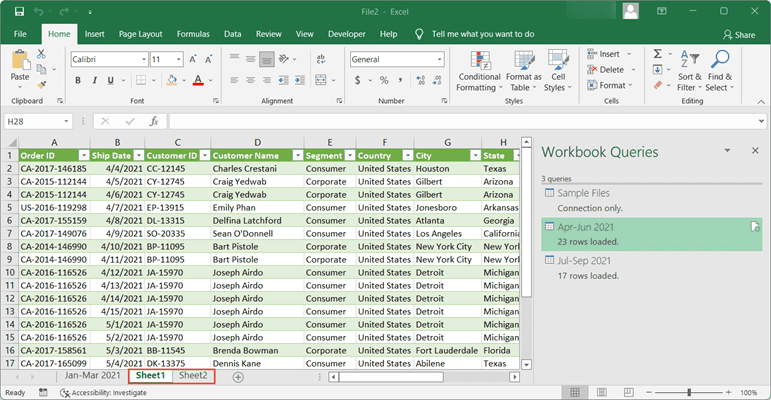
Notice that the names of the sheets are just the generic Sheet1 and Sheet2, so you’ll have to double click on each tab and change the sheet names (if you need to).
That’s it! You have now merged File1 into File2, which now contains all 3 sheets!
Also, notice that the data in the newly imported sheets are in the form of an Excel table. If you don’t want that, you could simply convert them back to ranges by navigating to Table Design->Convert to Range.

When you are asked to confirm, simply click OK.

In this tutorial, we showed you 3 ways to merge two files in Excel.
The first two methods (using Move or Copy and using VBA) are more commonly used since they have been around for a while.
The last method (using Get & Transform) is the lesser-used method since it is fairly new and only available in newer Excel versions.
However, Power Query is increasingly becoming the go-to tool for businesses and other industries, so it makes sense to learn how to bring together data from multiple sources into the framework, to facilitate further processing.
Other articles you may also like:
- How to Convert a CSV File to Excel?
- How to Convert a Text File to Excel?
- How to Make Excel File Read Only
- How to Insert an Excel file into MS Word
- How to Unmerge All Cells in Excel?
- How to Copy Multiple Sheets to a New Workbook in Excel
- How to Group and Ungroup Worksheets in Excel
- How to Open Excel File [xls, xlsx] Online (for FREE)
- Microsoft Excel vs Google Sheets – Which One Is Better for You?
- Switch Between Excel Workbooks (Shortcut)
- How to Combine Two Columns in Excel (with Space/Comma)
Bookmark this app
Press Ctrl + D to add this page to your favorites or Esc to cancel the action.
Send the download link to
Send us your feedback
Oops! An error has occurred.
Invalid file, please ensure that uploading correct file
Error has been reported successfully.
You have successfully reported the error, You will get the notification email when error is fixed.
Click this link to visit the forums.
Immediately delete the uploaded & processed files.
Are you sure to delete the files?
Enter Url
Learn everything about how to merge sheets in Excel, plus how to combine multiple Excel files into one.

Sometimes, the Microsoft Excel data you need is split across multiple sheets or even multiple files. It can be significantly more convenient to have all of this information in the same document.
You can copy and paste the cells you need in a pinch, placing them all on the same sheet. However, depending on how much data you’re working with, this might take a lot of time and effort.
Instead, we’ve rounded up some smarter ways to accomplish the same task. These methods will allow you to quickly and easily merge sheets or files in Excel.
How to Combine Excel Sheets Into One File
If you have multiple Excel files, perhaps each containing numerous sheets, that you want to combine into a single file, you can do this with the Move or Copy Sheet command. This method of merging Excel sheets has its limitations, but it’s quick and straightforward.
First, open up the sheets you want to merge into the same workbook. From there:
- From the top ribbon, select the Home tab.
- Within the Cells group, click Format.
- Select Move or Copy Sheet.
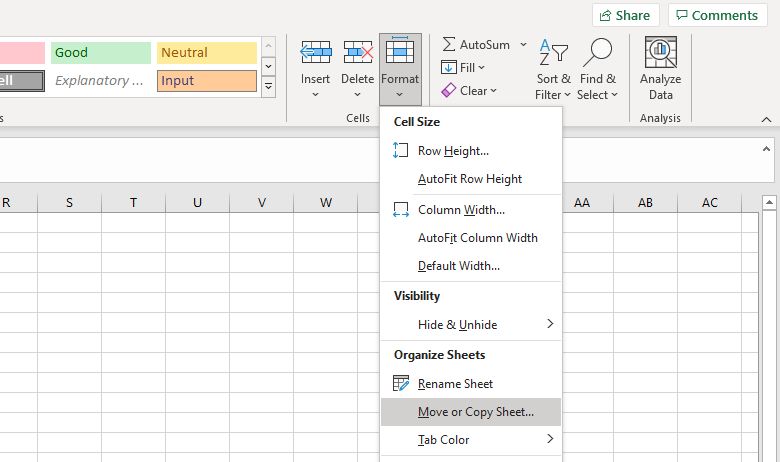
This opens the Move or Copy window. The To book dropdown lets you select the master spreadsheet where you want to send all of your individual sheets. Select (new book) to create a new file, or select an existing file. Use the Before sheet box to specify the order that the sheets are in (this will be blank if you’re using a new book). When ready, click OK.
Repeat this process for all the sheets that you wish to merge. To save time, you can select multiple sheets in a file by holding Ctrl as you click their tabs at the bottom.
Once done, save your new master document.
For the reverse of this, we’ve also covered how to split a large CSV into separate files.
How to Combine Excel Sheets Into One File With VBA
Rather than performing the above combination technique manually, the quicker way is to use a VBA macro. This will come in especially handy if you perform this task regularly.
First, make sure that all the files you want to combine are in the same folder on your computer. Then, create a new Excel spreadsheet that will bring them all together.
Head to the Developer tab. Within the Code section, select Visual Basic. Click Insert > Module.
For this process, we consulted ExtendOffice. Copy and paste the following code:
 Sub GetSheets()
Path = "C:FILE PATH"
Filename = Dir(Path & "*.xlsx")
  Do While Filename <> ""
  Workbooks.Open Filename:=Path & Filename, ReadOnly:=True
     For Each Sheet In ActiveWorkbook.Sheets
     Sheet.Copy After:=ThisWorkbook.Sheets(1)
  Next Sheet
     Workbooks(Filename).Close
     Filename = Dir()
  Loop
End Sub
Make sure to change the path on the second line to wherever the files are stored on your computer.
Next, click the run button (or press F5) to execute the macro. This will immediately combine all the Excel sheets into your current file. Close the Visual Basic window to return to your spreadsheet and see the result. Don’t forget to save the changes.
How to Merge Excel Data Into One Sheet
Sometimes, you might want to take more than one dataset and present it as a single sheet. This is pretty easy to accomplish in Excel, so long as you take the time to ensure that your Excel data is organized and formatted properly ahead of time.
There are two important conditions for this process to work correctly. First, the sheets you’re consolidating need to use the same layout, with identical headers and data types. Second, there can’t be any blank rows or columns.
When you’ve arranged your data to those specifications, create a new worksheet. It’s possible to run the consolidation procedure in an existing sheet where there’s already data, but it’s easier not to.
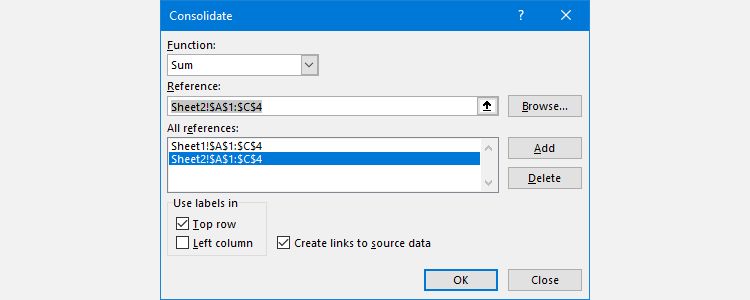
- In this new sheet, select the upper-left cell of where you want to place the consolidated data.
- Select the Data tab.
- Within the Data Tools section, click Consolidate.
- On the Function dropdown, select your desired summary function. The default is Sum, which adds values together.
- Click the up arrow button in the Reference field. If the data is in another file, use the Browse button.
- Highlight the range you wish to consolidate.
- Click Add to add the range to All references.
- Repeat step five until you’ve selected all the data that you want to consolidate.
- Check Create links to source data if you’re going to continue to update the data in other sheets and want this new sheet to reflect that. You can also select which labels are carried across with the Use labels in checkboxes.
- Finally, click OK.
Take Caution Before Merging Excel Data
Merging sheets and files in Excel can be complicated and messy. This illuminates one of the most important lessons about Microsoft Excel: it’s always good to plan ahead.
Merging different data sets after the fact is always going to cause a few headaches, especially if you’re working with large spreadsheets that have been in use for a long time. When you start working with a new workbook, it’s best to consider all possibilities of how you will use the file further down the line.