
![]()
Download Article
![]()
Download Article
- Merging Multiple Documents
- Merging Two Versions of a Single Document
- Q&A
|
|
This wikiHow teaches you how to merge multiple Microsoft Word documents into a single document. In addition to merging separate documents, you can also merge multiple versions of a single document into one brand-new file. Although combining documents may seem daunting at first, the steps are actually pretty easy, and you’ll be combining files in no time!
-

1
Open the Word document you want to merge into. The easiest way to do this is to double-click the document so it opens in Word. You can also open Word first, click the File menu in Word, click Open, and select the document.
-
2
Click in the place where you want to insert the next document. The text from the document you’re inserting will begin at the location you click.
Advertisement
-
3
Click the Insert tab. It’s at the top of the screen between «Home» and «Draw» (or «Home and «Design» in some versions).
-
4
Click the Object button. It’s in the «Text» panel of the Insert tab, which is toward the top-right corner of Word. This opens the «Object» dialog window.
- If you only want to merge plain text into this document (no images, special fonts, for formatting), you can click the arrow next to «Object» instead, select Text from File, and skip to step 7.
-
5
Click the Create from File tab. It’s the second tab in the Object window.
-
6
Click the Browse button. This opens your computer’s file browser.
-
7
Select the document you want to insert.
-
8
Click the Insert button. This closes the file browser and adds the file to the «File name» field.
-
9
Click the OK button to insert the document. The contents of the selected document should now appear where you set the cursor.
- Word documents and most RTF documents will retain their original formatting when merged. Results will vary for other types of files.
- Repeat these steps for each document you want to merge.


Advertisement
-
1
Open one of the documents you want to merge. The easiest way to do this is to double-click the document so it opens in Word. You can also open Word first, click the File menu in Word, click Open, and select the document.
- A Word document will have multiple versions if you’ve enabled Track Changes on the Review tab.[1]
- A Word document will have multiple versions if you’ve enabled Track Changes on the Review tab.[1]
-
2
Click the Review tab. It’s at the top of Word between «Mailings» and «View.»
- If you don’t have a Review tab, click the Tools tab.
-
3
Click Compare. It’s in the toolbar toward the top-right side. Two options will expand.
-
4
Click on Combine…. It’s the second option. A window will appear in which you can choose your documents.
-
5
Select the «Original document» from the labeled drop-down menu. This is the document that was originally sent for review (before you made modifications).[2]
-
6
Select the «Revised document» from the labeled drop-down menu. This is the one you’ve edited.
- If you want to mark the parts of the document that have been changed since revision, type a label into the «Label unmarked changes with» box. Usually you’ll want to use the name of the person who suggested the edits.
-
7
Select New document under «Show changes in.» This tells Word to create a new document from the two you’re merging.
-
8
Click OK. The two versions will be combined into a new Word document and it’ll show up in a new three-panel Word window. The document in the center is the merged document, the left panel shows the revisions, and the right shows the two documents compared to one another.
- If there’s too much information on the screen to read the new document, go to Compare > Show Source Documents > Hide Source Documents. This minimizes the right panel and marks revisions with a vertical red line in the new merged document.


Advertisement
Add New Question
-
Question
What is the point of merging a document?

If two people are working on the same document at the same time, you will end up with two conflicting revisions. Both may have started from the same base version of the document, but through their separate work, they have created two different, revised versions. The point of merging is to combine the changes of both contributors into a new, complete revision of the document. The merging process compares what was changed in each version of the document, and tries to automatically create a new document combining all changes from all editors. Manual intervention may be necessary, if, for example, two authors changed the same sentence in different ways.
-
Question
How do I restart page numbering within a document?
Page tab — Break — Insert New Section Break; this will give you this chance to change page numbering.
-
Question
How can I combine a German document and an English document to show the German text on the left side of the page and the English translation on the right side of the page?
Create a table with two columns on the page with two columns. Copy and paste the German text into the left column, and copy and paste the English text into the right column. If you wish you can put each paragraph of English and German into a new row in the table. Adjust your cells as necessary.
See more answers
Ask a Question
200 characters left
Include your email address to get a message when this question is answered.
Submit
Advertisement
Thanks for submitting a tip for review!
About This Article
Article SummaryX
1. Open a Word document.
2. Click the insertion point.
3. Click the Insert tab.
4. Click Object.
5. Click Create from file.
6. Select the document to merge.
7. Click Insert.
8. Click OK.
Did this summary help you?
Thanks to all authors for creating a page that has been read 1,422,216 times.
Is this article up to date?

For most people, the quickest method for combining Word documents is to manually copy and paste them into one. This isn’t the best method for merging documents—a far easier method is to insert your documents as objects instead. Here’s how.
You should be able to do this in any modern version of Microsoft Word, even those included with the latest versions of Office. These instructions should work for older versions of Word, too.
RELATED: What’s the Latest Version of Microsoft Office?
To begin, open a new or existing Microsoft Word document. This is the “master” document where you’ll combine all of your Word documents into a single file.
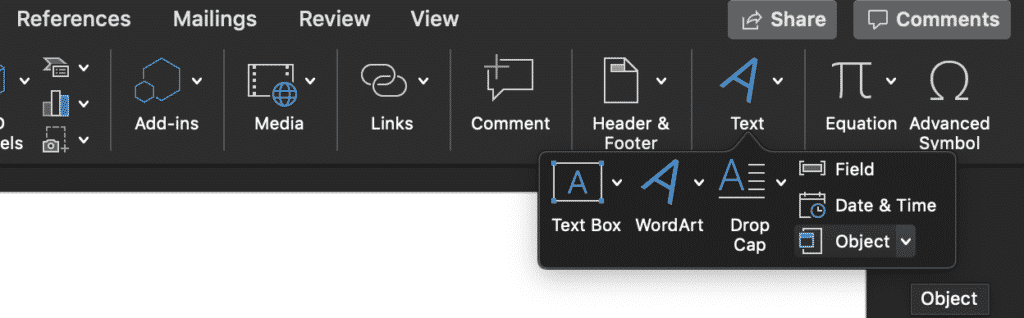
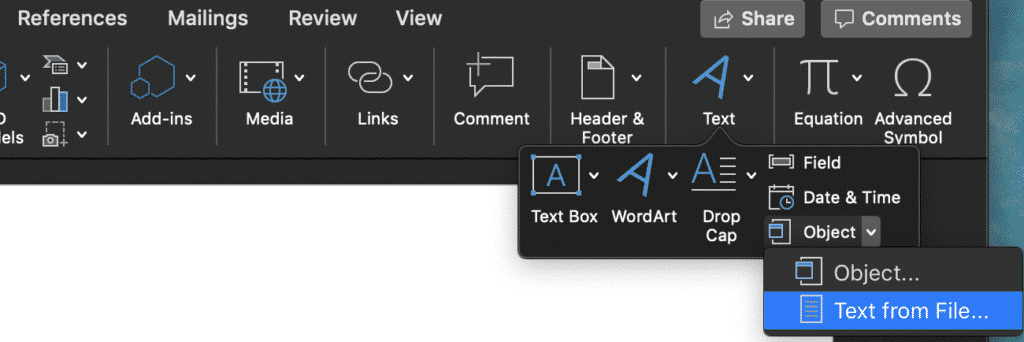
From the ribbon bar, click the “Insert” tab.

You’ll need to locate the “Object” button in the “Text” section. The icon may be large or small, depending on your screen resolution.
Press the downward-pointing arrow next to the “Object” button and then click the “Text from File” option in the drop-down menu that appears.
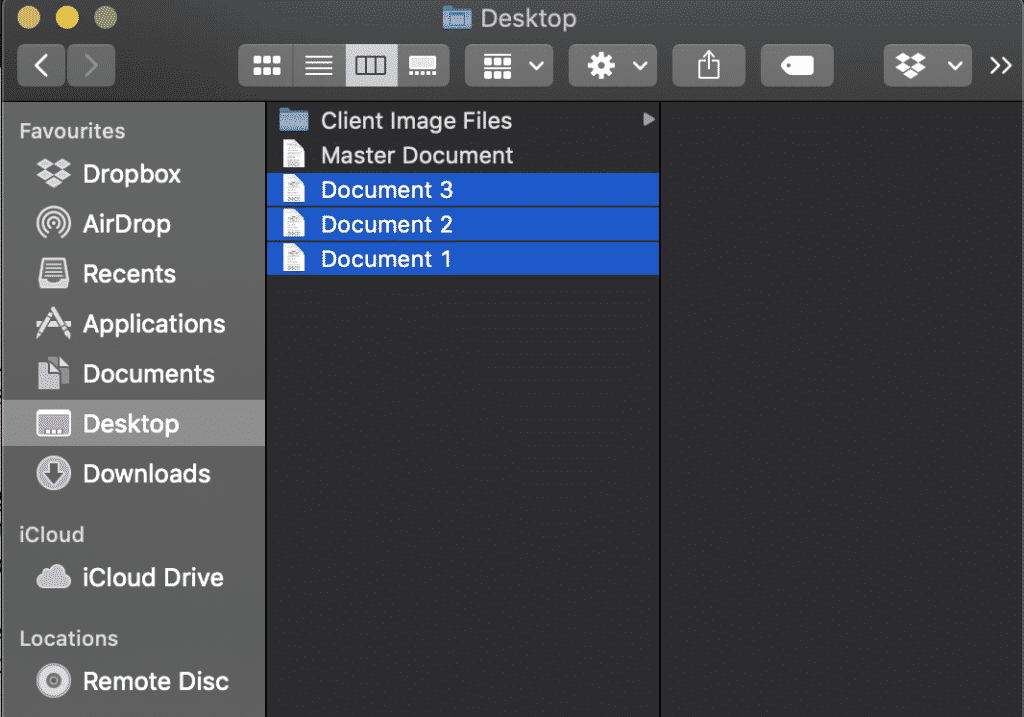
In the “Insert File” selection box, locate the first Word document you want to add to your open document.
Select the file and then click the “Insert” button to add it to your document.
The contents of the selected Word document will be combined with your open document.
If it’s a new document, the contents will appear from the beginning. If you’re merging Word files into an existing document, the contents of your inserted files will appear below any existing content.
There are no limitations to this process—you can repeat these steps to combine as many Word documents as you like.
You’ll need to think about the order of your final document before you merge multiple documents, however. In the example below, several Word documents have been named with the endings A, B, and C to clarify the order of insertion.
Merging multiple documents using the same Word format should mean your formatting, images, and other content move across to the new document, but double-check that this is the case when the merge process has been completed.
If you’re moving from a DOC to a DOCX file, you might lose formatting or other content, depending on how recently the file was edited in a modern version of Word.
RELATED: What Is a .DOCX File, and How Is It Different from a .DOC File in Microsoft Word?
READ NEXT
- › This New Google TV Streaming Device Costs Just $20
- › BLUETTI Slashed Hundreds off Its Best Power Stations for Easter Sale
- › Google Chrome Is Getting Faster
- › How to Adjust and Change Discord Fonts
- › The New NVIDIA GeForce RTX 4070 Is Like an RTX 3080 for $599
- › HoloLens Now Has Windows 11 and Incredible 3D Ink Features
How-To Geek is where you turn when you want experts to explain technology. Since we launched in 2006, our articles have been read billions of times. Want to know more?
Sometimes when you’re collaborating on a word document with co-workers or editors, the number of copies, edits, and changes can quickly grow out of hand. This is why it’s helpful to have the option to combine two separate documents in Word, because a copy and an edited copy will not only merge, but you’ll also have the option to label which changes were made by a specific author and when.
Learn how you can easily merge two documents in Microsoft Word.
To start, open the first document you want to act as the primary document. Then, using the top toolbar, click on the “Review” tab, and find the button labeled “Compare.”

From here, click the option to “Combine …” from the drop-down menu.

This will open up a secondary box where you’ll need to select the two documents you want to combine from a drop-down list.

Choose the first document you want to act as the master. In general, you’ll want this to be the original copy, while the second document should be the copy with any edits from other people. Also, make sure you use the “Label unmarked changes” box to identify which users made changes to which aspects of the document.
If you click “More,” you can also control where these changes will be shown, either in the “Original document,” the “Revised document,” or in a “New document.”

Manage the Combined Document
Once the document is merged, you’ll be greeted by the following window.

Here you’ll see three independent sections – the left showing the “Revisions” made to the document, the middle showing the combined document, and the right section which will show both the original document and the revised document simultaneously.
If this amount of information is a bit too overwhelming, you can click the “Compare” button again, and scroll down to find the option labeled “Hide source documents.”

Click on this and bring the three sections down to two.
Merge in Additional Copies
If you’d like to add in more copies (such as in the example of having multiple edits per document), simply repeat the same process as you did above, but use the “Revised document” as your original copy, and then find the secondary documents you want to add in from the same list you used for the initial import.
Copy and Paste
Of course, if you want to cut down on all the complicated measures listed above, there’s always the trusty process of simply hitting Ctrl + C and Ctrl + V.
To use this option, find the source text that you want to import into your new document, and select anything you want to bring over with your mouse.

Next, either right-click the text and choose “Copy” from the drop-down menu, or simply use the key command mentioned above to cut the text and paste it into the new document you want to edit.
Wrapping Up
The way you choose to merge your two documents will ultimately depend on the amount of control you want to have over what gets imported, as well as how many edits are made available during the revision process. Luckily, Word includes several different options for merging documents, so you can use it however suits your personal case the best!

Chris Stobing
A tech writer with seven years of experience in the industry, Chris Stobing has come to MakeTechEasier to do one thing and one thing only: make tech easier for the people who need it!
Subscribe to our newsletter!
Our latest tutorials delivered straight to your inbox
If you are someone that works with Microsoft Word a lot, you have probably come across a time when it would have been very convenient to merge a few Microsoft Word documents together, creating a single master file.

Merging is possible via the manual process of copy-and-paste, although its not very intuitive.
Microsoft does offer us a simpler way to merge multiple documents at once through their ‘Text Merge’ or ‘Object Merge’ function. It is easier but still seems a little clunky.
Nevertheless, in this post, we will show you how to merge multiple Word documents together using Microsoft tools. Because there are some exciting new tools on the market now that actually make this easier, we take you through those as well.
Let’s start with how to merge Word documents using Microsoft’s tools.
How to Combine Word Documents
- Open the Word document you wish to use as the ‘Master’.
- The Master Document is the document that you will merge all other documents onto.
- Find and click the Insert tab.

- Find and Click Text in the Interest tab drop-down.

- Locate Object in the drop-down and click the small triangle next to it.
- Find and click Text from File in the dropdown menu.
- Select the Word Documents you wish to merge into the Master Document.
- To select more than one document, press and hold Ctrl (PC) Shift (MAC) and click on each document you wish to merge into the Word Document.
The files will merge in the order they are selected. The first file selected will appear at the top when merged, followed by each subsequent document.
If you are trying to merge them in a certain sequence either select them manually or sort the files by file name, for example, Document 1, Document 2, Document 3 so they merge in the desired order.
Once you have merged all of your files into the Master Document be sure to save it as a new version. Giving it a new file name so that it is easily identified in your shared drive.
Looking for an easier way to collaborate and merge Word Documents?
The most common reason we need to merge multiple Microsoft Word Documents is that you are collaborating on a file with your team and two or more team members made edits at the same time. Leaving you with multiple versions of the same document and no way to easily merge them together.
Manually merging your documents by copy-and-paste is tedious, while Microsoft’s insert object tool only allows you to stick one document onto the bottom of another. What about merging them – combining them, paragraph for paragraph and picking up on the tracked changes between the two?
This is where purpose-built version control and collaboration tools like Simul Docs really shine. Here’s how it works:
Step 1: Upload & Invite
Instead of emailing documents around, you simply upload it to your Simul account and invite people to collaborate on it with you.
Step 2: Collaborators open and edit the document
Collaborators can access the latest version of a document in Word or Word Online in just 1 click.
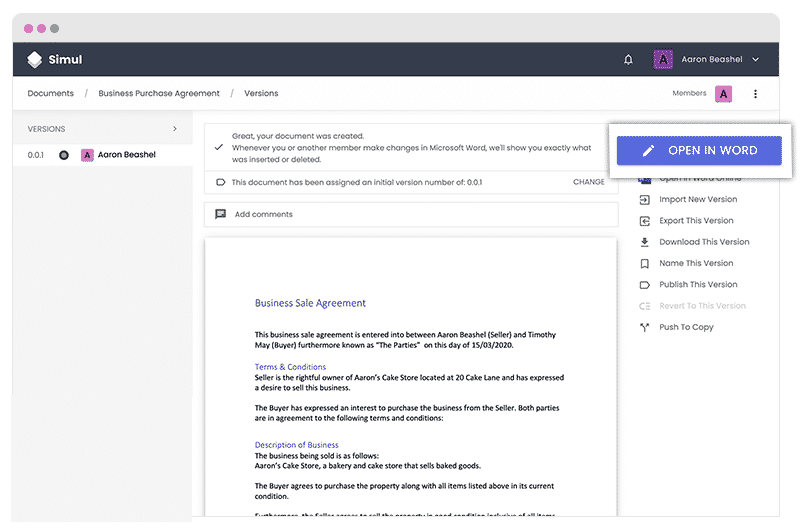
When they click the ‘Open in Word’ button it opens the selected version in Word on their computer and they can simply make changes like they normally would.
When they click ‘Save’ a new version is automatically created in Simul and collaborators are notified. No need for crazy filenames like ‘Contract_V12_FINAL’ and/or emailing documents back and forth between collaborators.

Step 3: See what changed, even if Track Changes wasn’t on
Simul has its own comparison algorithm that shows you exactly what each person changed, even if Track Changes wasn’t turned on.
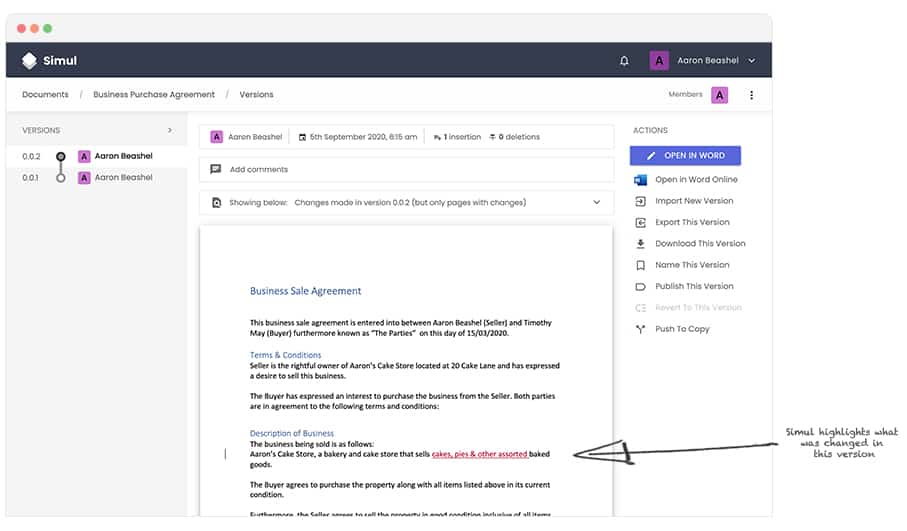
Step 3: Work simultaneously on the document
Now that you know what changes were made in the last version, you can open the document again and keep working.
If you happen to open the document at the same time as another collaborator, then Simul can handle that.
It automatically recognises when multiple people are editing the document at the same time, and saves each person’s changes in a separate branch so that nobody’s work gets overridden.

You can then merge these branches in just 1 click, and each author’s changes are marked up as tracked changes in Word, allowing you to easily identify the differences, accept or reject the changes, and fix any conflicts.

With software like Simul Docs on your team, you should never need to manually merge Microsoft Word documents again. You can work in a streamlined, effective manner knowing that Simul will track everything for you, manage your version control and allow you to easily merge any conflicting versions at the click of a button.
Combine multiple files (Word, PDF, PPT, JPG, Excel) with high speed online
Merge documents, photos, scans online
Combine files in various formats online for free. Our web service is designed to merge documents, photos, scans to a single file. Use it to join Word, PDF, JPG, PNG, Excel, PowerPoint files and combine them online. You can do it quickly and efficiently, without installing any software. Our service works from any web browser on any operating system.
Free Document Merger Online
You may need to merge documents, photos, scans in many cases. When it comes to organizing your data, file merging will help you to save paper and time. For example, you may want to join photos or scans together online for printing. Or you may want to create a single documents from multiple files and send the combined result to your colleagues. To do the job, just use our Free Document Merger, that will process a set of files and join them together in seconds.
Combine Word, PDF, HTML, JPG files online
This is a free document and image merging solution. Combine scans, photos, documents in the order you want. We guarantee the professional quality of the result.
FAQ
How to combine Word, PDF, JPG and files of other types into one?
Use our online service File Merger. It is fast and easy to use. Combine documents and images together for free.
What file formats does your file merging service support?
We support a variety of document and image file formats, including PDF, DOC, DOCX, RTF, ODT, HTML, PNG, JPG, TIFF, BMP, MOBI, CHM, WPS, TXT and many more.
How many files can I combine at a time?
You can combine up to 10 files at once.
What is the maximum allowed file size?
Each file size should not exceed 10 MB.
What are the ways to get the combined result?
At the end of the file merging operation, you will get a download link. You can download the combined result immediately or send the link to your email.
How long will my files be stored on your servers?
Your files are stored on Aspose servers for 24 hours. After this time, they are automatically deleted.
Can you guarantee the safety of my files? Is everything secure?
Aspose places the utmost importance on security and the protection of user data. Be assured that your files are stored on secure servers and protected from any unauthorized access.
Why does merging files take a little longer than I expected?
Merging multiple files into one may be time-consuming sometimes, as it involves data re-encoding and re-compressing.