
Объединение диапазона ячеек в одну или построчно с помощью кода VBA Excel. Метод Range.Merge и свойство MergeCells. Отмена объединения ячеек. Примеры.
Метод Range.Merge
Метод Merge объекта Range объединяет ячейки заданного диапазона в одну или построчно из кода VBA Excel.
Синтаксис метода:
- Expression — выражение, возвращающее объект Range.
- Across — логическое значение, определяющее характер объединения ячеек:
- True — ячейки объединяются построчно: каждая строка заданного диапазона преобразуется в одну ячейку.
- False — весь диапазон преобразуется в одну ячейку. False является значением по умолчанию.
Преимущество метода Range.Merge перед свойством MergeCells заключается в возможности построчного объединения ячеек заданного диапазона без использования цикла.
Свойство MergeCells
Свойство MergeCells объекта Range применяется как для объединения ячеек, так и для его отмены.
Синтаксис свойства с присвоением значения:
|
Expression.MergeCells = Boolean |
- Expression — выражение, представляющее объект Range.
- Boolean — логическое значение, определяющее необходимость объединения ячеек или его отмены:
- True — объединение ячеек заданного диапазона.
- False — отмена объединения ячеек.
С помощью свойства MergeCells можно из кода VBA Excel проверять диапазон (отдельную ячейку), входит ли он (она) в объединенную ячейку (True) или нет (False). Если проверяемый диапазон окажется комбинированным, то есть содержащим объединенные и необъединенные ячейки, компилятор сгенерирует ошибку.
Переменная Expression для отмены объединения ячеек с помощью свойства Range.MergeCells может представлять одну любую ячейку, входящую в объединенный диапазон.
Метод Range.UnMerge
Метод UnMerge объекта Range разделяет объединенную область на отдельные ячейки из кода VBA Excel.
Синтаксис метода:
Expression — выражение, возвращающее объект Range.
Переменная Expression для отмены объединения ячеек методом UnMerge может представлять одну любую ячейку, входящую в объединенный диапазон.
Примеры объединения ячеек и его отмены
Пример 1
Наблюдаем, как происходит объединение ячеек при разных значениях параметра Across:
|
Sub Primer1() ‘Объединяем ячейки диапазона «A1:D4» построчно Range(«A1:D4»).Merge (True) ‘Объединяем диапазон «A5:D8» в одну ячейку ‘Across принимает значение False по умолчанию Range(«A5:D8»).Merge End Sub |
Не забываем, что логическое выражение True можно заменить единичкой, а False — нулем.
Пример 2
Отменяем объединение ячеек в диапазонах из первого примера:
|
Sub Primer2() Range(«A1:D8»).MergeCells = False End Sub |
Пример 3
Предполагается, что перед этим примером отменено объединение ячеек кодом из предыдущего примера.
|
Sub Primer3() ‘Объединяем ячейки диапазона «A1:D4» Range(«A1:D4»).MergeCells = 1 ‘Проверяем принадлежность диапазона ‘объединенной ячейке* MsgBox Range(«A1:C2»).MergeCells MsgBox Range(«A6:C7»).MergeCells ‘Ячейки диапазона «A5:D8» ‘можно объединить и так Cells(5, 1).Resize(4, 4).Merge End Sub |
*Если проверяемый диапазон окажется комбинированным, VBA Excel сгенерирует ошибку.
Пример 4
Отмена объединения ячеек с помощью метода Range.UnMerge:
|
Sub Primer4() ‘Объединяем ячейки диапазона «A1:C4» Range(«A1:C4»).Merge MsgBox «Ячейки диапазона ««A1:C4»» объединены» ‘Смотрим адрес диапазона, входящего в объединенную ячейку MsgBox Range(«A2»).MergeArea.Address ‘Отменяем объединение ячеек диапазона «A1:C4» Range(«B3»).UnMerge ‘или: Range(«B3»).MergeArea.UnMerge MsgBox «Объединение ячеек диапазона ««A1:C4»» отменено» End Sub |
Предупреждение перед объединением
Если объединяемые ячейки не являются пустыми, пред их объединением появится предупреждающее диалоговое окно с сообщением: «В объединенной ячейке сохраняется только значение из верхней левой ячейки диапазона. Остальные значения будут потеряны.»
Пример 5
Наблюдаем появление предупреждающего окна:
|
Sub Primer5() ‘Отменяем объединение ячеек в диапазоне «A1:D4» Range(«A1:D4»).MergeCells = 0 ‘Заполняем ячейки диапазона текстом Range(«A1:D4») = «Ячейка не пустая» ‘Объединяем ячейки диапазона «A1:D4» Range(«A1:D4»).MergeCells = 1 ‘Наблюдаем предупреждающее диалоговое окно End Sub |

Чтобы избежать появление предупреждающего окна, следует использовать свойство Application.DisplayAlerts, с помощью которого можно отказаться от показа диалоговых окон при работе кода VBA Excel.
Пример 6
|
Sub Primer6() ‘Отменяем объединение ячеек в диапазоне «A5:D8» Range(«A5:D8»).MergeCells = 0 ‘Заполняем ячейки диапазона «A5:D8» текстом Range(«A5:D8») = «Ячейка не пустая» Application.DisplayAlerts = False Range(«A5:D8»).MergeCells = 1 Application.DisplayAlerts = True End Sub |
Теперь все прошло без появления диалогового окна. Главное, не забывать после объединения ячеек возвращать свойству Application.DisplayAlerts значение True.
Кстати, если во время работы VBA Excel предупреждающее окно не показывается, это не означает, что оно игнорируется. Просто программа самостоятельно принимает к действию ответное значение диалогового окна по умолчанию.
Содержание
- VBA Excel. Объединение ячеек и его отмена
- Метод Range.Merge
- Свойство MergeCells
- Метод Range.UnMerge
- Merge Multiple Cells into One Cell with VBA
- Merge multiple Cells into One Cell with VBA
- Excel VBA Merge Cells: Step-by-Step Guide and 6 Code Examples to Merge or Unmerge Cells with Macros
- Related VBA and Macro Tutorials
- #1: Merge Cells
- VBA Code to Merge Cells
- Process Followed by VBA Code
- VBA Statement Explanation
- Macro Example
- Effects of Executing Macro Example
- #2: Unmerge Cells
- VBA Code to Unmerge Cells
- Process Followed by VBA Code
- VBA Statement Explanation
- Macro Example
- Effects of Executing Macro Example
- #3: Merge Cells and Center
- VBA Code to Merge Cells and Center
- Process Followed by VBA Code
- VBA Statement Explanation
- Lines #1 and #5: With Worksheet.Range(“FirstCell:LastCell”) | End With
- Line #2: .HorizontalAlignment = xlCenter
- Line #3: VerticalAlignment = xlCenter
- Line #4: Merge
- Macro Example
- Effects of Executing Macro Example
- #4: Merge Cells Across
- VBA Code to Merge Cells Across
- Process Followed by VBA Code
- VBA Statement Explanation
- Macro Example
- Effects of Executing Macro Example
- #5: Merge Cells Based on Cell Value
- VBA Code to Merge Cells Based on Cell Value
- Process Followed by VBA Code
- VBA Statement Explanation
- Lines #1 and #5: With Worksheet | End With
- Lines #2 and #4: For Counter = LastRow To FirstRow Step -1 | Next Counter
- Line #3: If .Cells(Counter, CriteriaColumn).Value = Criteria Then .Range(.Cells(Counter, FirstColumn), .Cells(Counter, LastColumn)).Merge
- Macro Example
- Effects of Executing Macro Example
- #6: Merge Cells Within a Row Based on Cell Value
- VBA Code to Merge Cells Within a Row Based on Cell Value
- Process Followed by VBA Code
- VBA Statement Explanation
- Lines #1 and #5: With Worksheet | End With
- Lines #2 and #4: For Counter = LastRow To FirstRow Step -1 | Next Counter
- Line #3: .Cells(Counter, BaseColumn).Resize(ColumnSize:=.Cells(Counter, SizeColumn).Value).Merge
- Macro Example
- Effects of Executing Macro Example
- References to VBA Constructs Used in this VBA Tutorial
VBA Excel. Объединение ячеек и его отмена
Объединение диапазона ячеек в одну или построчно с помощью кода VBA Excel. Метод Range.Merge и свойство MergeCells. Отмена объединения ячеек. Примеры.
Метод Range.Merge
Метод Merge объекта Range объединяет ячейки заданного диапазона в одну или построчно из кода VBA Excel.
Синтаксис метода:
- Expression — выражение, возвращающее объект Range.
- Across — логическое значение, определяющее характер объединения ячеек:
- True — ячейки объединяются построчно: каждая строка заданного диапазона преобразуется в одну ячейку.
- False — весь диапазон преобразуется в одну ячейку. False является значением по умолчанию.
Преимущество метода Range.Merge перед свойством MergeCells заключается в возможности построчного объединения ячеек заданного диапазона без использования цикла.
Свойство MergeCells
Свойство MergeCells объекта Range применяется как для объединения ячеек, так и для его отмены.
Синтаксис свойства с присвоением значения:
- Expression — выражение, представляющее объект Range.
- Boolean — логическое значение, определяющее необходимость объединения ячеек или его отмены:
- True — объединение ячеек заданного диапазона.
- False — отмена объединения ячеек.
С помощью свойства MergeCells можно из кода VBA Excel проверять диапазон (отдельную ячейку), входит ли он (она) в объединенную ячейку (True) или нет (False). Если проверяемый диапазон окажется комбинированным, то есть содержащим объединенные и необъединенные ячейки, компилятор сгенерирует ошибку.
Переменная Expression для отмены объединения ячеек с помощью свойства Range.MergeCells может представлять одну любую ячейку, входящую в объединенный диапазон.
Метод Range.UnMerge
Метод UnMerge объекта Range разделяет объединенную область на отдельные ячейки из кода VBA Excel.
Источник
Merge Multiple Cells into One Cell with VBA
This post will guide you how to combine multiple cells into one cell with VBA code in Excel. How do I concatenate a range of cells with VBA macro in Excel 2013/2016. How to merge the contents of two or multiple cells into one cell with macro in Excel.
Merge multiple Cells into One Cell with VBA
If you want to merge multiple cells into one cell without losing data in excel, you can try to use an Excel VBA macro to quickly achieve the result. Just do the following steps:
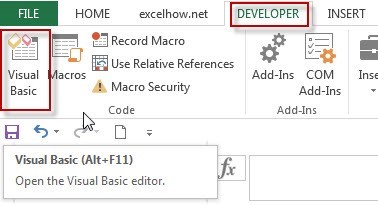
#1 open your excel workbook and then click on “Visual Basic” command under DEVELOPER Tab, or just press “ALT+F11” shortcut.
#2 then the “Visual Basic Editor” window will appear.
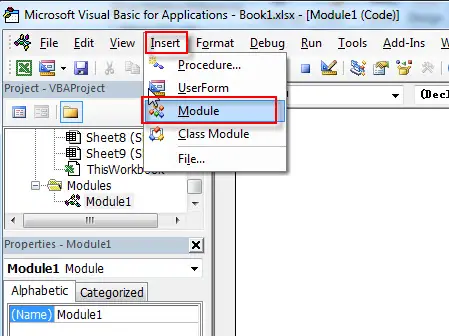
#3 click “Insert” ->”Module” to create a new module
#4 paste the below VBA code into the code window. Then clicking “Save” button.
#5 back to the current worksheet, then run the above excel macro. Click Run button.
#6 select one range of cells to merge cells
#7 select one destination cell
#8 let’s see the result.
You can also write an user defined function with VBA to merge multiple cells in Excel. just do use the following vba code:
Источник
Excel VBA Merge Cells: Step-by-Step Guide and 6 Code Examples to Merge or Unmerge Cells with Macros
 In this VBA Tutorial, you learn how to merge cells and unmerge cells in a variety of ways.
This VBA Tutorial is accompanied by Excel workbooks containing the data and macros I use in the examples below. You can get immediate free access to these example workbooks by subscribing to the Power Spreadsheets Newsletter.
Use the following Table of Contents to navigate to the section you’re interested in.
Table of Contents
The following VBA and Macro Tutorials may help you better understand and implement the contents below:
- General VBA constructs and structures:
- Learn about using variables here.
Learn about VBA data types here.
Learn about R1C1 and A1 style references here.
Practical VBA applications and macro examples:
You can find additional VBA and Macro Tutorials in the Archives.
#1: Merge Cells
VBA Code to Merge Cells
To merge cells with VBA, use a statement with the following structure:
Process Followed by VBA Code
merge cells» width=»312″ height=»104″ data-srcset=»https://powerspreadsheets.com/wp-content/uploads/process-merge-cells.jpg 312w, https://powerspreadsheets.com/wp-content/uploads/process-merge-cells-300×100.jpg 300w» data-src=»https://powerspreadsheets.com/wp-content/uploads/process-merge-cells.jpg» data-sizes=»(max-width: 312px) 100vw, 312px» gif;base64,R0lGODlhAQABAAAAACH5BAEKAAEALAAAAAABAAEAAAICTAEAOw==»/>
VBA Statement Explanation
- Item: Worksheet.
- VBA Construct: Workbook.Worksheets property.
Description: Returns a Worksheet object representing the worksheet you work with.
Item: Range(“FirstCell:LastCell”).
- VBA Construct: Worksheet.Range property.
Description: Returns a Range object representing the cell range between FirstCell and LastCell. This is the cell range you merge.
Specify FirstCell and LastCell using an A1-style cell reference. Separate FirstCell and LastCell using the range operator, a colon (:). Enclose the entire cell range address within quotations (“”).
Item: Merge.
- VBA Construct: Range.Merge method.
Macro Example
The following macro merges cells A5 to E6 of the worksheet named “Merge Cells”.
Effects of Executing Macro Example
The following GIF illustrates the results of executing this macro example. As expected, cells A5 to E6 are merged.

#2: Unmerge Cells
VBA Code to Unmerge Cells
To unmerge cells with VBA, use a statement with the following structure:
Process Followed by VBA Code
Unmerge cells» width=»311″ height=»101″ data-srcset=»https://powerspreadsheets.com/wp-content/uploads/process-unmerge-cells.jpg 311w, https://powerspreadsheets.com/wp-content/uploads/process-unmerge-cells-300×97.jpg 300w» data-src=»https://powerspreadsheets.com/wp-content/uploads/process-unmerge-cells.jpg» data-sizes=»(max-width: 311px) 100vw, 311px» gif;base64,R0lGODlhAQABAAAAACH5BAEKAAEALAAAAAABAAEAAAICTAEAOw==»/>
VBA Statement Explanation
- Item: Worksheet.
- VBA Construct: Workbook.Worksheets property.
Description: Returns a Worksheet object representing the worksheet you work with.
Item: Range(“A1CellReference”).
- VBA Construct: Worksheet.Range property.
Description: Returns a Range object representing a cell within the merged cell you unmerge. Specify the cell using an A1-style cell reference (A1CellReference) enclosed within quotations (“”).
Item: UnMerge.
- VBA Construct: Range.UnMerge method.
Macro Example
The following macro unmerges the merged cell containing cell C6 of the worksheet named “Merge Cells”.
Effects of Executing Macro Example
The following GIF illustrates the results of executing this macro example. As expected, the merged cell containing cell C6 is unmerged into individual regular cells.
The merged cell range (A5 to E6) was originally merged using the macro example #1 above.

#3: Merge Cells and Center
VBA Code to Merge Cells and Center
To merge cells and center the contents with VBA, use a macro with the following statement structure:
Process Followed by VBA Code
center contents of cell range > merge cells» width=»494″ height=»104″ data-srcset=»https://powerspreadsheets.com/wp-content/uploads/process-merge-cells-and-center.jpg 494w, https://powerspreadsheets.com/wp-content/uploads/process-merge-cells-and-center-300×63.jpg 300w» data-src=»https://powerspreadsheets.com/wp-content/uploads/process-merge-cells-and-center.jpg» data-sizes=»(max-width: 494px) 100vw, 494px» gif;base64,R0lGODlhAQABAAAAACH5BAEKAAEALAAAAAABAAEAAAICTAEAOw==»/>
VBA Statement Explanation
Lines #1 and #5: With Worksheet.Range(“FirstCell:LastCell”) | End With
- Item: With… End With.
- VBA Construct: With… End With statement.
Description: Statements within the With… End With statement (lines #2 through #4 below) are executed on the Range object returned by item #3 below.
Item: Worksheet.
- VBA Construct: Workbook.Worksheets property.
Description: Returns a Worksheet object representing the worksheet you work with.
Item: Range(“FirstCell:LastCell”).
- VBA Construct: Worksheet.Range property.
Description: Returns a Range object representing the cell range between FirstCell and LastCell. This is the cell range you merge.
Specify FirstCell and LastCell using an A1-style cell reference. Separate FirstCell and LastCell using the range operator, a colon (:). Enclose the entire cell range address within quotations (“”).
Line #2: .HorizontalAlignment = xlCenter
- Item: HorizontalAlignment = xlCenter.
- VBA Construct: Range.HorizontalAlignment property.
Line #3: VerticalAlignment = xlCenter
- Item: VerticalAlignment = xlCenter.
- VBA Construct: Range.VerticalAlignment property.
Line #4: Merge
- VBA Construct: Range.Merge method.
Macro Example
The following macro (i) centers the contents in cells A8 to E9 of the worksheet named “Merge Cells”, and (ii) merges those cells.
Effects of Executing Macro Example
The following GIF illustrates the results of executing this macro example. As expected, VBA merges cells A8 to E9 and centers the contents.

#4: Merge Cells Across
VBA Code to Merge Cells Across
To merge cells across (in the same row) with VBA, use a statement with the following structure:
Process Followed by VBA Code
merge cells across» width=»309″ height=»100″ data-srcset=»https://powerspreadsheets.com/wp-content/uploads/process-merge-cells-across.jpg 309w, https://powerspreadsheets.com/wp-content/uploads/process-merge-cells-across-300×97.jpg 300w» data-src=»https://powerspreadsheets.com/wp-content/uploads/process-merge-cells-across.jpg» data-sizes=»(max-width: 309px) 100vw, 309px» gif;base64,R0lGODlhAQABAAAAACH5BAEKAAEALAAAAAABAAEAAAICTAEAOw==»/>
VBA Statement Explanation
- Item: Worksheet.
- VBA Construct: Workbook.Worksheets property.
Description: Returns a Worksheet object representing the worksheet you work with.
Item: Range(“FirstCell:LastCell”).
- VBA Construct: Worksheet.Range property.
Description: Returns a Range object representing the cell range between FirstCell and LastCell. This is the cell range you merge.
Specify FirstCell and LastCell using an A1-style cell reference. Separate FirstCell and LastCell using the range operator, a colon (:). Enclose the entire cell range address within quotations (“”).
Item: Merge.
- VBA Construct: Range.Merge method.
Description: Merges the cells in each row of the cell range you specify in item #2 above to create separate merged cells. For these purposes, considers the Across parameter (item #4 below).
Item: Across:=True.
- VBA Construct: Across parameter of the Range.Merge method.
Description: Specifies that the cells in each row of the cell range you specify in item #2 above are merged separately. In other words, the cells in each row are merged into separate merged cells (vs. a single merged cell covering the entire cell range).
The default value of the Across parameter is False. In such case, all cells within the cell range you specify are merged into a single cell. This is the equivalent of simply merging cells (operation #1 above).
Macro Example
The following macro merges cells A11 to E15 of the worksheet named “Merge Cells” across. Therefore, the cells in each row from row 11 to row 15 are merged into separate merged cells.
Effects of Executing Macro Example
The following GIF illustrates the results of executing this macro example. As expected, VBA merges cells A11 to E15 across.

#5: Merge Cells Based on Cell Value
VBA Code to Merge Cells Based on Cell Value
To merge cells based on a cell value (whether it meets certain criteria), use a macro with the following statement structure:
Process Followed by VBA Code
Identify cell range in row > merge cells > go to previous row» width=»668″ height=»450″ data-srcset=»https://powerspreadsheets.com/wp-content/uploads/process-merge-cells-based-on-cell-value-criteria.jpg 668w, https://powerspreadsheets.com/wp-content/uploads/process-merge-cells-based-on-cell-value-criteria-300×202.jpg 300w» data-src=»https://powerspreadsheets.com/wp-content/uploads/process-merge-cells-based-on-cell-value-criteria.jpg» data-sizes=»(max-width: 668px) 100vw, 668px» gif;base64,R0lGODlhAQABAAAAACH5BAEKAAEALAAAAAABAAEAAAICTAEAOw==»/>
VBA Statement Explanation
Lines #1 and #5: With Worksheet | End With
- Item: With… End With.
- VBA Construct: With… End With statement.
Description: Statements within the With… End With statement (lines #2 through #4 below) are executed on the Worksheet object returned by item #2 below.
Item: Worksheet.
- VBA Construct: Workbook.Worksheets property.
Lines #2 and #4: For Counter = LastRow To FirstRow Step -1 | Next Counter
- Item: For… Next Counter.
- VBA Construct: For… Next statement.
Description: Repeats the statements within the loop (line #3 below) for each row between FirstRow (item #4 below) and LastRow (item #3 below).
Item: Counter.
- VBA Construct: Counter of For… Next statement.
Description: Loop counter. If you explicitly declare a variable to represent the loop counter, use the Long data type.
Item: LastRow.
- VBA Construct: Counter Start of For… Next statement.
Description: Number of the last row (further down the worksheet) you want the macro to consider when identifying rows to merge cells. The number of the last row is also the initial value of Counter (item #2 above).
If you explicitly declare a variable to represent the number of the last row to consider, use the Long data type.
Item: FirstRow.
- VBA Construct: Counter End of For… Next statement.
Description: Number of the first row (closer to the top of the worksheet) you want the macro to consider when identifying rows to merge cells. The number of the first row is also the final value of Counter (item (#2 above).
If you explicitly declare a variable to represent the number of the first row to consider, use the Long data type.
Item: Step -1.
- VBA Construct: Step of For… Next statement.
Description: Amount by which Counter (item #2 above) changes every time a loop iteration occurs.
In this scenario, you loop backwards: from LastRow (item #3 above) to FirstRow (item #4 above). Therefore, step is -1.
Line #3: If .Cells(Counter, CriteriaColumn).Value = Criteria Then .Range(.Cells(Counter, FirstColumn), .Cells(Counter, LastColumn)).Merge
- VBA Construct: If… Then… Else statement.
Description: Conditionally executes the statement at the end of the line of code (items #5 through #8 below) if the condition specified in item #4 below is met.
Item: .Cells(Counter, CriteriaColumn).
- VBA Construct: Worksheet.Cells property and Range.Item property.
Description: Returns a Range object representing the cell at the intersection of row number Counter and column number CriteriaColumn.
At any given time, the value of the loop counter (Counter) is the same as that of the row through which the macro is currently looping. CriteriaColumn is the number of the column containing the cells you consider for purposes of determining whether to merge cells in the row through which the macro is currently looping.
Item: Value.
- VBA Construct: Range.Value property.
Description: Returns the value of the cell represented by the Range object returned by item #2 above.
Item: .Cells(Counter, CriteriaColumn).Value = Criteria.
- VBA Construct: Condition of If… Then… Else statement.
Description: This condition is an expression that evaluates to True or False, as follows:
- True: When the value of the cell represented by the Range object returned by item #2 above is equal to the criteria you specify (Criteria).
False: When the value of the cell represented by the Range object returned by item #2 above isn’t equal to the criteria you specify (Criteria).
If you explicitly declare a variable to represent value, ensure that the data type you use can handle the value you use as criteria.
Item: .Range.
- VBA Construct: Worksheet.Range property.
Description: Returns a Range object representing a cell range specified as follows:
- Leftmost cell: Range object returned by item #6 below.
Rightmost cell: Range object returned by item #7 below.
Item: .Cells(Counter, FirstColumn).
- VBA Construct: Worksheet.Cells property and Range.Item property.
Description: Returns a Range object representing the cell at the intersection of row number Counter and column number FirstColumn.
At any given time, the value of the loop counter (Counter) is the same as that of the row through which the macro is currently looping. FirstColumn is the number of the first column in the cell range you want the macro to merge. If you explicitly declare a variable to represent FirstColumn, use the Long data type.
Item: .Cells(Counter, LastColumn).
- VBA Construct: Worksheet.Cells property and Range.Item property.
Description: Returns a Range object representing the cell at the intersection of row number Counter and column number LastColumn.
At any given time, the value of the loop counter (Counter) is the same as that of the row through which the macro is currently looping. LastColumn is the number of the last column in the cell range you want the macro to merge. If you explicitly declare a variable to represent LastColumn, use the Long data type.
Item: Merge.
- VBA Construct: Range.Merge method.
Macro Example
The following macro merges cells in columns myFirstColumn through myLastColumn in each row between myFirstRow and myLastRow where the value stored in column myCriteriaColumn is the string held by the myCriteria variable.
- myFirstRow is set to 5.
myLastRow is set to the number of the last row with data in the worksheet named “Merge Cells Based on Criteria”. The constructs used by the statement that finds the last row with data in the worksheet are the Worksheet.Cells property, the Range.Find method, and the Range.Row property.
Both myCriteriaColumn and myFirstColumn are set to 1 (column A).
myLastColumn is set to 5 (column E).
Effects of Executing Macro Example
The following GIF illustrates the results of executing this macro example. As expected, VBA merges cells in columns A through E in each row where the value stored in column A is the string “Merge Cells”.

#6: Merge Cells Within a Row Based on Cell Value
VBA Code to Merge Cells Within a Row Based on Cell Value
To merge cells within a row based on a cell value (the cell value determines the number of cells to merge), use a macro with the following statement structure:
Process Followed by VBA Code
resize cell range > merge cells > go to previous row» width=»702″ height=»416″ data-srcset=»https://powerspreadsheets.com/wp-content/uploads/process-merge-cells-based-on-cell-value.jpg 702w, https://powerspreadsheets.com/wp-content/uploads/process-merge-cells-based-on-cell-value-300×178.jpg 300w» data-src=»https://powerspreadsheets.com/wp-content/uploads/process-merge-cells-based-on-cell-value.jpg» data-sizes=»(max-width: 702px) 100vw, 702px» gif;base64,R0lGODlhAQABAAAAACH5BAEKAAEALAAAAAABAAEAAAICTAEAOw==»/>
VBA Statement Explanation
Lines #1 and #5: With Worksheet | End With
- Item: With… End With.
- VBA Construct: With… End With statement.
Description: Statements within the With… End With statement (lines #2 through #4 below) are executed on the Worksheet object returned by item #2 below.
Item: Worksheet.
- VBA Construct: Workbook.Worksheets property.
Lines #2 and #4: For Counter = LastRow To FirstRow Step -1 | Next Counter
- Item: For… Next Counter.
- VBA Construct: For… Next statement.
Description: Repeats the statements within the loop (line #3 below) for each row between FirstRow (item #4 below) and LastRow (item #3 below).
Item: Counter.
- VBA Construct: Counter of For… Next statement.
Description: Loop counter. If you explicitly declare a variable to represent the loop counter, use the Long data type.
Item: LastRow.
- VBA Construct: Counter Start of For… Next statement.
Description: Number of the last row (further down the worksheet) you want the macro to consider when identifying rows to merge cells. The number of the last row is also the initial value of Counter (item #2 above).
If you explicitly declare a variable to represent the number of the last row to consider, use the Long data type.
Item: FirstRow.
- VBA Construct: Counter End of For… Next statement.
Description: Number of the first row (closer to the top of the worksheet) you want the macro to consider when identifying rows to merge cells. The number of the first row is also the final value of Counter (item (#2 above).
If you explicitly declare a variable to represent the number of the first row to consider, use the Long data type.
Item: Step -1.
- VBA Construct: Step of For… Next statement.
Description: Amount by which Counter (item #2 above) changes every time a loop iteration occurs.
In this scenario, you loop backwards: from LastRow (item #3 above) to FirstRow (item #4 above). Therefore, step is -1.
Line #3: .Cells(Counter, BaseColumn).Resize(ColumnSize:=.Cells(Counter, SizeColumn).Value).Merge
- Item: .Cells(Counter, BaseColumn).
- VBA Construct: Worksheet.Cells property and Range.Item property.
Description: Returns a Range object representing the cell at the intersection of row number Counter and column number BaseColumn.
At any given time, the value of the loop counter (Counter) is the same as that of the row through which the macro is currently looping. BaseColumn is the number of the column you use as base for purposes of merging cells within the row through which the macro is currently looping.
Item: Resize(ColumnSize:=.Cells(Counter, SizeColumn).Value).
- VBA Construct: Range.Resize property.
Description: Returns a Range object representing a resized cell range. The Range object returned by Range.Resize is determined as follows:
- Base Cell Range: The base Range object (prior to resizing) is that returned by item #1 above.
Row Size: The number of rows in the cell range returned by Range.Resize remain the same. In other words, the cell range where cells are merged is 1 row tall.
This is because the first parameter of Resize (known as RowSize) is omitted. Therefore, the number of rows in the cell range remains the same.
Column Size: The number of columns in the cell range returned by Range.Resize is determined by item #3 below.
Item: ColumnSize:=.Cells(Counter, SizeColumn).Value.
- VBA Constructs: ColumnSize parameter of Range.Resize property and Range.Value property.
Description: Specifies the number of columns in the Range object returned by the Range.Resize property. The number of columns in this cell range is equal to the value within the cell at the intersection of row number Counter and column number SizeColumn (.Cells(Counter, SizeColumn).Value).
At any given time, the value of the loop counter (Counter) is the same as that of the row through which the macro is currently looping. SizeColumn is the number of the column containing the number of cells you want to merge within the row through which the macro is currently looping.
Item: Merge.
- VBA Construct: Range.Merge method.
Macro Example
The following macro merges a certain number of cells, starting with the cell in column myBaseColumn, in each row between myFirstRow and myLastRow. The number of merged cells is equal to the value stored in mySizeColumn. If that value is 1, no cells are merged.
In other words, the macro merges the cells between column number mySizeColumn and the column whose number is equal to that stored within the cell in myBaseColumn.
- myFirstRow is set to 5.
myLastRow is set to the number of the last row with data in the worksheet named “Merge Cells Based on Cell Value”. The constructs used by the statement that finds the last row with data in the worksheet are the Worksheet.Cells property, the Range.Find method, and the Range.Row property.
Effects of Executing Macro Example
The following GIF illustrates the results of executing this macro example. As expected, for each row with data, the macro merges the cells between column A and the column whose number is specified in column A.

References to VBA Constructs Used in this VBA Tutorial
Use the following links to visit the appropriate webpage within the Microsoft Office Dev Center:
- Identify the worksheet you work with:
Return a Range object representing the cells you merge:
Center the contents of a cell range horizontally or vertically:
Identify last row with data in a worksheet:
Loop through rows:
Identify the value stored in a cell to specify criteria for merging cells.
Test if cells meet criteria for merging:
Work with variables:
Simplify object references:
Источник
| title | keywords | f1_keywords | ms.prod | api_name | ms.assetid | ms.date | ms.localizationpriority |
|---|---|---|---|---|---|---|---|
|
Range.MergeCells property (Excel) |
vbaxl10.chm144161 |
vbaxl10.chm144161 |
excel |
Excel.Range.MergeCells |
42904357-5e55-1eb0-9b06-83b446fc6275 |
05/11/2019 |
medium |
Range.MergeCells property (Excel)
True if the range contains merged cells. Read/write Variant.
Syntax
expression.MergeCells
expression A variable that represents a Range object.
Remarks
When you select a range that contains merged cells, the resulting selection may be different from the intended selection. Use the Address property to check the address of the selected range.
Example
This example sets the value of the merged range that contains cell A3.
Set ma = Range("a3").MergeArea
If Range("a3").MergeCells Then
 ma.Cells(1, 1).Value = "42"
End If
[!includeSupport and feedback]
In this VBA Tutorial, you learn how to merge cells and unmerge cells in a variety of ways.
This VBA Tutorial is accompanied by Excel workbooks containing the data and macros I use in the examples below. You can get immediate free access to these example workbooks by subscribing to the Power Spreadsheets Newsletter.
Use the following Table of Contents to navigate to the section you’re interested in.
Related VBA and Macro Tutorials
The following VBA and Macro Tutorials may help you better understand and implement the contents below:
- General VBA constructs and structures:
- Learn about using variables here.
- Learn about VBA data types here.
- Learn about R1C1 and A1 style references here.
- Practical VBA applications and macro examples:
- Learn how to work with worksheets here.
You can find additional VBA and Macro Tutorials in the Archives.
VBA Code to Merge Cells
To merge cells with VBA, use a statement with the following structure:
Worksheet.Range("FirstCell:LastCell").Merge
Process Followed by VBA Code

VBA Statement Explanation
- Item: Worksheet.
- VBA Construct: Workbook.Worksheets property.
- Description: Returns a Worksheet object representing the worksheet you work with.
- Item: Range(“FirstCell:LastCell”).
- VBA Construct: Worksheet.Range property.
- Description: Returns a Range object representing the cell range between FirstCell and LastCell. This is the cell range you merge.
Specify FirstCell and LastCell using an A1-style cell reference. Separate FirstCell and LastCell using the range operator, a colon (:). Enclose the entire cell range address within quotations (“”).
- Item: Merge.
- VBA Construct: Range.Merge method.
- Description: Merges the cells represented by the Range object you specify in item #2 above to create a merged cell.
Macro Example
The following macro merges cells A5 to E6 of the worksheet named “Merge Cells”.
Sub mergeCells()

    Worksheets("Merge Cells").Range("A5:E6").Merge

End Sub
Effects of Executing Macro Example
The following GIF illustrates the results of executing this macro example. As expected, cells A5 to E6 are merged.
#2: Unmerge Cells
VBA Code to Unmerge Cells
To unmerge cells with VBA, use a statement with the following structure:
Worksheet.Range("A1CellReference").UnMerge
Process Followed by VBA Code

VBA Statement Explanation
- Item: Worksheet.
- VBA Construct: Workbook.Worksheets property.
- Description: Returns a Worksheet object representing the worksheet you work with.
- Item: Range(“A1CellReference”).
- VBA Construct: Worksheet.Range property.
- Description: Returns a Range object representing a cell within the merged cell you unmerge. Specify the cell using an A1-style cell reference (A1CellReference) enclosed within quotations (“”).
- Item: UnMerge.
- VBA Construct: Range.UnMerge method.
- Description: Separates the merged cell containing the cell you specify in item #2 above into individual regular cells.
Macro Example
The following macro unmerges the merged cell containing cell C6 of the worksheet named “Merge Cells”.
Sub unmergeCells()

    Worksheets("Merge Cells").Range("C6").UnMerge

End Sub
Effects of Executing Macro Example
The following GIF illustrates the results of executing this macro example. As expected, the merged cell containing cell C6 is unmerged into individual regular cells.
The merged cell range (A5 to E6) was originally merged using the macro example #1 above.
#3: Merge Cells and Center
VBA Code to Merge Cells and Center
To merge cells and center the contents with VBA, use a macro with the following statement structure:
With Worksheet.Range("FirstCell:LastCell")
    .HorizontalAlignment = xlCenter
    .VerticalAlignment = xlCenter
    .Merge
End With
Process Followed by VBA Code

VBA Statement Explanation
Lines #1 and #5: With Worksheet.Range(“FirstCell:LastCell”) | End With
- Item: With… End With.
- VBA Construct: With… End With statement.
- Description: Statements within the With… End With statement (lines #2 through #4 below) are executed on the Range object returned by item #3 below.
- Item: Worksheet.
- VBA Construct: Workbook.Worksheets property.
- Description: Returns a Worksheet object representing the worksheet you work with.
- Item: Range(“FirstCell:LastCell”).
- VBA Construct: Worksheet.Range property.
- Description: Returns a Range object representing the cell range between FirstCell and LastCell. This is the cell range you merge.
Specify FirstCell and LastCell using an A1-style cell reference. Separate FirstCell and LastCell using the range operator, a colon (:). Enclose the entire cell range address within quotations (“”).
Line #2: .HorizontalAlignment = xlCenter
- Item: HorizontalAlignment = xlCenter.
- VBA Construct: Range.HorizontalAlignment property.
- Description: Horizontally centers the contents of the cell range you specify in line #1 above by setting the HorizontalAlignment property to xlCenter.
Line #3: VerticalAlignment = xlCenter
- Item: VerticalAlignment = xlCenter.
- VBA Construct: Range.VerticalAlignment property.
- Description: Vertically centers the contents of the cell range you specify in line #1 above by setting the VerticalAlignment property to xlCenter.
Line #4: Merge
- Item: Merge.
- VBA Construct: Range.Merge method.
- Description: Merges the cells represented by the Range object you specify in line #1 above to create a merged cell.
Macro Example
The following macro (i) centers the contents in cells A8 to E9 of the worksheet named “Merge Cells”, and (ii) merges those cells.
Sub mergeCellsAndCenter()

    With Worksheets("Merge Cells").Range("A8:E9")
        .HorizontalAlignment = xlCenter
        .VerticalAlignment = xlCenter
        .Merge
    End With

End Sub
Effects of Executing Macro Example
The following GIF illustrates the results of executing this macro example. As expected, VBA merges cells A8 to E9 and centers the contents.
#4: Merge Cells Across
VBA Code to Merge Cells Across
To merge cells across (in the same row) with VBA, use a statement with the following structure:
Worksheet.Range("FirstCell:LastCell").Merge Across:=True
Process Followed by VBA Code

VBA Statement Explanation
- Item: Worksheet.
- VBA Construct: Workbook.Worksheets property.
- Description: Returns a Worksheet object representing the worksheet you work with.
- Item: Range(“FirstCell:LastCell”).
- VBA Construct: Worksheet.Range property.
- Description: Returns a Range object representing the cell range between FirstCell and LastCell. This is the cell range you merge.
Specify FirstCell and LastCell using an A1-style cell reference. Separate FirstCell and LastCell using the range operator, a colon (:). Enclose the entire cell range address within quotations (“”).
- Item: Merge.
- VBA Construct: Range.Merge method.
- Description: Merges the cells in each row of the cell range you specify in item #2 above to create separate merged cells. For these purposes, considers the Across parameter (item #4 below).
- Item: Across:=True.
- VBA Construct: Across parameter of the Range.Merge method.
- Description: Specifies that the cells in each row of the cell range you specify in item #2 above are merged separately. In other words, the cells in each row are merged into separate merged cells (vs. a single merged cell covering the entire cell range).
The default value of the Across parameter is False. In such case, all cells within the cell range you specify are merged into a single cell. This is the equivalent of simply merging cells (operation #1 above).
Macro Example
The following macro merges cells A11 to E15 of the worksheet named “Merge Cells” across. Therefore, the cells in each row from row 11 to row 15 are merged into separate merged cells.
Sub mergeCellsAcross()

    Worksheets("Merge Cells").Range("A11:E15").Merge Across:=True

End Sub
Effects of Executing Macro Example
The following GIF illustrates the results of executing this macro example. As expected, VBA merges cells A11 to E15 across.
#5: Merge Cells Based on Cell Value
VBA Code to Merge Cells Based on Cell Value
To merge cells based on a cell value (whether it meets certain criteria), use a macro with the following statement structure:
With Worksheet
    For Counter = LastRow To FirstRow Step -1
        If .Cells(Counter, CriteriaColumn).Value = Criteria Then .Range(.Cells(Counter, FirstColumn), .Cells(Counter, LastColumn)).Merge
    Next Counter
End With
Process Followed by VBA Code

VBA Statement Explanation
Lines #1 and #5: With Worksheet | End With
- Item: With… End With.
- VBA Construct: With… End With statement.
- Description: Statements within the With… End With statement (lines #2 through #4 below) are executed on the Worksheet object returned by item #2 below.
- Item: Worksheet.
- VBA Construct: Workbook.Worksheets property.
- Description: Returns a Worksheet object representing the worksheet you work with.
Lines #2 and #4: For Counter = LastRow To FirstRow Step -1 | Next Counter
- Item: For… Next Counter.
- VBA Construct: For… Next statement.
- Description: Repeats the statements within the loop (line #3 below) for each row between FirstRow (item #4 below) and LastRow (item #3 below).
- Item: Counter.
- VBA Construct: Counter of For… Next statement.
- Description: Loop counter. If you explicitly declare a variable to represent the loop counter, use the Long data type.
- Item: LastRow.
- VBA Construct: Counter Start of For… Next statement.
- Description: Number of the last row (further down the worksheet) you want the macro to consider when identifying rows to merge cells. The number of the last row is also the initial value of Counter (item #2 above).
If you explicitly declare a variable to represent the number of the last row to consider, use the Long data type.
- Item: FirstRow.
- VBA Construct: Counter End of For… Next statement.
- Description: Number of the first row (closer to the top of the worksheet) you want the macro to consider when identifying rows to merge cells. The number of the first row is also the final value of Counter (item (#2 above).
If you explicitly declare a variable to represent the number of the first row to consider, use the Long data type.
- Item: Step -1.
- VBA Construct: Step of For… Next statement.
- Description: Amount by which Counter (item #2 above) changes every time a loop iteration occurs.
In this scenario, you loop backwards: from LastRow (item #3 above) to FirstRow (item #4 above). Therefore, step is -1.
Line #3: If .Cells(Counter, CriteriaColumn).Value = Criteria Then .Range(.Cells(Counter, FirstColumn), .Cells(Counter, LastColumn)).Merge
- Item: If… Then.
- VBA Construct: If… Then… Else statement.
- Description: Conditionally executes the statement at the end of the line of code (items #5 through #8 below) if the condition specified in item #4 below is met.
- Item: .Cells(Counter, CriteriaColumn).
- VBA Construct: Worksheet.Cells property and Range.Item property.
- Description: Returns a Range object representing the cell at the intersection of row number Counter and column number CriteriaColumn.
At any given time, the value of the loop counter (Counter) is the same as that of the row through which the macro is currently looping. CriteriaColumn is the number of the column containing the cells you consider for purposes of determining whether to merge cells in the row through which the macro is currently looping.
- Item: Value.
- VBA Construct: Range.Value property.
- Description: Returns the value of the cell represented by the Range object returned by item #2 above.
- Item: .Cells(Counter, CriteriaColumn).Value = Criteria.
- VBA Construct: Condition of If… Then… Else statement.
- Description: This condition is an expression that evaluates to True or False, as follows:
-
- True: When the value of the cell represented by the Range object returned by item #2 above is equal to the criteria you specify (Criteria).
- False: When the value of the cell represented by the Range object returned by item #2 above isn’t equal to the criteria you specify (Criteria).
If you explicitly declare a variable to represent value, ensure that the data type you use can handle the value you use as criteria.
-
- Item: .Range.
- VBA Construct: Worksheet.Range property.
- Description: Returns a Range object representing a cell range specified as follows:
- Leftmost cell: Range object returned by item #6 below.
- Rightmost cell: Range object returned by item #7 below.
- Item: .Cells(Counter, FirstColumn).
- VBA Construct: Worksheet.Cells property and Range.Item property.
- Description: Returns a Range object representing the cell at the intersection of row number Counter and column number FirstColumn.
At any given time, the value of the loop counter (Counter) is the same as that of the row through which the macro is currently looping. FirstColumn is the number of the first column in the cell range you want the macro to merge. If you explicitly declare a variable to represent FirstColumn, use the Long data type.
- Item: .Cells(Counter, LastColumn).
- VBA Construct: Worksheet.Cells property and Range.Item property.
- Description: Returns a Range object representing the cell at the intersection of row number Counter and column number LastColumn.
At any given time, the value of the loop counter (Counter) is the same as that of the row through which the macro is currently looping. LastColumn is the number of the last column in the cell range you want the macro to merge. If you explicitly declare a variable to represent LastColumn, use the Long data type.
- Item: Merge.
- VBA Construct: Range.Merge method.
- Description: Merges the cells represented by the Range object returned by items #5 through #7 above to create a merged cell.
Macro Example
The following macro merges cells in columns myFirstColumn through myLastColumn in each row between myFirstRow and myLastRow where the value stored in column myCriteriaColumn is the string held by the myCriteria variable.
- myFirstRow is set to 5.
- myLastRow is set to the number of the last row with data in the worksheet named “Merge Cells Based on Criteria”. The constructs used by the statement that finds the last row with data in the worksheet are the Worksheet.Cells property, the Range.Find method, and the Range.Row property.
- Both myCriteriaColumn and myFirstColumn are set to 1 (column A).
- myLastColumn is set to 5 (column E).
- myCriteria holds the string “Merge cells”
Sub mergeCellsBasedOnCriteria()

    Dim myFirstRow As Long
    Dim myLastRow As Long
    Dim myCriteriaColumn As Long
    Dim myFirstColumn As Long
    Dim myLastColumn As Long
    Dim myWorksheet As Worksheet
    Dim myCriteria As String
    Dim iCounter As Long

    myFirstRow = 5
    myCriteriaColumn = 1
    myFirstColumn = 1
    myLastColumn = 5
    myCriteria = "Merge cells"

    Set myWorksheet = Worksheets("Merge Cells Based on Criteria")

    With myWorksheet

        myLastRow = .Cells.Find(What:="*", LookIn:=xlFormulas, LookAt:=xlPart, SearchOrder:=xlByRows, SearchDirection:=xlPrevious).Row

        For iCounter = myLastRow To myFirstRow Step -1
            If .Cells(iCounter, myCriteriaColumn).Value = myCriteria Then .Range(.Cells(iCounter, myFirstColumn), .Cells(iCounter, myLastColumn)).Merge
        Next iCounter

    End With

End Sub
Effects of Executing Macro Example
The following GIF illustrates the results of executing this macro example. As expected, VBA merges cells in columns A through E in each row where the value stored in column A is the string “Merge Cells”.
#6: Merge Cells Within a Row Based on Cell Value
VBA Code to Merge Cells Within a Row Based on Cell Value
To merge cells within a row based on a cell value (the cell value determines the number of cells to merge), use a macro with the following statement structure:
With Worksheet
    For Counter = LastRow To FirstRow Step -1
        .Cells(Counter, BaseColumn).Resize(ColumnSize:=.Cells(Counter, SizeColumn).Value).Merge
    Next iCounter
End With
Process Followed by VBA Code

VBA Statement Explanation
Lines #1 and #5: With Worksheet | End With
- Item: With… End With.
- VBA Construct: With… End With statement.
- Description: Statements within the With… End With statement (lines #2 through #4 below) are executed on the Worksheet object returned by item #2 below.
- Item: Worksheet.
- VBA Construct: Workbook.Worksheets property.
- Description: Returns a Worksheet object representing the worksheet you work with.
Lines #2 and #4: For Counter = LastRow To FirstRow Step -1 | Next Counter
- Item: For… Next Counter.
- VBA Construct: For… Next statement.
- Description: Repeats the statements within the loop (line #3 below) for each row between FirstRow (item #4 below) and LastRow (item #3 below).
- Item: Counter.
- VBA Construct: Counter of For… Next statement.
- Description: Loop counter. If you explicitly declare a variable to represent the loop counter, use the Long data type.
- Item: LastRow.
- VBA Construct: Counter Start of For… Next statement.
- Description: Number of the last row (further down the worksheet) you want the macro to consider when identifying rows to merge cells. The number of the last row is also the initial value of Counter (item #2 above).
If you explicitly declare a variable to represent the number of the last row to consider, use the Long data type.
- Item: FirstRow.
- VBA Construct: Counter End of For… Next statement.
- Description: Number of the first row (closer to the top of the worksheet) you want the macro to consider when identifying rows to merge cells. The number of the first row is also the final value of Counter (item (#2 above).
If you explicitly declare a variable to represent the number of the first row to consider, use the Long data type.
- Item: Step -1.
- VBA Construct: Step of For… Next statement.
- Description: Amount by which Counter (item #2 above) changes every time a loop iteration occurs.
In this scenario, you loop backwards: from LastRow (item #3 above) to FirstRow (item #4 above). Therefore, step is -1.
Line #3: .Cells(Counter, BaseColumn).Resize(ColumnSize:=.Cells(Counter, SizeColumn).Value).Merge
- Item: .Cells(Counter, BaseColumn).
- VBA Construct: Worksheet.Cells property and Range.Item property.
- Description: Returns a Range object representing the cell at the intersection of row number Counter and column number BaseColumn.
At any given time, the value of the loop counter (Counter) is the same as that of the row through which the macro is currently looping. BaseColumn is the number of the column you use as base for purposes of merging cells within the row through which the macro is currently looping.
- Item: Resize(ColumnSize:=.Cells(Counter, SizeColumn).Value).
- VBA Construct: Range.Resize property.
- Description: Returns a Range object representing a resized cell range. The Range object returned by Range.Resize is determined as follows:
- Base Cell Range: The base Range object (prior to resizing) is that returned by item #1 above.
- Row Size: The number of rows in the cell range returned by Range.Resize remain the same. In other words, the cell range where cells are merged is 1 row tall.
This is because the first parameter of Resize (known as RowSize) is omitted. Therefore, the number of rows in the cell range remains the same.
- Column Size: The number of columns in the cell range returned by Range.Resize is determined by item #3 below.
- Item: ColumnSize:=.Cells(Counter, SizeColumn).Value.
- VBA Constructs: ColumnSize parameter of Range.Resize property and Range.Value property.
- Description: Specifies the number of columns in the Range object returned by the Range.Resize property. The number of columns in this cell range is equal to the value within the cell at the intersection of row number Counter and column number SizeColumn (.Cells(Counter, SizeColumn).Value).
At any given time, the value of the loop counter (Counter) is the same as that of the row through which the macro is currently looping. SizeColumn is the number of the column containing the number of cells you want to merge within the row through which the macro is currently looping.
- Item: Merge.
- VBA Construct: Range.Merge method.
- Description: Merges the cells represented by the Range object returned by items #1 through #3 above.
Macro Example
The following macro merges a certain number of cells, starting with the cell in column myBaseColumn, in each row between myFirstRow and myLastRow. The number of merged cells is equal to the value stored in mySizeColumn. If that value is 1, no cells are merged.
In other words, the macro merges the cells between column number mySizeColumn and the column whose number is equal to that stored within the cell in myBaseColumn.
- myFirstRow is set to 5.
- myLastRow is set to the number of the last row with data in the worksheet named “Merge Cells Based on Cell Value”. The constructs used by the statement that finds the last row with data in the worksheet are the Worksheet.Cells property, the Range.Find method, and the Range.Row property.
- Both myBaseColumn and mySizeColumn are set to 1 (column A).
Sub mergeCellsBasedOnCellValue()

    Dim myFirstRow As Long
    Dim myLastRow As Long
    Dim myBaseColumn As Long
    Dim mySizeColumn As Long
    Dim myWorksheet As Worksheet
    Dim iCounter As Long

    myFirstRow = 5
    myBaseColumn = 1
    mySizeColumn = 1

    Set myWorksheet = Worksheets("Merge Cells Based on Cell Value")

    With myWorksheet

        myLastRow = .Cells.Find(What:="*", LookIn:=xlFormulas, LookAt:=xlPart, SearchOrder:=xlByRows, SearchDirection:=xlPrevious).Row

        For iCounter = myLastRow To myFirstRow Step -1
            .Cells(iCounter, myBaseColumn).Resize(ColumnSize:=.Cells(iCounter, mySizeColumn).Value).Merge
        Next iCounter

End With

End Sub
Effects of Executing Macro Example
The following GIF illustrates the results of executing this macro example. As expected, for each row with data, the macro merges the cells between column A and the column whose number is specified in column A.
References to VBA Constructs Used in this VBA Tutorial
Use the following links to visit the appropriate webpage within the Microsoft Office Dev Center:
- Identify the worksheet you work with:
- Workbook.Worksheets property.
- Return a Range object representing the cells you merge:
- Worksheet.Range property.
- Worksheet.Cells property.
- Range.Resize property.
- Merge cells:
- Range.Merge method.
- Unmerge cells:
- Range.UnMerge method.
- Center the contents of a cell range horizontally or vertically:
- Range.HorizontalAlignment property.
- Range.VerticalAlignment property.
- Identify last row with data in a worksheet:
- Range.Find method.
- Range.Row property.
- Loop through rows:
- For… Next statement.
- Identify the value stored in a cell to specify criteria for merging cells.
- Range.Value property.
- Test if cells meet criteria for merging:
- If… Then… Else statement.
- Work with variables:
- Dim statement.
- Set statement.
- Data types:
- Long data type.
- String data type.
- Simplify object references:
- With… End With statement.
Excel VBA, Merge Cells
In this article I will explain how you can use VBA to merge cells in Excel. I have also provided two sample codes.
Jump To:
- Basics, MergeCells
- Example 1, Merge Rows
- Example 2, Merge Columns
You can download the code and file related to this article here.
–
Basics, MergeCells:
Using the code below the cells A1 to D1 will be merged:
Range("A1:D1").MergeCells = True
Before:

After:

The line below will remove the merge cell property from the cells A1 to D1:
Range("A1").MergeCells = False
Note the lines below will not remove the merge cell property:
Range("A2").MergeCells = False
Range("A3").MergeCells = False
Range("A4").MergeCells = False
–
Example 1, Merge Rows:
The code below will loop through the rows in column A and merge the first 3 cells in each row:
Sub  Exampl1()

Dim  i As  Integer

For  i = 1 To  10

    Range(Cells(i, 1), Cells(i, 3)).MergeCells = True

Next  i

End  Sub
Before:

After:

–
Example 2, Merge Columns:
The code below will loop through the first 8 columns in row 1 and merge the first 7 cells in each column:
Sub  Example2()

Dim  i As  Integer

For  i = 1 To  8

    Range(Cells(1, i), Cells(7, i)).MergeCells = True

Next  i

End  Sub
Before:

After:

You can download the code and file related to this article here.
See also:
- VBA Excel, Alignment
- Excel VBA, Shrink to Fit On/Off
- Excel VBA, Wrap Text On/Off
If you need assistance with your code, or you are looking for a VBA programmer to hire feel free to contact me. Also please visit my website www.software-solutions-online.com
This post will guide you how to combine multiple cells into one cell with VBA code in Excel. How do I concatenate a range of cells with VBA macro in Excel 2013/2016. How to merge the contents of two or multiple cells into one cell with macro in Excel.
If you want to merge multiple cells into one cell without losing data in excel, you can try to use an Excel VBA macro to quickly achieve the result. Just do the following steps:
#1 open your excel workbook and then click on “Visual Basic” command under DEVELOPER Tab, or just press “ALT+F11” shortcut.
#2 then the “Visual Basic Editor” window will appear.
#3 click “Insert” ->”Module” to create a new module
#4 paste the below VBA code into the code window. Then clicking “Save” button.
Sub MergeCells()
    Dim xJoinRange As Range
    Dim xDestination As Range

    Set xJoinRange = Application.InputBox(prompt:="Highlight source cells to merge", Type:=8)
    Set xDestination = Application.InputBox(prompt:="Highlight destination cell", Type:=8)
    temp = ""
    For Each Rng In xJoinRange
        temp = temp & Rng.Value & " "
    Next
    xDestination.Value = temp
End Sub
#5 back to the current worksheet, then run the above excel macro. Click Run button.
#6 select one range of cells to merge cells
#7 select one destination cell
#8 let’s see the result.
You can also write an user defined function with VBA to merge multiple cells in Excel. just do use the following vba code:
Function MergeCells(sourceRange As Excel.Range) As String

    Dim finalValue As String

    Dim cell As Excel.Range

    For Each cell In sourceRange.Cells

        finalValue = finalValue + CStr(cell.Value)

    Next cell

    MergeCells = finalValue

End Function
The VBA Range Object
The Excel Range Object is an object in Excel VBA that represents a cell, row, column, a selection of cells or a 3 dimensional range. The Excel Range is also a Worksheet property that returns a subset of its cells.
Worksheet Range
The Range is a Worksheet property which allows you to select any subset of cells, rows, columns etc.
Dim r as Range 'Declared Range variable

Set r = Range("A1") 'Range of A1 cell

Set r = Range("A1:B2") 'Square Range of 4 cells - A1,A2,B1,B2

Set r= Range(Range("A1"), Range ("B1")) 'Range of 2 cells A1 and B1

Range("A1:B2").Select 'Select the Cells A1:B2 in your Excel Worksheet

Range("A1:B2").Activate 'Activate the cells and show them on your screen (will switch to Worksheet and/or scroll to this range.
Select a cell or Range of cells using the Select method. It will be visibly marked in Excel:
Working with Range variables
The Range is a separate object variable and can be declared as other variables. As the VBA Range is an object you need to use the Set statement:
Dim myRange as Range
'...
Set myRange = Range("A1") 'Need to use Set to define myRange
The Range object defaults to your ActiveWorksheet. So beware as depending on your ActiveWorksheet the Range object will return values local to your worksheet:
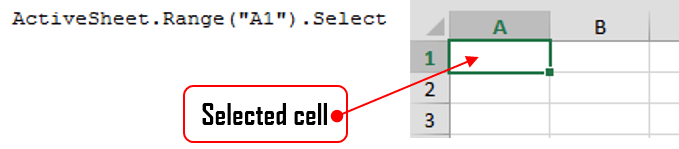
Range("A1").Select
'...is the same as...
ActiveSheet.Range("A1").Select
You might want to define the Worksheet reference by Range if you want your reference values from a specifc Worksheet:
Sheets("Sheet1").Range("A1").Select 'Will always select items from Worksheet named Sheet1
The ActiveWorkbook is not same to ThisWorkbook. Same goes for the ActiveSheet. This may reference a Worksheet from within a Workbook external to the Workbook in which the macro is executed as Active references simply the currently top-most worksheet. Read more here
Range properties
The Range object contains a variety of properties with the main one being it’s Value and an the second one being its Formula.
A Range Value is the evaluated property of a cell or a range of cells. For example a cell with the formula =10+20 has an evaluated value of 20.
A Range Formula is the formula provided in the cell or range of cells. For example a cell with a formula of =10+20 will have the same Formula property.
'Let us assume A1 contains the formula "=10+20"

Debug.Print Range("A1").Value 'Returns: 30

Debug.Print Range("A1").Formula 'Returns: =10+20
Other Range properties include:
Work in progress
Worksheet Cells
A Worksheet Cells property is similar to the Range property but allows you to obtain only a SINGLE CELL, based on its row and column index. Numbering starts at 1:

The Cells property is in fact a Range object not a separate data type.
Excel facilitates a Cells function that allows you to obtain a cell from within the ActiveSheet, current top-most worksheet.
Cells(2,2).Select 'Selects B2
'...is the same as...
ActiveSheet.Cells(2,2).Select 'Select B2
Cells are Ranges which means they are not a separate data type:
Dim myRange as Range
Set myRange = Cells(1,1) 'Cell A1
Range Rows and Columns
As we all know an Excel Worksheet is divided into Rows and Columns. The Excel VBA Range object allows you to select single or multiple rows as well as single or multiple columns. There are a couple of ways to obtain Worksheet rows in VBA:
Getting an entire row or column
 To get and entire row of a specified Range you need to use the EntireRow property. Although, the function’s parameters suggest taking both a RowIndex and ColumnIndex it is enough just to provide the row number. Row indexing starts at 1.
 To get and entire column of a specified Range you need to use the EntireColumn property. Although, the function’s parameters suggest taking both a RowIndex and ColumnIndex it is enough just to provide the column number. Column indexing starts at 1.
Range("B2").EntireRows(1).Hidden = True 'Gets and hides the entire row 2

Range("B2").EntireColumns(1).Hidden = True 'Gets and hides the entire column 2
The three properties EntireRow/EntireColumn, Rows/Columns and Row/Column are often misunderstood so read through to understand the differences.
Get a row/column of a specified range
 If you want to get a certain row within a Range simply use the Rows property of the Worksheet. Although, the function’s parameters suggest taking both a RowIndex and ColumnIndex it is enough just to provide the row number. Row indexing starts at 1.
 Similarly you can use the Columns function to obtain any single column within a Range. Although, the function’s parameters suggest taking both a RowIndex and ColumnIndex actually the first argument you provide will be the column index. Column indexing starts at 1.
Rows(1).Hidden = True 'Hides the first row in the ActiveSheet
'same as
ActiveSheet.Rows(1).Hidden = True

Columns(1).Hidden = True 'Hides the first column in the ActiveSheet
'same as
ActiveSheet.Columns(1).Hidden = True
To get a range of rows/columns you need to use the Range function like so:
Range(Rows(1), Rows(3)).Hidden = True 'Hides rows 1:3
'same as
Range("1:3").Hidden = True
'same as
ActiveSheet.Range("1:3").Hidden = True

Range(Columns(1), Columns(3)).Hidden = True 'Hides columns A:C
'same as
Range("A:C").Hidden = True
'same as
ActiveSheet.Range("A:C").Hidden = True
Get row/column of specified range
The above approach assumed you want to obtain only rows/columns from the ActiveSheet – the visible and top-most Worksheet. Usually however, you will want to obtain rows or columns of an existing Range. Similarly as with the Worksheet Range property, any Range facilitates the Rows and Columns property.
Dim myRange as Range
Set myRange = Range("A1:C3")

myRange.Rows.Hidden = True 'Hides rows 1:3
myRange.Columns.Hidden = True 'Hides columns A:C

Set myRange = Range("C10:F20")
myRange.Rows(2).Hidden = True 'Hides rows 11
myRange.Columns(3).Hidden = True 'Hides columns E
Getting a Ranges first row/column number
Aside from the Rows and Columns properties Ranges also facilitate a Row and Column property which provide you with the number of the Ranges first row and column.
Set myRange = Range("C10:F20")

'Get first row number
Debug.Print myRange.Row 'Result: 10
'Get first column number
Debug.Print myRange.Column 'Result: 3
Converting Column number to Excel Column
This is an often question that turns up – how to convert a column number to a string e.g. 100 to “CV”.
Function GetExcelColumn(columnNumber As Long)
    Dim div As Long, colName As String, modulo As Long
    div = columnNumber: colName = vbNullString

    Do While div > 0
        modulo = (div - 1) Mod 26
        colName = Chr(65 + modulo) & colName
        div = ((div - modulo) / 26)
    Loop

    GetExcelColumn = colName
End Function
Range Cut/Copy/Paste
Cutting and pasting rows is generally a bad practice which I heavily discourage as this is a practice that is moments can be heavily cpu-intensive and often is unaccounted for.
Copy function
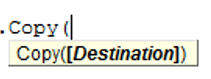 The Copy function works on a single cell, subset of cell or subset of rows/columns.
'Copy values and formatting from cell A1 to cell D1
Range("A1").Copy Range("D1")

'Copy 3x3 A1:C3 matrix to D1:F3 matrix - dimension must be same
Range("A1:C3").Copy Range("D1:F3")

'Copy rows 1:3 to rows 4:6
Range("A1:A3").EntireRow.Copy Range("A4")

'Copy columns A:C to columns D:F
Range("A1:C1").EntireColumn.Copy Range("D1")
The Copy function can also be executed without an argument. It then copies the Range to the Windows Clipboard for later Pasting.
Cut function
![]() The Cut function, similarly as the Copy function, cuts single cells, ranges of cells or rows/columns.
The Cut function, similarly as the Copy function, cuts single cells, ranges of cells or rows/columns.
'Cut A1 cell and paste it to D1
Range("A1").Cut Range("D1")

'Cut 3x3 A1:C3 matrix and paste it in D1:F3 matrix - dimension must be same
Range("A1:C3").Cut Range("D1:F3")

'Cut rows 1:3 and paste to rows 4:6
Range("A1:A3").EntireRow.Cut Range("A4")

'Cut columns A:C and paste to columns D:F
Range("A1:C1").EntireColumn.Cut Range("D1")
The Cut function can be executed without arguments. It will then cut the contents of the Range and copy it to the Windows Clipboard for pasting.
Cutting cells/rows/columns does not shift any remaining cells/rows/columns but simply leaves the cut out cells empty
PasteSpecial function
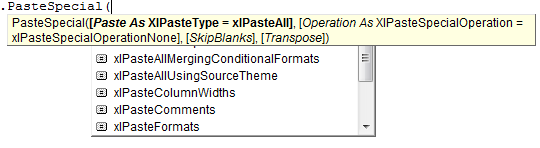 The Range PasteSpecial function works only when preceded with either the Copy or Cut Range functions. It pastes the Range (or other data) within the Clipboard to the Range on which it was executed.
Syntax
The PasteSpecial function has the following syntax:
PasteSpecial( Paste, Operation, SkipBlanks, Transpose)
The PasteSpecial function can only be used in tandem with the Copy function (not Cut)
Parameters
Paste
The part of the Range which is to be pasted. This parameter can have the following values:
| Parameter | Constant | Description | |
|---|---|---|---|
| xlPasteSpecialOperationAdd | 2 | Copied data will be added with the value in the destination cell. | |
| xlPasteSpecialOperationDivide | 5 | Copied data will be divided with the value in the destination cell. | |
| xlPasteSpecialOperationMultiply | 4 | Copied data will be multiplied with the value in the destination cell. | |
| xlPasteSpecialOperationNone | -4142 | No calculation will be done in the paste operation. | |
| xlPasteSpecialOperationSubtract | 3 | Copied data will be subtracted with the value in the destination cell. |
Operation
The paste operation e.g. paste all, only formatting, only values, etc. This can have one of the following values:
| Name | Constant | Description |
|---|---|---|
| xlPasteAll | -4104 | Everything will be pasted. |
| xlPasteAllExceptBorders | 7 | Everything except borders will be pasted. |
| xlPasteAllMergingConditionalFormats | 14 | Everything will be pasted and conditional formats will be merged. |
| xlPasteAllUsingSourceTheme | 13 | Everything will be pasted using the source theme. |
| xlPasteColumnWidths | 8 | Copied column width is pasted. |
| xlPasteComments | -4144 | Comments are pasted. |
| xlPasteFormats | -4122 | Copied source format is pasted. |
| xlPasteFormulas | -4123 | Formulas are pasted. |
| xlPasteFormulasAndNumberFormats | 11 | Formulas and Number formats are pasted. |
| xlPasteValidation | 6 | Validations are pasted. |
| xlPasteValues | -4163 | Values are pasted. |
| xlPasteValuesAndNumberFormats | 12 | Values and Number formats are pasted. |
SkipBlanks
If True then blanks will not be pasted.
Transpose
Transpose the Range before paste (swap rows with columns).
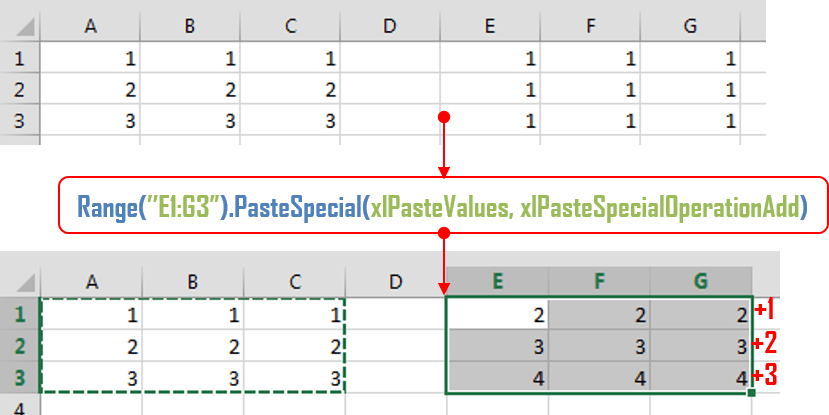
PasteSpecial Examples
'Cut A1 cell and paste its values to D1
Range("A1").Copy
Range("D1").PasteSpecial

'Copy 3x3 A1:C3 matrix and add all the values to E1:G3 matrix (dimension must be same)
Range("A1:C3").Copy
Range("E1:G3").PasteSpecial xlPasteValues, xlPasteSpecialOperationAdd
Below an example where the Excel Range A1:C3 values are copied an added to the E1:G3 Range. You can also multiply, divide and run other similar operations.
Paste
The Paste function allows you to paste data in the Clipboard to the actively selected Range. Cutting and Pasting can only be accomplished with the Paste function.
'Cut A1 cell and paste its values to D1
Range("A1").Cut
Range("D1").Select
ActiveSheet.Paste

'Cut 3x3 A1:C3 matrix and paste it in D1:F3 matrix - dimension must be same
Range("A1:C3").Cut
Range("D1:F3").Select
ActiveSheet.Paste

'Cut rows 1:3 and paste to rows 4:6
Range("A1:A3").EntireRow.Cut
Range("A4").Select
ActiveSheet.Paste

'Cut columns A:C and paste to columns D:F
Range("A1:C1").EntireColumn.Cut
Range("D1").Select
ActiveSheet.Paste
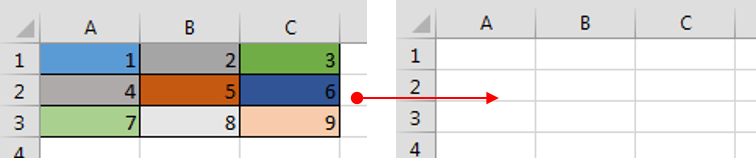
Range Clear/Delete
The Clear function
The Clear function clears the entire content and formatting from an Excel Range. It does not, however, shift (delete) the cleared cells.
Range("A1:C3").Clear
The Delete function
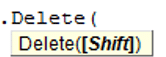 The Delete function deletes a Range of cells, removing them entirely from the Worksheet, and shifts the remaining Cells in a selected shift direction.
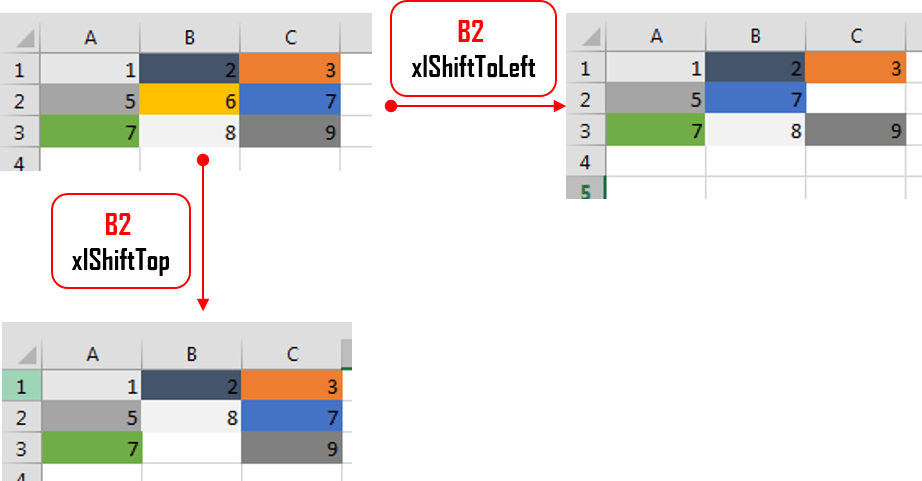
Although the manual Delete cell function provides 4 ways of shifting cells. The VBA Delete Shift values can only be either be xlShiftToLeft or xlShiftUp.
'If Shift omitted, Excel decides - shift up in this case
Range("B2").Delete

'Delete and Shift remaining cells left
Range("B2").Delete xlShiftToLeft

'Delete and Shift remaining cells up
Range("B2").Delete xlShiftTop

'Delete entire row 2 and shift up
Range("B2").EntireRow.Delete

'Delete entire column B and shift left
Range("B2").EntireRow.Delete
Traversing Ranges
Traversing cells is really useful when you want to run an operation on each cell within an Excel Range. Fortunately this is easily achieved in VBA using the For Each or For loops.
Dim cellRange As Range

For Each cellRange In Range("A1:C3")
  Debug.Print cellRange.Value
Next cellRange
Although this may not be obvious, beware of iterating/traversing the Excel Range using a simple For loop. For loops are not efficient on Ranges. Use a For Each loop as shown above. This is because Ranges resemble more Collections than Arrays. Read more on For vs For Each loops here
Traversing the UsedRange
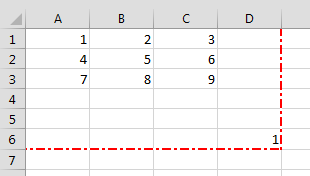 Every Worksheet has a UsedRange. This represents that smallest rectangle Range that contains all cells that have or had at some point values. In other words if the further out in the bottom, right-corner of the Worksheet there is a certain cell (e.g. E8) then the UsedRange will be as large as to include that cell starting at cell A1 (e.g. A1:E8). In Excel you can check the current UsedRange hitting CTRL+END. In VBA you get the UsedRange like this:
ActiveSheet.UsedRange
'same as
UsedRange
You can traverse through the UsedRange like this:
Dim cellRange As Range

For Each cellRange In UsedRange
  Debug.Print "Row: " & cellRange.Row & ", Column: " & cellRange.Column
Next cellRange
The UsedRange is a useful construct responsible often for bloated Excel Workbooks. Often delete unused Rows and Columns that are considered to be within the UsedRange can result in significantly reducing your file size. Read also more on the XSLB file format here
Range Addresses
The Excel Range Address property provides a string value representing the Address of the Range.
![]()
Syntax
Below the syntax of the Excel Range Address property:
Address( [RowAbsolute], [ColumnAbsolute], [ReferenceStyle], [External], [RelativeTo] )
Parameters
RowAbsolute
Optional. If True returns the row part of the reference address as an absolute reference. By default this is True.
$D$10:$G$100 'RowAbsolute is set to True
$D10:$G100 'RowAbsolute is set to False
ColumnAbsolute
Optional. If True returns the column part of the reference as an absolute reference. By default this is True.
$D$10:$G$100 'ColumnAbsolute is set to True
D$10:G$100 'ColumnAbsolute is set to False
ReferenceStyle
Optional. The reference style. The default value is xlA1. Possible values:
| Constant | Value | Description |
|---|---|---|
| xlA1 | 1 | Default. Use xlA1 to return an A1-style reference |
| xlR1C1 | -4150 | Use xlR1C1 to return an R1C1-style reference |
External
Optional. If True then property will return an external reference address, otherwise a local reference address will be returned. By default this is False.
$A$1 'Local
[Book1.xlsb]Sheet1!$A$1 'External
RelativeTo
Provided RowAbsolute and ColumnAbsolute are set to False, and the ReferenceStyle is set to xlR1C1, then you must include a starting point for the relative reference. This must be a Range variable to be set as the reference point.
Merged Ranges
![]() Merged cells are Ranges that consist of 2 or more adjacent cells. To Merge a collection of adjacent cells run Merge function on that Range.
Merged cells are Ranges that consist of 2 or more adjacent cells. To Merge a collection of adjacent cells run Merge function on that Range.
The Merge has only a single parameter – Across, a boolean which if True will merge cells in each row of the specified range as separate merged cells. Otherwise the whole Range will be merged. The default value is False.
Merge examples
To merge the entire Range:
'This will turn of any alerts warning that values may be lost
Application.DisplayAlerts = False

Range("B2:C3").Merge
This will result in the following:

To merge just the rows set Across to True.
'This will turn of any alerts warning that values may be lost
Application.DisplayAlerts = False

Range("B2:C3").Merge True
This will result in the following:

Remember that merged Ranges can only have a single value and formula. Hence, if you merge a group of cells with more than a single value/formula only the first value/formula will be set as the value/formula for your new merged Range
Checking if Range is merged
To check if a certain Range is merged simply use the Excel Range MergeCells property:
Range("B2:C3").Merge

Debug.Print Range("B2").MergeCells 'Result: True
The MergeArea
The MergeArea is a property of an Excel Range that represent the whole merge Range associated with the current Range. Say that $B$2:$C$3 is a merged Range – each cell within that Range (e.g. B2, C3..) will have the exact same MergedArea. See example below:
Range("B2:C3").Merge
Debug.Print Range("B2").MergeArea.Address 'Result: $B$2:$C$3
Named Ranges
Named Ranges are Ranges associated with a certain Name (string). In Excel you can find all your Named Ranges by going to Formulas->Name Manager. They are very useful when working on certain values that are used frequently through out your Workbook. Imagine that you are writing a Financial Analysis and want to use a common Discount Rate across all formulas. Just the address of the cell e.g. “A2”, won’t be self-explanatory. Why not use e.g. “DiscountRate” instead? Well you can do just that.
Creating a Named Range
Named Ranges can be created either within the scope of a Workbook or Worksheet:
Dim r as Range
'Within Workbook
Set r = ActiveWorkbook.Names.Add("NewName", Range("A1"))
'Within Worksheet
Set r = ActiveSheet.Names.Add("NewName", Range("A1"))
This gives you flexibility to use similar names across multiple Worksheets or use a single global name across the entire Workbook.
Listing all Named Ranges
You can list all Named Ranges using the Name Excel data type. Names are objects that represent a single NamedRange. See an example below of listing our two newly created NamedRanges:
Call ActiveWorkbook.Names.Add("NewName", Range("A1"))
Call ActiveSheet.Names.Add("NewName", Range("A1"))

Dim n As Name
For Each n In ActiveWorkbook.Names
  Debug.Print "Name: " & n.Name & ", Address: " & _
       n.RefersToRange.Address & ", Value: "; n.RefersToRange.Value
Next n

'Result:
'Name: Sheet1!NewName, Address: $A$1, Value:  1
'Name: NewName, Address: $A$1, Value:  1
SpecialCells
SpecialCells are a very useful Excel Range property, that allows you to select a subset of cells/Ranges within a certain Range.
Syntax
The SpecialCells property has the following syntax:
SpecialCells( Type, [Value] )
Parameters
Type
The type of cells to be returned. Possible values:
| Constant | Value | Description |
|---|---|---|
| xlCellTypeAllFormatConditions | -4172 | Cells of any format |
| xlCellTypeAllValidation | -4174 | Cells having validation criteria |
| xlCellTypeBlanks | 4 | Empty cells |
| xlCellTypeComments | -4144 | Cells containing notes |
| xlCellTypeConstants | 2 | Cells containing constants |
| xlCellTypeFormulas | -4123 | Cells containing formulas |
| xlCellTypeLastCell | 11 | The last cell in the used range |
| xlCellTypeSameFormatConditions | -4173 | Cells having the same format |
| xlCellTypeSameValidation | -4175 | Cells having the same validation criteria |
| xlCellTypeVisible | 12 | All visible cells |
Value
If Type is equal to xlCellTypeConstants or xlCellTypeFormulas this determines the types of cells to return e.g. with errors.
| Constant | Value |
|---|---|
| xlErrors | 16 |
| xlLogical | 4 |
| xlNumbers | 1 |
| xlTextValues | 2 |
SpecialCells examples
Get Excel Range with Constants
This will return only cells with constant cells within the Range C1:C3:
For Each r In Range("A1:C3").SpecialCells(xlCellTypeConstants)
  Debug.Print r.Value
Next r
Search for Excel Range with Errors
For Each r In ActiveSheet.UsedRange.SpecialCells(xlCellTypeFormulas, xlErrors)
  Debug.Print r.Address
Next r