
Summary
This article explains how to use the Mail Merge feature in Microsoft Word to create and to print form letters by using data from a Microsoft Excel worksheet.
When you use the Word Mail Merge feature, Word merges a main document with a recipient list to generate a set of output documents:
-
The main document contains the basic text that is the same in all of the output documents. It may contain a letterhead, text, and instructions in merge fields for inserting text (such as recipient names and addresses) that vary from one output document to another.
-
The recipient list is a database that contains the data that is to be merged into the output documents. For example, the recipient list is a Microsoft Access database file or an Excel worksheet.
This database is typically a list of names, addresses, phone numbers, and other categories of personal information.
-
The output documents are the result of the mail merge. The text in an output document can be the same in all output documents, but you can apply formatting to specific documents.
Step 1: Set Up the Excel Data File
Before you proceed with the Mail Merge Wizard, make sure that your Excel worksheet is well structured for this purpose. Note the following requirements for the data table:
-
The first row should contain field names for each column — for example, Title, Salutation, First Name, Middle Name, Last Name, Address1, and Address2.
-
Each field name should be unique.
-
Each row should provide information about a particular item. For example, in a mailing list, each row might include information about a particular recipient.
-
The table should contain no blank rows.
Create your Excel data file, and then arrange it by using the fields that you want to use for your letter, as shown in the following sample data file.
After you create your Excel data file, save it, and then close the data file.
For more information about how to create a mail-merge address list, click the following article number to view the article in the Microsoft Knowledge Base:
294688 How to design and set up a mail merge address list in Word 2002 and in later versions of Word
Step 2: Set Up the Main Document
-
In Microsoft Office Word 2003 and in earlier versions of Word, point to Letters and Mailings on the Tools menu, and then click Mail Merge Wizard.
In Microsoft Office Word 2007, click Start Mail Merge in the Start Mail Merge group on the Mailings tab, and then click Step by Step by Mail Merge Wizard.
-
Under Select document type, click Letters.
The active document becomes the main document. The main document contains the text and graphics that are the same for each version of the merged document. For example, the return address and the salutation in a form letter are the same for each version.
-
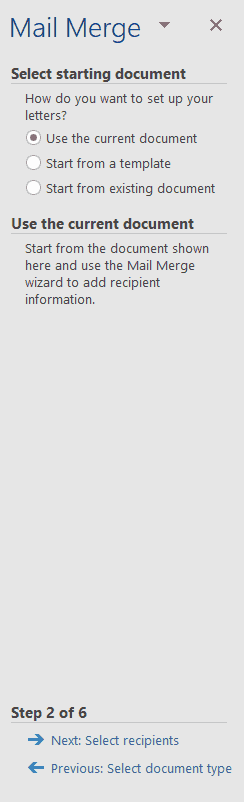
Click Next: Starting document.
-
Use one of the following methods:
-
Start with the document that is currently shown in the document window. To do this, click Use the current document.
You can then either type the letter in the document window or wait until the wizard prompts you to do so in a later step.
-
Start with a template. To do this, follow these steps:
-
Click Start from a template.
-
Click Select template.
-
On the Mail Merge tab, select the template that you want in the Select Template dialog box, and then click OK.
-
-
Start with an existing document. To do this, follow these steps:
-
Click Start from existing document.
-
In the Start from existing box, select the document that you want, and then click Open.
-
If you do not see the document, click More files, and then click Open. In the Open dialog box, locate the document that you want, and then click Open.
-
-
-
Click Next: Select recipients.
Step 3: Specify the Excel Data Source
-
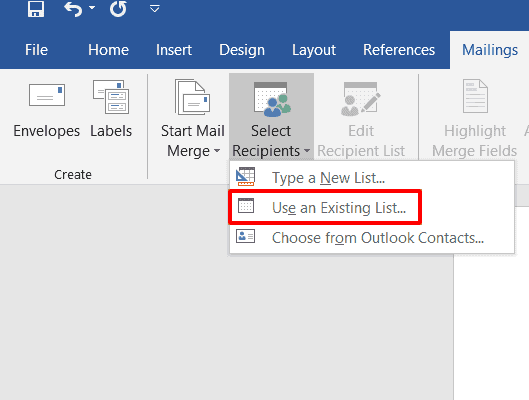
Under Select recipients, click Use an existing list.
-
Click Browse.
-
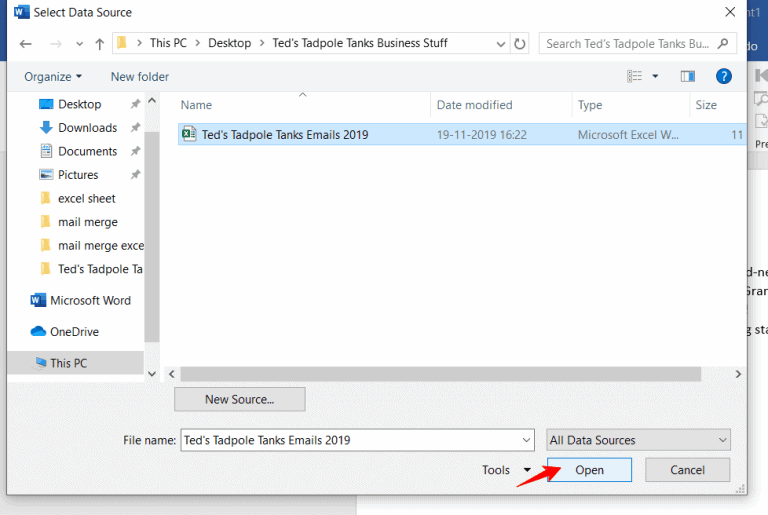
In the Select Data Source dialog box, locate and then click the Excel worksheet that you want to use.
By default, Word opens the «My Data Sources» folder.
-
Click Open.
-
If your Excel worksheet contains information about multiple tabs, select the tab that contains the information that you want, and then click OK.
-
All entries in the data source appear in the Mail Merge Recipients dialog box. Here, you can refine the list of recipients to include in the merge.
Step 4: Select the Recipients
-
In the Mail Merge Recipients dialog box, select the recipients that you want to include. To do this, use one of the following methods:
-
Use the check boxes to designate recipients.
This method is most useful if the list is short. Click to select the check boxes next to the recipients that you want to include, and then click to clear the check boxes next to the recipients that you want to exclude.
Note If you know that you want to include most of the list in your merge, click Select All, and then click to clear particular records. Similarly, if you want to include only a few records in the list, click Clear All, and then select the records that you want.
-
Sort items in the list.
This method is useful if you want to see items in alphabetical or numeric order. Click the column heading of the element by which you want to sort. For example, if you want to display the list alphabetically by last name, click the Last Name column heading.
-
Filter items in the list.
This method is useful if the list contains records that you know you do not want to see or include in the merge. After you have filtered the list, you can use the check boxes to include and exclude records, as described earlier. To filter the list, follow these steps:
-
Click the arrow next to the column heading of the element that you want to filter by.
-
Click any of the following:
-
(Blanks): This option displays all the records in which the corresponding field is blank.
-
(Nonblanks): This option displays all the records in which the corresponding field contains information.
-
If the data source contains records that share the same information, and if there are 10 or fewer unique values in the column, you can filter by specific information. For example, if there are multiple addresses that list Australia as the country, you can filter by Australia.
-
-
-
The Mail Merge Recipients dialog box displays only the designated records. To display all the records again, click (All).
Notes
-
For advanced sorting and filtering, click the arrow next to any column name, and then click (Advanced). Use the Filter Records and Sort Records tabs to set up the sorting or filtering query that you want.
-
If you have installed address validation software, click Validate in the Mail Merge Recipients dialog box to validate your recipients’ addresses.
-
-
Click OK to return to the Mail Merge Wizard.
Word uses the recipients that you designated for the merge.
-
Click Next: Write your letter.
Step 5: Complete the Letter and Add Merge Fields
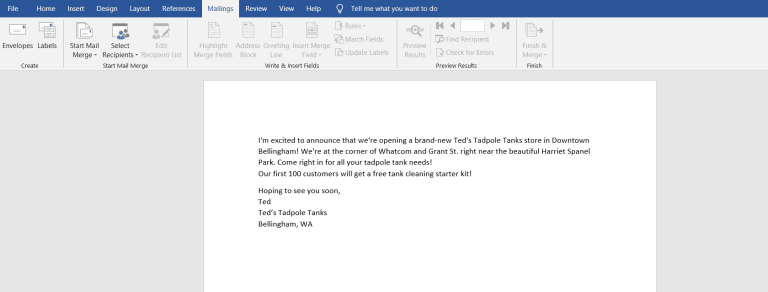
If you have not already done this, type the text that you want to appear in every form letter in the main document.
Insert Merge Fields
Insert merge fields where you want to merge names, addresses, and other information from the data source. To insert merge fields, follow these steps:
-
In the main document, click where you want to insert the field.
-
Insert any of the following:
-
Address block with name, address, and other information:
-
Click Address block.
-
In the Insert Address Block dialog box, select the address elements that you want to include and the formats that you want, and then click OK. For help on an option, click the question mark, and then click the option.
-
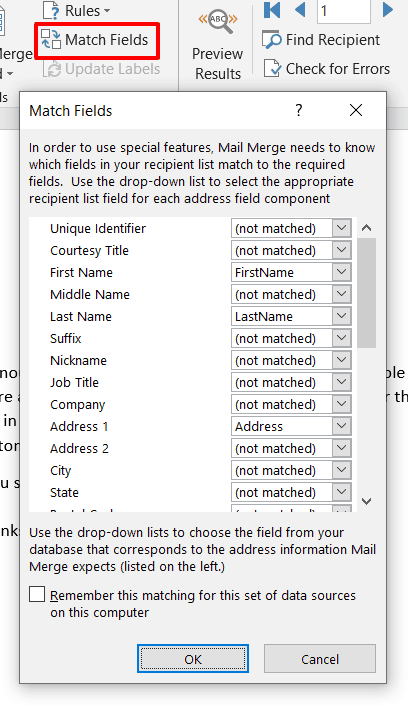
For help on an option, click the question mark, and then click the option. If the Match Fields dialog box appears, Word may be unable to find some of the information it needs for the address block. Click the arrow next to
(not available), and then select the field from your data source that corresponds to the field required for the mail merge.
-
-
Greeting line:
-
Click Greeting line.
-
Select the greeting line format that includes the salutation, name format, and following punctuation.
-
Select the text that you want to appear in the cases in which Word cannot interpret the recipient’s name. For example, Word cannot interpret the name when the data source contains no first or last name for a recipient, but only a company name.
-
Click OK.
-
If the Match Fields dialog box appears, Word may be unable to find some of the information it needs for the greeting line. Click the arrow next to (not available), and then select the field from your data source that corresponds to the field required for the mail merge.
-
-
Other fields of information:
-
Click More items.
-
Use one of the following methods:
-
Click Address Fields to select from address fields that will automatically map to corresponding fields in your data source, even if the data source’s fields do not have the same name as your fields.
-
Click Database Fields to select from fields that always take data directly from a column in a database.
-
-
In the Fields box, click the field that you want.
-
Click Insert, and then click Close.
-
If the Match Fields dialog box appears, Word may not be able to find some of the information it needs to insert the field. Click the arrow next to (not available), and then select the field from your data source that corresponds to the field required for the mail merge.
Note If you insert a field from the Database Fields list, and if you later switch to a data source that does not have a column with the same name, Word cannot insert that field information into the merged document.
-
-
Electronic postage:
To add electronic postage, you must first install an electronic postage program, such as one that you can purchase from a third-party provider on the Web. To use electronic postage, follow these steps:
-
Click Electronic postage.
If you do not have an electronic postage program installed, Word prompts you to install one, and offers to connect to the following Microsoft Office Web site:
Print Online Postage
http://office.microsoft.com/services/service.aspx?sid=2.4 -
Insert the postage according to the program’s instructions.
-
-
To add electronic postage, you must first install an electronic postage program, such as one that you can purchase from a third-party provider on the Web. To use electronic postage, follow these steps:Postal bar code: You must select a letter or envelope type that supports the POSTNET bar code. To use the Postal bar code, follow these steps:
-
Click Postal Bar Code.
-
In the Insert Postal Bar Code dialog box, select the appropriate address fields.
Note The Postal Bar Code option appears only if you are using the U.S. language version of Word.
-
Repeat steps a and b for all the fields that you want to insert. NOTES:
-
You cannot type merge field characters (» «) or insert them by using the Symbol command on the Insert menu.
-
If the merge fields appear inside braces, such as { MERGEFIELD City }, Word is displaying field codes instead of field results. This does not affect the merge, but if you want to display the results instead, right-click the field code, and then click Toggle Field Codes on the shortcut menu.
-
For example, by using the sample database shown earlier, your letter might contain the AddressBlock and GreetingLine fields, and therefore your first page appears similar to the following:
February 26, 2002
AddressBlock
GreetingLine
Type your letter here.
Sincerely,
Type your name here
-
Note You can also use the Mail Merge toolbar to insert merge fields, work with your mail-merge main document, or run a mail merge. To display the Mail Merge toolbar, point to Letters and Mailings on the Tools menu, and then click Show Mail Merge Toolbar.
The Mail Merge toolbar provides additional commands that are not included in the Mail Merge Wizard task panes. For example, you can use the Insert Word Field menu on the Mail Merge toolbar to insert Word fields for controlling the merge process. For example, you can insert an IF field that inserts text only if a particular merge field has a specified value.
Alternatively, you can click Check For Errors to make Word run the mail merge and report any errors that are contained in the main document.
-
Change the Format of the Merged Data
To format merged data, you must format the merge fields in the main document. Do not format the data in the data source, because its formatting is not retained when you merge the data into the document. To change the format of the merged data, follow these steps:
-
In the main document, select the field that contains the information that you want to format, including the enclosing merge field characters (<< >>).
-
In Word 2003 and in earlier versions of Word, click Font on the Format menu, and then select the options that you want.
In Word 2007, click the option that you want in the Theme Fonts box in the Font group on the Home tab.
Format by Using Field Codes
To control other aspects of formatting, press ALT+F9 to display field codes, and then add switches to the merge fields. When you work with fields, a switch is a special instruction that causes a specific action to occur. Generally, a switch is added to a field to modify a result.
Examples of how to use switches are as follows:
-
To display the number 34987.89 as $34,987.89, add the Numeric Picture switch (#).
-
To print client names in uppercase letters, add the Format switch (*).
-
To make sure that the merged information has the same font and point size that you apply to the merge field, add the Charformat switch (*).
Step 6: Save the Document
After you have completed the main document and inserted all the merge fields, make sure that you save the document before proceeding. To do this, follow these steps:
-
In Word 2003 and in earlier versions of Word, click Save As on the File menu.
In Word 2007, click the Microsoft Office Button, and then click Save As.
-
Name the document, and then click Save.
-
Click Next: Preview your letters.
Step 7: Preview the Letters and Fine-Tune the Recipient List
When the wizard displays the «Step 5 Mail Merge» task pane, the wizard replaces each of the merge fields in the main document that has the actual text from the first entry of the recipient list.Therefore, you can see how your first output document will look.
For example, if you were to continue to use the sample database shown earlier, the first page should resemble the following page after you click Next: Preview your letters:
February 26, 2002
Andrew Fuller
908 W. Capital Way
Tacoma 98401
Dear Andrew Fuller,
Type your letter here.
Sincerely,
Type your name here To preview additional entries, use one of the following methods:
-
To preview the items in order, click the left or right arrow buttons.
-
To locate and preview a specific item, click Find a recipient, and then enter the search criteria in the Find Entry dialog box.
Fine-tune the recipient list if you want. To do this, use one of the following methods:
-
To exclude a particular recipient from the merge operation, click Exclude this recipient.
-
To change the list of recipients, click Edit recipient list, and then make your changes in the Mail Merge Recipients dialog box.
Step 8: Complete the Merge
To complete the merge, use any of the following methods.
Personalize Individual Letters
To personalize individual items, you actually complete the merge, and then edit the information that you want in the resulting merged document. To do this, follow these steps:
-
Click Edit individual letters.
-
In the Merge to New Document dialog box, select the records that you want to merge.
-
Click OK.
Word creates and opens a new merged document. Your main document also remains open, and you can switch back to it if you want to change all the documents.
-
Scroll to the information that you want to edit, and then make your changes.
-
Print or save the document just as you would any regular document.
Print the Letters
To print the letters, use one of the following methods:
-
If you personalized the items and if the merged document is active, follow these steps:
-
In Word 2003 and in earlier versions of Word, click Print on the File menu.
In Word 2007, click the Microsoft Office Button, and then click Print.
-
Select the options that you want.
-
-
If you want to print directly from the Mail Merge Wizard, follow these steps:
-
In Step 6 of the Mail Merge Wizard (Complete the merge), click Print.
-
In the Merge to Printer dialog box, use one of the following methods, and then click OK:
-
To print all the documents, click All.
-
To print the document that you see in the document window, click Current record.
-
To print a range of documents, click From, and then type the record numbers in the From and To boxes.
-
-
In the Print dialog box, select the options that you want.
-
Save the Merged Letters for Later Use
If you want to edit merged letters or to save them for later use, you can collect them into a single document. To do this, follow these steps:
-
Click Edit individual letters.
-
In the Merge to a New Document dialog box, use one of the following methods, and then click OK:
-
To merge all the documents, click All.
-
To merge only the document that you see in the document window, click Current record.
-
To merge a range of documents, click From, and then type the record numbers in the From and To boxes.
-
-
Word opens a single new document that contains all the individual letters. You can then save the document for later use, just as you would any regular document.
References
For more information, click the following article numbers to view the articles in the Microsoft Knowledge Base:
318117 How to use addresses from an Excel worksheet to create labels in Word
318115 How to create a form letter by using information from an Access database in Word 2002
318112 How to use addresses from an Access 2002 database to create labels in Word 2002
294686 How to use mail merge to create a list sorted by category in Word 2002 and in later versions of Word
290408 Frequently asked questions about mail merge in Word 2002
294688 How to design and set up a mail merge address list in Word 2002 and in later versions of Word
294693 How to use mail merge to create a directory in Word 2002 and in later versions of Word
294683 How to use mail merge to create form letters in Word 2002 and in later versions of Word
A mail merge is a handy way to send personalized mass letters and bulk emails quickly.
It works by automatically adding personalization data from a data file (for example, a spreadsheet) to a template file (like a letter or an email).
In this article, I’ll first cover what a mail merge is and explain how it works. Then, I’ll go over how to mail merge using an Excel spreadsheet and a Word document.
Later, I’ll mention two issues of using the traditional method for mail merges and suggest a better and more powerful alternative to help you send mass emails.
Additionally, I’ll also answer seven FAQs associated with mail merges.
This Article Contains:
(Click on links to jump to specific sections)
- What Are Mail Merges?
- How Does Mail Merge Work?
- How to Use Mail Merge to Send Bulk Letters
- Two Problems of Using Microsoft Word to Send Mass Emails
- How to Use Mail Merge to Send Mass Emails
- 7 Mail Merge FAQs
Let’s jump right in.
What Are Mail Merges?
A mail merge lets you create personalized documents that are automatically customized on a recipient-by-recipient basis. This spares you the trouble of manually personalizing each document yourself!
You can use mail merges to create personalized messages automatically for:
- Marketing emails.
- Newsletters.
- Custom catalogs.
- Form letters, and more.
Note: A form letter is a template file used to create mass letters. Instead of typing a letter for each recipient, you can use a form letter to make quick, unique, personalized letters for each person.
Essentially, if there’s a document you need to personalize at scale, mail merges can take care of it for you!
Go back to Contents
Let’s now explore how a mail merge works.
How Does Mail Merge Work?
First, you need to understand the two essential components of every mail merge.
They are:
- Template File: the document that holds the message you’ll be sending out (like a letter or an email). It specifies the places where the personalization data will go. And that data (names, addresses, etc.) is fetched from a data file.
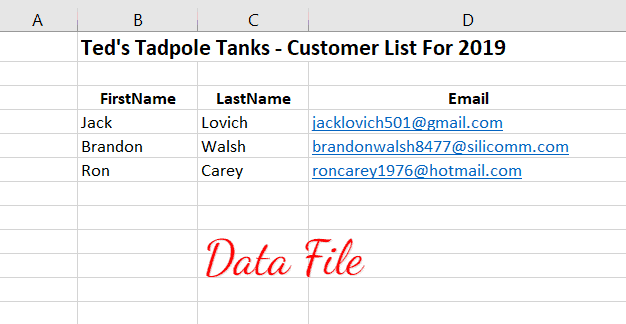
- Data File: a data source like a Microsoft Excel spreadsheet or a Google Sheets file. Each cell in the data file contains different information (first name, last name, email address, etc.) that will be placed in your template file in the corresponding space.
Essentially, a mail merge automatically adds the personalization data from your data file to your template file.
For example, let’s say you want to perform a mail merge to create mass letters.
Here, your letter is the template file — it has placeholders for your contacts’ names and addresses.
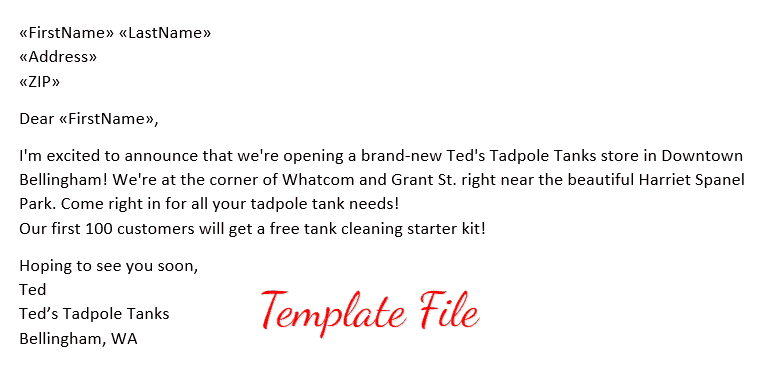
Notice the «FirstName», «Address» and other tags in the letter?
These are placeholders for your recipient’s details, also known as mail merge fields.
A mail merge field draws the personalization information from your data file (spreadsheet) to help you create your personalized letter.
But to make this work, the name of the mail merge field in your personalized letter template must match the name of the column header in your spreadsheet.
If the name of the merge fields and column headers match, the mail merge function would then merge your data file and your letter template to generate a personalized letter for each person.
Go back to Contents
Next, I’ll go over the steps involved in using mail merge to automatically personalize individual letters.
How to Use Mail Merge to Send Bulk Letters
You can use the mail merge feature in Word and Excel to create auto-personalized individual letters quickly.
Here:
- The mail merge template is a form letter in Microsoft Word.
- The data file is an Excel spreadsheet containing your recipients’ details.
Let’s now explore the steps involved in using mail merge for bulk letters:
Step 1: Create and format your address list in Microsoft Excel
Here’s a step-by-step guide on how to set up an Excel data file:
Step A
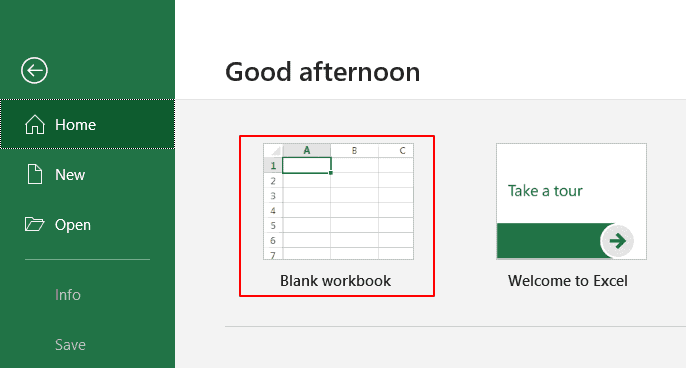
Open MS Excel and click on Blank workbook to open a blank Excel workbook (or document).
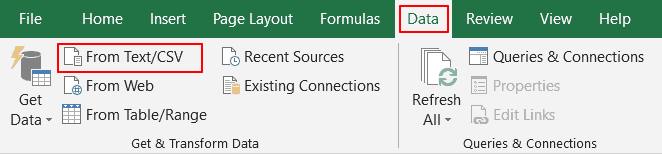
Note: If your contact data is readily available as an Excel spreadsheet, open the file and format it. If the data is present in a TXT or CSV file, go to Data → From Text/CSV to open the file in Excel.
Step B
Now you can start entering the details of your address list into the Excel workbook.
Only enter your column headers in the first row, starting in cell A1.
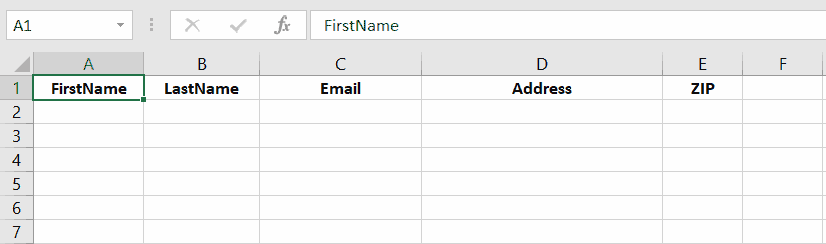
Check your header row to make sure the column headers in your Excel spreadsheet are exactly the same as the field names (or placeholder names) you want to use in your Word template document.
For example, if the column names in your Excel sheet are “FirstName”, “LastName”, and “Email”, the field names in your Microsoft Word document should also be “FirstName”, “LastName”, and “Email”.
Step C
Enter your contact information in your Excel database as one record per row, starting from cell A2.

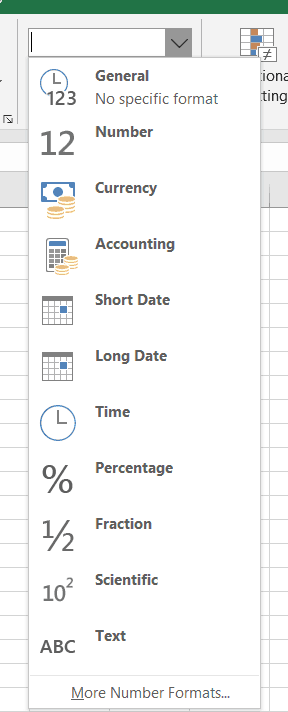
Quick Tip
Data entries such as ZIP codes, percentages, currencies, etc., must be in the correct numeric format. To ensure this, you need to:
1. Select a column that has numeric data entries.
2. Go to the Home → Number section.

3. Click on the Number Format box and choose the correct format from the drop-down list that appears.
4. Repeat steps 1–3 for all columns containing numeric values.
Step D
Once you’ve created the contact sheet, you can save your Excel document by pressing Ctrl+S or going to File → Save or File → Save As.
Bonus Tip for Gmail Users
If you’re creating your first mail merge data file, you can export all your existing Gmail contacts (or “Google Contacts”) to get started quickly. Read my guide on how to export contacts from Gmail to learn how.
Note: Ensure that you finish all edits to the Excel spreadsheet before starting the mail merge process. Making edits to an Excel sheet once you’ve already begun a mail merge is a complicated additional step.
Step 2: Create the main mail merge document in MS Word
The next step is to create the form letter (or mail merge template — your main document) in MS Word. You can create a different mail merge template for every bulk email campaign, and you can save the templates for future use.
A favorite time-saving technique of mass email managers is to choose an old email template that worked well, update the content where necessary, and give the mail merge template a new name.
As a result, when you create your mail merge document, try writing it in a way that will let you adapt and reuse it in future bulk mailings.
Here’s a step-by-step guide on how to create a mail merge template in MS Word:
Step A
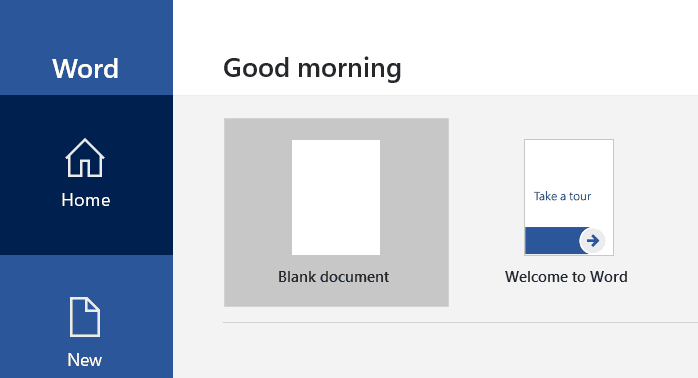
Open a new document (blank document) in Word.
This is the main document for your mail merge.
Step B
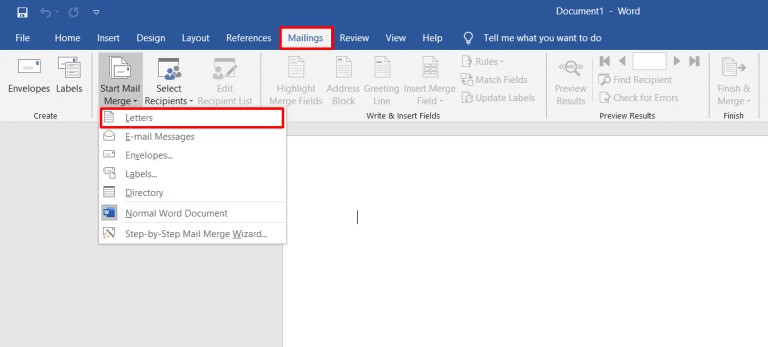
Click on the Mailings tab and select Start Mail Merge. A drop-down menu displaying every different mail merge document type will appear.
You can select the document type for letters, emails, envelopes, mailing labels, or a directory. Since we’re using the Word mail merge feature for sending letters, choose Letters as your merge document.
Step C (Optional)
You can also use the Step-by-Step Mail Merge Wizard (from the Start Mail Merge drop-down menu) to streamline the Word mail merge process.
The wizard lets you quickly select the starting mail merge document.
For example, it lets you use the current document, which is the mail merge letter you’re creating now. Or you could choose a starter template or another existing document as your mail merge template.
Step D
Write the body of the letter.
(Don’t worry about manually adding placeholders in your letter yet.)
Step 3: Select the recipient list
Now you can select the list of mail merge recipients (from your Excel file) who will receive your letter.
Here’s a step-by-step guide on how to do this:
Step A
Click on the Select Recipients option in the Mailings tab. A drop-down menu appears, showing different mail merge list sources.
As your contact information is already available as an Excel file, click on Use an Existing List.
Note: You can also include your Outlook Contact list if you have Outlook connected to Word.
Step B
In the dialog box that pops up, select the Excel sheet you created earlier and click Open.
Step C
A Select Table window appears. Choose the Excel worksheet you want to merge with the Word template and click OK.
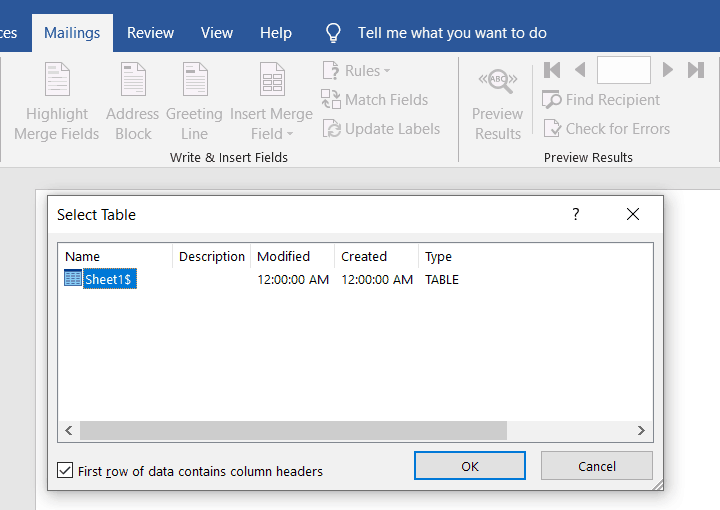
Note: If your Excel spreadsheet has only one worksheet, you’ll only see Sheet1 in the Select Table window.
Step D
If you want to edit your mail merge recipients list, click on the Edit Recipient List tab.
In the Mail Merge Recipients window that pops up, clear the checkbox of the person you don’t want in your mailing list.
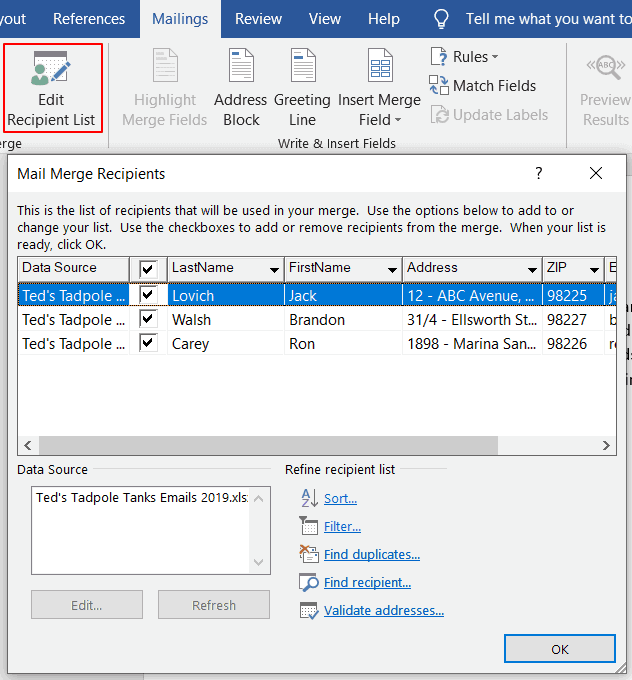
Anyone you remove from your recipient list in this step will be removed from any mail merge project that uses this data file in the future.
Step 4: Add personalized messages
The next step is to add personalized content (like contact names and addresses) to your form letter template (Word mail merge document).
In Word, you can insert three personalization variables into your document:
- Insert Address Block — add a recipient’s address to your document.
- Insert Greeting Line — include a personalized greeting or salutation in your letter.
- Insert Merge Field — insert other mail merge fields from your Excel file.
Here’s a walkthrough on how to add all three personalization variables to your merge document (form letter):
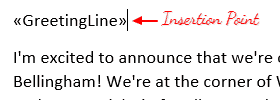
Note: You can add a personalization variable at an insertion point of your choice in the Word document. For example, to add a greeting line before the body of your letter, simply place the text cursor at the point you want to add it.
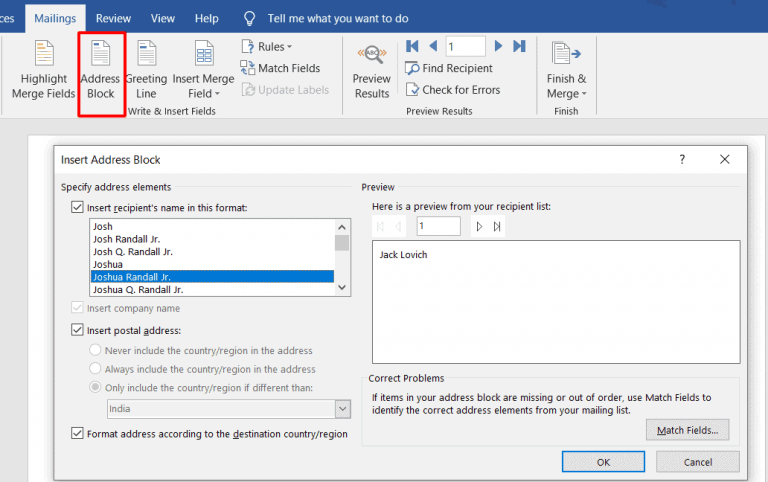
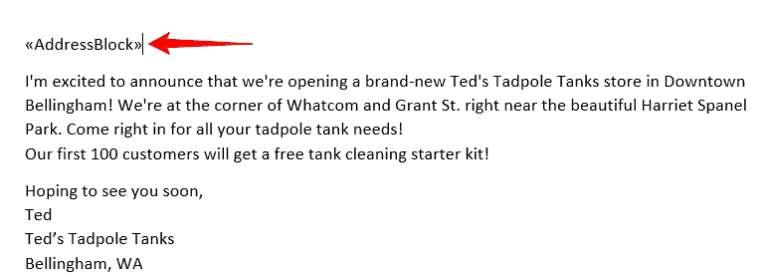
A. Insert an Address block
To insert a recipient’s address from your Excel worksheet, click on Address Block from the Write & Insert Fields section. In the window that appears, choose an address block format of your choice and click OK.
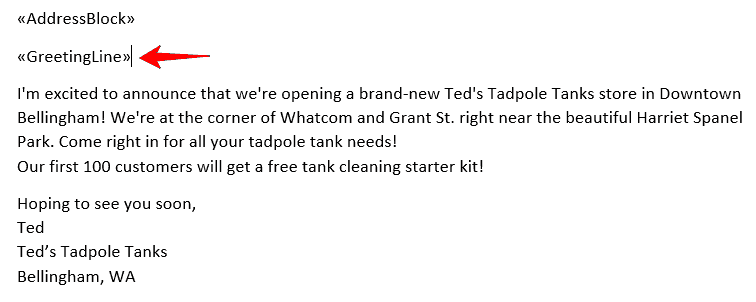
An address placeholder («AddressBlock») will be inserted automatically into your letter.
B. Insert a Greeting Line
To insert a greeting line, click on Greeting Line from the Write & Insert fields section.
In the dialog box that pops up, select the format you want to use and click OK.
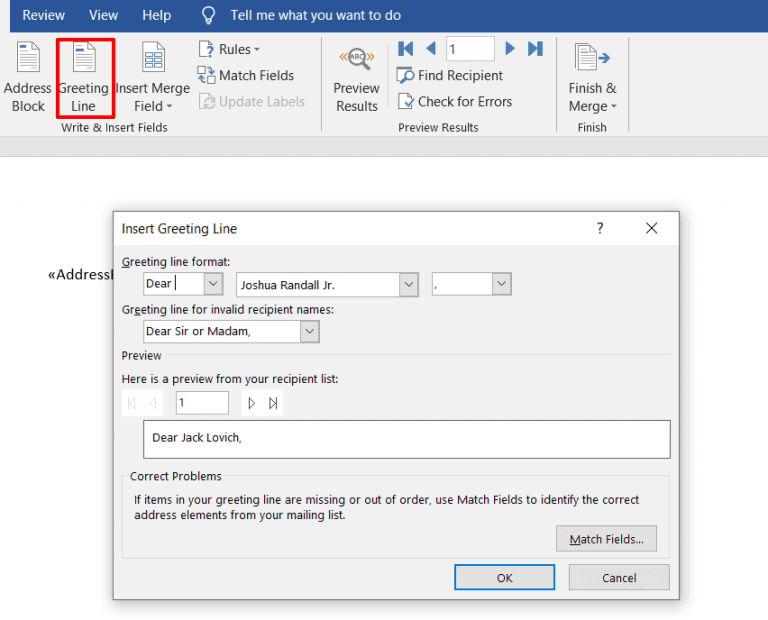
A greeting placeholder («GreetingLine») will be automatically added to your document.
C. Insert a Merge Field
You can also add other mail merge fields, like your contact’s first name, company name, email id, etc., from your Excel worksheet to your Word template.
To do this, click on Insert Merge Field from the Write & Insert fields group.
You can see a drop-down list of some mail merge labels. These labels are the column names in your Excel spreadsheet.
If you want to create a custom field, the easiest way is to add a column to your spreadsheet with the name of the custom field you want to make, like “birthday” or “pet name”. But you must do this before starting the mail merge process since you can’t edit your spreadsheet during mail merge.
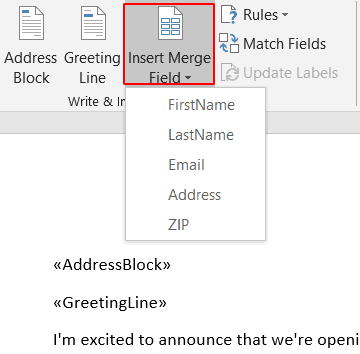
Click on the mail merge fields you want to add to your letter.
Here’s how my form letter looks after inserting the placeholders (mail merge fields) I needed:

Note: You can also use the Match Fields feature to manually match your Excel column fields with the Word placeholders. This way, you can ensure that all the mail merge fields are accurately mapped to your Excel column names.
Step 5: Preview and finish the mail merge process
After personalizing the form letter for each recipient, you can preview the letters to see how they look with the data inserted from your Excel worksheet.
Here’s a step-by-step guide on how to do this:
Step A
Click on Preview Results under the Mailings tab.
Step B
To preview the result for each recipient, you can enter the recipient number (the corresponding row number in your Excel spreadsheet) in the text box.
For example, to preview the form letter for my second recipient — Brandon Walsh, I type “2” in the text box and click the Preview Results button.
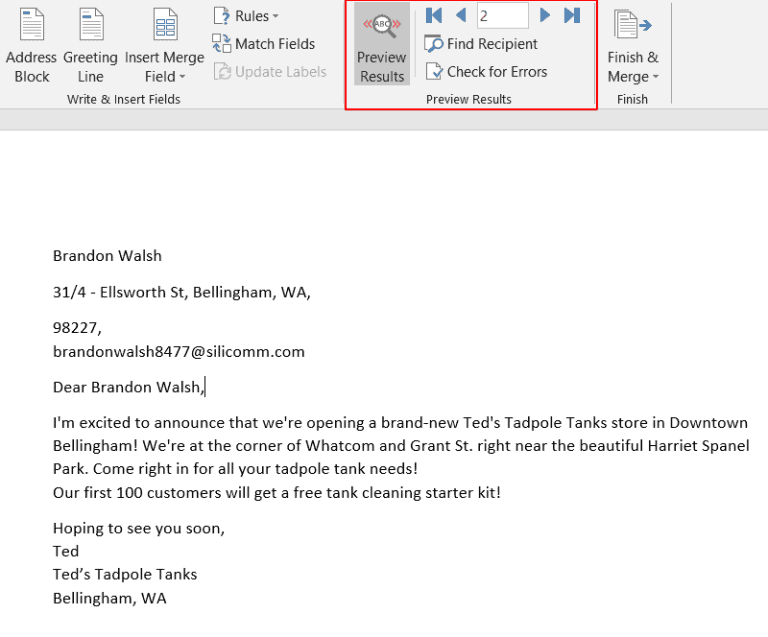
Note: You can also click on the Next and Previous buttons to quickly scroll through your mailing list to preview the letter for each person.
If you realize someone who is scheduled to receive your bulk email should be removed from the recipient list, refer to Step 3 (D) for instructions.
Step C
After previewing the form letter, click on Finish & Merge to finish the Word mail merge process.
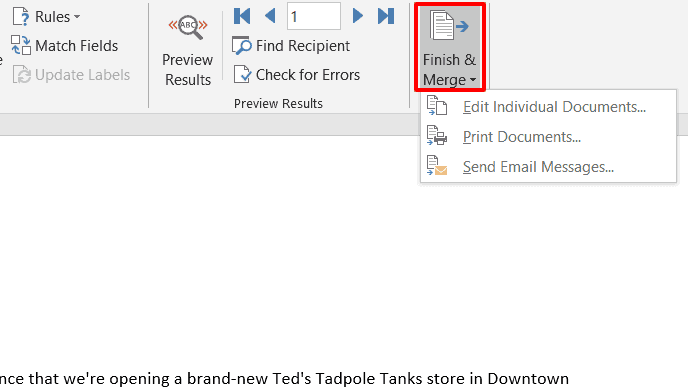
From the drop-down list that appears, you can choose to:
- Edit Individual Documents — if you want to edit each letter further, separately.
- Print Documents — if you want to print the letters.
- Send Email Messages — if you want to send the letters as emails.
Note: If you want to send the letters as email messages to a Gmail or Outlook contact, you must manually set up Gmail/Outlook with Word.
Step 6: Save the form letter
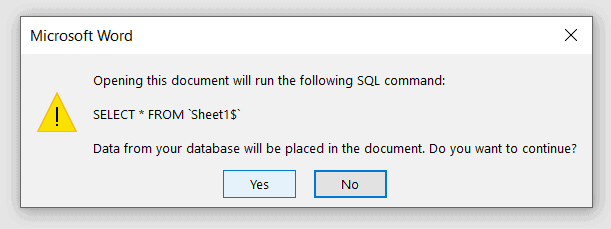
After you’ve finished working with the merged document, you can save it by pressing the Ctrl+S keys or by going to the File menu and clicking Save or Save As.
You can also reuse the merged document for sending additional letters — just open it and click Yes when Word prompts you with this alert:
Go back to Contents
How to Use Mail Merge to Send Mass Emails
You can use mail merge to quickly create personalized emails for newsletters, promos, and other email marketing messages.
Here, your mailing list is the data file, while the email is the mail merge template.
We’ve seen how to use Excel and Word to create personalized form letters.
Just follow the same steps to send merged emails to your mailing list.
However, I don’t recommend using Microsoft Word to send personalized emails at scale. Here’s why…
2 Problems of Using Microsoft Word to Send Mass Emails
While you can use a Microsoft Word document to create merged emails, there are two major drawbacks with this approach:
- To send the merged document as an email message, you must manually set up Microsoft Outlook or Gmail with Word. This can be time-consuming and confusing for most users.
- Microsoft Word isn’t well-equipped to handle mail merges. If your personalization tags are mismatched and there are hundreds of recipients (you can’t preview every email, can you?), you could end up sending something like this:

Image Source: Twitter
Now, imagine sending hundreds of such embarrassing emails!
That’s why it’s smarter to use a dedicated mail merge tool like GMass to send mass emails.
How to Use Mail Merge with GMass to Send Mass Emails
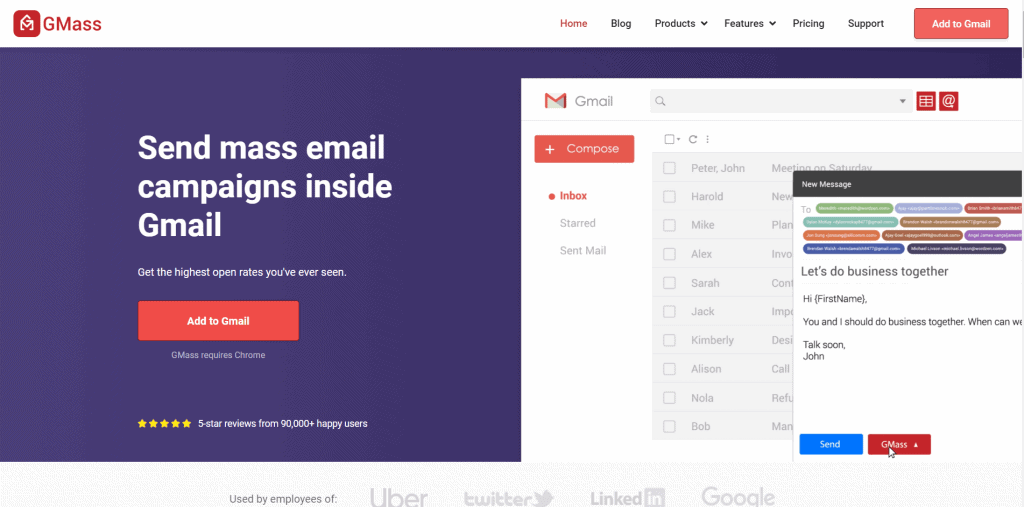
GMass is a powerful mail merge tool that lets you easily create and send tons of emails from your Gmail account.
Its advanced mail merge features have made it a popular tool used by employees from LinkedIn, Uber, Google, and Twitter. GMass is also perfect for individuals and groups like clubs, schools, churches, and other institutions to send emails to a target audience.
With GMass, you can easily create a mail merge with a data file stored as an Excel spreadsheet or a Google Sheet.
Here’s how:
Step 1: Import your Excel spreadsheet into Google Sheets
The first step is to import your Excel file into Google Sheets (this takes only a few seconds).
Why would you want to do this?
Because Google Sheets is far more powerful than Microsoft Excel for mail merging. Its automatic cloud-sync feature auto-saves your work with each edit made in the spreadsheet.
Plus, if you’re sending emails, it makes sense to have your spreadsheet online, right?
Additionally, Google Sheets is completely free and can be used by anyone with a Google (Gmail or Google Workspace) account. You won’t need a Microsoft Office subscription!
Note: If your data file is a CSV file, you can also import it into Google Sheets.
Here’s a step-by-step guide on how to import your Excel document into Google Sheets:
Note: I’ll be using the Excel sheet shown in the screenshot below for the walkthrough.
Step A
Open Google Sheets.

Step B
Select the folder icon to open the Google Sheets File Picker.
![]()
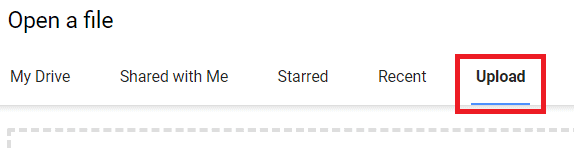
Step C
In the window that appears, click on the Upload tab to import your Excel sheet.
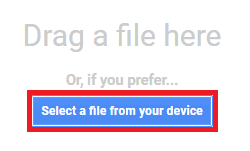
Step D
You can now choose the file you want to import from your computer. To select the file, click on the Select a file from your device button.
Step E
Choose the Excel file you want to import from your computer and click on the Open button.

Step F
Your file will be automatically imported as a new Google spreadsheet, which becomes your mail merge recipient list and data file.
Step 2: Format your Google Sheet
Your Google Sheet must be well-formatted before you use it with GMass.
But don’t worry, it’s not as complicated as formatting your Excel spreadsheet.
Here are some guidelines to ensure it works well:
- Your column names must be in plain text — they shouldn’t contain spaces, codes, or special characters.
- Your column names must begin from cell A1. If there are any blank rows or additional text (like a sheet title) above the column names, you must delete them.
- The actual personalization data must begin from the second row onward.
- There must be at least one column that has your recipients’ email addresses.
GMass will auto-detect all column names during the mail merge process. It will automatically use the column labels in your Google Sheet as the placeholders in your email template.
Step 3: Install GMass and connect it to your Gmail account
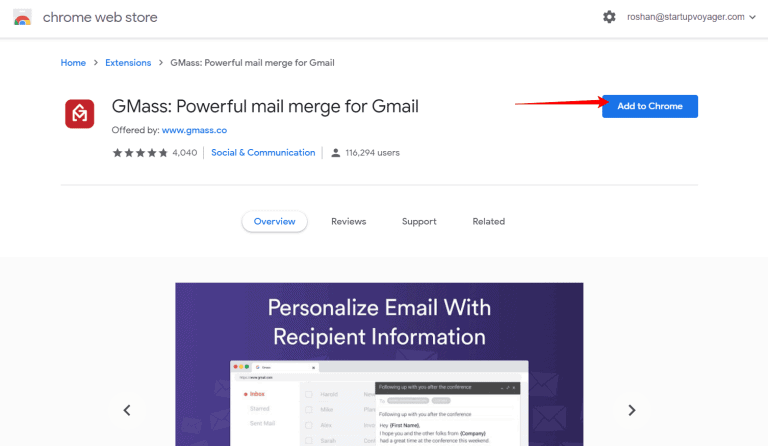
If you haven’t installed the GMass Chrome extension yet, here’s a step-by-step guide on how to install and connect it to your Gmail account quickly:
Step A
Head to the Chrome Web Store page for GMass.
Step B
Click on the Add to Chrome button.
Step C
A dialog box pops up:
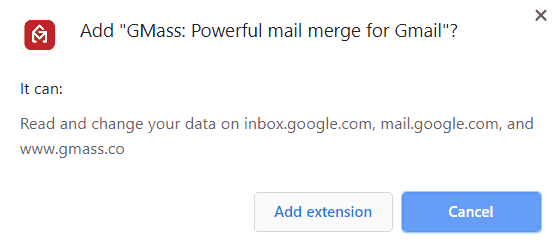
Click on the Add extension button to add GMass to Chrome.
Step D
Log in to the Gmail account you want to use with GMass.
After logging in, you can see three new GMass buttons next to your Gmail search box.
![]()
Click on one of these buttons, and you’ll be prompted to link your Gmail account to GMass:
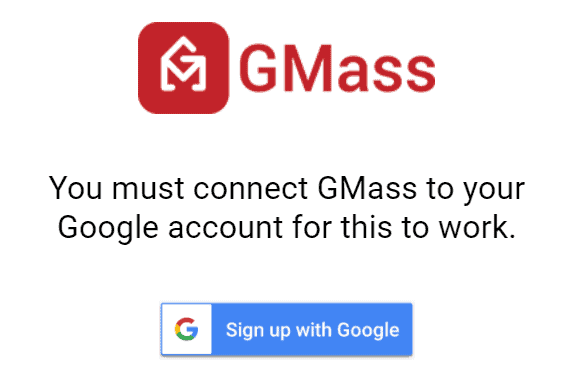
Click on the Connect GMass Now! button to connect your Gmail account with GMass.
Note: Simply installing the GMass extension doesn’t create a GMass account. It only makes the buttons appear in your Gmail account. You have to link it to your Gmail account (as above) to activate it.
Step 4: Connect your Google Sheet to GMass
Here’s a step-by-step guide on how to perform this last step:
Step A
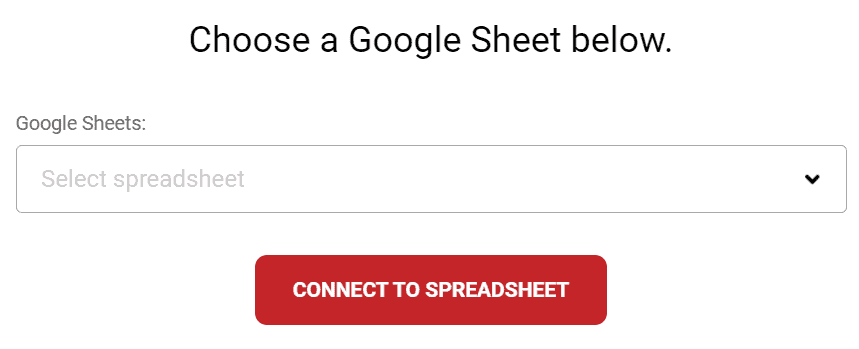
Open your Gmail account and click on the GMass spreadsheet button near your Gmail search box.

Step B
A dialog window appears:
Step C
You can now use the drop-down menu to choose the Google sheet you want to use for the mail merge.
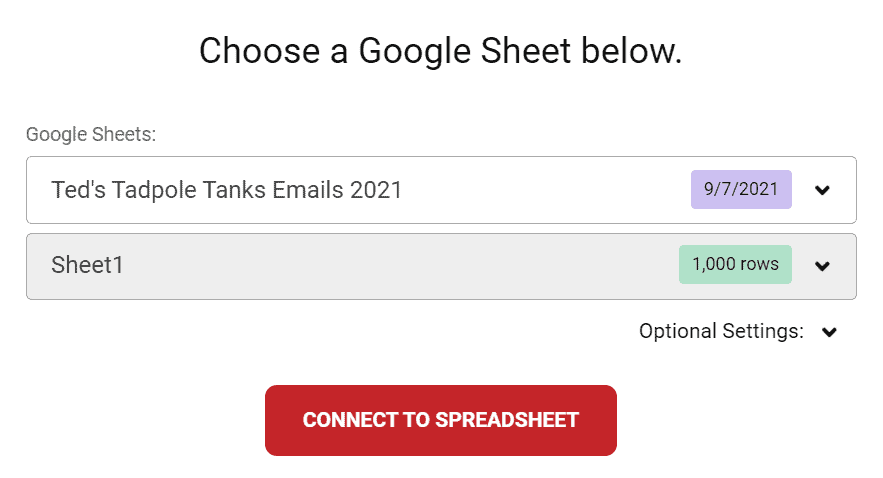
Note: If you have only one sheet (Sheet1) in your Google spreadsheet, that sheet gets chosen by default. However, if your spreadsheet has multiple sheets, you can select the sheet you want from the drop-down list.
Once you’ve chosen a spreadsheet, click on the CONNECT TO SPREADSHEET button.
Step D
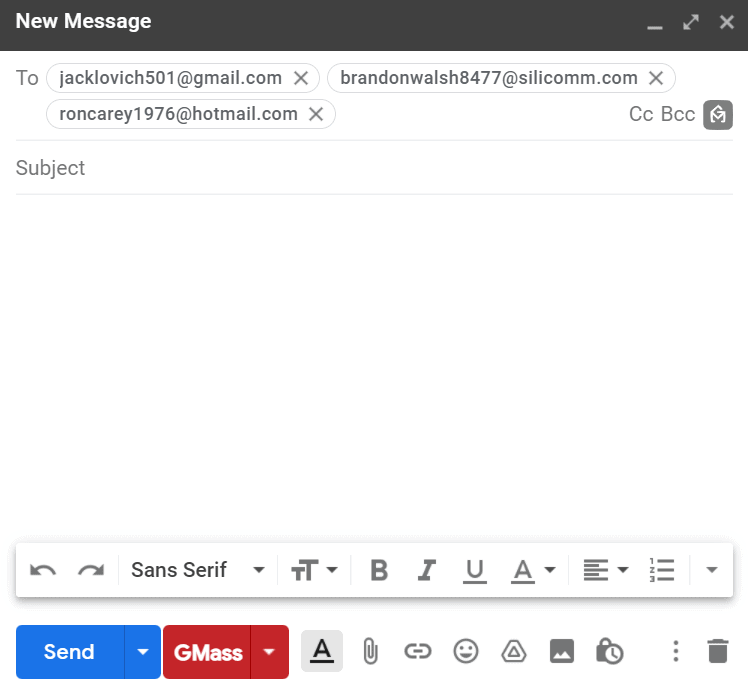
Now, GMass will auto-read all your recipients’ data from your Google sheet. It will also automatically insert their email addresses in the To field of a new email.
Note: GMass replaces the list of individual email addresses with a single alias address.
However, you can choose to display the email addresses individually. This way, you’ll be able to see the email IDs of everyone on your recipient list — but don’t worry, each recipient will see only their email address (just like when you add recipients to the BCC field).
Step E
After a new email window appears, you can compose your email with GMass’ powerful personalization features. To use these personalization settings, click on the settings arrow near the GMass button.
![]()
Click on the Personalize drop-down list button to see all the column names present in your Google sheet.
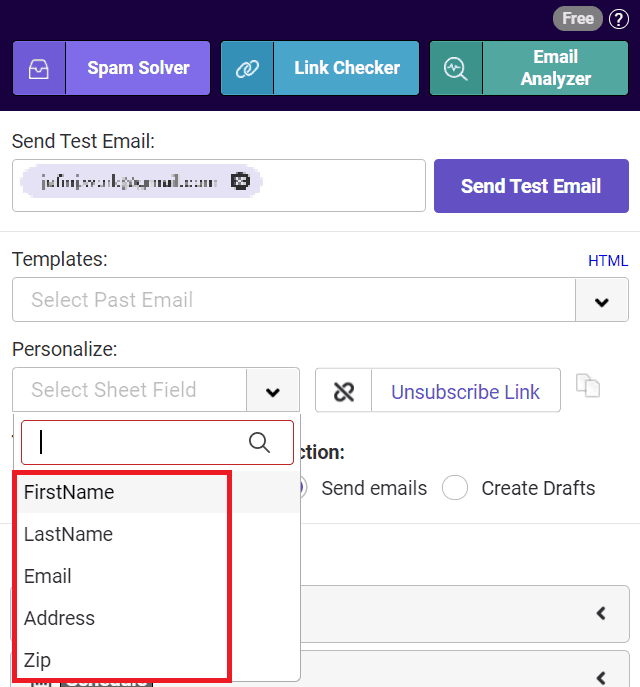
To personalize your email, select the column labels from the drop-down list. You can add these placeholders anywhere in your email message and subject line.
Here’s how my personalized email looks like with placeholders:
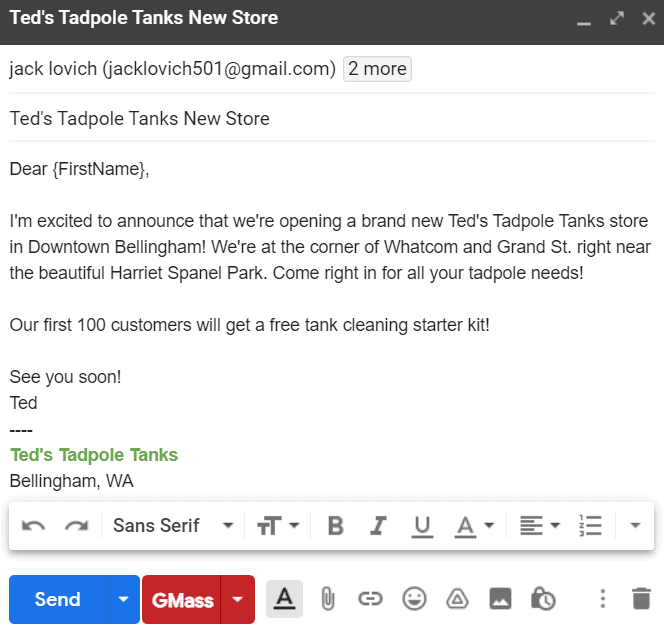
Notice the {FirstName} variable?
That’s a personalization label corresponding to the column header FirstName in my Google Sheet.
Step F
After composing your email, click on the GMass button to send it to all your recipients.
Note: GMass will auto-personalize the email for each person based on the mail merge labels you’ve used in your message.
For example, the third recipient of my email, Ron Carey, will receive an email that starts with “Dear Ron,” as the {FirstName} variable was used in the email message.
Go back to Contents
Now that we’ve seen how to use mail merge to send mass emails let’s check out some important mail merge FAQs.
7 Mail Merge FAQs
Here are the answers to seven commonly asked questions regarding mail merge:
1. What are the advantages and disadvantages of email mail merge?
Mail merge for your email marketing or cold emailing has several strong advantages, such as:
- Personalization: Mail merge personalization makes your form letter sound like individual correspondence, so it’s more likely to be read.
- Saves time: Once you set up your mail merge template, it takes relatively little time to create a large number of personalized messages because it’s tied to your Excel data — the single spreadsheet where all personalized information is kept.
- Controls the appearance of your message: A mail merge template lets you manage how the type and images look, so your email is attractive even where the personalized content is different.
- Allows for testing: You can quickly adapt a template to create two versions of the message for A/B testing. This way, you can effortlessly know what version of your message works best.
On the other hand, a mail merge also has some disadvantages for email campaigns:
- May require additional software: To go beyond the features of Microsoft Word, you may need email merge software, like GMass, with advanced features to automate data collection or add conditional formatting.
- Requires accuracy: If your Microsoft Excel database is incomplete, inaccurate, out of date, or saved under a new name, then mail merge may not work.
- Risk of error: If you make a mistake in your mail merge template or personalization data, that error will get reproduced on all the emails that use those elements. As a result, it’s essential to allow time to test your email before sending it to your entire list.
2. Can you perform an email merge with an attachment?
When you’re using Word, you don’t have the option to include an attachment with a standard mail merge message, but you can if you use the Mail Merge Toolkit add-in for Microsoft Office.
However, if you’re after a better solution, use a purpose-built mail merge platform like GMass that not only lets you include an attachment but even allows you to choose different attachments for each recipient.
Read more about how to send a mass email with personalized attachments.
3. How do you use a Mail Merge Toolkit in Word?
The Mail Merge Toolkit for Word is a third-party add-in that lets you do more personalization than the standard Word mail merge alone (for example, including attachments).
You can download a free trial and view an online toolkit tutorial to get started. Once you have the program, go to the Start Mail Merge selection under the Mailings tab and follow the prompts.
4. Can you send a mail merge from a shared mailbox?
If you want to send a mail merge from a shared mailbox (such as from an email address named for a department, company, or event instead of a person), you can arrange it in Outlook.
Start by finding the “Other User’s Folder” and open it to navigate to the shared mailbox. Associate that mailbox with the spreadsheet that contains your recipients’ data and prepare the mail merge as usual.
5. How do you do a mail merge in Word for labels?
One of the coolest features of MS Word’s mail merge functionality is the ability to drive printed labels with placement designed in Word and data-driven by your personalization datasheet.
If you know how to do a letter or email mail merge in Word, labels are very easy.
Under the Mailings tab in Word, click the Start Mail Merge selection and then the Step-by-Step Mail Merge Wizard. Choose Label as your template document type, and under Label Options, select a label manufacturer and style number (for example, Avery 5160, etc.).
From there, follow the wizard’s prompts.
You may also want to view Microsoft’s brief and helpful video tutorial.
6. How do you do a mail merge with Outlook?
To create an Outlook mail merge, you’ll need to use Microsoft Word, Excel, and Outlook.
Starting in Word, choose the Mailings menu, then Start Email Merge, and then Email Messages.
When your message is ready, click Select Recipients to link to the Excel spreadsheet with your data. Then, select Finish & Merge to send your email to your list using Outlook.
For more info, read my article on performing a mail merge in Outlook.
7. What is extended mail merge?
If you’re a Salesforce user, you have two options for mail merge — standard and extended.
Standard mail merge is the preferred approach for those with specific CRM software and operating systems, such as Luminate CRM and Windows 10.
Extended mail merge is a mail merge tool for all other Salesforce users. Although the tools are different, the results are the same — personalized emails to recipients listed in Salesforce.
Go back to Contents
Final Thoughts
Mail merging isn’t rocket science.
While you can use Microsoft Word to perform mail merges for letters, you need to follow a large number of steps correctly. Additionally, for sending mass emails, you have to set up a webmail client with Word manually.
Instead, why not use a powerful mail merge tool like GMass for sending mass emails?
Its advanced mass mailing features help you to perform mail merges and send out bulk emails effortlessly.
Why not try GMass today and simplify your mail merge experience?
Ready to transform Gmail into an email marketing/cold email/mail merge tool?
Only GMass packs every email app into one tool — and brings it all into Gmail for you. Better emails. Tons of power. Easy to use.
TRY GMASS FOR FREE
Download Chrome extension — 30 second intall!
No credit card required

Ajay is the founder of GMass and has been developing email sending software for 20 years.
Love what you’re reading? Get the latest email strategy and tips & stay in touch.
Today, mail takes on a whole new level as technology grows. From dozens to hundreds, we are now able to send up to thousands of letters all over the globe for corporate or marketing use. One such technology is mail merge, which makes mass mailing so much easier using pre-addressed and personalized letters.
If you are looking for a mail merge letter that is more convenient, then you can use this Sample Mail Merge Letter for Word. This Word template is free and can be used for all kinds of letters for your company or organization.
Versatile and Professional Design
This Sample Mail Merge Letter for Word is versatile and designed to be used along with different kinds of letterheads so you can easily incorporate it into your company letterhead. It can also go well with your email to create professional mass mail for all your recipients.
The mail merge letter template features great formatting that suits your company, whatever industry you may belong in. You can also easily insert your logo and change the style and color scheme to match your brand identity.
Create Letters in a Flash
The letter itself contains placeholders where you can add your own information. There are already pre-formatted letter parts such as inside address, salutation, and greeting. The body of the letter, meanwhile, contains guides and tips to help you compose your own letters concisely, as well as to organize your ideas to make you express your thoughts and ideas most effectively.
To change the overall appearance of the letter, the template also provides tips. Just go to the Theme menu on the Design tab on the Ribbon. You can also go to the Quick Styles to choose font styles and combinations that you prefer, or you can also create a style to make your letter fully customized.
The best part is, this template can be uploaded to your OneDrive account so you can easily access it and create mass mail and mail merge letters to anyone, anywhere you are. This also allows you to conveniently work with a team and have them all take a look at the mail merge letter together, for easy collaboration.
Go to Download Sample Mail Merge Letter for Word
Perform a Mail Merge in Microsoft Word to Generate Form Letters for Bulk Mailings
by Avantix Learning Team | Updated January 10, 2021
Applies to: Microsoft® Word® 2013, 2016, 2019 and 365 (Windows)
You can use mail merge in Microsoft Word to create form letters, labels, envelopes and even a catalog or directory. In this article, we’ll review the process for creating form letters for multiple contacts or clients. You’ll need to create a main document or letter in Microsoft Word and then connect to a data set of names and addresses in a Word document, Excel worksheet, delimited file or database like Microsoft Access. When you run the mail merge, you have the option of creating a new merged file (which would include a letter for each contact) or merge directly to a printer.
Recommended article: How to Create Labels in Word Using Mail Merge and Excel Source Data
Do you want to learn more about Word? Check out our virtual classroom or live classroom Word courses >
Understanding the mail merge process for form letters
There are 7 steps in the mail merge process to create form letters in Word:
- Start the merge and specify the main document for the letter.
- Select the source file containing the data set with names and addresses. Microsoft refers to a data set or database as a list. It’s best to create this file before you begin the mail merge process.
- Insert fields into the letter and any other required content (such as the body of the letter and signature).
- Format the letter.
- Select specific recipients or filter the recipient list (optional).
- Preview the merged letter (optional).
- Run the mail merge.
During the mail merge process, fields are inserted into the main document and appear in carets (such as <<FirstName>>). By default, when you click in a field, it is displayed with grey shading. When you run the merge, the fields are replaced by data from the source file.
In this article, we’ll be using the Mailings tab in the Ribbon to set up and run a mail merge (not the Mail Merge Wizard):

Step 1: Start the merge and specify the main document
The first step in the mail merge process is to start the merge using Start Mail Merge on the Mailings tab in the Word Ribbon:

To start the merge and specify the main document as a form letter:
- Create a new blank document or open a Word document containing a sample letter.
- Click the Mailings tab in the Ribbon and then click Start Mail Merge in the Start Mail Merge group.
- From the drop-down menu, select the type of document you want to create. In this case, select Letters. By default, Word uses the current document. At this point, you may want to insert other components such as a date, the body of the letter and a signature.
Step 2: Select the source file containing the data set
The next step is to connect to a source file containing a list of names and addresses using Select Recipients. The source file can be a Microsoft Word document containing a table or delimited data, Excel worksheet or even a table or query in a database such as Microsoft Access. For Word tables and Excel spreadsheets, the first row in the table or worksheet must contain field names such as FirstName, LastName, Company, Address and so on. In a Word source file, there cannot be any paragraphs above the table or data. You can also use a comma or tab delimited file as long as the first line in the document contains field names. In delimited files, the field names and data are separated by a delimiter such as a comma or tab.
Select Recipients appears on the Mailings tab in the Ribbon:

In the following example, note that the field names are in the first row of a Word table which will be used as a source:

In the following Excel example, note that the field names are in the first row of the worksheet which will be used as a source:

To select a Microsoft Word source file containing a table with names and addresses:
- In the main Word document, click the Mailings tab in the Ribbon and then click Select Recipients in the Start Mail Merge group. A dialog box appears.
- Click Use an Existing List from the drop-down menu. A dialog box appears.
- Navigate to the Word file containing the names and addresses you want to use.
- Double-click the file.
To select a Microsoft Excel source file containing a worksheet with names and addresses:
- In the main Word document, click the Mailings tab in the Ribbon and then click Select Recipients in the Start Mail Merge group. A dialog box appears.
- Click Use an Existing List from the drop-down menu. A dialog box appears.
- Navigate to the Excel file containing the names and addresses you want to use.
- Double-click the file. A dialog box appears.
- Ensure First row of data contains column headers is checked.
- Click the Excel worksheet containing the data you wish to use.
- Click OK.
The following dialog box appears when you select an Excel file as the source for a merge:

Step 3: Insert fields from the source file
Once you have connected to a source file, you can insert fields into the main document or letter. You have the option of using special Word fields such as Address Block and Greeting Line (for example, to insert Dear John) or inserting individual fields.
Address Block and Greeting Line appear as follows in the Ribbon:

To insert the Address Block field:
- Click in the main document where you want to insert an address block.
- Click the Mailings tab in the Ribbon and then click Address Block in the Write & Insert Fields group. A dialog box appears. Word will display an address based on the source data.
- In the samples on the left, select the address sample you prefer.
- Check or uncheck other options if necessary.
- Click OK. Word inserts an Address Block field into the main document.
For Address Block, select a sample address in the area on the left in the Insert Address Block dialog box:

To insert a Greeting Line field:
- Click in the main document where you want to insert a greeting.
- Click the Mailings tab in the Ribbon and then click Greeting Line in the Write & Fields group. A dialog box appears. Word will display a greeting based on the source data.
- Select greeting line options for the Greeting line format.
- Select an option for invalid recipient names.
- Click OK. Word inserts a Greeting Line field into the main document.
For Greeting Line, select greeting line options in the Insert Greeting Line dialog box:

To insert fields individually:
- Click in the main document where you want to insert a field (such as FirstName).
- Click the Mailings tab in the Ribbon and then select Insert Merge Field in the Write & Insert Fields group.
- From the drop-down menu, select the field you want to insert.
- Press the spacebar, type text or press Enter if necessary.
- Repeat for other fields you want to insert.
Step 4: Format the letter
You may need to apply formatting to the letter such as changing the font and size and adjusting paragraph spacing.
It’s common for an Address Block field or address lines to have extra paragraph spacing above and / or below lines in the address when the results are previewed or printed. This is caused by default settings for space above and below paragraphs.
To remove the paragraph spacing:
- Select the Address Block field or other lines (often in the address if you have inserted individual fields).
- Click the Home tab in the Ribbon and select the dialog box launcher on the bottom right of the Paragraph group.
- Select Don’t add space between paragraphs of the same style. Alternatively, change the space above and below the paragraph(s).
- Click OK.
Step 5: Select specific recipients or filter the recipient list (optional)
You have the option of specifying specific recipients or filtering the recipient list if you don’t want to create form letters for all contacts in the data source.
To choose specific contacts:
- Click the Mailings tab in the Ribbon and then click Edit Recipient List in the Start Mail Merge group. A dialog box appears.
- Uncheck the check boxes beside the recipients you do not want to include in the mail merge.
- Click OK.
To filter the source list:
- Click the Mailings tab in the Ribbon and then click Edit Recipient List in the Start Mail Merge group. A dialog box appears.
- Click Filter. A dialog box appears.
- Select / enter the desired filtering options.
- Click OK.
For example, below is a filter to display records from Toronto:

To remove the filter, repeat the process, but click Clear All in the Filter and Sort dialog box.
Step 6: Preview the results (optional)
Before you run the mail merge, you can preview the results:
- In the main document, click the Mailings tab in the Ribbon and then click Preview Results in the Preview Results group.
- Click the arrows in the Preview Results group to go to the next or previous letter.
- Click Preview Results to view the fields again.
Step 7: Run the mail merge for letters
The final step is to run the merge. You can either create a new merged document or merge directly to a printer.
To run the letter mail merge in the main document and create a new merged document:
- Click the Mailings tab in the Ribbon and then click Finish & Merge in the Finish group. A drop-down menu appears.
- Click Edit Individual Documents. A dialog box appears.
- Click Current Record or enter a selected range if necessary.
- Click OK. Word creates a new merged document that you can edit, print and save. Each letter will appear on a new page in a new section.
The following dialog box appears when you select Edit individual documents.

To run the letter mail merge in the main document and print the merged documents:
- Click the Mailings tab in the Ribbon and click Finish & Merge in the Finish group. A drop-down menu appears.
- Select Print Documents. A dialog box appears.
- Click Current Record or enter a selected range if necessary.
- Click OK. A dialog box appears.
- Select the desired printer and other printer options.
- Click OK.
The following dialog box appears when you select Print Documents:

You will typically want to save the main document and the source file. If you save the merged file, you will have a record of the letters that were created.
The process is similar for labels. The main document would be labels (usually a label type with a product code) and would connect to the source document in the same way.
This article was first published on December 9, 2019 and has been updated for clarity and content.
Subscribe to get more articles like this one
Did you find this article helpful? If you would like to receive new articles, join our email list.
More resources
How to Insert a DRAFT Watermark in Word and Remove It (Add Text or Picture Watermarks)
How to Remove Hard Returns in Word Documents
How to Superscipt or Subscript in Word (with Shortcuts)
Related courses
Microsoft Word: Intermediate / Advanced
Microsoft Word: Designing Dynamic Word Documents Using Fields
Microsoft Word: Long Documents Master Class
Microsoft Word: Accessible Word Documents
Microsoft PowerPoint: Intermediate / Advanced
VIEW MORE COURSES >
Our instructor-led courses are delivered in virtual classroom format or at our downtown Toronto location at 18 King Street East, Suite 1400, Toronto, Ontario, Canada (some in-person classroom courses may also be delivered at an alternate downtown Toronto location). Contact us at info@avantixlearning.ca if you’d like to arrange custom instructor-led virtual classroom or onsite training on a date that’s convenient for you.
Copyright 2023 Avantix® Learning
Microsoft, the Microsoft logo, Microsoft Office and related Microsoft applications and logos are registered trademarks of Microsoft Corporation in Canada, US and other countries. All other trademarks are the property of the registered owners.
Avantix Learning |18 King Street East, Suite 1400, Toronto, Ontario, Canada M5C 1C4 | Contact us at info@avantixlearning.ca
How do I create a Mail Merge template in MS Word?
![]()
Written by Team Wealthbox. Updated over a week ago
You can create a MS Word Mail Merge template that can then be uploaded into Wealthbox to print letters or other documents with fields inserted from Wealthbox. Note: be sure you save the Word file as a document, not a template format.
-
Open MS Word and choose a new document or an existing document that you would like to use as a Mail Merge template.
-
Click the “Insert” tab from the Menu bar and choose “Field” from the “Quick Parts” list.
-
Choose “Mail Merge” from the “Categories” list.
-
Select “MergeField” from the “Field names” list.
-
Within the “Field Properties” section, enter a Mail Merge field in the “Field name” box. Click here to see the available Mail Merge fields from Wealthbox.
-
Click “OK.”
NOTE: Copying and pasting the allowed Mail Merge fields will not work properly when conducting a Mail Merge within Wealthbox. The above steps are necessary when creating your templates within MS Word.
MS Word for PC example:

MS Word for Mac example:


Did this answer your question?

Word’s mail merge feature has been around for a long time but recent versions are much easier to use. You can use the mail merge feature to generate multiple documents at once. For instance, you might generate a batch of letters, forms, emails, or even labels using mail merge. Anytime most of the text is the same but it requires a bit of personalization, consider using mail merge. You’ll save time.
In this article, we’ll work through a simple example that inserts detailed information stored in Excel into a Word merge document. First, we’ll look at the required documents. Then, we’ll work through the merge to generate the final documents.
I’m using Office 365 (desktop) Word and Excel on a Windows 10 64-bit system. This feature isn’t available in the online versions. You can work with your own files or download the demonstration .xlsx and .docx files.
SEE: Server deployment/migration checklist (Tech Pro Research)
The pieces
To start, you need two components: The template document and the information document. The template will be a Word document that repeats most everything but a few details. Those details will be in the information document, and it will be different for each merged document.
For instance, you might send a welcome letter to new club members. The body of the letter is a Word document–the template. The recipients, their addresses, the types of memberships, and so on will be unique to each letter. The information document is often an Excel workbook. Figure A shows a simple welcome letter in a Word document and a short list of new members in an Excel file.

The Word template has a number of textual placeholders, denoted by the [] characters–member’s name, address, and membership type. These are a visual clue to you that you need to merge fields to display the personalized data. (The placeholders mean nothing to Word, and you can use any visual clue you want.) When setting up the merge, you’ll replace those with the merge fields that are mapped to the Excel fields, accordingly. The merge will generate four new membership letters ready to put in the mail. You might think that it would be faster to type four letters, but it isn’t. In addition, you can reuse the template every time you want to print new membership letters. Also, consider that a mail merge can handle hundreds of finished pages. We’re working with a short list to simplify the example.
Before creating the Word template from scratch, look for an existing template. Word offers a number of templates for a variety of purposes. In addition, if this were a large mailing, you might need to sort the detail records for some reason. For instance, if you want to take advantage of bulk mail rate, you’d want to sort the Excel records by ZIP Code before starting the merge.
The date
The first thing we want to replace is the text placeholder for the letter’s date. This isn’t part of the merge task, but it’s something you’ll need to deal with in most merges. You can type the manual date, but if you plan to reuse the template, there’s a better alternative–insert a date field. The quickest way to do so is to select the [date] placeholder and press Alt+Shift+d. However, you can’t control the format. If you want more control, delete the [date] placeholder, and then do the following:
- Click the Insert menu and then click Insert Date and Time in the Text group.
- In the resulting dialog, select a format (Figure B). Be sure to check the Update automatically option.
- Click OK, and Word will display the current date where the [date] placeholder was.

Start the merge
The next step is to start the merge by clicking the Mailings tab. In the Start Mail Merge group, click the Start Mail Merge option and choose Letters. There are several options as shown in Figure C. It’s a good idea to note the different options. You can use this feature to do a lot more than just print a few form letters.

Next, click Select Recipients and identify the Excel new members workbook that contains all of the details about each new member as follows:
- After clicking Select Recipients, choose Use an Existing List from the dropdown.
- Use the resulting dialog to locate and then select your details file. In this case, it’s an Excel workbook (Figure D).
- Click Open. Identify the appropriate sheet and click OK in the second dialog. Excel correctly notes that the data range (a Table object in this case) has headers (This is an option you might have to uncheck.).

Mapping the fields
Word knows where the details are coming from. Now, you need to tell Word where to insert those details within the template document. Before you can do so, you must map placeholders to specific fields in the details Excel file. In this case, we’re talking about a set of predefined placeholders, and not the text placeholders you typed when you created your template document.
To start mapping, click Match Fields in the Write & Insert Fields group. As you can see in Figure E, Word is able to match a few for you because the names–City, State, and ZIP–match. You’ll notice that Word has a long list of possible fields, and our document has only a few text placeholders. Don’t worry about the fields with no matching placeholder; you can completely ignore those.

Let’s match what we can. From the First Name dropdown, choose 1st First Name. From the Last Name dropdown, choose 1st Last Name (Figure F).

Using Figure G as a guideline, map the last name fields. Word matched City, State, and Postal Code for you.

Insert merge fields
With the fields mapped, you’re ready to start inserting merge fields into the actual document to replace the text placeholders you added when you created the template. Let’s start with [member]:
- Select [member].
- Click Insert Merge Field in the Write & Insert Fields group and choose M_1st_First_Name field from the resulting list (Figure H). This dropdown lists all the fields from the Excel sheet.
- Hit the spacebar to insert a space between the first and last names.
- Then, repeat step 2 to insert the M_1st_Last_Name field.

Continue replacing the text placeholders with the street address, city, state, and ZIP code merge fields. Remember to insert spaces and punctuation. Don’t forget to replace the [membership type] text placeholder with the Membership_Type field. Figure I shows all of the inserted merge fields. Notice that after inserting the Membership_Type merge field, I added the word membership. That was a simple error made when creating the template–see how easy it is to fix? You can edit the template document as you would any other document.

With all the merge fields in place, you’re ready to merge. Before you do though, click Preview Results in the Preview Results group. Doing so allows you to review the merge before you actually commit it to files. Once you’re satisfied that all is in place, click Finish & Merge in the Finish group. You can save the results so that you can edit or use later. Choose Edit Individual Documents, and then click OK to confirm the actual records. Figure J shows the first of four new member letters, ready to print.

Oops! We forgot to replace the [membership number] placeholder. No problem–simply access the Word template document, replace it using the instructions above and rerun the merge. (Imagine if you had to fix that in every document.)
A few tips
Save the template as a template file (.dotx) for future use–you don’t have to start over from scratch. Although we didn’t actually print our letters, you’ll often send your merge results to the printer. Be sure your letterhead or label sheets are ready to go. When using an email merge, send the file to yourself first so that you can see what the message actually looks like; you want to see what your recipients will see. You might make adjustments based on what you see.
Stay tuned
This is a simple merge example, but the feature offers much more. In a subsequent article, I’ll show you how to generate conditional merges.
Send me your question about Office
I answer readers’ questions when I can, but there’s no guarantee. Don’t send files unless requested; initial requests for help that arrive with attached files will be deleted unread. You can send screenshots of your data to help clarify your question. When contacting me, be as specific as possible. For example, “Please troubleshoot my workbook and fix what’s wrong” probably won’t get a response, but “Can you tell me why this formula isn’t returning the expected results?” might. Please mention the app and version that you’re using. I’m not reimbursed by TechRepublic for my time or expertise when helping readers, nor do I ask for a fee from readers I help. You can contact me at susansalesharkins@gmail.com.
See also
- Office Q&A: How to use a macro to set Find defaults (TechRepublic)
- How to use Office Picture Layout options to quickly arrange pictures (TechRepublic)
- How to use Excel’s find feature to highlight or delete matching values (TechRepublic)
- Office Q&A: How to share Outlook 365 contacts (TechRepublic)
- Office Q&A: How to anchor image files in Microsoft Word (TechRepublic)
- 20 pro tips to make Windows 10 work the way you want (TechRepublic download)
- Microsoft Office 365 for business: Everything you need to know (ZDNet)
- Programming languages and developer career resources coverage (TechRepublic on Flipboard)
Do you find yourself sending out the same letter to a large group of people? You might be able to send your message more efficiently by using Microsoft Word’s mail merge feature. In this mail merge tutorial, I’ll show you how to use Microsoft Excel with Microsoft Word to create personalized letters. (Updated for Microsoft 365).
What is Mail Merge
If you’re not familiar with the term “mail merge,” it refers to a way of combining data from one or more sources to create new items. For example, you could combine elements from a contact list with a letter template to make personalized letters. And, you can use the same merge steps to create printable gift certificates. Likewise, you can use a similar process to make custom address labels.
Understanding the Mail Merge Process
It helps me to think of the mail merge process in terms of three files.
- Mail merge letter with codes for the personalized fields. You might think of this as your letter template.
- A data source file with a row of information for each recipient. I’m using Excel.
- Your final Word letter file with the personalized letters.
The mail merge process uses your letter template + data source file = individual Word Letters.
The first step is to decide what to personalize. This requires knowing the content of your letter and your recipients. Using politicians as our example, they can get a .CSV file or .XLSX data extract with voter information from their election office. This file contains fields for:
- First Name
- Last Name
- Address 1
- Address 2
- City
- State
- Zipcode
You may add other fields to meet your needs. For example, you might add a field called “Event.” This could show an event time to meet the candidate.
Review & Fix Data Records
Before creating your letter, you should check your data source file. I don’t think I’ve seen a data source file that didn’t need correction. This is especially true if you didn’t input the data. Some common problems I look for are:
- Capitalization errors such as all CAPS
- Missing field data
- Invalid email addresses
- Initials as a first name
- Missing apostrophes in last names (Oneill)
- Misspellings
The top item can be fixed using the Excel Proper function. You don’t need to worry about deleting columns you won’t use in the letter.
You may need to worry about the First name field if you want to convey that you know someone. For example, your data source may have a formal name such as “Robert,” but you know the person as “Rob.” Salutations can also be an issue if you’re not familiar with first names. For example, I can attest to knowing female “Michael”s and male “Merideth”s.
Before saving your Excel file, make sure you have a header row with descriptive column names. This makes it easier to match and merge fields.
Allowable Data Source File Types
In this tutorial, I’ve used Microsoft Excel as my data source. Typically, if people have Microsoft Word, they also have Excel. However, you don’t have to use an Excel file. For example, the mail merge wizard accepts different file types:
- Office Database Connections (*.odc)
- Access Database (*.mdb, *mde. *accdb, *accde)
- Microsoft Office Address List (*.mdb)
- Microsoft Office List shortcuts (*.ols)
- Microsoft Data links (*.udl)
- ODBC File DSNs (*.dsn)
- Excel files (*.xlsx, *xlsm, *.xlsb, *.xls)
- Web pages (*.htm, *.html, *asp, *.mht, *.mhtml)
- Rich Text Format (*.rtf)
- Word Documents (*.docs, *.doc, *.docm)
- Text Files (*.txt, *prn, *.csv, *.tab, *.asc)
- Database Queries (*.dqy, *.rqy)
- Open Document Text Files (*.odt)
The advantage of using Microsoft Excel is that it’s easy for Word to parse the data, especially if you include column headers. When you use some of these other formats, you may have to define encodings, data fields, or field delimiters. In some cases, Word has no problems, such as with this CSV file.

With other formats, you may encounter difficulty. For example, if I try to use a Microsoft Word document as my data source file, the parsing is more complex.

Link the Excel Data Source File
As with many tasks, Microsoft created a helpful wizard. Before starting, make sure you have created your recipient list with the fields you need.
- Open Word with a blank document or your Word letterhead.
- From the Mailings tab, select Start Mail Merge
- From the Start Mail Merge menu, select Step by Step Mail Merge Wizard. The Mail Merge task pane will appear on the right side of your screen.

- Click the Next: Starting document link at the bottom of this panel. The Wizard advances you to Step 2.
- Keep the default option for Use the current document.
- Click the Next: Select recipients link at the bottom.
- Click the Browse … link in the middle of the panel. This opens the Select Data Source dialog.
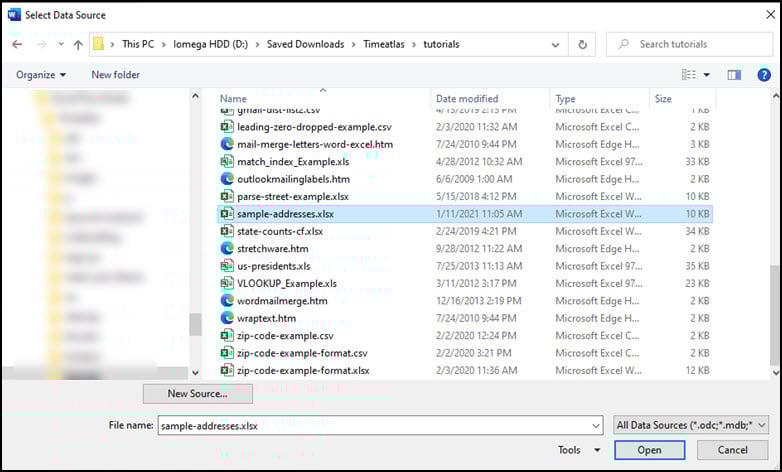
- Navigate to your Excel file and click Open. This opens the Select Table dialog. If you named your Excel worksheet, the name would show. Otherwise, it will appear as Sheet1$.

- Check the box at the bottom for the First row of data has column headers.
- Click OK. Below the Browse… link you should see an active link for Edit recipient list.. .on the Mail Merge task pane.

- A dialog will appear on your document with your recipients. You can uncheck items you don’t wish to import from the 2nd column. It’s the one which is not labeled. You can also refine the list order and remove duplicate records.

- Click OK again.
- The Mail Merge Recipients dialog disappears. You will still see Step 3 of 6 in the Mail Merge Wizard.
Add Address Merge Codes
The Mail Merge wizard should be on Step 4 of 6. Now that we’ve assigned the data source, we can insert the merge fields in our letter. The first code most people start with is the address. While you can insert merge codes for each address element, Word allows you to enter all the fields with an Address block.
- On the Mail Merge task pane, click Next : Write your letter. This will advance you to Step 4. The merge wizard will show links to various letter components.

- You should now write your letter.
- Click Address block… to add the recipient’s address.

- Check the options that best suit your addresses.
- Use the controls under the Preview section to spot check some records.
- Fix any address fields that you’ll use which show as (not matched) by selecting the proper field using the arrow control.
- Click OK.
On your Word document, you should see «AddressBlock». This code represents the address fields you selected. And no, you can’t wrap chevrons around your field names. You won’t see any real data until you merge the information.

Add Other Merge Codes
While adding address information is useful, you probably want some custom fields. These fields should have been defined on the Excel spreadsheet you linked. For example, you might tell people about an upcoming event. The process of inserting more fields is similar to the address block.
- From the Mail Merge task pane, go to Step 4 of 6.
- Add your letter text up to the point where you want to insert the field.
- Click More Items… from the task pane. The Insert Merge Field dialog appears.

- Highlight your field such as “event.”
- Click Insert.
Your merge field should show next to your cursor. As before, the chevrons « » are wrapped on either end.
Pulling it All Together
Once you’ve created your letter and added your merge codes, you’re ready to pull real data. If you glance at your Mail Merge task pane, you should be on Step 4 of 6. To see your letters with merged data, click Next: Preview your letters. Each merge code should show data from your Excel data source file. You should not see any chevron merge codes.

While you may be tempted to print your letters, I would check several examples. In particular, look for addresses that need an extra line, such as suites or apartments. This is also a good time to look for seeded records to make sure the correct fields are imported. This can be done using the Find a recipient link on the panel. You can move through your letters by using the directional controls at the top of the task pane. If you don’t like a record, you can exclude it from the set.
If you’re using a window envelope or letterhead, you should print a sample letter to ensure the alignment. If it isn’t, click the Previous link to go back to Step 4 of 6 and make adjustments.
Print and Save the Letters
The final part of the wizard lets you print your letters. This is done by clicking Next: Complete the merge, which advances you to Step 6. At this stage, you can either print your letters or edit individual ones.
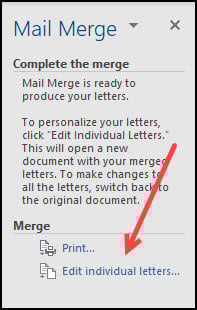
If the document you created is one that you plan to reuse, you should save it. When you save this document, you’ll see one letter with prefilled values. You won’t see the chevrons and field names. What’s nice about saving this letter is maintaining the relationship with your data file and merge codes. The next time you open the file, it will read your data file and populate the merge codes. Then, if you want to send it to a different set of people, you can edit your Excel file or link it to a new one.
When you’re looking to contact a large number of people, it can be time-consuming and expensive to create personalized letters for each person. To make the process less arduous, remember to use the mail merge functions in Microsoft Word with Excel. Mail merging allows you to use an Excel spreadsheet as your data source to produce individualized letters by inserting names into pre-written text templates customized for your recipients based on their information from the spreadsheet.
- Learn VLOOKUP with Examples
- How to Transpose Columns & Rows in Excel
- How to Create Excel Floating Headers
This Mail Merge in Word tutorial is suitable for users of Word 2010, 2013, 2016, 2019, and Word for Microsoft 365.
Objective
Perform a Mail Merge in Word to generate letters and labels in bulk using contacts stored in an Excel spreadsheet.
Mail Merge Explained
Do you need to generate lots of letters, envelopes, labels, or even emails? Let the Mail Merge feature in Word do the hard work for you.
Mail Merge is a utility in Word that’s been around for a long time. It allows you to create letters, envelopes, and labels in bulk and customize each one for individual recipients. Use a list of contact names and addresses stored in an Excel spreadsheet, or type them in manually during the merge process.
Mail Merge is a 5-step process:

Method
In this example, I am going to go through the process of creating letters in bulk using Word’s Mail Merge facility. These contacts are stored in an Excel spreadsheet.
Set-up the Excel data file
Before starting the mail merge, ensure that the Excel data file is set-up correctly.
- Data should be separated into different columns and have column headings. The columns must correspond to the merge fields to be used. For example, if you want to be able to address a recipient by their first name in the document, you’ll need to have separate columns for first and last name.
- Try and keep the data to be used in the merge on the first worksheet in the Excel workbook.
- The Excel spreadsheet should be stored on your local machine.
- Ensure the data is free from duplicates, blank rows, spelling errors, and addresses, postcodes, etc. are formatted correctly.

Set-up the main document
The main document is the document you are merging into, in this case, a letter.
- Open a blank Word document or a letter template.
- Type the letter you want to send to multiple recipients.
- Click the Mailings tab.
- Click Start Mail Merge.
- Select Letters.

Select the recipients
Word needs to know which recipients list you want to use and where it is stored. You can choose to type your list of recipients manually, use an existing list, or select from Outlook contacts. In this example, I have my contacts stored on Sheet 1 of the ‘Contact List.xlsx’ spreadsheet.
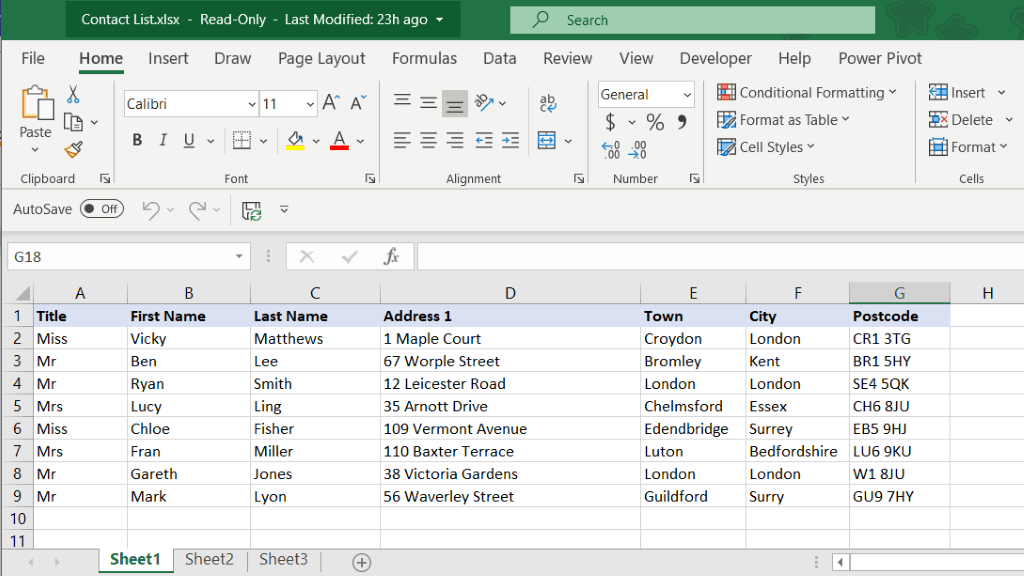
- Click Select Recipients
- Select Use an existing list
- Browse to the location where you contact list is stored and click Open
The Select Table window will open and show all the worksheets contained in the Excel spreadsheet. Ensure that you select the worksheet your contacts are stored in. (motivationandlove) If your column headings are in row 1 of the worksheet, ensure you have the ‘First row of data contains column headers’ checkbox ticked.
- Click OK

Edit the recipient’s list
At this point, you can review your recipient’s list and make changes.
- Click Edit Recipient List
Your contacts will be listed. If you do not want to include them all in the mail merge, remove the tick next to their name. The refine recipients list area contains options to help you sort and organize your contact list. Sort contacts alphabetically, filter out contacts, find duplicate entries or specific recipients.
- Click OK

Insert the merge fields
It’s now time to insert the merge fields into the letter. Merge fields are essentially the column headings from your source data file; in this case, the Excel spreadsheet. They are used to personalize each letter to the individual.
In this example, I am going to add an address block to the top of the letter, a greeting line and an individual merge field in the body of the letter. Ensure that your mouse is clicked at the top of the letter.
- Click Address Block on the Mailings tab

Choose how you want the recipient’s name to be formatted. You can see what each option looks like in the preview pane on the right. Use the arrows to scroll through your contacts.
If your contact list contains company names, ensure this option is ticked.
- Click OK
The first contact will display at the top of the letter. Preview how each contact looks by using the scroll arrows in the Preview Results group.

Next, I am going to add a Greeting Line. Ensure your cursor is positioned just above the body of the letter.
- Click Greeting Line
Select a greeting of ‘To’, ‘Dear’ or ‘None’ from the Greeting line format drop-down menu.

15. Click OK

Next, I am going to personalize my letters further by adding an individual merge field to the body of the letter. I want the opening line of the letter to read ‘Thank you, Vicky, for your recent inquiry…’.
- Position the cursor where you would like to insert the merge field
- Click Insert Merge Field
The merge field listed is the individual column headings from the Excel spreadsheet. You can use one or more merge fields together or separately to personalize the document.

18. Select First_Name

Completing the merge
Once all the merge fields are added to the letter, you can complete the merge. You can choose to send the merged letter directly to print directly to email recipients, or you can choose to view the merged letters before choosing what action to take.
- Click Finish and Merge
- Select Edit Individual Documents

- Merge All Records
- Click OK
Word will create a letter personalized to each individual in your contact list.

Video Tutorial
To see Mail Merge in action, please watch the following video tutorial.
How to Mail Merge in Word (11:36)
For more Free Microsoft Office tutorials from Simon Sez IT. Take a look at our MS Office Resource Center.
To learn Word with Simon Sez IT. Take a look at the Word courses we have available.
Deborah Ashby

Deborah Ashby is a TAP Accredited IT Trainer, specializing in the design, delivery, and facilitation of Microsoft courses both online and in the classroom.She has over 11 years of IT Training Experience and 24 years in the IT Industry. To date, she’s trained over 10,000 people in the UK and overseas at companies such as HMRC, the Metropolitan Police, Parliament, SKY, Microsoft, Kew Gardens, Norton Rose Fulbright LLP.She’s a qualified MOS Master for 2010, 2013, and 2016 editions of Microsoft Office and is COLF and TAP Accredited and a member of The British Learning Institute.