Merge and unmerge cells
You can’t split an individual cell, but you can make it appear as if a cell has been split by merging the cells above it.
Merge cells
-
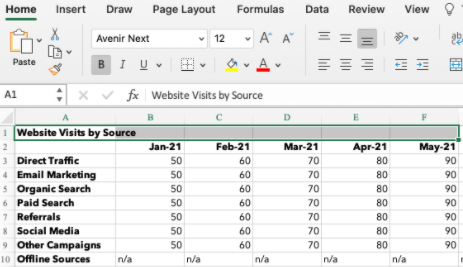
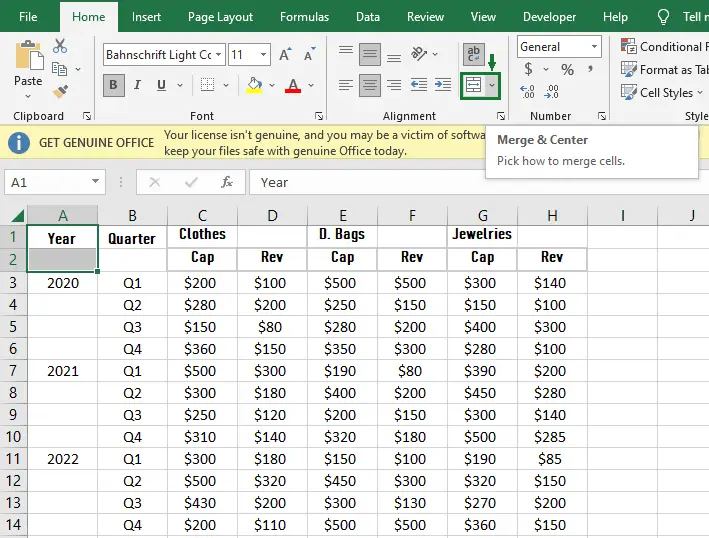
Select the cells to merge.
-
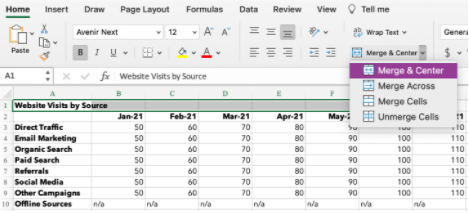
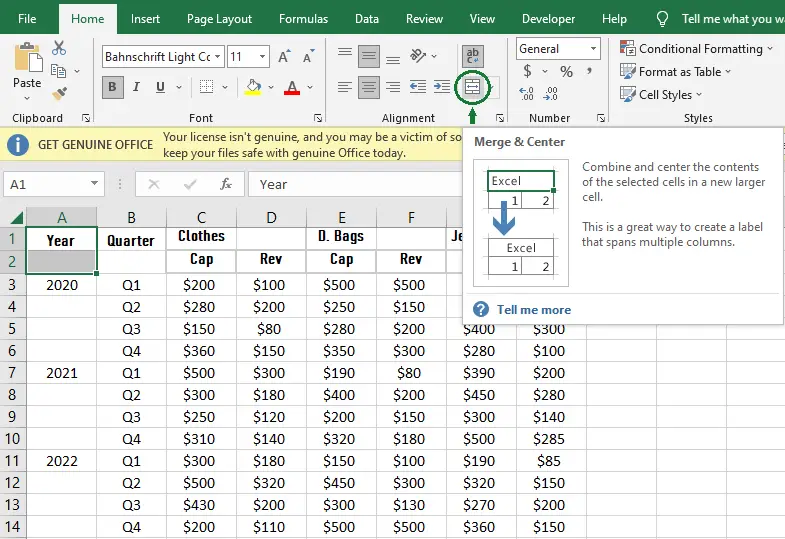
Select Merge & Center.
Important: When you merge multiple cells, the contents of only one cell (the upper-left cell for left-to-right languages, or the upper-right cell for right-to-left languages) appear in the merged cell. The contents of the other cells that you merge are deleted.
Unmerge cells
-
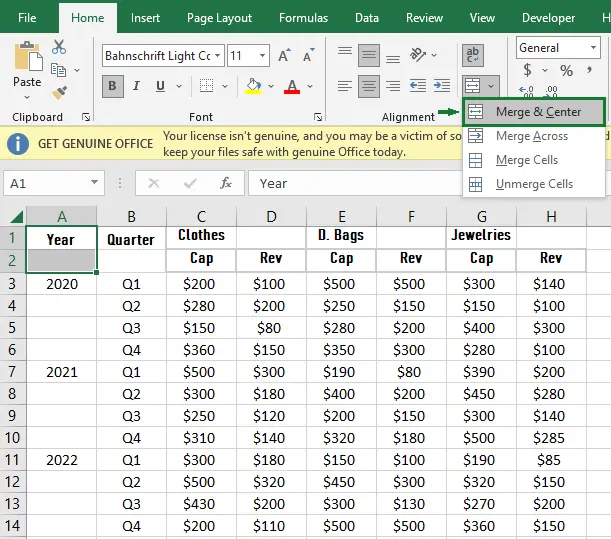
Select the Merge & Center down arrow.
-
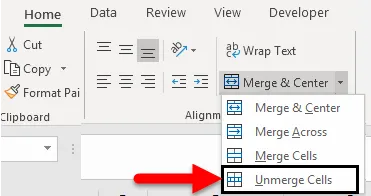
Select Unmerge Cells.
Important:
-
You cannot split an unmerged cell. If you are looking for information about how to split the contents of an unmerged cell across multiple cells, see Distribute the contents of a cell into adjacent columns.
-
After merging cells, you can split a merged cell into separate cells again. If you don’t remember where you have merged cells, you can use the Find command to quickly locate merged cells.
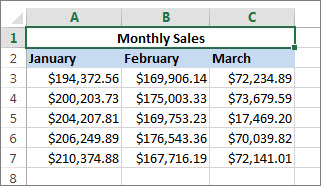
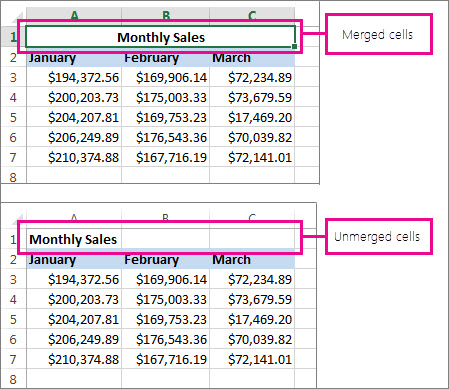
Merging combines two or more cells to create a new, larger cell. This is a great way to create a label that spans several columns.
In the example here, cells A1, B1, and C1 were merged to create the label “Monthly Sales” to describe the information in rows 2 through 7.
Merge cells
Merge two or more cells by following these steps:
-
Select two or more adjacent cells you want to merge.
Important: Ensure that the data you want to retain is in the upper-left cell, and keep in mind that all data in the other merged cells will be deleted. To retain any data from those other cells, simply copy it to another place in the worksheet—before you merge.
-
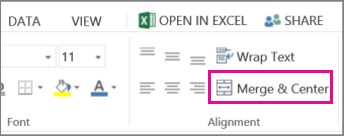
On the Home tab, select Merge & Center.
Tips:
-
If Merge & Center is disabled, ensure that you’re not editing a cell—and the cells you want to merge aren’t formatted as an Excel table. Cells formatted as a table typically display alternating shaded rows, and perhaps filter arrows on the column headings.
-
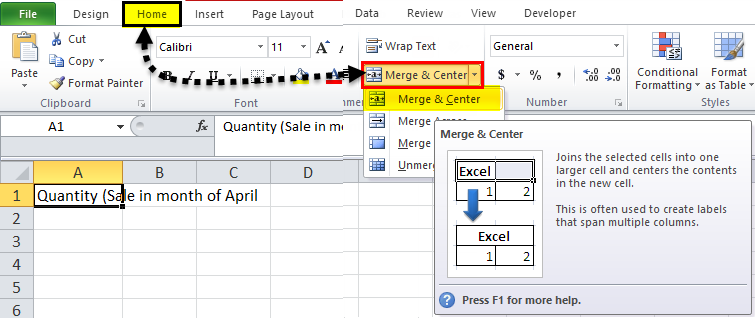
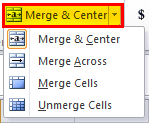
To merge cells without centering, click the arrow next to Merge and Center, and then click Merge Across or Merge Cells.
Unmerge cells
If you need to reverse a cell merge, click onto the merged cell and then choose Unmerge Cells item in the Merge & Center menu (see the figure above).
Split text from one cell into multiple cells
You can take the text in one or more cells, and distribute it to multiple cells. This is the opposite of concatenation, in which you combine text from two or more cells into one cell.
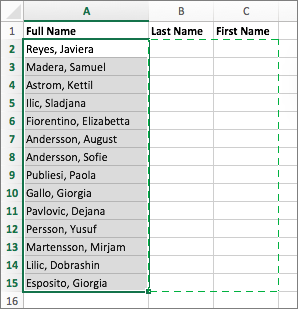
For example, you can split a column containing full names into separate First Name and Last Name columns:
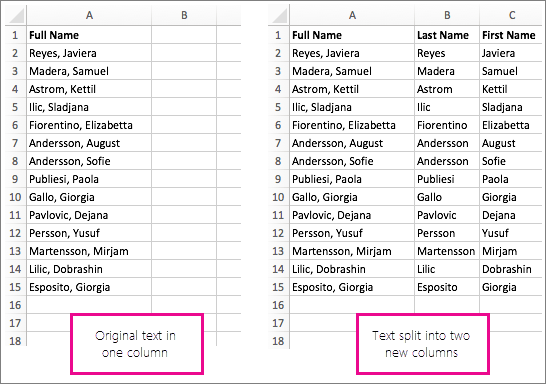
Follow the steps below to split text into multiple columns:
-
Select the cell or column that contains the text you want to split.
-
Note: Select as many rows as you want, but no more than one column. Also, ensure that are sufficient empty columns to the right—so that none of your data is deleted. Simply add empty columns, if necessary.
-
Click Data >Text to Columns, which displays the Convert Text to Columns Wizard.
-
Click Delimited > Next.
-
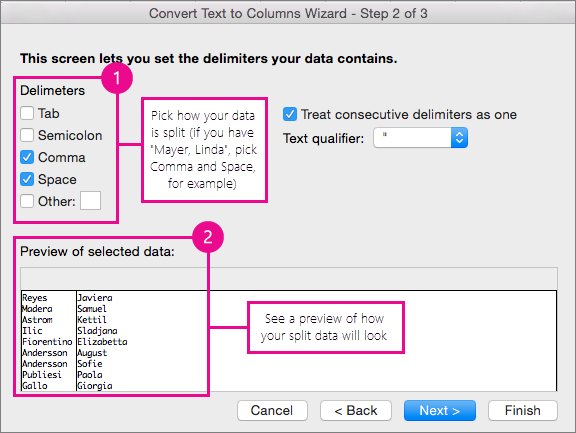
Check the Space box, and clear the rest of the boxes. Or, check both the Comma and Space boxes if that is how your text is split (such as «Reyes, Javiers», with a comma and space between the names). A preview of the data appears in the panel at the bottom of the popup window.
-
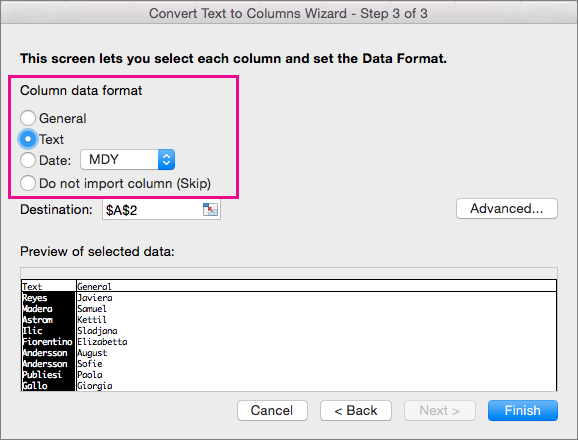
Click Next and then choose the format for your new columns. If you don’t want the default format, choose a format such as Text, then click the second column of data in the Data preview window, and click the same format again. Repeat this for all of the columns in the preview window.
-
Click the
button to the right of the Destination box to collapse the popup window.
-
Anywhere in your workbook, select the cells that you want to contain the split data. For example, if you are dividing a full name into a first name column and a last name column, select the appropriate number of cells in two adjacent columns.
-
Click the
button to expand the popup window again, and then click the Finish button.
Merging combines two or more cells to create a new, larger cell. This is a great way to create a label that spans several columns. For example, here cells A1, B1, and C1 were merged to create the label “Monthly Sales” to describe the information in rows 2 through 7.

Merge cells
-
Click the first cell and press Shift while you click the last cell in the range you want to merge.
Important: Make sure only one of the cells in the range has data.
-
Click Home > Merge & Center.
If Merge & Center is dimmed, make sure you’re not editing a cell or the cells you want to merge aren’t inside a table.
Tip: To merge cells without centering the data, click the merged cell and then click the left, center or right alignment options next to Merge & Center.
If you change your mind, you can always undo the merge by clicking the merged cell and clicking Merge & Center.
Unmerge cells
To unmerge cells immediately after merging them, press Ctrl + Z. Otherwise do this:
-
Click the merged cell and click Home > Merge & Center.
The data in the merged cell moves to the left cell when the cells split.
Need more help?
You can always ask an expert in the Excel Tech Community or get support in the Answers community.
See Also
Overview of formulas in Excel
How to avoid broken formulas
Find and correct errors in formulas
Excel keyboard shortcuts and function keys
Excel functions (alphabetical)
Excel functions (by category)
Need more help?
Excel has a unique button called “Merge & Center,” which is used to merge two or more different cells. When data is inserted into any merged cells, it is in the center position; thus, the name “Merge & Center.” On re-clicking on the button, it unmerges the cells. The value in the cell merged is located on the initial first cell in the worksheet.
Table of contents
- Merge and Center Cells in Excel
- How to Use Merge and Center in Excel?
- Shortcut for Merge and Center Cells in Excel
- Other Merging Options in Excel
- Things to Remember
- Recommended Articles
Merge and Center in Excel – Merge cell is a function in database programming that enables different nearby cells to be joined into a single larger cell. It is finished by choosing all cells to be merged and picking the “Merge Cells” order. Center means that it enables text alignment to be in the center.
How to Use Merge and Center in Excel?
Following are the steps used to merge and center in Excel:
- First, select the adjacent cells you want to merge.
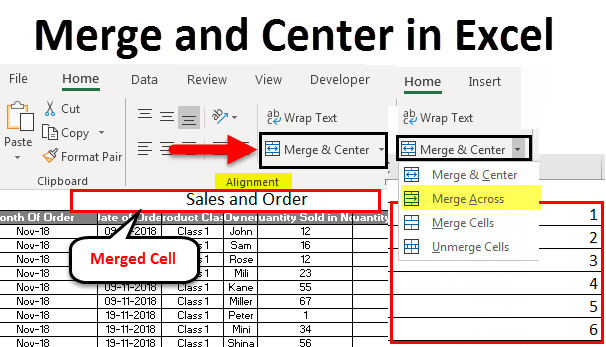
- On the “Home” button, go-to the “Alignment” group and click on “Merge & Center” in Excel.
- Click on the “Merge & Center” in Excel to combine the data into one cell.
- Once you click “Merge & Center,” selected cells get combined into one cell, and the text comes in centered like the above screenshot.
Shortcut for Merge and Center Cells in Excel
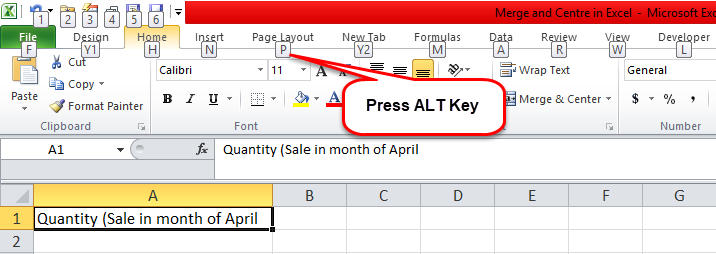
#1. Select the cells which you want to merge and center using a shortcutThere is no default shortcut key for “Merge & Center” in excel. But we have one shortcut that is «Alt + H + M + C». First press «Alt» key it highlights the shortcut alphabets for each Ribbon, then Press «H» key as «Merge & Center» option is in Home tab, then press «M» key to select «Merge & Center» Option there you will see more different shortcut key from that Press «C» for center Alignment. read more.
#2. Press the “Alt” key that enables the commands on the Excel ribbon.
#3. Press “H” to select the “Home” tab in the Excel ribbonThe ribbon is an element of the UI (User Interface) which is seen as a strip that consists of buttons or tabs; it is available at the top of the excel sheet. This option was first introduced in the Microsoft Excel 2007.read more. It allows the “Home” tab of Excel.
#4. Press “M” (shortcut) to allow the “Merge & Center” option in Excel.
#5. Press any one of the following keys:
- 6. Press “C” (shortcut) if you want to merge and center the selected cells in Excel.
- 7. Press “A” if you want to merge cells in a separate individual row.
- 8. Press “M” if you want to merge the cells without centering the alignment.
- 9. Press “U” if you want to unmerge the already merged cells.
Other Merging Options in Excel
- Merge Across: This option combines the selected cells in each row individually.
- Merge Cells: This option joins the selected cells into a single cell without entering the text in the cell.
- Merge and Center: This option enables us to merge the cell and align the text into the center.
Things to Remember
- If you use any formulas using the merged cell, ensure to unmerge the cell before using any formula.
- While merging any cell, check the right and left side data in a cell because once you combine the cell, it automatically deletes the data from the adjacent cell.
- We cannot merge the cell separately if you merge cell A1 to D1. So it will be called cell A1 after merge and center.
- After merging the cell, select the merged cell and tap the ideal alignment in the “Alignment” group on the “Home” tab to change the text alignment after merging the cell.
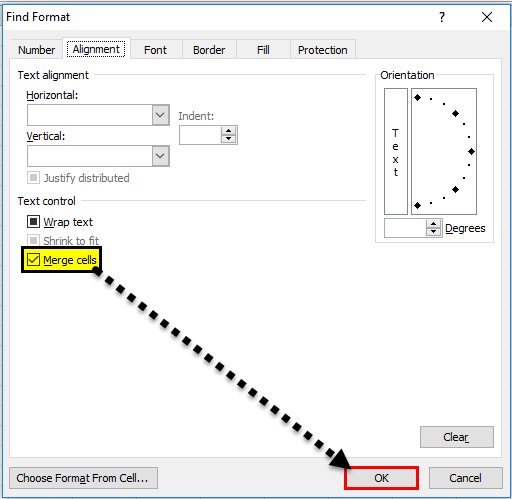
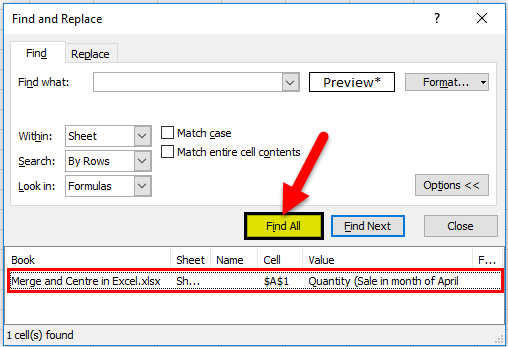
- After clicking “OK,” click on “Find All.” It will give you a result at which column cells are merged.
- After it merges the text, select the merged cell and tap the desired arrangement in the “Alignment” group on the “Home” tab to change the content arrangement.
- Ensure that the information you need to Excel cell merge and center is in the upper-left cell, and remember that it will erase all information in the other merged cells. To hold any information from those different cells, copy it somewhere else in the worksheet before merging them.
- Select as many rows as you want. However, not more than one column. Likewise, ensure adequate void segments to one side to erase none of your information. Just include empty rows if it is important to be added.
- If, by any chance, “Merge & Center” is not enabled, ensure that you are not merging the cell, and the cells you want to join aren’t arranged as an Excel tableIn excel, tables are a range with data in rows and columns, and they expand when new data is inserted in the range in any new row or column in the table. To use a table, click on the table and select the data range.read more. Cells designed as tables regularly show exchanging shaded rows and maybe filter arrows on the column headings.
Recommended Articles
This article is a guide to Merge and Center in Excel and its shortcut. We discuss how to merge and center in Excel using the menu and excel shortcut, practical examples, and downloadable Excel templates. You may also look at these useful functions in Excel: –
- Unmerge Cells in Excel
- Split Excel Cells
- Combine Cells in Excel
Reader Interactions
Merge & Center combine and center the contents of the selected cells in a new, larger cell. This is a great way to create a label that spans multiple criteria. This is used to combine multiple cells into a single cell and create the main headers for reports in Microsoft Excel.
So when you work dashboards, you get the need for Merge and Center cells. The traditional way is lengthy and there is no simple shortcut to merge and center, like CTRL+C for copying. But there are ways to workaround.
Sequential Merge and Center shortcut in excel (ALT>H>M>C)
To merge and center two or more cells follow these steps:
- Select the cells
- Press and release ALT key, following by H, M, and C key on keyboard.
This is not actually a shortcut to merge cells in excel but it is fast. The ALT key activates the ribbon and following keys take you to the Merge and Center option. H takes you to Home tab, M takes you to Merge and Center options and C selects the Merge and Center option.
As we can see text in B1 cell is now merged and centered in B1 to D1 cells.
Merge And Center Options
There are four options available in Merge and Center:-
- Merge and Center: This feature Combines & centers the cell text in Excel. Use the above shortcut for merge cells.
- Merge Across: To Merge Across use shortcut ALT>H>M>A. This feature works only on the selected rows. Combines the multiple columns of the row. The text in the merged cell will be right-aligned.
- Merge Cells: This feature just combines the selected cells. To only merge cells in excel use shortcut Use ALT>H>M>M .
- Unmerge Cells: This features Unmerge the selected cells to their default location. The shortcut to unmerge cells is ALT>H>M>U.
We are going to focus on Merge and Centre here.
Best Shortcut For Merge and Center (CTRL+j)
As I said, there is no specific shortcut for merge and center but you can create one using macros. It’s easy.
- Click on the Record Macro button on the status bar or go to Developer Tab and click on Record Macro. If you don’t see a Developer Tab, first add Developer Tab.
- Give a name to this macro. For example, mergeCellsShortcut.
- Define any shortcut you like for Merging Cell in Excel in ‘Shortcut key:’ section. Be careful while defining the shortcut. If you define any shortcut that is already defined then this will override the previous one. There are some keys that are free in excel, Like CTRL+j. I will use this as my shortcut of Merging cells. if you want to involve SHIFT KEY, press SHIFT+J.
- If you want this macro to run on the current file then choose This Workbook in ‘Store macro in:’ section. If you want your shortcut to merge and center to work on every workbook then choose Personel Macro Workbook.
- Click on OK.
- Now stop recording from the developer tab or status bar.
- Click on Macros in Developer Tab or press ALT+F8 the list of available macros will appear.
- Select mergeCellsShortcut and click on Edit.
- now copy below line to only merge cells in between sub and end sub(). Selection.Merge ‘to merge selected cells.
Selection.Merge 'to merge selected cells
Now you have a shortcut to merge cells. If you instead want to merge and center then add this line in macro
Selection.HorizontalAlignment = xlCenter
And if you want to the text to be in the center of the cell vertically too, add this line too.
Selection.VerticalAlignment = xlCenter
Finally, your code will look like this,
Sub mergeCells()

' mergeCells Macro

 Selection.HorizontalAlignment = xlCenter ' to align text horizontally in cent
 Selection.VerticalAlignment = xlCenter ' to align text vertically in center
 Selection.Merge ' to merge cells
End Sub
Now, whenever you’ll press CTRL+j, all selected cells will be merged. And this how you get a shortcut to merge and center cells in excel.
Note: Merge and Centre option takes the text of only one cell which will be upper-left most cell while performing Merge and center.
You have to be careful about your content in the cells which is to be merged.
Example of Merge And Center in Excel
We need to merge cells B1 to D1. When we’ll use ALT>H>M>C excel shortcut to merge cells, excel will show a warning. This warning says that all cells will lose their data except upper-left cell if we merge and center these cells.
Click OK and output will be like as shown below.
Now the same function will be performed on E1 to G1 cell and H1 to J1 cells.
So we will use the F4 key to perform the last function again.
In the above image data of Team A is under Team A label. Similarly, for Team B and Team C, we can say the same.
Frequently Asked Questions
Q1. How to merge columns in Excel?
Ans: Simple, select the columns and press keys ALT>H>M>C sequentially. Done. Next.
Q2. How to unmerge cells in excel?
Again same, select merged cells and press keys ALT>H>M>C sequentially. Done. Next.
Q3. How to merge cells in word?
Well, this is an Excel tutorial but still, select the cell in word and press ALT>J>L>M.
Please find more articles on Labeling and highlighting cells here. Hope you got this by now. Please share your queries in the comment box below. We will solve it for you.
Popular Articles:
50 Excel Shortcut to Increase Your Productivity
How to use the VLOOKUP Function in Excel
How to use the COUNTIF function in Excel 2016
How to use the SUMIF Function in Excel
Excel Merge and Center (Table of Contents)
- Merge and Center in Excel
- How to use Merge and Center?
- Pros and Cons of Merge and Center in Excel
Merge and Center in Excel
Merge and Center commands in Excel are available in the Home menu ribbon’s Alignment section, which merges or combines two cells into one and aligns them at the center. First, to merge any two cells, select the two cells minimum, which is located adjacent to each other, and then Click on Merge and Center. It will merge those selected cells but keeping the value of only the first cell. We can use Merge, Merge Across also from the drop-down list of Merge and Center.
How to use Merge and Center in Excel?
We use Merge and Center in Excel to merge a group of cells or to center the headings or text. Merge, and Center is located in the Home menu tab under the Alignment section. Using Merge and Center in Excel is very easy and convenient.
You can download this Merge and Center Excel Template here – Merge and Center Excel Template
Let’s understand how to Merge and Center in Excel with some examples.
Merge and Center in Excel – Example #1
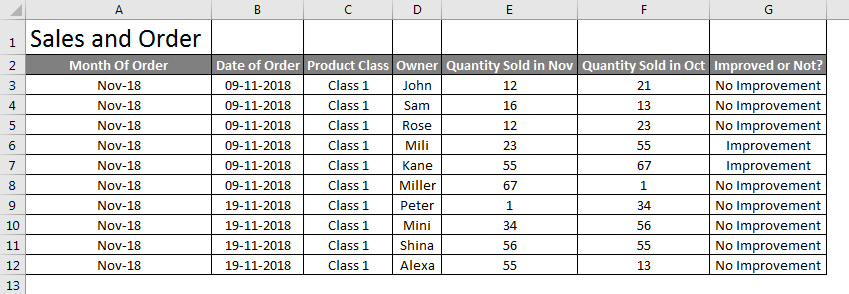
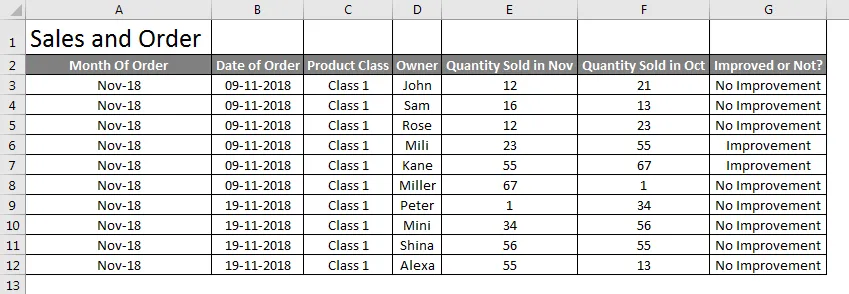
We have sales data for products of a month below. And we have named this table as Sales and Order, which is on the top row in font size 20, just to have pure clarity and visibility of the performed function.
Now to merge the table name Sales and Order in one cell so that it will become the table’s heading, select cells that you want to be merged in with Sales and Order text as shown below.
Now go to Home, and click on Merge and Center in the Alignment section.
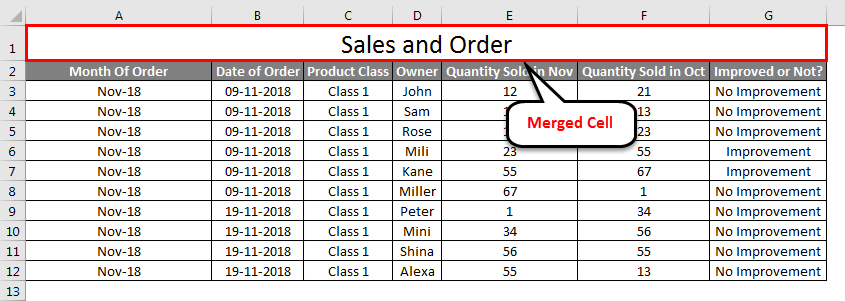
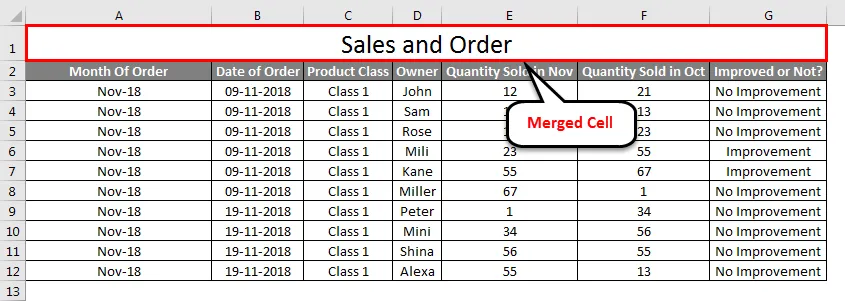
As we click on Merge and Center, we will see the text Sales and Order is now merged in a single cell. You can later change the alignment of merged text to any position as per your need.
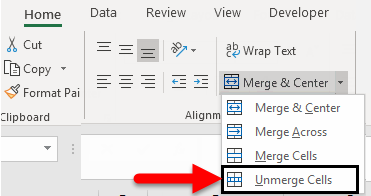
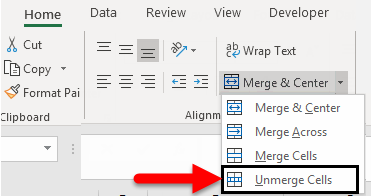
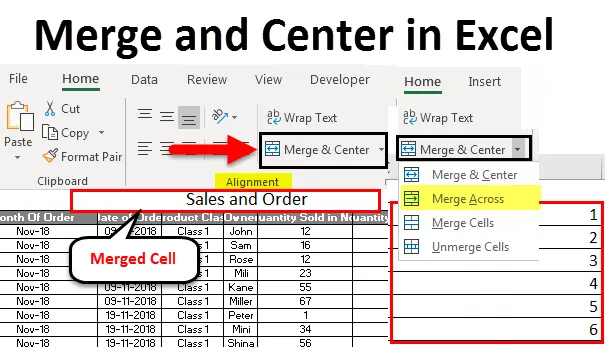
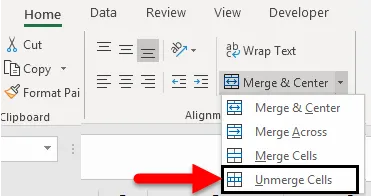
You can unmerge the cells as well if you want to. For that, follow the same path and click on the down arrow available in the right corner of the Merge and Center option. We will have more options, and one of them is Unmerge Cells.
Click on it. It will unmerge the cell, and the text will come back to the same previous format.
Merge and Center in Excel – Example #2
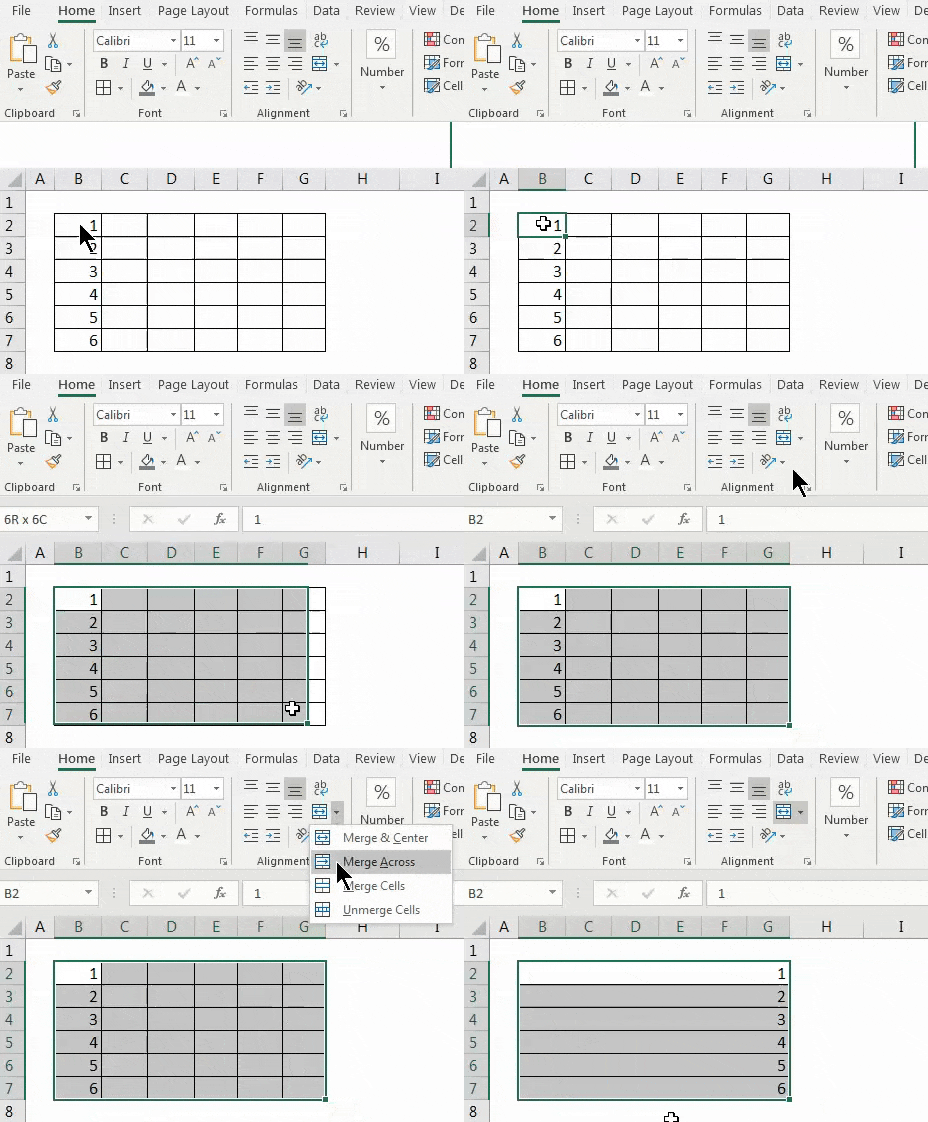
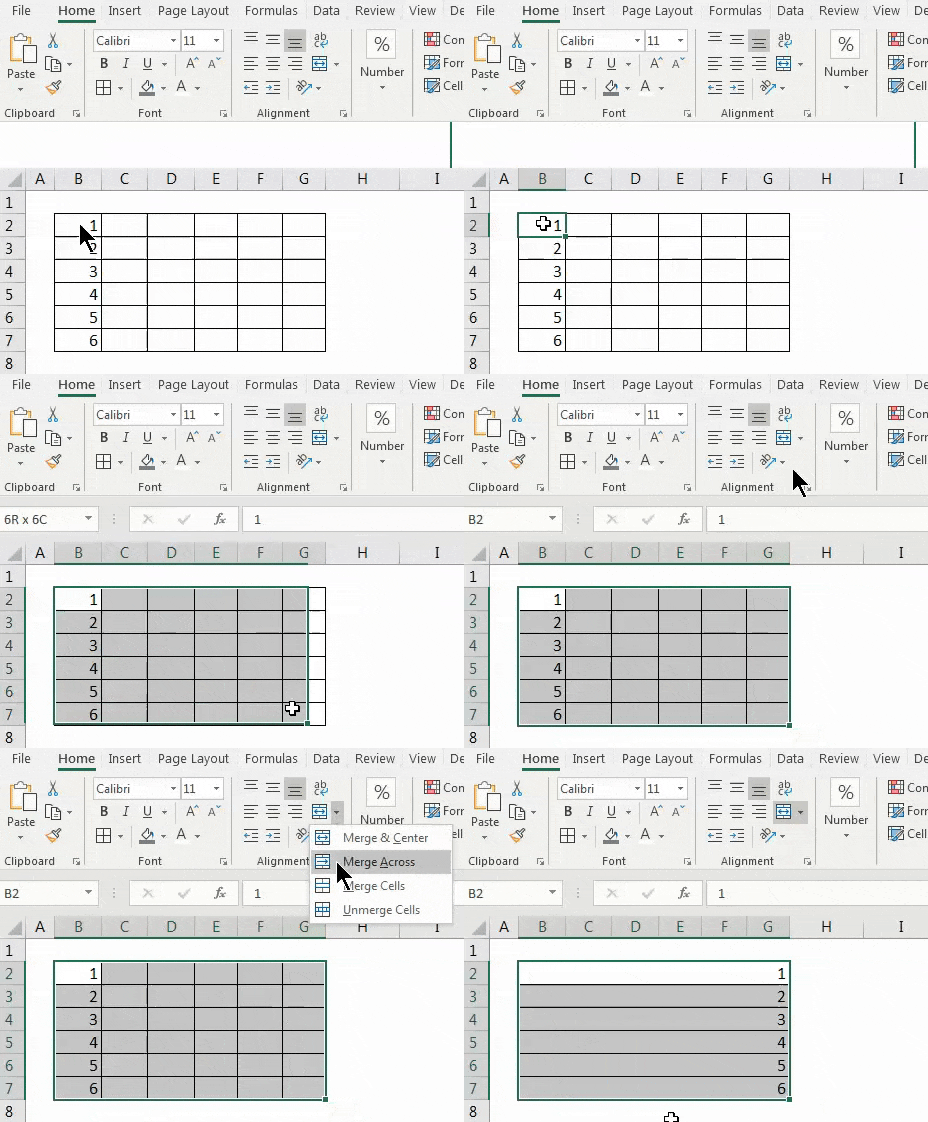
We will see another function of Merge and Center in Excel, which is Merge Across. Unlike Merge and Center in Excel, Merge Across is used to merge multiple rows or multiple line items. Where in Merge and Center, we could only merge one cell with multiple cells.
In Merge Across, a text comes to one side of the selected cells or row.
Below, we have some numbers in different rows. Here, we will merge them together in one row.
Select all cells covered in the box. Select Merge Across from a drop-down list of Merge & Center. Once we click on it, we will get the complete selected multiple rows merged with numbers entered from row 2 to 6 as below.
If we need to unmerge the merged cells, then select the Unmerge Cells options from the drop-down, as shown below.
Once we click on Unmerge Cells, the whole row will come back to the same condition as these were before.
Merge and Center in Excel – Example #3
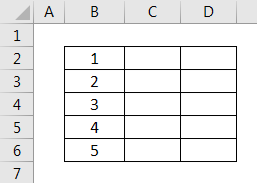
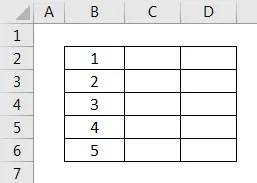
We can directly merge any cell content with multiple cells. This is an easy and quick process to perform. For that, we have sample data below.
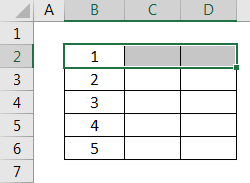
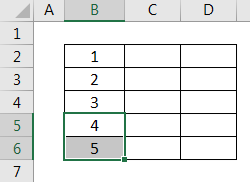
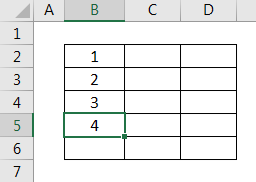
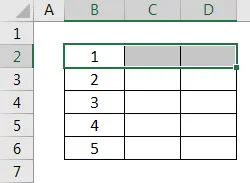
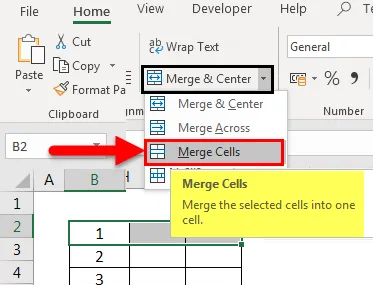
In the above screenshot, we have some numbers from 1 to 5 in sequence. Now Let’s try to merge any of the numbers with one or more than one cell. First, select the range of those cells that we need to merge together, as shown below.
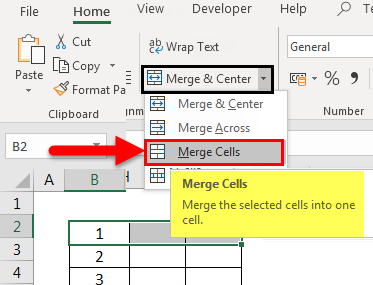
Above, we have selected the cell from B2 to D2 in a range. Now select Merge Cells from the drop-down list of Merge & Center, as shown in the below screenshot.
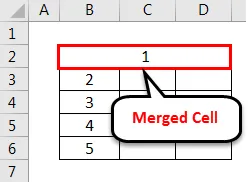
Once we click on it, the selected cells will get merged as one single cell. And the data present in the first cell will be the only cell data carried in other merged cells, as shown in the below screenshot.
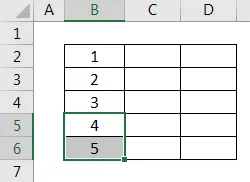
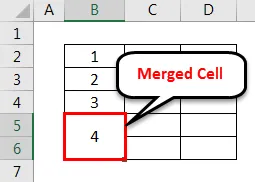
Let’s see what happens when we merge the cell number B5 and B6, as selected in the below screenshot.
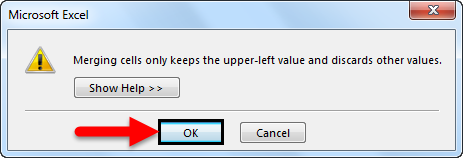
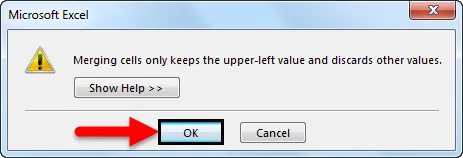
Now select Merge Cells from a drop-down list of Merge & Center. Once we do that, we will get a warning message, as shown below. This means only the upper or first value will be kept, and the rest will be discarded. Then, to proceed further, click on OK as shown below.
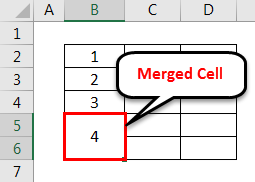
Once we do that, the selected cells will get merged with only one value: the first or upper value from the range, as shown below.
If I want to see the value in the previous format, then unmerge the cells by selecting Unmerge Cells option from a drop-down list of Merge & Center as shown below.
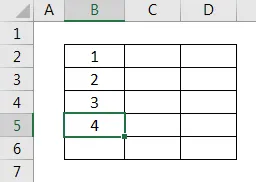
After that, all the merged cells will get separated, and only the upper or first value will be retained further, as shown below, losing the rest of the value.
Pros
- It manages data to look good by having a single value for multiple headers.
- By changing the position of merged cells, we can adjust the data and its visibility as per requirement.
- Merge & Center can be used for both rows and columns.
Cons
- Not advised to use where any file has a huge amount of data, and it is becoming bulky to handle it.
Things to Remember
- Always change the alignment of the merged cell so that it would help in adjusting and looking for correct attributes.
- Use Wrap Text, which is located above Merge & Center, so that if a cell has lengthy text, then by wrapping, it will be visible in the same cell and will be in its border.
- If all the selected cells are having data, then only the first or upper cell value will be carried and merged.
Recommended Articles
This has been a guide to Merge and Center in Excel. Here we discussed How to use Merge and Center in Excel and also unmerge the cells, Pros, and cons of Merge and Center in Excel along with practical examples and downloadable excel template. You can also go through our other suggested articles –
- Merge Cells in Excel
- Excel Merge Two Tables
- Excel Unmerge Cells
- Excel Shortcut For Merge Cells
How to merge cells in Excel
- Highlight the cells you want to merge and center.
- Click on “Merge & Center,” which should be displayed in the “Alignment” section of the toolbar at the top of your screen. The top row of cells here is selected.
- The cells will now be merged with the data centered in the merged cell.
Contents
- 1 How do I merge and center text in Excel?
- 2 Where is the merge and Centre option found?
- 3 What is the shortcut key for merge and center in Excel?
- 4 Is there a quick way to merge cells in Excel?
- 5 Why can’t I merge and center in Excel?
- 6 How do I combine A1 and A2 in Excel?
- 7 How do you merge and Centre?
- 8 How do I merge cells with data in Excel?
- 9 How do I merge and center multiple rows?
- 10 How do you merge table cells using the keyboard?
- 11 How do I merge cells in Excel without losing data?
- 12 How do I merge rows in Excel without losing data?
- 13 Why won’t my cells Center in Excel?
- 14 How do I enable merge and center in Excel shared workbook?
- 15 How do I enable merge in Excel?
- 16 How do you merge cells A1 and A2?
- 17 Which tool you will use to join some cell and place the content at the middle of joined cell?
- 18 How do I merge 3 columns in Excel?
- 19 Can you merge two columns in Excel?
- 20 How do I merge and center multiple columns?
To do this, select the cells you want to merge. In the “Alignment” section of the “Home” tab, click the “Merge & Center” button. The cells are merged and the text is centered in the single resulting cell. If you don’t want to merge the cells, you can still center text across them.
Where is the merge and Centre option found?
Go to the home tab> Click on “Merge & Center” in Alignment Group. And It’s done.
What is the shortcut key for merge and center in Excel?
Merge & Center: This will merge the selected cells into one and make the alignment of the text in the cell as the center. Shortcut is “ALT + H + M + C”.
Is there a quick way to merge cells in Excel?
ALT + H + M + M is the shortcut key to merge cells in excel. ALT + H + M + U is the shortcut key to unmerge cells in excel. If you are merging two cells together, then it will take out the right-hand side of the data and retain only the left-hand side portion of the data.
Why can’t I merge and center in Excel?
Actually, there are two conditions that can cause the Merge and Center tool to be unavailable. You should check, first, to see if your worksheet is protected.If you turn off sharing (if it is on) and disable protection (if the worksheet is protected), then the tool should once again be available.
How do I combine A1 and A2 in Excel?
Go to the cell where we want to see the outcome. Now press the equal sign and select both the cells separated by the ampersand (“&”) sign. For example, if we want to combine cell A1 and A2, then the combine cell formula will look like ”=A1&A2”.
How do you merge and Centre?
Click Home > Merge & Center. If Merge & Center is dimmed, make sure you’re not editing a cell or the cells you want to merge aren’t inside a table. Tip: To merge cells without centering the data, click the merged cell and then click the left, center or right alignment options next to Merge & Center.
How do I merge cells with data in Excel?
Combine text from two or more cells into one cell
- Select the cell where you want to put the combined data.
- Type = and select the first cell you want to combine.
- Type & and use quotation marks with a space enclosed.
- Select the next cell you want to combine and press enter. An example formula might be =A2&” “&B2.
How do I merge and center multiple rows?
To merge multiple rows and columns, select the cells and open the ‘Merge & Center’ menu, and click the ‘Merge & Center’ option. All that, cells in the select area will be merged into one single cell and the data/value on the first cell will be placed in the middle of the cell.
How do you merge table cells using the keyboard?
Select the cells to be merged and press Alt + Enter key. It easily works in windows 2010. Select the cells or rows you want to merge and then press Alt + A and then press M (2 times). it works in 2010 MS Word.
How do I merge cells in Excel without losing data?
How to merge cells in Excel without losing data
- Select all the cells you want to combine.
- Make the column wide enough to fit the contents of all cells.
- On the Home tab, in the Editing group, click Fill > Justify.
- Click Merge and Center or Merge Cells, depending on whether you want the merged text to be centered or not.
How do I merge rows in Excel without losing data?
Combine rows in Excel with Merge Cells add-in
- Select the range of cells where you want to merge rows.
- Go to the Ablebits Data tab > Merge group, click the Merge Cells arrow, and then click Merge Rows into One.
- This will open the Merge Cells dialog box with the preselected settings that work fine in most cases.
Why won’t my cells Center in Excel?
You can achieve this by changing the format in custom format. As shown below, highlight the cells where the Excel numbers won’t left or centre align and:Delete the * in the format, Click OK.
How do I enable merge and center in Excel shared workbook?
Open the original Shared Workbook into which you want to merge changes. Click the Tools menu and then select Merge Workbooks…. If prompted, save the workbook. In the file navigation dialog box, click the copy of the workbook that contains the changes you want to merge, then click OK.
How do I enable merge in Excel?
Enable or disable form merging
- On the Tools menu, click Form Options.
- Under Category, click Advanced.
- Do one of the following: To disable merging, clear the Enable form merging check box. To enable merging, select the Enable form merging check box. Enable users to merge forms by using custom code that you provide.
How do you merge cells A1 and A2?
In order to merger two cells, select two cells (A1 and A2) and merge them (Alt+H+mc). Now you have a merged cell. Once you have a set of merged cell, select both the rows (1 and 2) and Ctrl+R.
Which tool you will use to join some cell and place the content at the middle of joined cell?
The correct answer is option 4 i.e Click on Merge and Center icon on the alignment tab. Merge and Center button is available on the Excel toolbar to join some cells and place the content in the middle of the joined cell in MS Excel 2007.
How do I merge 3 columns in Excel?
How to Combine Three Columns in Excel
- Open your spreadsheet.
- Select the cell where you want to display the combined data.
- Type =CONCATENATE(AA, BB, CC) but insert your cell locations.
- Adjust the formula to include any needed spaces or punctuation.
Can you merge two columns in Excel?
Excel’s Merge option is useful for merging any group of cells, columns or rows that are adjacent to each other.If you need to format the columns in addition to merging them, then right-click the highlighted cells, select “Format Cells.” Under the Alignment tab, you will see a checkbox to Merge cells.
How do I merge and center multiple columns?
How to Merge Cells in Excel So They Span Multiple Columns
- Select the cells that you want to merge.
- Navigate to the Home tab in the office ribbon, if you aren’t already there.
- Select Merge & Center or Merge Across (if you want the text left aligned) from the Merge & Center menu.
- Слияние и центр в Excel
Excel Merge and Center (Содержание)
- Слияние и центр в Excel
- Как использовать Слияние и Центр?
- Плюсы и минусы слияния и центрирования в Excel
Слияние и центр в Excel
Слияние и Центр в Excel используется для объединения нескольких ячеек и строк в одной ячейке или строке. Это помогает классифицировать данные в другом формате. Объединение любой ячейки или строки помогает назначить одну ячейку или строку двум или более заголовкам или столбцам, так что если одному значению нужно соответствовать до двух или более заголовков столбцов, то этим мы можем выполнить эту работу.
Как использовать Merge и Center в Excel?
Мы используем Merge и Center в Excel, чтобы объединить группу ячеек или центрировать заголовки или текст. Объединение и центр расположены на вкладке «Главное меню» в разделе «Выравнивание». Использование Merge и Center в Excel очень просто и удобно.
Вы можете скачать этот шаблон Excel слияния и центрирования здесь — Шаблон Excel слияния и центрирования
Давайте разберемся, как объединить и отцентрировать в Excel несколько примеров.
Слияние и Центр в Excel — Пример # 1
У нас есть данные о продажах продуктов месяца ниже. И мы назвали эту таблицу как Sales and Order, которая находится в верхней строке с размером шрифта 20, просто чтобы иметь чистую ясность и видимость выполняемой функции.
Теперь, чтобы объединить имя таблицы Sales and Order в одну ячейку, чтобы она стала заголовком таблицы, выберите ячейки, в которые вы хотите объединить текст Sales и Order, как показано ниже.
Теперь перейдите в « Домой» и нажмите « Объединить и центрировать» в разделе « Выравнивание ».
Когда мы нажмем «Слияние» и «Центр», мы увидим, что текст «Продажи и заказы» теперь объединен в одной ячейке. Позже вы можете изменить выравнивание объединенного текста в любую позицию в соответствии с вашими потребностями.
Вы также можете удалить ячейки, если хотите. Для этого следуйте по тому же пути и нажмите на стрелку вниз, доступную в правом углу опции Слияние и Центр. У нас будет больше вариантов, и один из них — Unmerge Cells.
Нажмите здесь. Ячейка будет удалена, и текст вернется в прежний формат.
Слияние и Центр в Excel — Пример № 2
Мы увидим еще одну функцию слияния и центрирования в Excel — Merge Across . В отличие от слияния и центрирования в Excel, Merge Across используется для объединения нескольких строк или нескольких позиций. Где в Слиянии и Центре, мы могли объединить только одну ячейку с несколькими ячейками.
В Merge Across текст попадает на одну сторону выбранных ячеек или строки.
Ниже у нас есть несколько чисел в разных строках. Здесь мы объединяем их в один ряд.
Выберите все ячейки, покрытые в поле. Выберите Merge Across из раскрывающегося списка Merge & Center. После того, как мы щелкнем по нему, мы получим все выбранные несколько строк, объединенные с номерами, введенными из строк со 2 по 6, как показано ниже.
Если нам нужно объединить объединенные ячейки, выберите из раскрывающегося списка параметры « Объединить ячейки», как показано ниже.
Как только мы нажмем « Снять ячейки», весь ряд вернется к тому же состоянию, что и раньше.
Слияние и Центр в Excel — Пример № 3
Мы можем напрямую объединить любой контент с несколькими ячейками. Это простой и быстрый процесс для выполнения. Для этого у нас есть пример данных ниже.
На приведенном выше скриншоте у нас есть несколько цифр от 1 до 5 в последовательности. Теперь давайте попробуем объединить любое число с одной или несколькими ячейками. Для этого сначала выберите тот диапазон ячеек, которые нам нужно объединить, как показано ниже.
Выше мы выбрали ячейку от B2 до D2 в диапазоне. Теперь выберите Merge Cells из выпадающего списка Merge & Center, как показано на скриншоте ниже.
Как только мы нажмем на нее, выбранные ячейки будут объединены в одну ячейку. И данные, присутствующие в первой ячейке, будут единственными данными ячейки, переносимыми в других объединенных ячейках, как показано на снимке экрана ниже.
Давайте посмотрим, что произойдет, когда мы объединим ячейки B5 и B6, как показано на скриншоте ниже.
Теперь выберите Merge Cells из выпадающего списка Merge & Center. Как только мы это сделаем, мы получим предупреждающее сообщение, как показано ниже. Это означает, что будет сохранено только верхнее или первое значение, а остальные будут отброшены. Затем, чтобы продолжить, нажмите OK, как показано ниже.
Как только мы сделаем это, выбранные ячейки будут объединены только с одним значением, которое является первым или верхним значением из диапазона, как показано ниже.
Если я хочу увидеть значение в предыдущем формате, то объедините ячейки, выбрав опцию «Снять ячейки» в раскрывающемся списке «Слияние и центр», как показано ниже.
После этого все объединенные ячейки будут разделены, и только верхнее или первое значение будет сохранено далее, как показано ниже, теряя остальную часть значения.
Pros
- Он управляет данными, чтобы выглядеть хорошо, имея одно значение для нескольких заголовков.
- Изменяя положение объединенных ячеек, мы можем настроить данные и их видимость в соответствии с требованиями.
- Merge & Center можно использовать как для строк, так и для столбцов.
Cons
- Не рекомендуется использовать там, где в любом файле содержится огромное количество данных, и с ним становится громоздко обращаться.
То, что нужно запомнить
- Всегда изменяйте выравнивание объединенной ячейки, чтобы она помогала корректировать и искать правильные атрибуты.
- Используйте Wrap Text, который расположен над Merge & Center, так что если ячейка имеет длинный текст, то после переноса она будет видна в той же ячейке и будет на ее границе.
- Если все выбранные ячейки имеют данные, то будет перенесено и объединено только первое или верхнее значение ячейки.
Рекомендуемые статьи
Это было руководство по слиянию и центрированию в Excel. Здесь мы обсудили, как использовать Merge и Center в Excel, а также объединить ячейки, плюсы и минусы Merge и Center в Excel вместе с практическими примерами и загружаемым шаблоном Excel. Вы также можете просмотреть наши другие предлагаемые статьи —
- Как объединить ячейки в Excel?
- Как объединить две таблицы в Excel?
- Сортировать по цвету в Excel
- Руководство по переносу текста в Excel
- Примеры суммирования нескольких строк в Excel
Knowing the ins and outs of Excel is essential for organizing data, understanding analytics, and getting the most from your marketing efforts. The tool is great for quickly processing vast amounts of data, but it can be overwhelming if you don’t spend the majority of your workday whipping up spreadsheets.
Fortunately, a few basic skills are all you need to put together an easy-to-read spreadsheet. One is knowing how to merge cells in Excel. Whether you’re planning blog articles for the upcoming quarter, creating an email list for a targeted campaign, or designing SEO-friendly Google ads, merging cells is a handy way to organize your information.
To sharpen your skills, we’ll cover several ways to combine cells.
- How to merge two cells
- How to merge and center cells
- How to merge multiple cells
- How to merge cells without losing data
- A shortcut to merge cells
- Why can’t I merge cells?
Don’t want to start from scratch? Use these free Excel templates as a foundation for your own marketing spreadsheets.
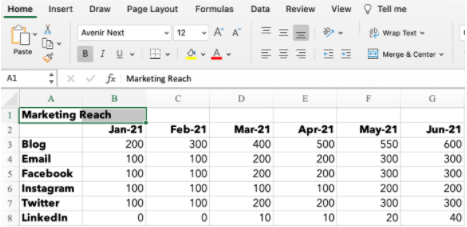
Merging is a way to turn two small cells into one new, large cell. This is useful for organizing information and creating headers, without the need to resize individual cells. Here’s how to do it.
Step 1: Highlight the two adjacent cells you want to merge (I’m merging A1 and B1 in the example).
Source
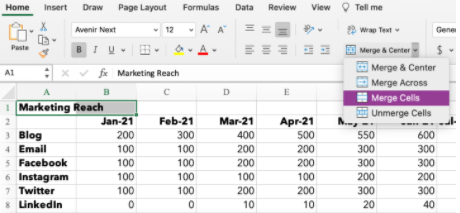
Step 2: Under the Home tab, click the ‘Merge’ icon and choose ‘Merge Cells’.
Source
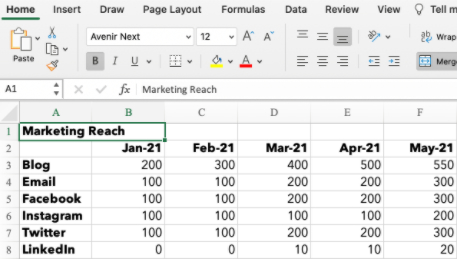
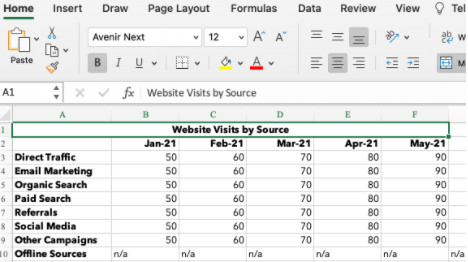
Step 3: That’s it! You’ve merged the cells.
Source
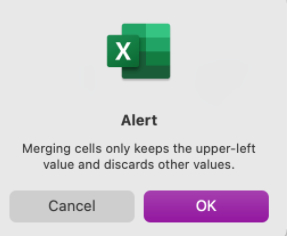
Note: When combining cells, only the data in the upper left cell is saved. Make sure to save the information from the other cell so it’s not lost. If you happen to have data in both A1 and B1, Excel won’t simply wipe it. This alert will pop up:
Source
Don’t want to delete the data? Click ‘Cancel,’ and copy/paste the information into a separate document or cell before merging. If you only need the information in the upper-left cell, click ‘OK’ to merge the cells.
How to Merge and Center Cells in Excel
Say you’re building a marketing report and want your titles to be centered above your data. Merge and center cells by following these steps.
Step 1: Highlight the cells you want to merge.
Source
Step 2: Under the Home tab, click the ‘Merge’ icon and choose ‘Merge & Center.’
Source
Step 3: Your cells will merge and the data will be centered within the cell.
Source
How to Merge Cells in Excel Shortcut
Clicking the correct ‘Merge’ function over and over can be a drag if you need to combine a lot of cells. For fast merging, start by highlighting the cells you want to merge. Then, type the following key combinations.
Excel Shortcuts for Windows
- Merge Cells: ALT H+M+M
- Merge & Center: ALT H+M+C
- Merge Across: ALT H+M+A
- Unmerge Cells: ALT H+M+U
Excel Shortcuts for OS
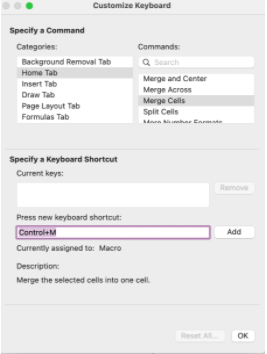
The Apple operating system doesn’t have an ALT key, so you have to set up your own shortcut to merge cells.
- In Excel, click ‘Tools’ under the navigation bar.
- Select ‘Customize Keyboard.’
- A pop-up will appear. Under the header ‘Specify a Command’ there are two columns: Categories and Commands. For Categories, select ‘Home Tab.’ For Commands, select ‘Merge Cells.’
- Select the text box under ‘Press new keyboard shortcut.’ Type the key combination for your shortcut. For example: CONTROL+M.
- Click ‘OK’ to set your shortcut.
- You can now use CONTROL+M to merge cells in Excel.
- Set up additional shortcuts for Merge Across, Merge & Center, or Unmerge.
Source
How to Merge Multiple Cells in Excel
You know the basics, but now you want to get creative and merge more than two cells. Depending on your desired spreadsheet layout, you can use the Merge Across, Merge Cells, or Merge & Center function.
1. Merge Across
This option is used to merge cells within a single row. You can’t use ‘Merge Across’ to combine cells within a column or across multiple rows.
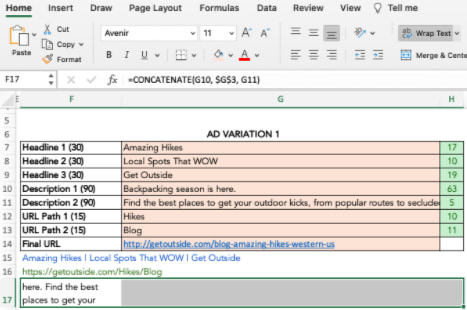
In this example, I’m setting up PPC ads and want to see my description copy in row 17. If I simply resize column F, my table will have too much space between column F and G. Merging multiple cells across row 17 lets me see the copy and keep the table neat.
Step 1: Highlight all the cells you want to merge within the row.
Source
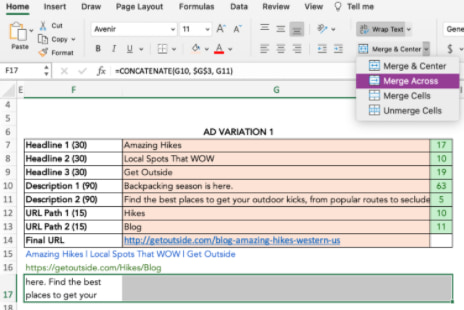
Step 2: Under the Home tab, click the ‘Merge’ icon and choose ‘Merge Across.’
Source
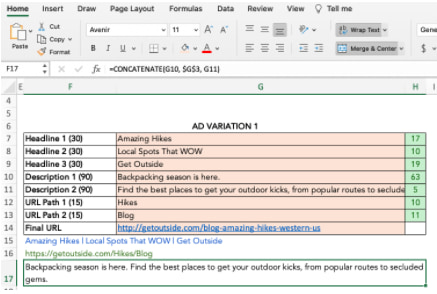
Step 3: The cells merge across the entire highlighted area.
Source
2. Merge & Center
You can merge and center multiple cells across rows and down columns. Just remember the data in the upper-left cell is the only information that will stay once merged. In the example below, I use ‘Merge & Center’ to combine rows 15, 16, and 17 with columns F, G, and H.
Source
Source
3. Merge Cells
The ‘Merge Cells’ function is ideal to combine multiple adjacent cells across rows and columns. It works just like the ‘Merge & Center’ function, except the data will be left-aligned instead of centered after merging.
Source
How to Merge Cells in Excel Without Losing Data
Want to merge cells without losing information from all but the upper left cell? Easy. You can use the ampersand (&) or the CONCATENATE function to combine data from two or more cells.
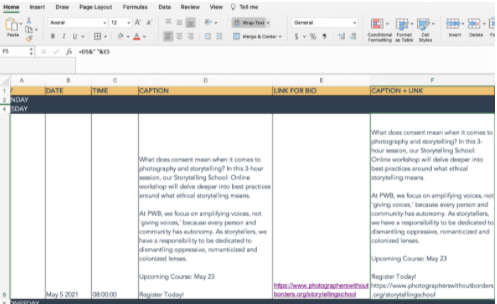
In the example below, I’m creating copy for Instagram and want to combine the caption with its corresponding link.
Ampersand
Step 1: Choose the cell where you want to put the merged data. Make sure this is separate from the cells you’re merging.
Step 2: Type = in the blank cell and select the first cell to combine.
Step 3: Type & and use » » to leave a space between cell data.
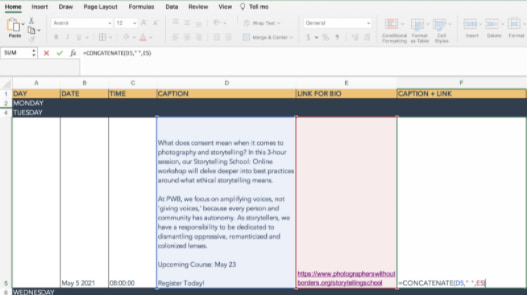
Step 4: Type & again before choosing the next cell. Repeat for all the cells you want to combine. An example formula is =D5&» «&E5.
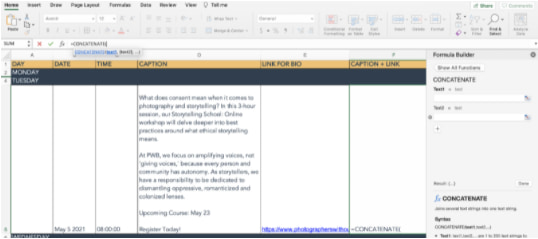
Step 5: Hit Enter. In the example, you can see how the text from cells D5 and E5 merged into F5.
Source
CONCATENATE or CONCAT
The CONCATENATE function (or CONCAT) is another way to combine two or more text strings together.
The formula in Excel is =CONCATENATE (text1,text2,…). Text1 is the first cell to merge and can be a text value, number, or cell reference. Text2 is the next item to join. For this function, you can merge up to 255 items or 8,192 characters.
Step 1: Highlight a new blank cell where you want to merge the data.
Step 2: In the formula bar, type =CONCATENATE(
Source
Step 3: A formula builder will pop up, allowing you to choose Text1, Text2, and so on. Select the cells you want to merge, in order from first to last. To include spaces between the cell data, you must include ,» «, within the formula. [i.e. =CONCATENATE(D5,» «,E5)]
Source
Step 4: Hit Enter. The data from your selected cells will be combined in the CONCATENATE cell.
Source
Why Can’t I Merge Cells in Excel?
A lot can go wrong if your formula or formatting isn’t set up correctly. If you’re struggling to merge cells, try these troubleshooting tips.
- Ensure you’re not actively editing a cell you want to merge. The ‘Merge’ icon will be shaded out if you’re in the middle of making changes. To fix this, simply hit ‘Enter’ to stop editing or click onto another cell before clicking back to the cell you’d like to merge.
- Check if one of the cells is part of an Excel table. Tables have a unique format that don’t allow merging. You can tell you’re on a Table if the ‘Chart Design’ or ‘Format’ tabs across the top of your workbook are highlighted in green and the ‘Merge’ icon is shaded out.
- Look at the sharing permissions of the Excel workbook. If it’s not shared with you or is protected, you won’t be able to make any changes or merge cells.
How to Unmerge Cells
Maybe you got a little excited trying out your new skills and merged one cell too many. Don’t panic. Simply unmerge your cells by following these steps.
- Highlight the cells you want to unmerge.
- Under the Home tab, click the ‘Merge’ icon and choose ‘Unmerge Cells.’
- Your cells will go back to the original formatting, but you will have lost the information from before the merge.
- If you need that information, click ‘Command’ + Z (OS) or ‘CTRL’ +Z (Windows) to undo your actions until you see the data pop up.
-
Excel 365
-
Excel 2021
-
Excel 2019
-
Excel 2016
-
February 12, 2022 -
18 Comments
A question we’re often asked is: What is the keyboard shortcut for Merge and Center?
Merge and Center isn’t a tool that tends to be used very often, but creating a complex layout often means we need to merge and center multiple times. You would expect that Excel would offer a convenient keyboard shortcut to make this quick and easy, but, at least by default, it doesn’t!
Don’t despair though, there are a few ways that Merge & Center can be accessed more easily, and you can even create keyboard shortcuts of your own without needing any external tools.
Accessing Merge & Center using the keyboard
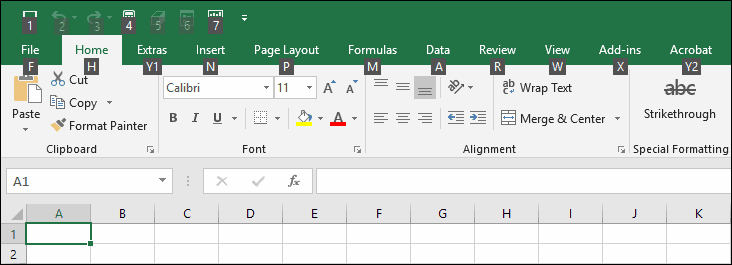
I just said that there isn’t a keyboard shortcut for Merge & Center, but that isn’t completely true. It is possible to access the command using Excel’s Key Tips feature.
Key Tips is covered in more depth in our Essential Skills course.
To do this:
- Hold down the key on the keyboard. After a short delay, letters and numbers appear on the Ribbon.
You can release the key once the key tips have appeared.
- Press the key to select the Home tab.
The letters change, offering all of the options on the Home tab. Notice M next to Merge & Center.
- Press the key.
The Merge & Center menu opens, offering key tips for each item.
- Press the key to choose Merge & Center.The Merge & Center command is executed.
This works, but it’s very long-winded and certainly isn’t going to speed up your work. Fortunately, there are quicker ways to do this.
Adding Merge & Center to the Quick Access Toolbar
The Quick Access Toolbar offers an easy way to get quick access to your favorite commands with a single click, but it also makes them easily accessible via the keyboard.
The Quick Access Toolbar is also covered in more depth in our Essential Skills course.
Too add Merge & Center to your Quick Access Toolbar, simply right-click it on the Ribbon and click Add to Quick Access Toolbar from the shortcut menu.

An icon appears on your Quick Access Toolbar at the top of the screen, making it easy to access this command with a single click, no matter which tab is selected.
This also makes it much easier to access Merge & Center with your keyboard. If you hold down the <Alt> key (as shown above), you’ll see that numbers appear over the Quick Access Toolbar.

In the screenshot above, you can see that that number 4 is appearing over the Merge & Center icon on the Quick Access Toolbar. There’s no need to hold down the <Alt> key first; you can now execute the Merge & Center command by simply pressing <Alt>+<4> on the keyboard!
This doesn’t just work for Merge & Center. You could do this with absolutely any Excel command, allowing you to create keyboard shortcuts for any command that you need.
Using Macros
Adding the command to your Quick Access Toolbar is definitely the best way to make something keyboard-accessible in the latest versions of Excel, but it wasn’t possible to do this in older versions. In previous versions, the only way to create new keyboard shortcuts was to record a macro and assign it to a shortcut key combination.
You can see this technique used in our Expert Skills course, but it’s not the best solution if you are using a modern version of Excel. Using Macros means you will need to use a macro-enabled workbook, which is a potential problem as macro-enabled workbooks can contain macro viruses.
If this doesn’t work for you
If keyboard shortcuts don’t work for you, it’s almost certainly because another program on your computer has already ‘claimed’ them for its own use. If another program is already using the <Alt>+<4> keyboard shortcut, for example, it may override the one you have created in Excel.
If you find that your keyboard shortcuts aren’t working, you should try closing any other programs that are running and then try again.


These are the only up-to-date Excel books currently published and includes the new Dynamic Arrays features.
They are also the only books that will teach you absolutely every Excel skill including Power Pivot, OLAP and DAX.
Some of the things you will learn





Share this article
Recent Articles
18 Responses
-
tell me direct short cut key
-
There is no built-in shortcut key for Merge & Center, but you can create one by adding Merge & Center to your Quick Access toolbar as shown above. Commands added to your Quick Access Toolbar automatically create Alt+Number shortcut keys.
-
Thank you
-
-
-
You are a life saver. These tips helped me save 2 hours. Thanks again.
-
WHAT IS THE SHORTCUT KEY IN MERGE & CENTER
PLEASE-
There is no built-in shortcut key for Merge & Center, but you can create one by adding Merge & Center to your Quick Access toolbar as shown above. Commands added to your Quick Access Toolbar automatically create Alt+Number shortcut keys.
-
Hi, i added the merge and center to my quick tool bar but it does not show any shortcut key. Alt+number shortkey is not working. what am i missing? 🙁
-
Hi Marie, it’s possible that you might be using an older version of Excel that did not support this feature.
If that’s not the case, it’s most likely that there is another program running on your computer that has ‘claimed’ the Alt+Number shortcut keys for its own use and is blocking Excel from using them. If you think that might be the problem, try closing any programs that are running in the background to see if the shortcut keys start working after they have been closed.
-
-
-
-
Thanks for the sharing, I had added a shortcut in Quick Access Toolbar (the 2nd method), and it works well and smoothly for my data.
-
Nice tip, really helps many people. thanks
-
This saved me! Thank you!
-
Thank you! I’m using the Quick Access Toolbar tip, I wish I could press the ALT + # faster but it is what it is .
-
Thanks so much. This really helped me a lot. I was so tired of one boring excel task but your post help me saved a lot of time. Thanks
-
I Will Make A Try And See Thanks.
-
Nice, this useful
-
Thanks very helpfull
-
thank you for your article this is helps a lot but i had one more doubt “is there a way to merge and center selected cells with some key? like Ctrl + Shift like that”?
-
Yes, you could do this by adding Merge & Center to the Quick Access toolbar as shown above, or by creating a macro with the shortcut key combination that you need (also mentioned above).
-
Leave a Reply
Learn the shortcut for how to merge and center cells in Excel using this simple tutorial. This guide will provide you with the complete information you need for this feature.
As workers engaged with Excel, we want to boost our productivity and save time. We can do that by knowing the various shortcuts in Excel. And if you are a beginner, worry no more, as we will teach you everything you need to know in Excel. All you have to do is visit our website and see tons of Excel tutorials.
Before jumping to our tutorial, learn why we use the function “merge and center” in Excel. So, without beating around the bush, here’s why there are some cases in which we must use this function:
There are many reasons for using the Excel “merge and center” function. The main reason is due to its benefits. What are these?
- It increased our productivity. Using the shortcut for Merge and Center in Excel increased our productivity as it saved us time.
- It enhances the visual appeal of our spreadsheet. Merging and centering cells also enhances the visual appeal of our spreadsheet, making it more professional.
- It improved organization. Lastly, it helps us create a more organized spreadsheet, making it reader-friendly and easier to understand.
What is the merge and center function in Excel?
The Excel merge and center function is a fascinating tool that allows us to merge cells into a massive cell. This function is useful when you want to place a title that spans multiple columns.
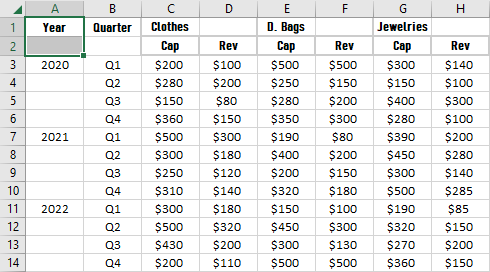
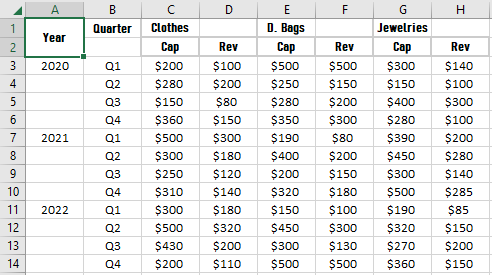
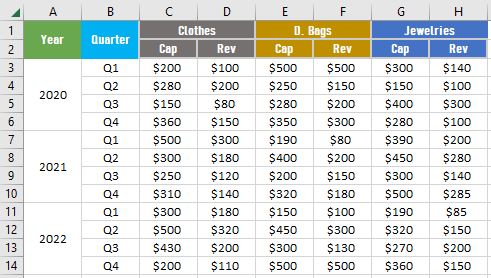
Here’s an example of a spreadsheet to which the merge and center functions in Excel were applied.
Now that we understand the use of the merge and center functions, let’s proceed to our tutorial.
Shortcut for Merge and Center in Excel (Tutorial)
Time needed: 1 minute.
Here’s how to use the shortcut for Merge and Center in Excel.
- Select cells.
The first thing we should do is select the cells that we want to merge and center.
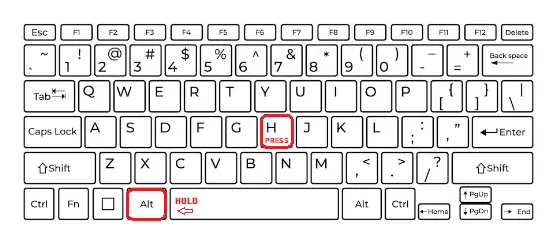
- Hold the alt key, then press the H key.
Next, hold the alt key on our keyboard, then the H key.
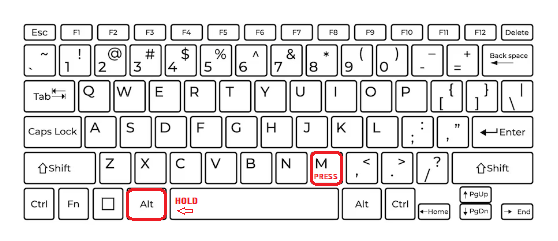
- Press the M key.
Without letting go of the alt key, press the M key after pressing the H key.
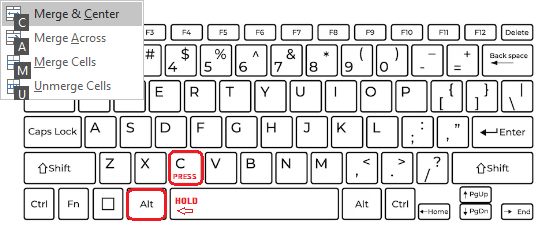
- Press the C key.
After pressing the M key, press the C key. Still, without letting go of the alt key.
Note: After pressing the M key, you’ll notice four options (see the picture below).
- Result.
Summary: The shortcut keys for merge and center in Excel are Alt + H + M + C.

Tip: Once you have applied the "merge and center" functions to your cells, you don't need to repeat the same process. Instead, you can use the F4 key. See the sample below.
On your next selection, just press the F4 key to merge and center cells. This is only applicable if you already used the merge and center tool.
Note: You can do the same to the cells you want to use the merge and center functions on.
Before we end our tutorial, let us first learn the manual method of using the merge and center functions.
You might also be interested in how to merge and unmerge cells in Excel.
Manual Procedure
The following is the manual method of merging and centering your cells.
Step 1: Select cells, then press the drop-down arrow of the merge and center button on the Home tab.
Note: You can directly click the merge and center button without clicking the drop-down arrow. It will automatically merge and center your cells (see the picture below).
Step 2: If you click the drop-down arrow, you’ll see four choices. Since we want our cells to merge and center, press the merge and center button.
Note: You can again use the F4 shortcut once you have applied the merge and center functions to your cells.Conclusion
In conclusion, this tutorial is essential for making Excel work simple and more productive. Learning keyboard shortcuts is crucial since they speed up our work, not just simplify it.
I believe that we have accomplished this tutorial. I hope you’ve learned something from this. If you have any questions or suggestions, please leave a comment below, and for more educational content, visit our website.
Thank you for reading!


 button to the right of the Destination box to collapse the popup window.
 button to expand the popup window again, and then click the Finish button.













![Download 10 Excel Templates for Marketers [Free Kit]](https://no-cache.hubspot.com/cta/default/53/9ff7a4fe-5293-496c-acca-566bc6e73f42.png)
