You can work with a matrix in the Excel just like with a range. That is, a set of adjacent cells occupying a rectangular area.
The matrix address is the upper left and right lower cell of the range indicated by the colon.
Array formulas
Building a matrix of Excel tools in most cases requires the use of appropriate arrays. Their main difference is that the result is not one value but a data set (a range of numbers).
The procedure for applying the data set formula:
- Select the range where the result of the formula action should appear.
- Enter the formula (starting with the sign «=»).
- Press the kea combination Ctrl + Shift + Enter.
The data set formula in curly brackets is displayed in the formula bar.
Select the entire range and perform the appropriate actions to change or delete a data set formula. The same combination is used (Ctrl + Shift + Enter) to enter changes. Part of the data set cannot be changed.
Matrix operations in Excel
You can perform such operations with matrices in Excel as transposition, addition, multiplication by number/array; finding the inverse matrix and its determinant.
Transpose the matrices
Transposing the matrix is an act of changing the rows and columns in places.
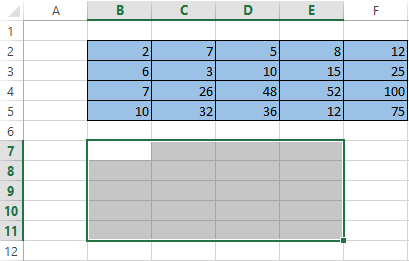
First, note the empty range where we transpose the matrix. There are 4 lines in the original table and the range for the transposition should have 4 columns. For 5 columns there are should be five lines in an empty area, etc.
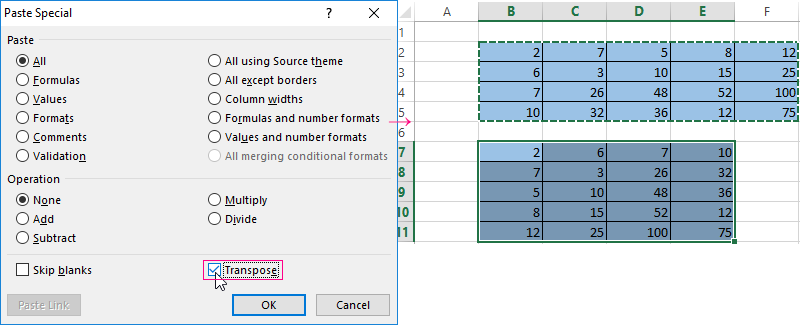
- Method #1. Select the original data array. Click «copy». Select an empty range. Expand the Paste button. Open the «Paste Special» menu (CTRL+ALT+V). Mark «Transpose» operation. Close the dialog by clicking OK.
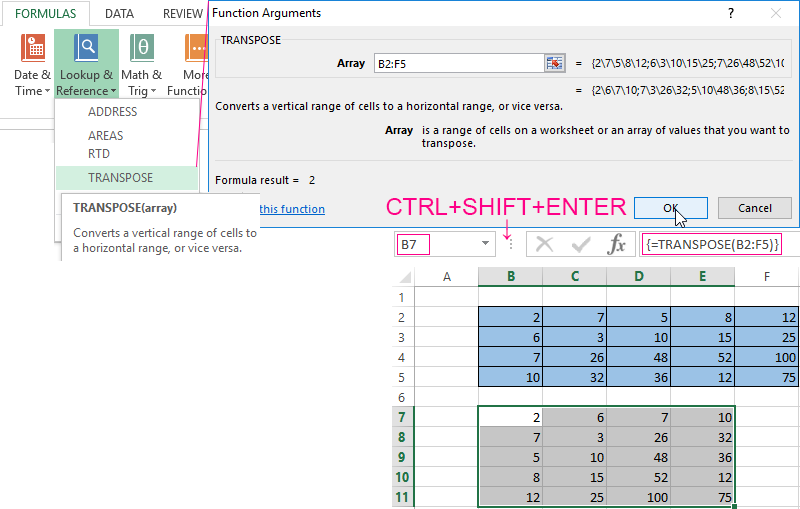
- Method #2. Select the range B7:E11 with active cell B7 in the upper left corner of the empty range. Select function: «FORMULAS»-«Lookup and Reference»-«TRANSPOSE». The argument is a range with the original array data. Click OK. Now the function produces an error. Select the entire range where you want to transpose the matrix. Press the F2 (go to the formula editing mode). Press the key combination Ctrl + Shift + Enter.
The advantage of the second method: the transposed matrix automatically changes while making changes to the original.
Addition of a matrices
You can sum up matrices with the same number of elements. The number of rows and columns of the first range should be equal to the number of rows and columns of the second range.
In the first cell of the resulting matrix you need to enter a formula of the next form: = the first element of the first array + the first element of the second: (=A1+E1). Press Enter and stretch the formula to the full range.
Matrices multiplication in Excel
The task is next:
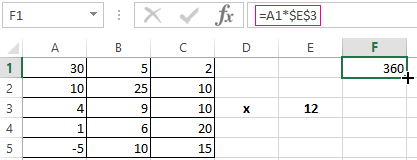
To multiply a matrix by a number you need to multiply each of its elements by this number. The formula in Excel: =A1*$E$3 ( a reference to a cell with a number must be absolute).
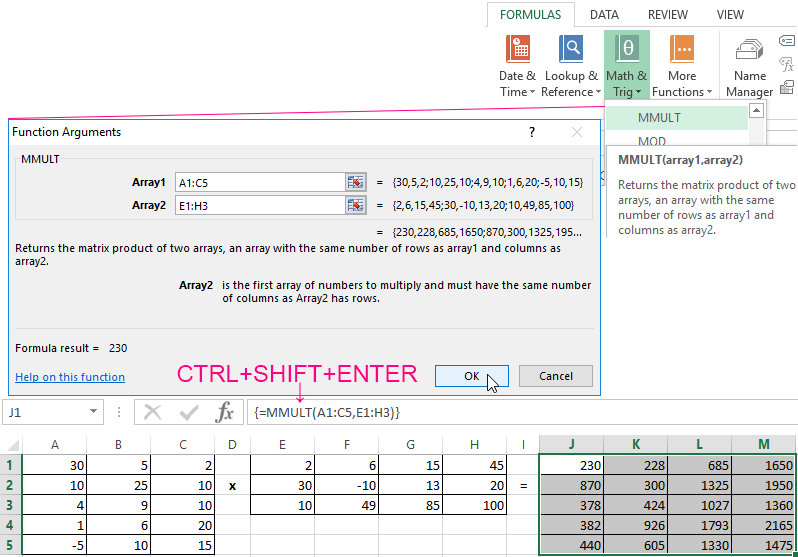
Let’s multiply the matrix with different ranges. It’s possible only to find the product of matrices if the number of columns of the first matrix is equal to the number of rows of the second one.
In the resulting matrix, the number of rows is equal to the number of rows of the first array, and the number of columns is equal to the number of columns of the second.
For convenience, we select the range where the multiplication results will be placed. We make the first cell of the resulting field active. Then select: «FORMULAS»-«Math and Trig»-«MMULT» We introduce the formula: = =MMULT(A1:C5,E1:H3). Enter as an array formula (CTRL+SHIFT+Enter).
The inverse matrices in Excel
It makes sense to find it if we are dealing with a square matrix (the number of rows and columns is the same).
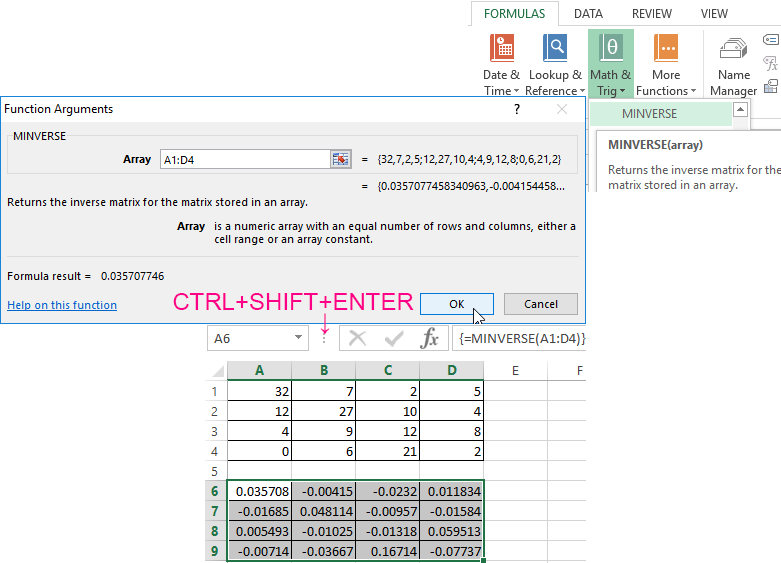
The dimension of the inverse matrix corresponds to the size of the original. We use: «FORMULAS»-«Math and Trig»-«MINVERSE» function in Excel.
Select the first cell of the empty range for the inverse matrix. We introduce the formula «= MINVERSE(A1:D4)» as a data set function. The only argument is the range with the original. We got the inverse array in Excel:
Finding the matrices determinant
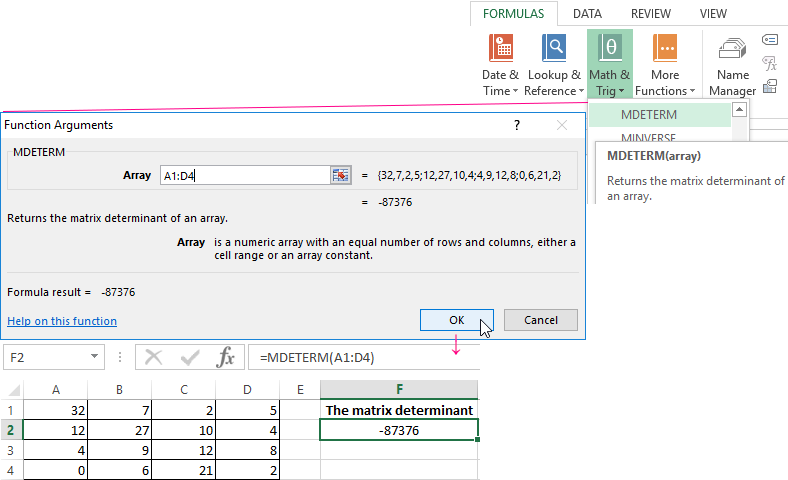
This is one single number that is found for a square matrix. We use: «FORMULAS»-«Math and Trig»-«MDETERM» function.
We put the cursor in any cell of the open sheet. Enter the formula: =MOPRED(A1:D4).
Thus, we performed actions with the matrixes using the built-in Excel features.
A matrix in Excel (Table of Contents)
- Introduction to Matrix In Excel
- Calculation methods of Matrix in Excel
- The Inverse of Matrix in Excel
- The Determinant of Square Matrix in Excel
Introduction to Matrix In Excel
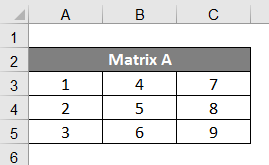
A Matrix is an array of elements. It mostly took the rectangular shape when formed. It’s been arranged in rows and columns. It is used to show the placement of two elements along two axes. You can use a matrix to illustrate nine possible combinations of three elements. Most of the MS Excel functions you’re using to perform Matrix operations are array functions which provide multiple values at a time. To create Matrix in MS Excel, just enter the data of the matrix as shown in the below screenshot. The above matrix is a {3X3} matrix, and its elements are numerics 1 to 9.
Naming a Matrix
Now it’s important to give a unique name to every matrix you make.
So we can do the further calculations easily by providing just the name of that matrix.
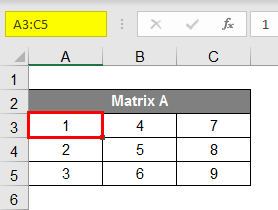
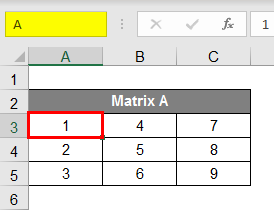
To give a name to the matrix, select all the matrix elements as per the fig. 2 and give it a name shown as per the fig. 3; for this example, we have given this matrix the name “AA”.
Calculation Methods of Matrix in Excel
There are two methods for the calculation of Matrices
- Brute Force Method (Cell reference method)
- Built-in array method
A. Brute Force Method
Addition of Matrices:
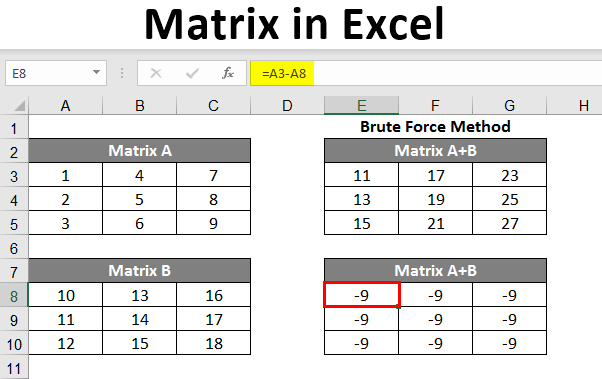
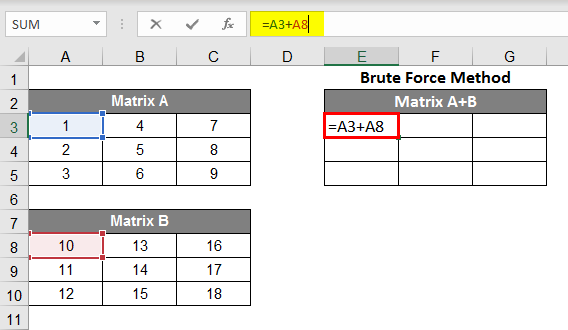
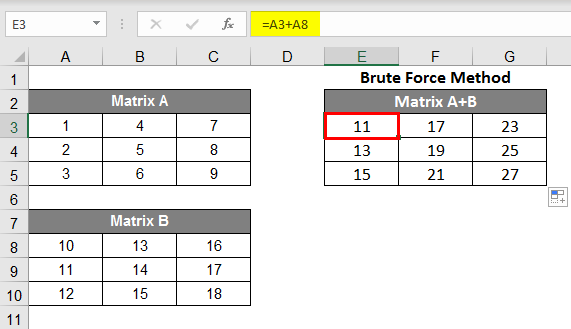
- For example, we have made two matrices here named A & B. For addition with this method, make the sum of both the 1st element respectively, then select the column and drag down the array till the third row and then select these 3 columns and drag it to the left till the third column.
- Now you can see the addition of these cells shown in the new matrix.
Subtraction in Matrices:
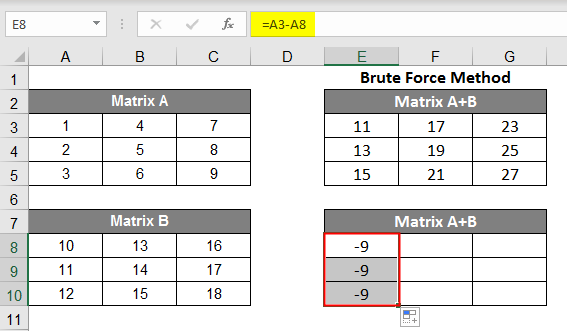
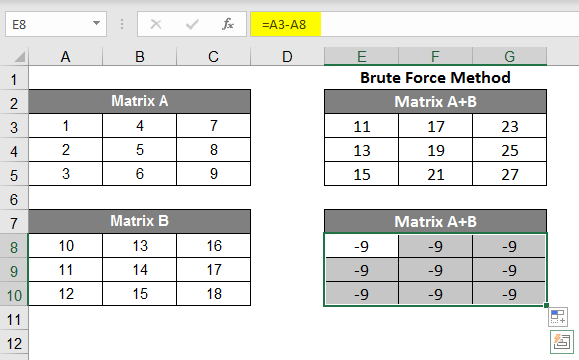
- To subtract a matrix from a matrix, look into the image below for your reference and follow the steps. As you can see in the formula bar, you need to subtract A8 from A3; for that, the formula became =A3-A8, you’ll get -9 as a result because 1-10 = -9. As per the image, you can see the black dot; you have to drag 2 steps to the right.
- As per image #2, you can see that you can do the subtraction of all the elements.
B. Built-in Array Method
Addition in Matrices:
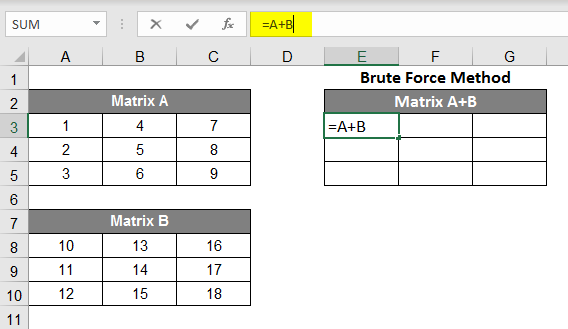
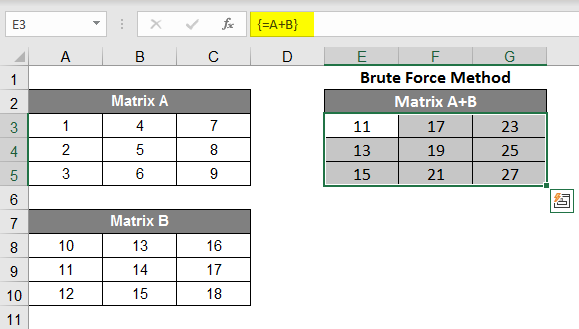
- For example, we have made two matrices here named A & B. For the addition of these both matrices, we have to highlight 3X3 space in the spreadsheet as both the Matrices A and B we are adding are of 3X3 elements.
- Now you need to select 3X3 space in a spreadsheet; just enter the simple addition formula =A+B and then press Shift +Ctrl+Enter, and you’ll have your addition of matrices (Note that the Braces will surround the formula).
Subtraction in Matrices:
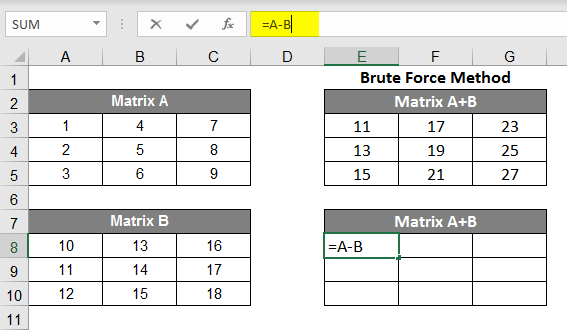
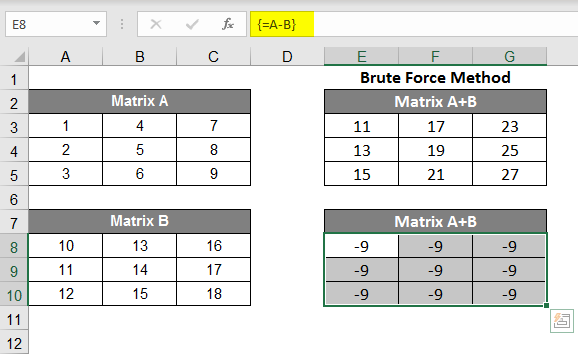
- Similarly to the addition, we just need to change the formula for this calculation; instead of = A+B, we will enter =A-B for this calculation.
- After selecting 3X3 space in a spreadsheet, just enter the simple addition formula =A-B and then press Shift +Ctrl+Enter, and you’ll have your subtraction of matrices.
Multiplication in Matrices:
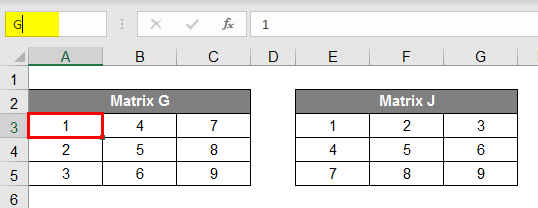
- Now this one is tricky, don’t you think that it will be the same as addition and subtraction. Same as all examples here, also we need two matrices for multiplication, so let’s make two different Matrices and give names as Matrix G and Matrix J. Both of these matrices are of 3X3 elements.
- Now for the Multiplication of the Matrices, there is not a regular calculation as it was in addition and subtraction; for multiplication of the Matrices, you need to follow the procedure. As we have given Names to our Matrices, now for the Multiplication of the Matrices, we need to select space of 3X3 and apply the formula =MMULT(G, J); after applying the above formula, just press Ctrl+Shift+Enter.
- You’ll find that the selected area of 3X3 is showing the Multiplication of the Matrix G and Matrix J.
Transpose of a Matrix:
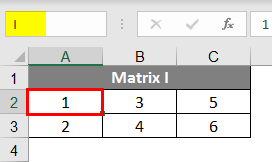
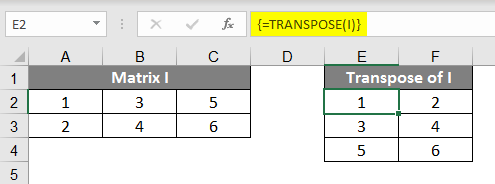
- To learn to transpose Matrix, we will take the Matrix of 2X3 elements. For example, let’s take a Matrix of 2X3 and give it a Name, “AI”. The transpose of Matrix I will result in 3X2. So select the 3X2 space in your spreadsheet. Now write down the transpose formula =TRANSPOSE(I) instead of I; we can also use the range of the matrix, which is A3 C4. Now Press Ctrl+Shift+Enter you will find the transpose of Matrix I. The mathematical representation for the transpose of Matrix I is Matrix I
- Matrix I is of 3X2 of elements.
The inverse of Matrix in Excel
Now to find Inverse of a Matrix, follows the procedure as below:
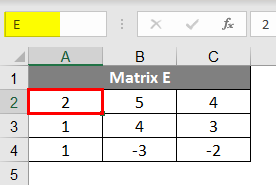
- The mathematical representation for an Inverse matrix E denoted by E-1
- Make a Matrix E of 3X3; for example, the Inverse of this matrix will be Matrix E, and it will also result in 3X3. Now write down the transpose formula =MINVERSE(E) instead of E; we can also use the range of the matrix, which is A10 C12.
- Now press Ctrl+Shift+Enter you will find the Inverse of Matrix E; we can call it Matrix E-1.
Determinant of Square Matrix in Excel
- This is very useful when it comes to using excel for matrix equations, It’s been a very lengthy method to find the determinant of a Matrix in general, but in excel, you can get it just by entering a formula for it.
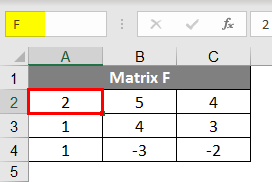
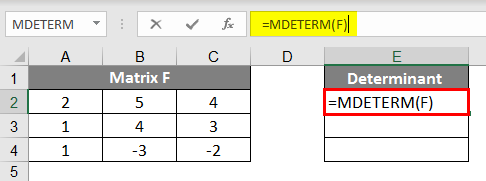
- The formula to find the determinant of a Square Matrix in Excel is =MDETERM(Array); the space of Array has to be filled either by the name of the array or the range of the array of which determinant we want to find. As you all know, the determinant of a Matrix is not result in a Matrix; it just needs a cell for the answer; that’s why we don’t need to select the matrix space before applying the formula. Now suppose for this, we make a Matrix F and to find the determinant of the Matrix F, the formula will be =MDETERM(F).
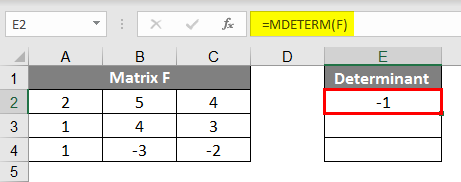
- You can see from the images that for our given Matrix F’s determinant is -1, so in a mathematical representation, you can write Matrix F = -1.
Recommended Articles
This is a guide to Matrix in Excel. Here we discuss the Calculation Method, Inverse, and Determinant of Matrix along with examples and downloadable excel template. You may also look at these useful functions in excel –
- Excel Correlation Matrix
- MMULT in Excel
- MINVERSE in Excel
- Inverse Matrix in Excel
Под матрицей подразумевается набор ячеек, расположенных непосредственно друг возле друга и которые образуют вместе прямоугольник. Не требуется особых навыков, чтобы выполнять различные действия с матрицей, достаточно тех же, какие используются во время работы с классическим диапазоном.
Каждая матрица имеет свой адрес, записывающийся аналогичным диапазону способом. Первая составная часть – первая ячейка диапазона (расположенная в верхнем левом углу), а второй – последняя ячейка, которая находится в нижнем правом углу.
Содержание
- Формулы массива
- Что можно делать с матрицами
- Транспонирование
- Сложение
- Умножение
- Обратная матрица
- Поиск определителя матрицы
- Несколько примеров
- Умножение и деление
- Метод 1
- Метод 2
- Сложение и вычитание
- Метод 1
- Метод 2
- Пример транспонирования матрицы
- Поиск обратной матрицы
- Выводы
Формулы массива
В подавляющем количестве задач при работе с массивами (а матрицы и являются таковыми) используются формулы соответствующего типа. Базовое их отличие от обычных заключается в том, что последние выводят всего одно значение. Для применения формулы массива необходимо осуществить несколько действий:
- Выделить набор ячеек, где будут выводиться значения.
- Непосредственно введение формулы.
- Нажатие последовательности клавиш Ctrl + Shift + Ввод.
После осуществления этих простых действий в поле ввода отображается формула массива. Ее можно отличить от обычной по фигурным скобкам.
Для редактирования, удаления формул массива, надо выделить требуемый диапазон и сделать то, что нужно. Чтобы редактировать матрицу, нужно использовать ту же комбинацию, что и для ее создания. При этом нет возможности редактировать отдельный элемент массива.
Что можно делать с матрицами
В целом, есть огромное количество действий, применение которых возможно для матриц. Давайте каждое из них рассмотрим более подробно.
Транспонирование
Многие люди не понимают значения этого термина. Представьте, что вам нужно поменять строки и колонки местами. Вот это действие и называется транспонированием.
Перед тем, как это осуществить, необходимо выделить отдельную область, которая имеет такое же количество строчек, сколько столбцов есть у исходной матрицы и такое же количество столбцов. Чтобы более наглядно понять, как это работает, посмотрите на этот скриншот.
Далее есть несколько методов, как можно осуществить транспонирование.
Первый способ следующий. Для начала нужно выделить матрицу, после чего скопировать ее. Далее выделяется диапазон ячеек, куда должен быть вставлен транспонированный диапазон. Далее открывается окно «Специальная вставка».
Там есть множество операций, но нам нужно найти радиокнопку «Транспонировать». После совершения этого действия нужно подтвердить его нажатием клавиши ОК.
Есть еще один способ, с помощью которого можно транспонировать матрицу. Сперва надо выделить ячейку, расположенную в верхнем левом углу диапазона, отведенного под транспонированную матрицу. Далее открывается диалоговое окно с функциями, где есть функция ТРАНСП. Ниже в примере вы более подробно узнаете, как это сделать. В качестве параметра функции используется диапазон, соответствующий изначальной матрице.
После нажатия кнопки ОК сначала будет показано, что вы допустили ошибку. Ничего в этом страшного нет. Все потому, что вставленная нами функция не определена, как формула массива. Поэтому нам нужно совершить такие действия:
- Выделить набор ячеек, отведенных под транспонированную матрицу.
- Нажать клавишу F2.
- Нажать на горячие клавиши Ctrl + Shift + Enter.
Главное достоинство метода заключается в способности транспонированной матрицы сразу корректировать содержащуюся в ней информацию, как только вносятся данные в изначальную. Поэтому рекомендуется использовать именно данный способ.
Сложение
Эта операция возможна лишь применительно к тем диапазонам, количество элементов которых такое же самое. Проще говоря, у каждой из матриц, с которыми пользователь собирается работать, должны быть одинаковые размеры. И приводим скриншот для наглядности.
В матрице, которая должна получиться, нужно выделить первую ячейку и ввести такую формулу.
=Первый элемент первой матрицы + Первый элемент второй матрицы
Далее подтверждаем ввод формулы с помощью клавиши Enter и используем автозаполнение (квадратик в правом нижнем углу), чтобы скопировать все значения на новую матрицу.
Умножение
Предположим, у нас есть такая таблица, которую следует умножить на 12.
Догадливый читатель может легко понять, что метод очень похож на предыдущий. То есть, каждая из ячеек матрицы 1 должна умножаться на 12, чтобы в итоговой матрице каждая ячейка содержала значение, умноженное на этот коэффициент.
При этом важно указывать абсолютные ссылки на ячейки.
Итого, получится такая формула.
=A1*$E$3
Дальше методика аналогична предыдущей. Нужно это значение растянуть на необходимое количество ячеек.
Предположим, что необходимо перемножить матрицы между собой. Но есть лишь одно условие, при котором это возможно. Надо, чтобы количество столбцов и строк у двух диапазонов было зеркально одинаковое. То есть, сколько столбцов, столько и строк.
Чтобы было более удобно, нами выделен диапазон с результирующей матрицей. Надо переместить курсор на ячейку в верхнем левом углу и ввести такую формулу =МУМНОЖ(А9:С13;Е9:H11). Не стоит забыть нажать Ctrl + Shift + Enter.
Обратная матрица
Если наш диапазон имеет квадратную форму (то есть, количество ячеек по горизонтали и вертикали одинаковое), то тогда получится найти обратную матрицу, если в этом есть такая необходимость. Ее величина будет аналогичной исходной. Для этого используется функция МОБР.
Для начала следует выделить первую ячейку матрицы, в какую будет вставляться обратная. Туда вводится формула =МОБР(A1:A4). В аргументе указывается диапазон, для какого нам надо создать обратную матрицу. Осталось только нажать Ctrl + Shift + Enter, и готово.
Поиск определителя матрицы
Под определителем подразумевается число, находящееся матрицы квадратной формы. Чтобы осуществить поиск определителя матрицы, существует функция – МОПРЕД.
Для начала ставится курсор в какой-угодно ячейке. Далее мы вводим =МОПРЕД(A1:D4)
Несколько примеров
Давайте для наглядности рассмотрим некоторые примеры операций, которые можно осуществлять с матрицами в Excel.
Умножение и деление
Метод 1
Предположим, у нас есть матрица A, имеющая три ячейки в высоту и четыре – в ширину. Также есть число k, которое записывается в другой ячейке. После выполнения операции умножения матрицы на число появится диапазон значений, имеющий аналогичные размеры, но каждая ее часть умножается на k.
Диапазон B3:E5 – это исходная матрица, которая будет умножаться на число k, которое в свою очередь расположено в ячейке H4. Результирующая матрица будет находиться в диапазоне K3:N5. Исходная матрица будет называться A, а результирующая – B. Последняя образуется путем умножения матрицы А на число k.
Далее вводится =B3*$H$4 в ячейку K3, где В3 — элемент A11 матрицы А.
Не стоит забывать о том, ячейку H4, где указано число k необходимо вводить в формулу с помощью абсолютной ссылки. Иначе значение будет изменяться при копировании массива, и результирующая матрица потеряет работоспособность.
Далее маркер автозаполнения (тот самый квадратик в правом нижнем углу) используется для того, чтобы скопировать значение, полученное в ячейке K3, во все другие ячейки этого диапазона.
Вот у нас и получилось умножить матрицу A на определенное число и получить на выходе матрицу B.
Деление осуществляется аналогичным образом. Только вводить нужно формулу деления. В нашем случае это =B3/$H$4.
Метод 2
Итак, основное отличие этого метода в том, в качетве результата выдается массив данных, поэтому нужно применить формулу массива, чтобы заполнить весь набор ячеек.
Необходимо выделить результирующий диапазон, ввести знак равно (=), выделить набор ячеек, с соответствующими первой матрице размерами, нажать на звездочку. Далее выделяем ячейку с числом k. Ну и чтобы подтвердить свои действия, надо нажать на вышеуказанную комбинацию клавиш. Ура, весь диапазон заполняется.
Деление осуществляется аналогичным образом, только знак * нужно заменить на /.
Сложение и вычитание
Давайте опишем несколько практических примеров использования методов сложения и вычитания на практике.
Метод 1
Не стоит забывать, что возможно сложение лишь тех матриц, размеры которых одинаковые. В результирующем диапазоне все ячейки заполняются значением, являющим собой сумму аналогичных ячеек исходных матриц.
Предположим, у нас есть две матрицы, имеющие размеры 3х4. Чтобы вычислить сумму, следет в ячейку N3 вставить такую формулу:
=B3+H3
Тут каждый элемент являет собой первую ячейку матриц, которые мы собрались складывать. Важно, чтобы ссылки были относительными, поскольку если использовать абсолютные, не будут отображаться правильные данные.
Далее, аналогично умножению, с помощью маркера автозаполнения распространяем формулу на все ячейки результирующей матрицы.
Вычитание осуществляется аналогично, за тем лишь исключением, что используется знак вычитания (-), а не сложения.
Метод 2
Аналогично методу сложения и вычитание двух матриц, этот способ подразумевает использование формулы массива. Следовательно, в качестве ее результата будет выдаваться сразу набор значений. Поэтому нельзя редактировать или удалять какие-то элементы.
Сперва надо выделить диапазон, отделенный под результирующую матрицу, а потом нажать на «=». Затем надо указать первый параметр формулы в виде диапазона матрицы А, нажать на знак + и записать второй параметр в виде диапазона, соответствующему матрице B. Подтверждаем свои действия нажатием комбинации Ctrl + Shift + Enter. Все, теперь вся результирующая матрица заполнена значениями.
Пример транспонирования матрицы
Допустим, нам надо создать матрицу АТ из матрицы А, которая у нас есть изначально методом транспонирования. Последняя имеет, уже по традиции, размеры 3х4. Для этого будем использовать функцию =ТРАНСП().
Выделяем диапазон для ячеек матрицы АТ.
Для этого надо перейти на вкладку «Формулы», где выбрать опцию «Вставить функцию», там найти категорию «Ссылки и массивы» и найти функцию ТРАНСП. После этого свои действия подтверждаются кнопкой ОК.
Далее переходим в окно «Аргументы функции», где вводится диапазон B3:E5, который повторяет матрицу А. Далее надо нажать Shift + Ctrl, после чего кликнуть «ОК».
Важно. Нужно не лениться нажимать эти горячие клавиши, потому что в ином случае будет рассчитано только значение первой ячейки диапазона матрицы АТ.
В результате, у нас получается такая транспонированная таблица, которая изменяет свои значения вслед за исходной.
Поиск обратной матрицы
Предположим, у нас есть матрица А, которая имеет размеры 3х3 ячеек. Мы знаем, что для поиска обратной матрицы необходимо использовать функцию =МОБР().
Теперь опишем, как это делать на практике. Сначала необходимо выделить диапазон G3:I5 (там будет располагаться обратная матрица). Необходимо найти на вкладке «Формулы» пункт «Вставить функцию».
Откроется диалог «Вставка функции», где нужно выбрать категорию «Математические». И там в перечне будет функция МОБР. После того, как мы ее выберем, нужно нажать на клавишу ОК. Далее появляется диалоговое окно «Аргументы функции», в котором записываем диапазон B3:D5, который соответствует матрице А. Далее действия аналогичные транспонированию. Нужно нажать на комбинацию клавиш Shift + Ctrl и нажать ОК.
Выводы
Мы разобрали некоторые примеры, как можно работать с матрицами в Excel, а также описали теорию. Оказывается, что это не так страшно, как может показаться на первый взгляд, не так ли? Это только звучит непонятно, но на деле с матрицами среднестатистическому пользователю приходится иметь дело каждый день. Они могут использоваться почти для любой таблицы, где есть сравнительно небольшое количество данных. И теперь вы знаете, как можно себе упростить жизнь в работе с ними.
Оцените качество статьи. Нам важно ваше мнение:
A matrix in Excel does not have anything to do with Neo and Morphius, we’re just going to break that to you now. Instead, a matrix is an array of elements in a grouping of equal quantity rows and columns (e.g. a 3×3 cell data group). Matrices can be used to conduct complex calculations, and are super easy to create.
Let’s take a look at how to create and work with matrices in Excel. For all other information, see our FAQ section at the end of this article.
Table of Contents
- How to create a matrix in Excel
- How to calculate with matrices in Excel (Brute Force method)
- How to calculate with matrices in Excel (Built-In Array method)
- FAQs
- What is a matrix in Microsoft Excel?
- Why would I want to create a matrix in Microsoft Excel?
- What are the two main means of calculating using Microsoft Excel matrices?
- Which method of matrix calculation is better?
- Related Posts
- Open Microsoft Excel on your device and either open an existing project or start a new one.
- Input data into a rectangular group of cells, equal in column and row length (i.e. 3×3 or 1×1, etc.). Alternatively, highlight a pre-existing group of cells with data in them which conforms to this 1:1 ratio requirement
- This is your matrix, simple as that. From here, there are a few things you can do:
- Name your matrix by highlighting it (drag and click from the top-left cell to the bottom-right), and then inputting a name into the white box to the left of the formula options.
- Make your matrix clear and distinct by formatting it. Highlight it as shown above, then right-click inside the selection and choose ‘Format Cells’. Click the tab ‘Border’ and choose whichever kind of outline you like. Alternatively, you could achieve a similar effect by highlighting the cells with a colour of your choosing.
- Name your matrix by highlighting it (drag and click from the top-left cell to the bottom-right), and then inputting a name into the white box to the left of the formula options.
How to calculate with matrices in Excel (Brute Force method)
- Open the Microsoft Excel app and spreadsheet with your various matrices in it
- Now, to calculate (for example) the sum of two matrices using the Brute Force method, you want to select an empty cell anywhere on your spreadsheet, and input the sum formula =[MATRICE A CELL 1]+[MATRICE B CELL 1] (this may look, for example, like =A1+A6).
- Press Enter and your highlighted cell will now show the sum of the data entered into the first upper-left cells of your two matrices. To then apply this formula across both matrices, creating a third matrix containing the calculation, click and drag the small green square on the bottom-right corner of this recently calculated cell, and drag it to cover the same area as your other matrices (i.e. if calculating the sum of two 3×3 matrices, click and drag this box to cover also 3×3 cells)
- Let go of the click and drag and you’ll find the sum applied to the first cell of this third matrix now duplicated throughout all cells.
- You have now successfully calculated the sum of the data in two matrices, and contained the findings within a third, using the Brute Force method.
How to calculate with matrices in Excel (Built-In Array method)
- Open the Microsoft Excel app and spreadsheet with your various matrices in it
- Now, to calculate (for example) the subtraction of one matrix from another using the Built-In ArrayForce method, you want to click and drag to select an area equal to your other matrices (i.e. if your other two matrices are both 3×3, click and drag this box to also cover 3×3 cells).
- Next, type in your formula: to subtract Matrix A from Matrix B, for example (make sure you’ve named both matrices involved in the calculation), type =A-B
- Now, at this point do not press Enter. Doing so will give you a #VALUE! error. Instead, hit CTRL+SHIFT+ENTER. Your new matrix will populate with the findings from your calculation of subtraction.
- You have successfully calculated the subtraction of the data in two matrices, and contained the findings within a third, using the Built-In Array method.
And there you go. Not particularly easy to get your head around some of this terminology, but once you’ve spent a short while practicing we guarantee you’ll be a master matrix-er in no time. Happy Excelling! For any other information or queries, please see our FAQs below.
FAQs
What is a matrix in Microsoft Excel?
In Microsoft Excel, a matrix is actually called an ‘array’. Since arrays are arrays of elements in rows and columns (of equal quantity), used to show the placement of concepts along axes, a Microsoft Excel spreadsheet is, technically speaking, a matrix, or array, in and of itself.
However, when referring to matrices or arrays within Microsoft Excel, what we mean is any group of cells with data in them whose column and row quantity is equal (e.g. 3×3 cells). Any such grouping is called an array (or matrix), and can be formatted with color and/or a border for your own sake, in order to better differentiate matrices from each other.
You can name the matrices you create to make them easier to conduct calculations with later. To learn how to create and calculate with matrices, simply follow our step-by-step guides above.
Why would I want to create a matrix in Microsoft Excel?
Matrices, or arrays, are created often in Excel, given that they refer simply to any grouping of cells equal in column and row quantity (2×2, 1×1, 4×4, etc.). However, purposefully creating an array is most useful for then conducting calculations pertaining to that (and other) array(s).
Since you have all of the data you need to refer to contained within your matrices, you can quickly calculate large sums with that data simply by referencing the matrices themselves, rather than each individual cell. There are, however, two different means of calculating matrices, each with its own benefits.
What are the two main means of calculating using Microsoft Excel matrices?
You can calculate using the Brute Force method (inputting cell formulae manually and stretching it out to duplicate it across the area of a new matrix, creating, for example, a third matrix containing the summation of two other matrices).
Alternatively, you can use the Built-In Arrays method, whereby you create a new array with a calculation directly referencing (for example) two other arrays. The effect is the same as the Brute Force method, but arguably quicker and more concrete.
Which method of matrix calculation is better?
The answer to this really depends on your preferred method of working, as well as your intended outcome. If you are happy to work more manually, and don’t require matrices themselves to be included in your calculations, but only require the data within them to be calculated, then the Brute Force method is preferable.
However, if you require that your two or more matrices be directly referenced as a whole in your matrix calculations, then you shall have to use the Built-In Arrays method. Personally, we find that the built-in arrays method is neater, and guarantees with slightly greater surety the connection between various matrices.
Содержание
- Выполнение расчетов
- Расчет определителя
- Расчет обратной матрицы
- Вопросы и ответы
Приложение Excel выполняет целый ряд вычислений, связанных с матричными данными. Программа обрабатывает их, как диапазон ячеек, применяя к ним формулы массива. Одно из таких действий – это нахождение обратной матрицы. Давайте выясним, что представляет собой алгоритм данной процедуры.
Выполнение расчетов
Вычисление обратной матрицы в Excel возможно только в том случае, если первичная матрица является квадратной, то есть количество строк и столбцов в ней совпадает. Кроме того, её определитель не должен быть равен нулю. Для вычисления применяется функция массива МОБР. Давайте на простейшем примере рассмотрим подобное вычисление.
Расчет определителя
Прежде всего, вычислим определитель, чтобы понять, имеет первичный диапазон обратную матрицу или нет. Это значение рассчитывается при помощи функции МОПРЕД.
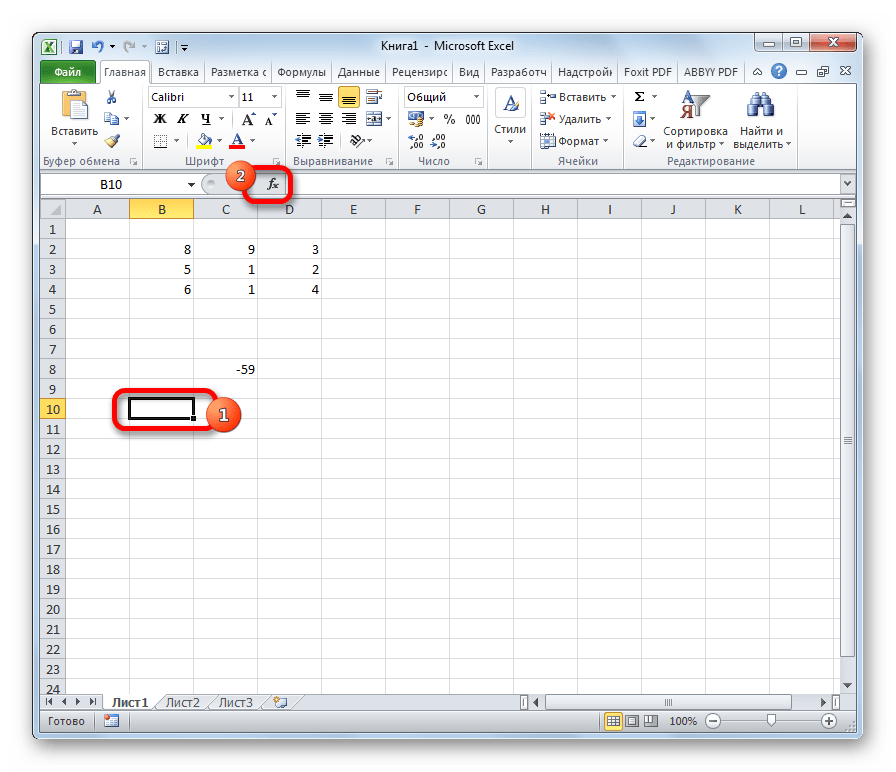
- Выделяем любую пустую ячейку на листе, куда будут выводиться результаты вычислений. Жмем на кнопку «Вставить функцию», размещенную около строки формул.
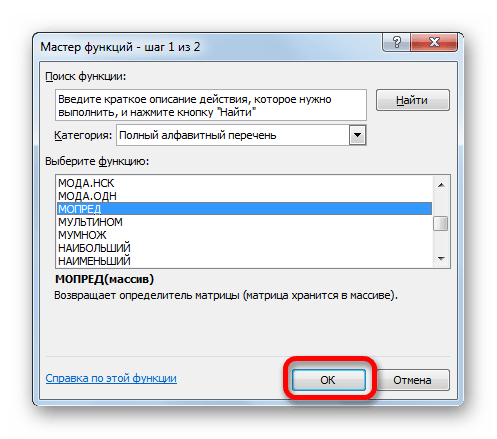
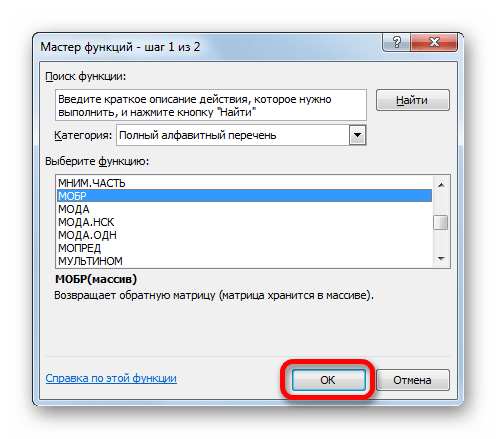
- Запускается Мастер функций. В перечне записей, который он представляет, ищем «МОПРЕД», выделяем этот элемент и жмем на кнопку «OK».
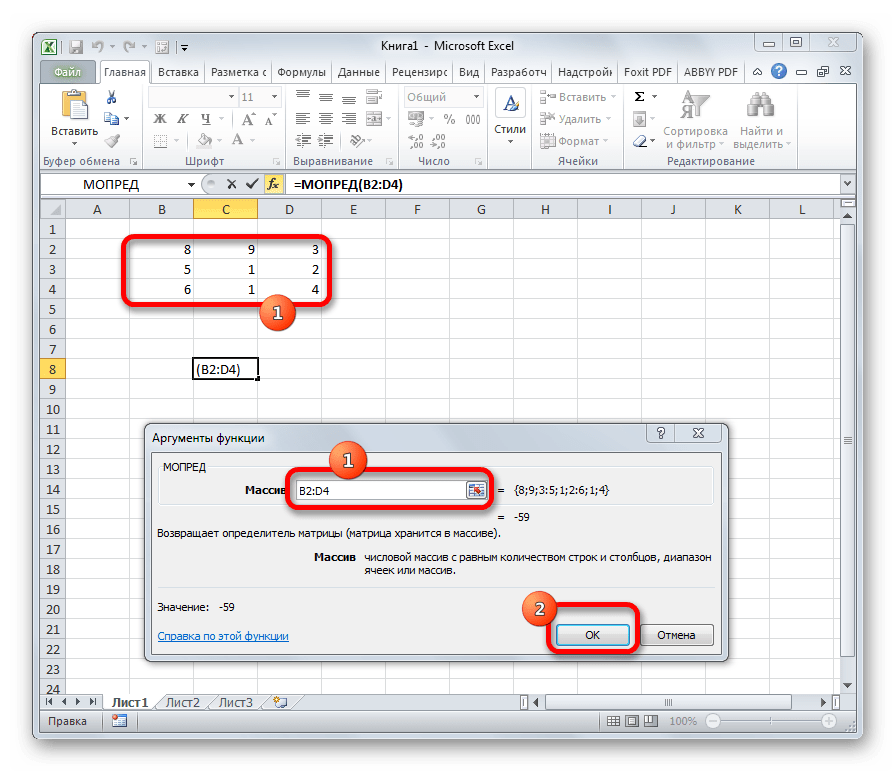
- Открывается окно аргументов. Ставим курсор в поле «Массив». Выделяем весь диапазон ячеек, в котором расположена матрица. После того, как его адрес появился в поле, жмем на кнопку «OK».
- Программа производит расчет определителя. Как видим, для нашего конкретного случая он равен – 59, то есть не тождественен нулю. Это позволяет сказать, что у данной матрицы существует обратная.
Расчет обратной матрицы
Теперь можно преступить к непосредственному расчету обратной матрицы.
- Выделяем ячейку, которая должна стать верхней левой ячейкой обратной матрицы. Переходим в Мастер функций, кликнув по значку слева от строки формул.
- В открывшемся списке выбираем функцию МОБР. Жмем на кнопку «OK».
- В поле «Массив», открывшегося окна аргументов функции, устанавливаем курсор. Выделяем весь первичный диапазон. После появления его адреса в поле, жмем на кнопку «OK».
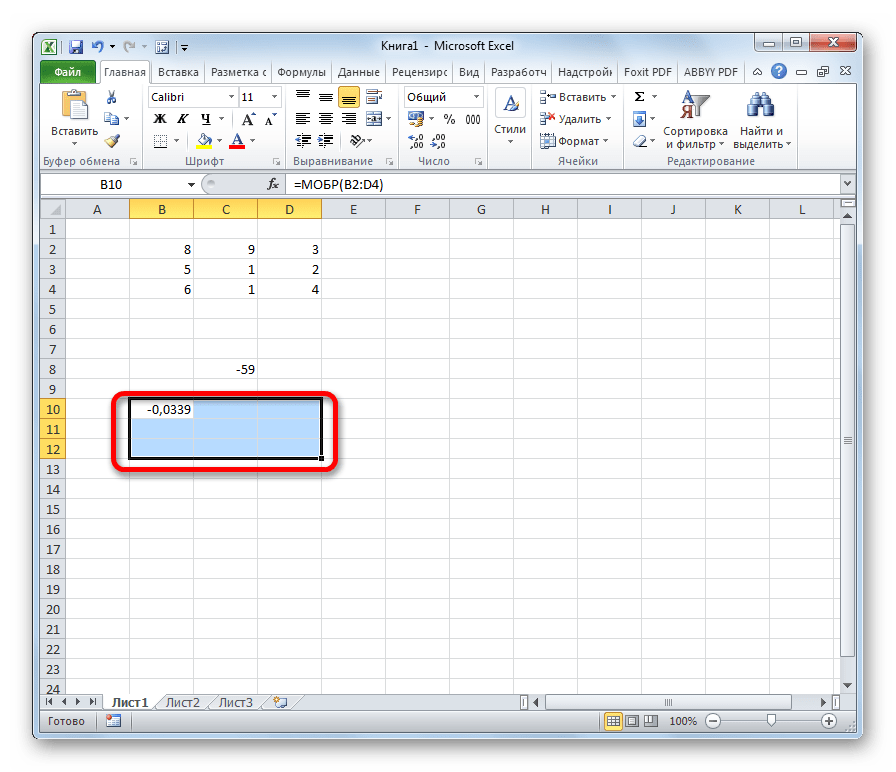
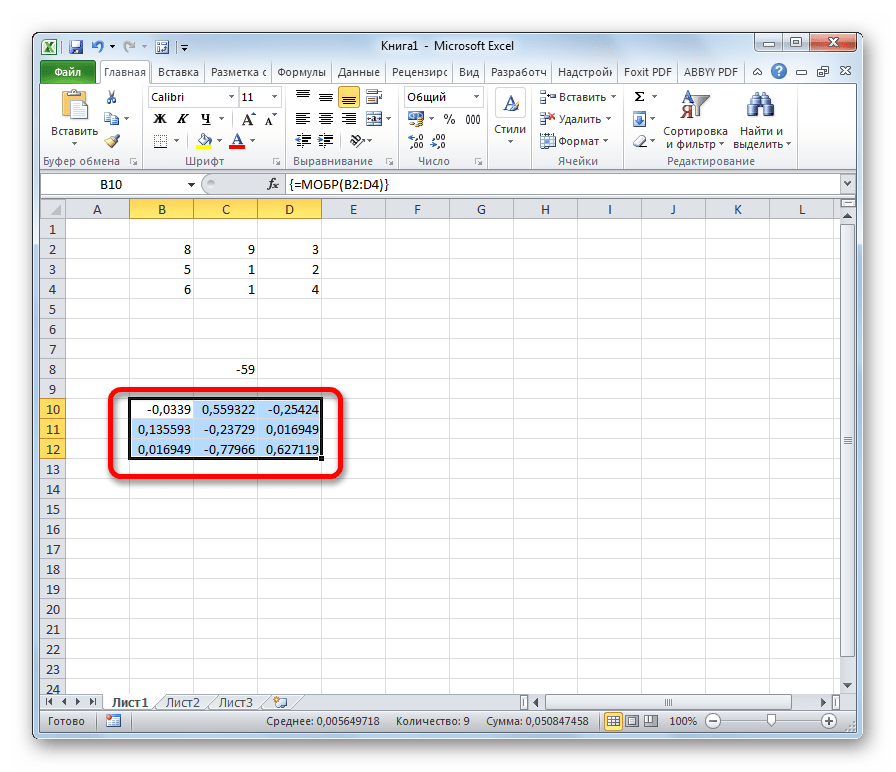
- Как видим, появилось значение только в одной ячейке, в которой была формула. Но нам нужна полноценная обратная функция, поэтому следует скопировать формулу в другие ячейки. Выделяем диапазон, равнозначный по горизонтали и вертикали исходному массиву данных. Жмем на функциональную клавишу F2, а затем набираем комбинацию Ctrl+Shift+Enter. Именно последняя комбинация предназначена для обработки массивов.
- Как видим, после этих действий обратная матрица вычислена в выделенных ячейках.
На этом расчет можно считать завершенным.
Если вы производите расчет определителя и обратной матрицы только при помощи ручки и бумаги, то над этим вычислением, в случае работы над сложным примером, можно ломать голову очень долго. Но, как видим, в программе Эксель данные вычисления производятся очень быстро, независимо от сложности поставленной задачи. Для человека, который знаком с алгоритмом подобных расчетов в этом приложении, все вычисление сводится к чисто механическим действиям.
Еще статьи по данной теме:

