
Write Tabular Data to Spreadsheet File
To export a table in the workspace to a Microsoft® Excel® spreadsheet file, use the writetable function. You can export data from the workspace to any worksheet in the file, and to any location within that worksheet. By default, writetable writes your table data to the first worksheet in the file, starting at cell A1.
For example, create a sample table of column-oriented data and display the first five rows.
load patients.mat
T = table(LastName,Age,Weight,Smoker);
T(1:5,:)
ans=5×4 table
      LastName      Age    Weight    Smoker
    ____________    ___    ______    ______

    {'Smith'   }    38      176      true
    {'Johnson' }    43      163      false
    {'Williams'}    38      131      false
    {'Jones'   }    40      133      false
    {'Brown'   }    49      119      false
Write table T to the first sheet in a new spreadsheet file named patientdata.xlsx, starting at cell D1. To specify the portion of the worksheet you want to write to, use the Range name-value pair argument. By default, writetable writes the table variable names as column headings in the spreadsheet file.
filename = 'patientdata.xlsx';
writetable(T,filename,'Sheet',1,'Range','D1')
Write the table T without the variable names to a new sheet called 'MyNewSheet'. To write the data without the variable names, specify the name-value pair WriteVariableNames as false.
writetable(T,filename,'Sheet','MyNewSheet','WriteVariableNames',false);
Write Numeric and Text Data to Spreadsheet File
To export a numeric array and a cell array to a Microsoft®
Excel® spreadsheet file, use the writematrix or
writecell functions. You can export data in individual
numeric and text workspace variables to any worksheet in the file, and to any
location within that worksheet. By default, the import functions write your
matrix data to the first worksheet in the file, starting at cell
A1.
For example, create a sample array of numeric data, A,
and a sample cell array of text and numeric data,
C.
A = magic(5)
C = {'Time', 'Temp'; 12 98; 13 'x'; 14 97}
A =

    17    24     1     8    15
    23     5     7    14    16
     4     6    13    20    22
    10    12    19    21     3
    11    18    25     2     9


C =

    'Time'    'Temp'
    [  12]    [  98]
    [  13]    'x'
    [  14]    [  97]
Write array A to the 5-by-5 rectangular region,
E1:I5, on the first sheet in a new spreadsheet file
named testdata.xlsx.
filename = 'testdata.xlsx';
writematrix(A,filename,'Sheet',1,'Range','E1:I5')
Write cell array C to a rectangular region that starts
at cell B2 on a worksheet named
Temperatures. You can specify range using only the
first cell.
writecell(C,filename,'Sheet','Temperatures','Range','B2');
writecell displays a warning because the worksheet,
Temperatures, did not previously exist, but you can
disable this warning.
Disable Warning When Adding New Worksheet
If the target worksheet does not exist in the file, then the
writetable and writecell functions display
this warning:
Warning: Added specified worksheet.
For information on how to suppress warning messages, see Suppress Warnings.
Format Cells in Excel Files
To write data to Excel files on Windows® systems with custom formats (such as fonts or colors), access the COM
server directly using actxserver rather than
writetable, writetimetable,
writematrix, or writecell. For example,
Technical Solution 1-QLD4K uses actxserver to
establish a connection between MATLAB® and Excel, write data to a worksheet, and specify the colors of the
cells.
For more information, see Get Started with COM.
See Also
writematrix | writecell | writetable
Запись табличных данных в файл электронной таблицы
Чтобы экспортировать таблицу в рабочей области в файл электронной таблицы Microsoft® Excel®, используйте writetable функция. Можно экспортировать данные из рабочей области в любой лист в файле и в любое место на этом листе. По умолчанию, writetable пишут ваши табличные данные в первый рабочий лист в файле, запускающемся в ячейке A1.
Например, составьте демонстрационную таблицу данных в столбцах и отобразите первые пять строк.
load patients.mat
T = table(LastName,Age,Weight,Smoker);
T(1:5,:)
ans=5×4 table
      LastName      Age    Weight    Smoker
    ____________    ___    ______    ______

    {'Smith'   }    38      176      true
    {'Johnson' }    43      163      false
    {'Williams'}    38      131      false
    {'Jones'   }    40      133      false
    {'Brown'   }    49      119      false
Запишите таблицу T к первому листу в новом файле электронной таблицы под названием patientdata.xlsx, запуск в ячейке D1. Чтобы задать фрагмент рабочего листа, вы хотите записать в, использовать Range аргумент пары «имя-значение». По умолчанию, writetable написал имена табличной переменной как заголовки столбцов в файле электронной таблицы.
filename = 'patientdata.xlsx';
writetable(T,filename,'Sheet',1,'Range','D1')
Запишите таблицу T без имен переменных к новому листу под названием 'MyNewSheet'. Чтобы записать данные без имен переменных, задайте пару «имя-значение» WriteVariableNames как false.
writetable(T,filename,'Sheet','MyNewSheet','WriteVariableNames',false);
Запись числовой и текстовые данные к файлу электронной таблицы
Экспортировать числовой массив и массив ячеек к Microsoft® Excel® файл электронной таблицы, используйте writematrix или writecell функции. Можно экспортировать данные в числовом индивидууме и текстовые переменные рабочей области к любому рабочему листу в файле, и к любому местоположению в рамках того рабочего листа. По умолчанию функции импорта пишут ваши матричные данные в первый рабочий лист в файле, запускающемся в ячейке A1.
Например, создайте демонстрационный массив числовых данных, A, и демонстрационный массив ячеек текста и числовых данных, C.
A = magic(5)
C = {'Time', 'Temp'; 12 98; 13 'x'; 14 97}
A =

    17    24     1     8    15
    23     5     7    14    16
     4     6    13    20    22
    10    12    19    21     3
    11    18    25     2     9


C =

    'Time'    'Temp'
    [  12]    [  98]
    [  13]    'x'
    [  14]    [  97]
Запишите массиву A в прямоугольную область 5 на 5, E1:I5, на первом листе в новом файле электронной таблицы под названием testdata.xlsx.
filename = 'testdata.xlsx';
writematrix(A,filename,'Sheet',1,'Range','E1:I5')
Запишите массиву ячеек C в прямоугольную область, которая запускается в ячейке B2 на рабочем листе под названием TemperaturesДиапазон можно задать, используя только первую ячейку.
writecell(C,filename,'Sheet','Temperatures','Range','B2');
writecell выводит предупреждение потому что рабочий лист, Temperatures, ранее не существовал, но можно отключить это предупреждение.
Отключение предупреждения при добавлении нового рабочего листа
Если целевой рабочий лист не существует в файле, то writetable и writecell функции выводят это предупреждение:
Warning: Added specified worksheet.
Для получения информации о том, как подавить предупреждающие сообщения, смотрите, Отключают предупреждения.
Ячейки формата в Excel Files
Записывать данные к файлам Excel на Windows® системы с пользовательскими форматами (такими как шрифты или цвета), получите доступ к серверу COM непосредственно с помощью actxserver вместо writetable, writetimetable, writematrix, или writecell. Например, Техническое решение 1-QLD4K использует actxserver установить связь между MATLAB® и Excel, запишите данные к рабочему листу и задайте цвета ячеек.
Для получения дополнительной информации смотрите Начало работы с COM.
Смотрите также
writematrix | writecell | writetable
MATLAB provides options to write a table, array, or matrix to Microsoft Excel spreadsheets. The function available to do so is the writetable () function. The general syntax for this function is:
Syntax:
writetable(<data>, <filename>, <optional_values>)
Now, in the following sections, we shall see how to write a table, an array, and a matrix into a spreadsheet.
Writing a Table to Excel Spreadsheet:
Firstly, we shall create a table and then write the same to an excel spreadsheet with the help of writetable function.
Example 1:
Matlab
tab = magic(5);
tab = array2table(tab,"VariableNames",
["R1" "R2" "R3" "R4" "R5"]);
disp(tab)
writetable(tab,'new.xls','FileType','spreadsheet')
The output of the above code will create a new excel sheet in the current folder.

In the above code, we create a table from magic with the variable names or table headers passed as a vector. Then, in the writetable function, we pass the table, and the file name to be used (if present then, it’ll overwrite the data. If not, then it will create a new file and then, it’ll create a new file). The next argument is a field type that decides the file type and the argument following it is the value for the same field; spreadsheet in this case.
Writing a Matrix to Excel Spreadsheet
In the above section, we discussed how to add a table to an excel sheet. In this section, we shall explore the writetable further by adding a matrix at specified cells in a spreadsheet. Let us see the same with the help of an example.
To write numeric data into an excel sheet, we need can use the writetable function. We have to use another function, the writematrix function.
writematrix(<data>, <filename>, <optional_values>)
The syntax is the same as the writetable just the datatype changes to double, float, or int.
Example 2:
Matlab
tab = magic(5);
writematrix(tab,'new.xls','Sheet',2,'Range','C1')
Output:
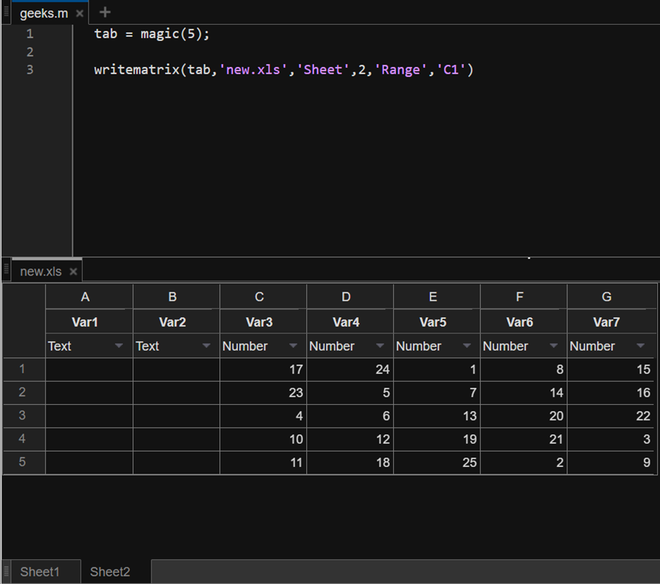
In this code, we write the magic square matrix to an excel spreadsheet named new.xls. The following arguments define the sheet number and the starting cell where we want to write our matrix-formed data.
Writing a cell array (array of multiple data types) to an excel spreadsheet
To write an array with both numeric and text data, we use the writecell() function. The syntax of the same is similar to writematrix and writetable however, the data type then changes to a cell array.
writecell(<data>, <filename>, <optional_values>)
In the following example, we will write a cell array to a new sheet in our new.xls spreadsheet.
Example 3:
Matlab
arr = {'cell', 'array'; 1, 2; 23, 31};
writecell(arr,'new.xls','Sheet',3,'Range','C1:E2')
Output:
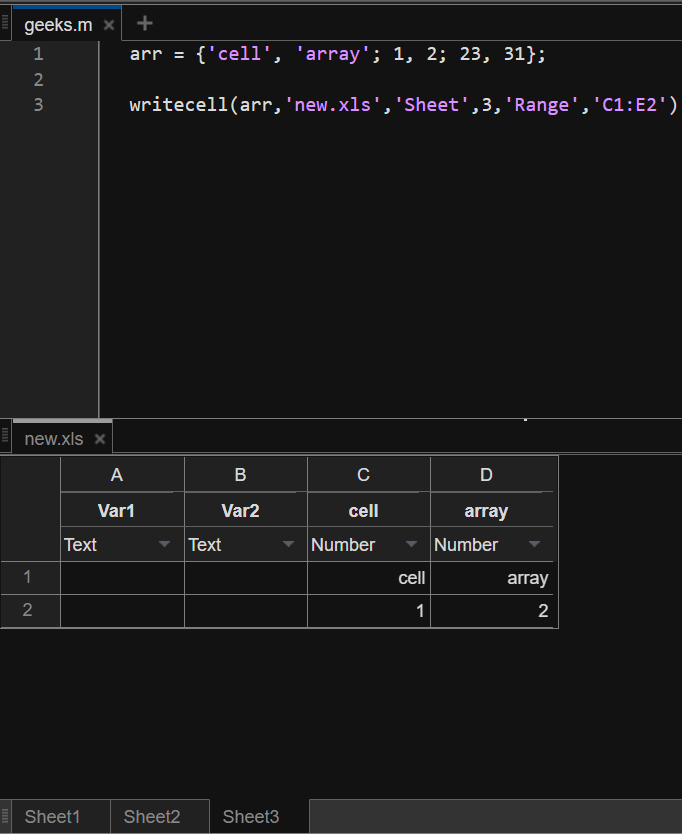
In this code, we are writing a 3×3 cell array to the spreadsheet in sheet 3 from a range of cells C1 to E2, this means that only as many elements as are specified in the range C1:E2.
- Export Data to Excel File Using the
writematrix()Function in MATLAB - Export Data to Excel File Using the
writecell()Function in MATLAB - Export Data to Excel File Using the
writetable()Function in MATLAB

This tutorial will discuss exporting data to an excel file using the writematrix(), writetable(), and writecell() function in MATLAB.
Export Data to Excel File Using the writematrix() Function in MATLAB
The writematrix() function is used to write a matrix to a file. If the data we want to export is saved in a matrix, we can use the writematrix() function.
The writematrix() function has three syntaxes shown below:
writematrix(data)
writematrix(data,file_name)
writematrix(___,Property_Name,Property_Value)
The first syntax will write the given matrix to a text file with the .txt extension and use a comma as the delimiter to separate the elements in a row. The writematrix() function will use the name of the matrix variable as the name of the output file, and if the function cannot use the matrix name, it will use the matrix.txt name as the name of the file.
Each input matrix row will become a row in the output file. If the file name already exists, the function will overwrite the data, meaning the previous data will be lost and replaced with the new data.
The second syntax is used to set the file name and its extension. We can give any name to the output file.
We can use the .txt, .dat, and .csv file extensions to save data in a text file where we can add delimiters. We can use the .xls, .xlsm, and .xlsx file extension to save data in spreadsheets of an Excel file.
We can use the .xlsb file extension to save data in an Excel spreadsheet only if the system supports the file format. For example, let us write a matrix to a spreadsheet file.
See the code below.
clc
clear

X = magic(3)
writematrix(X,'X.xls')
The last syntax changes the properties of the writematrix() function using the property name and value.
We can use the FileType property to set the file type to text or spreadsheet. We can use the DateLocale property to set the locales used to write dates.
The DateLocale property is useful when the input matrix contains DateTime values, and we can use it to specify the format of the date in which it will be stored in the file. Check this link to see all the formats supported by the locale that we can use to store the date values.
We can use the WriteMode property to set the data writing mode. In the case of text files, we can change the write mode from overwrite, the default mode, to append, which will append the new data to the previously stored data in the file.
In the case of excel files, the default mode is set to inplace, which will replace the data in the new data range. For example, if the new data have five rows and 5 columns, then only the 5 rows and 5 columns of the file will be replaced, and the rest of the data will remain the same.
We can use overwritesheet mode, which will clear the specified sheet and write new data to the sheet, and if we don’t specify the sheet, the first sheet will be used. We can use the append mode, which will append the new data at the end of the specified sheet, and if we don’t specify the sheet number, the first sheet will be used.
We can use the replacefile mode, which deletes all the previous sheets and writes new data to the specified sheet, and if we do not specify a sheet, the first sheet will be used. We can use the Delimiter property to set the delimiter, which is set to a comma to space for the space delimiter, tab for the tab delimiter, ; for the semicolon, and | for the vertical bar.
We can use the QuoteStrings property to set the indicator used to write quoted text in the file. The value of this property can be minimal, all, and none.
The minimal value is the default value and will enclose the variables containing the double quotation marks, delimiters, and line endings with double quotation marks. The all value will enclose all date, categorical, and text data with double quotes.
The none value will not enclose any variable. We can use the Encoding property to change the scheme used to encode characters, which is set to UTF-8 by default.
We can set the Encoding property to ISO-8859-1, windows-1251, and windows-1252. We can use the Sheet property to specify the sheet number or name we want to use to write data, and it can be a character vector or positive integer.
We can use the Range property to set the range of the spreadsheets we want to use to write new data. The range can be a single sheet that will specify the starting point, and it can also be a range like a form sheet 5 to sheet 10.
We can use the UseExcel property to set the starting of Excel software when we write data to an Excel file. By default, the property is set to false, which means the Excel software will not start, but we can also set it to true, which will start the Excel software.
For example, let’s repeat the above example and change some properties mentioned above. See the code below.
clc
clear

X = magic(3)
writematrix(X,'X.xls','Sheet',3)
m = readmatrix('X.xls','Sheet',3)
Output:
X =

     8     1     6
     3     5     7
     4     9     2


m =

     8     1     6
     3     5     7
     4     9     2
In the above code, X is the input matrix, and m is the matrix saved in the Excel file. We can also set other properties in the same way we change the properties in the above code.
Check this link for more details about the writematrix() function.
Export Data to Excel File Using the writecell() Function in MATLAB
The writecell() function is used to write a cell to a file. If the data we want to export is saved in a cell, we can use the writecell() function.
writecell() is the same as the writematrix() function. The only difference is that the input of the writecell() function is a cell, and the input of the writematrix() function is a matrix.
The properties of these functions that we can change are also the same.
For example, let’s create a cell and write it to an excel file. See the code below.
clc
clear

X = {1,2,3}
writecell(X,'Y.xls')
c = readcell('Y.xls')
Output:
X =

  1×3 cell array

    {[1]}    {[2]}    {[3]}


c =

  1×3 cell array

    {[1]}    {[2]}    {[3]}
In the above output, X is the input cell, and c is the cell we imported from the saved file. Check this link for more details about the writecell() function.
Export Data to Excel File Using the writetable() Function in MATLAB
The writetable() function is used to write a table to a file. If the data we want to export is saved in a table, we can use the writetable() function.
The writetable() function is also the same as the writematrix() function; the only difference is that the input of the writetable() function is a table, and the input of the writematrix() function is a matrix. The writetable() function has some additional properties that we can change.
We can use the WriteRowNames property to set the indicator for writing the names of the rows in the output file.
By default, the WriteRowNames property is set to false, meaning the table’s row names will not be included in the output file, but we can set it to true if we want to write row names to the output file. We can use the WriteVariableNames to set the indicator used to write the name of the column headings of the table to the output file.
By default, the WriteVariableNames property is set to false, which means the table’s column headings will not be included in the output file, but we can set it to true if we want to write column headings to the output file. For example, let’s create a table and write it into an Excel file.
See the code below.
clc
clear

Z = table([1;5],[10;15])
writetable(Z,'Z.xls')
m = readtable('Z.xls')
Output:
Z =

  2×2 table

    Var1    Var2
    ____    ____

     1       10
     5       15


m =

  2×2 table

    Var1    Var2
    ____    ____

     1       10
     5       15
In the above output, Z is the input table, and m is the table we imported from the saved file. Check this link for more details about the writetable() function.
I am trying to export a table from Matlab to Excel with the names of the rows. Here is a (very) simplified version of my table:
T = table(1,5,2);
T.Properties.RowNames = {'Number'}

T =

          Var1    Var2    Var3
          ____    ____    ____

Number    1       5       2
If I apply Matlab’s instructions for exporting a table:
filename = 'data.xlsx';
writetable(T,filename,'Sheet',1,'Range','D1')
it leaves out my row name «Number» and only exports the variables:
Var1    Var2    Var3
____    ____    ____

1       5       2
Is there a way to export a table including row names from Matlab?
asked Jan 24, 2016 at 4:02
![]()
Arthur TarasovArthur Tarasov
3,4619 gold badges44 silver badges57 bronze badges
You need to use the WriteRowNames optional input
writetable(T,filename,'Sheet',1,'Range','D1','WriteRowNames',true)
answered Jan 24, 2016 at 4:11
![]()
Phil GoddardPhil Goddard
10.5k1 gold badge16 silver badges28 bronze badges