
Как matlaims импорт / экспорт данных в Excel
Как мощный научный инструмент, MATLAB может потребоваться расчет экспорта данных в Excel при сохранении использования или простые данные во время использования, или просто импортировали данные в MATLAB для обработки чертежей. Сегодня я буду обобщать вышеописанную операцию сегодня, в основном используется в MATLAB.xlsreadиxlswriteфункция.
информация о программном обеспечении
- MATLAB 2018a
- Excel 2016
- среда Система Win10 64-разрядный
- Исходные данные **. ** Mat файл (wg_mode_neff_sweep_slab.mat)
импорт данных .mat
-
Во-первых имитируют файл MAT сгенерированный другим программным обеспечением в среде MATLAB до данных, передаваемых с Excel
-
Импорт в MATLAB
.matФайлы могут быть использованы непосредственно в командной строкеНАГРУЗКА (путь и имя файла)Функция импортируется, то здесь я использовать путь по умолчанию, введите имя файла для импорта -
load('wg_mode_neff_sweep_slab.mat')После импорта данных, вы можете увидеть текущий файл в рабочей области в рабочей области, здесь мы сначала попытаться импортthick_Si_list

-
Это наблюдается непосредственно в Matlab, можно увидеть столбец значение 41 * 1, а затем мы выводим его в файл Excel.
-

Запись данных в Excel
-
xlswriteФункция является функцией внутреннего MATLAB для записи в Excel, а именно:
-
xlswrite(filename,A) xlswrite(filename,A,sheet) xlswrite(filename,A,xlRange) xlswrite(filename,A,sheet,xlRange) -
вfilenameПуть и имя для цели Excel (Автоматически создавать, когда этот файл не существует)
-
AДля данных, которые вы хотите написать, то данные будут записаны непосредственно в ячейку A1 в sheet1 в Excel по умолчанию.
-
sheetиxlrangeВы можете удовлетворить потребности вас в дальнейшем выбрать рабочие листы записи и местоположение (например, E4: E60 блок в Лист2)
-
Здесь мы пишем целевые данные в Excel имя формы «DEMO.XLS» в папке рабочего стола Test, код выглядит следующим образом
-
xlswrite('C:UserssobermanDesktoptestdemo.xlsx',thick_Si_list) -
Обратите внимание, что в низкой версии суффикс Excel являетсяxls
-
На данный момент, вы увидите, что данные были записаны в Лист1.
-
-
Кроме того, написать другой набор ординат данных в В1: E41
-
xlswrite('C:UserssobermanDesktoptestdemo.xlsx',neff_slab,'sheet1','B1:E41') -
Результат, как показано
*
-


Данные пользователя EXCEL
-
xlsreadЭта функция используется для считывания данных в Excel в MATLAB, а формат функция:
-
num = xlsread(filename) num = xlsread(filename,sheet) num = xlsread(filename,xlRange) num = xlsread(filename,sheet,xlRange) num = xlsread(filename,sheet,xlRange,'basic') [num,txt,raw] = xlsread(filename,-1) -
filenameЧитайте файлы для цели, чтения sheet1 по умолчанию, можно передатьsheetиxlRangeОграниченные конкретные рабочие листы и диапазон ячеек, версия для Windows из Excel будет автоматическиbasicЗапуск в режиме, можно вообще игнорировать
-
[num,txt,raw]Вы можете разделить в зависимости от типа данных в форме, текст, цифровой текст смешиваться только система Windows, поддерживает использование
-
-
Пример: Импорт Лист2 данных в демонстрационном файле
-
параметры цели
*
-
Код:
-
[demo,txt]=xlsread('C:UserssobermanDesktoptestdemo.xlsx','sheet2','A1:B3') -
результат
-
-
Примечание: Не используйте код Demo = XlsRead (…) для описанного выше условия, только импорт значения, нет импорта символов
-


Write Tabular Data to Spreadsheet File
To export a table in the workspace to a Microsoft® Excel® spreadsheet file, use the writetable function. You can export data from the workspace to any worksheet in the file, and to any location within that worksheet. By default, writetable writes your table data to the first worksheet in the file, starting at cell A1.
For example, create a sample table of column-oriented data and display the first five rows.
load patients.mat
T = table(LastName,Age,Weight,Smoker);
T(1:5,:)
ans=5×4 table
      LastName      Age    Weight    Smoker
    ____________    ___    ______    ______

    {'Smith'   }    38      176      true
    {'Johnson' }    43      163      false
    {'Williams'}    38      131      false
    {'Jones'   }    40      133      false
    {'Brown'   }    49      119      false
Write table T to the first sheet in a new spreadsheet file named patientdata.xlsx, starting at cell D1. To specify the portion of the worksheet you want to write to, use the Range name-value pair argument. By default, writetable writes the table variable names as column headings in the spreadsheet file.
filename = 'patientdata.xlsx';
writetable(T,filename,'Sheet',1,'Range','D1')
Write the table T without the variable names to a new sheet called 'MyNewSheet'. To write the data without the variable names, specify the name-value pair WriteVariableNames as false.
writetable(T,filename,'Sheet','MyNewSheet','WriteVariableNames',false);
Write Numeric and Text Data to Spreadsheet File
To export a numeric array and a cell array to a Microsoft®
Excel® spreadsheet file, use the writematrix or
writecell functions. You can export data in individual
numeric and text workspace variables to any worksheet in the file, and to any
location within that worksheet. By default, the import functions write your
matrix data to the first worksheet in the file, starting at cell
A1.
For example, create a sample array of numeric data, A,
and a sample cell array of text and numeric data,
C.
A = magic(5)
C = {'Time', 'Temp'; 12 98; 13 'x'; 14 97}
A =

    17    24     1     8    15
    23     5     7    14    16
     4     6    13    20    22
    10    12    19    21     3
    11    18    25     2     9


C =

    'Time'    'Temp'
    [  12]    [  98]
    [  13]    'x'
    [  14]    [  97]
Write array A to the 5-by-5 rectangular region,
E1:I5, on the first sheet in a new spreadsheet file
named testdata.xlsx.
filename = 'testdata.xlsx';
writematrix(A,filename,'Sheet',1,'Range','E1:I5')
Write cell array C to a rectangular region that starts
at cell B2 on a worksheet named
Temperatures. You can specify range using only the
first cell.
writecell(C,filename,'Sheet','Temperatures','Range','B2');
writecell displays a warning because the worksheet,
Temperatures, did not previously exist, but you can
disable this warning.
Disable Warning When Adding New Worksheet
If the target worksheet does not exist in the file, then the
writetable and writecell functions display
this warning:
Warning: Added specified worksheet.
For information on how to suppress warning messages, see Suppress Warnings.
Format Cells in Excel Files
To write data to Excel files on Windows® systems with custom formats (such as fonts or colors), access the COM
server directly using actxserver rather than
writetable, writetimetable,
writematrix, or writecell. For example,
Technical Solution 1-QLD4K uses actxserver to
establish a connection between MATLAB® and Excel, write data to a worksheet, and specify the colors of the
cells.
For more information, see Get Started with COM.
See Also
writematrix | writecell | writetable

How to Convert MAT to XLS with Stat/Transfer
MAT files are actually binary data files created and used by MatLAB applications. This type of file usually contains arrays, functions, variables, expressions, and other mathematical data. XLS is one of the filename extensions used for Excel spreadsheets. XLS files are commonly used for the older version of Microsoft Excel (as the newer versions apply XLSX) and they contain data arranged in rows and columns. Converting MAT files to XLS spreadsheets can be useful if you want to quickly export data from your MatLAB as a format supported by multiple applications (compared to MAT files that are mainly used by MatLAB).
I will demonstrate the conversion process using Stat/Transfer 1.0 (Shareware $295) by Circle Systems, Inc., because it is one of the few methods you can turn MAT files into XLS without having to deal with MatLAB. It is also very easy to use as you will see from the following guide.
Tutorial assets
You will need to download the following software to keep up with this tutorial.
The trial version of this application comes with a limitation: approximately sixteen cases will be deleted from your output file. A message box will warn you about this and the border at the top of the Stat/Transfer window will say «Trial Mode».
Here are the simple steps you will need to complete in order to convert your files
Step 1
Select MatLAB as the input file type.
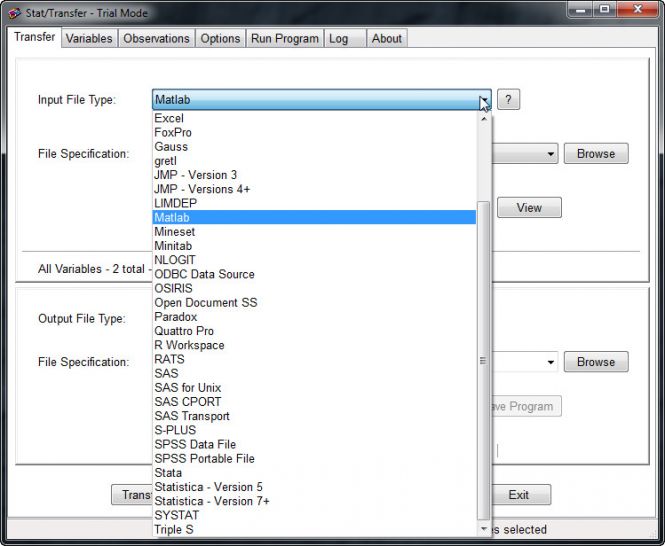 Select MatLab as the Input Format
Step 2
Load your MAT file by clicking on the «Browse» button.
Step 3
Choose «Excel ’97-2003» as the output file type.
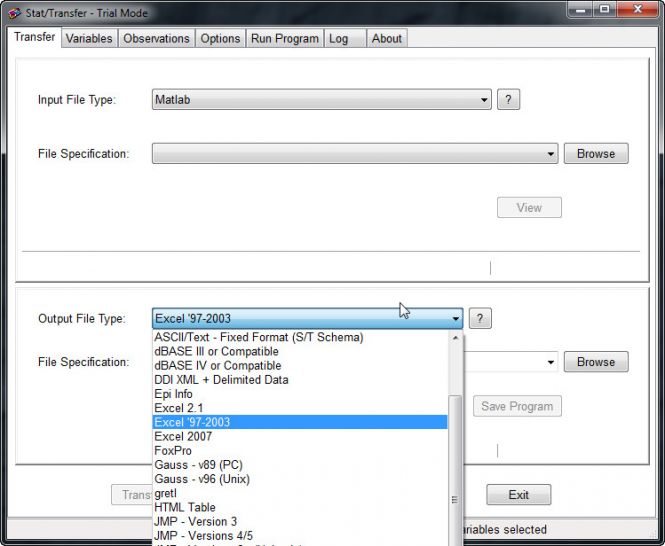 Output Format Selection
Step 4
Change the output location by pressing the «Browse» button.
Step 5
Click on the «Transfer» button to start the conversion.
Extras
a. Select which columns you want to convert to XLS from your MAT file by clicking on the «Variables» tab.
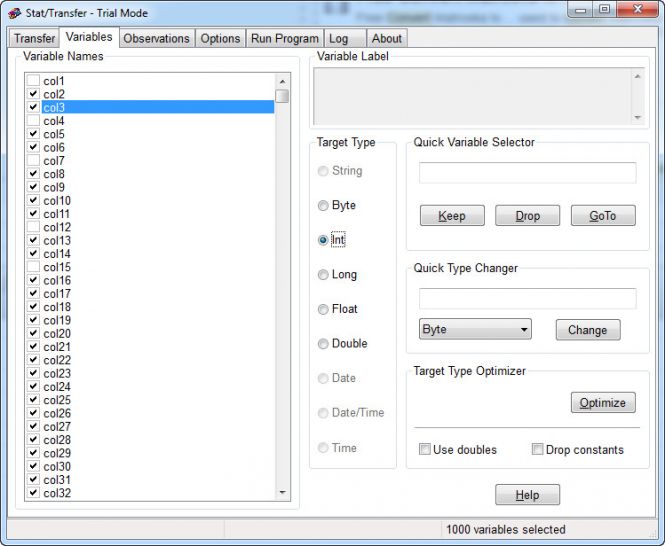 Variables Tab
b. Customize the output file by clicking on the «Options» tab and modifying any desired entry (see the image).
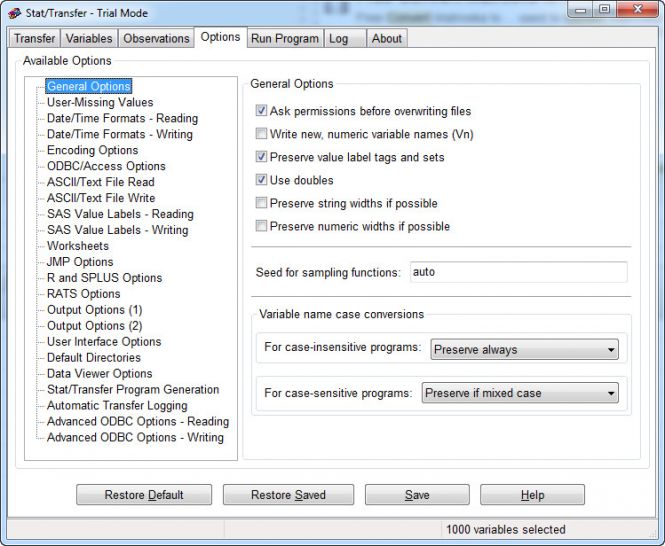 Options Window
Conclusion
As you can see, turning MatLAB MAT files into Excel XLS spreadsheets with Stat/Transfer is a pretty simple process (as long as you don’t have to modify any parameters). The only other way to perform the conversion task (at least, the only one that I’ve found) is by using MatLAB applications and the xlswrite command. I believe that the presented method is much easier and cheaper than the alternative.
- Easy to use
- Support for large number of formats
- Lots of output customization options
- A bit expensive ($295)
Alternative downloads
- Export Data to Excel File Using the
writematrix()Function in MATLAB - Export Data to Excel File Using the
writecell()Function in MATLAB - Export Data to Excel File Using the
writetable()Function in MATLAB

This tutorial will discuss exporting data to an excel file using the writematrix(), writetable(), and writecell() function in MATLAB.
Export Data to Excel File Using the writematrix() Function in MATLAB
The writematrix() function is used to write a matrix to a file. If the data we want to export is saved in a matrix, we can use the writematrix() function.
The writematrix() function has three syntaxes shown below:
writematrix(data)
writematrix(data,file_name)
writematrix(___,Property_Name,Property_Value)
The first syntax will write the given matrix to a text file with the .txt extension and use a comma as the delimiter to separate the elements in a row. The writematrix() function will use the name of the matrix variable as the name of the output file, and if the function cannot use the matrix name, it will use the matrix.txt name as the name of the file.
Each input matrix row will become a row in the output file. If the file name already exists, the function will overwrite the data, meaning the previous data will be lost and replaced with the new data.
The second syntax is used to set the file name and its extension. We can give any name to the output file.
We can use the .txt, .dat, and .csv file extensions to save data in a text file where we can add delimiters. We can use the .xls, .xlsm, and .xlsx file extension to save data in spreadsheets of an Excel file.
We can use the .xlsb file extension to save data in an Excel spreadsheet only if the system supports the file format. For example, let us write a matrix to a spreadsheet file.
See the code below.
clc
clear

X = magic(3)
writematrix(X,'X.xls')
The last syntax changes the properties of the writematrix() function using the property name and value.
We can use the FileType property to set the file type to text or spreadsheet. We can use the DateLocale property to set the locales used to write dates.
The DateLocale property is useful when the input matrix contains DateTime values, and we can use it to specify the format of the date in which it will be stored in the file. Check this link to see all the formats supported by the locale that we can use to store the date values.
We can use the WriteMode property to set the data writing mode. In the case of text files, we can change the write mode from overwrite, the default mode, to append, which will append the new data to the previously stored data in the file.
In the case of excel files, the default mode is set to inplace, which will replace the data in the new data range. For example, if the new data have five rows and 5 columns, then only the 5 rows and 5 columns of the file will be replaced, and the rest of the data will remain the same.
We can use overwritesheet mode, which will clear the specified sheet and write new data to the sheet, and if we don’t specify the sheet, the first sheet will be used. We can use the append mode, which will append the new data at the end of the specified sheet, and if we don’t specify the sheet number, the first sheet will be used.
We can use the replacefile mode, which deletes all the previous sheets and writes new data to the specified sheet, and if we do not specify a sheet, the first sheet will be used. We can use the Delimiter property to set the delimiter, which is set to a comma to space for the space delimiter, tab for the tab delimiter, ; for the semicolon, and | for the vertical bar.
We can use the QuoteStrings property to set the indicator used to write quoted text in the file. The value of this property can be minimal, all, and none.
The minimal value is the default value and will enclose the variables containing the double quotation marks, delimiters, and line endings with double quotation marks. The all value will enclose all date, categorical, and text data with double quotes.
The none value will not enclose any variable. We can use the Encoding property to change the scheme used to encode characters, which is set to UTF-8 by default.
We can set the Encoding property to ISO-8859-1, windows-1251, and windows-1252. We can use the Sheet property to specify the sheet number or name we want to use to write data, and it can be a character vector or positive integer.
We can use the Range property to set the range of the spreadsheets we want to use to write new data. The range can be a single sheet that will specify the starting point, and it can also be a range like a form sheet 5 to sheet 10.
We can use the UseExcel property to set the starting of Excel software when we write data to an Excel file. By default, the property is set to false, which means the Excel software will not start, but we can also set it to true, which will start the Excel software.
For example, let’s repeat the above example and change some properties mentioned above. See the code below.
clc
clear

X = magic(3)
writematrix(X,'X.xls','Sheet',3)
m = readmatrix('X.xls','Sheet',3)
Output:
X =

     8     1     6
     3     5     7
     4     9     2


m =

     8     1     6
     3     5     7
     4     9     2
In the above code, X is the input matrix, and m is the matrix saved in the Excel file. We can also set other properties in the same way we change the properties in the above code.
Check this link for more details about the writematrix() function.
Export Data to Excel File Using the writecell() Function in MATLAB
The writecell() function is used to write a cell to a file. If the data we want to export is saved in a cell, we can use the writecell() function.
writecell() is the same as the writematrix() function. The only difference is that the input of the writecell() function is a cell, and the input of the writematrix() function is a matrix.
The properties of these functions that we can change are also the same.
For example, let’s create a cell and write it to an excel file. See the code below.
clc
clear

X = {1,2,3}
writecell(X,'Y.xls')
c = readcell('Y.xls')
Output:
X =

  1×3 cell array

    {[1]}    {[2]}    {[3]}


c =

  1×3 cell array

    {[1]}    {[2]}    {[3]}
In the above output, X is the input cell, and c is the cell we imported from the saved file. Check this link for more details about the writecell() function.
Export Data to Excel File Using the writetable() Function in MATLAB
The writetable() function is used to write a table to a file. If the data we want to export is saved in a table, we can use the writetable() function.
The writetable() function is also the same as the writematrix() function; the only difference is that the input of the writetable() function is a table, and the input of the writematrix() function is a matrix. The writetable() function has some additional properties that we can change.
We can use the WriteRowNames property to set the indicator for writing the names of the rows in the output file.
By default, the WriteRowNames property is set to false, meaning the table’s row names will not be included in the output file, but we can set it to true if we want to write row names to the output file. We can use the WriteVariableNames to set the indicator used to write the name of the column headings of the table to the output file.
By default, the WriteVariableNames property is set to false, which means the table’s column headings will not be included in the output file, but we can set it to true if we want to write column headings to the output file. For example, let’s create a table and write it into an Excel file.
See the code below.
clc
clear

Z = table([1;5],[10;15])
writetable(Z,'Z.xls')
m = readtable('Z.xls')
Output:
Z =

  2×2 table

    Var1    Var2
    ____    ____

     1       10
     5       15


m =

  2×2 table

    Var1    Var2
    ____    ____

     1       10
     5       15
In the above output, Z is the input table, and m is the table we imported from the saved file. Check this link for more details about the writetable() function.
After executing code, I received an error:
 load('firstdiff.mat')
 xlswrite('test.xlsx', firstdiff)
mat file consist only numeric values (0 and 1)
Undefined function or variable ‘firstdiff’
![]()
asked Feb 9, 2016 at 11:01
![]()
4
Using load without output arguments is something which often confuses programmers. I recommend to use it with an output argument:
data=load('firstdiff.mat')
This way you get a struct containing the data of your mat file. A typical next step would be using fieldnames(data) to check which variables are present or if you already know, index a variable with an expression like data.x
In this case I assume you only have one variable in your matfile.
data=load('firstdiff.mat');
fn=fieldnames(data); %get all variable names
assert(numel(fn)==1); %assert there is only one variable in your mat, otherwise raise error
firstdiff=data.(fn{1}); %get the first variable
xlswrite('test.xlsx', firstdiff); %write it
answered Feb 9, 2016 at 11:21
![]()
DanielDaniel
36.5k3 gold badges34 silver badges68 bronze badges