| title | description | author | ms.author | ms.date | ms.service | ms.subservice | ms.topic | ms.custom |
|---|---|---|---|---|---|---|---|---|
|
Master Data Services Add-in for Microsoft Excel |
Learn how to load data from Master Data Services into Excel, and then publish it back to MDS by using the Master Data Services Add-in for Excel. |
CordeliaGrey |
jiwang6 |
03/20/2023 |
sql |
master-data-services |
conceptual |
microsoft-excel-add-in |
Master Data Services Add-in for Microsoft Excel
[!INCLUDE SQL Server Windows Only — ASDBMI]
With the [!INCLUDEssNoVersion] [!INCLUDEssMDSshort] [!INCLUDEssMDSXLS], you can load filtered lists of data from Master Data Services (MDS) into Excel and then work with it just as you would any other data. When you are done, you can publish the data back to MDS where it’s centrally stored. Security level determines which data you can view and update.
If you’re an administrator, you can use the [!INCLUDEssMDSXLS] to create entities and attributes, which you can load with data. This process eliminates the need to use other tools to load data into your models.
With the [!INCLUDEssMDSXLS], you can use Data Quality Services (DQS) to match data before loading it into MDS. This feature helps to prevent duplicate data in MDS.
[!NOTE]
Be aware of the following size limitations when interacting with the workbook in MDS Excel add-in.
- Excel on the web has a payload size limit for requests and responses of 5 MB. A
RichAPI.Errorwill be thrown if that limit is exceeded.- A range is limited to five million cells for get operations.
Downloads
- Master Data Services Add-in for Excel for SQL Server 2016 SP2.
- [[!INCLUDEssMDSshort] [!INCLUDEssMDSXLS] for SQL Server 2017](https://go.microsoft.com/fwlink/?linkid=836867).
- Master Data Services Add-in for Excel for SQL Server 2019.
- Master Data Services Add-in for Excel for SQL Server 2022.
[!NOTE]
The Master Data Services Add-in for Excel requires the Office Automation Security to be set to one of the following:
- Level 1 : Macros enabled (default)
- Level 2 : Use application macro security level
Terms
When working with the add-in, you might come across the following terms. For more information about these concepts, see Master Data Services Overview (MDS).
-
The MDS repository is where all master data is stored. It’s a [!INCLUDEssNoVersion] database configured to store MDS data. To work with data from the repository, you load it into Excel. When you’re done working with it, you publish the changes back to the repository. Administrators can add new entities and attributes to the repository.
-
MDS-managed data is data stored in the MDS repository. When you load MDS-managed data into Excel, it’s displayed as highlighted rows. You can also add data to your Excel worksheet that’s not MDS-managed. Such data won’t be affected if you refresh the MDS-managed data.
-
A model is a data container. You can create versions of these containers. The latest version is usually the most recent. For more information, see Models (Master Data Services).
-
An entity is a list of data, like a table in a database. For example, the Color entity might contain a list of colors. For more information, see Entities (Master Data Services).
-
A member is a record or a row of data. Each entity contains members. For example, Blue could be a member of the Color entity. For more information, see Members (Master Data Services).
-
An attribute is a column of data. Each member has attributes. For example, the Code attribute for the Blue member is B. For more information about attributes, see Attributes (Master Data Services).
Related tasks
| Task Description | Topic |
|---|---|
| Create a connection to a [!INCLUDEssMDSshort] repository. | Connect to an MDS repository |
| Load MDS-managed data into Excel. | Export data to Excel from Master Data Services |
| Save a shortcut query to open the currently displayed MDS-managed data in the future. | Save a shortcut query file |
| Share shortcuts with others. | Email a shortcut query file |
| View all the changes that have been made to a member. | View all annotations or transactions for a member |
| Find duplications before publishing new data. | Match similar data |
| Publish data from a worksheet into the MDS repository. | Import data from Excel to Master Data Services |
| Create a new entity by using data in the worksheet. (Administrators only) | Create an entity |
| Create a domain-based attribute or a constrained list. (Administrators only) | Create a domain-based attribute |
| Set properties for loading and publishing data. (Administrators only) | Setting properties |
Related content
- Connections (MDS Add-in for Excel)
- Overview: Exporting data to Excel (MDS Add-in for Excel)
- Shortcut query files (MDS Add-in for Excel)
- Refreshing data (MDS Add-in for Excel)
- Overview: Importing data from Excel (MDS Add-in for Excel)
- Validating data (MDS Add-in for Excel)
- Data quality matching in the MDS Add-in for Excel
- Building a model (MDS Add-in for Excel)
- Setting properties for Master Data Services Add-in for Excel
- Security (Master Data Services)

Категория: MDM, НСИ, DQ
Опубликовал:
28.09.2014
К списку статей
Довольно часто Бизнесу требуется быстро, за 1-2 дня организовать многопользовательский учет каких-либо списков: например, реестр аккредитованных риск-менеджментом компаний, список клиентов для рассылки предложений и фиксации обратной связи и т.д. Что же можно предложить Бизнесу в качестве Rapid Application Development?
- Самостоятельно выполнить собственную (in house) разработку. В таком случае придется обращаться, становиться в очередь к IT, у которых заданий и заказов, как правило, на год вперед. Постановка требований к функциональности, к интерфейсу пользователей (GUI), разделению доступа; тестирование, приемка, развитие, обеспечение минимально необходимой инфраструктуры, обоснование бюджета …
- Воспользоваться возможностями существующей в компании ERP-системой (например, вездесущей 1C) или CRM-системой (например, Oracle Siebel CRM). Снова нужно обращаться к IT. Вряд ли Бизнес-владелец системы будет рад / повышать приоритет требованиям навесить на систему дополнительные учетные подзадачи. Доработки, дополнительные лицензии, …
- Прибегнуть к функциональности корпоративного web-портала на основе промышленного решения (например, MS SharePoint). Развернута ли подобная платформа в вашей компании? Разрешено ли Бизнесу, умеет ли Бизнес самостоятельно администрировать собственные разделы сайта? Опять же могут оказаться критичными требования к функциональности интерфейса пользователя …
Безусловно, наиболее системным решением является вариант №2. Однако на практике выходит, что при всем богатстве возможностей выбор останавливается на … MS Excel. Сколько этих Excel-файлов в компаниях! Какого качества учетные данные в них, насколько они систематизированы и взаимоувязаны между собой, масштабируемость, безопасность, издержки сопровождения и интеграции — все это «прелести» наколенного учета.
Приступая к очередному проекту по реинжинирингу управленческой отчетности, мне хотелось перевести учет планов продаж, справочных данных, вспомогательных коэффициентов и т.п. на промышленную платформу. В декабре 2013г. на рабочей встрече в Microsoft Rus Иван Косяков порекомендовал посмотреть в сторону Master Data Services — серверная служба из состава Microsoft SQL Server 2012 Enterprise / BI Edition. Предыдущую версию MDS в составе MS SQL Server 2008R2 я исследовал двумя годами ранее, и, надо сказать, осталось слабое впечатление. В версии 2012 появилось несколько существенных улучшений. Сразу после Новогодних праздников, за несколько дней мною было разработано и внедрено решение по учету и расчету вознаграждений компаниям-контрагентам с применением службы Master Data Services 2012.
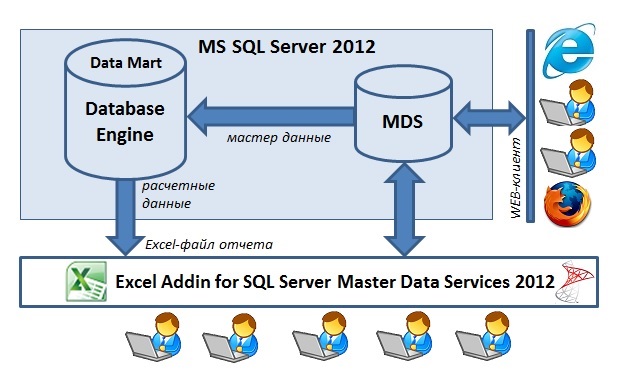
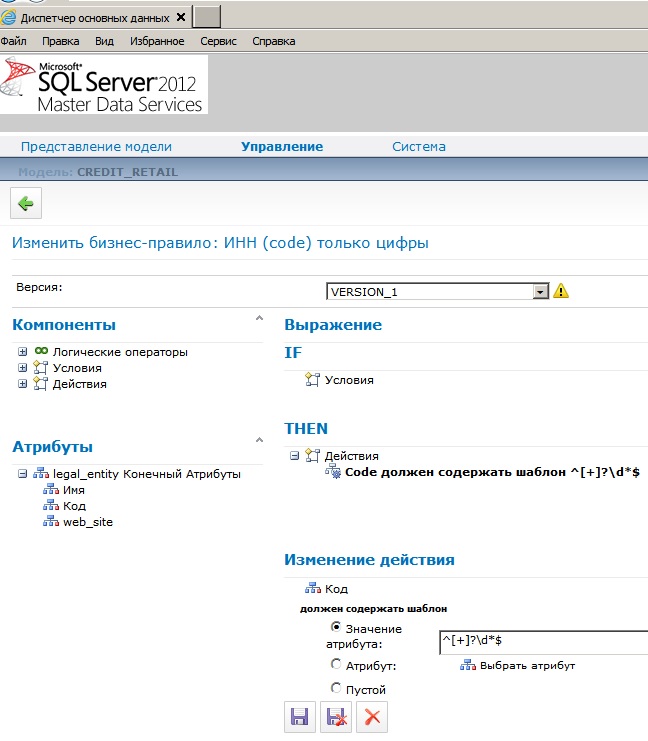
В данной задаче пользователи вводят параметры договоров, используя web-клиент или бесплатный Excel AddIn для Master Data Services. Данные сохраняются в базе данных, в подготовленной модели, проходят проверку на соответствие определенным бизнес-правилам (checks).
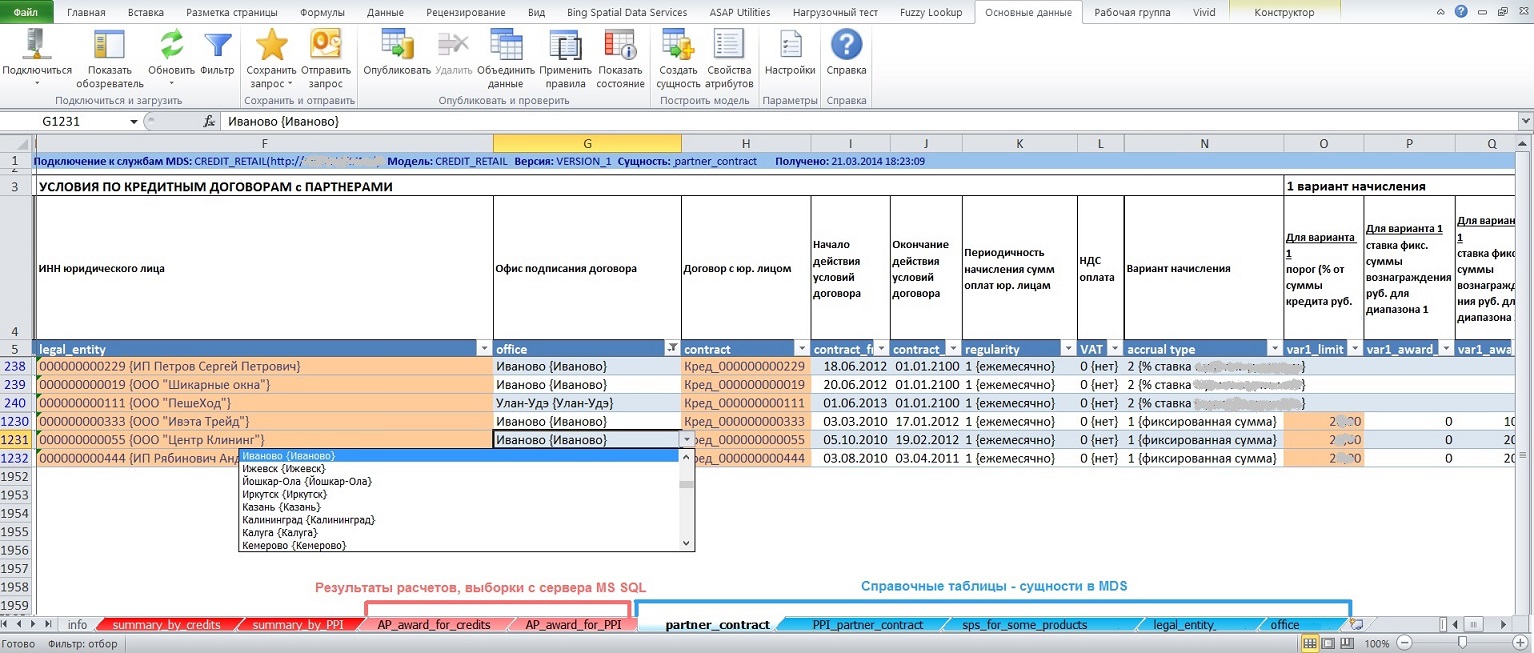
Валидированные данные тотчас же доступны для использования в расчетных процедурах. Уполномоченные пользователи имеют право запускать на выполнение серверную хранимую процедуру T-SQL (для этого используется небольшой макрос в Excel-файле). Хранимая процедура выбирает необходимые факты из витрины данных, подхватывает данные из Master Data Services, расчитывает суммы вознаграждений по договорам и результаты возвращает в тот же Excel-файл, который является также и готовым отчетом.
Возможные бизнес кейсы по использованию Master Data Services
- Собственно ведение мастер данных корпоративных справочников в заранее подготовленной, согласованной модели. Заинтересованные Бизнес-пользователи, обладающие компетенцией в своей предметной области, готовы выполнять функции Data Officer в привычной для себя экосистеме — MS Excel. И такие примеры есть;
- В продолжение п.1 — сопровождение перекодировочных таблиц, таблиц сопоставления данных, например, сопоставление произвольных / сокращенных / ошибочных наименований должностей клиентов из CRM-систем к унифицированным названиям должностей;
- Ввод, учет плановых показателей с целью последующего осуществления план-фактного анализа;
- Ведение метаданных, настроечных таблиц информационных систем;
- Использование бизнес-сущностей MDS в качестве буферных серверных таблиц, в которые пользователи могут легко загружать свои данные для последующей обработки, расчетов службой IT;
- Быстрое масштабирование Excel-файлов задач класса первичного учета: хранение данных на промышленном сервере MS SQL, совместная многопользовательская работа с данными.
Чего не хватает в MS Master Data Services 2012 / 2014
Административная часть, ядро системы
- — Создание описаний (длиной 500 — 1000 символов) не только к сущностям, но и атрибутам, бизнес-правилам; отображение описаний в клиентских приложениях: web-интерфейсе и Excel AddIn for MDS;
- — Возможность создания логических папок для разнесения сущностей по категориям. В модели, насчитывающей несколько сотен сущностей, трудно ориентироваться;
- — Необходима визуализация взаимосвязей сущностей между собой (особенно полезно для больших моделей), например, в виде ER-диаграммы, желательно интерактивной — по щелчку в контекстном меню переход к просмотру, редактированию данных или редактированию структуры;
- — Возможность создания доменных атрибутов, ссылающихся на сущности из другой модели;
- — Для доменных атрибутов — возможность указания совокупности атрибутов из родительских сущностей, значения которых должны отображаться в качестве заголовка. В версии MDS 2012 для доменного атрибута в фигурных скобках отображается только наименование {Name} ключевого атрибута непосредственно «старшей» сущности. (например, в сущности «Контрагент» для доменного атрибута «География» нужно видеть и название населенного пункта, и название региона и название страны. Вариант сбора в символьном коде конкатенации вида «Ханты-Мансийск_Тюменская_Россия» — накладно, да и названия могут изменяться, что чревато для ключей;
- — Возможность создания штатными средствами представлений (viewes) с включением дополнительных атрибутов из других связанных сущностей. Этого можно достичь, создав в SQL Management Studio свое view поверх базового view, но в этом случае контроль за валидным состоянием представления придется осуществлять самостоятельно;
- — Конструктор бизнес-правил должен быть более дружественным, например, как конструктор MDX-выражений в SQL Server Analysis Services, с возможностью написания выражения полностью вручную с последующей проверкой синтаксиса;
- — Необходимо дополнить встроенные функции — строковые, числовые, дата, преобразования (T-SQL functions in the business rules), например, REPLACE(), UPPER(), LOWER(), LTRIM(), RTRIM(), SUBSTR() — через правила-хранимые процедуры — это долгое решение; также не помешало бы наличие готовых шаблонов регулярных выражений — например, допускается ввод только цифр, проверка email;
- — Для бизнес-правил возможность задания уровня (число) серьезности ошибки, эти числа дожны быть видны в представлении-подписке; тогда подписчикам можно было бы более гибко обрабатывать записи, принимать решения о том, как использовать записи;
- — Возможность маскировать, скрывать содержание текстовых/доменных полей, например, для атрибутов персональных данных, атрибута «Password» вместо паролей в таблице Excel и web GUI показывать *******;
- — Возможность уведомления по Email при добавлении, изменении, удалении записей ответственных пользователей, список должен быть настраиваемым — не только отдельному доменному пользователю, локальной или доменной группе, но и нескольким доменным пользователям (мультиселект);
- — Возможность в бизнес-правилах оперирования данными из разных записей сущности, для реализации более сложных правил проверки (наподобие триггеров), например, сумма значений элементов атрибута «Убыток по региону» не более 10 млн. рублей;
- — Возможность создания правил для цветовой раскраски ячеек таблиц в зависимости от значений атрибутов (наподобие свойств BackColor, ForeColor в SQL Server Analysis Services);
- — Возможность задания для атрибутов не только системных наименований, но и бизнес-наименований = translation (длиной <=255 символов) и их отображение в заголовках столбцов в клиентских приложениях;
- — Необходима возможность более тонкой настройки прав доступа: раздельные права только на добавление, только на редактирование, только на удаление записей;
- — Возможность просмотра прав доступа как со стороны пользователей (кому что разрешно / запрещено), так и со стороны сущностей (что кому разрешно / запрещено);
- — В списке пользователей необхоимо отслеживать (можно по нажатию специальной кнопки) доменные логины, удаленные из Active Directory;
- — Возможность создания нескольких учетных записей с полномочиями администратора системы;
- — Возможность физического удаления записей (hard delete) из конкретной сущности (таблицы базы данных) через интерфейсы web и Excel, при наличии у пользователя соответствующих полномочий;
- — В целях быстрого создания сущности: создание сущности на основе существующей сущности (клонирование) вместе с бизнес-правилами, чтобы в клонированной сущности уже добавлять/изменять атрибуты;
- — Возможность создания в интерактивном режиме пакетов распространения моделей вместе с данными. В версии MDS 2012 с помощью Wizard можно создавать только пакеты распространения, содержащие только структуры моделей, без данных. Создание пакетов распространения с включением данных модели возможно только через утилиту командной строки:
C:Program FilesMicrosoft SQL Server120Master Data ServicesConfigurationMDSModelDeploy.exe; - — Создание пакетов распространения почему-то не подразумевает копирование-перенос описаний (Descriptions) сущностей, атрибутов;
- — Необходим функционал по сопоставлению структур моделей, возможность быстрого копирования сущностей, атрибутов, бизнес-правил, представлений подписки из одной модели в другую;
- Необходим функционал по сопоставлению, выявлению различий в данных, хранящихся в сущностях разных моделей;
- — Как показала практика, с точки зрения обеспечения производительности представления подписки необходимо материализовывать — данные нормативно-справочных сущностей приземлять в обычные таблицы, к которым предоставлять доступ подписчикам для использования данных в прикладных задачах.
Web-клиент
Необходима большая функциональность элемента управления табличной части (как в интерфейсе пользователей, так и разделе администрирования):
- — управление видимостью, размерами отдельных столбцов;
- — «заморозка» отдельных строк (как предусмотрели возможность заморозки столбцов!); при вводе данных в другие записи иногда полезно смотреть, опираться на зафиксированные записи;
- — сохранение на сервере всех персональных настроек табличной части (ширина, порядок колонок, сортировка, количества строк на странице). Функциональность современных web-интерфейсов (GUI) обеспечивает пользователям комфортную работу, например, см. Infragistics Web Grid;
- — необходимы текстовые поля для быстрых фильтров (сверху над заголовками полей), должна быть фильтрация записей в одно касание);
- — возможность прямого ввода значений для доменных атрибутов (direct code entry for the domain attribute), например, проще, быстрее ввести ИНН, чем выбор юридического лица из модального окна;
- — создание новой строки на основе имеющейся: дублирование текущей строки для последующего редактирования значений отдельных полей. Это позволяет ускорить ввод данных;
Отсутствует кнопка «Обновить» (Refresh), чтобы перезапросить данные с сервера;
Замена Silverlight на HTML5 и jQuery, т.к. в рамках корпоративной интрасети не всегда разрешена установка библиотеки Silverlight.
Excel AddIn for MDS
- — В Excel AddIn for MDS версии 2012 для доменного атрибута возможен либо прямой ввод значения кода (code) либо выбор из выпадающего списка (combobox), что не комфортно при количестве элементов более 100 и возмутительно при количестве элементов свыше 500. Необходима возможность выбора значения из модального окна + быстрые фильтры. Например, быстрые фильтры — это TextBox-ы над заголовком каждого поля для поиска по вхождению;
- — Скорость извлечения данных с сервера — 50+ тыс. записей, на мой взгляд, могла бы быть выше;
- — Скорость публикации данных на сервере также могла бы быть выше;
- — При публикации данных на MDS-сервер необходимо выключать обычные Excel-штатные фильтры столбцов, так как можно получить ошибку; ошибка плавающая, не всегда воспроизводимая;
- — Были случаи, когда для доменного атрибута после успешного сохранения данных на сервере и выполнения команды «Обновить» (Refresh) либо совсем ничего не показывалось (скорее сбой, глюк внутри файла Excel), либо показываются только значения code без значений {name}. Ситуация проявлялась на разных машинах при количестве записей в «родительской» сущности ~ 24-30 тыс. записей. Случаи подтверждаются в версии 2012, 2014;
- — Как в Excel AddIn, так и в web-клиенте фильтр запроса данных с сервера некорректно интерпретирует значение даты. Так, дата 30 мая 2014г. не воспринимается ни в виде 30.05.2014, ни в виде 05.30.2014;
- — Данный плагин очищает буфер обмена данных (Clipboard), что не есть хорошо;
- — Было бы удобнее, если бы в случае ошибок применения бизнес-правил, в отдельных столбцах показывался не только статус проверки, но собственно сообщение об ошибке (сейчас сообщение об ошибке показывается только как всплывающая подсказка, примечание (ToolTipText);
- — После применения команды «Фильтр» для отбора записей с сервера таблица в листе Excel перемещается снова в первую строку так, что, если ранее выше строки заголовков были вставлены строки для бизнес-заголовков, шапки и т.п., эти строки будут потеряны (break the layout of the sheet);
- — Возможность запоминания настроенного формата ячеек: в Excel AddIn for MDS версий 2012, 2014 при обновлении данных с сервера настройки Excel-форматирования ячеек слетают (игнорируются);
- — Возможность просмотра, изменения иерархий;
- — Возможность администрирования бизнес-правил;
- — Возможность связывания в Excel двух таблиц, которые в MDS связаны по доменному атрибуту; например, на листе сущность «Регионы» и на этом же листе правее — подчиненная сущность «Города»; при перемещении по таблице «Регионы» в таблице «Города» показываются только города текущего региона;
- — Как в Excel так и в Web-клиенте показывать прямо в таблице показывать поля:
— кто создал запись (логин и ФИО пользователя);
— когда была создана запись (дата время);
— кто последним редактировал запись (логин и ФИО пользователя);
— когда было последнее изменеие записи (дата время); - — Возможность отправки изменений на сервер в пакетном режиме по принципу всё или ничего: либо все модифицированные/ новые записи успешно сохраняются на сервере либо ни одно изменение не сохраняется (откат транзакции);
- — Excel AddIn for MDS включить в базовую инсталляцию Excel (возможно, после установки плагин может быть выключен) — внутри большой компании это избавляет от необходимости каждому пользователю оформлять заявки на установку плагина
Ресурсы по MS Master Data Services
Официальные ресурсы:
Microsoft TechNet — Master Data Services 2016
MSDN — Master Data Services 2014
Блог Master Data Services
Ресурс Microsoft, посвященный Master Data Services»
Видео презентации Ивана Косякова, посвященные Microsoft Master Data Services:
MDS в Denali
Совместное использование SQL Server 2012 DQS, MDS и IS
Бизнес-правила, статусы, журнал в MDS SQL Server 2008R2
Еще несколько видео роликов по Microsoft Master Data Services:
Что нового в MDS 2016
Видео ролики от Microsoft по теме SQL Server 2012 Master Data Services
New Features in Microsoft SQL Server 2012 Master Data Services
SQL Server 2012 EIM Demo Part 3 — MDS Excel Add-In
SQL Server 2012 EIM Demo Part 4 — MDS and SSIS
Развитие
Ничто не стоит на месте, всё течёт и изменяется. С момента публикации данной статьи произошли некоторые изменения: 05 января 2015г. была выпущена версия 12.0.2468.0 плагина Microsoft SQL Server 2014 Master Data Services для Microsoft Excel, которая в 4 раза быстрее (4-x faster) извлекает данные с сервера MDS в таблицу Excel. Это достигается за счет:
- 4-х параллельных потоков загрузки данных (4 parallel threads of data load);
- поддержки сжатия данных;
- отказа от запросов лишних метаданных.
Также разработчики из Microsoft обещают дальнейшее развитие, улучшения Master Data Services. Уже заявлены полезные дорабтки в следующей версии MS SQL Server 2016, в частности:
- + Возможность ссылаться на сущности другой модели;
- + Возможность создания пользовательских бизнес-правил — программируемых SQL функций;
- + Возможность создания для сущности некластерного индекса по одному атрибуту или списку атрибутов (составной индекс) с целью повышения производительности запросов;
- + Возможность разделение прав доступа пользователей на добавление, редактирование, удаление записей;
- + Возможность просматривать и управлять историей изменений как по сущности, так и по элементам; если пользователь имеет право на редактирование, то сможет выполнить откат к предыдущей версии элемента;
- + Возможность использования наборов изменений: если для измененных данных сущности требуется одобрение, их можно будет сохранить как ожидающие изменения в наборе изменений и отправить на утверждение администратору;
- + Возможность получения уведомлений по электронной почте при каждом изменении состояния набора изменений сущности, который требует утверждения;
+ Возможность полного удаления (purge) записей в указнной сущности, помеченных как удаленные (soft-deleted) и потому не видимых в Web-интерфейсе / Excel AddIn;
- + В Web-интерфейсе появится возможность создания новой строки на основе имеющейся;
- + В Excel AddIn for MDS будет доступно администрирование бизнес-правил.
Похоже, в Microsoft команда разработки Master Data Services набрала существенные обороты по доработке продукта. Так, 27.01.2016г. через Microsoft Connect я дал обратную связь о необходимости реализации партиционирования таблиц, а 11.03.2016г. получил ответ: «Table partitioning has been implemented in SQL Server 2016 release for MDS to improve performance. You can download the latest public release and try it out.». Такой вектор и темп развития MDS очень кстати, посколько согласно Приложению 3 к Положению №483-П от 06.08.2015 Банк России выставляет серьезные требования к качеству данных, используемых банками.
Пример внедрения MS Master Data Services
Крупнейший частный универсальный Банк, ТОП-7. В Розничном Блоке введен в промышленную эксплуатацию справочник торговых точек (POS) потребительского кредитования на базе серверной службы Microsoft Master Data Services 2012. Справочник является неотъемлемой частью системы аналитической отчетности и источником данных для базовых систем Банка.
Ниже перечислены основные профиты от внедрения Microsoft MDS
- Обеспечение качества данных за счет настраиваемых бизнес-правил проверки, ссылочной целостности данных на уровне серверной службы (доменных атрибутов), а, следовательно, повышение и обеспечение качества операционной деятельности и аналитической отчетности;
- Многопользовательский режим работы как в привычной среде через бесплатную Excel-надстройку, так и через web-интерфейс;
- Легкая интеграция для потребителей данных из других подразделений (в том числе региональных), доступность данных: подписчики могут получать почти on-line (данные актуализируются в интерфейсной таблице каждый час в рабочее время);
- Масштабируемость решения: обеспечение работоспособности по мере роста объема данных;
- Надежность хранения данных: в частности, штатными средствами MSSQL выполняется автоматическое создание резервных копий базы данных MDS;
- Обеспечение безопасности данных: разграничение доступа к сущностям и атрибутам осуществляется по доменным учетным записям на уровне сервера;
Какие работы были проведены:
- Проанализированы данные бывшего Excel-справочника POS, поля формализованы в логическую 3NF структуру нового справочника, в результате чего из плоской структуры были выделены не менее 7 базовых сущностей;
- Разработана физическая структура: созданы сущности в MDS;
- Сформулирована логика проверки данных и реализована в виде правил-ограничений штатными средствами MDS;
- Парсинг, довосполнение, устранение критичных ошибок в данных, которые накопились за 7 лет эксплуатации имевшегося справочника;
- Разработаны отчеты, в том числе для обратной совместимости, для поддержки существующих технологических процессов;
- Созданы интерфейсы (views) для потребителей данных других подразделений;
- Проведено обучение сотрудников;
- Осуществлена полная миграция данных, которая выполнялась в несколько итераций; приостановка деятельности отдела по вводу новых данных была только на 1 день;
- Дана обратная связь в Microsoft: пожелания по доработке/ развитию MDS, некоторые из которых взяты в работу.
Стоимость лицензий = 0 рублей, поскольку MDS является одной из служб MS SQL Server 2012 EE, который используется в Банке. Все работы были выполнены внутренними силами бизнес-подразделения, без отрыва от основной деятельности.
Эксплуатация осуществляется на ежедневной основе, количество операторов — 11 человек (в 2017г. — уже свыше 100 человек). Общее количество нормативно-справочных таблиц для аналитической OLAP и мотивационной отчетности потребительского кредитования свыше 100, зарегистрированных активных бизнес-пользователей (data officer) ~ 60 сотрудников (в 2017г. — уже свыше 130 сотрудников), в том числе из региональных подразделений.
dvbi.ru
2014-09-28 23:00:00Z
Последнее изменение: 2021-12-12 22:55:54Z
Возрастная аудитория: 14-70
Комментариев: 0
Теги: Примеры
Связанные статьи:
Пожалуйста, проголосуйте и ниже поставьте лайк:
Следующая статья:
SSAS — права доступа и MDS
Предыдущая статья:
Redmine — система управления проектами
К списку статей
In a previous article, we provided an overview of Master Data Management (MDM). In this article, we’re going to look at Microsoft’s platform for supporting the discipline of MDM: “Master Data Services”. Specifically, we’re going to look at how the Master Data Services Excel Add-in can be used to organize your MDM data models and manage the data update processes. We’ll also look at a simple alternative to MDS using the SQL Spreads Excel Add-In.
Master Data Services (MDS): An overview
What is Master Data Services?
Master Data Services (MDS) is Microsoft’s platform for supporting the discipline of Master Data Management (MDM). MDS allows you to manage a master set of your organizations’ data, which typically involves the following:
- Organizing master data using a model data structure
- Creating rules for updating the data
- Controlling who updates the data
- Sharing the master data set with key stakeholders
We’ll look at these in more detail below:
MDS Models
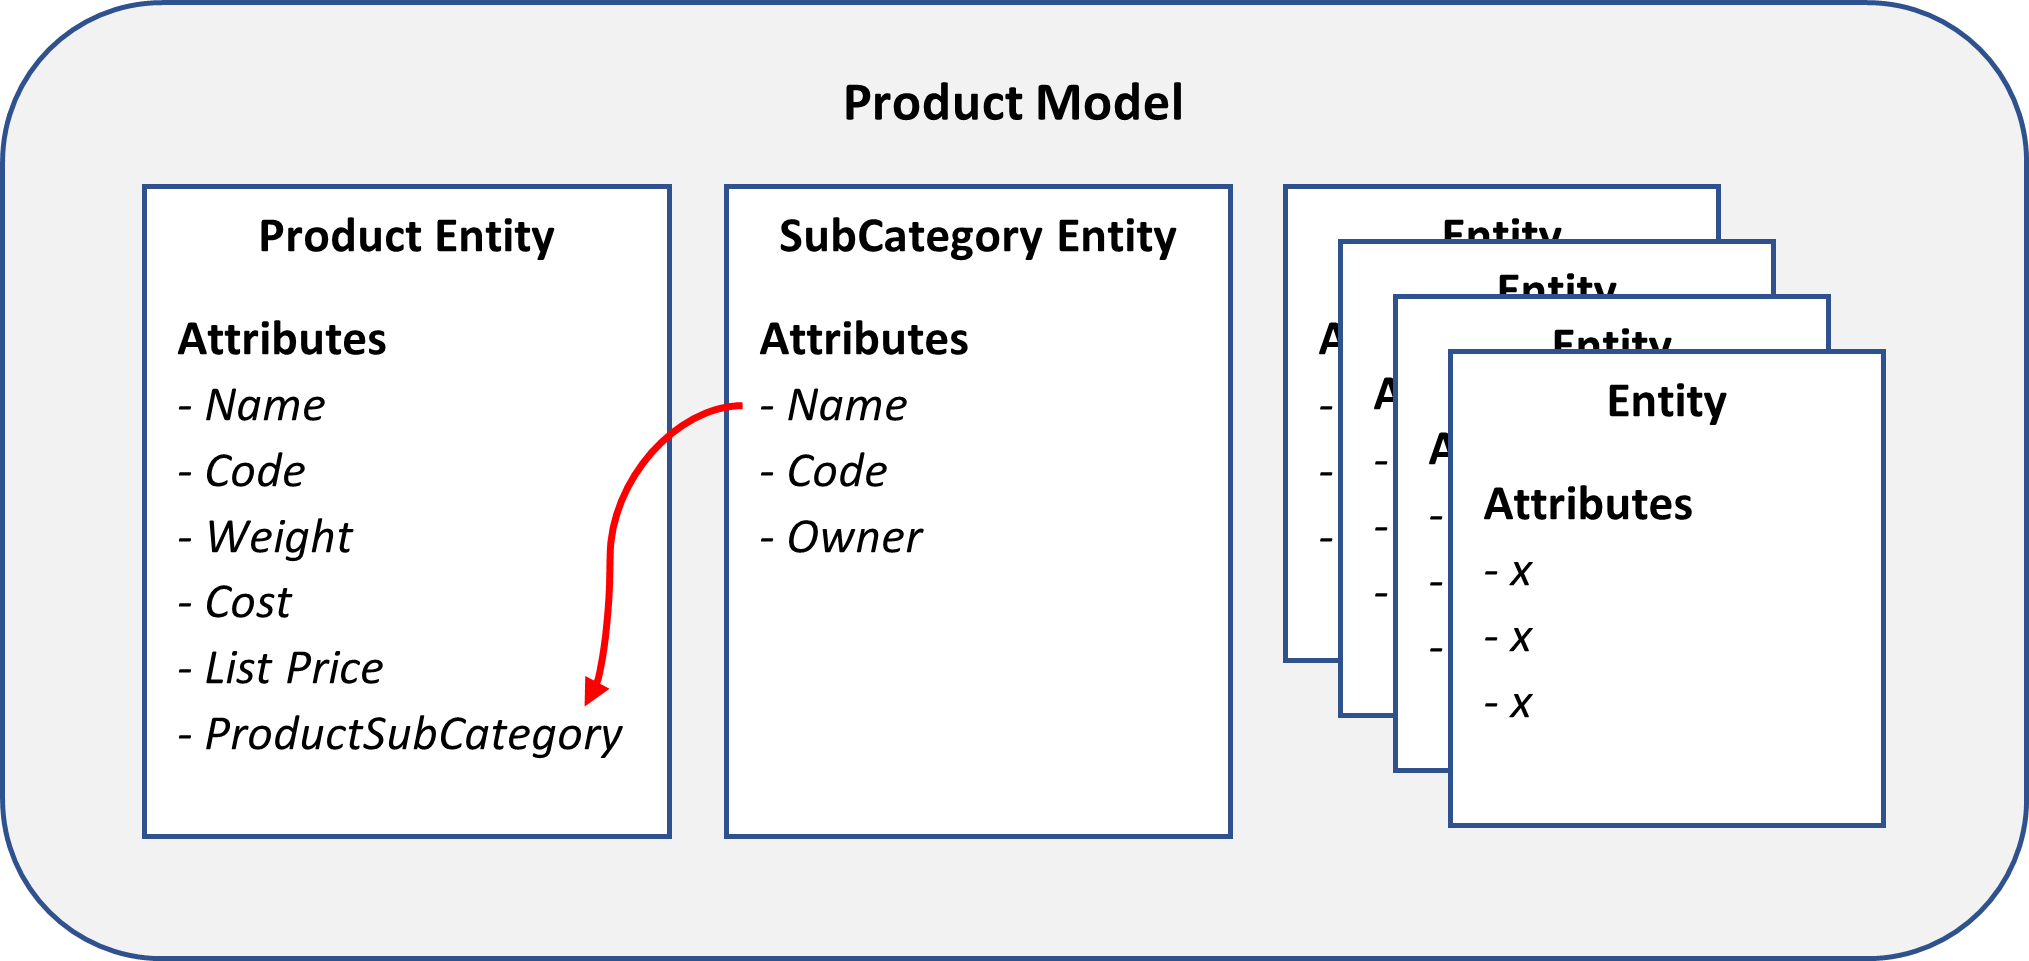
In MDS, the model is the highest-level container in the structure of your master data. You create a model to manage groups of similar data, for example, to manage product data.
A model contains one or more entities, and entities contain members that are the data records. A model is therefore like a database, and entities are like tables.
Attributes are objects that are contained in MDS entities. Attribute values describe the members of the entity. Members are the physical master data and are like rows in a table.
The diagram below shows part of a model to manage product data. Note that the ProductSubCategory attribute uses the SubCategory entity.
MDS Business Rules
Business rules are used to ensure the quality and accuracy of your master data. They are used to validate data before updates are made to the master data set. Validation typically involves checking to see if entered values meet specific criteria for an attribute (eg Cost must be > 0) and then taking an action (eg flagging an error or setting a default).
MDS Permissions and Roles
Permissions and roles in MDS are used to ensure that users have access to the specific master data necessary to do their jobs and to prevent them from accessing data that should not be available to them. They are also used to define who can create and edit models, and who can approve data updates.
Where do I get Master Data Services?
MDS ships as a part of the Microsoft SQL Server relational database management system. It can be enabled as a feature when you run the SQL Server setup.exe.
At this point, I need to warn you that installing and configuring MDS is not as simple as you might hope. At some stage, you may well end up cursing as yet another obscure missing pre-requisite is flagged at some stage of the process.
The main steps in the process are summarized below and detailed instructions can be found here.
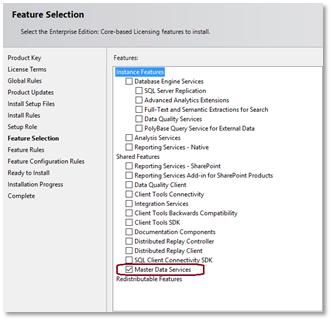
- Install Master Data Services using SQL Server Setup. In the installation wizard, select Master Data Services on the Feature Selection page under Shared Features. This will install Master Data Services Configuration Manager, various assemblies, folders, and files for Web applications and services.
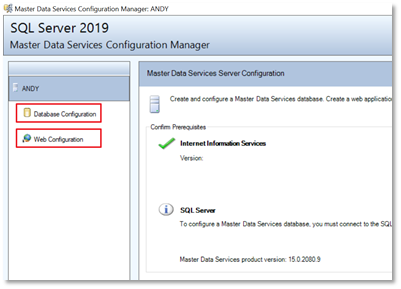
- Run the Master Data Services Configuration Manager. Here you’ll create and configure the MDS database and Web application. Once this is done, you can use the web UI to manage models and business rules.
- Deploy the Sample Models and Data. The MDS installation includes sample models and data files which you should install as they’ll help you understand the model structure. To install the samples, you need to deploy the model package files using a command-line utility called MDSModelDeploy.
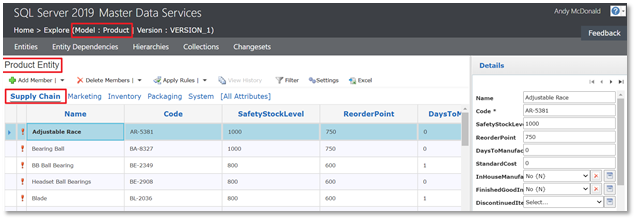
The web UI screenshot below shows the Supply Chain group of attributes in the Product entity in the Product model.
There are two ways to interact with master data in MDS: the web UI or the MDS Add-in for Excel. There is some overlap in the capabilities of each, but generally, the web UI is aimed at administrators that need to create models or business rules, whilst the Excel Add-in is for users to make updates to master data using Excel.
Using the MDS Add-in for Excel
The installation of the Master Data Services Excel Add-in is not included in the main installation process. Installation is, however, a simple process and you can download it here.
Once installed, the Master Data menu will be available on the ribbon in Excel.
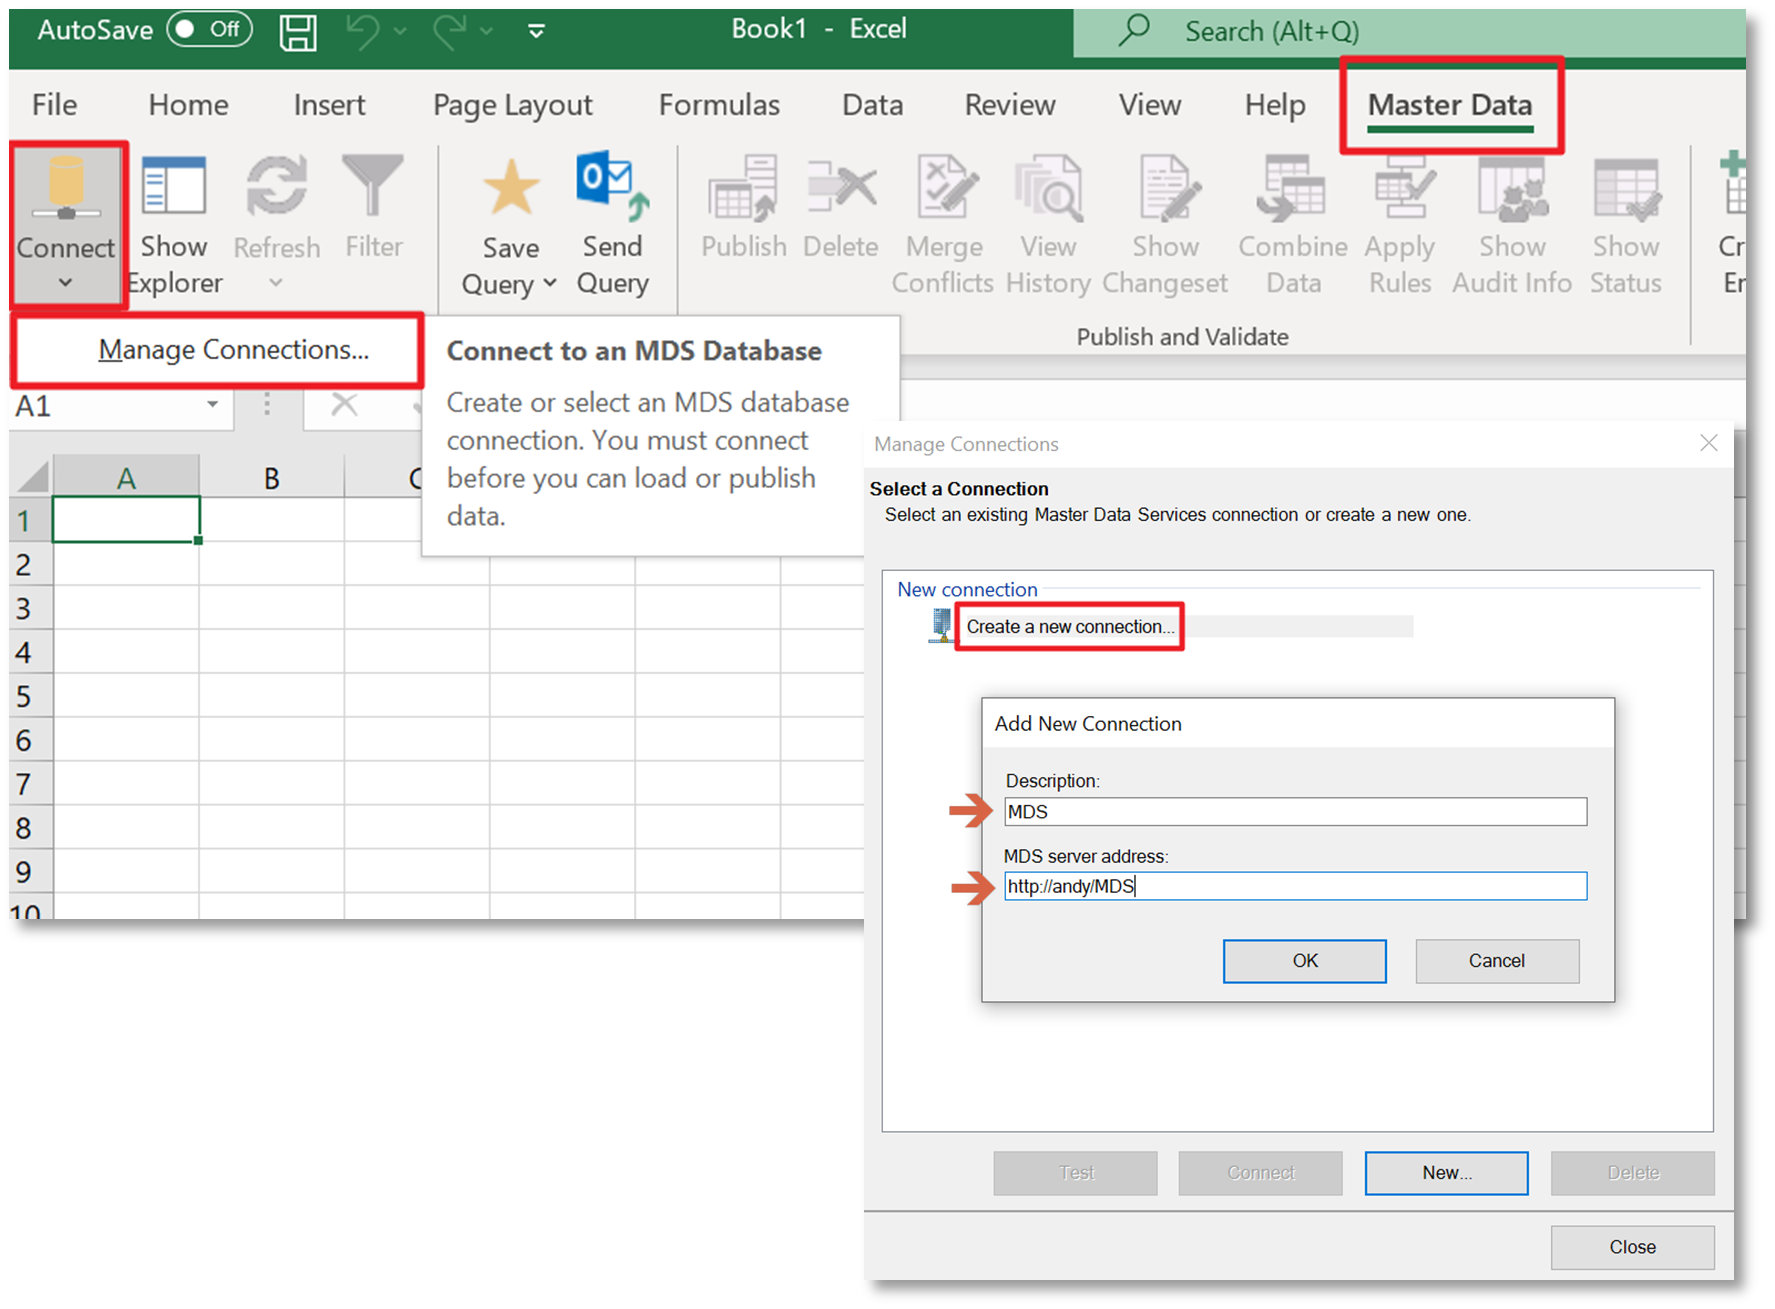
The next step is to create a connection to the MDS database that you created in the MDS Configuration Manager. Click on the ‘Connect’ button and then click the ‘Manage Connections’ button to bring up the Manage Connections dialog. Click on ‘Create a new connection’ and enter a name for the connection and the MDS Server address – this is the address you created in the configuration manager.
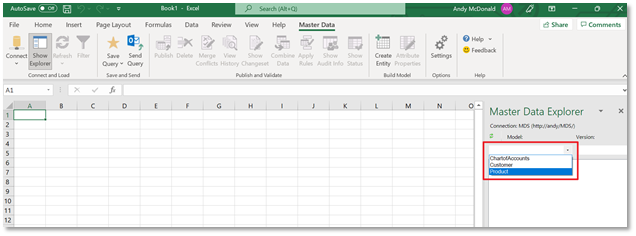
Once the connection has been created, the Master Data Explorer is displayed on the right-hand side.
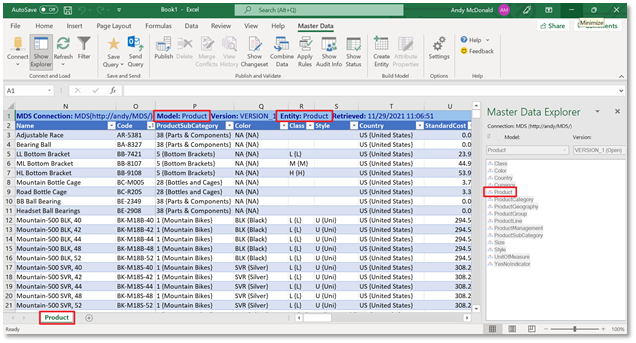
You can now select a Model from the drop-down list to load the data into Excel. When you select a model, the entities within the model are displayed in the data explorer. You can now select the entity you want to work on and the data will load into the active sheet in Excel. Note that once you have loaded data into a sheet in Excel, the data explorer is disabled. To view data in other entities you need to create a new sheet in Excel and select the Model > Entity from the data explorer.
Ok, you now have your Master Data in Excel – what next? The most common use cases for the MDS Excel Add-in are:
- Updating Master Data: this could include making updates to attribute values or adding in additional members (rows).
- Viewing Master Data: sometimes you need to look up or reference master data when preparing reports or other documents.
- Auditing Master Data: this could involve checking when and by whom data was updated, or the validation status of attributes.
Updating Master Data
Making updates to master data is the most common use case. Let’s look at an example to see how the process works.
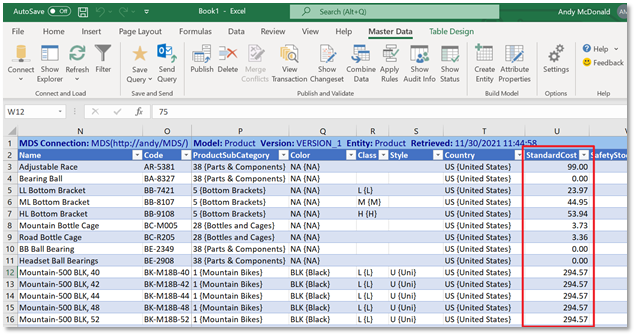
In the screenshot below you can see the data for the Product entity. We’re going to update the values for the StandardCost attribute.
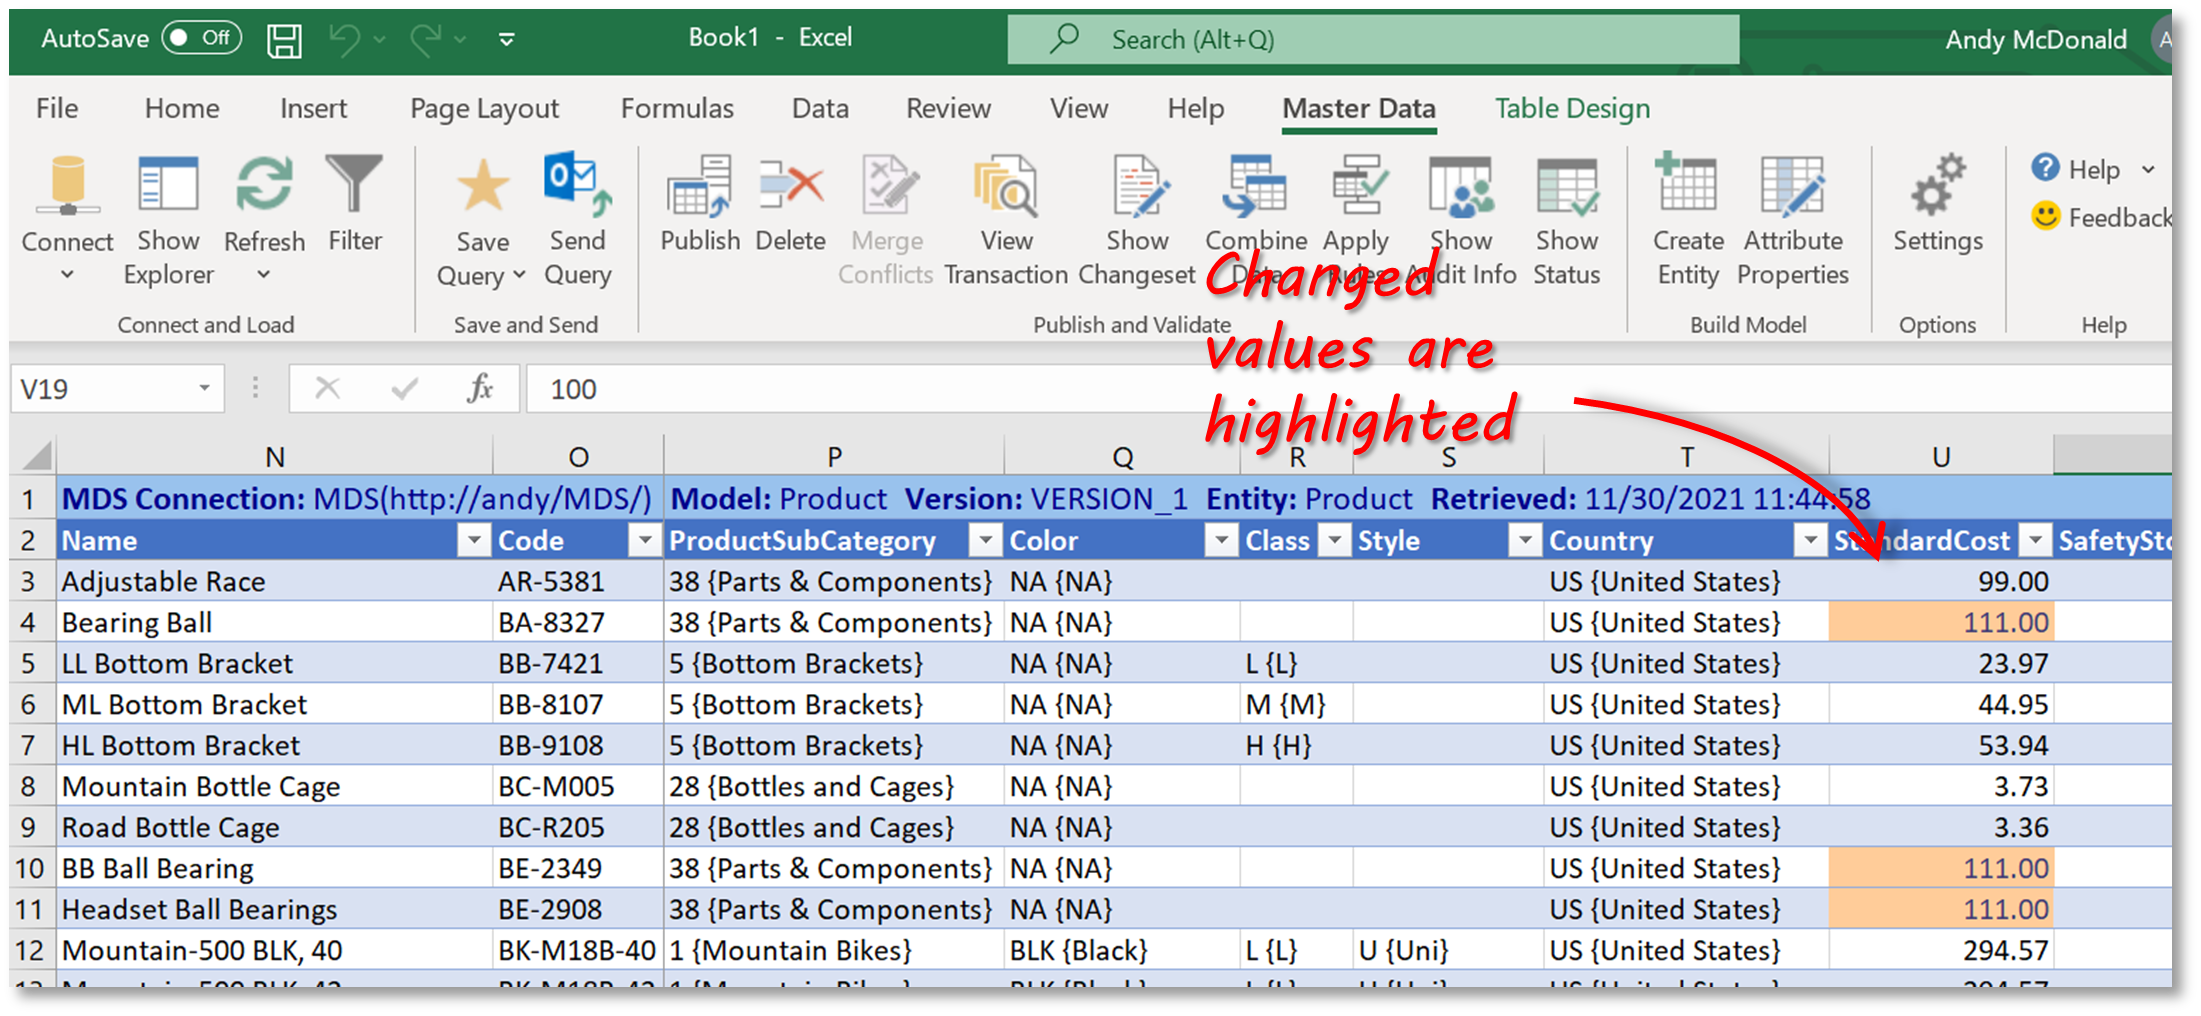
As you make changes to data in Excel, the updated cells are highlighted. These will remain highlighted until you publish the data back to the MDS database in SQL Server.
Once you have made all your changes, you can click the ‘Publish’ button. When you do this, the following happens:
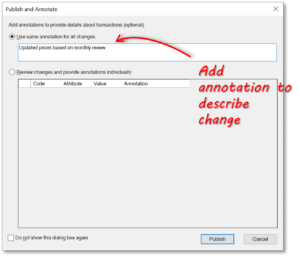
- You are required to enter annotations for the changes. You can either enter one annotation to cover all the changes or specific annotations for each change.
- When you click ‘Publish’ on the dialog box, any Business Rules are applied, and data is also checked against allowed attribute values (for example, number of characters or type of data).
- If the MDS Administrator has configured an entity to require approvals before any changes are published, you’ll be prompted to save the pending changes to a change set. The relevant person will then need to approve the change set before the changes are written back to SQL Server.
Auditing Master Data
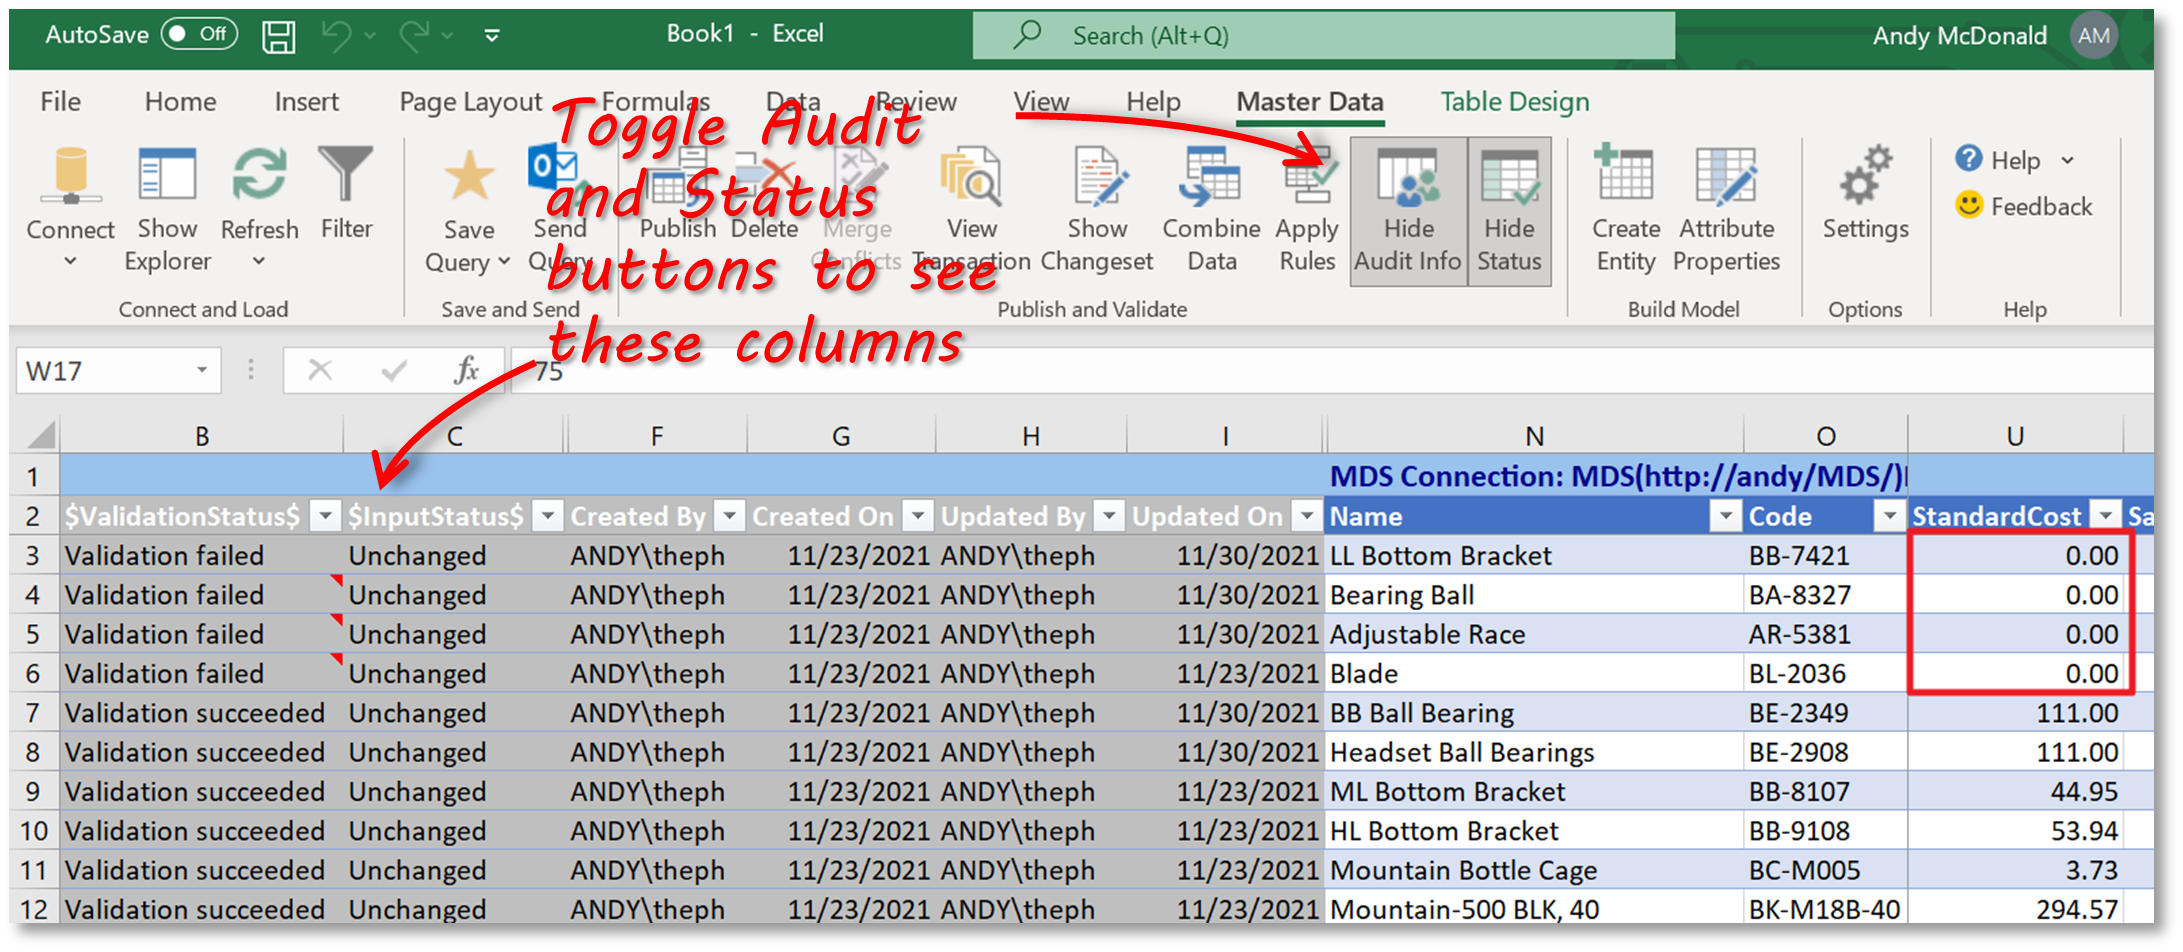
You can view when and by whom changes were made by clicking on the ‘Show Audit Info’ button. The status of any business or validation rules can be viewed by clicking on the ‘Show Status’ button.
In the screenshot below you can see that validation against one of the business rules has failed for some of the members because the rule ‘StandardCost > 0’ has not been met.
3 Reasons to Consider an Alternative to MDS
Microsoft’s Master Data Services platform ticks plenty of boxes when it comes to Master Data Management. It does, however, also come with some negatives:
- Complexity: Despite offering an Excel Add-In to support the adoption of the platform across a range of users, MDS can still feel overly complex for organizations that are starting on their MDM journey.
- Installation & configuration: MDS has been well thought out in terms of architecture and is built on a robust SQL foundation, but the installation and configuration process is not as straightforward as it could be.
- Limited community: MDS does not seem to have a large community from which to get advice or guidance.
SQL Spreads: An alternative to MDS
SQL Spreads is an Excel add-in that allows you to use Excel as a front-end to update and manage data in SQL Server. It includes features which support a Master Data Management initiative, including change tracking, data validation, role-based access, and more. Let’s look at a simple example to see how this could work.
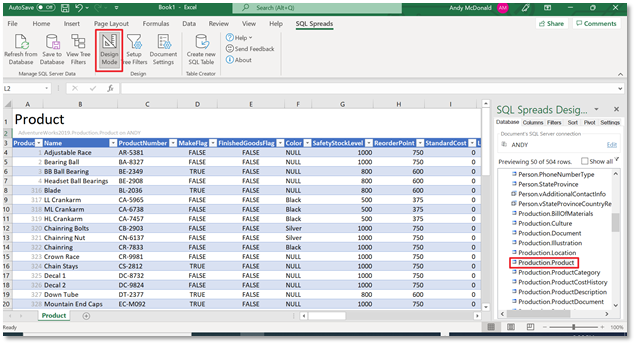
We’re going to use the AdventureWorks database for our example. In the screenshot below we’ve used SQL Spreads to connect to the AdventureWorks database and import the Products table into Excel.
We’re now going to assume that we are a data steward for the Product data and we’re going to do the following:
- Set up data validation for specific fields: (1) make the values in the ProductSubCategoryID column use a look-up from the ProductSubCategory table; (2) add a data validation rule to ensure that the StandardCost column has values greater than zero.
- Enable change tracking so that we can see when values in rows were changed and by whom
- Make changes to some values and save the changes back to the Product table in SQL Server.
Data Validation
By default, SQL Spreads will always validate all entered values against the Data Types in SQL Server. There are a couple of other ways that we can enforce validation.
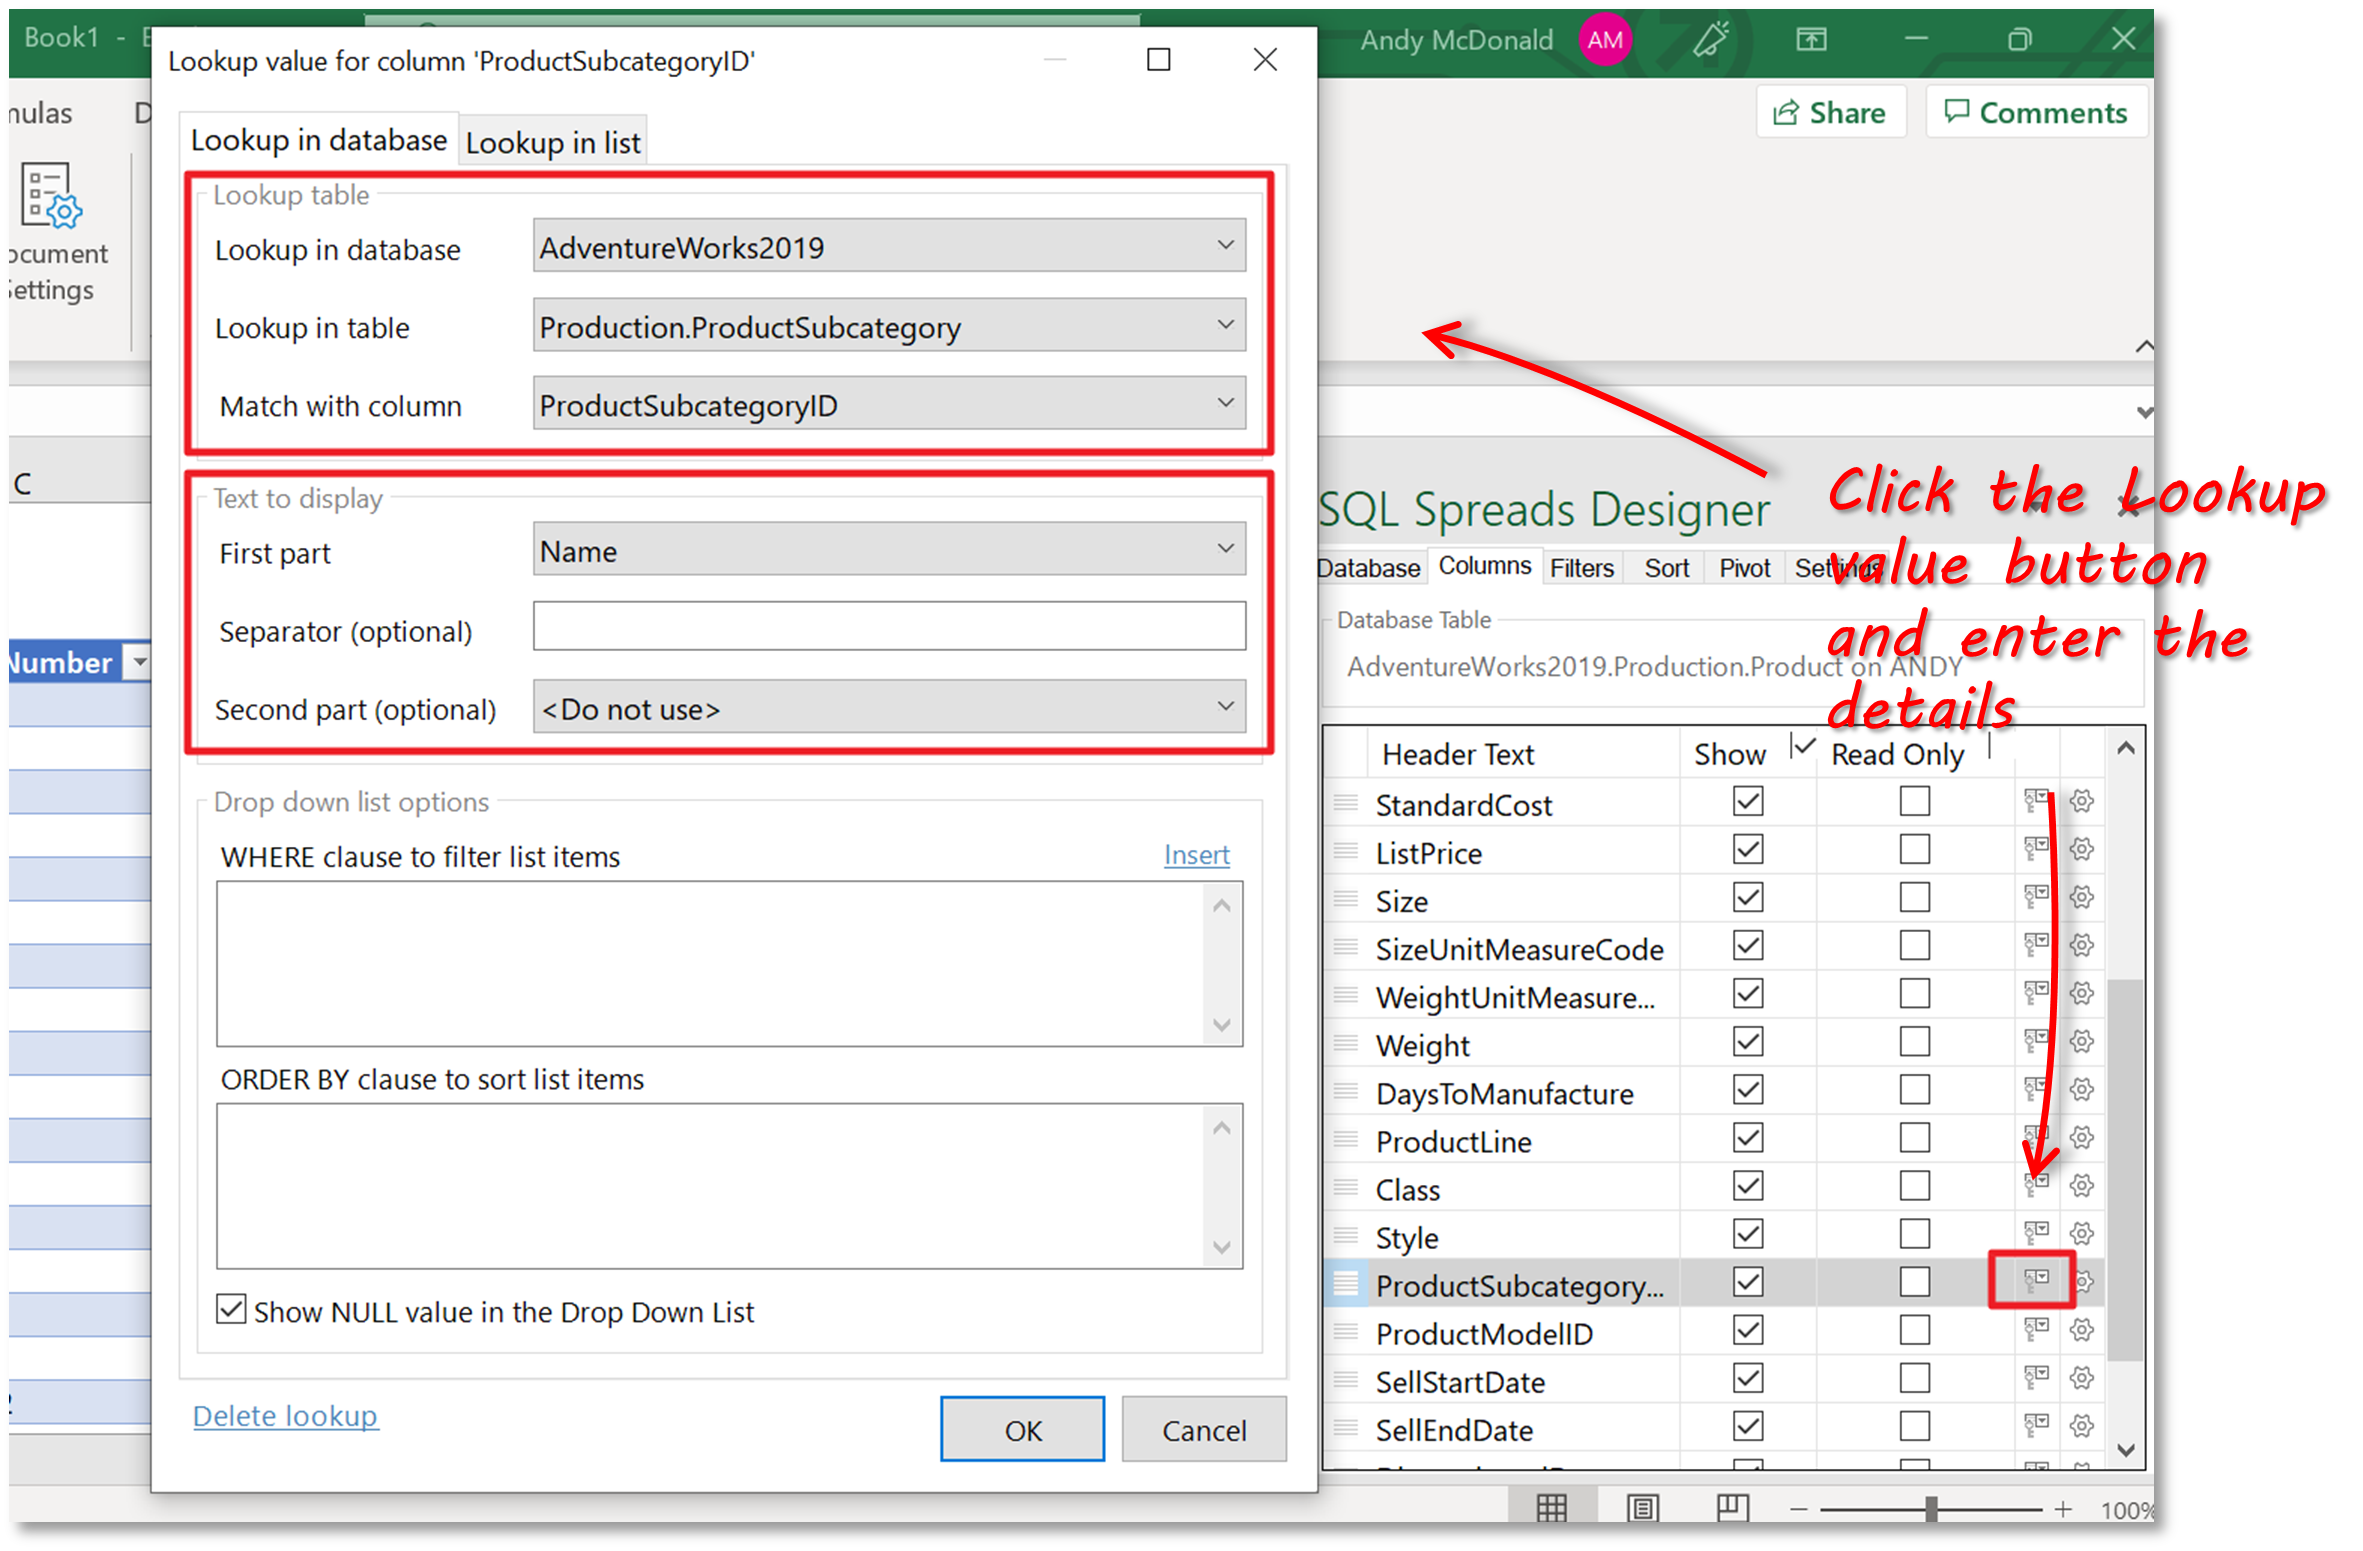
The first is to force the user to select from drop-down lists when entering certain data types such as categories, colors, sizes – master or reference data, in other words. You can either specify a static list in SQL Spreads or lookup values in another SQL Server table. Lookups are set up in the Columns tab in the SQL Spreads Designer. The screenshot below shows how we specify that we want to look up the ProductSubcategoryID in the ProductSubcategory table and return the Name field to display in the cell.
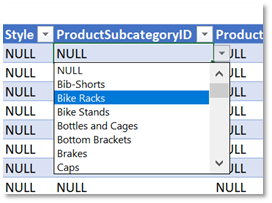
Once this is done, the user is limited to selecting from the values for Subcategory that are contained in the ProductSubcategory table.
The second way is to use a data post-processing script in SQL Spreads. The data post-processing script is a SQL query that will be executed as the last step in the transaction that updates the database with the changes made in Excel.
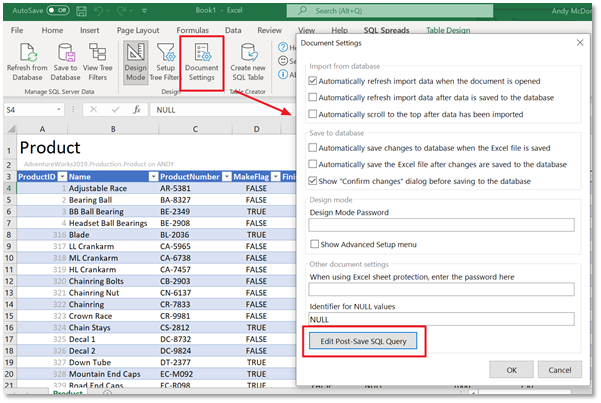
To add a Data Post-processing script in SQL Spreads, open Document Settings and click the Edit Post-Save SQL Query button.
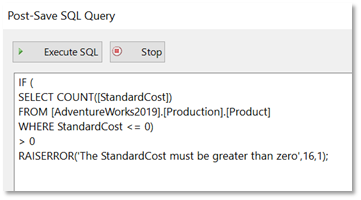
In the Post-Save SQL Query dialog box, we can now enter our validation script. The validation script contains the logic that we want to check and an error message that we can display to the user.
The example below shows a SQL query that checks if any of the values entered in the StandardCost column of the Product table are invalid (ie less than or equal to 0).
Now, if the user enters an invalid value in the StandardCost column, when trying to save to the database, the following message will be displayed, and the update transaction will be rolled back.
Change Tracking
To enable change tracking you need to specify the columns in your SQL table into which the username and date/time will be inserted whenever changes are made in Excel.
In the Product table in SQL, we therefore need to add the following columns:
ALTER TABLE Production.Product
ADD CreatedBy VARCHAR(255),
ModifiedBy VARCHAR(255),
CreatedOn DATETIME,
ModifiedOn DATETIME;
Once these columns have been added, 0pen the SQL Spreads Designer and click on the Settings tab. You can now select the CreatedBy, CreatedOn, ModifiedBy, and ModifiedOn columns from the drop-downs as shown below.
Now, when we make changes and save them to the database, these columns will be populated.
Data Changes
The process of making changes to the data is obviously easy, as we are working in the familiar environment of Excel. With the kind of validation and lookup fields that we’ve described above, users can be comfortable working with critical data in the knowledge that mistakes are unlikely to happen.
If required, additional settings can be applied to, for example, limit users to only changing data or adding rows and not allowing row deletion.
Summary
In this article, we’ve looked at Microsoft’s MDM platform – Master Data Services.
Under the hood, MDS is a powerful enterprise-grade solution for a Master Data Management initiative. Microsoft’s release of the Master Data Services Excel Add-In makes it easy for a wide range of users to manage their master data.
As we’ve seen, however, MDS may be too much for some organizations that would like to perform a simplified version of MDM. In which case, the use of a simple tool like SQL Spreads can go a long way to instilling some of the basic MDM principles into an organization.
Download a trial version of the SQL Spreads Excel Add-in, or get in touch to find out how SQL Spreads can help you get started with Master Data Management.
Andy McDonald
Andy has worked 20+ years in the Engineering, Financial, and IT sectors with data analysis and presentation using tools such as SQL Server, Excel, Power Query and Power BI.
Writes for SQL Spreads about Excel and SQL Server and how to tie those two together.
The following tips should help when you’re working with data in the MDS Add-in for Excel.
If you’re having issues installing the Add-in or need other troubleshooting help, see this article.
Undo (CTRL+Z)
As of SQL Server 2012 Release Candidate 0, there is no ability to undo changes to data by using CTRL+Z or the Undo Typing button. If you change data and want to undo the change, publish your changes and click the Load or Refresh button to get the latest data.
Cut and Paste
You can paste data into cells but not into header.
Auto Fill
When using Auto Fill (hovering over the corner of a cell until it becomes a + and then dragging to other cells), be aware that numbers will be incremented automatically. This is especially important when working with domain-based attributes that use numbers for Code values. See this example:

If this happens and you have other changes in your worksheet that you don’t want to lose, click Publish. These particular values will cause an error and will not be published. However, any other changes that can be successfully published will be. Then you can refresh the sheet to get the latest data again.
Workaround: You if you press CTRL while you drag, it will not increment the numbers.
Publishing
Only changes made in Excel are published. If you don’t have the latest data in your worksheet it doesn’t matter. Outdated data is not published. Only changed data is.
Dates
When working with dates, use your local computer’s format for input. For example, in the US, you should enter MM/DD/YY or YYYY format. When you press Enter, the date will automatically be converted to the format specified by the DateTime mask of the attribute. If you do not enter dates in the local format, the date can still be saved to the MDS repository; however the format may not match that of other dates.
Data That’s Loaded
Only 1 million rows can be loaded into Excel from the MDS repository.
In domain-based attribute (constrained) columns, a maximum of 1000 items are displayed in the drop-down lists.
Master Data Services (MDS) is Microsoft’s platform for supporting Master Data Management (MDM). A system like MDS, if properly maintained, gives organisations a powerful alternative to increasingly having to centralize databases as a way of preventing data from getting out sync or become inconsistent, and a reliable way of managing the flow of data through corporate IT systems. It makes microservice architectures realistic. Hari Yadav shows you how to get up and running with MDS.
Successful enterprises can grow organically or through acquisition. Either way, this will increase the volume and complexity of the data flowing through enterprise applications. Disconnected and separate systems bring various issues such as data inconsistency, fragmented data, data inaccuracy, and an increasing difficulty and effort within IT departments in reacting to changing business needs. It is this increasing task of disentangling the complex data issues that makes the case to have a centralized system that can define, integrate, cleanse, manage, and finally distribute data to various systems.
Master Data Management (MDM) defines a process of collecting enterprise data from various sources, applying standard rules and business processes, building a single view of the data, and finally distributing this ‘golden’ version of data to various systems in the enterprise, thereby making it accessible to all consumers. Here is more detailed article about MDM and its importance.
Master Data Services (MDS)
Master Data Services is a Microsoft product for developing MDM solutions that is built on top of SQL Server database technology for back end processing. It provides service-oriented architecture endpoints using Windows Communication Foundation (WCF). You can implement a hub architecture using MDS to create centralized and synchronized data sources to reduce data redundancies across systems.
Configuration Manager
Configuration Manager is a starting point for configuring Master Data Services. You can use it create and configure the MDM database. This database comes with many stored procedures, database tables, and functions which collectively support back-end processing. You can also create a web application called Master Data Manager and, finally, you can associate the database and web application together, thereby creating an MDM solution.
MDS Architecture
Master Data Services has a three-tier architecture consisting of the database layer, service layer, and UI/Add-in layer. This is illustrated in an architecture diagram below that shows MDS integrated with Data Quality Services and SQL Server Integrations Services. In order to understand MDS the area better, I have put blue rectangular box around the MDS components.
Borrowed from Microsoft website and put blue rectangle box to keep things in context.
History, installation and configuration
Microsoft first introduced Master Data Services with SQL Server 2008 and, as generally happens with first versions, there were limited features and some defects as well. Also, because there was little awareness and appreciation of master data management systems at the time, it is hardly surprising that its introduction went mostly unnoticed. Subsequent versions of SQL Server 2012, 2014, and 2016 brought some new features and product stability to MDS too. With SQL Server 2016, Master Data Management capabilities are now of similar quality and sophistication as any other enterprise-grade MDM solution.
The following installation instructions are based on SQL Server 2016 available on Microsoft Azure Cloud platform and should work fine with other MDS versions supported on SQL server as well.
- Login with your Azure account or create azure account if you have not done so already.
- Search for a virtual machine with following name “SQL Server 2016 RTM Enterprise on Windows Server 2012 R2”.
- Follow the simple ‘provisioning VM’ wizard, which mostly involves clicking ‘next-next’ with some occasional user inputs. Be sure to carefully note down the details as you go, especially the credentials.
- Start the recently-created virtual machine, and note down the public IP address that is assigned to it.
- You can ‘remote desktop’ into the virtual machine using its public IP address once it is fully up, running and operational. This might take a while depending on VM capacity.
- This virtual machine has pre-installed SQL Server 2016 and Master Data Services too. For others, the installation of Master Data Services is simple: You merely open setup.exe and follow the installation wizard.
Master Data Services is a two-step process; Firstly comes Database Configuration, and then Web Application Configuration.
MDS database configuration
Because MDS is implemented on SQL Server, most of the core logic is written in stored procedures. There are about three hundred stored procedures that get created as part of the database creation procedure. About fifty tables also get created as part of database setup along with some database views and functions. The process to set up the database is as follows:
- Launch the Configuration Manager for Master Data Services from the installed programs.
- You will see two options; Database Configuration and Web Configuration. We will create the website shortly to access the MDM features using the web user-interface.
- Select the Database Configuration option.
- Create the Database. The wizard will ask you to specify some user inputs and it will set up the database according to your user inputs. For now, let’s proceed with windows authentication only.
- You can connect to your newly-created database using SQL Server Management Studio which is also preinstalled.
- Here are some database tables that you will need to understand:
- tblModel – Contains information about MDM models, also known as business domain like Customer, Product, etc.
- tblEntity – Contains information about MDM entity. It stores information about entities for all models.
- tblAttribute – Contains attributes details for each entity. It is more like a database column.
- tblAttributeGroup – It is a logical grouping of similar attributes for a particular entity.
- tblModelVersion – to model versions.
Model & Entity related tables from MDS database
MDS is a highly configurable system and it does not come with any predefined domains or domain entities. More database tables get created as you proceed with model and entity creation.
MDS web UI setup
MDS provides a web application for administrative tasks such as the creation of models, entities, business rules, deploying models, integration management, version management, and users and group permission management. The web application also supports some non-administrative tasks such as updating data. The web application talks to the backend MDS service which is a web service based on Windows Communication Foundation (WCF). WCF is a framework for building service oriented applications. The process to create the web site, or rather the web application, goes as follows:
- IIS is preinstalled on this virtual machine but the installation of Roles and Features is required.
- To install required IIS roles and features for the MDS web application, open Server Manager and then click ‘Manage’ ‘Add Roles and Features’
- Select default installation type which is Role-based or feature-based installation
- You will see only one server for select a server from the server pool
- Select Roles and features as per the following picture.
- Complete the installation after selecting roles and features.
- If you open MDS configuration manager and select web configuration even before installing these roles and features, you will receive errors complaining about missing roles and features.
- Open Master Data Services Configuration Manager from installed programs
- Click on Web Configuration option and select the Default Web Site option from drop down.
- Clicking ‘create’ will give you options to specify application context name (Alias). Input MDS.
- You can use the same credentials as you windows VM credentials and click ‘OK’.
- Now select recently create database and hit ‘Apply’ to create web application. ‘Apply’ will open the user-interface in your default browser.
- You should be able to access
http://localhost/mdsafter few seconds.
Azure inbound rule setup for HTTP access over the internet
By default, any cloud provider will disable HTTP access to cloud resources from external sources, so does Azure. To access the MDS UI from your computer, you have to add an inbound rule for the HTTP protocol on port 80 or port of IIS server currently configured.
- Login to azure portal
- ‘All Resources’ Network Security Group (associated with your instance) ‘Inbound security rules’ ‘Add’
- Specify the option mentioned in the picture below and click ‘Ok’.
- Now you should be able to access MDS web application from your computer using the URL
http://publicipofvm:port/mds
Tools and components of MDS
Master Data Manager
Master Data Manager (‘UI’), is a graphical user interface to handle master data services tasks. The two types of tasks that can be performed are Data tasks, and Administrative tasks.
Data Tasks
User can view entities, entity dependencies, hierarchies, collections, and change sets at entity level. Member data can be created, viewed, updated, or deleted. You can also apply business rules, view history of any member. The model list selection acts as the context when you work with data tasks.
Administrative Tasks
Administrative tasks can be grouped in following four categories:
System Administration
You can perform CRUD operations on models, entities, attributes, attribute groups, hierarchies, indexes, and business rules. You can also create model packages without data to deploy in other environments and can also deploy previously-created model packages.
Integration Management
Integration management is about ways to get data in or out of MDS. You can import data into MDS in batches. You can also create subscription views to export data out of MDS and your downstream systems can subscribe to these SQL views.
Version Management
You can create a version of master data, lock-unlock versions, view ancestry, and purge members. You can also manage version flags. By default four version flags are created; archive, current, plan, and prior. You can also add or delete version flags. When you deploy model packages with data only version is created which is neither validate nor committed. You can validate and commit versions. You can also access transactions for a particular version of the model.
Security / User and Group Permissions
On installation of MDS, only the administrator account gets created; and more users or groups can be created to grant permission to specific MDS functions or to restrict access to functions. MDS security can be managed using Master Data Manger UI or programmatically by calling web service operations. Master Data Service security is based on Windows or Active Directory domain users and groups.
To set up security, here are the general steps to follow:
- Assign functional area access, out of five functional areas like Explorer, System Administration, Integration Management, Version Management, and User and Group Permissions.
- Assign Model object permissions, to determine attribute-level access and the type of access (Read or Write) for those attributes.
- Assign Hierarchy member permissions (optional and mostly not needed), to determine member-level access and the type of access to those members.
Security best practice for any system is to always create the group first and then assign permission to groups. Having done that, you can then add or remove users from groups anytime without juggling through specific permission.
Add a Group
Add a group to local users and groups on windows host where master data services is hosted. Add users to this group. You have to add a group to the application using the UI as well.
Add a User
Add a user to local users and groups on windows host where master data services is hosted. Add this user to designated group. You have to add the user to the application using the UI as well.
Assign functional permissions
Select the group whose permission you want to change/associate and edit the permissions. You can move functions between available and assigned lists.
Assign Model permissions
Select the group whose permission you want to change/associate and edit the permissions. You can select a specific model under the ‘Models’ tab and assign permission as you need.
The granularity of security does not stop at functions and models; rather you can assign permissions for entities, Leafs, Consolidated, collections, attributes, etc.
MDSModelDeploy.exe
MDSModelDeploy.exe utility is a tool that is used to create deployment packages of existing model objects with or without data, and it can also deploy previously-created model object packages. This is another way of deploying packages apart from UI deployment wizard. MDSModelDeploy can be used together with following commands:
- listservices – returns a list of all service instances on this MDS server
MDSModelDeploy listservices
MDS services <Service, Website, Virtual Path>: MDS1, Default Web Site, MDS
- listmodels – returns a list of all models
MDSModelDeploy listmodels
Models:
ChartofAccounts
Customer
Product
- listversions – returns a list of all versions for the specified model
MDSModelDeploy listversions – model Customer
Versions of model Customer:
VERSION_1
- deployclone – deploy a clone of a model. All Names and IDs will be identical to the model in the package
MDSModelDeploy deployclone –package samplemodel.pkg – service MDS1
- deploynew – create a new model by deploying a model package
MDSModelDeploy deploynew –package samplemodel.pkg –model Customer –service MDS1
Deploying sample models
MDS comes with three sample model packages and are available under directory “C:Program FilesMicrosoft SQL Server130Master Data ServicesSamplesPackages”. Follow these steps to deploy these models:
- Copy models from sample/packages to ../../Configuration directory where MDSModelDeploy.exe utility is present.
- Check service name by executing command “MDSModelDeploy listservices”
- To deploy ChartsofAccount
MDSModelDeploy deploynew -package chartofaccounts_en.pkg -model ChartofAccounts -service MDS1
- To deploy Customer
MDSModelDeploy deploynew -package customer_en.pkg -model Customer -service MDS1
- To deploy Product
MDSModelDeploy deploynew -package product_en.pkg -model Product -service MDS1
MDS Web Service
Service Oriented Architecture is a standard way to go for an enterprise with disparate tools and technologies. MDS provides a web service, which can be used to extend MDS capabilities or develop custom solutions. The MDS web service provides complete set of operations to allow developers to control all those functions that are supported by the Master Data Manager UI.
Previous versions of MDS had a simple configuration to enable web service using Master Data Service Configuration Manager but recent versions including 2016 do not provide web service enablement using Configuration Manager. You have to modify web.config xml from web site configuration and set flag enableWebservice=true.
Once the web service is enabled and the server is online, you can access WSDL using following URL: http://servername:port/mds/service/service.svc?singleWsdl and here are available web service operations:
The conceptual grouping of service operations are:
- Model Operations
- Entity Operations
- Member Operations
- Attribute Hierarchy Operations
- Business Rule Operations
- Annotation Operations
- Transaction operations
- Version and Validation Operations
- Data Quality Operations
- Data Import Operations
- Data Export Operations
- Security Operations
- System Operations
Add-in for Excel
When it comes to supporting MDM features, all vendors support more or less same features. The only difference is the user-experience in using MDM systems. Master Data Services Add-in for Excel is master-stroke because it empowers business users directly using their favorite tool Excel. At the beginning of any MDM implementation, the bulk data load is the key requirement for any enterprise and most enterprises end up by investing a good chunk of budget in developing custom solutions for data migration including high vendor consulting rates. Master Data Services Add-in for Excel, allows business users to manage data while also allowing administrators to create new entities and attributes with ease. Most of the features available via Master Data Manager are also possible using the Excel plugin.
To download the Add-in for Excel, log in to the Master Data Manager UI and click on “Install Master Data Services in Excel” which will take you to Microsoft website. Once there, you can download an installer based on your computer architecture (32 bit or 64 bit). You will then see the Master Data menu in Excel after successful installation. Enable plugin from ‘File‘ ‘options‘ ‘Add-ins‘ select ‘Master Data Services Add-in for Excel’, if you don’t see Master Data at top level menu.
To connect Excel with MDS server, you have to configure MDS connection in Excel by following these steps as per below picture:
- Click on ‘Master Data’ menu
- Click Connect/Manage Connections
- Create a new connection by specifying connection name and MDS server address
- Server address should be like
http://serveripaddress:port/website - My IIS is running on port 80 which is the default http port. That is why you won’t see the port mentioned in below server address.
- The easiest way to find it out is by launching MDS Configuration Manager. Select your website and hit ‘apply’.This will open the website in your browser something like
http://hostname:port/mds/gettingstarted - Your server address for Excel Add-in will be
http://hostname:port/mds
You will receive an authentication failure because the Add-in does not provide a way to provide credentials. To resolve this issue, you can login to your MDS application using the browser(s) and save the password. Saved credentials will then be used by Excel for authentication. For enterprise use, the MDS server will be integrated with the corporate LDAP/AD server and Excel can then use your Windows authentication.
Accessing sample data set using Excel
Connect and Load
You can manage one or more connections to MDS servers in different environment such as Dev, QA, or Prod. By selecting ‘entity’ from Master Data Explorer, you can click ‘refresh’ to fetch data from server into worksheet. You can also apply filters to load selective data sets. A filter gives you the capability to fetch selecting columns, a selective attribute group, a hierarchy, and so on.
Save and Send Query
Once the connection is established and data is retrieved with or without applying a filter, you can save this retrieval info as a shortcut query. This Shortcut query contains information about active connection, model, version, entity, and any applied filters. You can also email this query by clicking the ‘Send Query’ option which will email the query file as an attachment.
Publish and Validate
This has the most widely-used functions such as to publish data to the MDS database, delete selective rows, merge the publish conflicts, view selected member history and annotation, combine date from external worksheet into the entity, apply business rules, and show-hide audit info and validation status.
Build Model
If you are administrator then you can create a new entity in the MDS database by providing entity attributes information in a worksheet and then clicking “Create Entity”. It will ask you about the Model info, version info, entity name, and so on. Make sure that the model has been created using the UI or by using the web service before you create the entity under ‘new model’ or ‘select existing model’.
Conclusion
In this article, I have presented the context for Master Data Services and given a basic explanation of the internal architecture including various integration points. I’ve also described a detailed step-by-step process of installation and configuration on Azure platform. This includes Azure HTTP port permission to access the MDS system over the internet. The Tools and component section lists out the various features available in MDS, what you can do using those features and how to use those features. With this article you are ready to explore Master Data Services and possibly you can start implementing your organization’s master data management program.


